第 2 章 JUC
第 2 章 JUC
1、volatile 關鍵字
談談你對volatile的理解
1.1、volatile 三大特性
volatile是java虛擬機器提供的輕量級同步機制 機製
可以將 volatile 看作是乞丐版的 synchronized 鎖
- 保證記憶體可見性
- 禁止指令重排
- 不保證原子性
1.2、JMM 記憶體模型
1.2.1、談談 JMM
談談 JMM
JMM(Java記憶體模型Java Memory Model,簡稱JMM)本身是一種抽象的概念並不真實存在,它描述的是一組規則或規範,通過這組規範定義了程式中各個變數(包括範例欄位,靜態欄位和構成陣列物件的元素)的存取方式。
JMM關於同步的規定:
- 執行緒解鎖前,必須把共用變數的值重新整理回主記憶體
- 執行緒加鎖前,必須讀取主記憶體的最新值到自己的工作記憶體
- 加鎖解鎖是同一把鎖
記憶體可見性
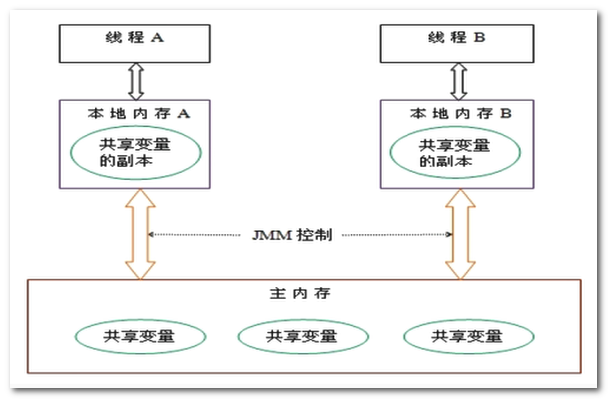
- 由於JVM執行程式的實體是執行緒,而每個執行緒建立時JVM都會爲其建立一個工作記憶體(有些地方稱爲棧空間),工作記憶體是每個執行緒的私有數據區域
- Java記憶體模型中規定所有變數都儲存在主記憶體,主記憶體是共用記憶體區域,所有執行緒都可以存取,但執行緒對變數的操作(讀取賦值等)必須在工作記憶體中進行
- 一個執行緒如果想要修改主記憶體中的變數,首先要將變數從主記憶體拷貝的自己的工作記憶體空間,然後對變數進行操作,操作完成後再將變數寫回主記憶體,不能直接操作主記憶體中的變數,各個執行緒中的工作記憶體中儲存着主記憶體中的變數副本拷貝,因此不同的執行緒間無法存取對方的工作記憶體
- 執行緒間的通訊(傳值)必須通過主記憶體來完成,其簡要存取過程如下圖:
1.2.2、記憶體可見性
JMM volatile 的記憶體可見性
- 通過前面對JMM的介紹,我們知道:各個執行緒對主記憶體中共用變數的操作都是各個執行緒各自拷貝到自己的工作記憶體進行操作後再寫回到主記憶體中的
- 這就可能存在一個執行緒AAA修改了共用變數X的值但還未寫回主記憶體時,另外一個執行緒BBB又對主記憶體中同一個共用變數X進行操作
- 但此時A執行緒工作記憶體中的共用變數X對執行緒B來說並不可見,這種工作記憶體與主記憶體同步延遲現象就造成了可見性問題
程式碼範例:記憶體可見性
程式碼範例 1 :執行緒間記憶體不可見
- 程式碼:number 變數未加 volatile 關鍵字
/**
 * @ClassName VolatileDemo
 * @Description TODO
 * @Author Heygo
 * @Date 2020/8/7 10:59
 * @Version 1.0
 */
public class VolatileDemo {

    public static void main(String[] args) {
        volatileVisibilityDemo();
    }

    /*
    驗證volatile的可見性
        1.1 加入int number=0,number變數之前根本沒有新增volatile關鍵字修飾,沒有可見性
        1.2 新增了volatile,可以解決可見性問題
     */
    private static void volatileVisibilityDemo() {
        System.out.println("可見性測試");
        MyData myData = new MyData();//資源類

        //啓動一個執行緒操作共用數據
        new Thread(() -> {
            System.out.println(Thread.currentThread().getName() + "\t come in");
            try {
                TimeUnit.SECONDS.sleep(3);
                myData.setTo60();
                System.out.println(Thread.currentThread().getName() + "\t update number value: " + myData.number);
            } catch (InterruptedException e) {
                e.printStackTrace();
            }
        }, "AAA").start();

        while (myData.number == 0) {
            //main執行緒持有共用數據的拷貝,一直爲0
        }
        System.out.println(Thread.currentThread().getName() + "\t mission is over. main get number value: " + myData.number);
    }
}


class MyData {

    int number = 0;

    public void setTo60() {
        this.number = 60;
    }

}
- 程式執行結果:程式未能停下來
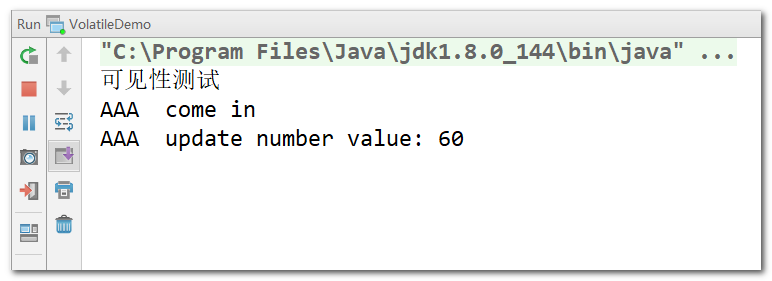
- 分析:
- 在上述程式中,兩個執行緒:main 執行緒和 AAA 執行緒,同時對 myData 數據進行操作
- 由於 AAA 執行緒先睡眠了 3s ,所以 main 執行緒先拿到了 myData.number 的值,將該值拷貝回自己執行緒的工作記憶體,此時 myData.number = 0
- AAA 執行緒 3s 後醒來,將 myData.number 拷貝回自己執行緒的工作記憶體,修改爲 60 後,寫回主記憶體
- 但 AAA 執行緒將 myData.number 的值寫回主記憶體後,並不會去通知 main 執行緒,所以 main 執行緒一直拿着自己執行緒的工作記憶體中的 myData.number = 0 ,擱那兒 while 回圈呢
程式碼範例 2 :volatile 保證執行緒間記憶體的可見性
- 程式碼:number 變數加上 volatile 關鍵字
/**
 * @ClassName VolatileDemo
 * @Description TODO
 * @Author Heygo
 * @Date 2020/8/7 10:59
 * @Version 1.0
 */
public class VolatileDemo {

    public static void main(String[] args) {
        volatileVisibilityDemo();
    }

    /*
    驗證volatile的可見性
        1.1 加入int number=0,number變數之前根本沒有新增volatile關鍵字修飾,沒有可見性
        1.2 新增了volatile,可以解決可見性問題
     */
    private static void volatileVisibilityDemo() {
        System.out.println("可見性測試");
        MyData myData = new MyData();//資源類
        //啓動一個執行緒操作共用數據
        new Thread(() -> {
            System.out.println(Thread.currentThread().getName() + "\t come in");
            try {
                TimeUnit.SECONDS.sleep(3);
                myData.setTo60();
                System.out.println(Thread.currentThread().getName() + "\t update number value: " + myData.number);
            } catch (InterruptedException e) {
                e.printStackTrace();
            }
        }, "AAA").start();

        while (myData.number == 0) {
            //main 執行緒收到通知後,會修改自己執行緒記憶體中的值
        }
        System.out.println(Thread.currentThread().getName() + "\t mission is over. main get number value: " + myData.number);
    }
}


class MyData {

    // volatile可以保證可見性,及時通知其它執行緒主實體記憶體的值已被修改
    volatile int number = 0;

    public void setTo60() {
        this.number = 60;
    }

}
- 程式執行結果:停下來了哦
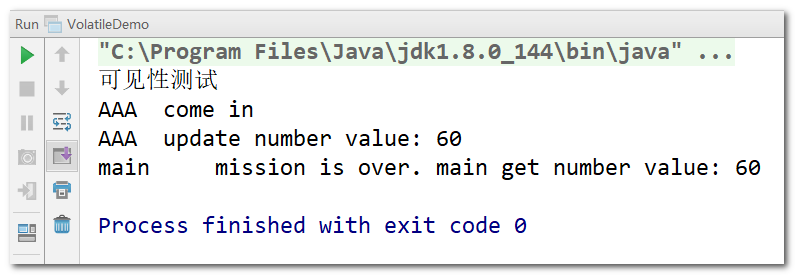
- 分析:由於有volatile 關鍵字的存在,當 AAA 執行緒修改了 myData.number 的值後,main 執行緒會受到通知,從而重新整理自己執行緒工作記憶體中的值
1.2.3、原子性
原子性是什麼?
原子性是不可分割,完整性。也即某個執行緒正在做某個具體業務時,中間不可以被加塞或者分割, 需要整體完成,要麼同時成功,要麼同時失敗(類比數據庫原子性)
程式碼範例:volatile 不保證原子性
- 程式碼
/**
 * @ClassName VolatileDemo
 * @Description TODO
 * @Author Heygo
 * @Date 2020/8/7 10:59
 * @Version 1.0
 */
public class VolatileDemo {

    public static void main(String[] args) {
        atomicDemo();
    }

    /*
    2 驗證volatile不保證原子性
        2.1 原子性是不可分割,完整性,也即某個執行緒正在做某個具體業務時,中間不可以被加塞或者分割。
            需要整體完成,要麼同時成功,要麼同時失敗。

        2.2 volatile不可以保證原子性演示

        2.3 如何解決原子性
            1)加sync
            2)使用我們的JUC下AtomicInteger
     */
    private static void atomicDemo() {
        System.out.println("原子性測試");
        MyData myData = new MyData();
        for (int i = 1; i <= 20; i++) {
            new Thread(() -> {
                for (int j = 0; j < 1000; j++) {
                    myData.addPlusPlus();
                }
            }, String.valueOf(i)).start();
        }
        /*
        需要等待上述20個執行緒都計算完成後,再用main執行緒去的最終的結果是多少?
        只要上述20個執行緒還有在執行的,main執行緒便禮讓,讓他們執行,直至最後只剩main執行緒
         */
        while (Thread.activeCount() > 2) {
            Thread.yield();
        }
        System.out.println(Thread.currentThread().getName() + "\t int type finally number value: " + myData.number);
    }
}


class MyData {

    // volatile可以保證可見性,及時通知其它執行緒主實體記憶體的值已被修改
    volatile int number = 0;

    public void setTo60() {
        this.number = 60;
    }

    //此時number前面已經加了volatile,但是不保證原子性
    public void addPlusPlus() {
        number++;
    }

}
- 程式執行結果
原子性測試
main	 int type finally number value: 19077
從位元組碼角度解釋原子性
- java 原始碼
/**
 * @ClassName T1
 * @Description TODO
 * @Author Heygo
 * @Date 2020/8/7 12:54
 * @Version 1.0
 */
public class T1 {

    volatile int n = 0;

    public void add() {
        n++;
    }

}
- n++ 的位元組碼指令
 0 aload_0
 1 dup
 2 getfield #2 <com/Heygo/T1.n>
 5 iconst_1
 6 iadd
 7 putfield #2 <com/Heygo/T1.n>
10 return
n++ 分爲三步
- 第一步:執行 getfield 指令拿到主記憶體中 n 的值
- 第二步:執行 iadd 指令執行加 1 的操作(執行緒工作記憶體中的變數副本值加 1)
- 第三步:執行 putfield 指令將累加後的 n 值寫回主記憶體
PS :iconst_1 是將常數 1 放入運算元棧中,準備執行 iadd 操作
分析多執行緒寫值,值丟失的原因
- 兩個執行緒:執行緒 A和執行緒 B ,同時拿到主記憶體中 n 的值,並且都執行了加 1 的操作
- 執行緒 A 先執行 putfield 指令將副本的值寫回主記憶體,執行緒 B 線上程 A 之後也將副本的值寫回主記憶體
- 此時,就會出現寫覆蓋、丟失寫值的情況
解決原子性問題:
兩個解決辦法:
- 對 addPlusPlus() 方法加同步鎖(加鎖這個解決方法太重)
- 使用 Java.util.concurrent.AtomicInteger 類
- 程式碼:使用 AtomicInteger 類保證 i++ 操作的原子性
/**
 * @ClassName VolatileDemo
 * @Description TODO
 * @Author Heygo
 * @Date 2020/8/7 10:59
 * @Version 1.0
 */
public class VolatileDemo {

    public static void main(String[] args) {
        atomicDemo();
    }

    /*
    2 驗證volatile不保證原子性
        2.1 原子性是不可分割,完整性,也即某個執行緒正在做某個具體業務時,中間不可以被加塞或者分割。
            需要整體完成,要麼同時成功,要麼同時失敗。

        2.2 volatile不可以保證原子性演示

        2.3 如何解決原子性
            1)加sync
            2)使用我們的JUC下AtomicInteger
     */
    private static void atomicDemo() {
        System.out.println("原子性測試");
        MyData myData = new MyData();
        for (int i = 1; i <= 20; i++) {
            new Thread(() -> {
                for (int j = 0; j < 1000; j++) {
                    myData.addPlusPlus();
                    myData.addAtomic();
                }
            }, String.valueOf(i)).start();
        }
        /*
        需要等待上述20個執行緒都計算完成後,再用main執行緒去的最終的結果是多少?
        只要上述20個執行緒還有在執行的,main執行緒便禮讓,讓他們執行,直至最後只剩main執行緒
         */
        while (Thread.activeCount() > 2) {
            Thread.yield();
        }
        System.out.println(Thread.currentThread().getName() + "\t int type finally number value: " + myData.number);
        System.out.println(Thread.currentThread().getName() + "\t AtomicInteger type finally number value: " + myData.atomicInteger);
    }
}


class MyData {

    // volatile可以保證可見性,及時通知其它執行緒主實體記憶體的值已被修改
    volatile int number = 0;

    public void setTo60() {
        this.number = 60;
    }

    //此時number前面已經加了volatile,但是不保證原子性
    public void addPlusPlus() {
        number++;
    }

    // Integer 原子包裝類
    AtomicInteger atomicInteger = new AtomicInteger();

    public void addAtomic() {
        atomicInteger.getAndIncrement();
    }

}
- 程式執行結果
原子性測試
main	 int type finally number value: 17591
main	 AtomicInteger type finally number value: 20000
瞅瞅 AtomicInteger 原始碼
先獲取再修改
- getAndIncrement() 方法
public final int getAndIncrement() {
    return unsafe.getAndAddInt(this, valueOffset, 1);
}
- getAndDecrement() 方法
public final int getAndDecrement() {
    return unsafe.getAndAddInt(this, valueOffset, -1);
}
- getAndAdd() 方法
public final int getAndAdd(int delta) {
    return unsafe.getAndAddInt(this, valueOffset, delta);
}
- 總結:以上方法都通過呼叫 unsafe.getAndAddInt() 實現
先修改再獲取
- incrementAndGet() 方法
public final int incrementAndGet() {
    return unsafe.getAndAddInt(this, valueOffset, 1) + 1;
}
- decrementAndGet() 方法
public final int decrementAndGet() {
    return unsafe.getAndAddInt(this, valueOffset, -1) - 1;
}
- addAndGet() 方法
public final int addAndGet(int delta) {
    return unsafe.getAndAddInt(this, valueOffset, delta) + delta;
}
- 總結:以上方法都通過呼叫 unsafe.getAndAddInt() + delta 實現
1.2.4、程式碼重排
有序性
計算機在執行程式時,爲了提高效能,編譯器和處理器的常常會對指令做重排,一般分以下3種

理解指令重排序
- 指令重排序,就是出於優化考慮,CPU執行指令的順序跟程式設計師自己編寫的順序不一致
- 就好比一份試卷,題號是老師規定的,是程式設計師規定的,但是考生(CPU)可以先做選擇,也可以先做填空
- 單執行緒環境裏面可以確保程式最終執行結果和程式碼順序執行的結果一致
- 處理器在進行重排序時必須要考慮指令之間的數據依賴性
- 多執行緒環境中執行緒交替執行,由於編譯器優化重排的存在,兩個執行緒中使用的變數能否保證一致性是無法確定的,結果無法預測
重排程式碼範例
範例 1
- 程式碼
public void mySort(){
    int x = 11; //語句1
    int y = 12; //語句2
    x = x + 5;  //語句3
    y = x * x;  //語句4
}
- 以上程式碼,可能出現的執行順序有1234、2134、1342,這三個都沒有問題,但是語句 4 不能變成第一條,因爲存在數據依賴(y 依賴於 x)。
範例 2
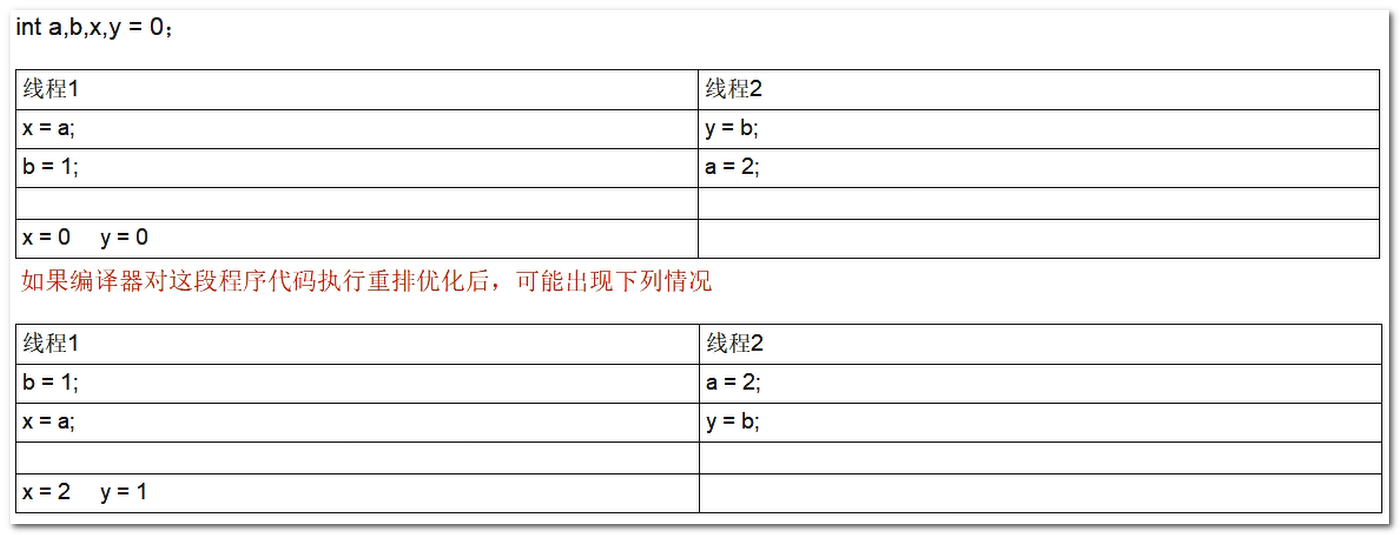
- 在程式碼中定義了 a, b, x, y 四個整形變數
- 執行緒 1 原本的執行順序爲
x = a; b = 1;,執行緒 2 原本的執行順序爲y = b; a = 1; - 但是經過指令重排後,指令執行順序變化,導致程式執行結果變化
- 這也就說明在多執行緒環境下,由於編譯器優化重排的存在,兩個執行緒中使用的變數能否保證一致性是無法確定的。
範例 3
- 程式碼
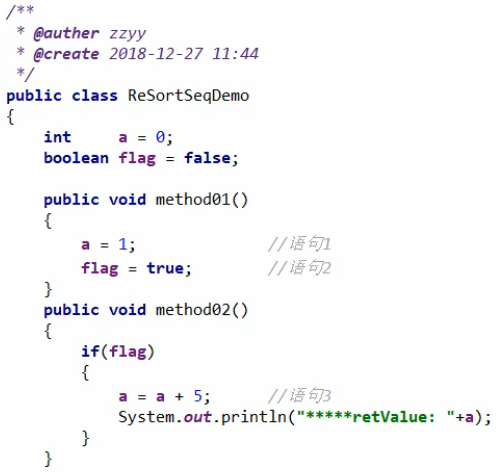
分析:
- 變數 a 與 flag 並沒有數據依賴性,所以 a = 1; 與 flag = true; 語句無法保證誰先誰後
- 執行緒操作資源類,執行緒1存取method1,執行緒2存取method2,正常情況順序執行,a=6
- 多執行緒下假設出現了指令重排,語句2在語句1之前,當執行完flag=true後,另一個執行緒馬上執行method2,則會輸出 a=5
禁止指令重排案例小結
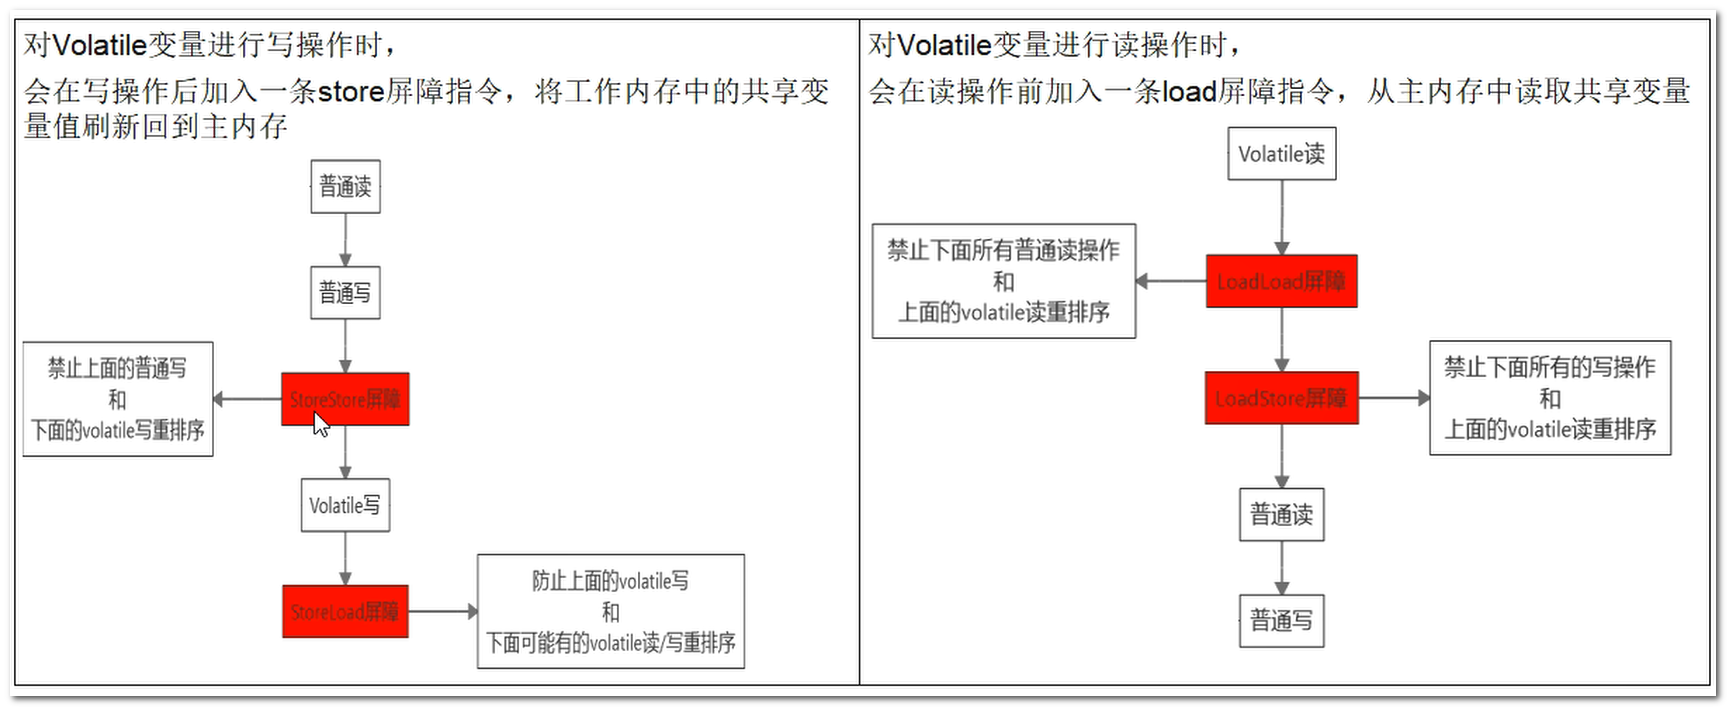
- volatile實現禁止指令重排優化,從而避免多執行緒環境下程式出現亂序執行的現象
- 我們先瞭解一個概念,記憶體屏障(Memory Barrfer)又稱記憶體柵欄,是一個CPU指令,它的作用有兩個:
- 一是保證特定操作的執行順序
- 二是保證某些變數的記憶體可見性(利用該特性實現volatile的記憶體可見性)。
- 由於編譯器和處理器都能執行指令重排優化。如果在指令間插入一條Memory Barrier則會告訴編譯器和CPU,不管什麼指令都不能和這條Memory Barrier指令重排序,也就是說通過插入記憶體屏障禁止在記憶體屏障前後的指令執行重排序優化。
- 記憶體屏障另外一個作用是強制刷出各種CPU的快取數據,因此任何CPU上的執行緒都能讀取到這些數據的最新版本。
1.3、執行緒安全性保證
如何使執行緒安全性獲得保證
- 工作記憶體與主記憶體同步延遲現象導致的可見性問題可以使用synchronized或volatile關鍵字解決,它們都可以使一個執行緒修改後的變數立即對其他執行緒可見。
- 對於指令重排導致的可見性問題和有序性問題可以利用volatile關鍵字解決,因爲volatile的另外一個作用就是禁止重排序優化。
1.4、volatile 單例模式
1.4.1、DCL 單例模式
DCL模式:Double Check Lock,即雙端檢索機制 機製:在加鎖前後都進行判斷
- 程式碼
/**
 * @ClassName SingletonDemo
 * @Description TODO
 * @Author Heygo
 * @Date 2020/8/7 15:14
 * @Version 1.0
 */
public class SingletonDemo {

    private static SingletonDemo singletonDemo = null;

    private SingletonDemo() {
        System.out.println(Thread.currentThread().getName() + "\t 我是構造方法");
    }

    //DCL模式 Double Check Lock 雙端檢索機制 機製:在加鎖前後都進行判斷
    public static SingletonDemo getInstance() {
        if (singletonDemo == null) {
            synchronized (SingletonDemo.class) {
                if (singletonDemo == null) {
                    singletonDemo = new SingletonDemo();
                }
            }
        }
        return singletonDemo;
    }

    public static void main(String[] args) {
        for (int i = 0; i < 10000; i++) {
            new Thread(() -> {
                SingletonDemo.getInstance();
            }, String.valueOf(i + 1)).start();
        }
    }

}
- 這種寫法在多執行緒條件下可能正確率爲 99.999999%,但可能由於指令重排出錯
1.4.2、單例volatile 分析
DCL 問題分析:
-
DCL(雙端檢鎖)機制 機製不一定執行緒安全,原因是有指令重排序的存在,加入volatile可以禁止指令重排
-
原因:可能出現某一個執行緒執行到第一次檢測,讀取到的instance不爲null時,但是instance的參照物件可能沒有完成初始化。原因如下:
-
範例化程式碼
instance=new SingletonDemo();可以分爲以下3步完成(虛擬碼)memory=allocate(); //1.分配物件記憶體空間 instance(memory) //2.初始化物件 instance=memory; //3.設定instance指向剛分配的記憶體地址,此時instance!=null -
步驟2和步驟3不存在數據依賴關係,而且無論重排前還是重排後程式的執行結果在單執行緒中並沒有改變,因此這種重排優化是允許的。
memory=allocate(); //1.分配物件記憶體空間 instance=memory; //3.設定instance指向剛分配的記憶體地址,此時instance!=null,但是物件還沒有初始化完成! instance(memory); //2.初始化物件 -
指令重排只會保證序列語意的執行的一致性(單執行緒),但並不會關心多執行緒間的語意一致性。所以當一條執行緒存取instance不爲null時,由於instance範例未必已初始化完成,也就造成了執行緒安全問題。
-
就比如說我們需要使用 instance 物件中的一個物件 heygo ,但是由於 instance 並未初始化完成,此時 heygo == null ,存取 instance.heygo 將拋出空指針異常
單例模式正確寫法:
加上 volatile ,禁止指令重排
private static volatile SingletonDemo singletonDemo=null;
2、CAS 演算法
CAS你知道嗎?
2.1、CAS 概述
CAS:compare and set(比較並交換)
程式碼範例
- 程式碼
/**
 * @ClassName CASDemo
 * @Description TODO
 * @Author Heygo
 * @Date 2020/8/7 15:43
 * @Version 1.0
 */
public class CASDemo {
    public static void main(String[] args) {
        /*
         CAS是什麼? ==>compareAndSet 比較並交換
        */
        AtomicInteger atomicInteger = new AtomicInteger(5);
        // 期望值與上次相同,修改成功
        System.out.println(atomicInteger.compareAndSet(5, 2019) + "\t current data : " + atomicInteger.get());
        // 期望值與上次不同,修改失敗
        System.out.println(atomicInteger.compareAndSet(5, 1024) + "\t current data : " + atomicInteger.get());
    }
}
- 程式執行結果
true	 current data : 2019
false	 current data : 2019
分析CAS:就拿 JMM 模型來說
- 現在有兩個執行緒:執行緒 A 和執行緒 B ,同時操作主記憶體中的變數 i
- 執行緒 A 將變數 i 的副本拷貝回自己執行緒的工作記憶體,先記錄變數 i 當前的值,記錄爲期望值
- 執行緒 A 修改值後,將 i 的值寫回主記憶體前,先判斷一下當前主記憶體的值是否與期望值相等,相等我才寫回,不相等證明別的執行緒(執行緒 B)改過了,如果強行寫,將出現寫覆蓋
2.2、CAS 原理
2.2.1、Unsafe 類
CAS底層原理?如果知道,談談你對Unsafe的理解
一句話總結:自旋鎖 + Unsafe 類
AtomicInteger 類的底層原始碼
- getAndIncrement() 方法
public final int getAndIncrement() {
    return unsafe.getAndAddInt(this, valueOffset, 1);
}
- 分析參數含義
- this:當前物件
- valueOffset:記憶體偏移量(記憶體地址)
- 爲什麼AtomicInteger能解決i++多執行緒下不安全的問題,靠的是底層的Unsafe類
- AtomicInteger 類中維護了一個 Unsafe 範例,和一個 volatile 修飾的 value 值
public class AtomicInteger extends Number implements java.io.Serializable {
    private static final long serialVersionUID = 6214790243416807050L;

    // setup to use Unsafe.compareAndSwapInt for updates
    private static final Unsafe unsafe = Unsafe.getUnsafe();
    private static final long valueOffset;

    static {
        try {
            valueOffset = unsafe.objectFieldOffset
                (AtomicInteger.class.getDeclaredField("value"));
        } catch (Exception ex) { throw new Error(ex); }
    }

    private volatile int value;
Unsafe 類
- Unsafe是CAS的核心類,由於Java方法無法直接存取底層系統,需要通過本地(native)方法來存取,Unsafe相當於一個後門,基於該類可以直接操作特定記憶體的數據。
- Unsafe類存在於sun.misc包中,其內部方法操作可以像C的指針一樣直接操作記憶體,Java中CAS操作的執行依賴於Unsafe類的方法。
- 注意Unsafe類中的所有方法都是native修飾的,也就是說Unsafe類中的方法都直接呼叫操作系統底層資源執行相應在務。
- 變數valueOffset,表示該量值在記憶體中的偏移地址,因爲Unsafe就是根據記憶體偏移地址獲取數據的。
- 變數value用volatile修飾,保證了多執行緒之間的記憶體可見性。
public final int getAndIncrement() {
    return unsafe.getAndAddInt(this, valueOffset, 1);
}
2.2.2、CAS 是什麼
CAS 到底是個什麼玩意兒?
- CAS的全稱爲Compare-And-Swap,它是一條CPU併發原語。
- 它的功能是判斷記憶體某個位置的值是否爲預期值,如果是則更改爲新的值,這個過程是原子的。
- CAS併發原語體現在JAVA語言中就是sun.misc.Unsafe類中的各個方法。呼叫UnSafe類中的CAS方法,JVM會幫我們實現出CAS彙編指令。這是一種完全依賴於硬體的功能,通過它實現了原子操作。
- 再次強調,由於CAS是一種系統原語,原語屬於操作系統用語範疇,是由若幹條指令組成的,用於完成某個功能的一個過程,並且原語的執行必須是連續的,在執行過程中不允許被中斷,也就是說CAS是一條CPU的原子指令,不會造成所謂的數據不一致問題。
AtomicInteger 類 CAS 演算法分析
- 通過 AtomicInteger 類呼叫 getAndIncrement() 方法
public final int getAndIncrement() {
    return unsafe.getAndAddInt(this, valueOffset, 1);
}
atomicInteger.getAndIncrement()方法呼叫unsafe.getAndAddInt()方法this.getIntVolatile(var1,var2)方法獲取var1這個物件在var2地址上的值this.compareAndSwapInt(var1, var2, var5, var5 + var4)方法判斷 var5 變數是否與期望值相同:- 如果 var5 與記憶體中的期望值相同,證明沒有其他執行緒改過,則執行 +var 操作
- 如果 var5 與記憶體中的期望值不同,證明沒有其他執行緒改過 var2 地址處的值,然後再重新獲取 var2 地址處的值,重複 compare and set 操作
public final int getAndAddInt(Object var1, long var2, int var4) {
    int var5;
    do {
        var5 = this.getIntVolatile(var1, var2);
    } while(!this.compareAndSwapInt(var1, var2, var5, var5 + var4));

    return var5;
}
- 總結:getAndIncrement()方法底層呼叫的是Unsafe類的getAndAddInt()方法,底層是CAS思想
atomicInteger.getAndIncrement() 方法詳解
- AtomicInteger 類的 getAndIncrement() 方法
public final int getAndIncrement() {
    return unsafe.getAndAddInt(this, valueOffset, 1);
}
- Unsafe 類的 getAndAddInt() 方法
public final int getAndAddInt(Object var1, long var2, int var4) {
    int var5;
    do {
        var5 = this.getIntVolatile(var1, var2);
    } while(!this.compareAndSwapInt(var1, var2, var5, var5 + var4));

    return var5;
}
流程分析:
- var1:Atomiclnteger物件本身。
- var2:該物件值得參照地址。
- var4:需要變動的數量。
- var5:使用var1 var2找出的主記憶體中真實的值。
- 用該物件當前的值與var5比較:
- 如果相同,更新var5 + var4並且返回true,
- 如果不同,繼續取值然後再比較,直到更新完成。
舉例說明:
- 假設執行緒A和執行緒B兩個執行緒同時執行getAndAddInt操作(分別跑在不同CPU上):
- AtomicInteger裏面的value原始值爲3,即主記憶體中AtomicInteger的value爲3,根據JMM模型,執行緒A和執行緒B各自持有一份值爲3的value的副本,分別拷貝到各自的工作記憶體。
- 執行緒A通過getIntVolatile(var1, var2)拿到value值3,這時執行緒A被掛起。
- 執行緒B也通過getIntVolatile(var1, var2)方法獲取到value值3,此時剛好執行緒B沒有被掛起並執行compareAndSwapInt方法比較記憶體值也爲3,成功修改記憶體值爲4,執行緒B打完收工,一切OK。
- 這時執行緒A恢復,執行compareAndSwapInt方法比較,發現自己手裏的值數位3和主記憶體的值數位4不一致,說明該值己經被其它執行緒搶先一步修改過了,那A執行緒本次修改失敗,只能重新讀取重新來一遍了。
- 執行緒A重新獲取value值,因爲變數value被volatile修飾,所以其它執行緒對它的修改,執行緒A總是能夠看到,執行緒A繼續執行compareAndSwaplnt進行比較替換,直到成功。
底層彙編指令
- Unsafe類中的compareAndSwapInt,是一個本地方法,該方法的實現位於unsafe.cpp中
- Atomic:cmpxchg 指令:但凡帶 Atomic 彙編指令都是不會被其他執行緒打斷

CAS 簡單小總結
CAS(CompareAndSwap)
比較當前工作記憶體中的值和主記憶體中的值,如果相同則執行規定操作,否則繼續比較直到主記憶體和工作記憶體中的值一致爲止
CAS應用
- CAS有3個運算元,記憶體值V,舊的預期值A,要修改的更新值B。
- 當且僅當預期值A和記憶體值V相同時,將記憶體值V修改爲B,否則什麼都不做。
2.3、CAS 缺點
1、回圈時間長開銷很大
我們可以看到getAndAddInt方法執行時,有個do while
如果CAS失敗,會一直進行嘗試。如果CAS長時間一直不成功,可能會給CPU帶來很大的開銷。
public final int getAndAddInt(Object var1, long var2, int var4) {
    int var5;
    do {
        var5 = this.getIntVolatile(var1, var2);
    } while(!this.compareAndSwapInt(var1, var2, var5, var5 + var4));

    return var5;
}
2、只能保證一個共用變數的原子操作
當對一個共用變數執行操作時,我們可以使用回圈CAS的方式來保證原子操作,但是對多個共用變數操作時,回圈CAS就無法保證操作的原子性,這個時候就可以用鎖來保證原子性。
3、引出來ABA問題?
2.4、面試題
爲什麼用 CAS 而不用synchronized?
以下是我的理解
- 使用 synchronized 雖然能保證操作的原子性,但是將操作變成了序列操作,大大降低了程式的併發性
- 如果使用 synchronized 沒有搶到同步鎖,那麼執行緒將處於阻塞狀態,等待 CPU 的下一次排程
- CAS 使用 Unsafe 類 + 自旋鎖實現操作的原子性,Unsafe 類中使用 do while 回圈實現 compare and set ,多個執行緒可以同時操作,大大提高了程式的併發性,並且不存在讓執行緒等待的問題
3、ABA 問題
原子類AtomicInteger的ABA問題?原子更新參照知道嗎?
3.1、ABA 問題的產生
面試坑爹套路
CAS —> UnSafe —> CAS底層思想 —> ABA —> 原子參照更新 —> 如何規避ABA問題
ABA問題是怎樣產生的?
CAS會導致 ABA 問題
- CAS演算法實現一個重要前提需要取出記憶體中某時刻的數據並在當下時刻比較並替換,那麼在這個時間差類會導致數據的變化。
- 比如說一個執行緒one從記憶體位置V中取出A,這時候另一個執行緒two也從記憶體中取出A,並且執行緒two進行了一些操作將值變成了B,然後執行緒two又將V位置的數據變成A,這時候執行緒one進行CAS操作發現記憶體中仍然是A,然後執行緒one操作成功。
- 儘管執行緒one的CAS操作成功,但是不代表這個過程就是沒有問題的。
- 一句話總結:狸貓換太子
3.2、原子參照
原子參照程式碼範例
- 程式碼:使用 AtomicReference 原子參照類封裝我們自定義的 User 類
/**
 * @ClassName AtomicReferenceDemo
 * @Description TODO
 * @Author Heygo
 * @Date 2020/8/7 18:45
 * @Version 1.0
 */
public class AtomicReferenceDemo {

    public static void main(String[] args) {
        AtomicReference<User> atomicReference = new AtomicReference<>();

        User z3 = new User("z3", 23);
        User l4 = new User("l4", 24);
        User w5 = new User("w5", 25);


        atomicReference.set(z3);
        System.out.println(atomicReference.compareAndSet(z3, l4) + "\t" + atomicReference.get().toString());
        System.out.println(atomicReference.compareAndSet(z3, w5) + "\t" + atomicReference.get().toString());
    }

}

class User {

    String userName;
    int age;

    public User(String userName, int age) {
        this.userName = userName;
        this.age = age;
    }

    @Override
    public String toString() {
        return "User{" +
                "userName='" + userName + '\'' +
                ", age=" + age +
                '}';
    }
}
- 程式執行結果
true	User{userName='l4', age=24}
false	User{userName='l4', age=24}
3.3、版本號原子參照
解決ABA問題:理解原子參照 + 新增一種機制 機製,那就是修改版本號(類似時間戳)
- 程式碼:使用帶版本號的原子類 AtomicStampedReference 解決 ABA 問題
/**
 * @ClassName ABADemo
 * @Description TODO
 * @Author Heygo
 * @Date 2020/8/7 21:08
 * @Version 1.0
 */
public class ABADemo {
    // 初始值爲 100
    static AtomicReference<Integer> atomicReference = new AtomicReference<>(100);
    // 初始值爲 100 ,初始版本號爲 1
    static AtomicStampedReference<Integer> atomicStampedReference = new AtomicStampedReference<>(100, 1);


    public static void main(String[] args) {

        System.out.println("======ABA問題的產生======");
        new Thread(() -> {
            atomicReference.compareAndSet(100, 101);
            atomicReference.compareAndSet(101, 100);
        }, "t1").start();

        new Thread(() -> {
            // 暫停1秒鐘執行緒2,保證上面t1執行緒完成一次ABA操作
            try {
                TimeUnit.SECONDS.sleep(1);
            } catch (InterruptedException e) {
                e.printStackTrace();
            }
            System.out.println(atomicReference.compareAndSet(100, 2019) + "\t" + atomicReference.get());
        }, "t2").start();

        // 保證上面的操作執行完成
        while (Thread.activeCount() > 2) {
            Thread.yield();
        }

        System.out.println("======以下是ABA問題的解決=====");
        new Thread(() -> {
            System.out.println(Thread.currentThread().getName() + "\t第1次版本號:" + atomicStampedReference.getStamp());
            // 暫停1秒鐘t3執行緒
            try {
                TimeUnit.SECONDS.sleep(1);
            } catch (InterruptedException e) {
                e.printStackTrace();
            }
            atomicStampedReference.compareAndSet(100, 101, atomicStampedReference.getStamp(), atomicStampedReference.getStamp() + 1);
            System.out.println(Thread.currentThread().getName() + "\t第2次版本號:" + atomicStampedReference.getStamp());
            atomicStampedReference.compareAndSet(101, 100, atomicStampedReference.getStamp(), atomicStampedReference.getStamp() + 1);
            System.out.println(Thread.currentThread().getName() + "\t第3次版本號:" + atomicStampedReference.getStamp());
        }, "t3").start();

        new Thread(() -> {
            int stamp = atomicStampedReference.getStamp();
            System.out.println(Thread.currentThread().getName() + "\t第1次版本號:" + stamp);
            // 暫停3秒鐘t4執行緒,保證上面t3執行緒完成一次ABA操作
            try {
                TimeUnit.SECONDS.sleep(3);
            } catch (InterruptedException e) {
                e.printStackTrace();
            }
            boolean result = atomicStampedReference.compareAndSet(100, 2019, stamp, atomicStampedReference.getStamp() + 1);
            System.out.println(Thread.currentThread().getName() + "\t修改成功否: " + result + "\t當前最新實際版本號:" + atomicStampedReference.getStamp());
            System.out.println(Thread.currentThread().getName() + "\t當前實際值:" + atomicStampedReference.getReference());
        }, "t4").start();
    }
}
- 程式執行結果
======ABA問題的產生======
true	2019
======以下是ABA問題的解決=====
t3	第1次版本號:1
t4	第1次版本號:1
t3	第2次版本號:2
t3	第3次版本號:3
t4	修改成功否: false	當前最新實際版本號:3
t4	當前實際值:100
關於 AtomicStampedReference 的一些說明
- AtomicStampedReference 的構造器
- initialRef:初始值
- initialStamp:初始版本號
public AtomicStampedReference(V initialRef, int initialStamp) {
    pair = Pair.of(initialRef, initialStamp);
}
- compareAndSet() 方法
- expectedReference:期望值
- newReference:新值
- expectedStamp:期望版本號
- newStamp:新的版本號
    public boolean compareAndSet(V   expectedReference,
                                 V   newReference,
                                 int expectedStamp,
                                 int newStamp) {
        Pair<V> current = pair;
        return
            expectedReference == current.reference &&
            expectedStamp == current.stamp &&
            ((newReference == current.reference &&
              newStamp == current.stamp) ||
             casPair(current, Pair.of(newReference, newStamp)));
    }
4、集合框架
我們知道ArrayList是執行緒不安全,請編碼一個不安全的案例並給出解決方案
4.1、ArrayList 不安全
我們知道ArrayList是執行緒不安全,請編碼一個不安全的案例並給出解決方案
- 程式碼
/**
 * @ClassName ContainerNotSafeDemo
 * @Description TODO
 * @Author Heygo
 * @Date 2020/8/7 21:35
 * @Version 1.0
 */
public class ContainerNotSafeDemo {

    /*
     * 1 故障現象
     *   java.util.ConcurrentModificationException
     *
     * 2 導致原因
     *   併發爭搶修改導致,參考我們的花名冊簽名情況。
     *   一個人正在寫入,另一個同學過來搶奪,導致數據不一致異常。併發修改異常。
     *
     * */
    public static void main(String[] args) {
        listNotSafe();
    }

    private static void listNotSafe() {
        List<String> list=new ArrayList<>();
        // java.util.ConcurrentModificationException
        for (int i = 1; i <= 30; i++) {
            new Thread(() -> {
                list.add(UUID.randomUUID().toString().substring(0, 8));
                System.out.println(Thread.currentThread().getName() + "\t" + list);
            }, String.valueOf(i)).start();
        }
    }

}
- 程式執行結果:由於 ArrayList 類的 add() 方法沒有加鎖,所以存在多執行緒併發安全問題
java.util.ConcurrentModificationException
	at java.util.ArrayList$Itr.checkForComodification(ArrayList.java:901)
	at java.util.ArrayList$Itr.next(ArrayList.java:851)
	at java.util.AbstractCollection.toString(AbstractCollection.java:461)
	at java.lang.String.valueOf(String.java:2994)
	at java.lang.StringBuilder.append(StringBuilder.java:131)
	at com.Heygo.ContainerNotSafeDemo.lambda$listNotSafe$0(ContainerNotSafeDemo.java:26)
	at java.lang.Thread.run(Thread.java:748)
解決問題 ArrayList 執行緒不安全
- 使用
new Vector<>();(ArrayList所有方法加synchronized,太重)。 - 使用
Collections.synchronizedList(new ArrayList<>());轉換成執行緒安全類。 - 使用
new java.concurrent.CopyOnWriteArrayList<>();(推薦)。
CopyOnWriteArrayList
CopyOnWriteArrayList 寫時複製
- 寫時複製:CopyOnWrite容器,即寫時複製的容器。
- 往一個容器新增元素的時候,不直接往當前容器 Object[] 新增,而是先將當前 Object[] 進行Copy,複製出一個新的容器Object[] newElements,然後新的容器Object[] newElements裡新增元素,新增完元素之後,再將原容器的參照指向新的容器setArray(newElements)
- 這樣做的好處是可以對CopyOnWrite容器進行併發的讀,而不需要加鎖,因爲當前容器不會新增任何元素。
- 所以CopyOnWrite容器也是一種讀寫分離的思想,讀和寫不同的容器。
CopyOnWriteArrayList 程式碼範例
- 程式碼:使用 CopyOnWriteArrayList 集合類,保證 ArrayList 併發修改安全性的同時,也保證了併發讀取的效率
/**
 * @ClassName ContainerNotSafeDemo
 * @Description TODO
 * @Author Heygo
 * @Date 2020/8/7 21:35
 * @Version 1.0
 */
public class ContainerNotSafeDemo {

    /*
     * 1 故障現象
     *   java.util.ConcurrentModificationException
     *
     * 2 導致原因
     *   併發爭搶修改導致,參考我們的花名冊簽名情況。
     *   一個人正在寫入,另一個同學過來搶奪,導致數據不一致異常。併發修改異常。
     *
     * 3 解決方案
     *   3.1 new Vector<>();
     *   3.2 集合工具類:Collections.synchronizedList(new ArrayList<>());
     *   3.3 new CopyOnWriteArrayList<>()
     *       寫時複製:CopyOnWrite容器即寫時複製的容器。
     *       往一個容器新增元素的時候,不直接往當前容器Object[]新增,而是先將當前object[]進行Copy,
     *       複製出一個新的容器Object[] newElements,然後新的容器Object[] newElements裡新增元素,
     *       新增完元素之後,再將原容器的參照指向新的容器setArray(newElements);
     *       這樣做的好處是可以對CopyOnWrite容器進行併發的讀,而不需要加鎖,因爲當前容器不會新增任何元素。
     *       所以CopyOnWrite容器也是一種讀寫分離的思想,讀和寫不同的容器。
     *
     * 4 優化建議(同樣的錯誤不犯兩次)
     *
     * */
    public static void main(String[] args) {
        listNotSafe();
    }

    private static void listNotSafe() {
        List<String> list = new CopyOnWriteArrayList<>();
        for (int i = 1; i <= 30; i++) {
            new Thread(() -> {
                list.add(UUID.randomUUID().toString().substring(0, 8));
                System.out.println(Thread.currentThread().getName() + "\t" + list);
            }, String.valueOf(i)).start();
        }
    }

}
- 程式執行結果
5	[ce629c0f, 195253cd, 9d98dc22, b3ed3b72]
8	[ce629c0f, 195253cd, 9d98dc22, b3ed3b72, 1542d43e, 1494f2e9]
10	[ce629c0f, 195253cd, 9d98dc22, b3ed3b72, 1542d43e, 1494f2e9, aa7e9f64, 413cf9d9]
2	[ce629c0f, 195253cd, 9d98dc22, b3ed3b72, 1542d43e, 1494f2e9, aa7e9f64, 413cf9d9]
3	[ce629c0f, 195253cd, 9d98dc22, b3ed3b72]
12	[ce629c0f, 195253cd, 9d98dc22, b3ed3b72, 1542d43e, 1494f2e9, aa7e9f64, 413cf9d9, ce7e5748, 1feaa74e, 6d40a803, 5fa45f02]
7	[ce629c0f, 195253cd, 9d98dc22, b3ed3b72, 1542d43e]
4	[ce629c0f, 195253cd, 9d98dc22, b3ed3b72]
15	[ce629c0f, 195253cd, 9d98dc22, b3ed3b72, 1542d43e, 1494f2e9, aa7e9f64, 413cf9d9, ce7e5748, 1feaa74e, 6d40a803, 5fa45f02, 86971d8b, 14886d8e, 232c6e3a]
14	[ce629c0f, 195253cd, 9d98dc22, b3ed3b72, 1542d43e, 1494f2e9, aa7e9f64, 413cf9d9, ce7e5748, 1feaa74e, 6d40a803, 5fa45f02, 86971d8b, 14886d8e]
13	[ce629c0f, 195253cd, 9d98dc22, b3ed3b72, 1542d43e, 1494f2e9, aa7e9f64, 413cf9d9, ce7e5748, 1feaa74e, 6d40a803, 5fa45f02, 86971d8b]
1	[ce629c0f, 195253cd, 9d98dc22, b3ed3b72, 1542d43e, 1494f2e9, aa7e9f64, 413cf9d9, ce7e5748, 1feaa74e]
22	[ce629c0f, 195253cd, 9d98dc22, b3ed3b72, 1542d43e, 1494f2e9, aa7e9f64, 413cf9d9, ce7e5748, 1feaa74e, 6d40a803, 5fa45f02, 86971d8b, 14886d8e, 232c6e3a, ecf34ff3, 9aa964b9, a4cf1f6e, 5427a83a, 250c0143, 4c32f82d, a76fe96a]
11	[ce629c0f, 195253cd, 9d98dc22, b3ed3b72, 1542d43e, 1494f2e9, aa7e9f64, 413cf9d9, ce7e5748, 1feaa74e]
6	[ce629c0f, 195253cd, 9d98dc22, b3ed3b72, 1542d43e, 1494f2e9, aa7e9f64, 413cf9d9, ce7e5748, 1feaa74e, 6d40a803]
9	[ce629c0f, 195253cd, 9d98dc22, b3ed3b72, 1542d43e, 1494f2e9, aa7e9f64]
27	[ce629c0f, 195253cd, 9d98dc22, b3ed3b72, 1542d43e, 1494f2e9, aa7e9f64, 413cf9d9, ce7e5748, 1feaa74e, 6d40a803, 5fa45f02, 86971d8b, 14886d8e, 232c6e3a, ecf34ff3, 9aa964b9, a4cf1f6e, 5427a83a, 250c0143, 4c32f82d, a76fe96a, e28f0c36, ee151ef4, 1ce730cc, 5807293f, 8163070f]
26	[ce629c0f, 195253cd, 9d98dc22, b3ed3b72, 1542d43e, 1494f2e9, aa7e9f64, 413cf9d9, ce7e5748, 1feaa74e, 6d40a803, 5fa45f02, 86971d8b, 14886d8e, 232c6e3a, ecf34ff3, 9aa964b9, a4cf1f6e, 5427a83a, 250c0143, 4c32f82d, a76fe96a, e28f0c36, ee151ef4, 1ce730cc, 5807293f]
25	[ce629c0f, 195253cd, 9d98dc22, b3ed3b72, 1542d43e, 1494f2e9, aa7e9f64, 413cf9d9, ce7e5748, 1feaa74e, 6d40a803, 5fa45f02, 86971d8b, 14886d8e, 232c6e3a, ecf34ff3, 9aa964b9, a4cf1f6e, 5427a83a, 250c0143, 4c32f82d, a76fe96a, e28f0c36, ee151ef4, 1ce730cc]
24	[ce629c0f, 195253cd, 9d98dc22, b3ed3b72, 1542d43e, 1494f2e9, aa7e9f64, 413cf9d9, ce7e5748, 1feaa74e, 6d40a803, 5fa45f02, 86971d8b, 14886d8e, 232c6e3a, ecf34ff3, 9aa964b9, a4cf1f6e, 5427a83a, 250c0143, 4c32f82d, a76fe96a, e28f0c36, ee151ef4]
23	[ce629c0f, 195253cd, 9d98dc22, b3ed3b72, 1542d43e, 1494f2e9, aa7e9f64, 413cf9d9, ce7e5748, 1feaa74e, 6d40a803, 5fa45f02, 86971d8b, 14886d8e, 232c6e3a, ecf34ff3, 9aa964b9, a4cf1f6e, 5427a83a, 250c0143, 4c32f82d, a76fe96a, e28f0c36]
21	[ce629c0f, 195253cd, 9d98dc22, b3ed3b72, 1542d43e, 1494f2e9, aa7e9f64, 413cf9d9, ce7e5748, 1feaa74e, 6d40a803, 5fa45f02, 86971d8b, 14886d8e, 232c6e3a, ecf34ff3, 9aa964b9, a4cf1f6e, 5427a83a, 250c0143, 4c32f82d]
20	[ce629c0f, 195253cd, 9d98dc22, b3ed3b72, 1542d43e, 1494f2e9, aa7e9f64, 413cf9d9, ce7e5748, 1feaa74e, 6d40a803, 5fa45f02, 86971d8b, 14886d8e, 232c6e3a, ecf34ff3, 9aa964b9, a4cf1f6e, 5427a83a, 250c0143]
19	[ce629c0f, 195253cd, 9d98dc22, b3ed3b72, 1542d43e, 1494f2e9, aa7e9f64, 413cf9d9, ce7e5748, 1feaa74e, 6d40a803, 5fa45f02, 86971d8b, 14886d8e, 232c6e3a, ecf34ff3, 9aa964b9, a4cf1f6e, 5427a83a]
18	[ce629c0f, 195253cd, 9d98dc22, b3ed3b72, 1542d43e, 1494f2e9, aa7e9f64, 413cf9d9, ce7e5748, 1feaa74e, 6d40a803, 5fa45f02, 86971d8b, 14886d8e, 232c6e3a, ecf34ff3, 9aa964b9, a4cf1f6e]
17	[ce629c0f, 195253cd, 9d98dc22, b3ed3b72, 1542d43e, 1494f2e9, aa7e9f64, 413cf9d9, ce7e5748, 1feaa74e, 6d40a803, 5fa45f02, 86971d8b, 14886d8e, 232c6e3a, ecf34ff3, 9aa964b9]
16	[ce629c0f, 195253cd, 9d98dc22, b3ed3b72, 1542d43e, 1494f2e9, aa7e9f64, 413cf9d9, ce7e5748, 1feaa74e, 6d40a803, 5fa45f02, 86971d8b, 14886d8e, 232c6e3a, ecf34ff3]
30	[ce629c0f, 195253cd, 9d98dc22, b3ed3b72, 1542d43e, 1494f2e9, aa7e9f64, 413cf9d9, ce7e5748, 1feaa74e, 6d40a803, 5fa45f02, 86971d8b, 14886d8e, 232c6e3a, ecf34ff3, 9aa964b9, a4cf1f6e, 5427a83a, 250c0143, 4c32f82d, a76fe96a, e28f0c36, ee151ef4, 1ce730cc, 5807293f, 8163070f, 8bc1cbfc, 58caaadd]
29	[ce629c0f, 195253cd, 9d98dc22, b3ed3b72, 1542d43e, 1494f2e9, aa7e9f64, 413cf9d9, ce7e5748, 1feaa74e, 6d40a803, 5fa45f02, 86971d8b, 14886d8e, 232c6e3a, ecf34ff3, 9aa964b9, a4cf1f6e, 5427a83a, 250c0143, 4c32f82d, a76fe96a, e28f0c36, ee151ef4, 1ce730cc, 5807293f, 8163070f, 8bc1cbfc, 58caaadd, ce11ccb2]
28	[ce629c0f, 195253cd, 9d98dc22, b3ed3b72, 1542d43e, 1494f2e9, aa7e9f64, 413cf9d9, ce7e5748, 1feaa74e, 6d40a803, 5fa45f02, 86971d8b, 14886d8e, 232c6e3a, ecf34ff3, 9aa964b9, a4cf1f6e, 5427a83a, 250c0143, 4c32f82d, a76fe96a, e28f0c36, ee151ef4, 1ce730cc, 5807293f, 8163070f, 8bc1cbfc]
ArrayList 原始碼分析
- 初始化時,構造了一個空的
Object[]陣列
    /**
     * Shared empty array instance used for default sized empty instances. We
     * distinguish this from EMPTY_ELEMENTDATA to know how much to inflate when
     * first element is added.
     */
    private static final Object[] DEFAULTCAPACITY_EMPTY_ELEMENTDATA = {};

	/**
     * Constructs an empty list with an initial capacity of ten.
     */
    public ArrayList() {
        this.elementData = DEFAULTCAPACITY_EMPTY_ELEMENTDATA;
    }
- ArrayList 中使用
Object[]陣列存放數據
    /**
     * The array buffer into which the elements of the ArrayList are stored.
     * The capacity of the ArrayList is the length of this array buffer. Any
     * empty ArrayList with elementData == DEFAULTCAPACITY_EMPTY_ELEMENTDATA
     * will be expanded to DEFAULT_CAPACITY when the first element is added.
     */
    transient Object[] elementData; // non-private to simplify nested class access
- 第一次新增元素時,初始化 Object[] 陣列的大小爲
DEFAULT_CAPACITY = 10
    /**
     * Appends the specified element to the end of this list.
     *
     * @param e element to be appended to this list
     * @return <tt>true</tt> (as specified by {@link Collection#add})
     */
    public boolean add(E e) {
        ensureCapacityInternal(size + 1);  // Increments modCount!!
        elementData[size++] = e;
        return true;
    }

    /**
     * Default initial capacity.
     */
    private static final int DEFAULT_CAPACITY = 10;

    private void ensureCapacityInternal(int minCapacity) {
        if (elementData == DEFAULTCAPACITY_EMPTY_ELEMENTDATA) {
            minCapacity = Math.max(DEFAULT_CAPACITY, minCapacity);
        }

        ensureExplicitCapacity(minCapacity);
    }
- 擴容操作
- 每次擴容爲舊容量的 1.5 倍
- ArrayList 最大容量爲
Integer.MAX_VALUE - 8 - 使用
Arrays.copyOf()方法擴容,並將將原來陣列中的值拷貝到新陣列中
    private void ensureExplicitCapacity(int minCapacity) {
        modCount++;

        // overflow-conscious code
        if (minCapacity - elementData.length > 0)
            grow(minCapacity);
    }

    /**
     * The maximum size of array to allocate.
     * Some VMs reserve some header words in an array.
     * Attempts to allocate larger arrays may result in
     * OutOfMemoryError: Requested array size exceeds VM limit
     */
    private static final int MAX_ARRAY_SIZE = Integer.MAX_VALUE - 8;

    /**
     * Increases the capacity to ensure that it can hold at least the
     * number of elements specified by the minimum capacity argument.
     *
     * @param minCapacity the desired minimum capacity
     */
    private void grow(int minCapacity) {
        // overflow-conscious code
        int oldCapacity = elementData.length;
        int newCapacity = oldCapacity + (oldCapacity >> 1);
        if (newCapacity - minCapacity < 0)
            newCapacity = minCapacity;
        if (newCapacity - MAX_ARRAY_SIZE > 0)
            newCapacity = hugeCapacity(minCapacity);
        // minCapacity is usually close to size, so this is a win:
        elementData = Arrays.copyOf(elementData, newCapacity);
    }
Collections. synchronizedList() 原始碼
Collections.synchronizedList()方法:由於 ArrayList 實現了 RandomAccess 介面,所以在方法內部建立了一個 SynchronizedRandomAccessList 的範例
    /**
     * Returns a synchronized (thread-safe) list backed by the specified
     * list.  In order to guarantee serial access, it is critical that
     * <strong>all</strong> access to the backing list is accomplished
     * through the returned list.<p>
     *
     * It is imperative that the user manually synchronize on the returned
     * list when iterating over it:
     * <pre>
     *  List list = Collections.synchronizedList(new ArrayList());
     *      ...
     *  synchronized (list) {
     *      Iterator i = list.iterator(); // Must be in synchronized block
     *      while (i.hasNext())
     *          foo(i.next());
     *  }
     * </pre>
     * Failure to follow this advice may result in non-deterministic behavior.
     *
     * <p>The returned list will be serializable if the specified list is
     * serializable.
     *
     * @param  <T> the class of the objects in the list
     * @param  list the list to be "wrapped" in a synchronized list.
     * @return a synchronized view of the specified list.
     */
    public static <T> List<T> synchronizedList(List<T> list) {
        return (list instanceof RandomAccess ?
                new SynchronizedRandomAccessList<>(list) :
                new SynchronizedList<>(list));
    }
- SynchronizedRandomAccessList 類是 Collections 類的靜態內部類
- SynchronizedRandomAccessList 的父類別爲 SynchronizedList 類
super(list);表示呼叫父類別 SynchronizedList 的構造方法
static class SynchronizedRandomAccessList<E>
    extends SynchronizedList<E>
    implements RandomAccess {

    SynchronizedRandomAccessList(List<E> list) {
        super(list);
    }
- SynchronizedList 類也是 Collections 類的靜態內部類
- SynchronizedList 類的父類別是 SynchronizedCollection 類
super(list);表示呼叫父類別 SynchronizedCollection 的構造方法- SynchronizedList 內部維護了 ArrayList 的參照:
this.list = list;
static class SynchronizedList<E>
    extends SynchronizedCollection<E>
    implements List<E> {
    private static final long serialVersionUID = -7754090372962971524L;

    final List<E> list;

    SynchronizedList(List<E> list) {
        super(list);
        this.list = list;
    }
- SynchronizedCollection 類也是 Collections 類的靜態內部類
- 在 SynchronizedCollection 內部維護了 ArrayList 的參照:
this.c = Objects.requireNonNull(c); - 通過
final Object mutex這把鎖,給集閤中的所有方法都加上鎖,保證多執行緒併發的安全性
static class SynchronizedCollection<E> implements Collection<E>, Serializable {
    private static final long serialVersionUID = 3053995032091335093L;

    final Collection<E> c;  // Backing Collection
    final Object mutex;     // Object on which to synchronize

    SynchronizedCollection(Collection<E> c) {
        this.c = Objects.requireNonNull(c);
        mutex = this;
    }

    SynchronizedCollection(Collection<E> c, Object mutex) {
        this.c = Objects.requireNonNull(c);
        this.mutex = Objects.requireNonNull(mutex);
    }

    public int size() {
        synchronized (mutex) {return c.size();}
    }
    public boolean isEmpty() {
        synchronized (mutex) {return c.isEmpty();}
    }
    public boolean contains(Object o) {
        synchronized (mutex) {return c.contains(o);}
    }
    public Object[] toArray() {
        synchronized (mutex) {return c.toArray();}
    }
    public <T> T[] toArray(T[] a) {
        synchronized (mutex) {return c.toArray(a);}
    }

    public Iterator<E> iterator() {
        return c.iterator(); // Must be manually synched by user!
    }

    public boolean add(E e) {
        synchronized (mutex) {return c.add(e);}
    }
    public boolean remove(Object o) {
        synchronized (mutex) {return c.remove(o);}
    }

    public boolean containsAll(Collection<?> coll) {
        synchronized (mutex) {return c.containsAll(coll);}
    }
    public boolean addAll(Collection<? extends E> coll) {
        synchronized (mutex) {return c.addAll(coll);}
    }
    public boolean removeAll(Collection<?> coll) {
        synchronized (mutex) {return c.removeAll(coll);}
    }
    public boolean retainAll(Collection<?> coll) {
        synchronized (mutex) {return c.retainAll(coll);}
    }
    public void clear() {
        synchronized (mutex) {c.clear();}
    }
    public String toString() {
        synchronized (mutex) {return c.toString();}
    }
    // Override default methods in Collection
    @Override
    public void forEach(Consumer<? super E> consumer) {
        synchronized (mutex) {c.forEach(consumer);}
    }
    @Override
    public boolean removeIf(Predicate<? super E> filter) {
        synchronized (mutex) {return c.removeIf(filter);}
    }
    @Override
    public Spliterator<E> spliterator() {
        return c.spliterator(); // Must be manually synched by user!
    }
    @Override
    public Stream<E> stream() {
        return c.stream(); // Must be manually synched by user!
    }
    @Override
    public Stream<E> parallelStream() {
        return c.parallelStream(); // Must be manually synched by user!
    }
    private void writeObject(ObjectOutputStream s) throws IOException {
        synchronized (mutex) {s.defaultWriteObject();}
    }
}
CopyOnWriteArrayList 原始碼分析
- CopyOnWriteArrayList 內部維護了兩個重要成員變數:
- ReentrantLock 鎖:保證多執行緒併發修改的安全性
- Object[] array 陣列:使用 volatile 修飾,保證記憶體的可見性
public class CopyOnWriteArrayList<E>
    implements List<E>, RandomAccess, Cloneable, java.io.Serializable {
    private static final long serialVersionUID = 8673264195747942595L;

    /** The lock protecting all mutators */
    final transient ReentrantLock lock = new ReentrantLock();

    /** The array, accessed only via getArray/setArray. */
    private transient volatile Object[] array;

    /**
     * Gets the array.  Non-private so as to also be accessible
     * from CopyOnWriteArraySet class.
     */
    final Object[] getArray() {
        return array;
    }

    /**
     * Sets the array.
     */
    final void setArray(Object[] a) {
        array = a;
    }

    /**
     * Creates an empty list.
     */
    public CopyOnWriteArrayList() {
        setArray(new Object[0]);
    }
- 新增元素:
- 上鎖{
- 陣列長度擴容 1 個元素,將舊元素拷貝至新陣列與中,將新元素放在陣列末尾
- 修改
rivate transient volatile Object[] array;的參照 - }解鎖
    /**
     * Appends the specified element to the end of this list.
     *
     * @param e element to be appended to this list
     * @return {@code true} (as specified by {@link Collection#add})
     */
    public boolean add(E e) {
        final ReentrantLock lock = this.lock;
        lock.lock();
        try {
            Object[] elements = getArray();
            int len = elements.length;
            Object[] newElements = Arrays.copyOf(elements, len + 1);
            newElements[len] = e;
            setArray(newElements);
            return true;
        } finally {
            lock.unlock();
        }
    }
- 由於採用了讀寫分離,所以讀取集合無需加鎖,提高了讀的併發性
public String toString() {
    return Arrays.toString(getArray());
}
4.2、HashSet 不安全
演示 HashSet 執行緒不安全
- 程式碼
/**
 * @ClassName ContainerNotSafeDemo
 * @Description TODO
 * @Author Heygo
 * @Date 2020/8/7 21:35
 * @Version 1.0
 */
public class ContainerNotSafeDemo {
    public static void main(String[] args) {
        setNoSafe();
    }

    private static void setNoSafe() {
        Set<String> set=new HashSet<>();
        for (int i = 1; i <= 30; i++) {
            new Thread(() -> {
                set.add(UUID.randomUUID().toString().substring(0, 8));
                System.out.println(Thread.currentThread().getName() + "\t" + set);
            }, String.valueOf(i)).start();
        }
    }
}
- 程式執行結果:
java.util.ConcurrentModificationException
java.util.ConcurrentModificationException
	at java.util.HashMap$HashIterator.nextNode(HashMap.java:1437)
	at java.util.HashMap$KeyIterator.next(HashMap.java:1461)
	at java.util.AbstractCollection.toString(AbstractCollection.java:461)
	at java.lang.String.valueOf(String.java:2994)
	at java.lang.StringBuilder.append(StringBuilder.java:131)
	at com.Heygo.ContainerNotSafeDemo.lambda$setNoSafe$2(ContainerNotSafeDemo.java:71)
	at java.lang.Thread.run(Thread.java:748)
解決 HashSet 執行緒不安全問題
- 使用 CollectionssynchronizedSet() 方法將 HashSet 轉爲執行緒安全版本
- 使用 CopyOnWriteArraySet 類:讀寫分離
CopyOnWriteArraySet 程式碼範例
- 程式碼
/**
 * @ClassName ContainerNotSafeDemo
 * @Description TODO
 * @Author Heygo
 * @Date 2020/8/7 21:35
 * @Version 1.0
 */
public class ContainerNotSafeDemo {
    public static void main(String[] args) {
        setNoSafe();
    }

    private static void setNoSafe() {
        Set<String> set = new CopyOnWriteArraySet<>();
        for (int i = 1; i <= 30; i++) {
            new Thread(() -> {
                set.add(UUID.randomUUID().toString().substring(0, 8));
                System.out.println(Thread.currentThread().getName() + "\t" + set);
            }, String.valueOf(i)).start();
        }
    }
}
- 程式執行結果
1	[d9f8ebbc, 1d6205eb, 836575a9, ce40bd87, 7bacd0f6, 57d5347f, e1676b1c, c10c5256, 247ff963, 3a5b3feb]
7	[d9f8ebbc, 1d6205eb, 836575a9, ce40bd87, 7bacd0f6, 57d5347f, e1676b1c, c10c5256, 247ff963, 3a5b3feb, ce846b2d, 9e050a24, 0e7e56e9, bf76ebc7, 6072428a]
16	[d9f8ebbc, 1d6205eb, 836575a9, ce40bd87, 7bacd0f6, 57d5347f, e1676b1c, c10c5256, 247ff963, 3a5b3feb, ce846b2d, 9e050a24, 0e7e56e9, bf76ebc7, 6072428a, 25b9d177]
18	[d9f8ebbc, 1d6205eb, 836575a9, ce40bd87, 7bacd0f6, 57d5347f, e1676b1c, c10c5256, 247ff963, 3a5b3feb, ce846b2d, 9e050a24, 0e7e56e9, bf76ebc7, 6072428a, 25b9d177, e5567ae6, 23fbb23e]
15	[d9f8ebbc, 1d6205eb, 836575a9, ce40bd87, 7bacd0f6, 57d5347f, e1676b1c, c10c5256, 247ff963, 3a5b3feb, ce846b2d, 9e050a24, 0e7e56e9, bf76ebc7, 6072428a]
21	[d9f8ebbc, 1d6205eb, 836575a9, ce40bd87, 7bacd0f6, 57d5347f, e1676b1c, c10c5256, 247ff963, 3a5b3feb, ce846b2d, 9e050a24, 0e7e56e9, bf76ebc7, 6072428a, 25b9d177, e5567ae6, 23fbb23e, ec60cb89, 73bd78e7, 3f6ded3e]
4	[d9f8ebbc, 1d6205eb, 836575a9, ce40bd87, 7bacd0f6, 57d5347f, e1676b1c, c10c5256, 247ff963, 3a5b3feb, ce846b2d, 9e050a24, 0e7e56e9, bf76ebc7]
3	[d9f8ebbc, 1d6205eb, 836575a9, ce40bd87, 7bacd0f6, 57d5347f, e1676b1c, c10c5256, 247ff963, 3a5b3feb, ce846b2d, 9e050a24, 0e7e56e9, bf76ebc7]
2	[d9f8ebbc, 1d6205eb, 836575a9, ce40bd87, 7bacd0f6, 57d5347f, e1676b1c, c10c5256, 247ff963, 3a5b3feb, ce846b2d, 9e050a24, 0e7e56e9, bf76ebc7]
13	[d9f8ebbc, 1d6205eb, 836575a9, ce40bd87, 7bacd0f6, 57d5347f, e1676b1c, c10c5256, 247ff963, 3a5b3feb, ce846b2d, 9e050a24, 0e7e56e9, bf76ebc7]
24	[d9f8ebbc, 1d6205eb, 836575a9, ce40bd87, 7bacd0f6, 57d5347f, e1676b1c, c10c5256, 247ff963, 3a5b3feb, ce846b2d, 9e050a24, 0e7e56e9, bf76ebc7, 6072428a, 25b9d177, e5567ae6, 23fbb23e, ec60cb89, 73bd78e7, 3f6ded3e, f995ef22, 866bc698, 22177284, 6252e23d]
8	[d9f8ebbc, 1d6205eb, 836575a9, ce40bd87, 7bacd0f6, 57d5347f, e1676b1c, c10c5256, 247ff963, 3a5b3feb, ce846b2d, 9e050a24, 0e7e56e9]
14	[d9f8ebbc, 1d6205eb, 836575a9, ce40bd87, 7bacd0f6, 57d5347f, e1676b1c, c10c5256, 247ff963, 3a5b3feb, ce846b2d, 9e050a24, 0e7e56e9]
30	[d9f8ebbc, 1d6205eb, 836575a9, ce40bd87, 7bacd0f6, 57d5347f, e1676b1c, c10c5256, 247ff963, 3a5b3feb, ce846b2d, 9e050a24, 0e7e56e9, bf76ebc7, 6072428a, 25b9d177, e5567ae6, 23fbb23e, ec60cb89, 73bd78e7, 3f6ded3e, f995ef22, 866bc698, 22177284, 6252e23d, 85e01c3e, 0edf78f9, a0c65913]
5	[d9f8ebbc, 1d6205eb, 836575a9, ce40bd87, 7bacd0f6, 57d5347f, e1676b1c, c10c5256, 247ff963, 3a5b3feb, ce846b2d]
11	[d9f8ebbc, 1d6205eb, 836575a9, ce40bd87, 7bacd0f6, 57d5347f, e1676b1c, c10c5256, 247ff963, 3a5b3feb, ce846b2d]
9	[d9f8ebbc, 1d6205eb, 836575a9, ce40bd87, 7bacd0f6, 57d5347f, e1676b1c, c10c5256, 247ff963, 3a5b3feb]
12	[d9f8ebbc, 1d6205eb, 836575a9, ce40bd87, 7bacd0f6, 57d5347f, e1676b1c, c10c5256, 247ff963, 3a5b3feb, ce846b2d, 9e050a24]
26	[d9f8ebbc, 1d6205eb, 836575a9, ce40bd87, 7bacd0f6, 57d5347f, e1676b1c, c10c5256, 247ff963, 3a5b3feb, ce846b2d, 9e050a24, 0e7e56e9, bf76ebc7, 6072428a, 25b9d177, e5567ae6, 23fbb23e, ec60cb89, 73bd78e7, 3f6ded3e, f995ef22, 866bc698, 22177284, 6252e23d, 85e01c3e, 0edf78f9, a0c65913, 9ae99682, 84b58b16]
25	[d9f8ebbc, 1d6205eb, 836575a9, ce40bd87, 7bacd0f6, 57d5347f, e1676b1c, c10c5256, 247ff963, 3a5b3feb, ce846b2d, 9e050a24, 0e7e56e9, bf76ebc7, 6072428a, 25b9d177, e5567ae6, 23fbb23e, ec60cb89, 73bd78e7, 3f6ded3e, f995ef22, 866bc698, 22177284, 6252e23d, 85e01c3e, 0edf78f9, a0c65913, 9ae99682]
29	[d9f8ebbc, 1d6205eb, 836575a9, ce40bd87, 7bacd0f6, 57d5347f, e1676b1c, c10c5256, 247ff963, 3a5b3feb, ce846b2d, 9e050a24, 0e7e56e9, bf76ebc7, 6072428a, 25b9d177, e5567ae6, 23fbb23e, ec60cb89, 73bd78e7, 3f6ded3e, f995ef22, 866bc698, 22177284, 6252e23d, 85e01c3e, 0edf78f9, a0c65913, 9ae99682]
28	[d9f8ebbc, 1d6205eb, 836575a9, ce40bd87, 7bacd0f6, 57d5347f, e1676b1c, c10c5256, 247ff963, 3a5b3feb, ce846b2d, 9e050a24, 0e7e56e9, bf76ebc7, 6072428a, 25b9d177, e5567ae6, 23fbb23e, ec60cb89, 73bd78e7, 3f6ded3e, f995ef22, 866bc698, 22177284, 6252e23d, 85e01c3e, 0edf78f9]
27	[d9f8ebbc, 1d6205eb, 836575a9, ce40bd87, 7bacd0f6, 57d5347f, e1676b1c, c10c5256, 247ff963, 3a5b3feb, ce846b2d, 9e050a24, 0e7e56e9, bf76ebc7, 6072428a, 25b9d177, e5567ae6, 23fbb23e, ec60cb89, 73bd78e7, 3f6ded3e, f995ef22, 866bc698, 22177284, 6252e23d, 85e01c3e]
22	[d9f8ebbc, 1d6205eb, 836575a9, ce40bd87, 7bacd0f6, 57d5347f, e1676b1c, c10c5256, 247ff963, 3a5b3feb, ce846b2d, 9e050a24, 0e7e56e9, bf76ebc7, 6072428a, 25b9d177, e5567ae6, 23fbb23e, ec60cb89, 73bd78e7, 3f6ded3e, f995ef22, 866bc698]
23	[d9f8ebbc, 1d6205eb, 836575a9, ce40bd87, 7bacd0f6, 57d5347f, e1676b1c, c10c5256, 247ff963, 3a5b3feb, ce846b2d, 9e050a24, 0e7e56e9, bf76ebc7, 6072428a, 25b9d177, e5567ae6, 23fbb23e, ec60cb89, 73bd78e7, 3f6ded3e, f995ef22]
20	[d9f8ebbc, 1d6205eb, 836575a9, ce40bd87, 7bacd0f6, 57d5347f, e1676b1c, c10c5256, 247ff963, 3a5b3feb, ce846b2d, 9e050a24, 0e7e56e9, bf76ebc7, 6072428a, 25b9d177, e5567ae6, 23fbb23e, ec60cb89, 73bd78e7]
19	[d9f8ebbc, 1d6205eb, 836575a9, ce40bd87, 7bacd0f6, 57d5347f, e1676b1c, c10c5256, 247ff963, 3a5b3feb, ce846b2d, 9e050a24, 0e7e56e9, bf76ebc7, 6072428a, 25b9d177, e5567ae6, 23fbb23e, ec60cb89]
17	[d9f8ebbc, 1d6205eb, 836575a9, ce40bd87, 7bacd0f6, 57d5347f, e1676b1c, c10c5256, 247ff963, 3a5b3feb, ce846b2d, 9e050a24, 0e7e56e9, bf76ebc7, 6072428a, 25b9d177, e5567ae6]
6	[d9f8ebbc, 1d6205eb, 836575a9, ce40bd87, 7bacd0f6, 57d5347f, e1676b1c, c10c5256, 247ff963, 3a5b3feb]
10	[d9f8ebbc, 1d6205eb, 836575a9, ce40bd87, 7bacd0f6, 57d5347f, e1676b1c, c10c5256, 247ff963, 3a5b3feb, ce846b2d, 9e050a24, 0e7e56e9, bf76ebc7, 6072428a]
HashSet 原始碼分析
- HashSet 的構造器:底層維護了一個負載因子爲 0.75 的 HashMap
public class HashSet<E>
    extends AbstractSet<E>
    implements Set<E>, Cloneable, java.io.Serializable
{
    static final long serialVersionUID = -5024744406713321676L;

    private transient HashMap<E,Object> map;

    // Dummy value to associate with an Object in the backing Map
    private static final Object PRESENT = new Object();

    /**
     * Constructs a new, empty set; the backing <tt>HashMap</tt> instance has
     * default initial capacity (16) and load factor (0.75).
     */
    public HashSet() {
        map = new HashMap<>();
    }
- add() 方法:
- key 爲待新增的元素
- value 統一爲
private static final Object PRESENT = new Object();
/**
* Adds the specified element to this set if it is not already present.
* More formally, adds the specified element <tt>e</tt> to this set if
* this set contains no element <tt>e2</tt> such that
* <tt>(e==null ? e2==null : e.equals(e2))</tt>.
* If this set already contains the element, the call leaves the set
* unchanged and returns <tt>false</tt>.
*
* @param e element to be added to this set
* @return <tt>true</tt> if this set did not already contain the specified
* element
*/
public boolean add(E e) {
return map.put(e, PRESENT)==null;
}
Collections.synchronizedSet() 原始碼分析
Collections.synchronizedSet()方法建立了一個 synchronizedSet 類的範例
    /**
     * Returns a synchronized (thread-safe) set backed by the specified
     * set.  In order to guarantee serial access, it is critical that
     * <strong>all</strong> access to the backing set is accomplished
     * through the returned set.<p>
     *
     * It is imperative that the user manually synchronize on the returned
     * set when iterating over it:
     * <pre>
     *  Set s = Collections.synchronizedSet(new HashSet());
     *      ...
     *  synchronized (s) {
     *      Iterator i = s.iterator(); // Must be in the synchronized block
     *      while (i.hasNext())
     *          foo(i.next());
     *  }
     * </pre>
     * Failure to follow this advice may result in non-deterministic behavior.
     *
     * <p>The returned set will be serializable if the specified set is
     * serializable.
     *
     * @param  <T> the class of the objects in the set
     * @param  s the set to be "wrapped" in a synchronized set.
     * @return a synchronized view of the specified set.
     */
    public static <T> Set<T> synchronizedSet(Set<T> s) {
        return new SynchronizedSet<>(s);
    }
- SynchronizedSet 類是 Collections 的靜態內部類
- SynchronizedSet 類的父類別是 SynchronizedCollection 類
super(s);呼叫父類別構造器
static class SynchronizedSet<E>
    extends SynchronizedCollection<E>
    implements Set<E> {
    private static final long serialVersionUID = 487447009682186044L;

    SynchronizedSet(Set<E> s) {
        super(s);
    }
- SynchronizedSet 和 SynchronizedList 都繼承自 SynchronizedCollection 類,均是通過 mutex 這把鎖解決了多執行緒併發修改的安全問題
static class SynchronizedCollection<E> implements Collection<E>, Serializable {
    private static final long serialVersionUID = 3053995032091335093L;

    final Collection<E> c;  // Backing Collection
    final Object mutex;     // Object on which to synchronize

    SynchronizedCollection(Collection<E> c) {
        this.c = Objects.requireNonNull(c);
        mutex = this;
    }

    SynchronizedCollection(Collection<E> c, Object mutex) {
        this.c = Objects.requireNonNull(c);
        this.mutex = Objects.requireNonNull(mutex);
    }

    public int size() {
        synchronized (mutex) {return c.size();}
    }
    public boolean isEmpty() {
        synchronized (mutex) {return c.isEmpty();}
    }
    public boolean contains(Object o) {
        synchronized (mutex) {return c.contains(o);}
    }
    public Object[] toArray() {
        synchronized (mutex) {return c.toArray();}
    }
    public <T> T[] toArray(T[] a) {
        synchronized (mutex) {return c.toArray(a);}
    }

    public Iterator<E> iterator() {
        return c.iterator(); // Must be manually synched by user!
    }

    public boolean add(E e) {
        synchronized (mutex) {return c.add(e);}
    }
    public boolean remove(Object o) {
        synchronized (mutex) {return c.remove(o);}
    }

    public boolean containsAll(Collection<?> coll) {
        synchronized (mutex) {return c.containsAll(coll);}
    }
    public boolean addAll(Collection<? extends E> coll) {
        synchronized (mutex) {return c.addAll(coll);}
    }
    public boolean removeAll(Collection<?> coll) {
        synchronized (mutex) {return c.removeAll(coll);}
    }
    public boolean retainAll(Collection<?> coll) {
        synchronized (mutex) {return c.retainAll(coll);}
    }
    public void clear() {
        synchronized (mutex) {c.clear();}
    }
    public String toString() {
        synchronized (mutex) {return c.toString();}
    }
    // Override default methods in Collection
    @Override
    public void forEach(Consumer<? super E> consumer) {
        synchronized (mutex) {c.forEach(consumer);}
    }
    @Override
    public boolean removeIf(Predicate<? super E> filter) {
        synchronized (mutex) {return c.removeIf(filter);}
    }
    @Override
    public Spliterator<E> spliterator() {
        return c.spliterator(); // Must be manually synched by user!
    }
    @Override
    public Stream<E> stream() {
        return c.stream(); // Must be manually synched by user!
    }
    @Override
    public Stream<E> parallelStream() {
        return c.parallelStream(); // Must be manually synched by user!
    }
    private void writeObject(ObjectOutputStream s) throws IOException {
        synchronized (mutex) {s.defaultWriteObject();}
    }
}
CopyOnWriteArraySet 原始碼分析
- CopyOnWriteArraySet 內部維護了一個 CopyOnWriteArrayList 範例,典型的掛羊皮賣狗肉
public class CopyOnWriteArraySet<E> extends AbstractSet<E>
        implements java.io.Serializable {
    private static final long serialVersionUID = 5457747651344034263L;

    private final CopyOnWriteArrayList<E> al;

    /**
     * Creates an empty set.
     */
    public CopyOnWriteArraySet() {
        al = new CopyOnWriteArrayList<E>();
    }
copyOnWriteArraySet.add()方法:呼叫copyOnWriteArrayList.addIfAbsent()方法
// CopyOnWriteArraySet 類的 add() 方法
/**
* Adds the specified element to this set if it is not already present.
* More formally, adds the specified element {@code e} to this set if
* the set contains no element {@code e2} such that
* <tt>(e==null ? e2==null : e.equals(e2))</tt>.
* If this set already contains the element, the call leaves the set
* unchanged and returns {@code false}.
*
* @param e element to be added to this set
* @return {@code true} if this set did not already contain the specified
* element
*/
public boolean add(E e) {
return al.addIfAbsent(e);
}
copyOnWriteArrayList.addIfAbsent()方法:- 獲取 Object[] 陣列的快照
- 將元素新增至 ArrayList(這裏看不太懂)
    /**
     * Appends the element, if not present.
     *
     * @param e element to be added to this list, if absent
     * @return {@code true} if the element was added
     */
    public boolean addIfAbsent(E e) {
        Object[] snapshot = getArray();
        return indexOf(e, snapshot, 0, snapshot.length) >= 0 ? false :
            addIfAbsent(e, snapshot);
    }

    /**
     * A version of addIfAbsent using the strong hint that given
     * recent snapshot does not contain e.
     */
    private boolean addIfAbsent(E e, Object[] snapshot) {
        final ReentrantLock lock = this.lock;
        lock.lock();
        try {
            Object[] current = getArray();
            int len = current.length;
            if (snapshot != current) {
                // Optimize for lost race to another addXXX operation
                int common = Math.min(snapshot.length, len);
                for (int i = 0; i < common; i++)
                    if (current[i] != snapshot[i] && eq(e, current[i]))
                        return false;
                if (indexOf(e, current, common, len) >= 0)
                        return false;
            }
            Object[] newElements = Arrays.copyOf(current, len + 1);
            newElements[len] = e;
            setArray(newElements);
            return true;
        } finally {
            lock.unlock();
        }
    }
4.3、HashMap 執行緒不安全
演示 HashMap 執行緒不安全
- 程式碼
/**
 * @ClassName ContainerNotSafeDemo
 * @Description TODO
 * @Author Heygo
 * @Date 2020/8/7 21:35
 * @Version 1.0
 */
public class ContainerNotSafeDemo {
    public static void main(String[] args) {
        mapNotSafe();
    }

    private static void mapNotSafe() {
        Map<String,String> map=new HashMap<>();
        for (int i = 1; i <= 30; i++) {
            new Thread(() -> {
                map.put(Thread.currentThread().getName(), UUID.randomUUID().toString().substring(0, 8));
                System.out.println(Thread.currentThread().getName() + "\t" + map);
            }, String.valueOf(i)).start();
        }
    }
}
- 程式執行結果:
java.util.ConcurrentModificationException
java.util.ConcurrentModificationException
	at java.util.HashMap$HashIterator.nextNode(HashMap.java:1437)
	at java.util.HashMap$EntryIterator.next(HashMap.java:1471)
	at java.util.HashMap$EntryIterator.next(HashMap.java:1469)
	at java.util.AbstractMap.toString(AbstractMap.java:554)
	at java.lang.String.valueOf(String.java:2994)
	at java.lang.StringBuilder.append(StringBuilder.java:131)
	at com.Heygo.ContainerNotSafeDemo.lambda$mapNotSafe$1(ContainerNotSafeDemo.java:60)
	at java.lang.Thread.run(Thread.java:748)
解決 HashMap 執行緒不安全
- 程式碼:使用 ConcurrentHashMap 類
/**
 * @ClassName ContainerNotSafeDemo
 * @Description TODO
 * @Author Heygo
 * @Date 2020/8/7 21:35
 * @Version 1.0
 */
public class ContainerNotSafeDemo {
    public static void main(String[] args) {
        mapNotSafe();
    }

    private static void mapNotSafe() {
        Map<String,String> map=new ConcurrentHashMap<>();
        for (int i = 1; i <= 30; i++) {
            new Thread(() -> {
                map.put(Thread.currentThread().getName(), UUID.randomUUID().toString().substring(0, 8));
                System.out.println(Thread.currentThread().getName() + "\t" + map);
            }, String.valueOf(i)).start();
        }
    }
}
- 程式執行結果
12	{11=ae36bafc, 12=16de3027, 13=dcb688cc, 1=bf7bc1a8, 2=d479c1fe, 3=f036e44c, 4=71eba0d9, 5=8d4fab3b, 6=ad508f93, 7=cb593b6f, 8=8c1542fa, 9=31d873ac, 10=8f6933de}
16	{11=ae36bafc, 12=16de3027, 13=dcb688cc, 14=ba2e61d8, 15=f9c89bc1, 16=0c7d1777, 1=bf7bc1a8, 2=d479c1fe, 3=f036e44c, 4=71eba0d9, 5=8d4fab3b, 6=ad508f93, 7=cb593b6f, 8=8c1542fa, 9=31d873ac, 10=8f6933de}
4	{11=ae36bafc, 12=16de3027, 1=bf7bc1a8, 13=dcb688cc, 2=d479c1fe, 14=ba2e61d8, 3=f036e44c, 15=f9c89bc1, 4=71eba0d9, 16=0c7d1777, 5=8d4fab3b, 6=ad508f93, 7=cb593b6f, 8=8c1542fa, 9=31d873ac, 10=8f6933de}
19	{11=ae36bafc, 12=16de3027, 13=dcb688cc, 14=ba2e61d8, 15=f9c89bc1, 16=0c7d1777, 19=801d369c, 1=bf7bc1a8, 2=d479c1fe, 3=f036e44c, 4=71eba0d9, 5=8d4fab3b, 6=ad508f93, 7=cb593b6f, 8=8c1542fa, 9=31d873ac, 10=8f6933de}
6	{11=ae36bafc, 12=16de3027, 1=bf7bc1a8, 13=dcb688cc, 2=d479c1fe, 14=ba2e61d8, 3=f036e44c, 15=f9c89bc1, 4=71eba0d9, 16=0c7d1777, 5=8d4fab3b, 17=7f64e3ee, 6=ad508f93, 7=cb593b6f, 19=801d369c, 8=8c1542fa, 9=31d873ac, 10=8f6933de}
7	{11=ae36bafc, 12=16de3027, 1=bf7bc1a8, 13=dcb688cc, 2=d479c1fe, 14=ba2e61d8, 3=f036e44c, 15=f9c89bc1, 4=71eba0d9, 5=8d4fab3b, 6=ad508f93, 7=cb593b6f, 8=8c1542fa, 9=31d873ac, 10=8f6933de}
1	{11=ae36bafc, 12=16de3027, 1=bf7bc1a8, 13=dcb688cc, 2=d479c1fe, 14=ba2e61d8, 3=f036e44c, 15=f9c89bc1, 4=71eba0d9, 16=0c7d1777, 5=8d4fab3b, 17=7f64e3ee, 6=ad508f93, 18=3c3c1d41, 7=cb593b6f, 19=801d369c, 8=8c1542fa, 9=31d873ac, 20=6926e455, 10=8f6933de, 21=f8e65c72}
22	{11=ae36bafc, 22=3af2e92c, 12=16de3027, 23=e96165a6, 13=dcb688cc, 14=ba2e61d8, 15=f9c89bc1, 16=0c7d1777, 17=7f64e3ee, 18=3c3c1d41, 19=801d369c, 1=bf7bc1a8, 2=d479c1fe, 3=f036e44c, 4=71eba0d9, 5=8d4fab3b, 6=ad508f93, 7=cb593b6f, 8=8c1542fa, 9=31d873ac, 20=6926e455, 10=8f6933de, 21=f8e65c72}
25	{22=3af2e92c, 23=e96165a6, 25=71972304, 10=8f6933de, 11=ae36bafc, 12=16de3027, 13=dcb688cc, 14=ba2e61d8, 15=f9c89bc1, 16=0c7d1777, 17=7f64e3ee, 18=3c3c1d41, 19=801d369c, 1=bf7bc1a8, 2=d479c1fe, 3=f036e44c, 4=71eba0d9, 5=8d4fab3b, 6=ad508f93, 7=cb593b6f, 8=8c1542fa, 9=31d873ac, 20=6926e455, 21=f8e65c72}
2	{11=ae36bafc, 12=16de3027, 1=bf7bc1a8, 13=dcb688cc, 2=d479c1fe, 14=ba2e61d8, 3=f036e44c, 15=f9c89bc1, 4=71eba0d9, 5=8d4fab3b, 6=ad508f93, 7=cb593b6f, 8=8c1542fa, 9=31d873ac, 10=8f6933de}
28	{22=3af2e92c, 23=e96165a6, 24=961abac9, 25=71972304, 26=a58c6246, 27=0b742cd8, 28=efe599df, 10=8f6933de, 11=ae36bafc, 12=16de3027, 13=dcb688cc, 14=ba2e61d8, 15=f9c89bc1, 16=0c7d1777, 17=7f64e3ee, 18=3c3c1d41, 19=801d369c, 1=bf7bc1a8, 2=d479c1fe, 3=f036e44c, 4=71eba0d9, 5=8d4fab3b, 6=ad508f93, 7=cb593b6f, 8=8c1542fa, 9=31d873ac, 20=6926e455, 21=f8e65c72}
3	{11=ae36bafc, 12=16de3027, 1=bf7bc1a8, 13=dcb688cc, 2=d479c1fe, 14=ba2e61d8, 3=f036e44c, 15=f9c89bc1, 4=71eba0d9, 5=8d4fab3b, 6=ad508f93, 7=cb593b6f, 8=8c1542fa, 9=31d873ac, 10=8f6933de}
15	{11=ae36bafc, 12=16de3027, 13=dcb688cc, 14=ba2e61d8, 15=f9c89bc1, 1=bf7bc1a8, 2=d479c1fe, 3=f036e44c, 4=71eba0d9, 5=8d4fab3b, 6=ad508f93, 7=cb593b6f, 8=8c1542fa, 9=31d873ac, 10=8f6933de}
14	{11=ae36bafc, 12=16de3027, 13=dcb688cc, 14=ba2e61d8, 1=bf7bc1a8, 2=d479c1fe, 3=f036e44c, 4=71eba0d9, 5=8d4fab3b, 6=ad508f93, 7=cb593b6f, 8=8c1542fa, 9=31d873ac, 10=8f6933de}
30	{22=3af2e92c, 23=e96165a6, 24=961abac9, 25=71972304, 26=a58c6246, 27=0b742cd8, 28=efe599df, 29=ecd71129, 30=7c2cc2a8, 10=8f6933de, 11=ae36bafc, 12=16de3027, 13=dcb688cc, 14=ba2e61d8, 15=f9c89bc1, 16=0c7d1777, 17=7f64e3ee, 18=3c3c1d41, 19=801d369c, 1=bf7bc1a8, 2=d479c1fe, 3=f036e44c, 4=71eba0d9, 5=8d4fab3b, 6=ad508f93, 7=cb593b6f, 8=8c1542fa, 9=31d873ac, 20=6926e455, 21=f8e65c72}
29	{22=3af2e92c, 23=e96165a6, 24=961abac9, 25=71972304, 26=a58c6246, 27=0b742cd8, 28=efe599df, 29=ecd71129, 10=8f6933de, 11=ae36bafc, 12=16de3027, 13=dcb688cc, 14=ba2e61d8, 15=f9c89bc1, 16=0c7d1777, 17=7f64e3ee, 18=3c3c1d41, 19=801d369c, 1=bf7bc1a8, 2=d479c1fe, 3=f036e44c, 4=71eba0d9, 5=8d4fab3b, 6=ad508f93, 7=cb593b6f, 8=8c1542fa, 9=31d873ac, 20=6926e455, 21=f8e65c72}
24	{22=3af2e92c, 23=e96165a6, 24=961abac9, 25=71972304, 26=a58c6246, 27=0b742cd8, 10=8f6933de, 11=ae36bafc, 12=16de3027, 13=dcb688cc, 14=ba2e61d8, 15=f9c89bc1, 16=0c7d1777, 17=7f64e3ee, 18=3c3c1d41, 19=801d369c, 1=bf7bc1a8, 2=d479c1fe, 3=f036e44c, 4=71eba0d9, 5=8d4fab3b, 6=ad508f93, 7=cb593b6f, 8=8c1542fa, 9=31d873ac, 20=6926e455, 21=f8e65c72}
26	{22=3af2e92c, 23=e96165a6, 25=71972304, 26=a58c6246, 10=8f6933de, 11=ae36bafc, 12=16de3027, 13=dcb688cc, 14=ba2e61d8, 15=f9c89bc1, 16=0c7d1777, 17=7f64e3ee, 18=3c3c1d41, 19=801d369c, 1=bf7bc1a8, 2=d479c1fe, 3=f036e44c, 4=71eba0d9, 5=8d4fab3b, 6=ad508f93, 7=cb593b6f, 8=8c1542fa, 9=31d873ac, 20=6926e455, 21=f8e65c72}
27	{22=3af2e92c, 23=e96165a6, 24=961abac9, 25=71972304, 26=a58c6246, 27=0b742cd8, 10=8f6933de, 11=ae36bafc, 12=16de3027, 13=dcb688cc, 14=ba2e61d8, 15=f9c89bc1, 16=0c7d1777, 17=7f64e3ee, 18=3c3c1d41, 19=801d369c, 1=bf7bc1a8, 2=d479c1fe, 3=f036e44c, 4=71eba0d9, 5=8d4fab3b, 6=ad508f93, 7=cb593b6f, 8=8c1542fa, 9=31d873ac, 20=6926e455, 21=f8e65c72}
23	{11=ae36bafc, 12=16de3027, 23=e96165a6, 13=dcb688cc, 14=ba2e61d8, 15=f9c89bc1, 16=0c7d1777, 17=7f64e3ee, 18=3c3c1d41, 19=801d369c, 1=bf7bc1a8, 2=d479c1fe, 3=f036e44c, 4=71eba0d9, 5=8d4fab3b, 6=ad508f93, 7=cb593b6f, 8=8c1542fa, 9=31d873ac, 20=6926e455, 10=8f6933de, 21=f8e65c72}
5	{11=ae36bafc, 12=16de3027, 1=bf7bc1a8, 13=dcb688cc, 2=d479c1fe, 14=ba2e61d8, 3=f036e44c, 15=f9c89bc1, 4=71eba0d9, 16=0c7d1777, 5=8d4fab3b, 17=7f64e3ee, 6=ad508f93, 18=3c3c1d41, 7=cb593b6f, 19=801d369c, 8=8c1542fa, 9=31d873ac, 20=6926e455, 10=8f6933de, 21=f8e65c72}
13	{11=ae36bafc, 12=16de3027, 1=bf7bc1a8, 13=dcb688cc, 2=d479c1fe, 14=ba2e61d8, 3=f036e44c, 15=f9c89bc1, 4=71eba0d9, 16=0c7d1777, 5=8d4fab3b, 17=7f64e3ee, 6=ad508f93, 18=3c3c1d41, 7=cb593b6f, 19=801d369c, 8=8c1542fa, 9=31d873ac, 20=6926e455, 10=8f6933de, 21=f8e65c72}
21	{11=ae36bafc, 12=16de3027, 13=dcb688cc, 14=ba2e61d8, 15=f9c89bc1, 16=0c7d1777, 17=7f64e3ee, 18=3c3c1d41, 19=801d369c, 1=bf7bc1a8, 2=d479c1fe, 3=f036e44c, 4=71eba0d9, 5=8d4fab3b, 6=ad508f93, 7=cb593b6f, 8=8c1542fa, 9=31d873ac, 20=6926e455, 10=8f6933de, 21=f8e65c72}
20	{11=ae36bafc, 12=16de3027, 13=dcb688cc, 14=ba2e61d8, 15=f9c89bc1, 16=0c7d1777, 17=7f64e3ee, 18=3c3c1d41, 19=801d369c, 1=bf7bc1a8, 2=d479c1fe, 3=f036e44c, 4=71eba0d9, 5=8d4fab3b, 6=ad508f93, 7=cb593b6f, 8=8c1542fa, 9=31d873ac, 20=6926e455, 10=8f6933de}
10	{11=ae36bafc, 12=16de3027, 1=bf7bc1a8, 13=dcb688cc, 2=d479c1fe, 14=ba2e61d8, 3=f036e44c, 15=f9c89bc1, 4=71eba0d9, 16=0c7d1777, 5=8d4fab3b, 17=7f64e3ee, 6=ad508f93, 18=3c3c1d41, 7=cb593b6f, 19=801d369c, 8=8c1542fa, 9=31d873ac, 20=6926e455, 10=8f6933de}
18	{11=ae36bafc, 12=16de3027, 13=dcb688cc, 14=ba2e61d8, 15=f9c89bc1, 16=0c7d1777, 17=7f64e3ee, 18=3c3c1d41, 19=801d369c, 1=bf7bc1a8, 2=d479c1fe, 3=f036e44c, 4=71eba0d9, 5=8d4fab3b, 6=ad508f93, 7=cb593b6f, 8=8c1542fa, 9=31d873ac, 20=6926e455, 10=8f6933de}
9	{11=ae36bafc, 12=16de3027, 1=bf7bc1a8, 13=dcb688cc, 2=d479c1fe, 14=ba2e61d8, 3=f036e44c, 15=f9c89bc1, 4=71eba0d9, 16=0c7d1777, 5=8d4fab3b, 17=7f64e3ee, 6=ad508f93, 18=3c3c1d41, 7=cb593b6f, 19=801d369c, 8=8c1542fa, 9=31d873ac, 10=8f6933de}
17	{11=ae36bafc, 12=16de3027, 13=dcb688cc, 14=ba2e61d8, 15=f9c89bc1, 16=0c7d1777, 17=7f64e3ee, 19=801d369c, 1=bf7bc1a8, 2=d479c1fe, 3=f036e44c, 4=71eba0d9, 5=8d4fab3b, 6=ad508f93, 7=cb593b6f, 8=8c1542fa, 9=31d873ac, 10=8f6933de}
8	{11=ae36bafc, 12=16de3027, 1=bf7bc1a8, 13=dcb688cc, 2=d479c1fe, 14=ba2e61d8, 3=f036e44c, 15=f9c89bc1, 4=71eba0d9, 16=0c7d1777, 5=8d4fab3b, 6=ad508f93, 7=cb593b6f, 19=801d369c, 8=8c1542fa, 9=31d873ac, 10=8f6933de}
11	{11=ae36bafc, 12=16de3027, 1=bf7bc1a8, 13=dcb688cc, 2=d479c1fe, 14=ba2e61d8, 3=f036e44c, 15=f9c89bc1, 4=71eba0d9, 16=0c7d1777, 5=8d4fab3b, 6=ad508f93, 7=cb593b6f, 8=8c1542fa, 9=31d873ac, 10=8f6933de}
HashMap 底層原始碼
- 參考資料:https://www.cnblogs.com/iwenwen/p/11052708.html
- HashMap 中維護了一個 KV 鏈表陣列:Node<K,V>[]
transient Node<K,V>[] table;
構造方法
- 預設建構函式:負載因子爲 0.75
    static final float DEFAULT_LOAD_FACTOR = 0.75f;

	/**
     * Constructs an empty <tt>HashMap</tt> with the default initial capacity
     * (16) and the default load factor (0.75).
     */
    public HashMap() {
        this.loadFactor = DEFAULT_LOAD_FACTOR; // all other fields defaulted
    }
- 通過另一個 Map 建立 HashMap
// 包含另一個「Map」的建構函式
public HashMap(Map<? extends K, ? extends V> m) {
    this.loadFactor = DEFAULT_LOAD_FACTOR;
    putMapEntries(m, false);//下面 下麪會分析到這個方法
}

final void putMapEntries(Map<? extends K, ? extends V> m, boolean evict) {
    int s = m.size();
    if (s > 0) {
        // 判斷table是否已經初始化
        if (table == null) { // pre-size
            // 未初始化,s爲m的實際元素個數
            float ft = ((float)s / loadFactor) + 1.0F;
            int t = ((ft < (float)MAXIMUM_CAPACITY) ?
                    (int)ft : MAXIMUM_CAPACITY);
            // 計算得到的t大於閾值,則初始化閾值
            if (t > threshold)
                threshold = tableSizeFor(t);
        }
        // 已初始化,並且m元素個數大於閾值,進行擴容處理
        else if (s > threshold)
            resize();
        // 將m中的所有元素新增至HashMap中
        for (Map.Entry<? extends K, ? extends V> e : m.entrySet()) {
            K key = e.getKey();
            V value = e.getValue();
            putVal(hash(key), key, value, false, evict);
        }
    }
}
- 指定初始容量大小的建構函式
// 指定「容量大小」的建構函式
public HashMap(int initialCapacity) {
    this(initialCapacity, DEFAULT_LOAD_FACTOR);
}
- 指定初始容量大小和負載因子的建構函式
// 指定「容量大小」和「載入因子」的建構函式
public HashMap(int initialCapacity, float loadFactor) {
    if (initialCapacity < 0)
        throw new IllegalArgumentException("Illegal initial capacity: " + initialCapacity);
    if (initialCapacity > MAXIMUM_CAPACITY)
        initialCapacity = MAXIMUM_CAPACITY;
    if (loadFactor <= 0 || Float.isNaN(loadFactor))
        throw new IllegalArgumentException("Illegal load factor: " + loadFactor);
    this.loadFactor = loadFactor;
    this.threshold = tableSizeFor(initialCapacity);
}
新增元素
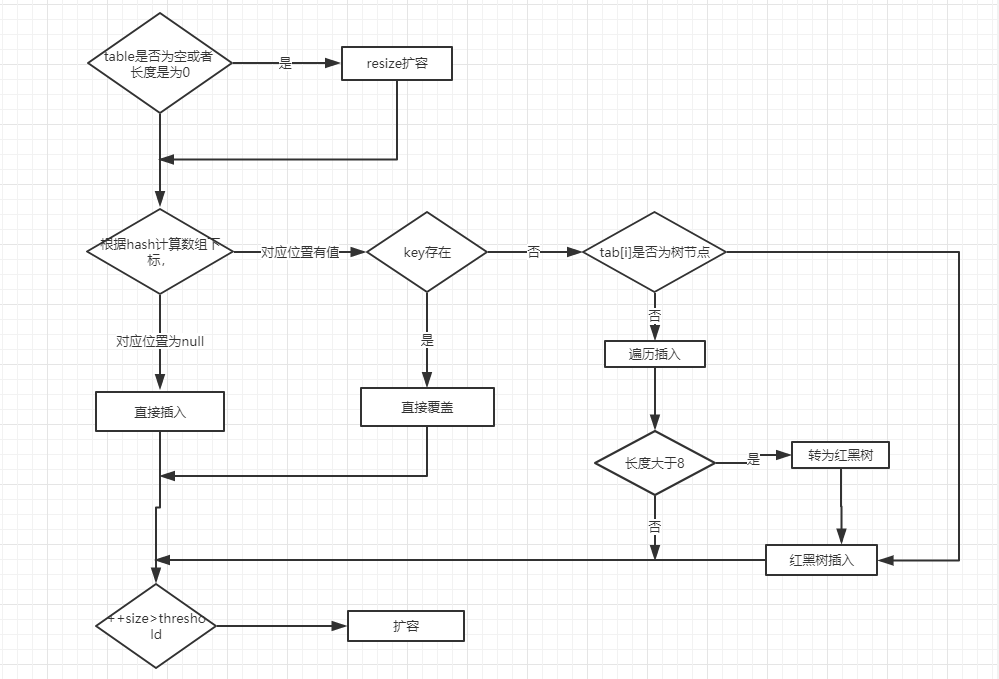
- put() 方法新增元素:
- 如果 tab 陣列爲空或者長度爲 0 ,則擴容
- 如果定位到的陣列位置沒有元素 就直接插入
- 如果定位到的陣列位置有元素就和要插入的key比較
- 如果key相同就直接覆蓋
- 如果key不相同,就判斷p是否是一個樹節點
- 如果是就呼叫
e = ((TreeNode<K,V>)p).putTreeVal(this, tab, hash, key, value);將元素新增進 HashMap 中 - 如果不是就遍歷鏈表插入(插入在鏈表尾部)
- 如果是就呼叫
public V put(K key, V value) {
    return putVal(hash(key), key, value, false, true);
}

static final int hash(Object key) {
    int h;
    return (key == null) ? 0 : (h = key.hashCode()) ^ (h >>> 16);
}

final V putVal(int hash, K key, V value, boolean onlyIfAbsent,
                   boolean evict) {
    Node<K,V>[] tab; Node<K,V> p; int n, i;
    // table未初始化或者長度爲0,進行擴容
    if ((tab = table) == null || (n = tab.length) == 0)
        n = (tab = resize()).length;
    // (n - 1) & hash 確定元素存放在哪個桶中,桶爲空,新生成結點放入桶中(此時,這個結點是放在陣列中)
    if ((p = tab[i = (n - 1) & hash]) == null)
        tab[i] = newNode(hash, key, value, null);
    // 桶中已經存在元素
    else {
        Node<K,V> e; K k;
        // 比較桶中第一個元素(陣列中的結點)的hash值相等,key相等
        if (p.hash == hash &&
            ((k = p.key) == key || (key != null && key.equals(k))))
                // 將第一個元素賦值給e,用e來記錄
                e = p;
        // hash值不相等,即key不相等;爲紅黑樹結點
        else if (p instanceof TreeNode)
            // 放入樹中
            e = ((TreeNode<K,V>)p).putTreeVal(this, tab, hash, key, value);
        // 爲鏈表結點
        else {
            // 在鏈表最末插入結點
            for (int binCount = 0; ; ++binCount) {
                // 到達鏈表的尾部
                if ((e = p.next) == null) {
                    // 在尾部插入新結點
                    p.next = newNode(hash, key, value, null);
                    // 結點數量達到閾值,轉化爲紅黑樹
                    if (binCount >= TREEIFY_THRESHOLD - 1) // -1 for 1st
                        treeifyBin(tab, hash);
                    // 跳出回圈
                    break;
                }
                // 判斷鏈表中結點的key值與插入的元素的key值是否相等
                if (e.hash == hash &&
                    ((k = e.key) == key || (key != null && key.equals(k))))
                    // 相等,跳出回圈
                    break;
                // 用於遍歷桶中的鏈表,與前面的e = p.next組合,可以遍歷鏈表
                p = e;
            }
        }
        // 表示在桶中找到key值、hash值與插入元素相等的結點
        if (e != null) {
            // 記錄e的value
            V oldValue = e.value;
            // onlyIfAbsent爲false或者舊值爲null
            if (!onlyIfAbsent || oldValue == null)
                //用新值替換舊值
                e.value = value;
            // 存取後回撥
            afterNodeAccess(e);
            // 返回舊值
            return oldValue;
        }
    }
    // 結構性修改
    ++modCount;
    // 實際大小大於閾值則擴容
    if (++size > threshold)
        resize();
    // 插入後回撥
    afterNodeInsertion(evict);
    return null;
}
- put 方法流程圖
- get 方法:如果陣列對應位置爲 null ,則直接返回 null ,否則去對應鏈表或者紅黑樹中去取
public V get(Object key) {
    Node<K,V> e;
    return (e = getNode(hash(key), key)) == null ? null : e.value;
}

final Node<K,V> getNode(int hash, Object key) {
    Node<K,V>[] tab; Node<K,V> first, e; int n; K k;
    if ((tab = table) != null && (n = tab.length) > 0 &&
        (first = tab[(n - 1) & hash]) != null) {
        // 陣列元素相等
        if (first.hash == hash && // always check first node
            ((k = first.key) == key || (key != null && key.equals(k))))
            return first;
        // 桶中不止一個節點
        if ((e = first.next) != null) {
            // 在樹中get
            if (first instanceof TreeNode)
                return ((TreeNode<K,V>)first).getTreeNode(hash, key);
            // 在鏈表中get
            do {
                if (e.hash == hash &&
                    ((k = e.key) == key || (key != null && key.equals(k))))
                    return e;
            } while ((e = e.next) != null);
        }
    }
    return null;
}
- resize方法:進行擴容,會伴隨着一次重新hash分配,並且會遍歷hash表中所有的元素,是非常耗時的。在編寫程式中,要儘量避免resize
final Node<K,V>[] resize() {
    Node<K,V>[] oldTab = table;
    int oldCap = (oldTab == null) ? 0 : oldTab.length;
    int oldThr = threshold;
    int newCap, newThr = 0;
    if (oldCap > 0) {
        // 超過最大值就不再擴充了,就只好隨你碰撞去吧
        if (oldCap >= MAXIMUM_CAPACITY) {
            threshold = Integer.MAX_VALUE;
            return oldTab;
        }
        // 沒超過最大值,就擴充爲原來的2倍
        else if ((newCap = oldCap << 1) < MAXIMUM_CAPACITY && oldCap >= DEFAULT_INITIAL_CAPACITY)
            newThr = oldThr << 1; // double threshold
    }
    else if (oldThr > 0) // initial capacity was placed in threshold
        newCap = oldThr;
    else {
        // signifies using defaults
        newCap = DEFAULT_INITIAL_CAPACITY;
        newThr = (int)(DEFAULT_LOAD_FACTOR * DEFAULT_INITIAL_CAPACITY);
    }
    // 計算新的resize上限
    if (newThr == 0) {
        float ft = (float)newCap * loadFactor;
        newThr = (newCap < MAXIMUM_CAPACITY && ft < (float)MAXIMUM_CAPACITY ? (int)ft : Integer.MAX_VALUE);
    }
    threshold = newThr;
    @SuppressWarnings({"rawtypes","unchecked"})
        Node<K,V>[] newTab = (Node<K,V>[])new Node[newCap];
    table = newTab;
    if (oldTab != null) {
        // 把每個bucket都移動到新的buckets中
        for (int j = 0; j < oldCap; ++j) {
            Node<K,V> e;
            if ((e = oldTab[j]) != null) {
                oldTab[j] = null;
                if (e.next == null)
                    newTab[e.hash & (newCap - 1)] = e;
                else if (e instanceof TreeNode)
                    ((TreeNode<K,V>)e).split(this, newTab, j, oldCap);
                else {
                    Node<K,V> loHead = null, loTail = null;
                    Node<K,V> hiHead = null, hiTail = null;
                    Node<K,V> next;
                    do {
                        next = e.next;
                        // 原索引
                        if ((e.hash & oldCap) == 0) {
                            if (loTail == null)
                                loHead = e;
                            else
                                loTail.next = e;
                            loTail = e;
                        }
                        // 原索引+oldCap
                        else {
                            if (hiTail == null)
                                hiHead = e;
                            else
                                hiTail.next = e;
                            hiTail = e;
                        }
                    } while ((e = next) != null);
                    // 原索引放到bucket裡
                    if (loTail != null) {
                        loTail.next = null;
                        newTab[j] = loHead;
                    }
                    // 原索引+oldCap放到bucket裡
                    if (hiTail != null) {
                        hiTail.next = null;
                        newTab[j + oldCap] = hiHead;
                    }
                }
            }
        }
    }
    return newTab;
}
ConcurrentHashMap 底層原始碼
等我功力提升,再回來看
5、多執行緒各種鎖
公平鎖/非公平鎖/可重入鎖/遞回鎖/自旋鎖,談談你的理解?請手寫一個自旋鎖
5.1、公平鎖與非公平鎖
是個啥玩意兒?
- 公平鎖:是指多個執行緒按照申請鎖的順序來獲取鎖,類似排隊打飯,先來後到。
- 非公平鎖:是指多個執行緒獲取鎖的順序並不是按照申請鎖的順序,有可能後申請的執行緒比先申請的執行緒優先獲取鎖,在高併發的情況下,有可能會造成優先順序反轉或者飢餓現象
- 併發包中ReentrantLock的建立可以指定建構函式的boolean型別來得到公平鎖或非公平鎖,預設是非公平鎖
    /**
     * Creates an instance of {@code ReentrantLock}.
     * This is equivalent to using {@code ReentrantLock(false)}.
     */
    public ReentrantLock() {
        sync = new NonfairSync();
    }

    /**
     * Creates an instance of {@code ReentrantLock} with the
     * given fairness policy.
     *
     * @param fair {@code true} if this lock should use a fair ordering policy
     */
    public ReentrantLock(boolean fair) {
        sync = fair ? new FairSync() : new NonfairSync();
    }
公平鎖與非公平鎖的區別
公平鎖
- 公平鎖:Threads acquire a fair lock in the order in which they requested it
- 公平鎖,就是很公平,在併發環境中,每個執行緒在獲取鎖時會先檢視此鎖維護的等待佇列,如果爲空,或者當前執行緒是等待佇列的第一個,就佔有鎖,否則就會加入到等待佇列中,以後會按照FIFO的規則從佇列中取到自己
非公平鎖
- 非公平鎖:a nonfair lock permits barging:threads requesting a lock can jump ahead of the queue of waiting threads if the lock happens to be available when it is requested.
- 非公平鎖比較粗魯,上來就直接嘗試佔有鎖,如果嘗試失敗,就再採用類似公平鎖那種方式。
題外話
- Java ReentrantLock而言,通過建構函式指定該鎖是否是公平鎖,預設是非公平鎖。非公平鎖的優點在於吞吐量比公平鎖大。
- 對於Synchronized而言,也是一種非公平鎖
5.2、可重入鎖
可重入鎖(又名遞回鎖)是啥玩意兒?
- 可重入鎖(也叫做遞回鎖)指的是同一執行緒外層函數獲得鎖之後,內層遞回函數仍然能獲取該鎖的程式碼,在同一個執行緒在外層方法獲取鎖的時候,在進入內層方法會自動獲取鎖
- 就像有了家門的鎖,廁所、書房、廚房就爲你敞開了一樣
- 也即是說,執行緒可以進入任何一個它已經擁有的鎖所同步着的程式碼塊
- ReentrantLock,synchronized 就是一個典型的可重入鎖
- 可重入鎖的最大作用就是避免死鎖
可重入鎖的程式碼範例
synchronized 範例
- 程式碼
/**
 * @ClassName RenenterLockDemo
 * @Description TODO
 * @Author Heygo
 * @Date 2020/8/8 13:03
 * @Version 1.0
 */

/*
 * 可重入鎖(也就是遞回鎖)
 *
 * 指的是同一個執行緒外層函數獲得鎖之後,內層遞回函數仍然能獲取該鎖的程式碼,
 * 在同一執行緒在外層方法獲取鎖的時候,在進入內層方法會自動獲取鎖。
 *
 * 也就是說,執行緒可以進入任何一個它已經擁有的鎖所有同步着的程式碼塊。
 *
 * t1   invoked sendSMS()      t1執行緒在外層方法獲取鎖的時候
 * t1   invoked sendEmail()    t1在進入內層方法會自動獲取鎖
 * t2   invoked sendSMS()
 * t2   invoked sendEmail()
 *
 */
public class RenenterLockDemo {
    public static void main(String[] args) {
        Phone phone = new Phone();
        new Thread(() -> {
            try {
                phone.sendSMS();
            } catch (Exception e) {
                e.printStackTrace();
            }
        }, "t1").start();

        new Thread(() -> {
            try {
                phone.sendSMS();
            } catch (Exception e) {
                e.printStackTrace();
            }
        }, "t2").start();
    }

}

class Phone {
    public synchronized void sendSMS() throws Exception {
        System.out.println(Thread.currentThread().getName() + "\t invoked sendSMS()");
        sendEmail();
    }

    public synchronized void sendEmail() throws Exception {
        System.out.println(Thread.currentThread().getName() + "\t invoked sendEmail()");
    }
}
- 程式執行結果
t1	 invoked sendSMS()
t1	 invoked sendEmail()
t2	 invoked sendSMS()
t2	 invoked sendEmail()
ReentrantLock 範例
- 程式碼
/**
 * @ClassName RenenterLockDemo
 * @Description TODO
 * @Author Heygo
 * @Date 2020/8/8 13:03
 * @Version 1.0
 */

/*
 * 可重入鎖(也就是遞回鎖)
 *
 * 指的是同一個執行緒外層函數獲得鎖之後,內層遞回函數仍然能獲取該鎖的程式碼,
 * 在同一執行緒在外層方法獲取鎖的時候,在進入內層方法會自動獲取鎖。
 *
 * 也就是說,執行緒可以進入任何一個它已經擁有的鎖所有同步着的程式碼塊。
 *
 */
public class RenenterLockDemo {
    public static void main(String[] args) {
        Phone phone = new Phone();
        new Thread(() -> {
            try {
                phone.get();
            } catch (Exception e) {
                e.printStackTrace();
            }
        }, "t1").start();

        new Thread(() -> {
            try {
                phone.get();
            } catch (Exception e) {
                e.printStackTrace();
            }
        }, "t2").start();
    }

}

class Phone implements Runnable {
    //Reentrant TEST
    Lock lock = new ReentrantLock();

    @Override
    public void run() {
        get();
    }

    public void get() {
        lock.lock();
        try {
            System.out.println(Thread.currentThread().getName() + "\t" + "get()");
            set();
        } finally {
            lock.unlock();
        }
    }

    public void set() {
        lock.lock();
        try {
            System.out.println(Thread.currentThread().getName() + "\t" + "set()");
        } finally {
            lock.unlock();
        }
    }
}
- 程式執行結果
t1	get()
t1	set()
t2	get()
t2	set()
鎖兩次,釋放兩次
- 程式碼
class Phone implements Runnable {
    //Reentrant TEST
    Lock lock = new ReentrantLock();

    @Override
    public void run() {
        get();
    }

    public void get() {
        lock.lock();
        lock.lock();
        try {
            System.out.println(Thread.currentThread().getName() + "\t" + "get()");
            set();
        } finally {
            lock.unlock();
            lock.unlock();
        }
    }

    public void set() {
        lock.lock();
        try {
            System.out.println(Thread.currentThread().getName() + "\t" + "set()");
        } finally {
            lock.unlock();
        }
    }
}
- 程式執行結果:正常執行
t1	get()
t1	set()
t2	get()
t2	set()
鎖兩次,釋放一次
- 程式碼
class Phone implements Runnable {
    //Reentrant TEST
    Lock lock = new ReentrantLock();

    @Override
    public void run() {
        get();
    }

    public void get() {
        lock.lock();
        lock.lock();
        try {
            System.out.println(Thread.currentThread().getName() + "\t" + "get()");
            set();
        } finally {
            lock.unlock();
        }
    }

    public void set() {
        lock.lock();
        try {
            System.out.println(Thread.currentThread().getName() + "\t" + "set()");
        } finally {
            lock.unlock();
        }
    }
}
- 程式執行結果:由於 t1 執行緒未釋放 lock 鎖,程式卡死(死鎖)
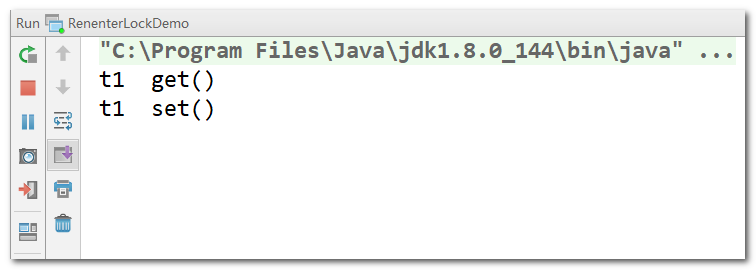
結論:鎖幾次,就釋放幾次
5.3、自旋鎖
什麼是自旋鎖?
自旋鎖(SpinLock)
是指嘗試獲取鎖的執行緒不會立即阻塞,而是採用回圈的方式去嘗試獲取鎖,這樣的好處是減少執行緒上下文切換的消耗,缺點是回圈會消耗CPU
public final int getAndAddInt(Object var1, long var2, int var4) {
    int var5;
    do {
        var5 = this.getIntVolatile(var1, var2);
    } while(!this.compareAndSwapInt(var1, var2, var5, var5 + var4));

    return var5;
}
自旋鎖程式碼範例
- 程式碼:使用 AtomicReference 封裝 Thread ,通過 CAS演算法實現執行緒的自旋鎖
/**
 * 寫一個自旋鎖
 * 自旋鎖的好處:回圈比較獲取直到成功爲止,沒有類似wait的阻塞。
 *
 * 通過CAS操作完成自旋鎖:
 *  A執行緒先進來呼叫myLock方法自已持有鎖5秒鐘
 *  B隨後進來後發現當前有執行緒持有鎖,不是null,
 *  所以只能通過自旋等待,直至A釋放鎖後B隨後搶到
 *
 * @ClassName SpinLockDemo
 * @Description TODO
 * @Author Heygo
 * @Date 2020/8/8 13:37
 * @Version 1.0
 */
public class SpinLockDemo {
    // 泛型爲 Thread
    AtomicReference<Thread> atomicReference = new AtomicReference<>();

    public void myLock() {
        // 獲取當前執行緒
        Thread thread = Thread.currentThread();
        System.out.println(Thread.currentThread().getName() + "\t come in ");
        /*
         自旋:
            期望值爲 null 表示當前沒有執行緒
            新值爲 thread ,即 Thread.currentThread()
          */
        while (!atomicReference.compareAndSet(null, thread)) {

        }
    }

    public void myUnLock() {
        // 獲取當前執行緒
        Thread thread = Thread.currentThread();
        // 解鎖當前執行緒
        atomicReference.compareAndSet(thread, null);
        System.out.println(Thread.currentThread().getName() + "\t invoked myUnLock()");
    }

    public static void main(String[] args) {
        // 原子參照執行緒
        SpinLockDemo spinLockDemo = new SpinLockDemo();

        new Thread(() -> {
            spinLockDemo.myLock(); // 加鎖
            try {
                TimeUnit.SECONDS.sleep(5);
            } catch (InterruptedException e) {
                e.printStackTrace();
            }
            spinLockDemo.myUnLock(); // 解鎖
        }, "AA").start();

        try {
            TimeUnit.SECONDS.sleep(1);
        } catch (InterruptedException e) {
            e.printStackTrace();
        }

        new Thread(() -> {
            spinLockDemo.myLock(); // 加鎖
            try {
                TimeUnit.SECONDS.sleep(1);
            } catch (InterruptedException e) {
                e.printStackTrace();
            }
            spinLockDemo.myUnLock(); // 解鎖
        }, "BB").start();
    }
}
- 程式執行結果:核心爲 CAS 演算法
- 執行緒 A 先執行,此時期望值爲 null ,執行緒 A 將獲得鎖,並將期望值設定爲執行緒 A 自身
- 執行緒 B 嘗試獲取鎖,發現期望值並不是 null ,就在那兒原地自旋
- 執行緒 A 釋放鎖之後,將期望值設定爲 null ,此時執行緒 B 獲得鎖,將期望值設定爲執行緒 B 自身
- 最後執行緒 B 釋放鎖
AA	 come in
BB	 come in
AA	 invoked myUnLock()
BB	 invoked myUnLock()
5.4、讀寫鎖
獨佔鎖(寫鎖)、共用鎖(讀鎖)、互斥鎖
- 獨佔鎖:指該鎖一次只能被一個執行緒所持有。對ReentrantLock和synchronized而言都是獨佔鎖
- 共用鎖:指該鎖可以被多個執行緒所持有
- 對ReentrantReadWriteLock其讀鎖是共用鎖,其寫鎖是獨佔鎖。
- 讀鎖的共用鎖可保證併發讀是非常高效的,讀寫,寫讀,寫寫的過程是互斥的。
讀寫鎖的程式碼範例
- 程式碼:使用 ReentrantReadWriteLock 完成讀鎖、寫鎖分離
/**
 * 多個執行緒同時讀一個資源類沒有問題,所以爲了滿足併發量,讀取共用資源應該可以同時進行。
 *
 * 但是寫資源只能有一個執行緒。
 *
 * 寫操作:原子+獨佔,整個過程必須是一個完整的統一體,中間不許被分割,被打斷。
 *
 * 小總結:
 * 讀-讀能共存
 * 讀-寫不能共存
 * 寫-寫不能共存
 *
 * 寫操作:原子性+獨佔,整個過程必須是一個完整的統一體,中間不許被分隔,被打斷
 *
 * @ClassName ReadWriteLockDemo
 * @Description TODO
 * @Author Heygo
 * @Date 2020/8/8 14:13
 * @Version 1.0
 */
public class ReadWriteLockDemo {
    public static void main(String[] args) {
        MyCache myCache = new MyCache();
        for (int i = 1; i <= 5; i++) {
            int tempInt = i;
            new Thread(() -> {
                myCache.put(tempInt + "", tempInt + "");
            }, String.valueOf(i)).start();
        }

        for (int i = 1; i <= 5; i++) {
            int tempInt = i;
            new Thread(() -> {
                myCache.get(tempInt + "");
            }, String.valueOf(i)).start();
        }
    }
}

class MyCache {
    // 凡快取,一定要用 volatile 修飾,保證記憶體可見性
    private volatile Map<String, Object> map = new HashMap<>();
    // ReentrantReadWriteLock:讀寫鎖
    private ReentrantReadWriteLock reentrantReadWriteLock = new ReentrantReadWriteLock();

    public void put(String key, Object value) {
        reentrantReadWriteLock.writeLock().lock(); // 加寫鎖
        try {
            System.out.println(Thread.currentThread().getName() + "\t 正在寫入:" + key);
            try {
                TimeUnit.MILLISECONDS.sleep(300); // 模擬網路傳輸,暫停執行緒一會兒
            } catch (InterruptedException e) {
                e.printStackTrace();
            }
            map.put(key, value);
            System.out.println(Thread.currentThread().getName() + "\t 寫入完成");
        } catch (Exception e) {
            e.printStackTrace();
        } finally {
            reentrantReadWriteLock.writeLock().unlock(); // 釋放寫鎖
        }
    }

    public void get(String key) {
        reentrantReadWriteLock.readLock().lock(); // 加讀鎖
        try {
            System.out.println(Thread.currentThread().getName() + "\t 正在讀取:" + key);
            try {
                TimeUnit.MILLISECONDS.sleep(300); // 模擬網路傳輸,暫停執行緒一會兒
            } catch (InterruptedException e) {
                e.printStackTrace();
            }
            Object result = map.get(key);
            System.out.println(Thread.currentThread().getName() + "\t 讀取完成" + result);
        } catch (Exception e) {
            e.printStackTrace();
        } finally {
            reentrantReadWriteLock.readLock().unlock(); // 釋放讀鎖
        }
    }
}
- 程式執行結果:寫操作沒有被打斷
2	 正在寫入:2
2	 寫入完成
3	 正在寫入:3
3	 寫入完成
1	 正在寫入:1
1	 寫入完成
4	 正在寫入:4
4	 寫入完成
5	 正在寫入:5
5	 寫入完成
1	 正在讀取:1
2	 正在讀取:2
3	 正在讀取:3
4	 正在讀取:4
5	 正在讀取:5
2	 讀取完成2
4	 讀取完成4
1	 讀取完成1
5	 讀取完成5
3	 讀取完成3
- 在ReentrantReadWriteLock中分別維護了一把讀鎖和一把寫鎖
public class ReentrantReadWriteLock
        implements ReadWriteLock, java.io.Serializable {
    private static final long serialVersionUID = -6992448646407690164L;
    /** Inner class providing readlock */
    private final ReentrantReadWriteLock.ReadLock readerLock;
    /** Inner class providing writelock */
    private final ReentrantReadWriteLock.WriteLock writerLock;
    /** Performs all synchronization mechanics */
    final Sync sync;
6、執行緒通訊
CountDownLatch、CyclicBarrier、Semaphore使用過嗎?
6.1、CountDownLatch
CountDownLatch 的用法
- 讓一些執行緒阻塞,直到另一些執行緒完成一系列操作後才被喚醒
- CountDownLatch 維護了一個計數器,有兩個核心方法:
countDown()和await()- 呼叫
countDown()方法會將計數器減一 - 當計數器的值不爲零時,執行緒呼叫
await()方法時,會被阻塞 - 當計數器的值變爲0時,因呼叫
await()方法被阻塞的執行緒會被喚醒,繼續執行
- 呼叫
CountDownLatch 程式碼範例
- 程式碼
/**
 * @ClassName CountDownLatchDemo
 * @Description TODO
 * @Author Heygo
 * @Date 2020/8/8 17:43
 * @Version 1.0
 */
public class CountDownLatchDemo {
    public static void main(String[] args) throws InterruptedException {
        leaveClassroom();
    }

    private static void leaveClassroom() throws InterruptedException {
        CountDownLatch countDownLatch = new CountDownLatch(6); // 初始化次數爲 6
        for (int i = 1; i <= 6; i++) {
            new Thread(() -> {
                System.out.println(Thread.currentThread().getName() + "\t上完自習,離開教室");
                countDownLatch.countDown(); // 計數器減 1
            }, String.valueOf(i)).start();
        }
        countDownLatch.await(); // 等待上述執行緒執行完成(等待計數減爲 0)
        System.out.println(Thread.currentThread().getName() + "\t ******班長最後關門走人");
    }
}
- 程式執行結果:班長等待所有同學都完成自習後,再鎖門
2	上完自習,離開教室
1	上完自習,離開教室
3	上完自習,離開教室
4	上完自習,離開教室
5	上完自習,離開教室
6	上完自習,離開教室
main	 ******班長最後關門走人
CountDownLatch + 列舉類的使用
- 定義列舉類:可以通過 CountryEnum.ONE 獲得齊國對應的 CountryEnum 物件
/**
 * @ClassName CountryEnum
 * @Description TODO
 * @Author Heygo
 * @Date 2020/8/8 17:44
 * @Version 1.0
 */
public enum CountryEnum {
    ONE(1, "齊"), TWO(2, "楚"), THREE(3, "燕"), FOUR(4, "趙"), FIVE(5, "魏"), SIX(6, "韓");

    private Integer retCode;
    private String retMsg;

    CountryEnum(Integer retCode, String retMsg) {
        this.retCode = retCode;
        this.retMsg = retMsg;
    }

    public Integer getRetCode() {
        return retCode;
    }

    public void setRetCode(Integer retCode) {
        this.retCode = retCode;
    }

    public String getRetMsg() {
        return retMsg;
    }

    public void setRetMsg(String retMsg) {
        this.retMsg = retMsg;
    }

    public static CountryEnum list(int idx) {
        // 獲取列舉類中的所有值
        CountryEnum[] countryEnums = CountryEnum.values();
        for (CountryEnum countryEnum : countryEnums) {
            if (idx == countryEnum.getRetCode()) {
                return countryEnum;
            }
        }
        return null;
    }
}
- 秦滅六國,後一統華夏
/**
 * @ClassName CountDownLatchDemo
 * @Description TODO
 * @Author Heygo
 * @Date 2020/8/8 17:43
 * @Version 1.0
 */
public class CountDownLatchDemo {
    public static void main(String[] args) throws InterruptedException {
        county();
    }

    private static void county() throws InterruptedException {
        CountDownLatch countDownLatch = new CountDownLatch(6); // 初始化次數爲 6
        for (int i = 1; i <= 6; i++) {
            new Thread(() -> {
                System.out.println(Thread.currentThread().getName() + "\t 國被滅");
                countDownLatch.countDown(); // 計數器減 1
            }, CountryEnum.list(i).getRetMsg()).start();
        }
        countDownLatch.await(); // 等待上述執行緒執行完成(等待計數減爲 0)
        System.out.println(Thread.currentThread().getName() + "\t ******秦國一統華夏");
    }
}
- 程式執行結果
齊	 國被滅
魏	 國被滅
燕	 國被滅
楚	 國被滅
韓	 國被滅
趙	 國被滅
main	 ******秦國一統華夏
6.2、CyclicBarrier
CyclicBarrier 的使用
- CyclicBarrier 字面意思是可回圈使用的屏障。它要做的事情是,讓一組執行緒到達一個屏障時被阻塞,直到最後一個執行緒到達屏障時,屏障纔會開啓,所有被屏障攔截的執行緒纔會繼續幹活
- 通過 CyclicBarrie r的 await() 方法,使執行緒進入屏障
- CountDownLatch 是減,而 CyclicBarrier 是加,理解了CountDownLatch,CyclicBarrier 就很容易
- 一句話總結:集齊7顆龍珠召喚神龍
CyclicBarrier 程式碼範例
- 程式碼
/**
 * @ClassName CyclicBarrierDemo
 * @Description TODO
 * @Author Heygo
 * @Date 2020/8/8 18:52
 * @Version 1.0
 */
public class CyclicBarrierDemo {
    public static void main(String[] args) {
        CyclicBarrier cyclicBarrier = new CyclicBarrier(7, () -> {
            System.out.println("召喚神龍"); // 龍珠收集完成,召喚神龍
        });

        for (int i = 1; i <= 7; i++) {
            final int tempInt = i;
            new Thread(() -> {
                System.out.println(Thread.currentThread().getName() + "\t 收集到第:" + tempInt + "龍珠");
                try {
                    cyclicBarrier.await(); // 等待龍珠收集完成
                } catch (InterruptedException e) {
                    e.printStackTrace();
                } catch (BrokenBarrierException e) {
                    e.printStackTrace();
                }

            }, String.valueOf(i)).start();
        }
    }
}
- 程式執行結果(感覺像是執行緒完成後的回撥函數)
2	 收集到第:2龍珠
3	 收集到第:3龍珠
1	 收集到第:1龍珠
6	 收集到第:6龍珠
5	 收集到第:5龍珠
4	 收集到第:4龍珠
7	 收集到第:7龍珠
召喚神龍
6.3、Semaphore
Semaphore 的使用
- Semaphore 即號志,號志主要用於兩個目的,一個是用於多個共用資源的互斥使用,另一個用於併發執行緒數的控制。
- 構造器
Semaphore(int)用於指定共用資源的數目,如果設定爲 1 ,則 Semaphore 號志退化爲 Lock 鎖或者 synchronized 鎖 - 呼叫
semaphore.acquire()方法獲取對共用資源的使用,呼叫semaphore.release()釋放對共用資源的佔用 - 一句話講明白:搶車位
Semaphore 程式碼範例
- 程式碼:使用 Semaphore 完成對共用資源的併發控制
/**
 * @ClassName SemaphoreDemo
 * @Description TODO
 * @Author Heygo
 * @Date 2020/8/8 19:02
 * @Version 1.0
 */
public class SemaphoreDemo {
    public static void main(String[] args) {
        Semaphore semaphore = new Semaphore(3); // 模擬3個車位
        for (int i = 1; i <= 6; i++) { // 模擬6部車
            new Thread(() -> {
                try {
                    semaphore.acquire(); // 嘗試搶車位(獲取號志)
                    System.out.println(Thread.currentThread().getName() + "\t搶到車位");
                    try {
                        TimeUnit.SECONDS.sleep(3);
                    } catch (InterruptedException e) {
                        e.printStackTrace();
                    }
                    System.out.println(Thread.currentThread().getName() + "\t停車3秒後離開車位");
                } catch (InterruptedException e) {
                    e.printStackTrace();
                } finally {
                    semaphore.release(); // 釋放車位(釋放號志)
                }
            }, String.valueOf(i)).start();
        }
    }
}
- 程式執行結果
2	搶到車位
1	搶到車位
3	搶到車位
3	停車3秒後離開車位
2	停車3秒後離開車位
1	停車3秒後離開車位
5	搶到車位
6	搶到車位
4	搶到車位
4	停車3秒後離開車位
6	停車3秒後離開車位
5	停車3秒後離開車位
7、阻塞佇列
阻塞佇列知道嗎?
7.1、什麼是阻塞佇列
佇列 + 阻塞佇列
- 阻塞佇列,顧名思義,首先它是一個佇列,而一個阻塞佇列在數據結構中所起的作用大致如下圖所示
- 當阻塞佇列是滿時,往佇列裡新增元素的操作將會被阻塞。當佇列是空時,從佇列中取出元素的操作將被阻塞
- 試圖從空的阻塞佇列中獲取元素的執行緒將會被阻塞,直到其他的執行緒往空的佇列插入新的元素。
- 試圖往己滿的阻塞佇列中新增新元素的執行緒同樣也會被阻塞,直到其他的執行緒從列中移除一個或者多個元素,或者完全清空佇列後使佇列重新變得空閒起來並後續新增一些元素
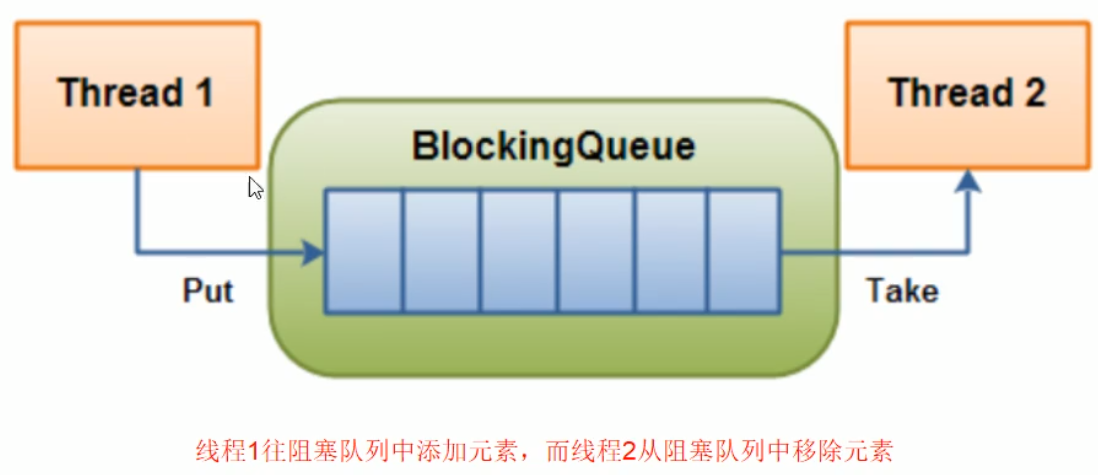
7.2、阻塞佇列好處
爲什麼用阻塞佇列?有什麼好處?
- 在多執行緒領域:所謂阻塞,在某些情況下會掛起執行緒(即阻塞),一旦條件滿足,被掛起的執行緒又會自動被喚醒
- 爲什麼需要BlockingQueue?好處是我們不需要關心什麼時候需要阻塞執行緒,不用我們自己去控制執行緒的喚醒(notify)和阻塞(wait)
- 什麼時候需要喚醒執行緒?這一切BlockingQueue都給你一手包辦了
- 在concurrent包發佈以前,在多執行緒環境下,我們每個程式設計師都必須去自己控制這些細節,尤其還要兼顧效率和執行緒安全,而這會給我們的程式帶來不小的複雜度
7.3、阻塞佇列分類
BlockingQueue 分類(看前三個即可)
- ArrayBlockingQueue:由陣列結構組成的有界阻塞佇列——對應於 ArrayList
- LinkedBlockingQueue:由鏈表結構組成的有界(大小預設值爲Integer.MAX_VALUE)阻塞佇列——對應於 LinkedList
- SynchronousQueue:不儲存元素的阻塞佇列,也即單個元素的佇列——生產一個,消費一個
- PriorityBlockingQueue:支援優先順序排序的無界阻塞佇列
- DelayQueue:使用優先順序佇列實現的延遲無界阻塞佇列
- LinkedTransferQueue:由鏈表結構組成的無界阻塞佇列。
- LinkedBlockingDeque:由鏈表結構組成的雙向阻塞佇列
7.4、阻塞佇列用法
BlockingQueue 的核心方法
| 方法型別 | 拋出異常 | 返回布爾 | 阻塞 | 超時 |
|---|---|---|---|---|
| 插入 | add(E e) | offer(E e) | put(E e) | offer(E e,Time,TimeUnit) |
| 取出 | remove() | poll() | take() | poll(Time,TimeUnit) |
| 隊首 | element() | peek() | 無 | 無 |
拋出異常
- 當阻塞佇列滿時,再往佇列裡add插入元素會拋IllegalStateException:Queue full
- 當阻塞佇列空時,再往佇列裡remove移除元素會拋NoSuchElementException
返回布爾
- 插入方法,成功 ture 失敗 false
- 移除方法,成功返回出佇列的元素,佇列裏面沒有就返回null
一直阻塞
- 當阻塞佇列滿時,生產者執行緒繼續往佇列裡put元素,佇列會一直阻塞生產執行緒直到put數據成功或者響應中斷退出。
- 當阻塞佇列空時,消費者執行緒試圖從佇列裡take元素,佇列會一直阻塞消費者執行緒直到佇列可用。
超時退出
當阻塞佇列滿時,佇列會阻塞生產者執行緒一定時間,超過後限時後生產者執行緒會退出
7.4.1、ArrayBlockingQueue
程式碼範例
/**
 * ArrayBlockingQueue:是一個基於陣列結構的有界阻塞佇列,此佇列按FIFO原則對元素進行排序
 * LinkedBlockingQueue:是一個基於鏈表結構的阻塞佇列,此佇列按FIFO排序元素,吞吐量高於ArrayBlockingQueue
 * SynchronousQueue:一個不儲存元素的阻塞佇列,每個插入操作必須等到另一個執行緒呼叫移出操作,否則插入操作一直處於阻塞狀態,吞吐量通常要高
 *
 * 阻塞佇列
 *   1.阻塞佇列有沒有好的一面
 *   2.不得不阻塞,你如何管理
 *
 * @ClassName BlockingQueueDemo
 * @Description TODO
 * @Author Heygo
 * @Date 2020/8/8 19:11
 * @Version 1.0
 */
public class BlockingQueueDemo {
    public static void main(String[] args) throws InterruptedException {
        BlockingQueue<String> blockingQueue = new ArrayBlockingQueue<String>(3);
        //addAndRemove(blockingQueue);
        //offerAndPoll(blockingQueue);
        //putAndTake(blockingQueue);
        outOfTime(blockingQueue);
    }

    private static void addAndRemove(BlockingQueue<String> blockingQueue) {
        System.out.println(blockingQueue.add("a"));
        System.out.println(blockingQueue.add("b"));
        System.out.println(blockingQueue.add("c"));
        System.out.println(blockingQueue.add("e"));
        System.out.println(blockingQueue.element());
        System.out.println(blockingQueue.remove());
        System.out.println(blockingQueue.remove());
        System.out.println(blockingQueue.remove());
        System.out.println(blockingQueue.remove());
    }

    private static void offerAndPoll(BlockingQueue<String> blockingQueue) {
        System.out.println(blockingQueue.offer("a"));
        System.out.println(blockingQueue.offer("b"));
        System.out.println(blockingQueue.offer("c"));
        System.out.println(blockingQueue.offer("e"));
        System.out.println(blockingQueue.peek());
        System.out.println(blockingQueue.poll());
        System.out.println(blockingQueue.poll());
        System.out.println(blockingQueue.poll());
        System.out.println(blockingQueue.poll());
    }

    private static void putAndTake(BlockingQueue<String> blockingQueue) throws InterruptedException {
        blockingQueue.put("a");
        blockingQueue.put("b");
        blockingQueue.put("c");
        blockingQueue.put("d");
        System.out.println(blockingQueue.take());
        System.out.println(blockingQueue.take());
        System.out.println(blockingQueue.take());
        System.out.println(blockingQueue.take());
    }

    private static void outOfTime(BlockingQueue<String> blockingQueue) throws InterruptedException {
        System.out.println(blockingQueue.offer("a",2L, TimeUnit.SECONDS));
        System.out.println(blockingQueue.offer("a",2L, TimeUnit.SECONDS));
        System.out.println(blockingQueue.offer("a",2L, TimeUnit.SECONDS));
        System.out.println(blockingQueue.offer("a",2L, TimeUnit.SECONDS));
    }

}
7.4.2、SynchronousQueue
阻塞佇列之 SynchronousQueue
- SynchronousQueue沒有容量。與其他BlockingQueue不同,SynchronousQueue是一個不儲存元素的BlockingQueue。
- 每一個put操作必須要等待一個take操作,否則不能繼續新增元素,反之亦然。
- 一句話總結:SynchronousQueue 時零庫存阻塞佇列
程式碼範例
- 程式碼
/**
 * 阻塞佇列SynchronousQueue演示
 *
 * @ClassName SynchronousQueueDemo
 * @Description TODO
 * @Author Heygo
 * @Date 2020/8/8 20:13
 * @Version 1.0
 */
public class SynchronousQueueDemo {
    public static void main(String[] args) {
        BlockingQueue<String> blockingQueue = new SynchronousQueue<>();

        new Thread(() -> {
            try {
                System.out.println(Thread.currentThread().getName() + "\t put 1");
                blockingQueue.put("1");
                System.out.println(Thread.currentThread().getName() + "\t put 2");
                blockingQueue.put("2");
                System.out.println(Thread.currentThread().getName() + "\t put 3");
                blockingQueue.put("3");
            } catch (InterruptedException e) {
                e.printStackTrace();
            }
        }, "AAA").start();

        new Thread(() -> {
            try {
                try {
                    TimeUnit.SECONDS.sleep(5);
                } catch (InterruptedException e) {
                    e.printStackTrace();
                }
                System.out.println(Thread.currentThread().getName() + "\t" + blockingQueue.take());

                try {
                    TimeUnit.SECONDS.sleep(5);
                } catch (InterruptedException e) {
                    e.printStackTrace();
                }
                System.out.println(Thread.currentThread().getName() + "\t" + blockingQueue.take());

                try {
                    TimeUnit.SECONDS.sleep(5);
                } catch (InterruptedException e) {
                    e.printStackTrace();
                }
                System.out.println(Thread.currentThread().getName() + "\t" + blockingQueue.take());
            } catch (InterruptedException e) {
                e.printStackTrace();
            }
        }, "BBB").start();
    }
}
- 程式執行結果:執行緒 AAA 生產完新的數據後,必須等待執行緒 BBB 取走後,才能 纔能繼續生產
AAA	 put 1
BBB	1
AAA	 put 2
BBB	2
AAA	 put 3
BBB	3
7.5、阻塞佇列使用場景
阻塞佇列使用場景
生產者消費者模式、執行緒池、訊息中介軟體
傳統版:消費者生產者模式
- 程式碼:
- Lock 替代 synchronized
lock.await()替代object.wait()lock.signalAll()替代object.notifyAll()
/**
 * 題目:一個初始值爲0的變數,兩個執行緒對其交替操作,一個加1,一個減1,來5輪
 *
 * 口訣:
 *  1.執行緒操作資源類     --> 編寫方法
 *  2.判斷 幹活 通知     --> await() 和 signalAll()
 *  3.防止虛假喚醒機制 機製   --> 使用 while 判斷,而不是 if
 *
 * @ClassName ProdConsumer_TraditionDemo
 * @Description TODO
 * @Author Heygo
 * @Date 2020/8/8 20:26
 * @Version 1.0
 */
public class ProdConsumer_TraditionDemo {
    public static void main(String[] args) {
        ShareData shareData = new ShareData();

        new Thread(() -> {
            for (int i = 1; i <= 5; i++) {
                try {
                    shareData.increment();
                } catch (Exception e) {
                    e.printStackTrace();
                }
            }
        }, "AAA").start();

        new Thread(() -> {
            for (int i = 1; i <= 5; i++) {
                try {
                    shareData.decrement();
                } catch (Exception e) {
                    e.printStackTrace();
                }
            }
        }, "BBB").start();
    }
}

// 資源類
class ShareData {
    private int number = 0;
    private Lock lock = new ReentrantLock();
    private Condition condition = lock.newCondition();

    public void increment() throws InterruptedException {
        lock.lock();
        try {
            //1 判斷
            while (number == 1) {
                //等待,不能生產
                condition.await();
            }
            //2 幹活
            number++;
            System.out.println(Thread.currentThread().getName() + "\t" + number);
            //3 通知喚醒
            condition.signalAll();
        } catch (Exception e) {
            e.printStackTrace();
        } finally {
            lock.unlock();
        }
    }

    public void decrement() throws InterruptedException {
        lock.lock();
        try {
            //1 判斷
            while (number == 0) {
                //等待,不能生產
                condition.await();
            }
            //2 幹活
            number--;
            System.out.println(Thread.currentThread().getName() + "\t" + number);
            //3 通知喚醒
            condition.signalAll();
        } catch (Exception e) {
            e.printStackTrace();
        } finally {
            lock.unlock();
        }
    }
}
- 程式執行結果
AAA	1
BBB	0
AAA	1
BBB	0
AAA	1
BBB	0
AAA	1
BBB	0
AAA	1
BBB	0
補充:synchronized 和Lock有什麼區別?用新的Lock有什麼好處?你舉例說說
1、實現方式:https://www.cnblogs.com/lycroseup/p/7486860.html
- synchronized是關鍵字屬天JVM層面,synchronized的語意底層是通過一個monitor的物件來完成,其實
wait()、notify()等方法也依賴於monitor物件,這就是爲什麼只有在同步的塊或者方法中才能 纔能呼叫wait()、notify()等方法,否則會拋出java.lang.IllegalMonitorStateException的異常的原因 - Lock是具體類(java.util.concurrent.Locks.Lock)是api層面的鎖
2、使用方法
- synchronized 不需要使用者去手動釋放鎖,當synchronized程式碼執行完後系統會自動讓執行緒釋放對鎖的佔用
- ReentrantLock則需要使用者去手動釋放鎖着沒有主動放鎖,就有可能導致出現死鎖現象。需要
lock()和unlock()方法配合try{ }finally{ }語句塊來完成。
3、等待是否可中斷
- synchronized不可中斷,除非拋出異常或者正常執行完成
- ReentrantLock 可中斷
- 設定超時方法
trylock(long timeout,TimeUnit unit) - 或者
LockInterruptibly()放程式碼塊中,呼叫interrupt()方法可中斷
- 設定超時方法
4、加鎖是否公平
- synchronized非公平鎖
- ReentrantLock兩者都可以,預設公平鎖,構造方法可以傳入boolean值,true爲公平鎖,false爲非公平鎖
5、鎖系結多個條件condition
- synchronized沒有
- ReentrantLock用來實現分組喚醒需要喚醒的執行緒們,可以精確喚醒,而不是像synchronized要麼隨機喚醒一個執行緒要麼喚醒全部執行緒。
從位元組碼來看 synchronized 和 Lock
- 程式碼
public static void main(String[] args) {
    synchronized (new Object()) {
    }

    ReentrantLock lock = new ReentrantLock();
}
- 位元組碼指令
- 有一條 monitorenter 指令,表示獲取鎖
- 有兩條 monitorexit 指令,其中第二條 monitorexit 指令保證程式出了一場,照樣能釋放鎖
- 使用 ReentrantLock 類,在位元組碼層面就是 new 了一個物件
 0 new #2 <java/lang/Object>
 3 dup
 4 invokespecial #1 <java/lang/Object.<init>>
 7 dup
 8 astore_1
 9 monitorenter
10 aload_1
11 monitorexit
12 goto 20 (+8)
15 astore_2
16 aload_1
17 monitorexit
18 aload_2
19 athrow
20 new #3 <java/util/concurrent/locks/ReentrantLock>
23 dup
24 invokespecial #4 <java/util/concurrent/locks/ReentrantLock.<init>>
27 astore_1
28 return
題目:多執行緒交替列印,展示 Lock 的精確喚醒
- 程式碼
/**
 * 題目:多執行緒之間按順序呼叫,實現A->B->C三個執行緒啓動,要求如下:
 * A列印5次,B列印10次,C列印15次
 * 緊接着
 * A列印5次,B列印10次,C列印15次
 * ......
 * 列印10輪
 *
 * @ClassName SyncAndReenLockDemo
 * @Description TODO
 * @Author Heygo
 * @Date 2020/8/8 21:01
 * @Version 1.0
 */
public class SyncAndReentrantLockDemo {
    public static void main(String[] args) {
        ShareResource shareResource = new ShareResource();

        new Thread(() -> {
            for (int i = 1; i <= 10; i++) {
                shareResource.print5();
            }
        }, "A").start();
        new Thread(() -> {
            for (int i = 1; i <= 10; i++) {
                shareResource.print10();
            }
        }, "B").start();
        new Thread(() -> {
            for (int i = 1; i <= 10; i++) {
                shareResource.print15();
            }
        }, "C").start();
    }
}

// 資源類
class ShareResource {
    private int number = 1;//A:1.B:2,C:3
    private Lock lock = new ReentrantLock();
    private Condition c1 = lock.newCondition();
    private Condition c2 = lock.newCondition();
    private Condition c3 = lock.newCondition();

    public void print5() {
        lock.lock();
        try {
            //1判斷
            while (number != 1) {
                c1.await();
            }
            //2幹活
            for (int i = 1; i <= 5; i++) {
                System.out.println(Thread.currentThread().getName() + "\t" + i);
            }
            //3通知
            number = 2;
            c2.signal();
        } catch (Exception e) {
            e.printStackTrace();
        } finally {
            lock.unlock();
        }
    }

    public void print10() {
        lock.lock();
        try {
            //1判斷
            while (number != 2) {
                c2.await();
            }
            //2幹活
            for (int i = 1; i <= 10; i++) {
                System.out.println(Thread.currentThread().getName() + "\t" + i);
            }
            //3通知
            number = 3;
            c3.signal();
        } catch (Exception e) {
            e.printStackTrace();
        } finally {
            lock.unlock();
        }
    }

    public void print15() {
        lock.lock();
        try {
            //1判斷
            while (number != 3) {
                c3.await();
            }
            //2幹活
            for (int i = 1; i <= 15; i++) {
                System.out.println(Thread.currentThread().getName() + "\t" + i);
            }
            //3通知
            number = 1;
            c1.signal();
        } catch (Exception e) {
            e.printStackTrace();
        } finally {
            lock.unlock();
        }
    }
}
- 程式執行結果(一下結果僅是一輪列印的結果)
A	1
A	2
A	3
A	4
A	5
B	1
B	2
B	3
B	4
B	5
B	6
B	7
B	8
B	9
B	10
C	1
C	2
C	3
C	4
C	5
C	6
C	7
C	8
C	9
C	10
C	11
C	12
C	13
C	14
C	15
阻塞佇列版:消費者生產者模式
- 程式碼
/**
 * volatile/CAS/atomicInteger/BlockQueue/執行緒互動/原子參照
 *
 * @ClassName ProdConsumer_BlockQueueDemo
 * @Description TODO
 * @Author Heygo
 * @Date 2020/8/8 21:26
 * @Version 1.0
 */
public class ProdConsumer_BlockQueueDemo {
    public static void main(String[] args) throws Exception {
        MyResource myResource = new MyResource(new ArrayBlockingQueue<>(10));

        new Thread(() -> {
            System.out.println(Thread.currentThread().getName() + "\t 生產執行緒啓動");
            try {
                myResource.myProd();
            } catch (Exception e) {
                e.printStackTrace();
            }
        }, "Prod").start();

        new Thread(() -> {
            System.out.println(Thread.currentThread().getName() + "\t 消費執行緒啓動");
            try {
                myResource.myConsumer();
            } catch (Exception e) {
                e.printStackTrace();
            }
        }, "Consumer").start();

        try {
            TimeUnit.SECONDS.sleep(5);
        }catch (InterruptedException e){

        }

        System.out.println("5秒鐘到,main停止");
        myResource.stop();
    }
}

class MyResource {
    private volatile boolean FLAG = true; // 預設開啓,進行生產 + 消費
    private AtomicInteger atomicInteger = new AtomicInteger();

    BlockingQueue<String> blockingQueue = null; // 通配、適用:傳介面,不能傳具體實現類

    public MyResource(BlockingQueue<String> blockingQueue) {
        this.blockingQueue = blockingQueue;
        System.out.println(blockingQueue.getClass().getName()); // 檢視介面具體的落地實現類名稱
    }

    public void myProd() throws Exception {
        String data = null;
        boolean retValue;
        while (FLAG) {
            data = atomicInteger.incrementAndGet() + ""; // 原子整形物件加 1
            retValue = blockingQueue.offer(data, 2L, TimeUnit.SECONDS); // 將數據放入阻塞佇列
            if (retValue) {
                System.out.println(Thread.currentThread().getName() + "\t插入佇列" + data + "成功");
            } else {
                System.out.println(Thread.currentThread().getName() + "\t插入佇列" + data + "失敗");
            }
            TimeUnit.SECONDS.sleep(1);
        }
        System.out.println(Thread.currentThread().getName() + "\t生產停止");
    }

    public void myConsumer() throws Exception {
        String result = null;
        while (FLAG) {
            result = blockingQueue.poll(2L, TimeUnit.SECONDS); // 從阻塞佇列中取出數據
            if (null == result || result.equalsIgnoreCase("")) {
                FLAG = false;
                System.out.println(Thread.currentThread().getName() + "\t 超過2秒,消費退出");
                return;
            }
            System.out.println(Thread.currentThread().getName() + "\t消費佇列" + result + "成功");
        }
        System.out.println(Thread.currentThread().getName() + "\t消費停止");
    }

    public void stop() throws Exception {
        this.FLAG = false; // 停止生產與消費
    }
}
- 程式執行結果
java.util.concurrent.ArrayBlockingQueue
Prod	 生產執行緒啓動
Consumer	 消費執行緒啓動
Prod	插入佇列1成功
Consumer	消費佇列1成功
Prod	插入佇列2成功
Consumer	消費佇列2成功
Prod	插入佇列3成功
Consumer	消費佇列3成功
Prod	插入佇列4成功
Consumer	消費佇列4成功
Prod	插入佇列5成功
Consumer	消費佇列5成功
5秒鐘到,main停止
Prod	生產停止
Consumer	 超過2秒,消費退出
8、執行緒池
執行緒池用過嗎?ThreadPoolExecutor他談你的理解?生產上你如何設定合理參數?
8.1、Callable 介面
Callable 與 Futuretask(適配器模式)
- 程式碼
/**
 * @ClassName CallableDemo
 * @Description TODO
 * @Author Heygo
 * @Date 2020/8/8 21:51
 * @Version 1.0
 */
public class CallableDemo {
    public static void main(String[] args) throws ExecutionException, InterruptedException {
        FutureTask<Integer> futureTask = new FutureTask<>(new MyThread());
        new Thread(futureTask, "AA").start(); // 開始執行耗時計算
        int result01 = 100;
        // 等待執行緒執行完成
        while (!futureTask.isDone()){
            // Do something here
        }
        // 要求獲得Callable執行緒的計算結果,如果沒有計算完成就要去強求,會導致阻塞,直到計算完成
        int result02 = futureTask.get();
        System.out.println("result=" + (result01 + result02));
    }
}

class MyThread implements Callable<Integer> {
    @Override
    public Integer call() throws Exception {
        System.out.println("callable come in ...");
        // 模擬耗時操作
        try {
            TimeUnit.SECONDS.sleep(2);
        }catch (InterruptedException e){

        }
        return 1024;
    }
}
- 程式執行結果
callable come in ...
result=1124
多個執行緒共用 Futuretask
- 程式碼:執行緒 A 和執行緒 B 共用 Futuretask
/**
 * @ClassName CallableDemo
 * @Description TODO
 * @Author Heygo
 * @Date 2020/8/8 21:51
 * @Version 1.0
 */
public class CallableDemo {
    public static void main(String[] args) throws ExecutionException, InterruptedException {
        FutureTask<Integer> futureTask = new FutureTask<>(new MyThread());
        new Thread(futureTask, "AA").start(); // 開始執行耗時計算
        new Thread(futureTask, "BB").start(); // 開始執行耗時計算
        int result01 = 100;
        while (!futureTask.isDone()){
            // Do something here
        }
        // 要求獲得Callable執行緒的計算結果,如果沒有計算完成就要去強求,會導致阻塞,直到計算完成
        int result02 = futureTask.get();
        System.out.println("result=" + (result01 + result02));
    }
}

class MyThread implements Callable<Integer> {
    @Override
    public Integer call() throws Exception {
        System.out.println("callable come in ...");
        // 模擬耗時操作
        try {
            TimeUnit.SECONDS.sleep(2);
        }catch (InterruptedException e){

        }
        return 1024;
    }
}
- 程式執行結果
callable come in ...
result=1124
8.2、執行緒池的優勢
爲什麼要用執行緒池,執行緒池的優勢是什麼?
執行緒池做的工作主要是控制執行的執行緒的數量,處理過程中將任務放入佇列,然後線上程建立後啓動這些任務,如果執行緒數量超過了最大數量超出數量的執行緒排隊等候,等其它執行緒執行完畢,再從佇列中取出任務來執行。
執行緒池的主要特點爲:執行緒複用;控制最大併發數;管理執行緒。
- 第一:降低資源消耗。通過重複利用已建立的執行緒降低執行緒建立和銷燬造成的消耗。
- 第二:提高響應速度。當任務到達時,任務可以不需要的等到執行緒建立就能立即執行。
- 第三:提高執行緒的可管理性。執行緒是稀缺資源,如果無限制的建立,不僅會消耗系統資源,還會降低系統的穩定性,使用執行緒池可以進行統一的分配,調優和監控
8.3、執行緒池如何使用
執行緒池架構說明
- Java 中的執行緒池是通過Executor框架實現的
- 該框架中用到了Executor,Executors,ExecutorService,ThreadPoolExecutor這幾個類
- 執行緒池框架架構圖如下:
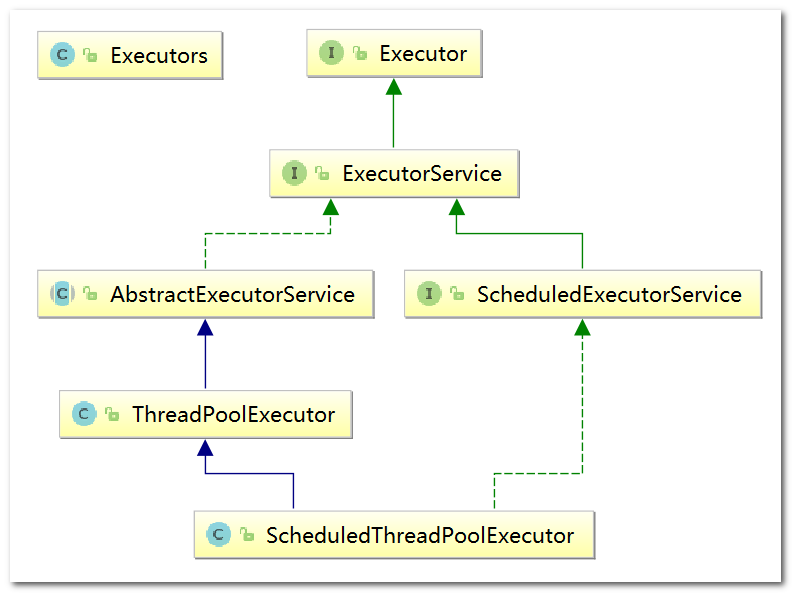
執行緒池的編碼實現
瞭解:
Executor:newScheduledThreadPool(),帶時間排程的執行緒池Executors.newWorkStealingPool(int):java8新增,使用目前機器上可用的處理器作爲它的並行級別
重要:
Executors.newFixedThreadPool(int):執行長期的任務,效能好很多Executors.newSingleThreadExecutor():一個任務一個任務執行的場景Executors.newCachedThreadPool():執行很多短期非同步的小程式或者負載較輕的伺服器
執行緒池使用步驟:
- 建立執行緒池
- 使用執行緒池
- 關閉執行緒池
Executors.newFixedThreadPool(int):固定執行緒數量的執行緒池
主要特點如下:
- 建立一個定長執行緒池,可控制執行緒最大併發數,超出的執行緒會在佇列中等待。
newFixedThreadPool()建立的執行緒池corePoolSize和maximumPoolSize值是相等的,它使用的LinkedBlockingQueue 阻塞佇列
public static ExecutorService newFixedThreadPool(int nThreads) {
    return new ThreadPoolExecutor(nThreads, nThreads,
                                  0L, TimeUnit.MILLISECONDS,
                                  new LinkedBlockingQueue<Runnable>());
}
程式碼範例
- 程式碼
/**
 * 第四種使用Java多執行緒的方式:執行緒池
 *
 * @ClassName MyThreadPoolDemo
 * @Description TODO
 * @Author Heygo
 * @Date 2020/8/8 22:34
 * @Version 1.0
 */
public class MyThreadPoolDemo {
    public static void main(String[] args) {
        System.out.println("Fixed Thread Pool");
        fixedThreadPool();
    }

    private static void fixedThreadPool() {
        //一池5個執行緒
        ExecutorService threadPool = Executors.newFixedThreadPool(5);
        //一般常用try-catch-finally
        //模擬10個使用者來辦理業務,每個使用者就是一個執行緒
        try {
            for (int i = 0; i < 9; i++) {
                threadPool.execute(() -> {
                    System.out.println(Thread.currentThread().getName() + "\t辦理業務");
                });
            }
        } catch (Exception e) {
            e.printStackTrace();
        } finally {
            threadPool.shutdown();
        }
    }
}
- 程式執行結果:執行緒池數量爲 5,所以執行緒名最大爲 pool-1-thread-5
Fixed Thread Pool
pool-1-thread-3	辦理業務
pool-1-thread-4	辦理業務
pool-1-thread-2	辦理業務
pool-1-thread-1	辦理業務
pool-1-thread-2	辦理業務
pool-1-thread-4	辦理業務
pool-1-thread-5	辦理業務
pool-1-thread-3	辦理業務
pool-1-thread-1	辦理業務
Executors.newSingleThreadExecutor():單個執行緒的執行緒池
主要特點如下:
- 建立一個單執行緒化的執行緒池,它只會用唯一的工作執行緒來執行任務,保證所有任務按照指定順序執行。
newSingleThreadExecutor()將執行緒池的corePoolSize和maximumPoolSize都設定爲1,它使用的LinkedBlockingQueue 阻塞佇列
public static ExecutorService newSingleThreadExecutor() {
    return new FinalizableDelegatedExecutorService
        (new ThreadPoolExecutor(1, 1,
                                0L, TimeUnit.MILLISECONDS,
                                new LinkedBlockingQueue<Runnable>()));
}
程式碼範例
- 程式碼
/**
 * 第四種使用Java多執行緒的方式:執行緒池
 *
 * @ClassName MyThreadPoolDemo
 * @Description TODO
 * @Author Heygo
 * @Date 2020/8/8 22:34
 * @Version 1.0
 */
public class MyThreadPoolDemo {
    public static void main(String[] args) {
        System.out.println("Single Thread Pool");
        singleThreadPool();
    }

    private static void singleThreadPool() {
        //一池1個執行緒
        ExecutorService threadPool = Executors.newSingleThreadExecutor();
        try {
            for (int i = 0; i < 9; i++) {
                threadPool.execute(() -> {
                    System.out.println(Thread.currentThread().getName() + "\t辦理業務");
                });
            }

        } catch (Exception e) {
            e.printStackTrace();
        } finally {
            threadPool.shutdown();
        }
    }

}
- 程式執行結果:執行緒池中只有一個執行緒
Single Thread Pool
pool-1-thread-1	辦理業務
pool-1-thread-1	辦理業務
pool-1-thread-1	辦理業務
pool-1-thread-1	辦理業務
pool-1-thread-1	辦理業務
pool-1-thread-1	辦理業務
pool-1-thread-1	辦理業務
pool-1-thread-1	辦理業務
pool-1-thread-1	辦理業務
Executors.newCachedThreadPool():自適應執行緒數量的執行緒
主要特點如下:
- 建立一個可快取執行緒池,如果執行緒池長度超過處理需要,可靈活回收空閒執行緒,若無可回收,則新建執行緒。
newCachedThreadPool()將執行緒池的corePoolSize設定爲0,將執行緒池的maximumPoolSize設定爲Integer.MAX_VALUE,使用的SynchronousQueue,也就是說來了任務就建立執行緒執行,當執行緒空閒超過60秒,就銷燬執行緒
public static ExecutorService newCachedThreadPool() {
    return new ThreadPoolExecutor(0, Integer.MAX_VALUE,
                                  60L, TimeUnit.SECONDS,
                                  new SynchronousQueue<Runnable>());
}
程式碼範例
- 程式碼
/**
 * 第四種使用Java多執行緒的方式:執行緒池
 *
 * @ClassName MyThreadPoolDemo
 * @Description TODO
 * @Author Heygo
 * @Date 2020/8/8 22:34
 * @Version 1.0
 */
public class MyThreadPoolDemo {
    public static void main(String[] args) {
        System.out.println("Cached Thread Pool");
        cachedThreadPool();
    }

    private static void cachedThreadPool() {
        //不定量執行緒
        ExecutorService threadPool = Executors.newCachedThreadPool();
        try {
            for (int i = 0; i < 9; i++) {
                threadPool.execute(() -> {
                    System.out.println(Thread.currentThread().getName() + "\t辦理業務");
                });
            }

        } catch (Exception e) {
            e.printStackTrace();
        } finally {
            threadPool.shutdown();
        }
    }

}
- 程式執行結果
Cached Thread Pool
pool-1-thread-1	辦理業務
pool-1-thread-2	辦理業務
pool-1-thread-3	辦理業務
pool-1-thread-4	辦理業務
pool-1-thread-5	辦理業務
pool-1-thread-6	辦理業務
pool-1-thread-7	辦理業務
pool-1-thread-8	辦理業務
pool-1-thread-3	辦理業務
new ThreadPoolExecutor()
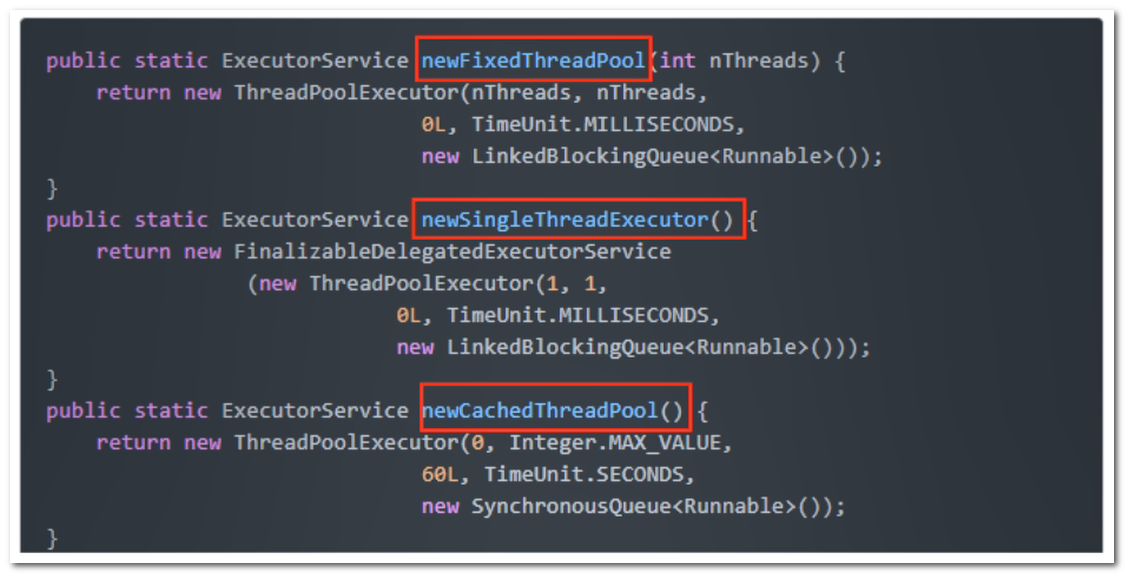
8.4、執行緒池 7 大參數
ThreadPoolExecutor 構造器
/**
 * Creates a new {@code ThreadPoolExecutor} with the given initial
 * parameters.
 *
 * @param corePoolSize the number of threads to keep in the pool, even
 *        if they are idle, unless {@code allowCoreThreadTimeOut} is set
 * @param maximumPoolSize the maximum number of threads to allow in the
 *        pool
 * @param keepAliveTime when the number of threads is greater than
 *        the core, this is the maximum time that excess idle threads
 *        will wait for new tasks before terminating.
 * @param unit the time unit for the {@code keepAliveTime} argument
 * @param workQueue the queue to use for holding tasks before they are
 *        executed.  This queue will hold only the {@code Runnable}
 *        tasks submitted by the {@code execute} method.
 * @param threadFactory the factory to use when the executor
 *        creates a new thread
 * @param handler the handler to use when execution is blocked
 *        because the thread bounds and queue capacities are reached
 * @throws IllegalArgumentException if one of the following holds:<br>
 *         {@code corePoolSize < 0}<br>
 *         {@code keepAliveTime < 0}<br>
 *         {@code maximumPoolSize <= 0}<br>
 *         {@code maximumPoolSize < corePoolSize}
 * @throws NullPointerException if {@code workQueue}
 *         or {@code threadFactory} or {@code handler} is null
 */
public ThreadPoolExecutor(int corePoolSize,
                          int maximumPoolSize,
                          long keepAliveTime,
                          TimeUnit unit,
                          BlockingQueue<Runnable> workQueue,
                          ThreadFactory threadFactory,
                          RejectedExecutionHandler handler) {
    if (corePoolSize < 0 ||
        maximumPoolSize <= 0 ||
        maximumPoolSize < corePoolSize ||
        keepAliveTime < 0)
        throw new IllegalArgumentException();
    if (workQueue == null || threadFactory == null || handler == null)
        throw new NullPointerException();
    this.acc = System.getSecurityManager() == null ?
            null :
            AccessController.getContext();
    this.corePoolSize = corePoolSize;
    this.maximumPoolSize = maximumPoolSize;
    this.workQueue = workQueue;
    this.keepAliveTime = unit.toNanos(keepAliveTime);
    this.threadFactory = threadFactory;
    this.handler = handler;
}
七大參數
- corePoolSize:執行緒池中的常駐核心執行緒數
- 在建立了執行緒池後,當有請求任務來之後,就會安排池中的執行緒去執行請求任務,近似理解爲今日當值執行緒
- 當執行緒池中的執行緒數目達到corePoolSize後,就會把到達的任務放到快取佇列當中
- maximumPoolSize:執行緒池能夠容納同時執行的最大執行緒數,此數值必須大於等於1
- keepAliveTime:多餘的空閒執行緒的存活時間。當前執行緒池數量超過corePoolSize時,當空閒時間達到keepAliveTime值時,多餘空閒執行緒會被銷燬直到只剩下corePoolSize個執行緒爲止
- unit:keepAliveTime的單位
- workQueue:任務佇列,被提交但尚未被執行的任務(阻塞佇列)
- threadFactory:表示生成執行緒池中工作執行緒的執行緒工廠,用於建立執行緒一般用預設的即可
- handler:拒絕策略,表示當佇列滿了並且工作執行緒大於等於執行緒池的最大執行緒數時,如何來拒絕
理解:執行緒池的建立參數,就像一個銀行。
- corePoolSize就像銀行的「當值視窗「,比如今天有2位櫃員在受理客戶請求(任務)。如果超過2個客戶,那麼新的客戶就會在等候區(等待佇列workQueue)等待。
- 當等候區也滿後,又來了幾位客戶,這個時候就要開啓「加班視窗」,讓其它3位櫃員來加班,此時達到最大視窗maximumPoolSize,爲5個。emmm …,但後來的客戶會搶佔等候區客戶的機會,先辦理業務
- 如果開啓了所有視窗,等候區依然滿員,此時就應該啓動」拒絕策略「handler,告訴不斷涌入的客戶,叫他們不要進入,已經爆滿了。
- 由於不再涌入新客戶,加班視窗逐漸開始空閒,這個時候就通過keepAlivetTime將多餘的3個」加班視窗「取消,恢復到2個」當值視窗「。
驗證從core擴容到maximum後,立即執行當前到達的任務,而不是佇列中的
- 程式碼:執行緒池的核心執行緒數量爲 2,最大執行緒數量爲 5
/**
 * @ClassName T1
 * @Description TODO
 * @Author Heygo
 * @Date 2020/8/7 12:54
 * @Version 1.0
 */
public class T1 {

    public static void main(String[] args) {
        ExecutorService threadPool = new ThreadPoolExecutor(
                2,
                5,
                100,
                TimeUnit.SECONDS,
                new LinkedBlockingDeque<>(3),
                Executors.defaultThreadFactory(),
                new ThreadPoolExecutor.AbortPolicy()
        );
        try {
            for (int i = 1; i <= 8; i++) {
                final int tempInt = i;
                threadPool.execute(() -> {
                    System.out.println(Thread.currentThread().getName() + "號視窗,服務顧客" + tempInt);
                    try {
                        Thread.sleep(3000);
                    } catch (InterruptedException e) {
                        e.printStackTrace();
                    }
                });
            }
        } catch (Exception e) {
            e.printStackTrace();
        } finally {
            threadPool.shutdown();
        }
    }
}
- 程式執行結果
pool-1-thread-2號視窗,服務顧客2
pool-1-thread-1號視窗,服務顧客1
pool-1-thread-3號視窗,服務顧客6
pool-1-thread-4號視窗,服務顧客7
pool-1-thread-5號視窗,服務顧客8
pool-1-thread-1號視窗,服務顧客3
pool-1-thread-2號視窗,服務顧客4
pool-1-thread-5號視窗,服務顧客5
- 分析結果:core=2,所以1號視窗對應1號顧客,2號視窗對應2號顧客,但是接下來,3、4、5號顧客又來了,進入容量爲3的佇列中排隊,接下來6、7、8號顧客又來了,1、2號視窗正在服務,且佇列也滿了,此時應該開啓3、4、5號視窗來提供服務,爲6、7、8號顧客提供服務,然後再由這5個視窗爲3、4、5號顧客提供服務
8.5、執行緒池底層原理
- 在建立了執行緒池後,等待提交過來的任務請求。
- 當呼叫execute()方法新增一個請求任務時,執行緒池會做如下判斷:
- 如果正在執行的執行緒數量小於corePoolSize,那麼馬上建立執行緒執行這個任務;
- 如果正在執行的執行緒數量大於或等於corePoolSize,那麼將這個任務放入佇列;
- 如果這時候佇列滿了且正在執行的執行緒數量還小於maximumPoolSize,那麼還是要建立非核心執行緒立刻執行這個任務;
- 如果佇列滿了且正在執行的執行緒數量大於或等於maximumPoolSize,那麼執行緒池會啓動飽和拒絕策略來執行。
- 當一個執行緒完成任務時,它會從佇列中取下一個任務來執行。
- 當一個執行緒無事可做超過一定的時間(keepAliveTime)時,執行緒池會判斷:
- 如果當前執行的執行緒數大於corePoolSize,那麼這個執行緒就被停掉
- 所以執行緒池的所有任務完成後它最終會收縮到corePoolSize的大小
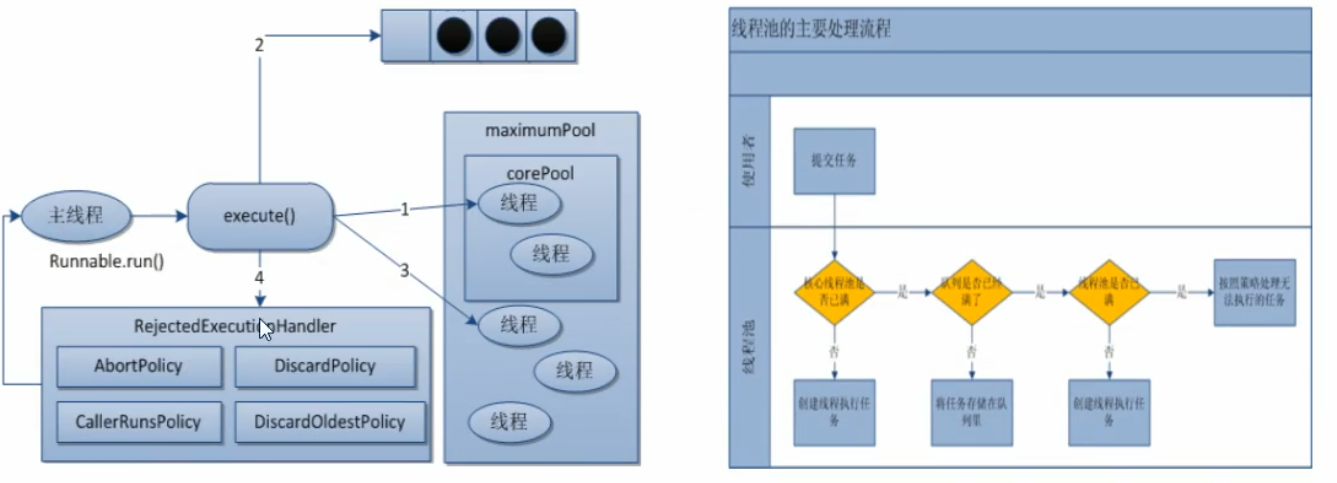
8.6、執行緒池面試題
8.6.1、執行緒池拒絕策略
拒絕策略是什麼?
- 等待佇列也已經排滿了,再也塞不下新任務了,同時執行緒池中的max執行緒也達到了,無法繼續爲新任務服務。
- 這時候我們就需要拒絕策略機制 機製合理的處理這個問題。
JDK內建拒絕策略(以下內建策略均實現了RejectedExecutionHandler介面)
-
AbortPolicy(預設):直接拋出RejectedExecutionException異常阻止系統正常執行
-
CallerRunsPolicy:呼叫者執行,該策略既不會拋棄任務,也不會拋出異常,而是將某些任務回退給呼叫者,從而降低新任務的流量
-
DiscardOldestPolicy:拋棄佇列中等待最久的任務,然後把當前任務加入佇列中嘗試再次提交當前任務
-
DiscardPolicy:直接丟棄任務,不予任何處理也不拋出異常。如果允許任務丟失,這是最好的一種方案
8.6.2、建立執行緒池方法
單一的、固定的、可變的三種建立執行緒池的方法,用哪個多?
結論:一個都不用,答案來自於阿裡開發手冊
【強制】執行緒資源必須通過執行緒池提供,不允許在應用中自行顯式建立執行緒。
說明:使用執行緒池的好處是減少在建立和銷燬執行緒上所消耗的時間以及系統資源的開銷,解決資源不足的問題。如果不使用執行緒池,有可能造成系統建立大量同類執行緒而導致消耗完記憶體或者「過度切換」的問題。
【強制】執行緒池不允許使用Executors 去建立,而是通過ThreadPoolExecutor的方式,這樣的處理方式讓寫的同學更加明確執行緒池的執行規則,規避資源耗盡的風險。
說明:Executors返回的執行緒池物件的弊端如下:
- FixedThreadPool和SingleThreadPool:允許的請求佇列長度爲Integer.MAX_VALUE,可能會堆積大量的請求,從而導致OOM。
- CachedThreadPool和ScheduledThreadPool:允許的建立執行緒數量爲Integer.MAX_VALUE,可能會建立大量的執行緒,從而導致OOM。
8.6.3、自己手寫執行緒池
工作中如何使用執行緒池,是否自定義過執行緒池使用?
- JDK 自帶執行緒池的缺陷:底層使用了 LinkedBlockingQueue 阻塞佇列,該阻塞佇列預設是無界的,允許的請求佇列長度爲Integer.MAX_VALUE
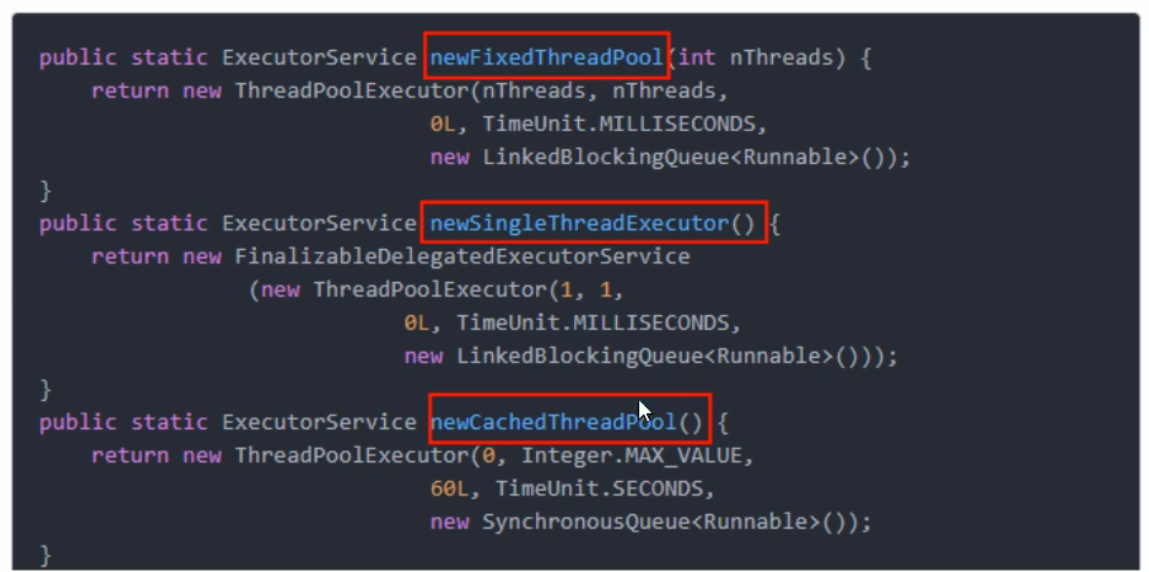
/**
 * Creates a {@code LinkedBlockingQueue} with a capacity of
 * {@link Integer#MAX_VALUE}.
 */
public LinkedBlockingQueue() {
    this(Integer.MAX_VALUE);
}
程式碼範例:指令阻塞佇列上限 + 使用預設的 AbortPolicy 策略
- 程式碼
/**
 * 第四種使用Java多執行緒的方式:執行緒池
 *
 * @ClassName MyThreadPoolDemo
 * @Description TODO
 * @Author Heygo
 * @Date 2020/8/8 22:34
 * @Version 1.0
 */
public class MyThreadPoolDemo {
    public static void main(String[] args) {
        System.out.println("Custom Thread Pool\n");
        customThreadPool();

    }

    private static void customThreadPool() {
        ExecutorService threadPool =
                new ThreadPoolExecutor(2,
                        5,
                        1L,
                        TimeUnit.SECONDS,
                        new LinkedBlockingQueue<>(3),
                        Executors.defaultThreadFactory(),
                        new ThreadPoolExecutor.AbortPolicy()
                );
        try {
            for (int i = 1; i <= 8; i++) {
                final int temp = i;
                threadPool.execute(() -> {
                    System.out.println(Thread.currentThread().getName() + "\t辦理業務" + temp);
                });
            }

        } catch (Exception e) {
            e.printStackTrace();
        } finally {
            threadPool.shutdown();
        }
    }
}
- for (int i = 1; i <= 8; i++) 時,執行緒池最大執行緒數 + 阻塞佇列數量 = 8 ,所以程式不會拋異常,執行緒池 hold 得住
Custom Thread Pool

pool-1-thread-1	辦理業務1
pool-1-thread-1	辦理業務3
pool-1-thread-1	辦理業務4
pool-1-thread-1	辦理業務5
pool-1-thread-2	辦理業務2
pool-1-thread-5	辦理業務8
pool-1-thread-3	辦理業務6
pool-1-thread-4	辦理業務7
- for (int i = 1; i <= 8; i++) 時,同時併發的最大執行緒數可能會超過 8 ,所以程式可能會拋異常,也可能不會,跑不跑異常,就看執行緒池能不能即時處理我們交給他的任務
Custom Thread Pool

java.util.concurrent.RejectedExecutionException: Task com.Heygo.MyThreadPoolDemo$$Lambda$1/990368553@7ba4f24f rejected from java.util.concurrent.ThreadPoolExecutor@3b9a45b3[Running, pool size = 5, active threads = 2, queued tasks = 0, completed tasks = 6]
	at java.util.concurrent.ThreadPoolExecutor$AbortPolicy.rejectedExecution(ThreadPoolExecutor.java:2063)
	at java.util.concurrent.ThreadPoolExecutor.reject(ThreadPoolExecutor.java:830)
	at java.util.concurrent.ThreadPoolExecutor.execute(ThreadPoolExecutor.java:1379)
	at com.Heygo.MyThreadPoolDemo.customThreadPool(MyThreadPoolDemo.java:40)
	at com.Heygo.MyThreadPoolDemo.main(MyThreadPoolDemo.java:23)
pool-1-thread-2	辦理業務2
pool-1-thread-3	辦理業務6
pool-1-thread-2	辦理業務3
pool-1-thread-2	辦理業務5
pool-1-thread-5	辦理業務8
pool-1-thread-1	辦理業務1
pool-1-thread-4	辦理業務7
pool-1-thread-3	辦理業務4
程式碼範例:使用 CallerRunsPolicy 策略
- 程式碼
private static void customThreadPool() {
    ExecutorService threadPool =
            new ThreadPoolExecutor(2,
                    5,
                    1L,
                    TimeUnit.SECONDS,
                    new LinkedBlockingQueue<>(3),
                    Executors.defaultThreadFactory(),
                    new ThreadPoolExecutor.CallerRunsPolicy()
            );
    try {
        for (int i = 1; i <= 9; i++) {
            final int temp = i;
            threadPool.execute(() -> {
                System.out.println(Thread.currentThread().getName() + "\t辦理業務" + temp);
            });
        }

    } catch (Exception e) {
        e.printStackTrace();
    } finally {
        threadPool.shutdown();
    }
}
- 程式執行結果:無法處理的任務會回退給呼叫執行緒
Custom Thread Pool

pool-1-thread-1	辦理業務1
pool-1-thread-3	辦理業務6
pool-1-thread-2	辦理業務2
pool-1-thread-3	辦理業務4
pool-1-thread-1	辦理業務3
main	辦理業務9
pool-1-thread-5	辦理業務8
pool-1-thread-4	辦理業務7
pool-1-thread-2	辦理業務5
程式碼範例:使用 DiscardOldestPolicy 策略
- 程式碼
private static void customThreadPool() {
    ExecutorService threadPool =
            new ThreadPoolExecutor(2,
                    5,
                    1L,
                    TimeUnit.SECONDS,
                    new LinkedBlockingQueue<>(3),
                    Executors.defaultThreadFactory(),
                    new ThreadPoolExecutor.DiscardOldestPolicy()
            );
    try {
        for (int i = 1; i <= 9; i++) {
            final int temp = i;
            threadPool.execute(() -> {
                System.out.println(Thread.currentThread().getName() + "\t辦理業務" + temp);
            });
        }

    } catch (Exception e) {
        e.printStackTrace();
    } finally {
        threadPool.shutdown();
    }
}
- 程式執行結果:等待時間最長的業務 3 被拋棄了。。。
Custom Thread Pool

pool-1-thread-1	辦理業務1
pool-1-thread-3	辦理業務6
pool-1-thread-1	辦理業務4
pool-1-thread-2	辦理業務2
pool-1-thread-1	辦理業務9
pool-1-thread-5	辦理業務8
pool-1-thread-4	辦理業務7
pool-1-thread-3	辦理業務5
程式碼範例:使用 DiscardPolicy 策略
- 程式碼
private static void customThreadPool() {
    ExecutorService threadPool =
            new ThreadPoolExecutor(2,
                    5,
                    1L,
                    TimeUnit.SECONDS,
                    new LinkedBlockingQueue<>(3),
                    Executors.defaultThreadFactory(),
                    new ThreadPoolExecutor.DiscardPolicy()
            );
    try {
        for (int i = 1; i <= 9; i++) {
            final int temp = i;
            threadPool.execute(() -> {
                System.out.println(Thread.currentThread().getName() + "\t辦理業務" + temp);
            });
        }

    } catch (Exception e) {
        e.printStackTrace();
    } finally {
        threadPool.shutdown();
    }
}
- 程式執行結果:業務 9 直接來吃閉門羹
Custom Thread Pool

pool-1-thread-1	辦理業務1
pool-1-thread-3	辦理業務6
pool-1-thread-2	辦理業務2
pool-1-thread-1	辦理業務3
pool-1-thread-4	辦理業務7
pool-1-thread-5	辦理業務8
pool-1-thread-2	辦理業務5
pool-1-thread-3	辦理業務4
8.6.4、合理設定執行緒池
如何檢視機器的邏輯處理器個數
System.out.println(Runtime.getRuntime().availableProcessors());
如何合理設定執行緒池?
CPU 密集型
- CPU密集的意思是該任務需要大量的運算,而沒有阻塞,CPU一直全速執行。
- CPU密集任務只有在真正的多核CPU上纔可能得到加速(通過多執行緒),而在單核CPU上無論你開幾個模擬的多執行緒該任務都不可能得到加速,因爲CPU總的運算能力就那些。
- CPU密集型任務設定儘可能少的執行緒數量,一般公式:CPU核數+1個執行緒的執行緒池
IO 密集型
- 由於IO密集型任務執行緒並不是一直在執行任務,則應設定儘可能多的執行緒,如CPU核數*2。
- IO密集型,即該任務需要大量的IO,即大量的阻塞。
- 在單執行緒上執行IO密集型的任務會導致浪費大量的CPU運算能力浪費在等待。
- 所以在IO密集型任務中使用多執行緒可以大大的加速程式執行,即使在單核CPU上,這種加速主要就是利用了被浪費掉的阻塞時間。
- IO密集型時,大部分執行緒都阻塞,故需要多設定執行緒數:參考公式:CPU核數/(1-阻塞係數),阻塞係數在0.8~0.9之間,比如8核CPU:8/(1-0.9)=80個執行緒數
9、死鎖及定位
死鎖編碼及定位分析
9.1、什麼是死鎖
產生死鎖的主要原因
死鎖是指兩個或兩個以上的進程在執行過程中,因爭奪資源而造成的一種互相等待的現象,若無外力幹涉那它們都將無法推進下去,如果系統資源充足,進程的資源請求都能夠得到滿足,死鎖出現的可能性就很低,否則就會因爭奪有限的資源而陷入死鎖。
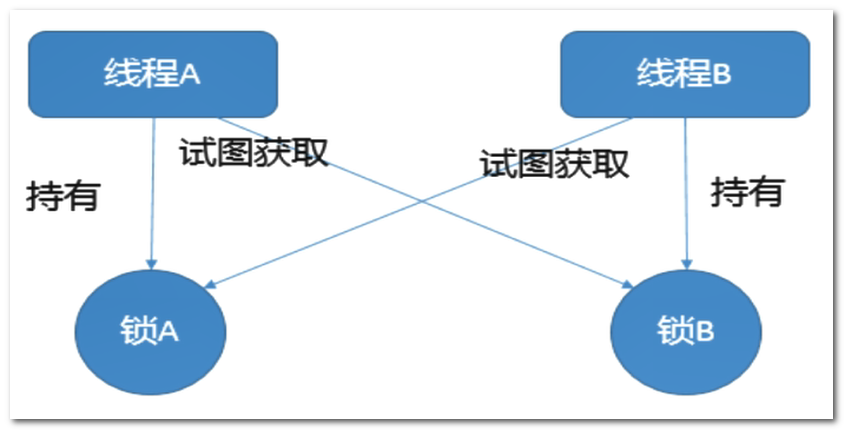
死鎖產生原因
- 系統資源不足
- 進程執行推進的順序不合適
- 資源分配不當
9.2、死鎖範例程式碼
死鎖程式碼 Demo
- 程式碼:兩個執行緒執行緒持有自己的鎖,同時又去搶對方的鎖,emmm。。。不是說不讓用字串作爲執行緒同步鎖嗎
/**
 * 死鎖是指兩個或者兩個以上的進程在執行過程中,因搶奪資源而造成的一種互相等待的現象,
 * 若無外力幹涉它們將都無法推進下去,如果系統資源充足,進程的資源請求都能夠得到滿足,
 * 死鎖出現的可能性也就很低,否則就會因爭奪有限的資源而陷入死鎖。
 *
 * @ClassName DeadLockDemo
 * @Description TODO
 * @Author Heygo
 * @Date 2020/8/9 12:48
 * @Version 1.0
 */
public class DeadLockDemo {
    public static void main(String[] args) {
        String lockA = "lockA";
        String lockB = "lockB";

        new Thread(new HoldLockThread(lockA, lockB), "ThreadAAA").start();
        new Thread(new HoldLockThread(lockB, lockA), "ThreadBBB").start();

        /*
         * windows下的java執行程式,也有類似ps的檢視進程的命令,但是目前我們需要檢視的只是java
         *
         * linux
         *          ps -ef|grep xxxx    ls -l檢視當前進程的命令
         *
         * windows
         *          jps = java ps      jps -l
         *          jstack
         * */
    }
}

class HoldLockThread implements Runnable {
    private String lockA;
    private String lockB;

    public HoldLockThread(String lockA, String lockB) {
        this.lockA = lockA;
        this.lockB = lockB;
    }

    public void run() {
        // 持有自己的鎖
        synchronized (lockA) {
            System.out.println(Thread.currentThread().getName() + "\t自己持有:" + lockA + "\t嘗試獲得:" + lockB);
            // 睡眠一會兒,保證另一個執行緒能持有自己的鎖
            try {
                TimeUnit.SECONDS.sleep(2);
            } catch (InterruptedException e) {
                e.printStackTrace();
            }
            // 還希望得到別人的鎖
            synchronized (lockB) {
                System.out.println(Thread.currentThread().getName() + "\t自己持有:" + lockB + "\t嘗試獲得:" + lockA);
            }
        }
    }
}
- 程式執行結果
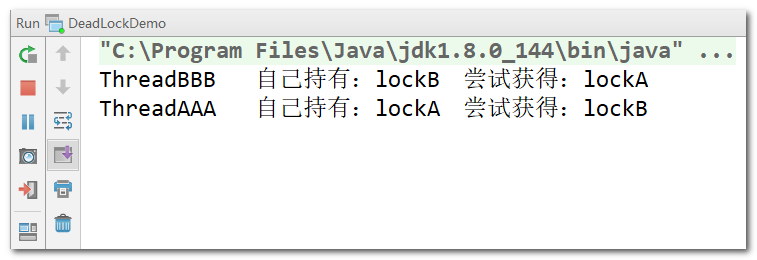
9.3、死鎖解決方案
如何排查死鎖問題?
- jps命令定位進程號
- jstack找到死鎖檢視
操作範例
- jps -l 檢視產生死鎖的進程號
C:\Users\Heygo\Desktop\Interview>jps -l
29808 sun.tools.jps.Jps
3824 org.jetbrains.jps.cmdline.Launcher
25220
8900 DeadLockDemo
- jstack pid :找到死鎖
Found one Java-level deadlock:
=============================
"ThreadBBB":
  waiting to lock monitor 0x000000001c403158 (object 0x000000076b518a18, a java.lang.String),
  which is held by "ThreadAAA"
"ThreadAAA":
  waiting to lock monitor 0x000000001c400ef8 (object 0x000000076b518a50, a java.lang.String),
  which is held by "ThreadBBB"

Java stack information for the threads listed above:
===================================================
"ThreadBBB":
        at HoldLockThread.run(DeadLockDemo.java:56)
        - waiting to lock <0x000000076b518a18> (a java.lang.String)
        - locked <0x000000076b518a50> (a java.lang.String)
        at java.lang.Thread.run(Thread.java:748)
"ThreadAAA":
        at HoldLockThread.run(DeadLockDemo.java:56)
        - waiting to lock <0x000000076b518a50> (a java.lang.String)
        - locked <0x000000076b518a18> (a java.lang.String)
        at java.lang.Thread.run(Thread.java:748)

Found 1 deadlock.