Python爬蟲基礎操作二
目錄
上一篇爬蟲操作基礎,本篇講解爬蟲數據儲存、cookies,session,以及瀏覽器自動操作工具selenium
爬蟲操作比較完整的步驟如下圖所示:
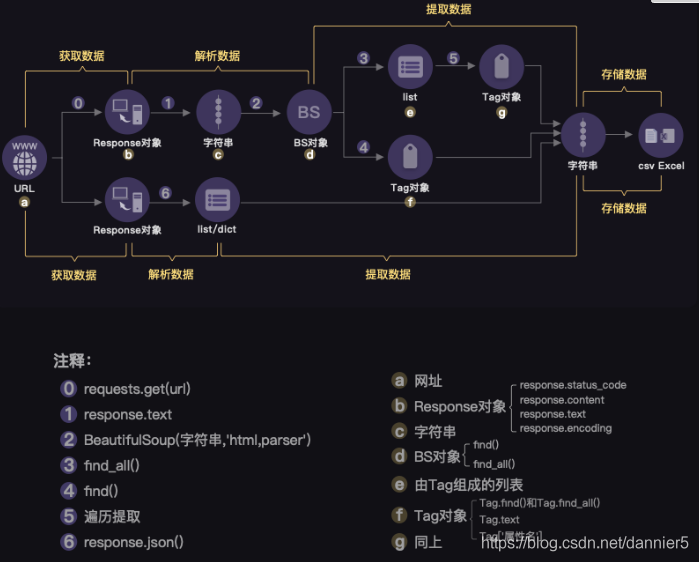
總體上來說,從Response物件開始,我們就分成了兩條路徑,一條路徑是數據放在HTML裡,所以我們用BeautifulSoup庫去解析數據和提取數據;另一條,數據作爲Json儲存起來,所以我們用response.json()方法去解析,然後提取、儲存數據。
四、爬蟲數據儲存csv/excel
csv爲python自帶模組,無需安裝。
csv基本操作步驟:
開啓檔案——>讀取數據/寫入數據——>關閉檔案
範例如下:
# CSV儲存範例
import csv
with open('test.csv','a', newline='',encoding='utf-8') as f:
    writer  = csv.writer(f)
#['4', '貓砂', '25', '1022', '886']
#['5', '貓罐頭', '18', '2234', '3121']
    writer.writerow(['4', '貓砂', '25', '1022', '886'])
    writer.writerow(['5', '貓罐頭', '18', '2234', '3121'])
# CSV讀取範例
with open('test.csv','r', newline='',encoding='utf-8') as f:
    read = csv.reader(f)
    for row in read:
        print(row)
excel操作可以使用openpyxl,爲第三方庫,需按照:pip install openpyxl
Excel檔案寫入步驟:
1、建立工作簿:利用openpyxl.Workbook()建立workbook物件;
2、獲取工作表:藉助workbook物件的avtive屬性;
3、操作單元格:單元格:sheet['A1'];一行:append();
4、儲存工作簿:save().
# xlsx表格儲存範例
from openpyxl import Workbook

wb = Workbook()    #建立工作簿
ws = wb.active
ws.title    #列印title
# ‘Sheet’
ws.title = 'python'    #改變sheet title
ws.title
# 'python'
ws2 = wb.create_sheet('java')    #新建工作表
ws2.title
# 'java'
wb.sheetnames
# ['python','java']
ws['E1'] = 111    #向E1單元寫入數據
ws.cell(row=2,column=2,value=222)    #向第二行第二列的單元格寫入數據
# <Cell 'python'.B2>
wb.save('example.xlsx')    #儲存excel表格
五、session與cookies
1、session與cookies聯繫
session和cookies的關係還非常密切——cookies中儲存着session的編碼資訊,session中又儲存了cookies的資訊。
當瀏覽器第一次存取購物網頁時,伺服器會返回set cookies的欄位給瀏覽器,而瀏覽器會把cookies儲存到本地。
等瀏覽器第二次存取這個購物網頁時,就會帶着cookies去請求,而因爲cookies裏帶有對談的編碼資訊,伺服器立馬就能辨認出這個使用者,同時返回和這個使用者相關的特定編碼的session。
流程如下圖所示:
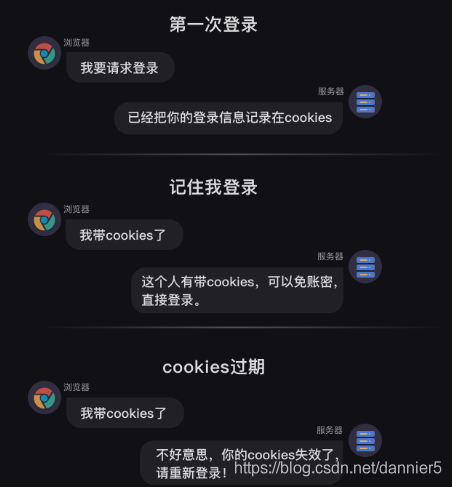
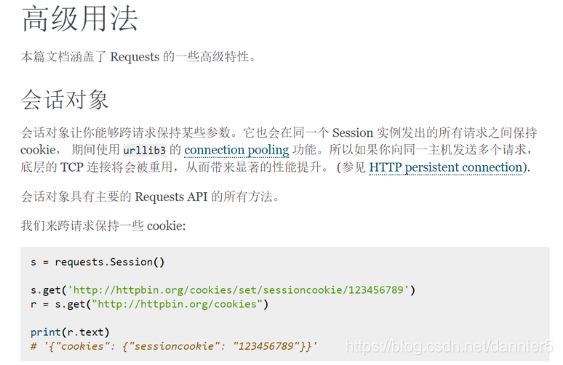
cookies和session的關係如此密切,那我們可以通過建立一個session來處理cookies。
計算機之所以需要cookies和session,是因爲HTTP協定是無狀態的協定。
何爲無狀態?就是一旦瀏覽器和伺服器之間的請求和響應完畢後,兩者會立馬斷開連線,也就是恢復成無狀態。
這樣會導致:伺服器永遠無法辨認,也記不住使用者的資訊,像一條只有7秒記憶的金魚。是cookies和session的出現,才破除了web發展史上的這個難題。
cookies不僅僅能實現自動登錄,因爲它本身攜帶了session的編碼資訊,網站還能根據cookies,記錄你的瀏覽足跡,從而知道你的偏好,只要再加以推薦演算法,就可以實現給你推播定製化的內容。
2、post請求:
post和get都可以帶着參數請求,不過get請求的參數會在url上顯示出來。但post請求的參數就不會直接顯示,而是隱藏起來。像賬號密碼這種私密的資訊,就應該用post的請求。如果用get請求的話,賬號密碼全部會顯示在網址上。可以這麼理解,get是明文顯示,post是非明文顯示。
通常,get請求會應用於獲取網頁數據,比如我們之前學的requests.get()。post請求則應用於向網頁提交數據,比如提交表單型別數據(像賬號密碼就是網頁表單的數據)。
【requests headers】儲存的是瀏覽器的請求資訊,【response headers】儲存的是伺服器的響應資訊
一般post操作重點:
1、post帶着參數地請求登錄;
2、獲得登錄的cookies;
3、帶cookies去請求發送資訊;
3、cookies儲存與提取
1) cookies

cookies轉化成字典的方法
- requests.utils.dit_from_cookieday(cj)
- 從CookieJar返回鍵/值字典。
- 參數: cj - 從中提取cookie的CookieJar物件。
- 返回型別:字典
requests對於cookies格式的轉化,提供了三個工具方法:
requests.utils.dict_from_cookiejar(cj)
Returns a key/value dictionary from a CookieJar.
Parameters: cj – CookieJar object to extract cookies from.


requests.utils.cookiejar_from_dict(cookie_dict, cookiejar=None, overwrite=True)
Returns a CookieJar from a key/value dictionary.
Parameters:

    cookie_dict – Dict of key/values to insert into CookieJar.
    cookiejar – (optional) A cookiejar to add the cookies to.
    overwrite – (optional) If False, will not replace cookies already in the jar with new ones.


requests.utils.add_dict_to_cookiejar(cj, cookie_dict)
Returns a CookieJar from a key/value dictionary.
Parameters:

    cj – CookieJar to insert cookies into.
    cookie_dict – Dict of key/values to insert into CookieJar.
json模組的使用方法:
- json爲第三方庫,安裝: pip install json
- json.dumps() 將Python物件編碼成JSON字串。
- json.loads() 將已編碼的JSON字串解碼爲Python物件。
但都是cookiejar和字典格式之間的轉換,並沒有幾種cookies格式相互的轉換,所以我是以字典爲中間格式進行轉換的。
2)讀取cookies
在這裏我用的是LWPCookieJar儲存在txt檔案中
#範例化一個LWPCookieJar物件
load_cookiejar = cookielib.LWPCookieJar()
#從檔案中載入cookies(LWP格式)
load_cookiejar.load('cookies/' + self.username + '.txt', ignore_discard=True, ignore_expires=True)
#工具方法轉換成字典
load_cookies = requests.utils.dict_from_cookiejar(load_cookiejar)
#工具方法將字典轉換成RequestsCookieJar,賦值給session的cookies.
self.session.cookies = requests.utils.cookiejar_from_dict(load_cookies)
3)儲存cookies
將cookies轉換成LWP格式然後儲存爲文字格式
#範例化一個LWPcookiejar物件
new_cookie_jar = cookielib.LWPCookieJar(self.username + '.txt')

#將轉換成字典格式的RequestsCookieJar(這裏我用字典推導手動轉的)儲存到LWPcookiejar中
requests.utils.cookiejar_from_dict({c.name: c.value for c in self.session.cookies}, new_cookie_jar)

#儲存到本地檔案
new_cookie_jar.save('cookies/' + self.username + '.txt', ignore_discard=True, ignore_expires=True)
4)完整範例
import requests, json
session = requests.session()
headers = {
    'User-Agent': 'Mozilla/5.0 (Windows NT 10.0; Win64; x64) AppleWebKit/537.36 (KHTML, like Gecko) Chrome/70.0.3538.110 Safari/537.36'}

def cookies_read():
    cookies_txt = open('cookies.txt', 'r')
    cookies_dict = json.loads(cookies_txt.read())
    cookies = requests.utils.cookiejar_from_dict(cookies_dict)
    return (cookies)
    # 以上4行程式碼,是cookies讀取。

def sign_in():
    url = ' https://wordpress-edu-3autumn.localprod.oc.forchange.cn/wp-login.php'
    data = {'log': input('請輸入你的賬號'),
            'pwd': input('請輸入你的密碼'),
            'wp-submit': '登錄',
            'redirect_to': 'https://wordpress-edu-3autumn.localprod.oc.forchange.cn',
            'testcookie': '1'}
    session.post(url, headers=headers, data=data)
    cookies_dict = requests.utils.dict_from_cookiejar(session.cookies)
    cookies_str = json.dumps(cookies_dict)
    f = open('cookies.txt', 'w')
    f.write(cookies_str)
    f.close()
    # 以上5行程式碼,是cookies儲存。


def write_message():
    url_2 = 'https://wordpress-edu-3autumn.localprod.oc.forchange.cn/wp-comments-post.php'
    data_2 = {
        'comment': input('請輸入你要發表的評論:'),
        'submit': '發表評論',
        'comment_post_ID': '13',
        'comment_parent': '0'
    }
    return (session.post(url_2, headers=headers, data=data_2))
    #以上9行程式碼,是發表評論。

try:
    session.cookies = cookies_read()
except FileNotFoundError:
    sign_in()

num = write_message()
if num.status_code == 200:    #解決cookies過期的問題,如果過期則重新登入
    print('成功啦!')
else:
    sign_in()
    num = write_message()
    print(num.status_code)
六、selenium庫:控制瀏覽器操作
selenium是什麼呢?它是一個強大的Python庫。
它可以做什麼呢?它可以用幾行程式碼,控制瀏覽器,做出自動開啓、輸入、點選等操作,就像是有一個真正的使用者在操作一樣。
selenium操作步驟:
1、安裝selenium
pip install selenium
2、下載谷歌瀏覽器chrome,安裝對應版本瀏覽器驅動ChromeDriver
https://www.google.cn/intl/zh-CN/chrome/
http://npm.taobao.org/mirrors/chromedriver/
https://localprod.pandateacher.com/python-manuscript/crawler- html/chromedriver/ChromeDriver.html
3、瀏覽器設定
# 本地Chrome瀏覽器設定方法(開啓一個真實的瀏覽器介面)
from selenium import webdriver #從selenium庫中呼叫webdriver模組
driver = webdriver.Chrome() # 設定引擎爲Chrome,真實地開啓一個Chrome瀏覽器

# 本地Chrome瀏覽器的靜默默模式設定(不顯示瀏覽器介面,後臺執行):
from selenium import  webdriver #從selenium庫中呼叫webdriver模組
from selenium.webdriver.chrome.options import Options # 從options模組中呼叫Options類

chrome_options = Options() # 範例化Option物件
chrome_options.add_argument('--headless') # 把Chrome瀏覽器設定爲靜默模式
driver = webdriver.Chrome(options = chrome_options) # 設定引擎爲Chrome,在後台默默執行
4、selenium數據提取
BeautifulSoup解析網頁原始碼,然後提取其中的數據。
selenium庫同樣也具備解析數據、提取數據的能力。它和BeautifulSoup的底層原理一致,但在一些細節和語法上有所出入selenium所解析提取的,是Elements中的所有數據,而BeautifulSoup所解析的則只是Network中第0個請求的響應。
使用BeautifulSoup解析提取數據時,首先要把Response物件解析爲BeautifulSoup物件,然後再從中提取數據。
而在selenium中,獲取到的網頁存在了driver中,而後,解析與提取是同時做的,都是由driver這個範例化的瀏覽器完成,解析數據是由driver自動完成的,提取數據是driver的一個方法。
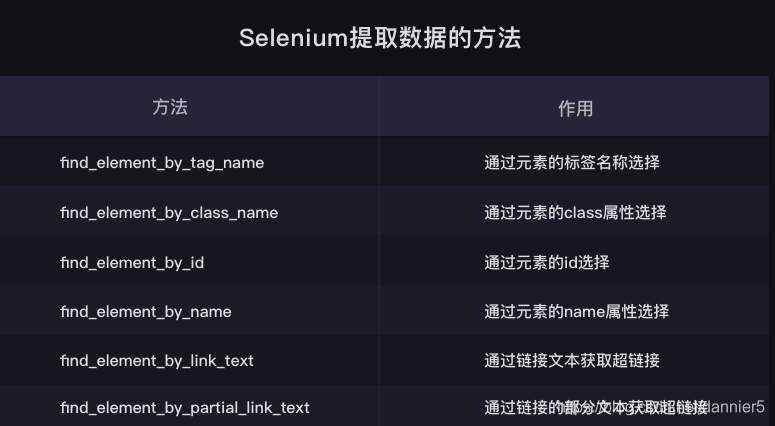
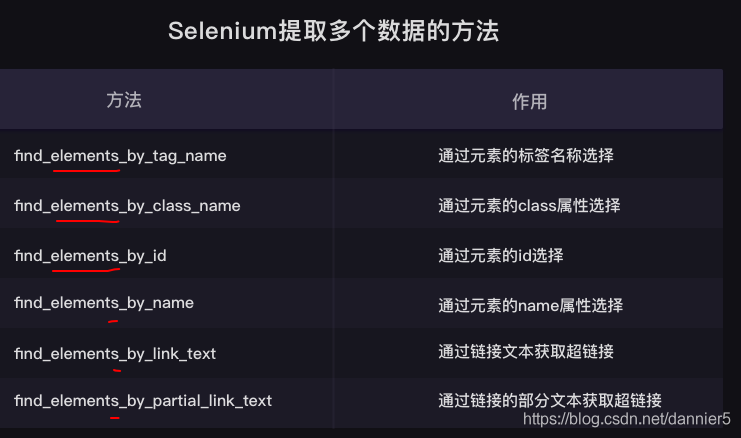
selenium解析與提取數據的過程中,我們操作的物件轉換:
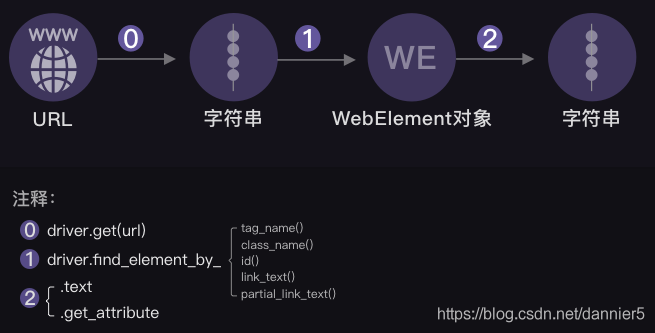
selenium可以獲取到渲染完整的網頁原始碼。
使用driver的一個方法:page_source
HTML原始碼字串 = driver.page_source
用requests.get()獲取到的是Response物件,在交給BeautifulSoup解析之前,需要用到.text的方法才能 纔能將Response物件的內容以字串的形式返回。
而使用selenium獲取到的網頁原始碼,本身已經是字串了。可以直接交給BeautifulSoup進行解析。

5、selenium自動操作瀏覽器
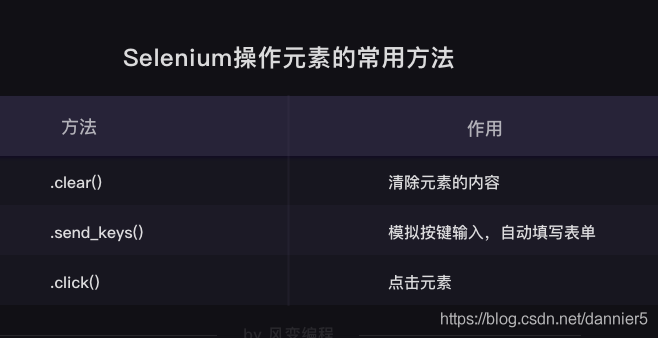
完整範例:
# 本地Chrome瀏覽器設定方法
from selenium import  webdriver #從selenium庫中呼叫webdriver模組
import time
from bs4 import BeautifulSoup

driver = webdriver.Chrome() # 設定引擎爲Chrome,真實地開啓一個Chrome瀏覽器
#driver是瀏覽器驅動的範例化物件
driver.get('https://localprod.pandateacher.com/python-manuscript/hello-spiderman/')
time.sleep(2)

#操作瀏覽器
# teacher = driver.find_element_by_id('teacher')
# teacher.send_keys('必須是吳楓呀')
# assistant = driver.find_element_by_name('assistant')
# assistant.send_keys('都喜歡')
# time.sleep(1)
# button = driver.find_element_by_class_name('sub')
# time.sleep(1)
# button.click()
# time.sleep(1)
# driver.close()

# 提取出網頁 你好,蜘蛛俠! 中所有label標籤中的文字
#方法一:
# labels = driver.find_elements_by_tag_name('label')
# labels = BeautifulSoup.find_all('label')
# for label in labels:
#     print(label.text)
# driver.close()
#方法二:selenium + BeautifulSoup
html = driver.page_source
html_soup = BeautifulSoup(html,'html.parser')
labels = html_soup.find_all('label')
for label in labels:
    print(label.text)
driver.close()
#重新整理頁面
import time
from selenium import webdriver

driver = webdriver.Chrome()
driver.maximize_window()
driver.implicitly_wait(6)

driver.get("https://www.baidu.com")
time.sleep(2)
try:
driver.refresh() # 重新整理方法 refresh
print ('test pass: refresh successful')
except Exception as e:
print ("Exception found", format(e))
driver.quit()
Selenium是一個強大的網路數據採集工具,它的優勢是簡單直觀,而它當然也有缺點。由於是真實地模擬人操作瀏覽器,需要等待網頁緩衝的時間,在爬取大量數據的時候,速度會比較慢。通常情況,在爬蟲專案中,selenium都是用在其它方法無法解決,或是很難解決的問題時,纔會用到。
當然,除了爬蟲,selenium的使用場景還有很多。比如:它可以控制網頁中圖片檔案的顯示、控制CSS和JavaScript的載入與執行等等。
七、定時與郵件
1、郵件發送步驟:
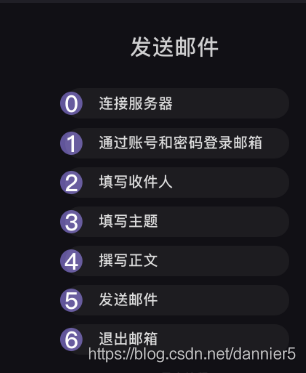
2、定時
關於時間,其實Python有兩個內建的標準庫——time和datetime(我們在基礎課也學過time.sleep())。
但在這裏,我們不準 不準備完全依靠標準庫來實現,而準備選取第三方庫——schedule。
標準庫一般意味着最原始最基礎的功能,第三方庫很多是去呼叫標準庫中封裝好了的操作函數。比如schedule,就是用time和datetime來實現的。
完整範例:
#@ description  :爬蟲+郵件定時發送實戰:定時發送天氣資訊
#               自動爬取每日的天氣,並定時把天氣數據和穿衣提示發送到你的郵箱
#               http://www.weather.com.cn/weather/101280601.shtml
#@ Author       :Dannie
#@ time         :2020/08/09 23:02:02
#@ version      :V1.0
#********************#

import requests
import smtplib
import schedule
import time
from bs4 import BeautifulSoup
from email.mime.text import MIMEText
from email.header import Header

account = input('請輸入你的郵箱:')
password = input('請輸入你的密碼:')
receiver = input('請輸入收件人的郵箱:')

def weather_spider():
    headers={'user-agent':'Mozilla/5.0 (Macintosh; Intel Mac OS X 10_13_6) AppleWebKit/537.36 (KHTML, like Gecko) Chrome/71.0.3578.98 Safari/537.36'}
    url='http://www.weather.com.cn/weather/101280601.shtml'
    res=requests.get(url,headers=headers)
    res.encoding='utf-8'
    soup=BeautifulSoup(res.text,'html.parser')
    tem1= soup.find(class_='tem')
    weather1= soup.find(class_='wea')
    tem=tem1.text
    weather=weather1.text
    return tem,weather

def send_email(tem,weather):
    mailhost='smtp.qq.com'
    qqmail = smtplib.SMTP()
    qqmail.connect(mailhost,25)
    qqmail.login(account,password)
    content= tem+weather
    message = MIMEText(content, 'plain', 'utf-8')
    subject = '今日天氣預報'
    message['Subject'] = Header(subject, 'utf-8')
    try:
        qqmail.sendmail(account, receiver, message.as_string())
        print ('郵件發送成功')
    except:
        print ('郵件發送失敗')
    qqmail.quit()

def job():
    print('開始一次任務')
    tem,weather = weather_spider()
    send_email(tem,weather)
    print('任務完成')

schedule.every().day.at("07:30").do(job)
while True:
    schedule.run_pending()
    time.sleep(1)