Solr搜尋服務
Solr搜尋服務
【簡介】
Apache Solr 是一個開源的搜尋伺服器。Solr 使用 Java 語言開發,主要基於 HTTP 和 Apache Lucene 實現。Apache Solr 中儲存的資源是以 Document 爲物件進行儲存的。每個文件由一系列的 Field 構成,每個 Field 表示資源的一個屬性。Solr 中的每個 Document 需要有能唯一標識其自身的屬性,預設情況下這個屬性的名字是 id,在 Schema 組態檔中使用:id進行描述。
Solr是一個高效能,採用Java5開發,基於Lucene的全文搜尋伺服器。Solr是一個獨立的企業級搜尋應用伺服器,很多企業運用solr開源服務。原理大致是文件通過Http利用XML加到一個搜尋集閤中。查詢該集合也是通過 http收到一個XML/JSON響應來實現。它的主要特性包括:高效、靈活的快取功能,垂直搜尋功能,高亮顯示搜尋結果,通過索引複製來提高可用性,提供一套強大Data Schema來定義欄位,型別和設定文字分析,提供基於Web的管理介面等。
常用的搜尋伺服器:
- Lucence
- solr 全文搜尋伺服器 solrj用戶端
- Elastic Search
一、solr的安裝與設定
【安裝】
解壓solr-4.10.3.zip

-
把D:\Tomcat\solr\solr-4.10.3\example\webapps目錄下的solr.war
部署到tomcat(tomcat要啓動),然後刪除solr.war檔案(先關掉tomcat再刪除)
(Tomcat最好用全新的來測試,當startup.bat執行後沒部署war包,可先借用eclipse的Tomcat來部署一次) -
把D:\Tomcat\solr\solr-4.10.3\example\lib\ext 之下的.jar複製到
D:\Tomcat\solr\apache-tomcat-8.0.50\webapps\solr\WEB-INF\lib 之下 -
建立solrHome(相當於solr的工作目錄), 存放solr伺服器所有組態檔的目錄。
把D:\Tomcat\solr\solr-4.10.3\example\solr(範例的工作目錄) 複製到任意的solr資料夾並改名"solrHome" (位置任意吧,看你喜歡)
再把D:\Tomcat\solr\solr-4.10.3\之下的contrib和dist兩個目錄複製到solrHome資料夾中。
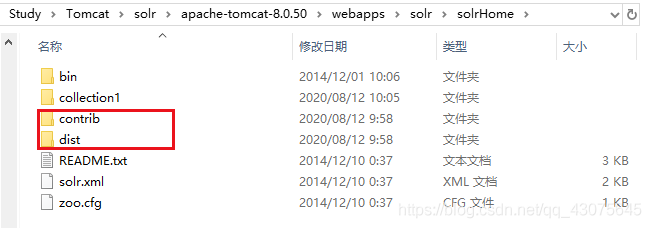
-
指定solr伺服器的solrHome的位置
修改solr工程的web.xml檔案:

 <!--設定solr工程關聯Tomcat伺服器-->
   <env-entry>
       <env-entry-name>solr/home</env-entry-name>
       <!--在此處修改爲之前建立的solr工程的路徑-->
       <env-entry-value>D:/Tomcat/solr/apache-tomcat-8.0.50/solr/solrHome</env-entry-value>
       <env-entry-type>java.lang.String</env-entry-type>
   </env-entry>
-
啓動tomcat,存取http://localhost:8080/solr/
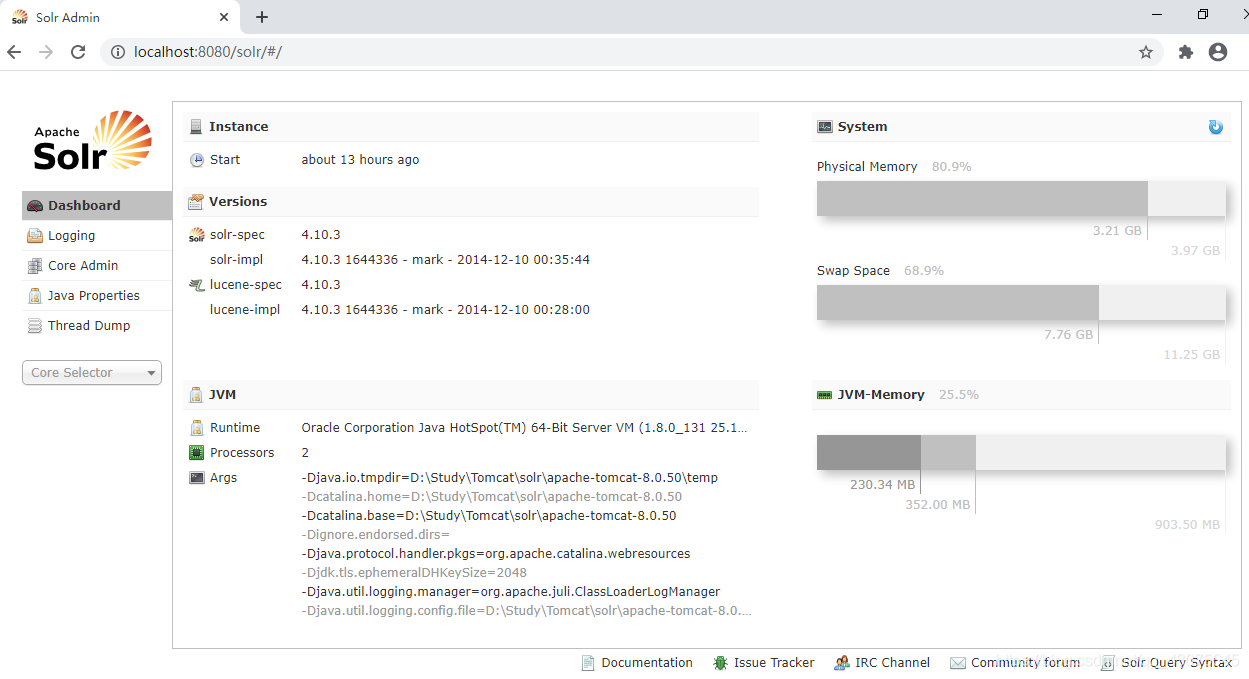
作用:主要做一些搜尋數據的測試, 最終通過solj用戶端來存取solr伺服器
【設定業務欄位】
1. 設定中文分詞器,手動設定
FildType中指定
– IK Analyzer 的jar包新增到solr的web工程lib中

– 把IK Analyzer的擴充套件詞典、停用詞典、組態檔複製到solr的web工程的classes中(classes要自己建立)
D:\Tomcat\solr\apache-tomcat-8.0.50\webapps\solr\WEB-INF\classes
2.編寫schema.xml
– 設定FieldType(分詞器的欄位型別)
位置:
solrHome/collection1/conf/schema.xml
  <fieldType name="text_ik" class="solr.TextField">
      <analyzer class="org.wltea.analyzer.lucene.IKAnalyzer"/>
  </fieldType>
solr中的業務欄位先設定後使用
  <field name="item_title" type="text_ik" indexed="true" stored="true"/>
  <field name="item_sell_point" type="text_ik" indexed="true" stored="true"/>
  <field name="item_price"  type="long" indexed="true" stored="true"/>
  <field name="item_image" type="string" indexed="false" stored="true" />
  <field name="item_category_name" type="string" indexed="true" stored="true" />
  <field name="item_desc" type="text_ik" indexed="true" stored="true" />
  <field name="item_goodsid" type="text_ik" indexed="true" stored="true" />
  <field name="item_category" type="text_ik" indexed="true" stored="true" />
  <field name="item_brand" type="text_ik" indexed="true" stored="true" />
  <field name="item_seller" type="text_ik" indexed="true" stored="true" />

  <field name="item_keywords" type="text_ik" indexed="true" stored="false" multiValued="true"/>
  <copyField source="item_title" dest="item_keywords"/>
  <copyField source="item_sell_point" dest="item_keywords"/>
  <copyField source="item_desc" dest="item_keywords"/>
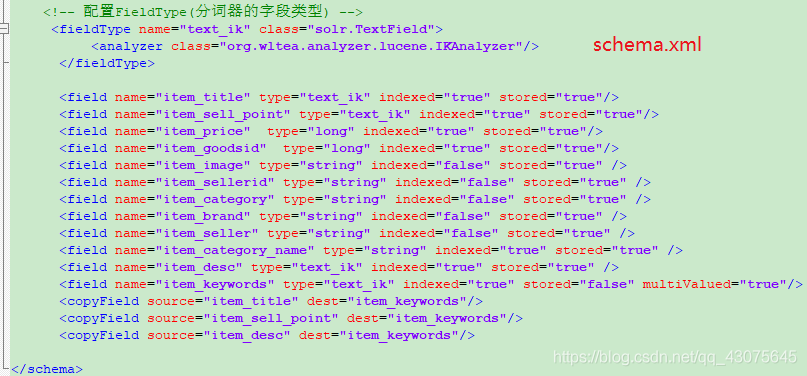
設定好後,重新啓動一下tomcat喔。
二、solr-demo
普通專案結構:
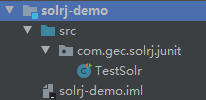
導包:
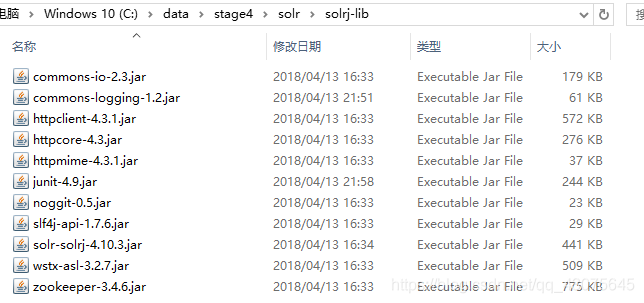
執行前需要先啓動了solr並已經有匯入了數據喔。
public class TestSolr {
    @Test
    public void testAdd() throws IOException, SolrServerException {
        //建立solrj的連線
        SolrServer solrServer=new HttpSolrServer("http://localhost:8080/solr");
        //建立solr的文件document
        SolrInputDocument document=new SolrInputDocument();
        document.addField("id","item007");
        document.addField("item_title","華爲手機Meta30測試");
        document.addField("item_price","3000");
        document.addField("item_desc","5G手機");

        solrServer.add(document);
        solrServer.commit();
        System.out.println("數據新增完成。");

    }


    @Test
    public void testQuery() throws SolrServerException {
        //建立solrj的連線
        SolrServer solrServer = new HttpSolrServer("http://localhost:8080/solr");

        SolrQuery query=new SolrQuery();
        query.set("q","item_price:[3000 TO 5000]");
        query.set("sort","item_price desc");
        query.setStart(0);
        query.setRows(100);

        QueryResponse queryResponse=solrServer.query(query);
        SolrDocumentList list = queryResponse.getResults();
        System.out.println("list.getNumFound() = " + list.getNumFound());

        for (SolrDocument document : list) {
            System.out.println(document.get("id"));
            System.out.println(document.get("item_title"));
            System.out.println(document.get("item_price"));
            System.out.println("-------------------------");
        }

    }

}
三、SpringBoot搭建
專案結構:
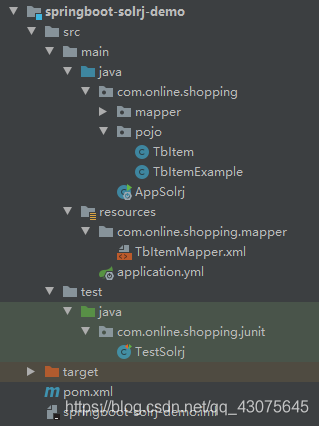
pom.xml
<?xml version="1.0" encoding="UTF-8"?>
<project xmlns="http://maven.apache.org/POM/4.0.0"
         xmlns:xsi="http://www.w3.org/2001/XMLSchema-instance"
         xsi:schemaLocation="http://maven.apache.org/POM/4.0.0 http://maven.apache.org/xsd/maven-4.0.0.xsd">
    <modelVersion>4.0.0</modelVersion>

    <groupId>org.example</groupId>
    <artifactId>springboot-solrj-demo</artifactId>
    <version>1.0-SNAPSHOT</version>

    <parent>
        <groupId>org.springframework.boot</groupId>
        <artifactId>spring-boot-starter-parent</artifactId>
        <version>2.2.6.RELEASE</version>
        <relativePath/> <!-- lookup parent from repository -->
    </parent>
    <properties>
        <java.version>1.8</java.version>
    </properties>

    <dependencies>
        <dependency>
            <groupId>org.springframework.boot</groupId>
            <artifactId>spring-boot-starter-web</artifactId>
        </dependency>

        <dependency>
            <groupId>org.mybatis.spring.boot</groupId>
            <artifactId>mybatis-spring-boot-starter</artifactId>
            <version>1.3.2</version>
        </dependency>

        <dependency>
            <groupId>com.github.pagehelper</groupId>
            <artifactId>pagehelper-spring-boot-starter</artifactId>
            <version>1.2.3</version>
            <exclusions>
                <exclusion>
                    <groupId>org.mybatis.spring.boot</groupId>
                    <artifactId>mybatis-spring-boot-starter</artifactId>
                </exclusion>
            </exclusions>
        </dependency>

        <dependency>
            <groupId>mysql</groupId>
            <artifactId>mysql-connector-java</artifactId>
            <scope>runtime</scope>
        </dependency>

        <!--整合druid連線池-->
        <dependency>
            <groupId>com.alibaba</groupId>
            <artifactId>druid-spring-boot-starter</artifactId>
            <version>1.1.10</version>
        </dependency>

        <dependency>
            <groupId>org.springframework.boot</groupId>
            <artifactId>spring-boot-starter-data-solr</artifactId>
        </dependency>

        <dependency>
            <groupId>org.springframework.boot</groupId>
            <artifactId>spring-boot-starter-test</artifactId>
            <scope>test</scope>
            <exclusions>
                <exclusion>
                    <groupId>org.junit.vintage</groupId>
                    <artifactId>junit-vintage-engine</artifactId>
                </exclusion>
            </exclusions>
        </dependency>
    </dependencies>

    <build>
        <plugins>
            <plugin>
                <groupId>org.springframework.boot</groupId>
                <artifactId>spring-boot-maven-plugin</artifactId>
            </plugin>
        </plugins>
    </build>

</project>
application.yml
server:
  port: 8081
spring:
  datasource:
    url: jdbc:mysql://localhost:3306/pinyougoudb?useUnicode=true&characterEncoding=utf-8&serverTimezone=Asia/Shanghai
    username: root
    password: root
  data:
    solr:
      host: http://127.0.0.1:8080/solr
AppSolrj.java
@SpringBootApplication
@MapperScan("com.online.shopping.mapper")
public class AppSolrj {
    public static void main(String[] args) {
        SpringApplication.run(AppSolrj.class,args);
    }
}
TestSolrj.java
@SpringBootTest
public class TestSolrj {
    @Autowired
    private SolrTemplate solrTemplate;
    @Autowired
    private TbItemMapper tbItemMapper;

    @Test
    public void testRemoveAll(){
        Query query=new SimpleQuery("*:*");
        solrTemplate.delete("collection1",query);
        solrTemplate.commit("collection1");
        System.out.println("刪除完成。");
    }

    @Test
    public void testAdd(){
        TbItem item=new TbItem();
        item.setId(10L);
        item.setTitle("榮耀手機");
        item.setPrice(3000D);
        item.setImage("http://localhost:9000/mall/xxx.jpg");

        solrTemplate.saveBean("collection1",item);
        solrTemplate.commit("collection1");
        System.out.println("新增成功。");
    }


    @Test
    public void importData(){
        List<TbItem> list = tbItemMapper.selectByExample(null);
        solrTemplate.saveBeans("collection1",list);
        solrTemplate.commit("collection1");
        System.out.println("新增成功。");
    }

    @Test
    public void testQuery(){
        Query query=new SimpleQuery("*:*");

        //select * from xxx where item_title =?
        Criteria criteria=new Criteria("item_title").endsWith("手機");
        query.setRows(100);

        query.addCriteria(criteria);

        ScoredPage<TbItem> scoredPage = solrTemplate.query("collection1", query, TbItem.class);
        List<TbItem> list = scoredPage.getContent();
        for (TbItem item : list) {
            System.out.println(item.getTitle()+","+item.getPrice()+","+item.getImage());
        }

    }

}
最後要記得 持久化物件 的屬性和solr業務欄位的對映關係,也就是在pojo的javabean要設定好對映。
schema.xml
<field name="item_title" type="text_ik" indexed="true" stored="true"/>
TbItem .java
public class TbItem implements Serializable {
    /**
     * 商品id,同時也是商品編號
     *
     * @mbg.generated
     */
    @Field
    private Long id;

    /**
     * 商品標題
     *
     * @mbg.generated
     */
    @Field("item_title")//表示 持久化物件 的屬性和solr業務欄位的對映關係
    private String title

	//其它省略

}