Kubernetes K8S之Pod 生命週期與init container初始化容器詳解
K8S中Pod的生命週期與init container初始化容器詳解
主機設定規劃
| 伺服器名稱(hostname) | 系統版本 | 設定 | 內網IP | 外網IP(模擬) |
|---|---|---|---|---|
| k8s-master | CentOS7.7 | 2C/4G/20G | 172.16.1.110 | 10.0.0.110 |
| k8s-node01 | CentOS7.7 | 2C/4G/20G | 172.16.1.111 | 10.0.0.111 |
| k8s-node02 | CentOS7.7 | 2C/4G/20G | 172.16.1.112 | 10.0.0.112 |
Pod容器生命週期

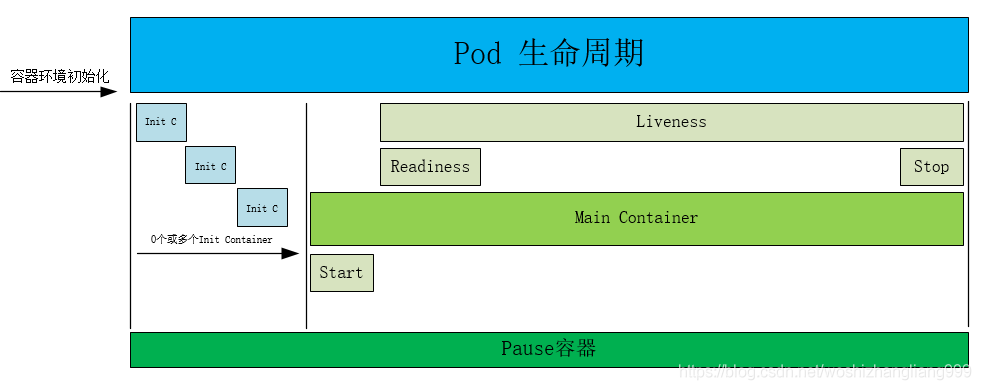
Pause容器說明
每個Pod裡執行着一個特殊的被稱之爲Pause的容器,其他容器則爲業務容器,這些業務容器共用Pause容器的網路棧和Volume掛載卷,因此他們之間通訊和數據交換更爲高效。在設計時可以充分利用這一特性,將一組密切相關的服務進程放入同一個Pod中;同一個Pod裡的容器之間僅需通過localhost就能互相通訊。
PID名稱空間:Pod中的不同應用程式可以看到其他應用程式的進程ID。
網路名稱空間:Pod中的多個容器能夠存取同一個IP和埠範圍。
IPC名稱空間:Pod中的多個容器能夠使用System V IPC或POSIX訊息佇列進行通訊。
UTS名稱空間:Pod中的多個容器共用一個主機名;Volumes(共用儲存卷)。
Pod中的各個容器可以存取在Pod級別定義的Volumes。
Init Container容器
Pod可以包含多個容器,應用執行在這些容器裏面,同時 Pod 也可以有一個或多個先於應用容器啓動的 Init 容器。
如果爲一個 Pod 指定了多個 Init 容器,這些Init容器會按順序逐個執行。每個 Init 容器都必須執行成功,下一個才能 纔能夠執行。當所有的 Init 容器執行完成時,Kubernetes 纔會爲 Pod 初始化應用容器並像平常一樣執行。
Init容器與普通的容器非常像,除了以下兩點:
1、Init容器總是執行到成功完成且正常退出爲止
2、只有前一個Init容器成功完成並正常退出,才能 纔能執行下一個Init容器。
如果Pod的Init容器失敗,Kubernetes會不斷地重新啓動Pod,直到Init容器成功爲止。但如果Pod對應的restartPolicy爲Never,則不會重新啓動。
在所有的 Init 容器沒有成功之前,Pod 將不會變成 Ready 狀態。 Init 容器的埠將不會在 Service 中進行聚集。 正在初始化中的 Pod 處於 Pending 狀態,但會將條件 Initializing 設定爲 true。
如果 Pod 重新啓動,所有 Init 容器必須重新執行。
在 Pod 中的每個應用容器和 Init 容器的名稱必須唯一;與任何其它容器共用同一個名稱,會在校驗時拋出錯誤。
Init 容器能做什麼?
因爲 Init 容器是與應用容器分離的單獨映象,其啓動相關程式碼具有如下優勢:
1、Init 容器可以包含一些安裝過程中應用容器不存在的實用工具或個性化程式碼。例如,在安裝過程中要使用類似 sed、 awk、 python 或 dig 這樣的工具,那麼放到Init容器去安裝這些工具;再例如,應用容器需要一些必要的目錄或者組態檔甚至涉及敏感資訊,那麼放到Init容器去執行。而不是在主容器執行。
2、Init 容器可以安全地執行這些工具,避免這些工具導致應用映象的安全性降低。
3、應用映象的建立者和部署者可以各自獨立工作,而沒有必要聯合構建一個單獨的應用映象。
4、Init 容器能以不同於Pod內應用容器的檔案系統檢視執行。因此,Init容器可具有存取 Secrets 的許可權,而應用容器不能夠存取。
5、由於 Init 容器必須在應用容器啓動之前執行完成,因此 Init 容器提供了一種機制 機製來阻塞或延遲應用容器的啓動,直到滿足了一組先決條件。一旦前置條件滿足,Pod內的所有的應用容器會並行啓動。
Init 容器範例
下面 下麪的例子定義了一個具有 2 個 Init 容器的簡單 Pod。 第一個等待 myservice 啓動,第二個等待 mydb 啓動。 一旦這兩個 Init容器都啓動完成,Pod 將啓動spec區域中的應用容器。
Pod yaml檔案
[root@k8s-master lifecycle]# pwd
/root/k8s_practice/lifecycle
[root@k8s-master lifecycle]# cat init_C_pod.yaml
apiVersion: v1
kind: Pod
metadata:
  name: myapp-busybox-pod
  labels:
    app: myapp
spec:
  containers:
  - name: myapp-container
    image: registry.cn-beijing.aliyuncs.com/google_registry/busybox:1.24
    command: ['sh', '-c', 'echo The app is running! && sleep 3600']
  initContainers:
  - name: init-myservice
    image: registry.cn-beijing.aliyuncs.com/google_registry/busybox:1.24
    command: ['sh', '-c', "until nslookup myservice; do echo waiting for myservice; sleep 60; done"]
  - name: init-mydb
    image: registry.cn-beijing.aliyuncs.com/google_registry/busybox:1.24
    command: ['sh', '-c', "until nslookup mydb; do echo waiting for mydb; sleep 60; done"]
啓動這個 Pod,並檢查其狀態,可以執行如下命令:
[root@k8s-master lifecycle]# kubectl apply -f init_C_pod.yaml
pod/myapp-busybox-pod created
[root@k8s-master lifecycle]# kubectl get -f init_C_pod.yaml -o wide  # 或者kubectl get pod myapp-busybox-pod -o wide
NAME                READY   STATUS     RESTARTS   AGE   IP            NODE         NOMINATED NODE   READINESS GATES
myapp-busybox-pod   0/1     Init:0/2   0          55s   10.244.4.16   k8s-node01   <none>           <none>
如需更詳細的資訊:
[root@k8s-master lifecycle]# kubectl describe pod myapp-busybox-pod
Name:         myapp-busybox-pod
Namespace:    default
Priority:     0
…………
Node-Selectors:  <none>
Tolerations:     node.kubernetes.io/not-ready:NoExecute for 300s
                 node.kubernetes.io/unreachable:NoExecute for 300s
Events:
  Type    Reason     Age    From                 Message
  ----    ------     ----   ----                 -------
  Normal  Scheduled  2m18s  default-scheduler    Successfully assigned default/myapp-busybox-pod to k8s-node01
  Normal  Pulled     2m17s  kubelet, k8s-node01  Container image "registry.cn-beijing.aliyuncs.com/google_registry/busybox:1.24" already present on machine
  Normal  Created    2m17s  kubelet, k8s-node01  Created container init-myservice
  Normal  Started    2m17s  kubelet, k8s-node01  Started container init-myservice
如需檢視Pod內 Init 容器的日誌,請執行:
[root@k8s-master lifecycle]# kubectl logs -f --tail 500 myapp-busybox-pod -c init-myservice   # 第一個 init container 詳情
Server:    10.96.0.10
Address 1: 10.96.0.10 kube-dns.kube-system.svc.cluster.local

waiting for myservice
nslookup: can't resolve 'myservice'
Server:    10.96.0.10
Address 1: 10.96.0.10 kube-dns.kube-system.svc.cluster.local
………………
[root@k8s-master lifecycle]# kubectl logs myapp-busybox-pod -c init-mydb   # 第二個 init container 詳情
Error from server (BadRequest): container "init-mydb" in pod "myapp-busybox-pod" is waiting to start: PodInitializing
此時Init 容器將會等待直至發現名稱爲mydb和myservice的 Service。
Service yaml檔案
[root@k8s-master lifecycle]# pwd
/root/k8s_practice/lifecycle
[root@k8s-master lifecycle]# cat init_C_service.yaml
---
kind: Service
apiVersion: v1
metadata:
  name: myservice
spec:
  ports:
    - protocol: TCP
      port: 80
      targetPort: 9376
---
kind: Service
apiVersion: v1
metadata:
  name: mydb
spec:
  ports:
    - protocol: TCP
      port: 80
      targetPort: 9377
建立mydb和myservice的 service 命令:
[root@k8s-master lifecycle]# kubectl create -f init_C_service.yaml
service/myservice created
service/mydb created
之後檢視pod狀態和service狀態,能看到這些 Init容器執行完畢後,隨後myapp-busybox-pod的Pod轉移進入 Running 狀態:
[root@k8s-master lifecycle]# kubectl get svc -o wide mydb myservice
NAME        TYPE        CLUSTER-IP       EXTERNAL-IP   PORT(S)   AGE   SELECTOR
mydb        ClusterIP   10.108.24.84     <none>        80/TCP    72s   <none>
myservice   ClusterIP   10.105.252.196   <none>        80/TCP    72s   <none>
[root@k8s-master lifecycle]#
[root@k8s-master lifecycle]# kubectl get pod myapp-busybox-pod -o wide
NAME                READY   STATUS    RESTARTS   AGE     IP            NODE         NOMINATED NODE   READINESS GATES
myapp-busybox-pod   1/1     Running   0          7m33s   10.244.4.17   k8s-node01   <none>           <none>
由上可知:一旦我們啓動了 mydb 和 myservice 這兩個 Service,我們就能夠看到 Init 容器完成,並且 myapp-busybox-pod 被建立。
進入myapp-busybox-pod容器,並通過nslookup檢視這兩個Service的DNS記錄。
[root@k8s-master lifecycle]# kubectl exec -it myapp-busybox-pod sh
/ # nslookup mydb
Server:    10.96.0.10
Address 1: 10.96.0.10 kube-dns.kube-system.svc.cluster.local

Name:      mydb
Address 1: 10.108.24.84 mydb.default.svc.cluster.local
/ #
/ #
/ #
/ # nslookup myservice
Server:    10.96.0.10
Address 1: 10.96.0.10 kube-dns.kube-system.svc.cluster.local

Name:      myservice
Address 1: 10.105.252.196 myservice.default.svc.cluster.local
完畢!
