Netty
文章目錄
Netty筆記
1 簡介
Netty是⼀個⾼效能的、非同步的、基於事件驅動的⽹絡應⽤框架
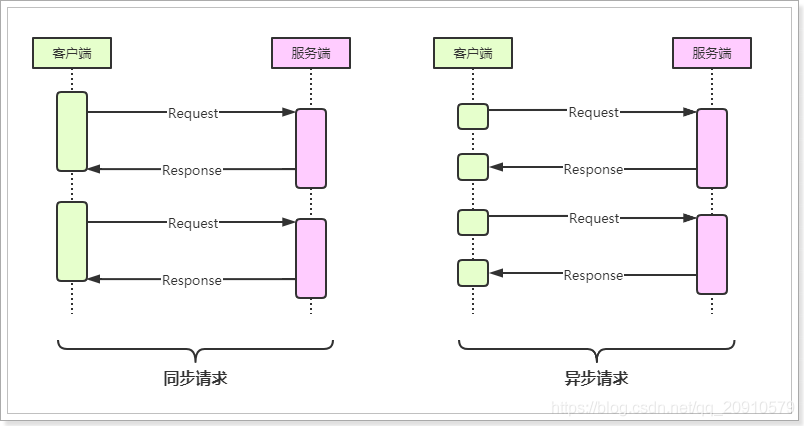
同步、非同步是相對的,在請求或執⾏過程中,如果會阻塞等待,就是同步操作,反之就是非同步操作
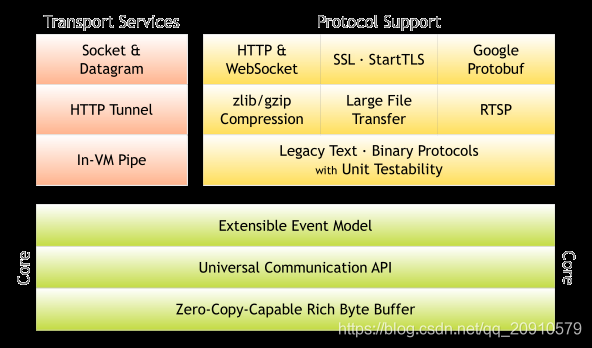
1.1.2、核⼼架構
-
核⼼
- 可延伸的事件模型
- 統⼀的通訊api
- ⽆論是http還是socket都使⽤統⼀的api,簡化了操作
- 零拷⻉機制 機製與位元組緩衝區
-
傳輸服務
-
⽀持socket以及datagram(數據報)
-
⽀持http協定
-
In-VM Pipe (管道協定)
-
-
協定⽀持
- http 以及 websocket
- SSL 安全通訊端協定⽀持
- Google Protobuf (序列化框架)
- ⽀持zlib、gzip壓縮
- ⽀持⼤⽂件的傳輸
- RTSP(實時流傳輸協定,是TCP/IP協定體系中的⼀個應⽤層協定)
- ⽀持⼆進位制協定並且提供了完整的單元測試
1.2 Netty優勢
-
Netty是基於Java的NIO實現的,Netty將各種傳輸型別、協定的實現API進⾏了統⼀封裝,實現了
阻塞和⾮阻塞Socket。 -
基於事件模型實現,可以清晰的分離關注點,讓開發者可以聚焦業務,提升開發效率。
⾼度可定製的執行緒模型-單執行緒、⼀個或多個執行緒池,如SEDA(Staged Event-Driven
Architecture)- SEDA:把⼀個請求處理過程分成⼏個Stage,不同資源消耗的Stage使⽤不同數量的執行緒來處
理,Stage間使⽤事件驅動的非同步通訊模式。
- SEDA:把⼀個請求處理過程分成⼏個Stage,不同資源消耗的Stage使⽤不同數量的執行緒來處
-
Netty只依賴了JDK底層api,沒有其他的依賴,如:Netty 3.X依賴JDK5以上,Netty4.x依賴JDK6以
上。 -
Netty在⽹絡通訊⽅⾯更加的⾼效能、低延遲,儘可能的減少不必要的記憶體拷⻉,提⾼效能。
-
在安全⽅⾯,完整的SSL/TLS和StartTLS⽀持。
-
社羣⽐較活躍,版本迭代週期短,發現bug可以快速修復,新版本也會不斷的加⼊
1.3 版本說明
Netty的版本分爲,3.x、4.x和5.x,其中5.x版本已經被官⽅廢棄,詳情檢視github的issue:[https://git
hub.com/netty/netty/issues/4466](https://git
hub.com/netty/netty/issues/4466)
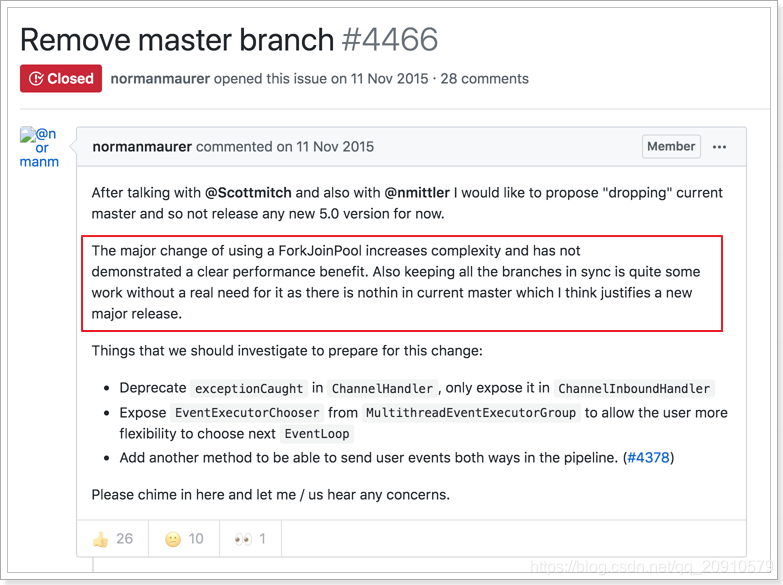
廢棄5.x的主要原因是,使⽤ForkJoinPool後複雜度提升了,但是效能⽅⾯並沒有明顯的優勢,反⽽給項
⽬的維護帶來了很⼤的⼯作量,因此還有到發佈新版本的時機,所以將5.x廢棄。
Netty的下載:
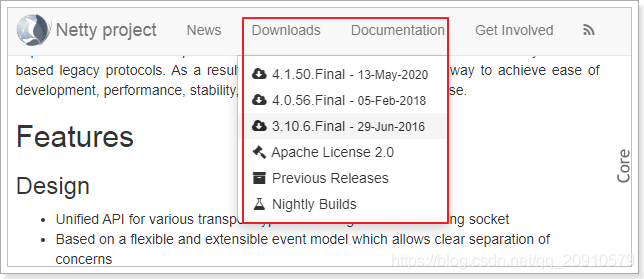
⽬前Netty的最新版本爲4.1.50.Final,本套課程基於此版本學習的
1.4 爲什麼選擇Netty,而不選擇原生的NIO
在⽹絡程式設計⽅⾯,⼀般都不會選擇原⽣的NIO,⽽是會選擇Netty、Mina等封裝後的框架,主要原因
是:
- NIO的類庫和API繁雜,使⽤麻煩,需要熟練掌握Selector、ServerSocketChannel、
SocketChannel、ByteBuffer等。 - 需要具備其他的額外技能做鋪墊,例如熟悉Java多執行緒程式設計。這是因爲NIO程式設計涉及到Reactor模
式,你必須對多執行緒和⽹路程式設計⾮常熟悉,才能 纔能編寫出⾼品質的NIO程式。 - 可靠效能⼒補⻬,⼯作量和難度都⾮常⼤。例如用戶端⾯臨斷連重連、⽹絡閃斷、半包讀寫、失敗
快取、⽹絡擁塞和異常碼流的處理等問題,NIO程式設計的特點是功能開發相對容易,但是可靠效能⼒
補⻬的⼯作量和難度都⾮常⼤。 - JDK NIO的BUG,例如臭名昭著的epoll bug,它會導致Selector空輪詢,最終導致CPU 100%。官
⽅聲稱在JDK 1.6版本的update18修復了該問題,但是直到JDK 1.7版本該問題仍舊存在,只不過該
BUG發⽣概率降低了⼀些⽽已,它並沒有得到根本性解決。- 具體問題檢視:https://www.jianshu.com/p/3ec120ca46b2
1.5 Netty應⽤場景
Netty的應⽤場景是⾮常⼴泛的,⽐如:互聯⽹⾏業的、遊戲⾏業、⼤數據⾏業、醫療⾏業、⾦融等⾏
業。
- 互聯⽹⾏業
- 在互聯⽹⾏業項⽬中,最具代表性的就是分佈式系統架構的遠端服務調⽤,通過RPC的⽅式
進⾏⾼效能的服務調⽤,⽬前主流的RPC框架底層均採⽤了Netty作爲⽹絡通訊元件。 - ⽐如:阿⾥巴巴的分佈式服務治理框架Dubbo,底層就是使⽤Netty作爲通訊元件。
- gRPC,是Google提供的⾼效能RPC框架,底層也使⽤了Netty。
- 在互聯⽹⾏業項⽬中,最具代表性的就是分佈式系統架構的遠端服務調⽤,通過RPC的⽅式
- ⼤數據⾏業
- ⼤數據⾏業中的許多技術也採⽤了Netty作爲通訊元件,如:Flink、Spark、Elasticsearch
等。
- ⼤數據⾏業中的許多技術也採⽤了Netty作爲通訊元件,如:Flink、Spark、Elasticsearch
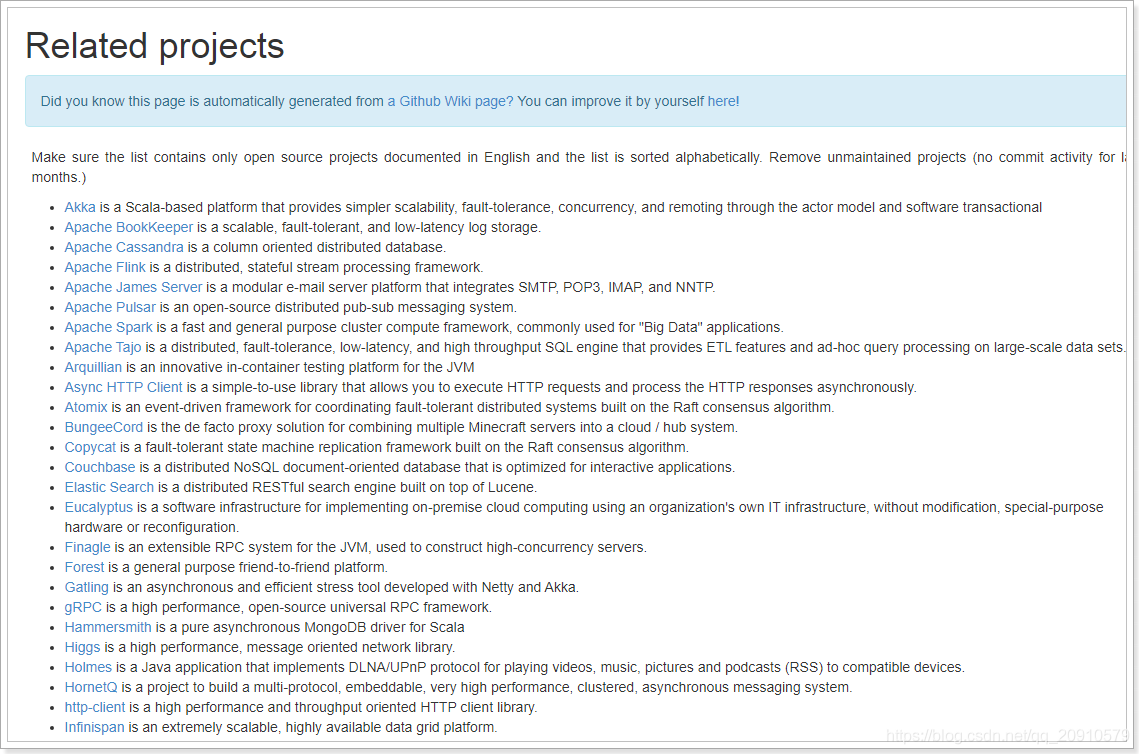
官⽅列出了使⽤Netty的⼀些項⽬:https://netty.io/wiki/related-projects.html
1.6 電商系統⾃研RPC
市⾯上有很多的RPC框架,⽐如:dubbo、gRPC、thrift等產品,在開發項⽬時,我們可以選擇使⽤已
有的RPC產品,也可以⾃研RPC,⼀線⼤⼚⼀般會選擇⾃研RPC,會根據⾃身的業務特點進⾏研發,以
追求更⾼的效能
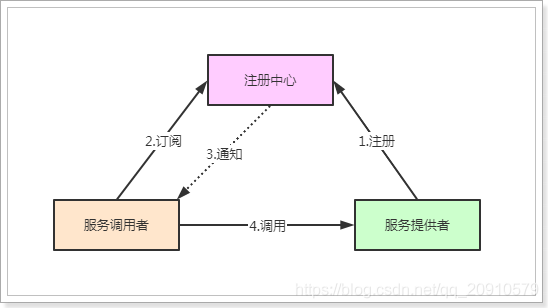
RPC基本的調⽤示意圖:
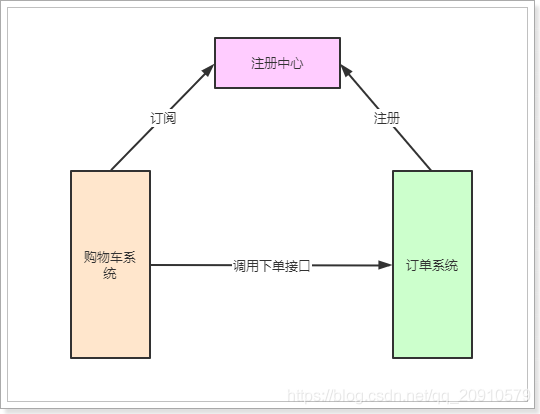
在實現⾃研RPC後,我們將基於此來實現電商系統中的訂單模組的業務,當然了,這⾥所實現的業務⽐
較簡單,主要是學習⾃研RPC爲主。
2、Netty的⾼效能設計
Netty就是使⽤Java的NIO實現了Reactor執行緒模型
2.1 Java中的IO模型
在JDK1.4之前,基於Java所有的socket通訊都採⽤了同步阻塞模型(BIO),這種模型效能低下,當時
⼤型的服務均採⽤C或C++開發,因爲它們可以直接使⽤操作系統提供的非同步IO或者AIO,使得效能得到
⼤幅提升。
2002年,JDK1.4發佈,新增了java.nio包,提供了許多非同步IO開發的API和類庫。新增的NIO,極⼤的促
進了基於Java的非同步⾮阻塞的發展和應⽤。
2011年,JDK7發佈,將原有的NIO進⾏了升級,稱爲NIO2.0,其中也對AIO進⾏了⽀持。
2.1.1 BIO模型
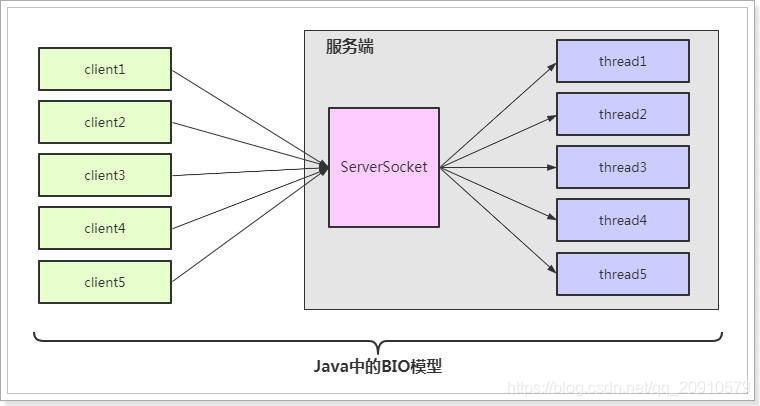
java中的BIO是blocking I/O的簡稱,它是同步阻塞型IO,其相關的類和接⼝在java.io下。
BIO模型簡單來講,就是伺服器端爲每⼀個請求都分配⼀個執行緒進⾏處理,如下:
範例程式碼:
BIOServer
package com.jeaw.netty.bio;

import java.io.InputStream;
import java.net.ServerSocket;
import java.net.Socket;
import java.util.concurrent.ExecutorService;
import java.util.concurrent.Executors;

public class BIOServer {
    public static void main(String[] args) throws Exception {
        ServerSocket serverSocket = new ServerSocket(6666);
        ExecutorService executorService = Executors.newCachedThreadPool();
        while (true) {
            System.out.println("等待用戶端連線。。。。");
            Socket socket = serverSocket.accept(); //阻塞
            executorService.execute(() -> {
                try {
                    InputStream inputStream = socket.getInputStream(); //阻塞
                    byte[] bytes = new byte[1024];
                    while (true) {
                        int length = inputStream.read(bytes);
                        if (length == -1) {
                            break;
                        }
                        System.out.println(new String(bytes, 0, length, "UTF-8"));
                    }
                } catch (Exception e) {
                    e.printStackTrace();
                }
            });
        }
    }
}
BIOClient
package com.jeaw.netty.bio;

import java.io.InputStream;
import java.io.OutputStream;
import java.net.Socket;
import java.util.Scanner;

public class BIOClient {
    public static void main(String[] args) throws Exception {
        //1 建立Socket物件
        Socket socket = new Socket("127.0.0.1", 9999);

        while (true) {
            //2 從連線中取出輸出流 發送訊息
            OutputStream os = socket.getOutputStream();
            System.out.println("請輸入:");
            Scanner sc = new Scanner(System.in);
            String s = sc.nextLine();
            os.write(s.getBytes());
            //3.從連線中取出輸入流並接收回話
            InputStream is = socket.getInputStream();
            byte[] b = new byte[20];
            is.read(b);
            System.out.println("伺服器說:" + new String(b).trim());
            //4 關閉
            is.close();
            os.close();
            socket.close();
        }
    }
}
這種模式存在的問題:
- 用戶端的併發數與後端的執行緒數成1:1的⽐例,執行緒的建立、銷燬是⾮常消耗系統資源的,隨着並
髮量增⼤,伺服器端效能將顯著下降,甚⾄會發⽣執行緒堆疊溢位等錯誤。 - 當連線建立後,如果該執行緒沒有操作時,會進⾏阻塞操作,這樣極⼤的浪費了伺服器資源。
2.1.2 NIO模型
NIO,稱之爲New IO 或是 non-block IO (⾮阻塞IO),這兩種說法都可以,其實稱之爲⾮阻塞IO更恰
當⼀些。 NIO相關的程式碼都放在了java.nio包下,其三⼤核⼼元件:Buffer(緩衝區)、Channel(通道)、
Selector(選擇器/多路復⽤器)
- Buffer
- 在NIO中,所有的讀寫操作都是基於緩衝區完成的,底層是通過陣列實現的,常⽤的緩衝區是
ByteBuffer,每⼀種java基本型別都有對應的緩衝區物件(除了Boolean型別),如:
CharBuffer、IntBuffer、LongBuffer等。
- 在NIO中,所有的讀寫操作都是基於緩衝區完成的,底層是通過陣列實現的,常⽤的緩衝區是
- Channel
- 在BIO中是基於Stream實現,⽽在NIO中是基於通道實現,與流不同的是,通道是雙向的,
既可以讀也可以寫。 - Selector
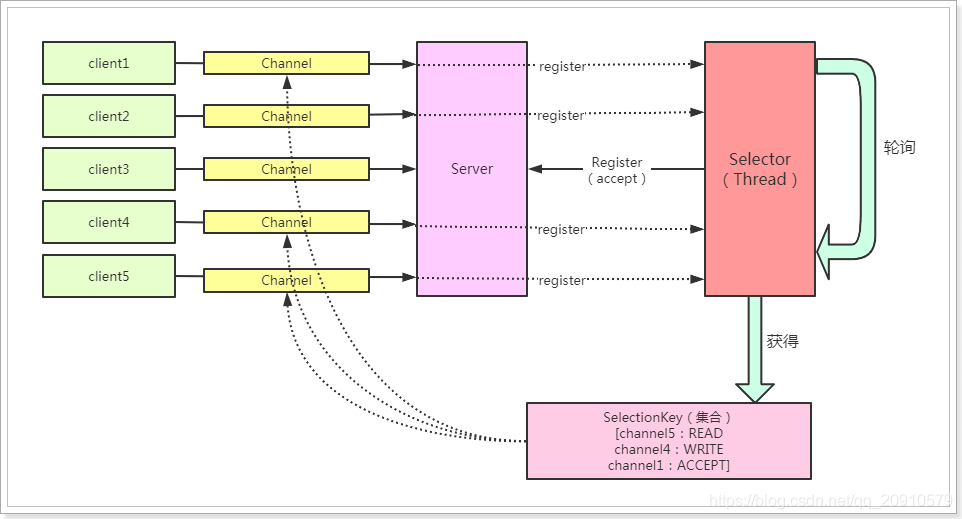
- Selector是多路復⽤器,它會不斷的輪詢註冊在其上的Channel,如果某個Channel上發⽣ 讀或寫事件,這個Channel就處於就緒狀態,會被Selector輪詢出來,然後通過SelectionKey獲取 就緒Ch//annel的集合,進⾏IO的讀寫操作。
基本示意圖如下:
可以看出,NIO模型要優於BIO模型,主要是:
- 通過多路復⽤器就可以實現⼀個執行緒處理多個通道,避免了多執行緒之間的上下⽂切換導致系統開銷
過⼤。 - NIO⽆需爲每⼀個連線開⼀個執行緒處理,並且只有通道真正有有事件時,才進⾏讀寫操作,這樣⼤
⼤的減少了系統開銷。
範例程式碼:
NIOServer
package com.jeaw.netty.nio.net;

import java.io.IOException;
import java.lang.annotation.ElementType;
import java.net.InetSocketAddress;
import java.nio.Buffer;
import java.nio.ByteBuffer;
import java.nio.channels.*;
import java.util.Iterator;
import java.util.Scanner;
import java.util.Set;

public class NIOServer {
    public static void main(String[] args) throws IOException {
        //1 得到一個ServerSocketChannel 物件  老大
        ServerSocketChannel serverSocketChannel = ServerSocketChannel.open();

        //2 得到一個Selector物件 間諜
        Selector selector = Selector.open();

        //3 系結埠
        serverSocketChannel.bind(new InetSocketAddress(9999));

        //4 設定非阻塞
        serverSocketChannel.configureBlocking(false);

        //5 註冊 serverSocketChannel物件給Selector物件
        serverSocketChannel.register(selector, SelectionKey.OP_ACCEPT);

        //6 業務程式碼

        while (true) {
            if (selector.select(2000) == 0) {
                System.out.println("Server:沒有用戶端搭理我,我就乾點 幹點別的事");
                continue;
            }
            //6.2 得到SelectionKey,判斷通道裡的事件
            Iterator<SelectionKey> keyIterator = selector.selectedKeys().iterator();
            while (keyIterator.hasNext()) {
                SelectionKey key = keyIterator.next();
                System.out.println("OP_ACCEPT");
                if (key.isAcceptable()) {
                    //用戶端連線請求事件
                    SocketChannel socketChannel = serverSocketChannel.accept();
                    socketChannel.configureBlocking(false);
                    socketChannel.register(selector, SelectionKey.OP_READ, 				                     							ByteBuffer.allocate(1024));
                }else if(key.isReadable()){
                    SocketChannel channel = (SocketChannel) key.channel();
                    ByteBuffer buffer = (ByteBuffer) key.attachment();
                    ByteBuffer direct = ByteBuffer.allocateDirect(3);
                    channel.read(buffer);
                    System.out.println("用戶端發來數據:"+new String(buffer.array()));
                }else if (key.isWritable()){
                    SocketChannel channel = (SocketChannel) key.channel();
                    ByteBuffer buffer = (ByteBuffer) key.attachment();
                    Scanner sc = new Scanner(System.in);
                    System.out.println("請輸入:");
                    String s = sc.nextLine();
                    ByteBuffer byteBuffer = ByteBuffer.wrap(s.getBytes());
                    channel.write(byteBuffer.put(byteBuffer.array()));
                }
                // 6.3 手動從集閤中移除當前key,防止重複處理
                keyIterator.remove();
            }
        }
    }
}
NIOClient
package com.jeaw.netty.nio.net;

import java.io.IOException;
import java.net.InetSocketAddress;
import java.net.SocketAddress;
import java.nio.ByteBuffer;
import java.nio.channels.SocketChannel;
import java.util.Scanner;

public class NIOClient {
    public static void main(String[] args) throws IOException {
        //1. 得到一個網路通道
        SocketChannel socketChannel = SocketChannel.open();
        //2. 設定非阻塞方式
        socketChannel.configureBlocking(false);
        //3. 提供伺服器端的IP 地址和埠號
        InetSocketAddress address=new InetSocketAddress("127.0.0.1",9999);
        //4. 連線伺服器端
        if (!socketChannel.connect(address)) {
            while (!socketChannel.finishConnect()) {//nio 作爲非阻塞式的優勢
                try {
                    Thread.sleep(200);
                } catch (InterruptedException e) {
                    e.printStackTrace();
                }
                System.out.println("Client:連線伺服器端的同時,我還可以幹別的一些事情");
            }
        }
        //5. 得到一個緩衝區並存入數據
        String msg ="hello Server";
        //6. 發送數據
        while (true){
            Scanner sc = new Scanner(System.in);
            System.out.println("請輸入:");
            String s = sc.nextLine();
            ByteBuffer byteBuffer = ByteBuffer.wrap(s.getBytes());
            socketChannel.write(byteBuffer);
        }
    }
}
2.1.3 AIO模型
在NIO中,Selector多路復⽤器在做輪詢時,如果沒有事件發⽣,也會進⾏阻塞,如何能把這個阻塞也
優化掉呢?那麼AIO就在這樣的背景下誕⽣了。
AIO是asynchronous I/O的簡稱,是非同步IO,該非同步IO是需要依賴於操作系統底層的非同步IO實現。
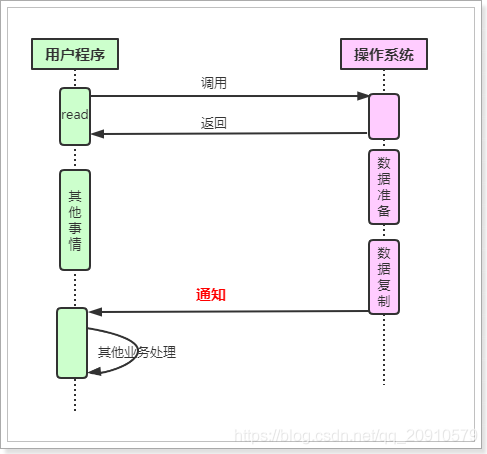
AIO的基本流程是:⽤戶執行緒通過系統調⽤,告知kernel內核啓動某個IO操作,⽤戶執行緒返回。kernel
內核在整個IO操作(包括數據準備、數據複製)完成後,通知⽤戶程式,⽤戶執⾏後續的業務操作。
kernel的數據準備
- 將數據從⽹絡物理裝置(⽹卡)讀取到內核緩衝區。
kernel的數據複製
- 將數據從內核緩衝區拷⻉到⽤戶程式空間的緩衝區。
⽬前AIO模型存在的不⾜:
- 需要完成事件的註冊與傳遞,這⾥邊需要底層操作系統提供⼤量的⽀持,去做⼤量的⼯作。
- Windows 系統下通過 IOCP 實現了真正的非同步 I/O。但是,就⽬前的業界形式來說,Windows 系
統,很少作爲百萬級以上或者說⾼併發應⽤的伺服器操作系統來使⽤。 - ⽽在 Linux 系統下,非同步IO模型在2.6版本才引⼊,⽬前並不完善。所以,這也是在 Linux 下,實
現⾼併發⽹絡程式設計時都是以 NIO 多路復⽤模型模式爲主。
2.2 Reactor執行緒模型
Reactor執行緒模型不是Java專屬,也不是Netty專屬,它其實是⼀種併發程式設計模型,是⼀種思想,具有指
導意義。⽐如,Netty就是結合了NIO的特點,應⽤了Reactor執行緒模型所實現的。
Reactor模型中定義的三種⻆⾊:
- Reactor:負責監聽和分配事件,將I/O事件分派給對應的Handler。新的事件包含連線建⽴就緒、
讀就緒、寫就緒等。 - Acceptor:處理用戶端新連線,並分派請求到處理器鏈中。
- Handler:將⾃身與事件系結,執⾏⾮阻塞讀/寫任務,完成channel的讀⼊,完成處理業務邏輯
後,負責將結果寫出channel。
常⻅的Reactor執行緒模型有三種,如下:
- Reactor單執行緒模型
- Reactor多執行緒模型
- 主從Reactor多執行緒模型
2.2.1 單Reactor單執行緒模型
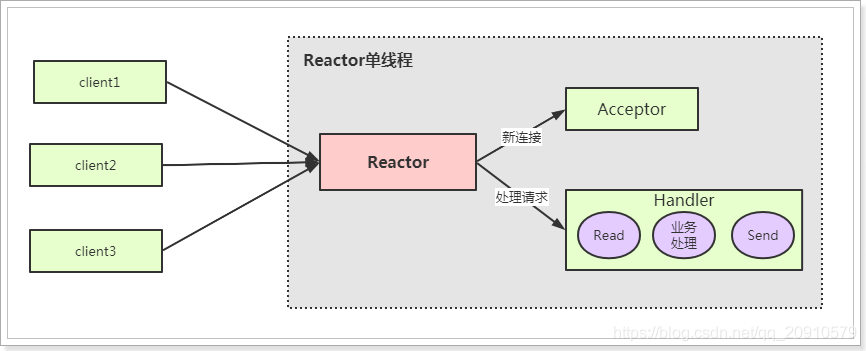
說明:
- Reactor充當多路復⽤器⻆⾊,監聽多路連線的請求,由單執行緒完成
- Reactor收到用戶端發來的請求時,如果是新建連線通過Acceptor完成,其他的請求由Handler完
成。 - Handler完成業務邏輯的處理,基本的流程是:Read --> 業務處理 --> Send 。
這種模型的優缺點:
- 優點
- 結構簡單,由單執行緒完成,沒有多執行緒、進程通訊等問題。
- 適合⽤在⼀些業務邏輯⽐較簡單、對於效能要求不⾼的應⽤場景。
- 缺點
- 由於是單執行緒操作,不能充分發揮多核CPU的效能。
- 當Reactor執行緒負載過重之後,處理速度將變慢,這會導致⼤量用戶端連線超時,超時之後往
往會進⾏重發,這更加重Reactor執行緒的負載,最終會導致⼤量訊息積壓和處理超時,成爲系
統的效能瓶頸。 - 可靠性差,如果該執行緒進⼊死回圈或意外終⽌,就會導致整個通訊系統不可⽤,容易造成單
點故障。
2.2.2 單Reactor多執行緒模型
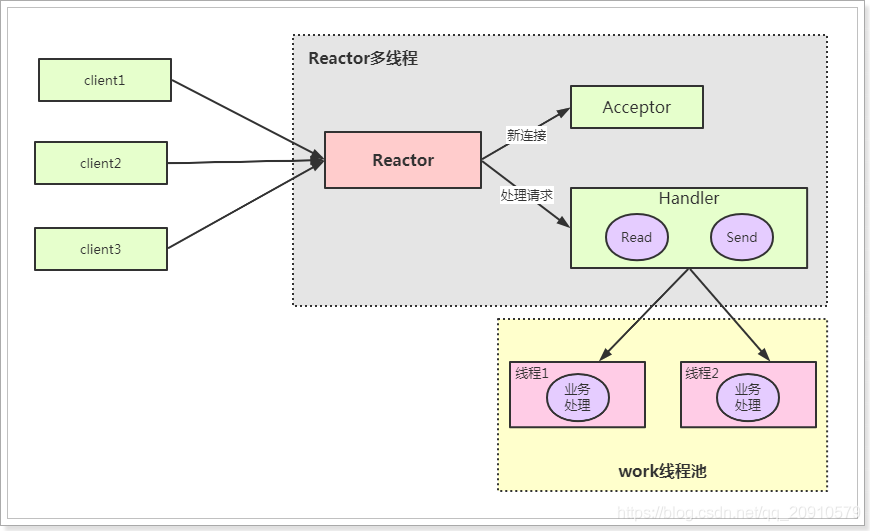
說明:
- 在Reactor多執行緒模型相⽐較單執行緒模型⽽⾔,不同點在於,Handler不會處理業務邏輯,只是負
責響應⽤戶請求,真正的業務邏輯,在另外的執行緒中完成。 - 這樣可以降低Reactor的效能開銷,充分利⽤CPU資源,從⽽更專注的做事件分發⼯作了,提升整
個應⽤的吞吐。
但是這個模型存在的問題:
-
多執行緒數據共用和存取⽐較複雜。如果⼦執行緒完成業務處理後,把結果傳遞給主執行緒Reactor進⾏
發送,就會涉及共用數據的互斥和保護機制 機製。 -
Reactor承擔所有事件的監聽和響應,只在主執行緒中運⾏,可能會存在效能問題。例如併發百萬客
戶端連線,或者伺服器端需要對用戶端握⼿進⾏安全認證,但是認證本身⾮常損耗效能。
爲了解決效能問題,產⽣了第三種主從Reactor多執行緒模型。
2.2.3 主從Reactor多執行緒模型
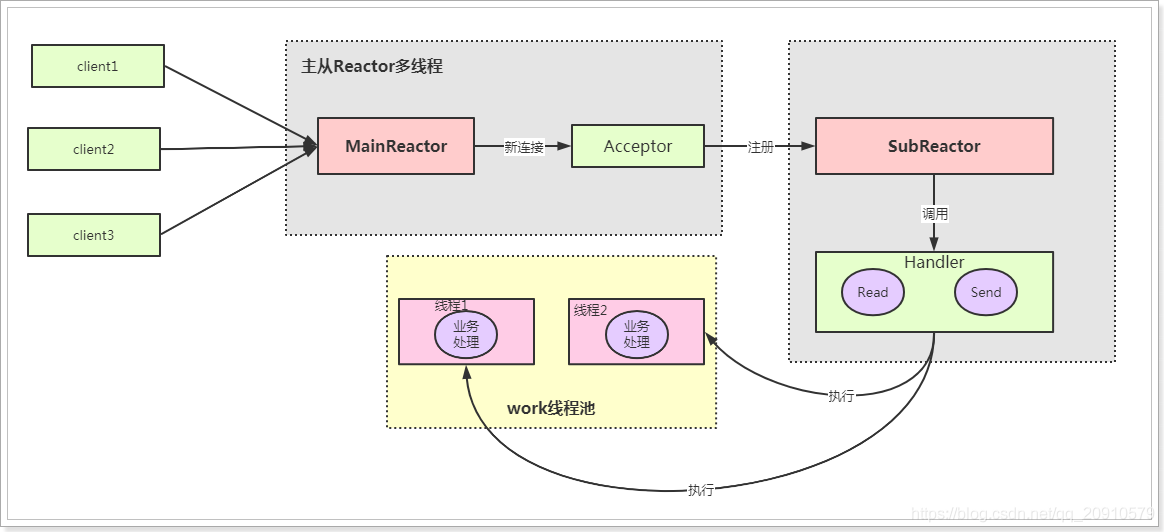
在主從模型中,將Reactor分成2部分:
- MainReactor負責監聽server socket,⽤來處理⽹絡IO連線建⽴操作,將建⽴的socketChannel指
定註冊給SubReactor。 - SubReactor主要完成和建⽴起來的socket的數據互動和事件業務處理操作。\
該模型的優點:
- 響應快,不必爲單個同步事件所阻塞,雖然Reactor本身依然是同步的。
- 可延伸性強,可以⽅便地通過增加SubReactor範例個數來充分利⽤CPU資源。
- 可復⽤性⾼,Reactor模型本身與具體事件處理邏輯⽆關,具有很⾼的復⽤性。
2.3、Netty模型
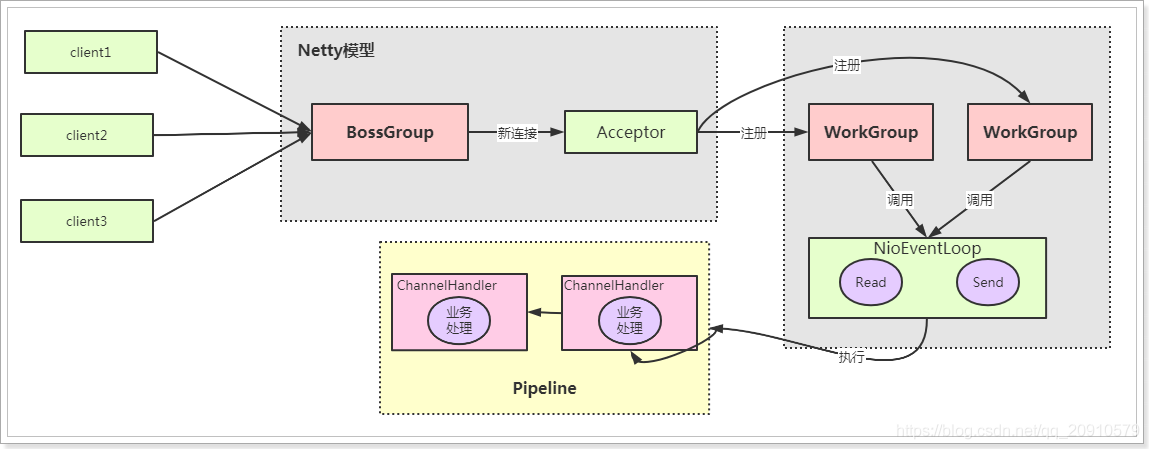
Netty模型是基於Reactor模型實現的,對於以上三種模型都有⾮常好的⽀持,也⾮常的靈活,⼀般情
況,在伺服器端會採⽤主從架構模型,基本示意圖如下:
說明:
- 在Netty模型中,負責處理新連線事件的是BossGroup,負責處理其他事件的是WorkGroup。
Group就是執行緒池的概念。 - NioEventLoop表示⼀個不斷回圈的執⾏處理任務的執行緒,⽤於監聽系結在其上的讀/寫事件。
- 通過Pipeline(管道)執⾏業務邏輯的處理,Pipeline中會有多個ChannelHandler,真正的業務邏
輯是在ChannelHandler中完成的。
3 Netty快速⼊⻔
開發環境:JDK8 + Idea
3.1 建立MyRPC項⽬
pom.xml⽂件:
<?xml version="1.0" encoding="UTF-8"?>

<project xmlns="http://maven.apache.org/POM/4.0.0" xmlns:xsi="http://www.w3.org/2001/XMLSchema-instance"
  xsi:schemaLocation="http://maven.apache.org/POM/4.0.0 http://maven.apache.org/xsd/maven-4.0.0.xsd">
  <modelVersion>4.0.0</modelVersion>

  <groupId>com.jeaw</groupId>
  <artifactId>netty-test</artifactId>
  <version>1.0-SNAPSHOT</version>
  <packaging>war</packaging>

  <name>netty-test Maven Webapp</name>
  <!-- FIXME change it to the project's website -->
  <url>http://www.example.com</url>

  <properties>
    <project.build.sourceEncoding>UTF-8</project.build.sourceEncoding>
    <maven.compiler.source>1.8</maven.compiler.source>
    <maven.compiler.target>1.8</maven.compiler.target>
  </properties>

  <dependencies>
    <dependency>
      <groupId>junit</groupId>
      <artifactId>junit</artifactId>
      <version>4.12</version>
    </dependency>

    <dependency>
      <groupId>io.netty</groupId>
      <artifactId>netty-all</artifactId>
      <version>4.1.51.Final</version>
    </dependency>
    <dependency>
      <groupId>org.junit.jupiter</groupId>
      <artifactId>junit-jupiter-api</artifactId>
      <version>5.7.0-M1</version>
    </dependency>
  </dependencies>

  <build>
    <finalName>netty-test</finalName>
    <pluginManagement><!-- lock down plugins versions to avoid using Maven defaults (may be moved to parent pom) -->
      <plugins>
        <plugin>
          <artifactId>maven-clean-plugin</artifactId>
          <version>3.1.0</version>
        </plugin>
        <!-- see http://maven.apache.org/ref/current/maven-core/default-bindings.html#Plugin_bindings_for_war_packaging -->
        <plugin>
          <artifactId>maven-resources-plugin</artifactId>
          <version>3.0.2</version>
        </plugin>
        <plugin>
          <artifactId>maven-compiler-plugin</artifactId>
          <version>3.8.0</version>
        </plugin>
        <plugin>
          <artifactId>maven-surefire-plugin</artifactId>
          <version>2.22.1</version>
        </plugin>
        <plugin>
          <artifactId>maven-war-plugin</artifactId>
          <version>3.2.2</version>
        </plugin>
        <plugin>
          <artifactId>maven-install-plugin</artifactId>
          <version>2.5.2</version>
        </plugin>
        <plugin>
          <artifactId>maven-deploy-plugin</artifactId>
          <version>2.8.2</version>
        </plugin>
      </plugins>
    </pluginManagement>
  </build>
</project>
3.2 伺服器端
MyRPCServer
package com.jeaw.netty.netty.server;

import io.netty.bootstrap.ServerBootstrap;
import io.netty.channel.ChannelFuture;
import io.netty.channel.EventLoopGroup;
import io.netty.channel.nio.NioEventLoopGroup;
import io.netty.channel.socket.nio.NioServerSocketChannel;

public class MyRPCServer {

    public void start(int port) throws Exception {
        //主執行緒 ,不處理任何業務,只是接收用戶端的連線請求
        EventLoopGroup boss = new NioEventLoopGroup(1);
        //工作執行緒,執行緒數量是: CPU*2
        NioEventLoopGroup worker = new NioEventLoopGroup(10);

        try {
            //服務啓動類
            ServerBootstrap serverBootstrap = new ServerBootstrap();
            serverBootstrap.group(boss, worker) //設定執行緒組
                    .channel(NioServerSocketChannel.class) //設定Server通道
                    .childHandler(new MyChannelInitializer());   //worker執行緒的處理器

            ChannelFuture future = serverBootstrap.bind(port).sync();
            System.out.println("伺服器啓動完成,埠號爲:"+port);
            //等待伺服器端監聽埠關閉
            future.channel().closeFuture().sync();

        } catch (Exception e) {
            e.printStackTrace();
        } finally {
            boss.shutdownGracefully();
            worker.shutdownGracefully();
        }

    }
}
MyChannelInitializer
package com.jeaw.netty.netty.server;

import io.netty.channel.ChannelInitializer;
import io.netty.channel.socket.SocketChannel;

public class MyChannelInitializer extends ChannelInitializer<SocketChannel> {
    @Override
    protected void initChannel(SocketChannel socketChannel) throws Exception {
        // 將業務處理器加入到列表中
        socketChannel.pipeline().addLast(new MyChannelHandler());
    }
}
MyChannelHandler
package com.jeaw.netty.netty.server;

import io.netty.buffer.ByteBuf;
import io.netty.buffer.Unpooled;
import io.netty.channel.ChannelHandler;
import io.netty.channel.ChannelHandlerContext;
import io.netty.channel.ChannelInboundHandlerAdapter;
import io.netty.util.CharsetUtil;
import io.netty.util.concurrent.EventExecutorGroup;

import java.nio.charset.Charset;

public class MyChannelHandler extends ChannelInboundHandlerAdapter {
    @Override
    public void channelRead(ChannelHandlerContext ctx, Object msg) throws Exception {

        ByteBuf byteBuf = (ByteBuf) msg;
        String s = byteBuf.toString(CharsetUtil.UTF_8);
        System.out.println("用戶端發來的數據:"+s);
        ctx.writeAndFlush(Unpooled.copiedBuffer("ok",CharsetUtil.UTF_8));
    }

    @Override
    public void exceptionCaught(ChannelHandlerContext ctx, Throwable cause) throws Exception {
        cause.printStackTrace();
        ctx.close();
    }
}
3.3 測試⽤例
package com.jeaw.netty.netty.server;

import org.junit.Test;

public class TestServer {

    @Test
    public void testServer() throws Exception{
        MyRPCServer myRPCServer = new MyRPCServer();
        myRPCServer.start(9999);  //65536
    }
}
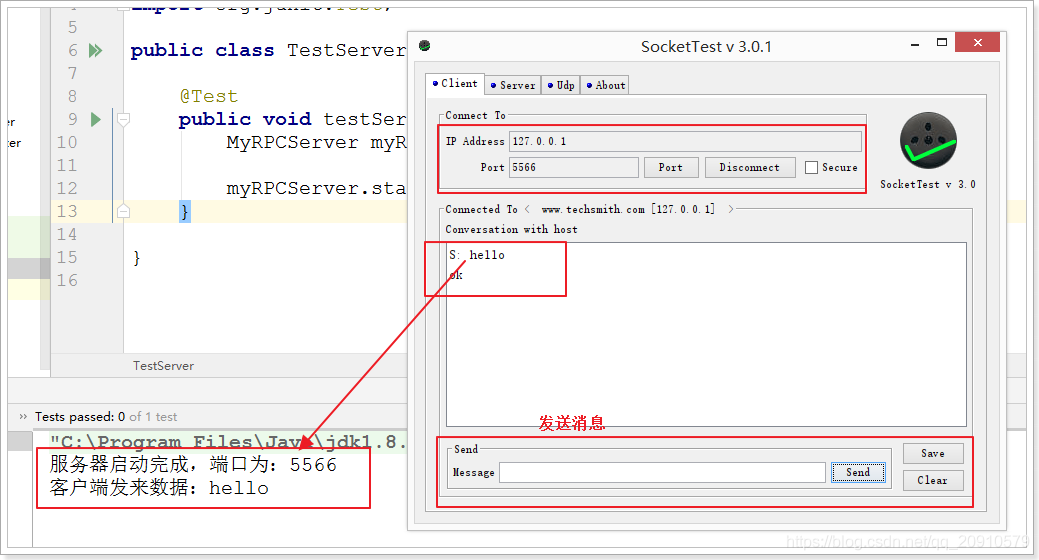
3.4 用戶端
3.4.1 MyRPCClient
package com.jeaw.netty.netty.client;

import io.netty.bootstrap.Bootstrap;
import io.netty.channel.ChannelFuture;
import io.netty.channel.nio.NioEventLoopGroup;
import io.netty.channel.socket.nio.NioSocketChannel;
import javafx.concurrent.Worker;

public class MyRPCClient {

    public void start(String host,int port) throws Exception {
        //定義工作執行緒組
        NioEventLoopGroup worder = new NioEventLoopGroup();

        try {
            //client 使用Bootstrap
            Bootstrap bootstrap = new Bootstrap();
            bootstrap.group(worder)
                    .channel(NioSocketChannel.class)
                    .handler(new MyClientHandler());

            ChannelFuture future = bootstrap.connect(host, port).sync();

            future.channel().closeFuture().sync();
        } catch (Exception e) {
            e.printStackTrace();
        } finally {
            worder.shutdownGracefully();
        }

    }
}
3.4.2 MyClientHandler
package com.jeaw.netty.netty.client;

import io.netty.buffer.ByteBuf;
import io.netty.buffer.Unpooled;
import io.netty.channel.ChannelHandlerContext;
import io.netty.channel.SimpleChannelInboundHandler;
import io.netty.util.CharsetUtil;

public class MyClientHandler extends SimpleChannelInboundHandler<ByteBuf> {
    @Override
    protected void channelRead0(ChannelHandlerContext channelHandlerContext, ByteBuf msg) throws Exception {
        System.out.println("接收到伺服器的訊息"+msg.toString(CharsetUtil.UTF_8));
    }

    @Override
    public void channelActive(ChannelHandlerContext ctx) throws Exception {
        //向伺服器端發送數據
        String s ="hello";
        ctx.writeAndFlush(Unpooled.copiedBuffer(s,CharsetUtil.UTF_8));
    }

    @Override
    public void exceptionCaught(ChannelHandlerContext ctx, Throwable cause) throws Exception {
        cause.printStackTrace();
        ctx.close();
    }
}
3.4.3 測試⽤例
package cn.itcast.myrpc;

import cn.itcast.myrpc.client.MyRPCClient;
import org.junit.Test;

public class TestClient {

	@Test
	public void testClient() throws Exception{
		new MyRPCClient().start("127.0.0.1", 5566);
	}
}
4 Netty核⼼元件
4.1 Channel
Channel可以理解爲是socket連線,在用戶端與伺服器端連線的時候就會建⽴⼀個Channel,它負責基本
的IO操作,⽐如:bind()、connect(),read(),write() 等。
Netty 的 Channel 接⼝所提供的 API,⼤⼤地降低了直接使⽤ Socket 類的複雜性。
不同協定、不同的阻塞型別的連線都有不同的 Channel 型別與之對應,常⽤的 Channel 型別:
- NioSocketChannel,NIO的用戶端 TCP Socket 連線。
- NioServerSocketChannel,NIO的伺服器端 TCP Socket 連線。
- NioDatagramChannel, UDP 連線。
- NioSctpChannel,用戶端 Sctp 連線。
- NioSctpServerChannel,Sctp 伺服器端連線,這些通道涵蓋了 UDP 和 TCP ⽹絡 IO 以及⽂件IO。
4.2 EventLoop、EventLoopGroup
有了 Channel 連線服務,連線之間可以訊息流動。如果伺服器發出的訊息稱作「出站」訊息,伺服器接受
的訊息稱作「⼊站」訊息。那麼訊息的「出站」/「⼊站」就會產⽣事件(Event)。
例如:連線已啓用;數據讀取;⽤戶事件;異常事件;開啓鏈接;關閉鏈接等等。
有了事件,就需要⼀個機制 機製去監控和協調事件,這個機制 機製(元件)就是EventLoop。
在 Netty 中每個 Channel 都會被分配到⼀個 EventLoop。⼀個 EventLoop 可以服務於多個 Channel。
每個 EventLoop 會佔⽤⼀個 Thread,同時這個 Thread 會處理 EventLoop 上⾯發⽣的所有 IO 操作和
事件。
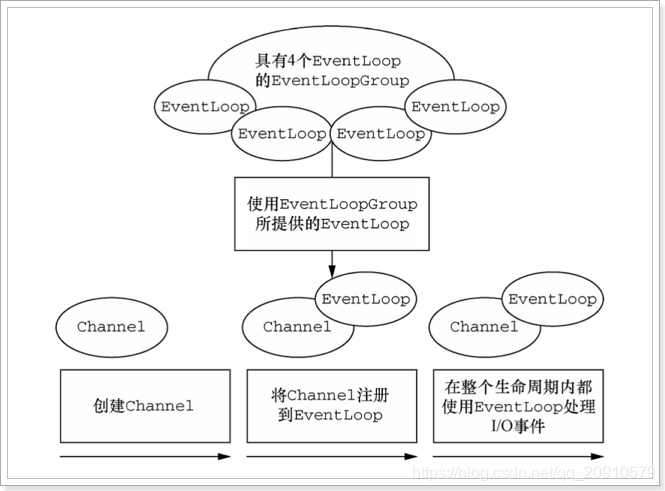
EventLoopGroup 是⽤來⽣成 EventLoop 的,在前⾯的例⼦中,第⼀⾏程式碼就是 new
NioEventLoopGroup();
// 主執行緒,不處理任何業務邏輯,只是接收客戶的連線請求
EventLoopGroup boss = new NioEventLoopGroup(1);
// ⼯作執行緒,執行緒數預設是:cpu*2
EventLoopGroup worker = new NioEventLoopGroup();
如果沒有指定執行緒數⼤⼩,預設執行緒數爲:cpu核數*2,原始碼如下:
static {
		DEFAULT_EVENT_LOOP_THREADS = Math.max(1, SystemPropertyUtil.getInt(
			"io.netty.eventLoopThreads", NettyRuntime.availableProcessors()
		* 2)); //可⽤cpu核數 * 2
		if (logger.isDebugEnabled()) {
			logger.debug("-Dio.netty.eventLoopThreads: {}",
			DEFAULT_EVENT_LOOP_THREADS);
		}
}
上圖關係爲:
- ⼀個 EventLoopGroup 包含⼀個或者多個 EventLoop;
- ⼀個 EventLoop 在它的⽣命週期內只和⼀個 Thread 系結;
- 所有由 EventLoop 處理的 I/O 事件都將在它專有的 Thread 上被處理;
- ⼀個 Channel 在它的⽣命週期內只註冊於⼀個 EventLoop;
- ⼀個 EventLoop 可能會被分配給⼀個或多個 Channel。
4.3 ChannelHandler
ChannelHandler對使⽤者⽽⾔,可以說是最重要的元件了,因爲對於數據的⼊站和出站的業務邏輯的
編寫都是在ChannelHandler中完成的。
在前⾯的例⼦中,MyChannelHandler就是實現了channelRead⽅法,獲取到用戶端傳來的數據。
對於數據的出站和⼊站,有着不同的ChannelHandler型別與之對應:
- ChannelInboundHandler ⼊站事件處理器
- ChannelOutBoundHandler 出站事件處理器
接⼝繼承關係如下:

ChannelHandlerAdapter提供了⼀些⽅法的預設實現,可減少⽤戶對於ChannelHandler的編寫。
ChannelInboundHandlerAdapter 與 SimpleChannelInboundHandler的區別:
- 在伺服器端編寫ChannelHandler時繼承的是ChannelInboundHandlerAdapter
- 在用戶端編寫ChannelHandler時繼承的是SimpleChannelInboundHandler
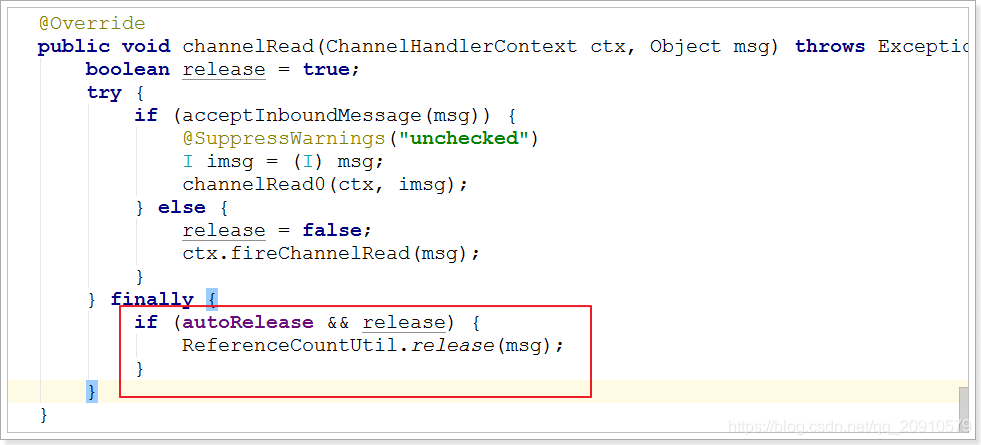
- 兩者的區別在於,前者不會釋放訊息數據的引⽤,⽽後者會釋放訊息數據的引⽤。
4.4 ChannelPipeline
在Channel的數據傳遞過程中,對應着有很多的業務邏輯需要處理,⽐如:編碼解碼處理、讀寫操作
等,那麼對於每種業務邏輯實現都需要有個ChannelHandler完成,也就意味着,⼀個Channel對應着多
個ChannelHandler,多個ChannelHandler如何去管理它們,它們的執⾏順序⼜該是怎麼樣的,這就需
要ChannelPipeline進⾏管理了。
⼀個Channel包含了⼀個ChannelPipeline,⽽ChannelPipeline中維護了⼀個ChannelHandler的列
表。
ChannelHandler與Channel和ChannelPipeline之間的對映關係,由ChannelHandlerContext進⾏維
護。
它們關係如下:

ChannelHandler按照加⼊的順序會組成⼀個雙向鏈表,⼊站事件從鏈表的head往後傳遞到最後⼀個
ChannelHandler,出站事件從鏈表的tail向前傳遞,直到最後⼀個ChannelHandler,兩種型別的
ChannelHandler相互不會影響。
4.5 Bootstrap
Bootstrap是引導的意思,它的作⽤是設定整個Netty程式,將各個元件都串起來,最後系結端⼝、啓動
Netty服務。
Netty中提供了2種類型的引導類,⼀種⽤於用戶端(Bootstrap),⽽另⼀種(ServerBootstrap)⽤於服務
器。
它們的區別在於:
- ServerBootstrap 將系結到⼀個端⼝,因爲伺服器必須要監聽連線,⽽ Bootstrap 則是由想要連線
到遠端節點的用戶端應⽤程式所使⽤的。 - 引導⼀個用戶端只需要⼀個EventLoopGroup,但是⼀個ServerBootstrap則需要兩個。
- 因爲伺服器需要兩組不同的 Channel
- 第⼀組將只包含⼀個 ServerChannel,代表伺服器⾃身的已系結到某個本地端⼝的正在監聽
的通訊端。 - 第⼆組將包含所有已建立的⽤來處理傳⼊用戶端連線。
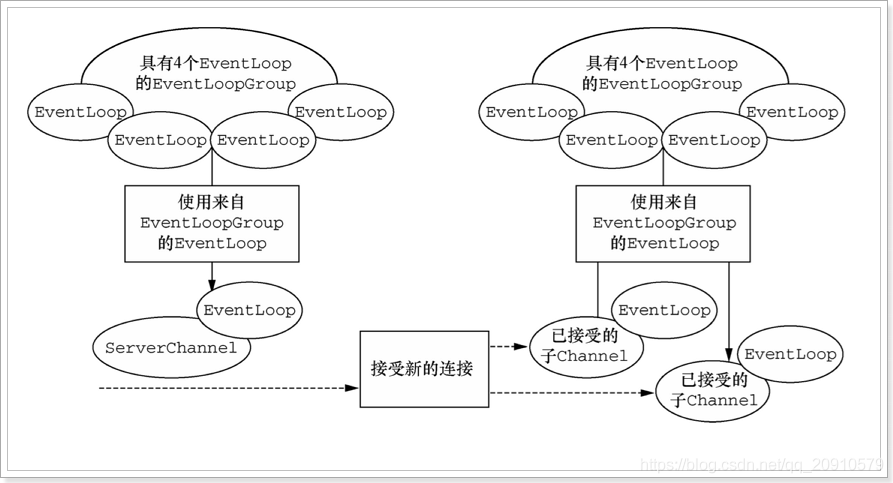
與ServerChannel相關聯的EventLoopGroup 將分配⼀個負責爲傳⼊連線請求建立 Channel 的
EventLoop。⼀旦連線被接受,第⼆個 EventLoopGroup 就會給它的 Channel 分配⼀個 EventLoop。
4.6 Future
Future提供了⼀種在操作完成時通知應⽤程式的⽅式。這個物件可以看作是⼀個非同步操作的結果的佔位
符,它將在未來的某個時刻完成,並提供對其結果的存取。
JDK 預置了 interface java.util.concurrent.Future,但是其所提供的實現,只允許⼿動檢查對應的操作
是否已經完成,或者⼀直阻塞直到它完成。這是⾮常繁瑣的,所以 Netty 提供了它⾃⼰的實現——
ChannelFuture,⽤於在執⾏非同步操作的時候使⽤。
- ChannelFuture提供了⼏種額外的⽅法,這些⽅法使得我們能夠註冊⼀個或者多個
ChannelFutureListener範例。 - 監聽器的回撥⽅法operationComplete(),將會在對應的 操作完成時被調⽤ 。然後監聽器可以判
斷該操作是成功地完成了還是出錯了。 - 每個 Netty 的出站 I/O 操作都將返回⼀個 ChannelFuture,也就是說,它們都不會阻塞。 所以
說,Netty完全是非同步和事件驅動的。
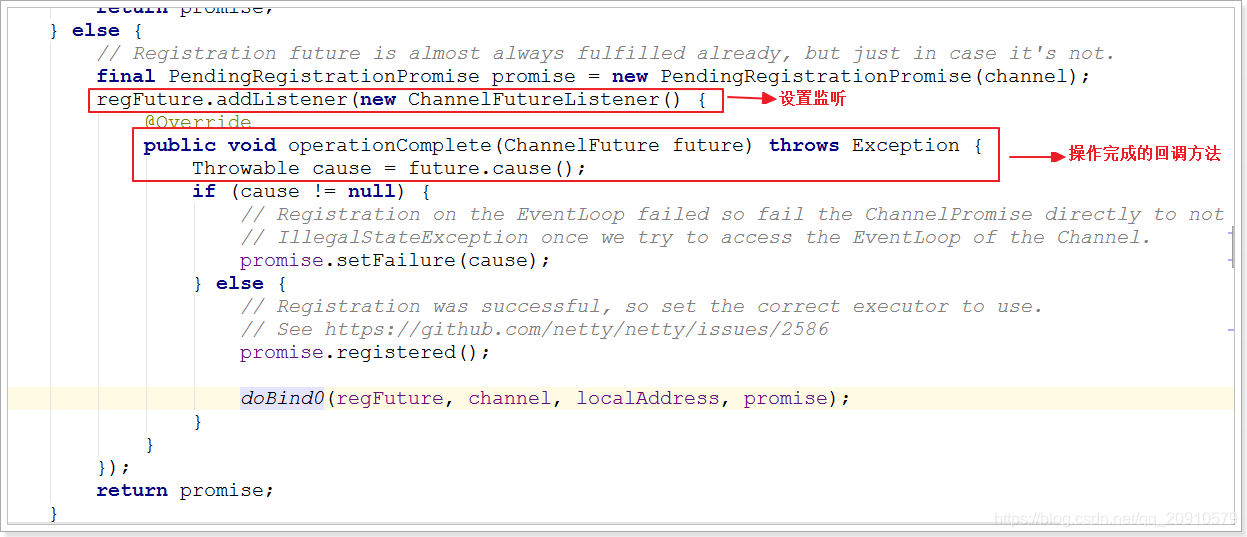
上圖是 serverBootstrap.bind(port) ⽅法底層的邏輯實現。
4.7 ⼩結
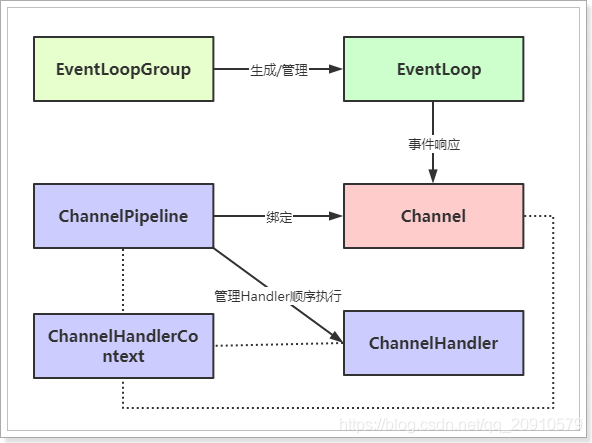
通過以上圖將Netty中的核⼼元件串起來。
5 詳解ByteBuf
5.1 ⼯作原理
Java NIO 提供了ByteBuffer 作爲它 的位元組容器,但是這個類使⽤起來過於複雜,⽽且也有些繁瑣。
Netty 的 ByteBuffer 替代品是 ByteBuf,⼀個強⼤的實現,既解決了JDK API 的侷限性, ⼜爲⽹絡應⽤
程式的開發者提供了更好的API。
從結構上來說,ByteBuf 由⼀串位元組陣列構成。陣列中每個位元組⽤來存放資訊。
ByteBuf 提供了兩個索引,⼀個⽤於讀取數據,⼀個⽤於寫⼊數據。這兩個索引通過在位元組陣列中移
動,來定位需要讀或者寫資訊的位置。
當從 ByteBuf 讀取時,它的 readerIndex(讀索引)將會根據讀取的位元組數遞增。
同樣,當寫 ByteBuf 時,它的 writerIndex(寫索引) 也會根據寫⼊的位元組數進⾏遞增。
+-------------------+------------------+------------------+
| discardable bytes | readable bytes   | writable bytes   |
| 					| (CONTENT) 	   |                  |
+-------------------+------------------+------------------+
| 					|				   |				  |
0 	 <= 	 readerIndex 	<=  writerIndex   <=   capacity
#discardable bytes -- 可丟棄的位元組空間
#readable bytes -- 可讀的位元組空間
#writable bytes --可寫的位元組空間
#capacity -- 最⼤的容量
如果 readerIndex 超過了 writerIndex 的時候,Netty 會拋出 IndexOutOf-BoundsException 異常。
5.2 基本使⽤
5.2.1 讀取操作
package com.jeaw.netty.byteBuf;

import io.netty.buffer.ByteBuf;
import io.netty.buffer.Unpooled;
import io.netty.util.CharsetUtil;

public class TestByteBuf01 {
    public static void main(String[] args) {
        //構造
        ByteBuf byteBuf = Unpooled.copiedBuffer("hello world",
                CharsetUtil.UTF_8);
        System.out.println("byteBuf的容量爲:" + byteBuf.capacity());
        System.out.println("byteBuf的可讀容量爲:" + byteBuf.readableBytes());
        System.out.println("byteBuf的可寫容量爲:" + byteBuf.writableBytes());
        System.out.println("------------------⽅法⼀---------------------------");
        //⽅法⼀:內部通過移動readerIndex進⾏讀取
        while (byteBuf.isReadable()) {
            System.out.println((char) byteBuf.readByte());
        }
        System.out.println("---------------------⽅法⼆------------------------");
        //⽅法⼆:通過下標直接讀取
        for (int i = 0; i < byteBuf.readableBytes(); i++) {
            System.out.println((char) byteBuf.getByte(i));
        }
        System.out.println("---------------------⽅法三------------------------");
        //⽅法三:轉化爲byte[]進⾏讀取
        byte[] bytes = byteBuf.array();
        for (byte b : bytes) {
            System.out.println((char) b);
        }
    }
}
5.2.2 寫⼊操作
package com.jeaw.netty.byteBuf;

import io.netty.buffer.ByteBuf;
import io.netty.buffer.Unpooled;
import io.netty.util.CharsetUtil;

public class TestByteBuf02 {
    public static void main(String[] args) {
        //構造空的位元組緩衝區,初始⼤⼩爲10,最⼤爲20
        ByteBuf byteBuf = Unpooled.buffer(10, 20);
        System.out.println("byteBuf的容量爲:" + byteBuf.capacity());
        System.out.println("byteBuf的可讀容量爲:" + byteBuf.readableBytes());
        System.out.println("byteBuf的可寫容量爲:" + byteBuf.writableBytes());
        for (int i = 0; i < 5; i++) {
            byteBuf.writeInt(i); //寫⼊int型別,⼀個int佔4個位元組
        }
        System.out.println("ok");
        System.out.println("byteBuf的容量爲:" + byteBuf.capacity());
        System.out.println("byteBuf的可讀容量爲:" + byteBuf.readableBytes());
        System.out.println("byteBuf的可寫容量爲:" + byteBuf.writableBytes());
        while (byteBuf.isReadable()) {
            System.out.println(byteBuf.readInt());
        }
    }
}
5.2.3 丟棄已讀位元組
#通過discardReadBytes()⽅可以將已經讀取的數據進⾏丟棄處理,就可以回收已經讀取的位元組空間
BEFORE discardReadBytes()
+-------------------+------------------+------------------+
| discardable bytes |  readable bytes  |  writable bytes  |
+-------------------+------------------+------------------+
|					|  				   | 				  |
0   <=   readerIndex   <=   writerIndex   <=   capacity
AFTER discardReadBytes()
+------------------+--------------------------------------+
|  readable bytes  |  writable bytes  (got more space)    |
+------------------+--------------------------------------+
| 				   |                                      |
	readerIndex (0)    <=    writerIndex (decreased)
package com.jeaw.netty.byteBuf;

import io.netty.buffer.ByteBuf;
import io.netty.buffer.Unpooled;
import io.netty.util.CharsetUtil;

public class TestByteBuf03 {
    public static void main(String[] args) {
        ByteBuf byteBuf = Unpooled.copiedBuffer("hello world",
                CharsetUtil.UTF_8);
        System.out.println("byteBuf的容量爲:" + byteBuf.capacity());
        System.out.println("byteBuf的可讀容量爲:" + byteBuf.readableBytes());
        System.out.println("byteBuf的可寫容量爲:" + byteBuf.writableBytes());
        while (byteBuf.isReadable()) {
            System.out.println((char) byteBuf.readByte());
        }
        byteBuf.discardReadBytes(); //丟棄已讀的位元組空間
        System.out.println("byteBuf的容量爲:" + byteBuf.capacity());
        System.out.println("byteBuf的可讀容量爲:" + byteBuf.readableBytes());
        System.out.println("byteBuf的可寫容量爲:" + byteBuf.writableBytes());
    }
}
5.2.4 clear()
#通過clear() 重置readerIndex 、 writerIndex 爲0,需要注意的是,重置並沒有刪除真正的內容BEFORE clear()
+-------------------+------------------+------------------+
| discardable bytes |  readable bytes  |  writable bytes  |
+-------------------+------------------+------------------+
| 					|				   |                  |
0 	<= 	readerIndex 	<= 	writerIndex 	<= 	capacity
AFTER clear()
+---------------------------------------------------------+
|         writable bytes (got more space)  				  |
+---------------------------------------------------------+
| 														  |
0  =  readerIndex  =  writerIndex  <= 	 capacity
package com.jeaw.netty.byteBuf;

import io.netty.buffer.ByteBuf;
import io.netty.buffer.Unpooled;
import io.netty.util.CharsetUtil;

public class TestByteBuf04 {
    public static void main(String[] args) {
        ByteBuf byteBuf = Unpooled.copiedBuffer("hello world",
                CharsetUtil.UTF_8);
        System.out.println("byteBuf的容量爲:" + byteBuf.capacity());
        System.out.println("byteBuf的可讀容量爲:" + byteBuf.readableBytes());
        System.out.println("byteBuf的可寫容量爲:" + byteBuf.writableBytes());

        byteBuf.clear(); //重置readerIndex 、 writerIndex 爲0

        System.out.println("byteBuf的容量爲:" + byteBuf.capacity());
        System.out.println("byteBuf的可讀容量爲:" + byteBuf.readableBytes());
        System.out.println("byteBuf的可寫容量爲:" + byteBuf.writableBytes());
    }
}
5.3 ByteBuf 使⽤模式
根據存放緩衝區的不同分爲三類:
- 堆緩衝區(HeapByteBuf),記憶體的分配和回收速度⽐較快,可以被JVM⾃動回收,缺點是,如
果進⾏socket的IO讀寫,需要額外做⼀次記憶體複製,將堆記憶體對應的緩衝區複製到內核Channel
中,效能會有⼀定程度的下降。
由於在堆上被 JVM 管理,在不被使⽤時可以快速釋放。可以通過 ByteBuf.array() 來獲取 byte[] 數
據。 - 直接緩衝區(DirectByteBuf),⾮堆記憶體,它在對外進⾏記憶體分配,相⽐堆記憶體,它的分配和回
收速度會慢⼀些,但是將它寫⼊或從Socket Channel中讀取時,由於減少了⼀次記憶體拷⻉,速度⽐
堆記憶體塊。 - 複合緩衝區,顧名思義就是將上述兩類緩衝區聚合在⼀起。Netty 提供了⼀個 CompsiteByteBuf,
可以將堆緩衝區和直接緩衝區的數據放在⼀起,讓使⽤更加⽅便。
//預設使⽤的是DirectByteBuf,如果需要使⽤HeapByteBuf模式,則需要進⾏系統參數的設定
System.setProperty("io.netty.noUnsafe", "true"); //netty中IO操作都是基於Unsafe完成的
//ByteBuf 的分配要設定爲⾮池化,否則不能切換到堆緩衝器模式
serverBootstrap.childOption(ChannelOption.ALLOCATOR,
UnpooledByteBufAllocator.DEFAULT);
5.4 ByteBuf 的分配
Netty 提供了兩種 ByteBufAllocator 的實現,分別是:
- PooledByteBufAllocator,實現了 ByteBuf 的物件的池化,提⾼效能減少並最⼤限度地減少記憶體
碎⽚。 - UnpooledByteBufAllocator,沒有實現物件的池化,每次會⽣成新的物件範例。
//通過ChannelHandlerContext獲取ByteBufAllocator範例
ctx.alloc();
//通過channel也可以獲取
channel.alloc();
//Netty預設使⽤了PooledByteBufAllocator
//可以在引導類中設定⾮池化模式
serverBootstrap.childOption(ChannelOption.ALLOCATOR,
UnpooledByteBufAllocator.DEFAULT);
//或通過系統參數設定
System.setProperty("io.netty.allocator.type", "pooled");
System.setProperty("io.netty.allocator.type", "unpooled");
5.5 ByteBuf的釋放
ByteBuf如果採⽤的是堆緩衝區模式的話,可以由GC回收,但是如果採⽤的是直接緩衝區,就不受GC的
管理,就得⼿動釋放,否則會發⽣記憶體泄露。
關於ByteBuf的釋放,分爲⼿動釋放與⾃動釋放。
5.5.1 ⼿動釋放
⼿動釋放,就是在使⽤完成後,調⽤ReferenceCountUtil.release(byteBuf); 進⾏釋放。
通過release⽅法減去 byteBuf 的使⽤計數,Netty 會⾃動回收 byteBuf 。
範例
/**
     * 獲取用戶端發來的數據
     *
     * @param ctx
     * @param msg
     * @throws Exception
     */
    public void channelRead(ChannelHandlerContext ctx, Object msg) throws
            Exception {
        ByteBuf byteBuf = (ByteBuf) msg;
        String msgStr = byteBuf.toString(CharsetUtil.UTF_8);
        System.out.println("用戶端發來數據:" + msgStr);
        //釋放資源
        ReferenceCountUtil.release(byteBuf);
    }
⼿動釋放可以達到⽬的,但是這種⽅式會⽐較繁瑣,如果⼀旦忘記釋放就可能會造成記憶體泄露。
5.5.2 ⾃動釋放
⾃動釋放有三種⽅式,分別是:⼊站的TailHandler、繼承SimpleChannelInboundHandler、HeadHandler的出站釋放。
5.5.2.1 TailHandler
Netty的ChannelPipleline的流⽔線的末端是TailHandler,預設情況下如果每個⼊站處理器Handler都把
訊息往下傳,TailHandler會釋放掉ReferenceCounted型別的訊息。
 /**
     * 獲取用戶端發來的數據
     *
     * @param ctx
     * @param msg
     * @throws Exception
     */
    public void channelRead(ChannelHandlerContext ctx, Object msg) throws
            Exception {
        ByteBuf byteBuf = (ByteBuf) msg;
        String msgStr = byteBuf.toString(CharsetUtil.UTF_8);
        System.out.println("用戶端發來數據:" + msgStr);
        //向用戶端發送數據
        ctx.writeAndFlush(Unpooled.copiedBuffer("ok", CharsetUtil.UTF_8));
        ctx.fireChannelRead(msg); //將ByteBuf向下傳遞
    }
在DefaultChannelPipeline中的TailContext內部類會在最後執⾏:
	@Override
    public void channelRead(ChannelHandlerContext ctx, Object msg) {
        onUnhandledInboundMessage(ctx, msg);
    }

    //最後會執⾏
    protected void onUnhandledInboundMessage(Object msg) {
        try {
            logger.debug(
                    "Discarded inbound message {} that reached at the tail of the
                    pipeline." +
                    "Please check your pipeline configuration.", msg);
        } finally {
            ReferenceCountUtil.release(msg); //釋放資源
        }
    }
需要注意的是,如果沒有進⾏向下傳遞,那麼在TailHandler中是不會進⾏釋放操作的。
5.5.2.2 SimpleChannelInboundHandler
當ChannelHandler繼承了SimpleChannelInboundHandler後,在SimpleChannelInboundHandler的
channelRead()⽅法中,將會進⾏資源的釋放,我們的業務程式碼也需要寫⼊到channelRead0()中。
//SimpleChannelInboundHandler中的channelRead()
    @Override
    public void channelRead(ChannelHandlerContext ctx, Object msg) throws
            Exception {
        boolean release = true;
        try {
            if (acceptInboundMessage(msg)) {
                @SuppressWarnings("unchecked")
                I imsg = (I) msg;
                channelRead0(ctx, imsg);
            } else {
                release = false;
                ctx.fireChannelRead(msg);
            }
        } finally {
            if (autoRelease && release) {
                ReferenceCountUtil.release(msg); //在這⾥釋放
            }
        }
    }
使⽤:
package com.jeaw.netty.byteBuf;

import io.netty.buffer.ByteBuf;
import io.netty.buffer.Unpooled;
import io.netty.channel.ChannelHandlerContext;
import io.netty.channel.SimpleChannelInboundHandler;
import io.netty.util.CharsetUtil;

public class MyClientHandler extends SimpleChannelInboundHandler<ByteBuf> {
    @Override
    protected void channelRead0(ChannelHandlerContext ctx, ByteBuf msg) throws
            Exception {
        System.out.println("接收到伺服器端的訊息:" +
                msg.toString(CharsetUtil.UTF_8));
    }

    @Override
    public void channelActive(ChannelHandlerContext ctx) throws Exception {
        // 向伺服器端發送數據
        String msg = "hello";
        ctx.writeAndFlush(Unpooled.copiedBuffer(msg, CharsetUtil.UTF_8));
    }

    @Override
    public void exceptionCaught(ChannelHandlerContext ctx, Throwable cause)
            throws Exception {
        cause.printStackTrace();
        ctx.close();
    }
}
5.5.2.3 HeadHandler
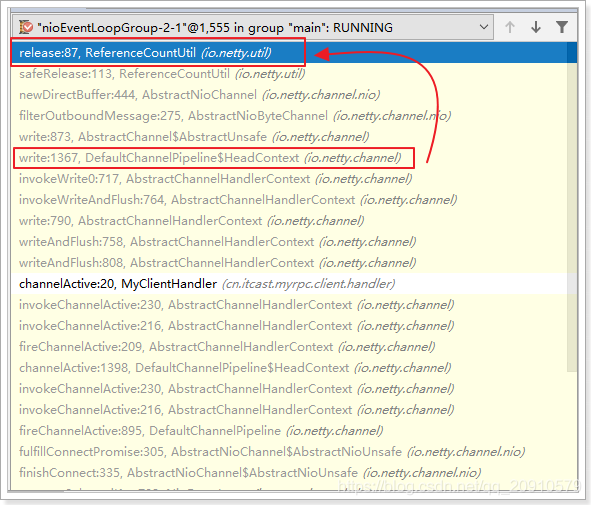
出站處理流程中,申請分配到的 ByteBuf,通過 HeadHandler 完成⾃動釋放。
出站處理⽤到的 Bytebuf 緩衝區,⼀般是要發送的訊息,通常由應⽤所申請。在出站流程開始的時候,
通過調⽤ ctx.writeAndFlush(msg),Bytebuf 緩衝區開始進⼊出站處理的 pipeline 流⽔線 。
在每⼀個出站Handler中的處理完成後,最後訊息會來到出站的最後⼀棒 HeadHandler,再經過⼀輪復
雜的調⽤,在flush完成後終將被release掉。
範例:
package com.jeaw.netty.byteBuf;

import io.netty.buffer.ByteBuf;
import io.netty.buffer.Unpooled;
import io.netty.channel.ChannelHandlerContext;
import io.netty.channel.SimpleChannelInboundHandler;
import io.netty.util.CharsetUtil;

public class MyClientHandler extends SimpleChannelInboundHandler<ByteBuf> {
    @Override
    protected void channelRead0(ChannelHandlerContext ctx, ByteBuf msg) throws
            Exception {
        System.out.println("接收到伺服器端的訊息:" +
                msg.toString(CharsetUtil.UTF_8));
    }

    @Override
    public void channelActive(ChannelHandlerContext ctx) throws Exception {
        // 向伺服器端發送數據
        String msg = "hello";
        ctx.writeAndFlush(Unpooled.copiedBuffer(msg, CharsetUtil.UTF_8));
    }

    @Override
    public void exceptionCaught(ChannelHandlerContext ctx, Throwable cause)
            throws Exception {
        cause.printStackTrace();
        ctx.close();
    }
}
執⾏⽅法調⽤鏈:
5.5.3 ⼩結
- ⼊站處理流程中,如果對原訊息不做處理,調⽤ ctx.fireChannelRead(msg) 把原訊息往下傳,由
流⽔線最後⼀棒 TailHandler 完成⾃動釋放。 - 如果截斷了⼊站處理流⽔線,則可以繼承 SimpleChannelInboundHandler ,完成⼊站ByteBuf ⾃
動釋放。 - 出站處理過程中,申請分配到的 ByteBuf,通過 HeadHandler 完成⾃動釋放。
- ⼊站處理中,如果將原訊息轉化爲新的訊息並調⽤ ctx.fireChannelRead(newMsg)往下傳,那必須
把原訊息release掉; - ⼊站處理中,如果已經不再調⽤ ctx.fireChannelRead(msg) 傳遞任何訊息,也沒有繼承
.netty.byteBuf;