Spring框架學習筆記來啦
1、簡介
Spring框架是一個開放原始碼的 J2EE 應用程式框架,由 Rod Johnson 發起,是針對bean的生命週期進行管理的輕量級容器(lightweight container)。
1.1 Spring框架主要由七部分組成:
- Spring Core
- Spring AOP
- Spring ORM
- Spring DAO
Spring Context - Spring Web
- Spring Web MVC
圖片: 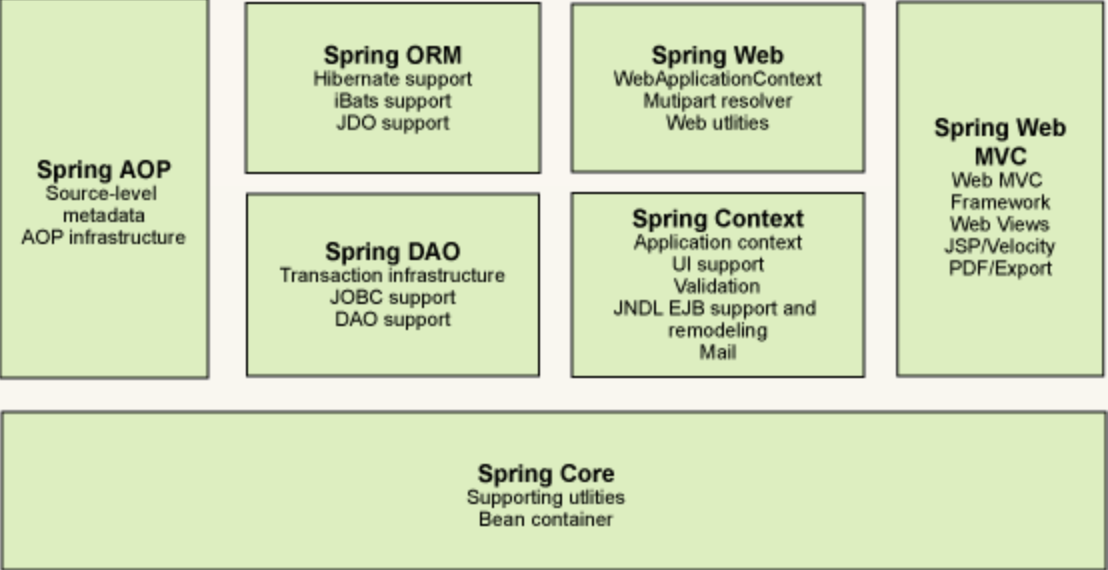
以下是Spring框架的指導原則:
- 提供各個級別的選擇。Spring使您可以儘可能推遲設計決策。例如,您可以在不更改程式碼的情況下通過設定切換永續性提供程式。對於許多其他基礎架構問題以及與第三方API的整合也是如此。
- 適應不同的觀點。Spring擁有靈活性,並且對如何完成事情沒有意見。它從不同的角度支援廣泛的應用程式需求。
- 保持強大的向後相容性。對Spring的演變進行了精心管理,以使各個版本之間幾乎沒有重大更改。Spring支援精心選擇的JDK版本和第三方庫,以方便維護依賴於Spring的應用程式和庫。
- 關心API設計。Spring團隊投入了大量的思想和時間來製作直觀的API,並在許多版本和許多年中都得到了應用。
- 爲程式碼品質設定高標準。Spring框架非常強調有意義,最新和準確的javadoc。它是極少數可以宣告乾淨程式碼結構且程式包之間沒有回圈依賴關係的專案之一。
Spring的優點:
- Spring是一個開源免費的框架
- Spring是輕量級的、非入侵式的框架
- 控制反轉(Ioc)、面向切面程式設計(AOP)
- 支援事物的處理,對框架整合的支援
- 可以下載所有版本原始碼地址:https://repo.spring.io/release/org/springframework/spring/
2、IoC
控制反轉是一種設計思想,而依賴注入(DI)是實現IoC的一種方法。
本質上就是將獲得依賴物件的控制權反轉了,由程式交由第三方。
採用XML方式設定Bean的時候,Bean的定義資訊是和實現分離的,而採用註解的方式可以把兩者合爲一體,Bean的定義資訊直接以註解的形式定義在實現類中,從而達到零設定的目的。
2.1 HelloSpring範例:
//application.xml
<?xml version="1.0" encoding="UTF-8"?>
<beans xmlns="http://www.springframework.org/schema/beans"
       xmlns:xsi="http://www.w3.org/2001/XMLSchema-instance"
       xsi:schemaLocation="http://www.springframework.org/schema/beans
        https://www.springframework.org/schema/beans/spring-beans.xsd">

    <bean id="hello" class="com.alinu.pojo.Hello">
        <property name="str" value="Spring"/>
        <!--  str是類變數,直接用value賦值,如果是物件,則用ref賦值 -->
    </bean>

</beans>

//Hello.java
public class Hello {
    private String str;

    public String getStr() {
        return str;
    }

    public void setStr(String str) {
        this.str = str;
    }

    @Override
    public String toString() {
        return "Hello{" +
                "str='" + str + '\'' +
                '}';
    }
}

public class SpringTest {
    public static void main(String[] args) {
        //獲取spring的上下文物件
        ApplicationContext context = new ClassPathXmlApplicationContext("applicationContext.xml");
        //從spring中取出bean
        Object hello = context.getBean("hello");
        System.out.println(hello);
    }
}
2.2 IoC建立物件方式
- 預設使用無參構造方法
- 通過index實現有參構造:
<constructor-arg value="index有參構造" index="0"/> - (不建議使用)通過type實現有殘構造:
<constructor-arg type="java.lang.String" value="type有參構造"/> - 通過name實現有參構造:
<constructor-arg name="str" value="name有參構造"/>
總結:在組態檔載入的時候,容器中管理的物件就已經初始化了。
3、Spring設定
3.1 別名
<alias name="hello" alias="helloNew"/>
3.2 bean設定
- id-bean的唯一識別符號,也是物件名
- class-bean物件所對應的全限定類名
- name-也是別名,而且可以取多個別名
<bean id="hello" class="com.alinu.pojo.Hello" name="hello2,a;b c"></bean>
3.3 import
import一般用於團隊開發使用,它可以將多個組態檔匯入合併爲一個。
<import resource="bean.xml"/>
<import resource="bean2.xml"/>
4、依賴注入
依賴注入(DI)是一個過程,通過該過程,物件只能通過建構函式參數,工廠方法的參數或在構造或建立物件範例後在物件範例上設定的屬性來定義其依賴關係(即,與它們一起工作的其他物件)。
4.1 基於建構函式的依賴注入
基於建構函式的DI是通過容器呼叫具有多個參數(每個參數代表一個依賴項)的建構函式來完成的。呼叫static帶有特定參數的工廠方法來構造Bean幾乎是等效的,並且本次討論也將建構函式和static工廠方法的參數視爲類似。以下範例顯示了只能通過建構函式注入進行依賴項注入的類:
public class SimpleMovieLister {

    // the SimpleMovieLister has a dependency on a MovieFinder
    private MovieFinder movieFinder;

    // a constructor so that the Spring container can inject a MovieFinder
    public SimpleMovieLister(MovieFinder movieFinder) {
        this.movieFinder = movieFinder;
    }

    // business logic that actually uses the injected MovieFinder is omitted...
}
建構函式參數解析匹配通過使用參數的型別進行。如果Bean定義的建構函式參數中不存在潛在的歧義,則在範例化Bean時,在Bean定義中定義建構函式參數的順序就是將這些參數提供給適當的建構函式的順序。考慮以下類別:
package x.y;

public class ThingOne {

    public ThingOne(ThingTwo thingTwo, ThingThree thingThree) {
        // ...
    }
}

<beans>
    <bean id="beanOne" class="x.y.ThingOne">
        <constructor-arg ref="beanTwo"/>
        <constructor-arg ref="beanThree"/>
    </bean>

    <bean id="beanTwo" class="x.y.ThingTwo"/>

    <bean id="beanThree" class="x.y.ThingThree"/>
</beans>
當參照另一個bean時,型別是已知的,並且可以發生匹配(與前面的範例一樣)。當使用諸如的簡單型別時 true,Spring無法確定值的型別,因此在沒有幫助的情況下無法按型別進行匹配。考慮以下類別:
package examples;

public class ExampleBean {

    // Number of years to calculate the Ultimate Answer
    private int years;

    // The Answer to Life, the Universe, and Everything
    private String ultimateAnswer;

    public ExampleBean(int years, String ultimateAnswer) {
        this.years = years;
        this.ultimateAnswer = ultimateAnswer;
    }
}
//建構函式參數型別匹配
<bean id="exampleBean" class="examples.ExampleBean">
    <constructor-arg type="int" value="7500000"/>
    <constructor-arg type="java.lang.String" value="42"/>
</bean>
//建構函式參數索引
<bean id="exampleBean" class="examples.ExampleBean">
    <constructor-arg index="0" value="7500000"/>
    <constructor-arg index="1" value="42"/>
</bean>
//建構函式參數名稱
<bean id="exampleBean" class="examples.ExampleBean">
    <constructor-arg name="years" value="7500000"/>
    <constructor-arg name="ultimateAnswer" value="42"/>
</bean>
4.2 基於setter的依賴注入(重點)
<bean id="address" class="com.alinu.pojo.Address">
    <property name="address" value="河南鄭州"/>
</bean>

<bean id="student" class="com.alinu.pojo.Student">
    <!--普通屬性注入-->
    <property name="name" value="林新"/>
    <!--bean注入-->
    <property name="address" ref="address"/>
    <!--陣列注入-->
    <property name="books">
        <array>
            <value>紅樓夢</value>
            <value>西遊記</value>
            <value>三國演義</value>
            <value>水滸傳</value>
        </array>
    </property>
    <!--list集合注入-->
    <property name="hobbies">
        <list>
            <value>籃球</value>
            <value>程式設計</value>
            <value>音樂</value>
        </list>
    </property>
    <!--set集合注入-->
    <property name="games">
        <set>
            <value>王者榮耀</value>
            <value>刺激戰場</value>
            <value>英雄聯盟</value>
        </set>
    </property>
    <!--map集合注入-->
    <property name="studentID">
        <map>
            <entry key="身份證" value="123287168123"/>
            <entry key="手機號" value="1371741231"/>
            <entry key="學號" value="1927929317419"/>
        </map>
    </property>
    <!--空值注入-->
    <property name="pointer">
        <null/>
    </property>
    <!--properties注入-->
    <property name="properties">
        <props>
            <prop key="driver">com.mysql...</prop>
            <prop key="url">java:mysql://...</prop>
            <prop key="username">root</prop>
            <prop key="password">123</prop>
        </props>
    </property>
</bean>
4.3 具有c命名和p名稱空間的xml快捷方式
<beans xmlns="http://www.springframework.org/schema/beans"
    xmlns:xsi="http://www.w3.org/2001/XMLSchema-instance"
    xmlns:p="http://www.springframework.org/schema/p"
    xsi:schemaLocation="http://www.springframework.org/schema/beans
        https://www.springframework.org/schema/beans/spring-beans.xsd">

    <bean id="user" class="com.alinu.pojo.User" p:age="21" p:name="林新"/>

</beans>

<beans xmlns="http://www.springframework.org/schema/beans"
    xmlns:xsi="http://www.w3.org/2001/XMLSchema-instance"
    xmlns:c="http://www.springframework.org/schema/c"
    xsi:schemaLocation="http://www.springframework.org/schema/beans
        https://www.springframework.org/schema/beans/spring-beans.xsd">

<bean id="hello" class="com.alinu.pojo.Hello" c:str="快捷方式注入"/>

</beans>
5、bean的作用域
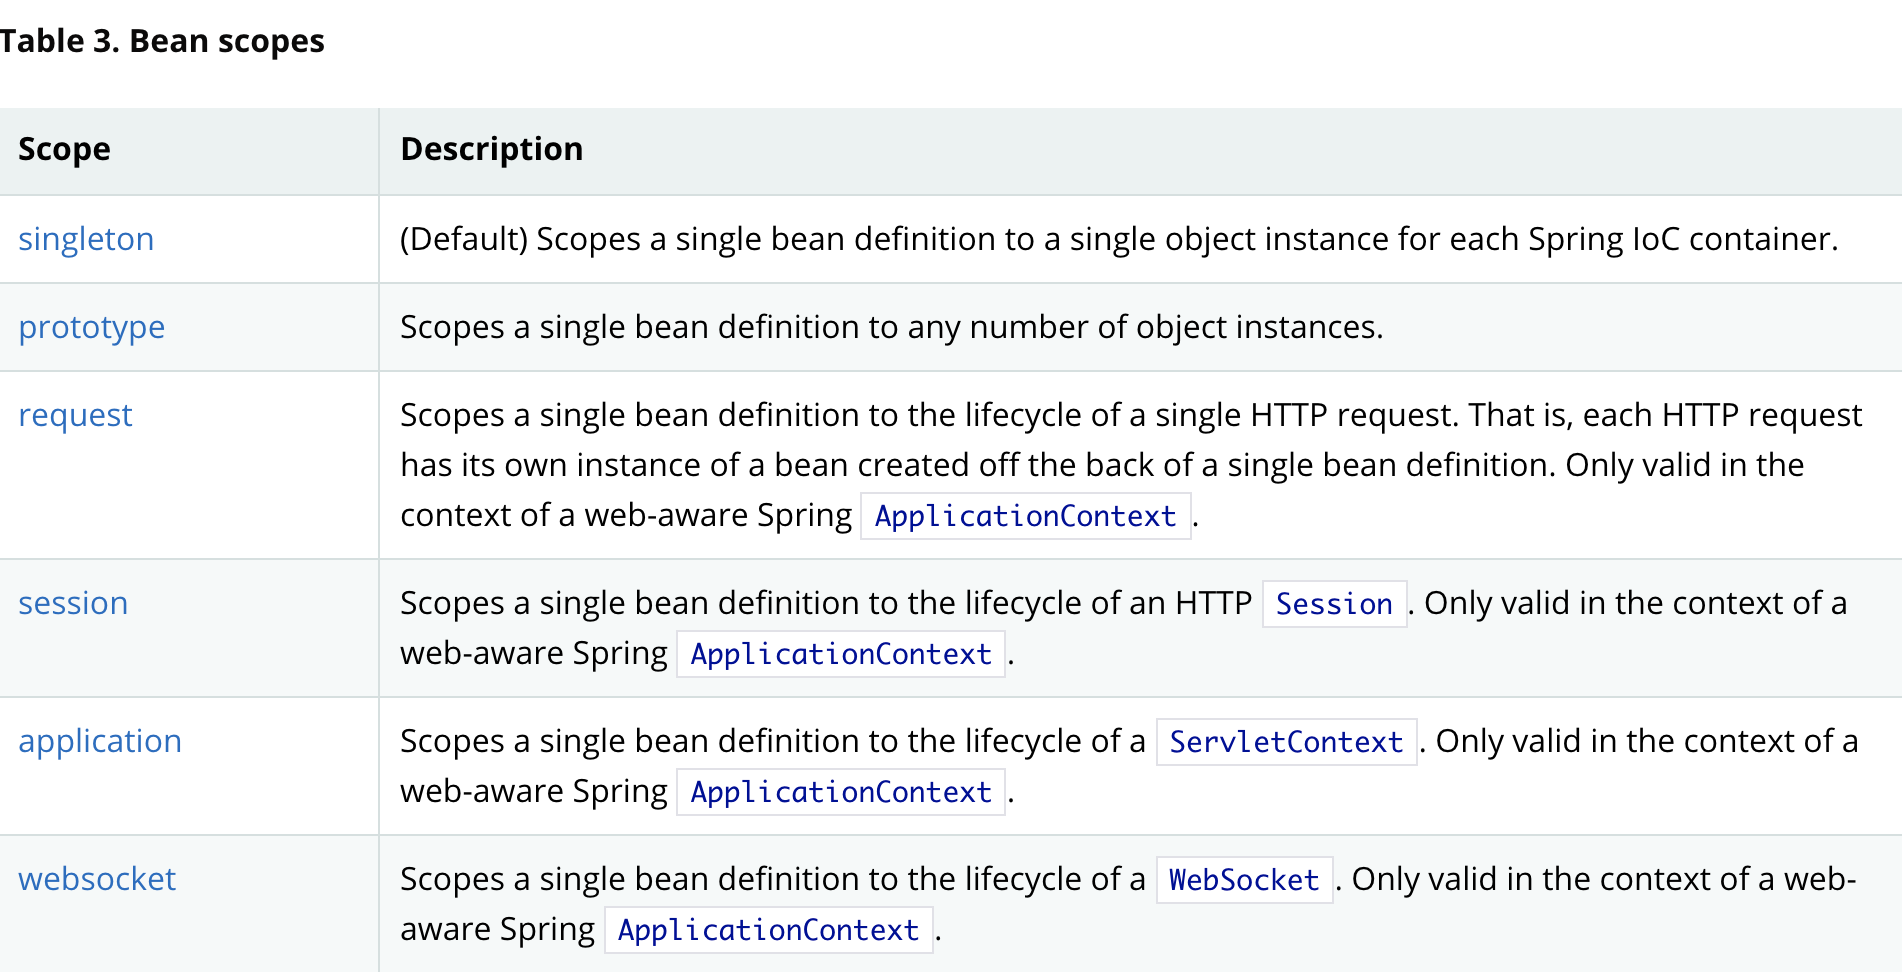
5.1 單例範圍
Spring預設機制 機製,僅管理一個singleton bean的一個共用範例,並且所有對具有ID或與該bean定義相匹配的ID的bean的請求都將導致該特定的bean範例由Spring容器返回。
<bean id="accountService" class="com.something.DefaultAccountService"/>

<!-- the following is equivalent, though redundant (singleton scope is the default) -->
<bean id="accountService" class="com.something.DefaultAccountService" scope="singleton"/>
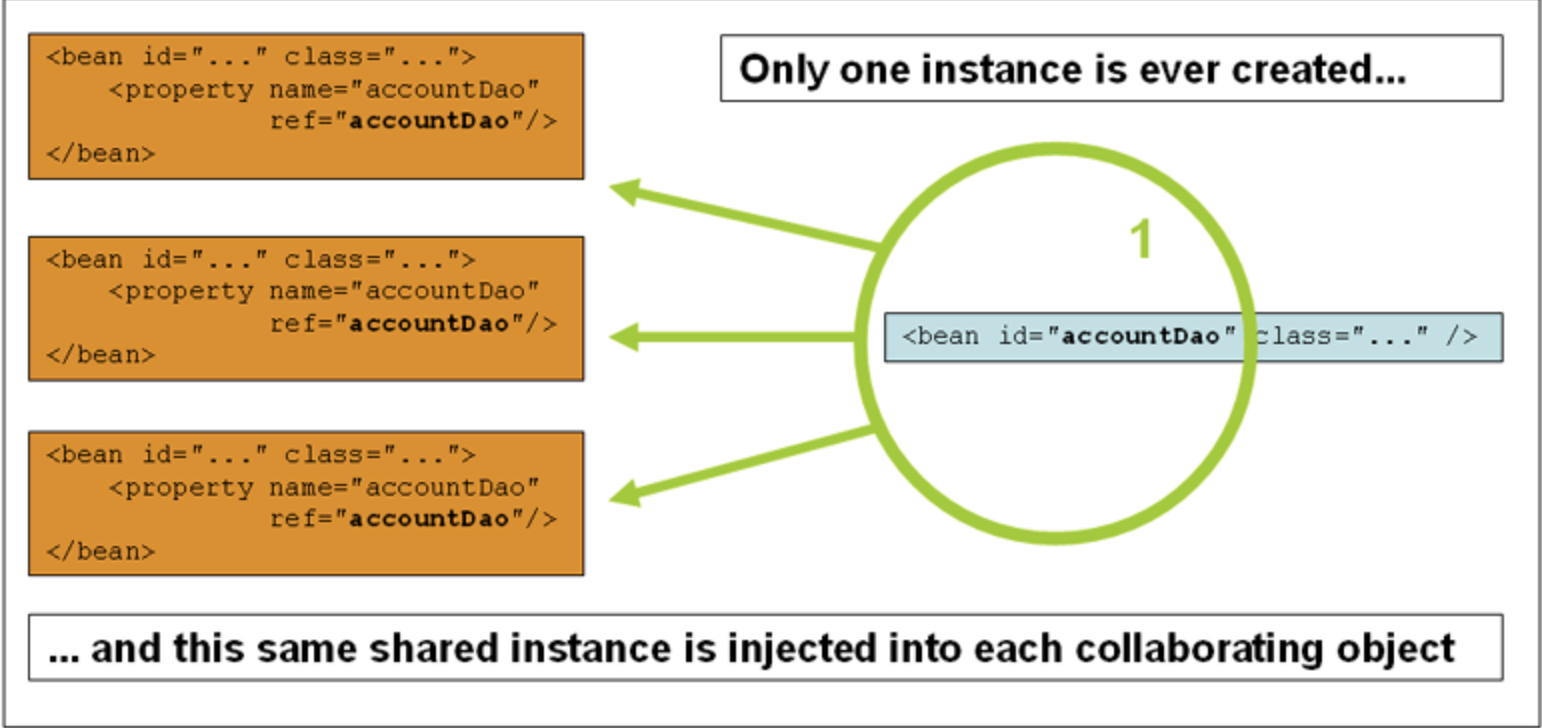
5.2 原型範圍
每次對特定bean提出請求時,bean部署的非單一原型範圍都會導致建立一個新bean範例。也就是說,將Bean注入到另一個Bean中,或者您可以通過getBean()容器上的方法呼叫來請求它。通常,應將原型作用域用於所有有狀態Bean,將單例作用域用於無狀態Bean。
數據存取物件(DAO)通常不設定爲原型,因爲典型的DAO不擁有任何對話狀態。
<bean id="accountService" class="com.something.DefaultAccountService" scope="prototype"/>
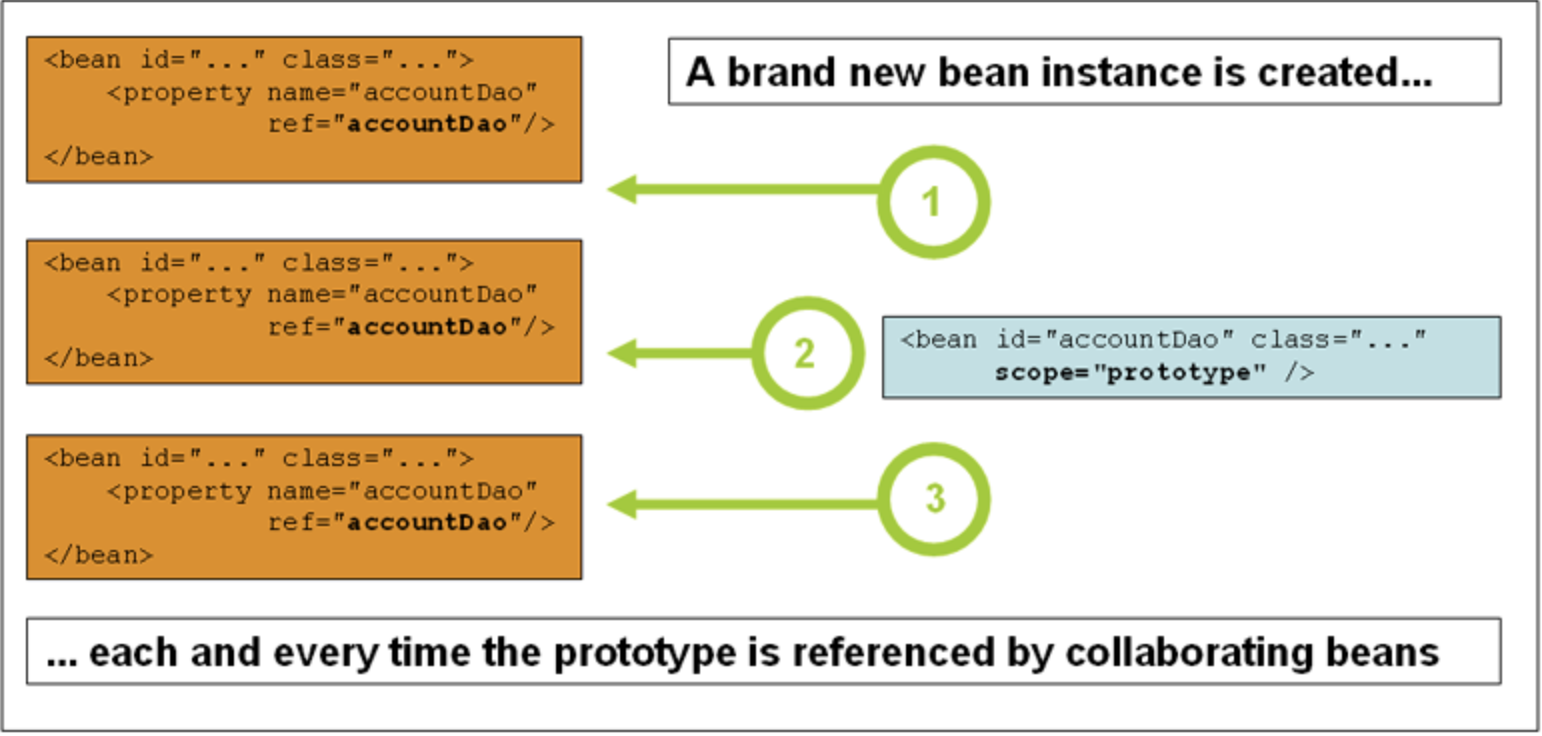
5.3 request、session、application和websocket範圍
在request,session,application,和websocket範圍只有當你使用一個基於web的Spring可ApplicationContext實現(例如 XmlWebApplicationContext)。如果您將這些作用域與常規的Spring IoC容器(例如)一起使用ClassPathXmlApplicationContext,IllegalStateException則會拋出抱怨未知bean作用域的。
6、bean的自動裝配
自動裝配是spring滿足依賴的一種方式
spring會在上下文中自動尋找,並自動給bean裝配屬性
Spring有三種裝配的方式:
- 基於xml的顯示設定
- 基於Java的顯示設定
- 基於註解的隱式設定(重點)
6.1 基於xml的自動裝配
- byName :會自動在容器上下文中查詢,和自己物件set方法後面值對應的beanID
<?xml version="1.0" encoding="UTF-8"?>
<beans xmlns="http://www.springframework.org/schema/beans"
       xmlns:xsi="http://www.w3.org/2001/XMLSchema-instance"
       xsi:schemaLocation="http://www.springframework.org/schema/beans http://www.springframework.org/schema/beans/spring-beans.xsd">

    <bean id="person" class="com.alinu.pojo.Person" autowire="byName">
        <property name="name" value="lincy"/>
    </bean>

    <bean id="cat" class="com.alinu.pojo.Cat"/>

    <bean id="dog" class="com.alinu.pojo.Dog"/>

</beans>
- byType:會自動在容器上下文中查詢,和自己物件屬性型別相同的bean
<bean id="person" class="com.alinu.pojo.Person" autowire="byType">
    <property name="name" value="lincy"/>
</bean>

<bean id="cat" class="com.alinu.pojo.Cat"/>

<bean id="dog" class="com.alinu.pojo.Dog"/>
注意: byName的方式需要保證bean id值需要和自動注入的方法名稱一致;byType的方式需要保證bean的型別和自動注入的型別一致。
6.2 基於註解的自動裝配
基於註解的設定提供了XML設定的替代方法,該設定依賴位元組碼元數據來連線元件,而不是尖括號宣告。
您可以將它們註冊爲單獨的bean定義,但是也可以通過在基於XML的Spring設定中包含以下標記來隱式註冊它們(注意,包括context名稱空間):
<?xml version="1.0" encoding="UTF-8"?>
<beans xmlns="http://www.springframework.org/schema/beans"
    xmlns:xsi="http://www.w3.org/2001/XMLSchema-instance"
    xmlns:context="http://www.springframework.org/schema/context"
    xsi:schemaLocation="http://www.springframework.org/schema/beans
        https://www.springframework.org/schema/beans/spring-beans.xsd
        http://www.springframework.org/schema/context
        https://www.springframework.org/schema/context/spring-context.xsd">

    <context:annotation-config/>

</beans>
6.2.1 使用@Autowired
- 您可以將@Autowired註釋應用於建構函式
- 您還可以將@Autowired註釋應用於傳統的 setter方法
- 您還可以將註釋應用於具有任意名稱和多個參數的方法
- 您還可以將其應用於@Autowired欄位,甚至可以將其與建構函式混合使用
- 您還可以ApplicationContext通過將@Autowired註解新增到需要該型別陣列的欄位或方法中,指示Spring提供特定型別的所有bean
- 預設行爲是將帶註釋的方法和欄位視爲指示所需的依賴項。(即,將required屬性設定@Autowired爲false)
- @Nullable註解標記欄位,表明此欄位可以爲空。
<?xml version="1.0" encoding="UTF-8"?>
<beans xmlns="http://www.springframework.org/schema/beans"
       xmlns:xsi="http://www.w3.org/2001/XMLSchema-instance"
       xmlns:context="http://www.springframework.org/schema/context"
       xsi:schemaLocation="http://www.springframework.org/schema/beans
        https://www.springframework.org/schema/beans/spring-beans.xsd
        http://www.springframework.org/schema/context
        https://www.springframework.org/schema/context/spring-context.xsd">

    <context:annotation-config/>

    <bean id="cat" class="com.alinu.pojo.Cat"/>
    <bean id="dog" class="com.alinu.pojo.Dog"/>
    <bean id="person" class="com.alinu.pojo.Person"/>

</beans>
當存在多個型別相同的bean時,@Autowired無法自動裝配,需要新增@Qualifier註解,指定一個bean
@Qualifier(value = "littlecat")
@Autowired
private Cat cat;
@Autowired
private Dog dog;
<bean id="littlecat" class="com.alinu.pojo.Cat"/>
<bean id="bigcat" class="com.alinu.pojo.Cat"/>
<bean id="dog" class="com.alinu.pojo.Dog"/>
<bean id="person" class="com.alinu.pojo.Person"/>
6.2.2 使用@Resource
Spring還通過在欄位或bean屬性設定器方法上使用JSR-250 @Resource批註(javax.annotation.Resource)支援注入。這是Java EE中的常見模式。@Resource具有名稱屬性。預設情況下,Spring將該值解釋爲要注入的Bean名稱。(JDK 11不支援了)
如果未明確指定名稱,則預設名稱是從欄位名稱或setter方法派生的。如果是欄位,則使用欄位名稱。在使用setter方法的情況下,它採用bean屬性名稱。
public class SimpleMovieLister {

    private MovieFinder movieFinder;

    @Resource(name="myMovieFinder")
    public void setMovieFinder(MovieFinder movieFinder) {
        this.movieFinder = movieFinder;
    }
}
7、使用註解開發
7.1 @Component註解
相當於使用:
<context:component-scan base-package="com.alinu.pojo"/>
@Component
public class User {
    private String name = "lincy";

    @Override
    public String toString() {
        return "User{" +
                "name='" + name + '\'' +
                '}';
    }
}
@Component擴充套件註解:
- @Controller
- @Service
- @Repository
其作用都是將類注入到Spring IoC容器中。
7.2 @Value註解
@Value 通常用於注入外部屬性:
@Component
public class MovieRecommender {

    private final String catalog;

    public MovieRecommender(@Value("${catalog.name}") String catalog) {
        this.catalog = catalog;
    }
}

@Configuration
@PropertySource("classpath:application.properties")
public class AppConfig {

//application.properties檔案:
catalog.name=MovieCatalog
8、基於Java的容器設定
- 基本概念:@Bean和@Configuration
- 使用範例化Spring容器 AnnotationConfigApplicationContext
- 使用@Bean註釋
- 使用@Configuration註釋
- 組成基於Java的設定
- Bean定義組態檔
- PropertySource 抽象化
- 使用 @PropertySource
- 宣告中的佔位符解析
8.1 基本概念: @Bean和@Configuration
Spring的新Java設定支援中的主要工件是-帶 @Configuration註解的類和帶@Bean註解的方法。
該@Bean註解被用於指示一個方法範例,可以設定,並初始化到由Spring IoC容器進行管理的新物件。對於那些熟悉Spring的XML設定的人來說,@Bean註解的作用與元素相同。您可以@Bean對任何Spring 使用帶註解的方法 @Component。但是,它們最常與@Configurationbean一起使用。
用註解類@Configuration表明其主要目的是作爲Bean定義的來源。此外,@Configuration類允許通過呼叫@Bean同一類中的其他方法來定義Bean之間的依賴關係。最簡單的@Configuration類如下:
@Configuration
@ComponentScan("com.alinu.pojo")
@Import(MyConfig2.class)
@Scope("single")
public class MyConfig {

    @Bean
    public User getUser(){
        return new User();
    }
}
等效於:
<beans>
    <bean id="user" class="com.alinu.pojo.User"/>
</beans>
- @ComponentScan(「com.alinu.pojo」)開啓掃描
- @Import(MyConfig2.class)匯入一個設定類
- @Scope(「single/prototype/request/session」)作用範圍
實體類:
@Component
public class User {
    private String name;

    public String getName() {
        return name;
    }

    @Value("lincy")
    public void setName(String name) {
        this.name = name;
    }

    @Override
    public String toString() {
        return "User{" +
                "name='" + name + '\'' +
                '}';
    }
}
測試類:
public class MyTest {
    @Test
    public void test() {
    //如果完全使用了註解設定類實現開發,就只能通過AnnotationConfig上下文來獲取容器,通過設定類的class物件載入
        ApplicationContext context = new AnnotationConfigApplicationContext(MyConfig.class);
        User user = context.getBean("getUser", User.class);
        System.out.println(user);
    }

}
9、代理模式
- 靜態代理
- 動態代理
9.1 靜態代理
角色分析:
- 抽象角色:一般用介面或抽象類來實現
- 真實角色:被代理的角色
- 代理角色:代理真實角色
- 使用者:存取代理物件的角色
public interface RentHouse {
    void rent();
}


public class Host implements RentHouse{

    @Override
    public void rent() {
        System.out.println("房東要出租房屋");
    }
}
public class Proxy implements RentHouse{
    private final Host host;

    public Proxy(Host host) {
        this.host = host;
    }

    @Override
    public void rent() {
        host.rent();
    }

    public void seeHouse(){
        System.out.println("看房子");
    }
}
public class Client {
    public static void main(String[] args) {
        Host host = new Host();
        Proxy proxy = new Proxy(host);
        proxy.rent();
        proxy.seeHouse();

    }
}
在不改變原始碼的情況下,使用代理物件橫向新增功能
public interface UserService {
    void add();

    void delete();

    void search();

    void update();
}
public class UserServiceImpl implements UserService {
    @Override
    public void add() {
        System.out.println("增加了一個使用者");
    }

    @Override
    public void delete() {
        System.out.println("刪除了一個使用者");
    }

    @Override
    public void search() {
        System.out.println("查詢一個使用者");
    }

    @Override
    public void update() {
        System.out.println("修改一個使用者");
    }
}
public class Proxy implements UserService {
    private UserService userService;

    public void setUserService(UserService userService) {
        this.userService = userService;
    }

    @Override
    public void add() {
        userService.add();
        log("新增");
    }

    @Override
    public void delete() {
        userService.delete();
        log("刪除");
    }

    @Override
    public void search() {
        userService.search();
        log("查詢");
    }

    @Override
    public void update() {
        userService.update();
        log("修改");
    }

    private void log(String msg){
        System.out.println("使用代理物件"+msg+"一個使用者");
    }
}
public class Client {
    public static void main(String[] args) {
        UserService userService = new UserServiceImpl();
        Proxy proxy = new Proxy();
        proxy.setUserService(userService);
        proxy.add();
        proxy.delete();
        proxy.search();
        proxy.update();
    }
}
9.2 動態代理
代理類是動態生成的,可以分爲兩大類:
- 基於介面的動態代理-JDK動態代理
- 基於類的動態代理-cglib
Java位元組碼:Javassist
需要瞭解兩個類:Proxy、InvocationHandler - Proxy: Proxy提供用於建立物件的靜態方法,這些物件的行爲類似於介面範例,但允許自定義方法呼叫
- InvocationHnadler:InvocationHandler是由代理範例的呼叫處理程式實現的介面。每個代理範例都有一個關聯的呼叫處理程式。在代理範例上呼叫方法時,該方法呼叫將被編碼並分派到invoke 其呼叫處理程式的方法。
10、AOP
AOP是面向切面程式設計,通過預編譯方式和執行期間動態代理實現程式功能的統一維護的一種技術。
10.1 AOP的實現方式
方式一:使用Spring API
<?xml version="1.0" encoding="UTF-8"?>
<beans xmlns="http://www.springframework.org/schema/beans"
       xmlns:xsi="http://www.w3.org/2001/XMLSchema-instance"
       xmlns:aop="http://www.springframework.org/schema/aop"
       xsi:schemaLocation="http://www.springframework.org/schema/beans
       http://www.springframework.org/schema/beans/spring-beans.xsd
       http://www.springframework.org/schema/aop
       http://www.springframework.org/schema/aop/spring-aop.xsd">

    <bean id="log" class="com.alinu.log.Log"/>
    <bean id="userService" class="com.alinu.service.UserServiceImpl"/>
    <bean id="afterLog" class="com.alinu.log.AfterLog"/>

    <!-- 方式一:使用原生Spring API介面 -->
    <!-- 設定aop:需要匯入AOP的約束 -->
    <aop:config>
        <!-- 切入點 -->
        <aop:pointcut id="pointcut" expression="execution(* com.alinu.service.UserServiceImpl.*(..))"/>

        <!-- 執行環繞增加 -->
        <aop:advisor advice-ref="log" pointcut-ref="pointcut"/>
        <aop:advisor advice-ref="afterLog" pointcut-ref="pointcut"/>
    </aop:config>

</beans>
方式二:自定義類
<bean id="diy" class="com.alinu.diy.DiyPointCut"/>
<aop:config>
    <!-- 自定義切面 ref-要參照的類-->
    <aop:aspect ref="diy">
        <aop:pointcut id="pointcut" expression="execution(* com.alinu.service.UserServiceImpl.*(..))"/>
        <!--通知-->
        <aop:before method="before" pointcut-ref="pointcut"/>
        <aop:after method="after" pointcut-ref="pointcut"/>
    </aop:aspect>
</aop:config>
方式三:註解實現
<bean id="annotationPointCut" class="com.alinu.diy.AnnotationPointCut"/>
<!--開啓註解支援-->
<aop:aspectj-autoproxy/>
註解類:
package com.alinu.diy;

import org.aspectj.lang.ProceedingJoinPoint;
import org.aspectj.lang.annotation.After;
import org.aspectj.lang.annotation.Around;
import org.aspectj.lang.annotation.Aspect;
import org.aspectj.lang.annotation.Before;

/**
 * @author Chenzuwei
 * @description
 * @createTime 2020-08-10 16:14
 * @since 1.0
 */
@Aspect
public class AnnotationPointCut {

    @Before("execution(* com.alinu.service.UserServiceImpl.*(..))")
    public void before() {
        System.out.println("====方法執行前====");
    }

    @After("execution(* com.alinu.service.UserServiceImpl.*(..))")
    public void after(){
        System.out.println("====方法執行後====");
    }

    @Around("execution(* com.alinu.service.UserServiceImpl.*(..))")
    public void around(ProceedingJoinPoint joinPoint) throws Throwable {
        System.out.println("環繞前");
        Object proceed = joinPoint.proceed(); //執行方法
        System.out.println("環繞後");
    }

}
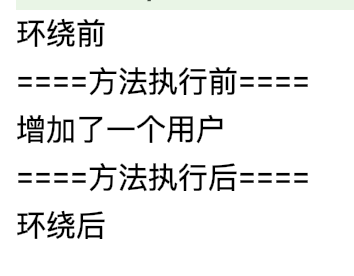
方法執行的順序是:
11、整合MyBatis
applicationContext.xml
<?xml version="1.0" encoding="UTF-8"?>
<beans xmlns="http://www.springframework.org/schema/beans"
       xmlns:xsi="http://www.w3.org/2001/XMLSchema-instance"
       xsi:schemaLocation="http://www.springframework.org/schema/beans http://www.springframework.org/schema/beans/spring-beans.xsd">

    <import resource="spring-dao.xml"/>

    <bean id="userMapper" class="com.alinu.mapper.UserMapperImpl">
        <property name="sqlSessionTemplate" ref="sqlSessionTemplate"/>
    </bean>

</beans>
spring-dao.xml
<!-- 使用Spring的數據源替換Mybatis的設定-->
 <bean id="dataSource" class="org.springframework.jdbc.datasource.DriverManagerDataSource">
     <property name="driverClassName" value="com.mysql.cj.jdbc.Driver"/>
     <property name="url" value="jdbc:mysql://localhost:3306/mybatis"/>
     <property name="username" value="root"/>
     <property name="password" value="Chenzuwei_0817"/>
 </bean>
<!-- SqlsessionFactory -->
 <bean id="sqlSessionFactory" class="org.mybatis.spring.SqlSessionFactoryBean">
     <property name="dataSource" ref="dataSource"/>
     <!--系結mybatis組態檔-->
     <property name="configLocation" value="classpath:mybatis-config.xml"/>
     <!--系結所有mapper-->
     <property name="mapperLocations" value="classpath:*Mapper.xml"/>
 </bean>

 <bean id="sqlSessionTemplate" class="org.mybatis.spring.SqlSessionTemplate">
     <!--沒有set方法,只能使用構造器注入-->
     <constructor-arg index="0" ref="sqlSessionFactory"/>
 </bean>

 <!--設定宣告式事務-->
 <bean id="transactionManager" class="org.springframework.jdbc.datasource.DataSourceTransactionManager">
     <property name="dataSource" ref="dataSource"/>
 </bean>
mybatis-config.xml
<?xml version="1.0" encoding="utf-8" ?>
<!DOCTYPE configuration
        PUBLIC "-//mybatis.org//DTD Config 3.0//EN"
        "http://mybatis.org/dtd/mybatis-3-config.dtd">
<!-- mybatis主組態檔-->
<configuration>
    <!--別名-->
    <typeAliases>
        <typeAlias type="com.alinu.pojo.User" alias="User"/>
    </typeAliases>
    <!--設定-->
    <!--<settings>
        <setting name="" value=""/>
    </settings>-->
</configuration>
UserMapperImpl.java
package com.alinu.mapper;

import com.alinu.pojo.User;
import org.mybatis.spring.SqlSessionTemplate;

/**
 * @author Chenzuwei
 * @description
 * @createTime 2020-08-11 11:34
 * @since 1.0
 */
public class UserMapperImpl implements UserMapper {
    private SqlSessionTemplate sqlSessionTemplate;

    public void setSqlSessionTemplate(SqlSessionTemplate sqlSessionTemplate) {
        this.sqlSessionTemplate = sqlSessionTemplate;
    }

    @Override
    public User findById(int id) {
        UserMapper mapper = sqlSessionTemplate.getMapper(UserMapper.class);
       return mapper.findById(id);
    }
}
12、宣告式事務
12.1 事務的特性:
- 原子性
- 一致性
- 隔離性
- 永續性
12.2 spring事務型別:
- 交由容器管理事務(宣告式AOP)
- 程式設計式事務管理
<!--設定宣告式事務-->
<bean id="transactionManager" class="org.springframework.jdbc.datasource.DataSourceTransactionManager">
    <property name="dataSource" ref="dataSource"/>
</bean>

<!--設定事務的通知-->
<tx:advice id="txAdvice" transaction-manager="transactionManager">
    <!--給哪些方法設定事務-->
    <tx:attributes>
        <!--設定事務的傳播特性:propagation(預設爲REQUIRED)-->
        <tx:method name="add" propagation="REQUIRED"/>
        <tx:method name="delete" propagation="REQUIRED"/>
        <tx:method name="update" propagation="REQUIRED"/>
        <tx:method name="query" read-only="true"/>
        <tx:method name="*" propagation="REQUIRED"/>
    </tx:attributes>
</tx:advice>

<!--設定事務切入-->
<aop:config>
    <aop:pointcut id="txPointCut" expression="execution(* com.alinu.mapper.*.*(..))"/>
    <aop:advisor advice-ref="txAdvice" pointcut-ref="txPointCut"/>
</aop:config>
筆記的內容到後面會稍微有些不足,如有需要請去B站看UP主:遇見狂神說
如有問題請在評論區留言