Welcome to YARP
目錄
Welcome to YARP - 1.認識YARP並搭建反向代理服務
- 2.1 - 組態檔(Configuration Files)
- 2.2 - 設定提供者(Configuration Providers)
- 2.3 - 設定過濾器(Configuration Filters)
Welcome to YARP - 5.身份驗證和授權
Welcome to YARP - 6.壓縮、快取
Welcome to YARP - 7.健康檢查
Welcome to YARP - 8.分散式跟蹤
介紹
反向代理可用於在將請求代理到目標伺服器之前對請求進行速率限制(限流)。這可以減少目標伺服器上的負載,增加一層保護,並確保在應用程式中實施一致的策略。
此功能僅在使用 .NET 7.0 或更高版本時可用 ,因為YARP是基於.NET開發的,只有.NET 7才支援了 限流功能,YARP直接可以拿來用。
預設限流功能是關閉的。而開啟限流會應用到所有的路由,限流中介軟體: app.UseRateLimiter() ,這將應用到專案的所有路由上。
範例:
using Microsoft.AspNetCore.RateLimiting;
using System.Threading.RateLimiting;

var builder = WebApplication.CreateBuilder(args);

// Add services to the container.
builder.Services.AddRateLimiter(_ => _
    .AddFixedWindowLimiter(policyName: "customPolicy", options =>
    {
        options.PermitLimit = 1;
        options.Window = TimeSpan.FromSeconds(2);
        //options.QueueProcessingOrder = QueueProcessingOrder.OldestFirst;
        //options.QueueLimit = 2;
    }));

builder.Services.AddReverseProxy()
    .LoadFromConfig(builder.Configuration.GetSection("ReverseProxy"));

var app = builder.Build();

app.UseRouting();
app.UseRateLimiter();
app.MapReverseProxy();

app.Run();
以上程式碼含義:
- 呼叫 AddRateLimiter 來將速率限制服務新增到服務集合。
- 呼叫
AddFixedWindowLimiter來建立策略名為"customPolicy"的固定視窗限制器,並進行如下設定: - 將 PermitLimit 設定為 1,將時間 Window 設定為 2。 允許每 2 秒的視窗最多 1 個請求。
- QueueProcessingOrder 重新命名為 OldestFirst。
- 將 QueueLimit 設定為 2。
- 呼叫 UseRateLimiter 來啟用速率限制。
設定
Rate Limiter policies 可以通過 RouteConfig.RateLimiterPolicy 為每個路由指定,並且可以從 Routes 組態檔的部分進行繫結。與其他路由屬性一樣,可以在不重新啟動代理的情況下修改和重新載入此屬性。策略名稱不區分大小寫。
範例:
{
  "ReverseProxy": {
    "Routes": {
      "route1" : {
        "ClusterId": "cluster1",
        "RateLimiterPolicy": "customPolicy",
        "Match": {
          "Hosts": [ "localhost" ]
        },
      }
    },
    "Clusters": {
      "cluster1": {
        "Destinations": {
          "cluster1/destination1": {
            "Address": "http://localhost:5011/"
          }
        }
      }
    }
  }
}
RateLimiter policies 是 YARP 使用 ASP.NET Core 的概念。YARP 只是提供上述設定來為每個路由指定一個策略,其餘部分由現有的 ASP.NET Core 速率限制中介軟體處理。
這裡就要讚歎一下 YARP 的設計了,所有的功能都是作為 .NET的中介軟體提供的,讓 .NET 開發者很容易上手。而且可延伸性也是 YARP 的最大優勢。
範例:
app.UseRouting();
app.UseRateLimiter();
app.MapReverseProxy();
在使用速率限制終結點特定的 API 時,必須在
UseRouting之後呼叫UseRateLimiter。 當僅呼叫全域性限制器時,可以在UseRouting之前呼叫UseRateLimiter。
效果展示
我們建立三個專案,一個是YARP代理服務,一個是真實的服務 web api專案,一個是使用者端控制檯 模擬呼叫。限流的設定就按上面說的設定,設定在代理服務上。web api上面也可以配,但是基本上都配代理服務,讓瀏覽在代理層就被攔截掉。

Server程式碼:
var builder = WebApplication.CreateBuilder(args);

// Add services to the container.
// Learn more about configuring Swagger/OpenAPI at https://aka.ms/aspnetcore/swashbuckle
builder.Services.AddEndpointsApiExplorer();
builder.Services.AddSwaggerGen();

var app = builder.Build();

// Configure the HTTP request pipeline.
if (app.Environment.IsDevelopment())
{
    app.UseSwagger();
    app.UseSwaggerUI();
}


app.MapGet("/api", () =>
{
    return "hello i am api server";
});

app.Run();
程式碼很簡單,就提供一個路由為 "api" 介面供使用者端呼叫。
Client 程式碼:
string apiUrl = "http://localhost:5057/api"; // API地址
int totalCalls = 10; // 總共的呼叫次數

using (HttpClient client = new())
{
    for (int callCount = 0; callCount < totalCalls; callCount++)
    {
        HttpResponseMessage response = await client.GetAsync(apiUrl);

        if (response.IsSuccessStatusCode)
        {
            string result = await response.Content.ReadAsStringAsync();
            Console.WriteLine($"Call {callCount + 1}: {result}");
        }
        else
        {
            Console.WriteLine($"Call {callCount + 1} failed: {response.StatusCode}");
        }
    }
}

Console.WriteLine("All calls completed.");
Console.ReadKey();
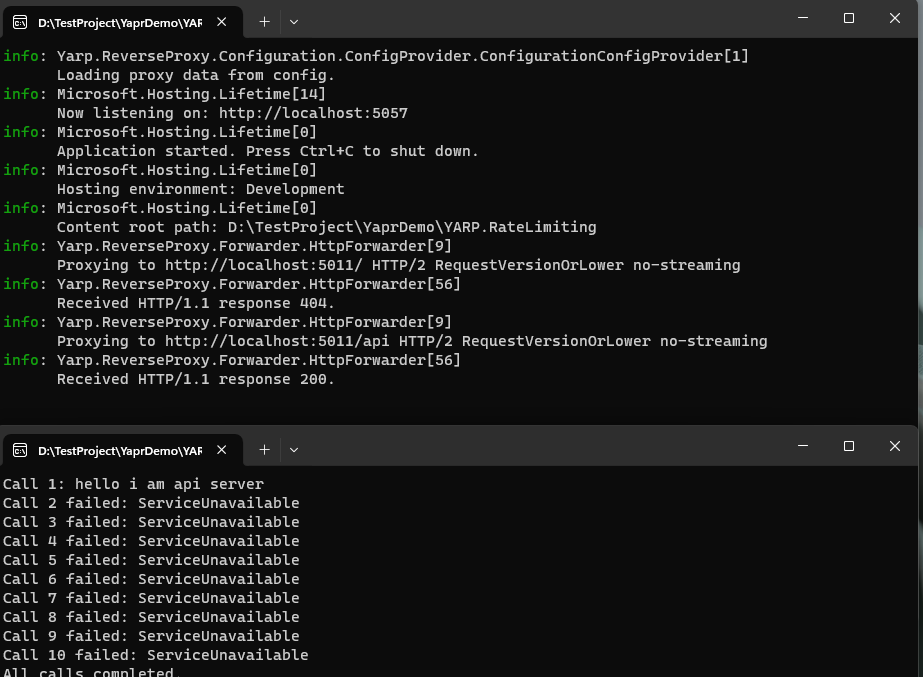
迴圈呼叫介面10次,按照上述先流的設定,2秒內只允許有一個請求,那麼接下來的9個請求應該都是失敗的。

可以看到只有第一次請求成功了,其他的請求全部失敗了。而且YARP 的代理輸出也顯示只代理了一次,其他流量並沒有打真實的伺服器。
禁用Rate Limiting
在路由 RateLimiterPolicy 的引數中指定值 disable 意味著速率限制器中介軟體不會對此路由應用任何策略,即使是預設策略。
總結
本章我們使用YARP對代理服務進行了限流操作。但是這個功能是.NET 自身提供的,而且支援很多種限流規則,這裡就不展開敘述了,想了解的同學可以翻看微軟檔案-限流。如果有時間我們把 YARP 整完,在單獨對某些功能拿出來細聊。本章原始碼已上傳GitHub
下篇文章我們繼續講如何使用YARP 的 身份驗證和授權 功能