在 kubernetes 環境中實現 gRPC 負載均衡
前言
前段時間寫過一篇 gRPC 的入門文章,在最後還留了一個坑沒有填:
也就是 gRPC 的負載均衡問題,因為當時的業務請求量不算大,再加上公司沒有對 Istio 這類服務網格比較熟悉的大牛,所以我們也就一直拖著沒有解決,依然只是使用了 kubernetes 的 service 進行負載,好在也沒有出什麼問題。
由於現在換了公司後也需要維護公司的服務網格服務,結合公司內部對 Istio 的使用現在終於不再停留在理論階段了。
所以也終有機會將這個坑填了。
gRPC 負載均衡
負載不均衡
原理
先來回顧下背景,為什麼會有 gRPC 負債不均衡的問題。
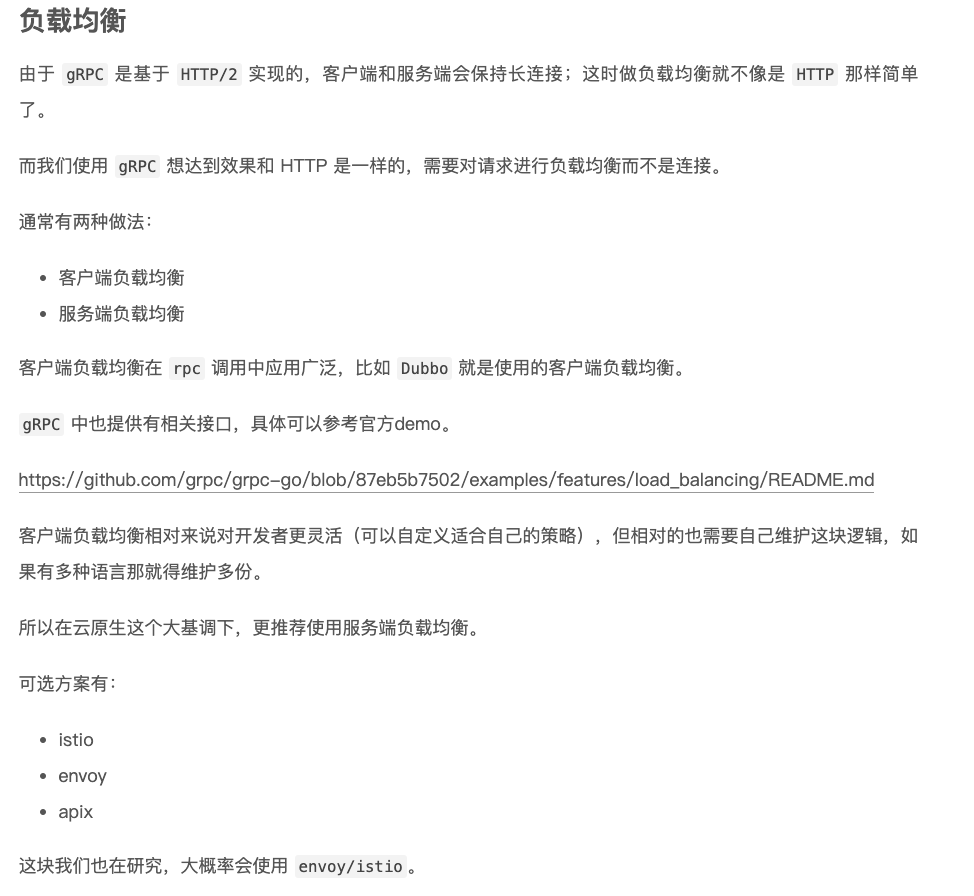
由於 gRPC 是基於 HTTP/2 協定的,所以使用者端和伺服器端會保持長連結,一旦連結建立成功後就會一直使用這個連線處理後續的請求。

除非我們每次請求之後都新建一個連線,這顯然是不合理的。
所以要解決 gRPC 的負載均衡通常有兩種方案:
- 伺服器端負載均衡
- 使用者端負載均衡
在gRPC這個場景伺服器端負載均衡不是很合適,所有的請求都需要經過一個負載均衡器,這樣它就成為整個系統的瓶頸,所以更推薦使用使用者端負載均衡。
使用者端負載均衡目前也有兩種方案,最常見也是傳統方案。
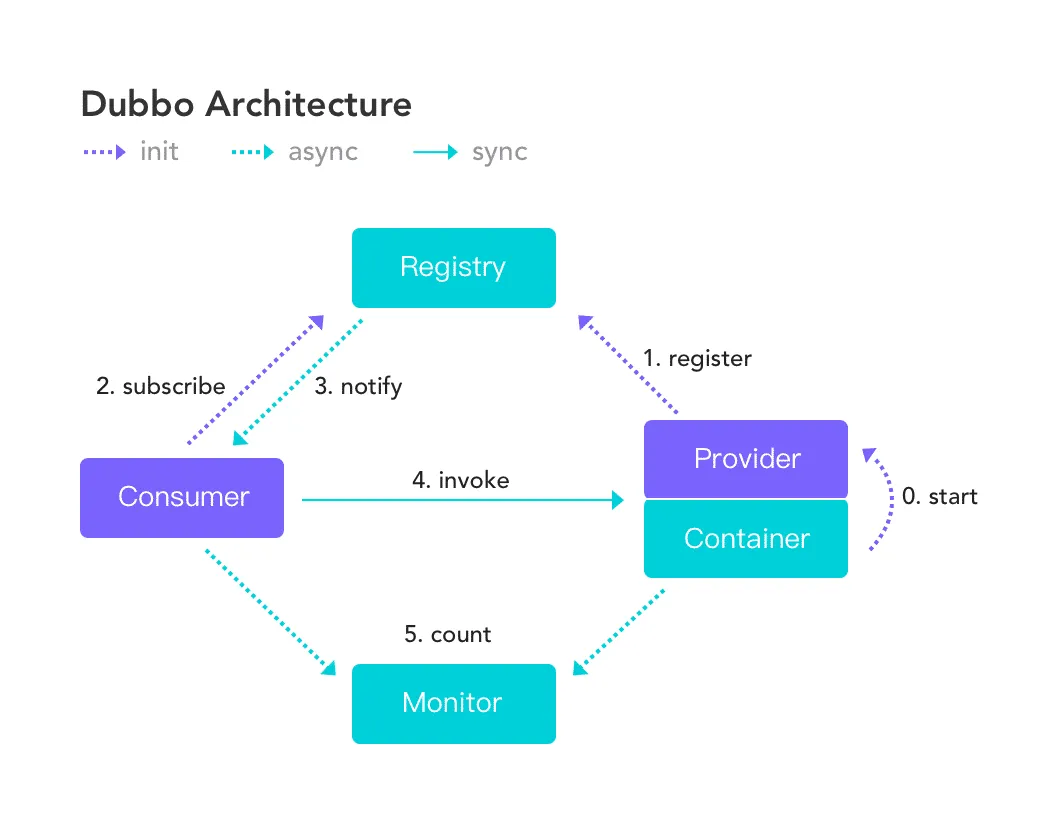
這裡以 Dubbo 的呼叫過程為例,呼叫的時候需要從服務註冊中心獲取到提供者的節點資訊,然後在使用者端本地根據一定的負載均衡演演算法得出一個節點然後發起請求。
換成 gRPC 也是類似的,這裡以 go-zero 負載均衡的原理為例:
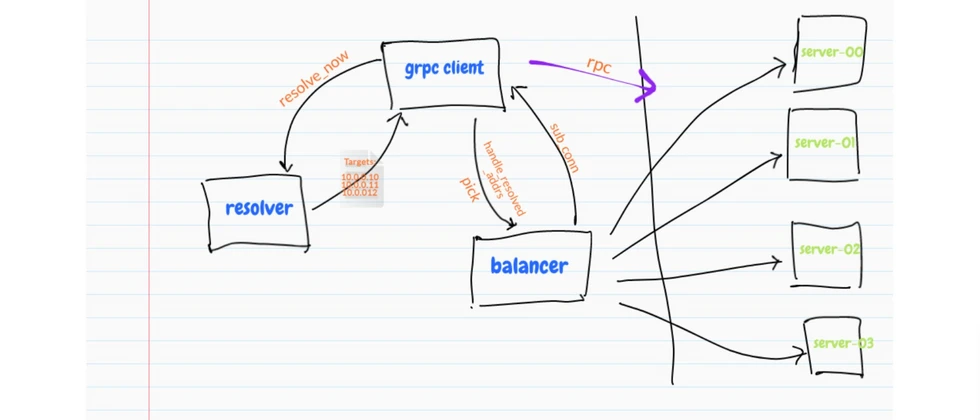
gRPC 官方庫也提供了對應的負載均衡介面,但我們依然需要自己維護服務列表然後在使用者端編寫負載均衡演演算法,這裡有個官方 demo:
但切換到 kubernetes 環境中時再使用以上的方式就不夠優雅了,因為我們使用 kubernetes 的目的就是不想再額外的維護這個使用者端包,這部分能力最好是由 kubernetes 自己就能提供。
但遺憾的是 kubernetes 提供的 service 只是基於 L4 的負載,所以我們每次請求的時候都只能將請求發往同一個 Provider 節點。
測試
這裡我寫了一個小程式來驗證負債不均衡的範例:
// Create gRPC server
go func() {
   var port = ":50051"
   lis, err := net.Listen("tcp", port)
   if err != nil {
      log.Fatalf("failed to listen: %v", err)
   }
   s := grpc.NewServer()
   pb.RegisterGreeterServer(s, &server{})
   if err := s.Serve(lis); err != nil {
      log.Fatalf("failed to serve: %v", err)
   } else {
      log.Printf("served on %s \n", port)
   }
}()
// server is used to implement helloworld.GreeterServer.
type server struct {
   pb.UnimplementedGreeterServer
}

// SayHello implements helloworld.GreeterServer
func (s *server) SayHello(ctx context.Context, in *pb.HelloRequest) (*pb.HelloReply, error) {
   log.Printf("Received: %v", in.GetName())
   name, _ := os.Hostname()
   // Return hostname of Server
   return &pb.HelloReply{Message: fmt.Sprintf("hostname:%s, in:%s", name, in.Name)}, nil
}
使用同一個 gRPC 連線發起一次 gRPC 請求,伺服器端會返回它的 hostname
var (
   once sync.Once
   c    pb.GreeterClient
)
http.HandleFunc("/grpc_client", func(w http.ResponseWriter, r *http.Request) {
   once.Do(func() {
      service := r.URL.Query().Get("name")
      conn, err := grpc.Dial(fmt.Sprintf("%s:50051", service), grpc.WithInsecure(), grpc.WithBlock())
      if err != nil {
         log.Fatalf("did not connect: %v", err)
      }
      c = pb.NewGreeterClient(conn)
   })

   // Contact the server and print out its response.
   name := "world"
   ctx, cancel := context.WithTimeout(context.Background(), time.Second)
   defer cancel()
   g, err := c.SayHello(ctx, &pb.HelloRequest{Name: name})
   if err != nil {
      log.Fatalf("could not greet: %v", err)
   }
   fmt.Fprint(w, fmt.Sprintf("Greeting: %s", g.GetMessage()))
})
建立一個 service 用於給 gRPC 提供域名:
apiVersion: v1
kind: Service
metadata:
  name: native-tools-2
spec:
  selector:
    app: native-tools-2
  ports:
    - name: http
      port: 8081
      targetPort: 8081
    - name: grpc
      port: 50051
      targetPort: 50051
同時將我們的 gRPC server 部署三個節點,再部署了一個使用者端節點:
❯ k get pod
NAME                                READY   STATUS    RESTARTS
native-tools-2-d6c454689-52wgd      1/1     Running   0
native-tools-2-d6c454689-67rx4      1/1     Running   0
native-tools-2-d6c454689-zpwxt      1/1     Running   0
native-tools-65c5bd87fc-2fsmc       2/2     Running   0
我們進入使用者端節點執行多次 grpc 請求:
k exec -it native-tools-65c5bd87fc-2fsmc bash
Greeting: hostname:native-tools-2-d6c454689-zpwxt, in:worldistio-proxy@n:/$ curl http://127.0.0.1:8081/grpc_client?name=native-tools-2
Greeting: hostname:native-tools-2-d6c454689-zpwxt, in:worldistio-proxy@n:/$ curl http://127.0.0.1:8081/grpc_client?name=native-tools-2
Greeting: hostname:native-tools-2-d6c454689-zpwxt, in:worldistio-proxy@n:/$ curl http://127.0.0.1:8081/grpc_client?name=native-tools-2
Greeting: hostname:native-tools-2-d6c454689-zpwxt, in:worldistio-proxy@n:/$ curl http://127.0.0.1:8081/grpc_client?name=native-tools-2
Greeting: hostname:native-tools-2-d6c454689-zpwxt, in:worldistio-proxy@n:/$ curl http://127.0.0.1:8081/grpc_client?name=native-tools-2
Greeting: hostname:native-tools-2-d6c454689-zpwxt, in:worldistio-proxy@n:/$ curl http://127.0.0.1:8081/grpc_client?name=native-tools-2
Greeting: hostname:native-tools-2-d6c454689-zpwxt, in:worldistio-proxy@n:/$ curl http://127.0.0.1:8081/grpc_client?name=native-tools-2
Greeting: hostname:native-tools-2-d6c454689-zpwxt, in:worldistio-proxy@n:/$ curl http://127.0.0.1:8081/grpc_client?name=native-tools-2
會發現每次請求的都是同一個節點 native-tools-2-d6c454689-zpwxt,這也就證明了在 kubernetes 中直接使用 gRPC 負載是不均衡的,一旦連線建立後就只能將請求發往那個節點。
使用 Istio
Istio 可以拿來解決這個問題,我們換到一個注入了 Istio 的 namespace 下還是同樣的 程式碼,同樣的 service 資源進行測試。
關於開啟 namespace 的 Istio 注入會在後續更新,現在感興趣的可以檢視下官方檔案:
https://istio.io/latest/docs/setup/additional-setup/sidecar-injection/
Greeting: hostname:native-tools-2-5fbf46cf54-5m7dl, in:worldistio-proxy@n:/$ curl http://127.0.0.1:8081/grpc_client?name=native-tools-2

Greeting: hostname:native-tools-2-5fbf46cf54-xprjz, in:worldistio-proxy@n:/$ curl http://127.0.0.1:8081/grpc_client?name=native-tools-2

Greeting: hostname:native-tools-2-5fbf46cf54-5m7dl, in:worldistio-proxy@n:/$ curl http://127.0.0.1:8081/grpc_client?name=native-tools-2

Greeting: hostname:native-tools-2-5fbf46cf54-5m7dl, in:worldistio-proxy@n:/$ curl http://127.0.0.1:8081/grpc_client?name=native-tools-2

Greeting: hostname:native-tools-2-5fbf46cf54-xprjz, in:worldistio-proxy@n:/$ curl http://127.0.0.1:8081/grpc_client?name=native-tools-2

Greeting: hostname:native-tools-2-5fbf46cf54-xprjz, in:worldistio-proxy@n:/$ curl http://127.0.0.1:8081/grpc_client?name=native-tools-2

Greeting: hostname:native-tools-2-5fbf46cf54-5m7dl, in:worldistio-proxy@n:/$ curl http://127.0.0.1:8081/grpc_client?name=native-tools-2

Greeting: hostname:native-tools-2-5fbf46cf54-5m7dl, in:worldistio-proxy@n:/$ curl http://127.0.0.1:8081/grpc_client?name=native-tools-2

Greeting: hostname:native-tools-2-5fbf46cf54-nz8h5, in:worldistio-proxy@n:/$ curl http://127.0.0.1:8081/grpc_client?name=native-tools-2

Greeting: hostname:native-tools-2-5fbf46cf54-nz8h5, in:worldistio-proxy@n:/$ curl http://127.0.0.1:8081/grpc_client?name=native-tools-2
可以發現同樣的請求已經被負載到了多個 server 後端,這樣我們就可以不再單獨維護一個使用者端 SDK 的情況下實現了負載均衡。
原理
其實本質上 Istio 也是使用者端負載均衡的一種實現。
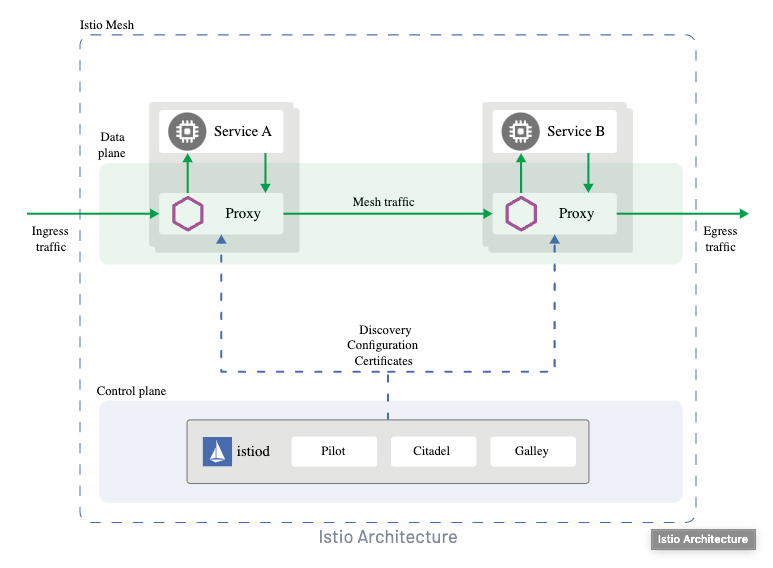
以 Istio 的架構圖為例:
- 每一個 Pod 下會新增一個
Proxy的container,所有的流量入口和出口都會經過它。 - 它會從控制平面
Istiod中拿到服務的註冊資訊,也就是kubernetes中的 service。 - 發生請求時由 proxy 容器中的
Envoy進行最終的負載請求。
可以在使用了 Istio 的 Pod 中檢視到具體的容器:
❯ k get pod native-tools-2-5fbf46cf54-5m7dl -n istio-test-2 -o json | jq '.spec.containers[].name'
"istio-proxy"
"native-tools-2"
可以發現這裡存在一個 istio-proxy 的容器,也就是我們常說的 sidecar,這樣我們就可以把原本的 SDK 裡的功能全部交給 Istio 去處理。
總結
當然 Istio 的功能遠不止於此,比如:
- 統一閘道器,處理東西、南北向流量。
- 灰度釋出
- 流量控制
- 介面粒度的超時設定
- 自動重試等
這次只是一個開胃菜,更多關於 Istio 的內容會在後續更新,比如會從如何在 kubernetes 叢集中安裝 Istio 講起,帶大家一步步使用好 Istio。
本文相關原始碼:
https://github.com/crossoverJie/k8s-combat
參考連結:
作者: crossoverJie

歡迎關注博主公眾號與我交流。
本文版權歸作者所有,歡迎轉載,但未經作者同意必須保留此段宣告,且在文章頁面明顯位置給出, 如有問題, 可郵件(crossoverJie#gmail.com)諮詢。