【Unity3D】Shader Graph節點
1 前言
Shader Graph 16.0.3 中有 208 個 Node(節點),本文梳理了 Shader Graph 中大部分 Node 的釋義,官方介紹詳見→Node-Library。
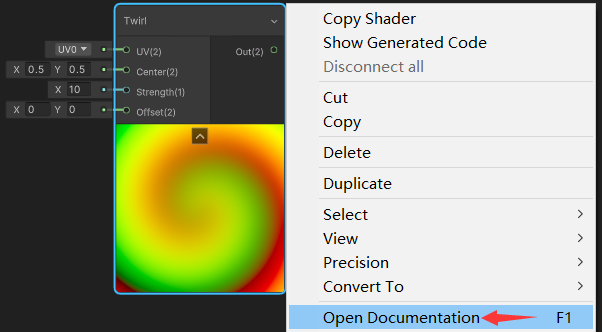
選中節點後,右鍵彈出選單欄,點選 Open Documentation(或 按 F1 鍵),瀏覽器中將跳轉到該節點的官方釋義網頁。
Shader Graph 通過影象的形式表達了頂點變換和片元著色流程,其背後都是一系列的數學理論支撐著,為更好地理解 Shader Graph 中的 Node,推薦讀者學習以下內容。
2 Artistic(美術)
Artistic 官方介紹詳見→Artistic Nodes。
2.1 Adjustment(顏色調整)
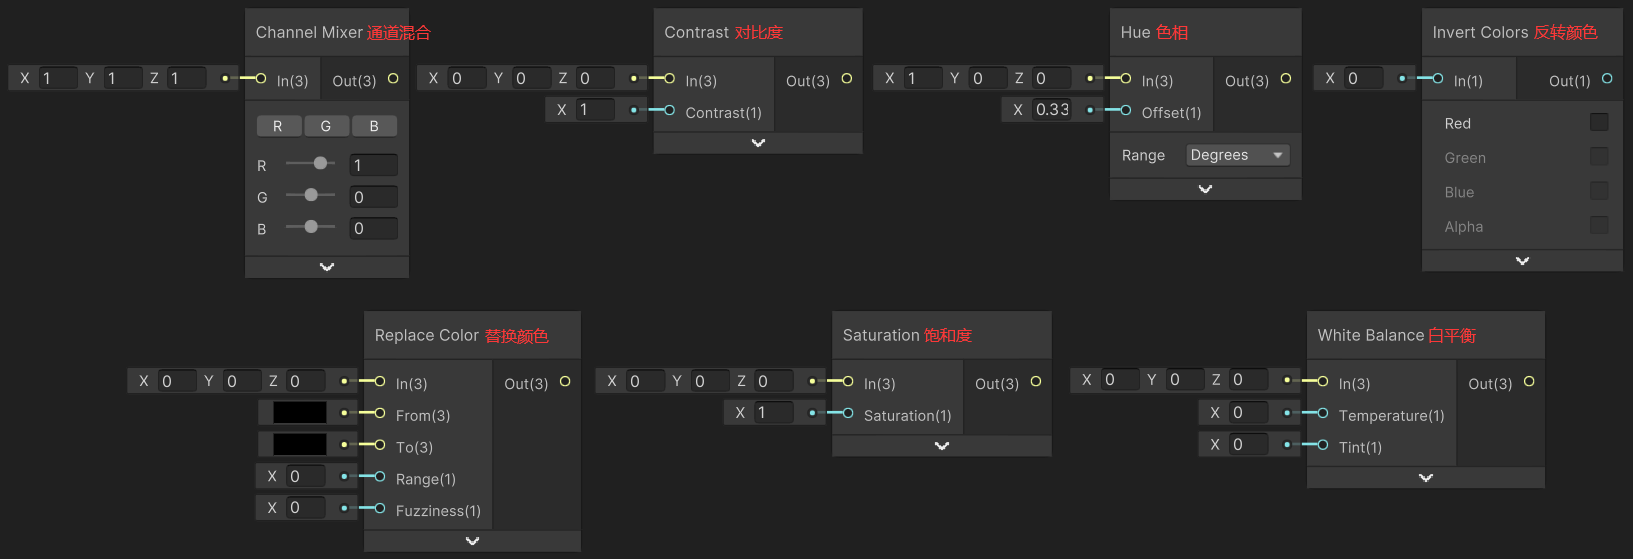
1)Channel Mixer(通道混合)
Channel Mixer 節點用於通道混合,根據混合權重對每個通道進行混合,_ChannelMixer_Red、_ChannelMixer_Green、_ChannelMixer_Blue 分別為紅色、綠色、藍色通道的權重向量。
void ChannelMixer(float3 In, float3 _ChannelMixer_Red, float3 _ChannelMixer_Green, float3 _ChannelMixer_Blue, out float3 Out) {
    Out = float3(dot(In, _ChannelMixer_Red), dot(In, _ChannelMixer_Green), dot(In, _ChannelMixer_Blue));
}
2)Contrast(調整對比度)
Contrast 節點用於調整對比度。
void Contrast(float3 In, float Contrast, out float3 Out) {
    float midpoint = pow(0.5, 2.2); // 約等於0.217638
    Out = (In - midpoint) * Contrast + midpoint;
}
說明:midpoint = pow(0.5, 2.2) 是對 0.5 進行了伽馬編碼(詳見伽馬校正),解決亮度異常問題。
3)Hue(調整色相)
Hue 節點用於調整色相,其實現見→Hue Node。
void Hue(float3 In, float Offset, out float3 Out)
說明:色相調整有 2 種模式:Degrees、 Normalized。在視覺化介面中,色相的調整一般通過色相環實現,offset 就對應色相環中的角度,在 Degrees 模式下,offset 取值範圍是 0 ~ 360°,在 Normalized 模式下,offest 取值範圍是 0 ~ 1。
4)Invert Colors(反轉顏色)
Invert Colors 節點用於反轉顏色。
void InvertColors(float4 In, float4 InvertColors, out float4 Out) {
    Out = abs(InvertColors - In);
}
5)Replace Color(替換顏色)
Replace Color 節點用於替換顏色,如果輸入顏色與 From 顏色比較接*,就將輸入顏色替換為 To 顏色,Range 是輸入顏色被替換的邊界,Fuzziness 是模糊係數。
void ReplaceColor(float3 In, float3 From, float3 To, float Range, float Fuzziness, out float3 Out) {
    float Distance = distance(From, In);
    Out = lerp(To, In, saturate((Distance - Range) / max(Fuzziness, 1e-5))); // 1e-5=0.00001, 避免Fuzziness為0時除數為0
}
6)Saturation(調整飽和度)
Saturation 節點用於調整飽和度。
void Saturation(float3 In, float Saturation, out float3 Out) {
    float luma = dot(In, float3(0.2126729, 0.7151522, 0.0721750));
    Out =  luma.xxx + Saturation.xxx * (In - luma.xxx);
}
7)White Balance(調整白*衡)
White Balance 節點用於調整白*衡,其實現見→White Balance Node,Temperature 用於調整色溫,Tint 用於調整色調。
void WhiteBalance(float3 In, float Temperature, float Tint, out float3 Out)
2.2 Blend(顏色混合)
Blend 節點用於混合兩種顏色。

Mode 取值有:Burn、Darken、Difference、Dodge、Divide、Exclusion、Hard Light、Hard Mix、Lighten、Linear Burn、Linear Dodge、Linear Light、Linear Light Add Sub、Multiply、Negation、Overlay(預設值)、Pin Light、Screen、Soft Light、Subtract、Vivid Light、Overwrite。不同 Mode 對應的混合函數詳見→Blend Node。
2.3 Filter(濾波器)
Filter 裡只有一個 Node:Dither,它用於模擬顏色隨機振動,它通過一個 4 x 4 的矩陣模擬偽隨機振動,這個矩陣的每一行和每一列都呈波浪狀(一大一小交錯排列)。

void Dither(float4 In, float4 ScreenPosition, out float4 Out) {
    float2 uv = ScreenPosition.xy * _ScreenParams.xy;
    float DITHER_THRESHOLDS[16] = {
        1.0 / 17.0,  9.0 / 17.0,  3.0 / 17.0, 11.0 / 17.0,
        13.0 / 17.0,  5.0 / 17.0, 15.0 / 17.0,  7.0 / 17.0,
        4.0 / 17.0, 12.0 / 17.0,  2.0 / 17.0, 10.0 / 17.0,
        16.0 / 17.0,  8.0 / 17.0, 14.0 / 17.0,  6.0 / 17.0
    };
    uint index = (uint(uv.x) % 4) * 4 + uint(uv.y) % 4;
    Out = In - DITHER_THRESHOLDS[index];
}
說明:對於 ScreenPosition 的取值,使用者可以自己輸入,也可以使用 Unity 自帶的取值,主要有:Default、Raw、Center、Tiled。
2.4 Mask(遮罩)

1)Channel Mask(通道遮罩)
Channel Mask 節點用於遮罩通道,將被遮罩的通道置為 0,如下是將 RG 通道遮罩的程式碼邏輯。
void ChannelMask_RedGreen(float4 In, out float4 Out) {
    Out = float4(0, 0, In.b, In.a);
}
2)Color Mask(顏色遮罩)
Color Mask 節點用於顏色遮罩,計算輸入顏色與目標顏色的*似程度,比較接*就輸出 1,偏移比較大就輸出 0。
void ColorMask(float3 In, float3 MaskColor, float Range, float Fuzziness, out float4 Out) {
    float Distance = distance(MaskColor, In);
    Out = saturate(1 - (Distance - Range) / max(Fuzziness, 1e-5)); // 1e-5=0.00001, 避免Fuzziness為0時除數為0
}
2.5 Normal(法線)

1)Normal Blend(法線混合)
Normal Blend 有 2 種模式:Default、Reoriented。
void NormalBlend(float3 A, float3 B, out float3 Out) { // Default模式
    Out = normalize(float3(A.rg + B.rg, A.b * B.b));
}

void NormalBlend_Reoriented(float3 A, float3 B, out float3 Out) { // Reoriented模式
    float3 t = A.xyz + float3(0.0, 0.0, 1.0);
    float3 u = B.xyz * float3(-1.0, -1.0, 1.0);
    Out = (t / t.z) * dot(t, u) - u;
}
2)Normal From Height(由高度值轉換為法線紋理)
Normal From Height 節點用於將輸入的高度值轉換到法線紋理中。Output Space(輸出空間)有:Tangent(切線空間)、World(世界空間)。原始碼詳見→Normal From Height Node,它通過對 Position、In 求 ddx 和 ddy 等運算得到法線值。
void NormalFromHeight(float In, out float3 Out)
3)Normal From Texture(由高度紋理轉換為法線紋理)
Normal From Texture 節點用於將高度紋理轉換為法線紋理。Offset 為高度取樣 uv 偏移量,Strength 用於調整法線強度(物體表面凹凸程度)。
void NormalFromTexture(Texture texture, SamplerState Sampler, float2 UV, float Offset, float Strength, out float3 Out) {
    Offset = pow(Offset, 3) * 0.1;
    float2 offsetU = float2(UV.x + Offset, UV.y);
    float2 offsetV = float2(UV.x, UV.y + Offset);
    float normalSample = Texture.Sample(Sampler, UV);
    float uSample = Texture.Sample(Sampler, offsetU);
    float vSample = Texture.Sample(Sampler, offsetV);
    float3 va = float3(1, 0, (uSample - normalSample) * Strength); // 切線(高度圖1m一個畫素)
    float3 vb = float3(0, 1, (vSample - normalSample) * Strength); // 切線(高度圖1m一個畫素)
    Out = normalize(cross(va, vb)); // 通過2條切線向量叉乘得到法線向量
}
4)Normal Reconstract Z(法線重構)
Normal Reconstract Z 節點用於重構法線向量,原來的 z 分量被拋棄,由 x、y 分量推匯出,再對法線向量進行歸一化。
void NormalReconstructZ(float2 In, out float3 Out) {
    float reconstructZ = sqrt(1.0 - saturate(dot(In.xy, In.xy)));
    float3 normalVector = float3(In.x, In.y, reconstructZ);
    Out = normalize(normalVector);
}
5)Normal Strength(調整物體表面凹凸程度)
Normal Strength 節點用於調整法線強度(物體表面凹凸程度,案例見→法線貼圖和凹凸對映)。注意,調整法線向量後需要歸一化法線向量。
void NormalStrength(float3 In, float Strength, out float3 Out) {
    Out = {precision}3(In.rg * Strength, lerp(1, In.b, saturate(Strength)));
}
說明:"{precision}3" 是一個類似於建構函式的語法,用於構建一個包含 3 個分量的向量。
6)Normal Unpack(由法線紋理解碼法線向量)
Normal Unpack 節點用於從法線紋理中解碼法線向量。Output Space(輸出空間)有:Tangent(切線空間)、Object(模型空間)。
void NormalUnpack(float4 In, out float3 Out) { //Tangent
    Out = UnpackNormalmapRGorAG(In);
}

void NormalUnpackRGB(float4 In, out float3 Out) { // Object
    Out = UnpackNormalmapRGB(In);
}
2.6 Utility(實用工具)
Utility 中只有 Colorspace Conversion 節點,用於進行 RGB、Linear、HSV 顏色空間之間的相互轉換,原始碼詳見→Colorspace Conversion Node。

3 Channel(通道)
Channel 官方介紹詳見→Channel Nodes。

1)Combine(合併通道)
Combine 節點用於合併通道。
void Combine(float R, float G, float B, float A, out float4 RGBA, out float3 RGB, out float2 RG) {
    RGBA = float4(R, G, B, A);
    RGB = float3(R, G, B);
    RG = float2(R, G);
}
2)Flip(翻轉通道)
Flip 節點用於翻轉通道,即相應通道數值取反,Flip 取值為 0(未啟用)或 1(啟用)。
void Flip(float4 In, float4 Flip, out float4 Out) {
    Out = (Flip * -2 + 1) * In;
}
3)Split(分離通道)
Split 節點用於分離通道,以下是輸入為 2 維的情況,如果輸入維數低於輸出維數,高維通道補零輸出。
void Split(float2 In, out float R, out float G, out float B, out float A) {
    R = In[0];
    G = In[1];
    B = 0;
    A = 0;
}
4)Swizzle(交換通道)
Swizzle 節點用於交換通道,根據 Mask 中通道的順序重組通道。如下是其中一種交換方式。
float4 _Swizzle_Out = In.xzyw;
4 Input(輸入)
Input 官方介紹詳見→Input Nodes。
4.1 Basic(基礎變數)
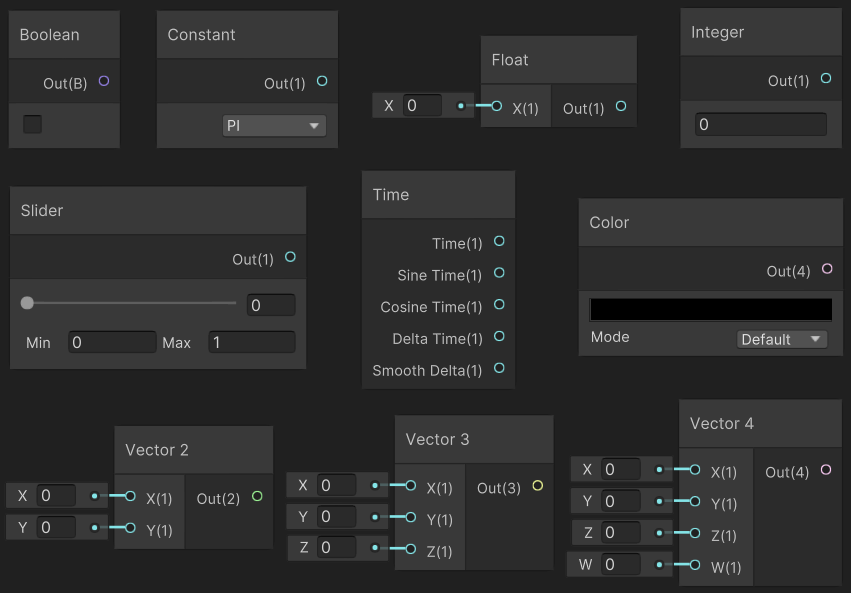
Basic 中是一些基礎的變數節點,如:Boolean、Constant、Float、Integer、Slider、Time、Color、Vector2、Vector3、Vector4。
4.2 Geometry(頂點幾何屬性)
Geometry 中提供了存取頂點或片元幾何屬性的節點,如:Position、Screen Position、UV、Vertex Color、Tangent Vector、Bitangent Vector、Normal Vector、View Direction、View Vector。

- Position:頂點或片元的座標,Space 取值有:Object(模型空間)、World(世界空間)、View(觀察空間)、Tangent(切線空間)、Absolute World(絕對世界空間)。對於所有可程式化渲染管線,Absolute World 選項始終返回物件在場景中的絕對世界位置,World 選項返回所選的可程式化渲染管線的預設世界空間。HDRP(高清渲染管線)使用 Camera Relative 作為預設世界空間,URP(通用渲染管線)使用 Absolute World 作為預設世界空間。
- Screen Position:頂點或片元的螢幕座標,Mode 取值有:Default、Raw、Center、Tiled。
- UV:頂點或片元的 UV 座標。
- Vertex Color:頂點或片元的顏色。
- Tangent Vector:頂點或片元的切線向量,Space 取值有:Object(模型空間)、World(世界空間)、View(觀察空間)、Tangent(切線空間)。
- Bitangent Vector:頂點或片元的副切線向量,Space 取值有:Object(模型空間)、World(世界空間)、View(觀察空間)、Tangent(切線空間)。
- Normal Vector:頂點或片元的法線向量,Space 取值有:Object(模型空間)、World(世界空間)、View(觀察空間)、Tangent(切線空間)。
- View Direction:頂點或片元的觀察向量(頂點指向相機,已歸一化),Space 取值有:Object(模型空間)、World(世界空間)、View(觀察空間)、Tangent(切線空間)。
- View Vector:頂點或片元的觀察向量(頂點指向相機,未歸一化),Space 取值有:Object(模型空間)、World(世界空間)、View(觀察空間)、Tangent(切線空間)。
Screen Position 不同模式下的實現如下。
// Default, 歸一化的裝置座標(NDC), x、y值域: [0, 1], 可以用於顏色緩衝區(Scene Color)的uv座標
float4 Out = float4(IN.NDCPosition.xy, 0, 0);
// Raw, 螢幕座標, x值域: [0, w], y值域: [0, w]
float4 Out = IN.ScreenPosition;
// Center, 標準化的裝置座標, x、y值域: [-1, 1]
float4 Out = float4(IN.NDCPosition.xy * 2 - 1, 0, 0);
// Tiled, x值域: [-screenWidth/screenHeight, screenWidth/screenHeight], y值域: [-1, 1]
float4 Out = frac(float4((IN.NDCPosition.x * 2 - 1) * _ScreenParams.x / _ScreenParams.y, IN.{0}.y * 2 - 1, 0, 0));
// Pixel, 畫素座標, x值域: [0, screenWidth], y值域: [0, screenHeight]
float4 Out = float4(IN.PixelPosition.xy, 0, 0);
4.3 Gradient(漸變顏色)
Blackbody、Gradient、Sample Gradient 節點都是用於生成漸變顏色。

1) Blackbody(黑體輻射漸變取樣)
Blackbody 節點通過模擬黑體輻射漸變取樣得到漸變顏色,其實現見→Blackbody Node,它基於 Mitchell Charity 收集的資料,輸出線性 RGB 空間的顏色,並使用一個 D65 白點和一個 CIE 1964 10 度的顏色空間執行轉換,Temperature 為取樣的溫度或溫度貼圖(以開爾文為單位)。
void Blackbody(float Temperature, out float3 Out)
2)Gradient(生成漸變物件)
Gradient 節點用於生成 Gradient 漸變物件,它通過 2 個 Color 和 2 個 Alpha 引數計算得到,實現見→Gradient Node。

3)Sample Gradient(漸變取樣)
Sample Gradient 節點用於對 Gradient 進行漸變取樣,其實現見→Sample Gradient Node,Time 為取樣漸變的時間點 (0.0–1.0)。
void SampleGradient(float4 Gradient, float Time, out float4 Out)
4.4 Lighting(光照)

1)Ambient(環境光)
Ambient 節點用於獲取環境光顏色。
float3 _Ambient_ColorSky = SHADERGRAPH_AMBIENT_SKY;
float3 _Ambient_Equator = SHADERGRAPH_AMBIENT_EQUATOR;
float3 _Ambient_Ground = SHADERGRAPH_AMBIENT_GROUND;
2)Baked GI(烘焙的全域性光照)
Baked GI 節點用於獲取烘焙的全域性光照顏色,Position 為頂點座標(世界空間),Normal 為頂點法線(世界空間)、StaticUV 為靜態 lightmap 的紋理座標、DynamicUV 為動態 lightmap 的紋理座標。
void BakedGI(float3 Position, float3 Normal, float2 StaticUV, float2 DynamicUV, out float Out) {
    Out = SHADERGRAPH_BAKED_GI(Position, Normal, StaticUV, DynamicUV, false);
}
3)Reflection Probe(反射探針)
Reflection Probe 節點用於獲取反射探針顏色。ViewDire 為頂點的座標(模型空間),Normal 為頂點的法線向量(模型空間)。
void ReflectionProbe(float3 ViewDir, float3 Normal, float LOD, out float3 Out) {
    Out = SHADERGRAPH_REFLECTION_PROBE(ViewDir, Normal, LOD);
}
4)Main Light Direction
Main Light Direction 節點用於獲取頂點指向光源的單位方向向量(世界空間)。Shader Graph 13.1.9(2022.1+)版本才開始出現 Main Light Direction 節點。如果使用者的 Shader Graph 版本較低,可以通過 8.2 節中 Custom Function 節點建立自定義函數,獲取燈光方向。
4.5 Matrix(矩陣)
Matrix 中包含 Matrix 2x2、Matrix 3x3、Matrix 4x4、Transformation Matrix 節點。
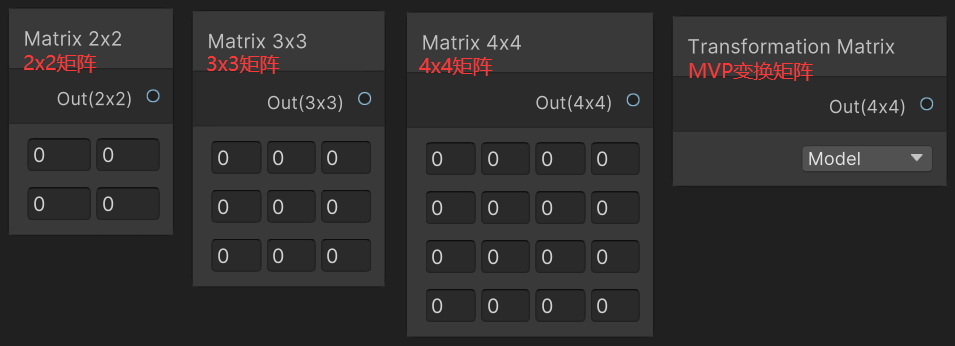
Transformation Matrix 節點可以獲取到 Model、Inverse Model、View、Inverse View、Projection、Inverse Projection、View Projection、Inverse View Projection 矩陣,實現如下。
// Model, [模型空間->世界空間]的變換矩陣M
float4x4 _TransformationMatrix_Out = UNITY_MATRIX_M;
// InverseModel, [世界空間->模型空間]的變換矩陣I_M
float4x4 _TransformationMatrix_Out = UNITY_MATRIX_I_M;
// View, [世界空間->觀察空間]的變換矩陣V
float4x4 _TransformationMatrix_Out = UNITY_MATRIX_V;
// InverseView, [觀察空間->世界空間]的變換矩陣I_V
float4x4 _TransformationMatrix_Out = UNITY_MATRIX_I_V;
// Projection, [觀察空間->裁剪空間]的變換矩陣P
float4x4 _TransformationMatrix_Out = UNITY_MATRIX_P;
// InverseProjection, [裁剪空間->觀察空間]的變換矩陣I_P
float4x4 _TransformationMatrix_Out = UNITY_MATRIX_I_P;
// ViewProjection, [世界空間->裁剪空間]的變換矩陣VP
float4x4 _TransformationMatrix_Out = UNITY_MATRIX_VP;
// InverseViewProjection, [裁剪空間->世界空間]的變換矩陣I_VP
float4x4 _TransformationMatrix_Out = UNITY_MATRIX_I_VP;
4.6 Scene(場景引數)
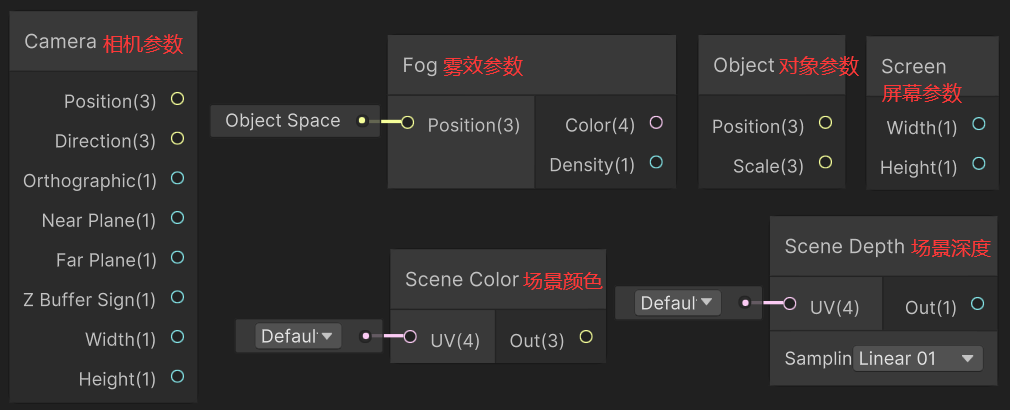
1)Camera(相機引數)
Camera 節點用於獲取相機的以下屬性。
- Position:相機的座標(世界空間),程式碼:_WorldSpaceCameraPos。
- Direction:相機的 forward 向量。
- Orthographic:如果攝像機是正交攝像機,則返回 1,否則返回 0,程式碼:unity_OrthoParams.w。
- Near Plane:*裁剪*面到相機的距離,程式碼:_ProjectionParams.y。
- Far Plane:遠裁剪*面到相機的距離,程式碼:_ProjectionParams.z。
- Z Buffer Sign:使用反轉的 Z 緩衝區時返回 -1,否則返回 1,程式碼:_ProjectionParams.x。
- Width:攝像機的寬度(如果是正交攝像機),unity_OrthoParams.x。
- Height:攝像機的高度(如果是正交攝像機),unity_OrthoParams.y。
2)Fog(霧效引數)
Fog 節點用於獲取 Color(霧效顏色)和 Density(裁剪空間深度處的霧效強度)。
void Fog(float3 Position, out float4 Color, out float Density) {
    SHADERGRAPH_FOG(Position, Color, Density);
}
3)Object(物件引數)
Object 節點用於獲取當前渲染物件在世界空間中的位置縮放。
float3 _Object_Position = SHADERGRAPH_OBJECT_POSITION;
float3 _Object_Scale = float3(
    length(float3(UNITY_MATRIX_M[0].x, UNITY_MATRIX_M[1].x, UNITY_MATRIX_M[2].x)),
    length(float3(UNITY_MATRIX_M[0].y, UNITY_MATRIX_M[1].y, UNITY_MATRIX_M[2].y)),
    length(float3(UNITY_MATRIX_M[0].z, UNITY_MATRIX_M[1].z, UNITY_MATRIX_M[2].z)));
4)Scene Color(場景顏色)
Scene Color 節點用於獲取 UV 處的顏色緩衝區的顏色值,uv 座標可以通過 Screen Position 節點(Default 模式)獲取。
void SceneColor(float4 UV, out float3 Out) {
    Out = SHADERGRAPH_SAMPLE_SCENE_COLOR(UV);
}
說明:Scene Color 節點僅支援 URP 和 HDRP 管線,對於 Built-in 管線,節點返回 0;在URP 中,此節點返回 Camera Opaque Texture 的值,此紋理的內容僅適用於透明物件;將主節點的 Surface Type 屬性設定為 Transparent 可以從此節點接收正確的值。
5)Scene Depth(場景深度)
Scene Depth 節點用於獲取 UV 處的深度緩衝區的深度值。
void SceneDepth_Raw(float4 UV, out float Out) {
    Out = SHADERGRAPH_SAMPLE_SCENE_DEPTH(UV);
}
6)Screen(螢幕引數)
Screen 節點用於獲取螢幕的寬度和高度引數。
float _Screen_Width = _ScreenParams.x;
float _Screen_Height = _ScreenParams.y;
4.7 Texture(紋理)
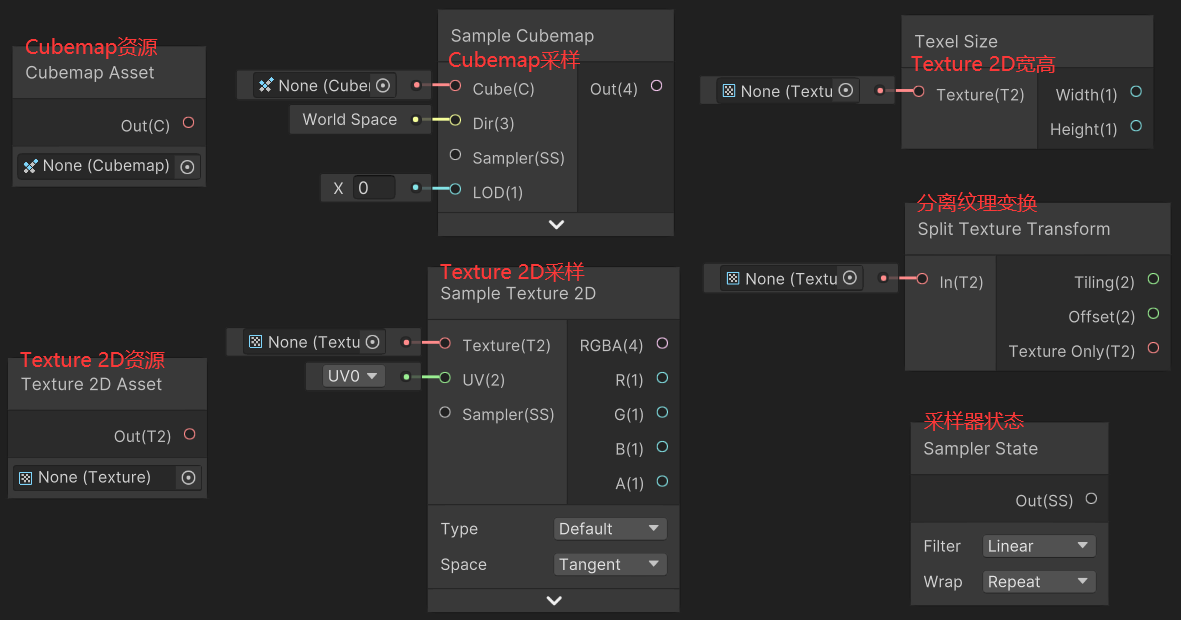
1)Texture 2D Asset 和 Cubemap Asset
Texture 2D Asset 節點用於匯入 Texture 2D 資源,Cubemap Asset 節點用於匯入 Cubemap 資源。
2)Sample Texture 2D 和 Sample Cubemap
Sample Texture 2D 節點用於對 Texture 2D 進行取樣,Sample Cubemap 節點用於對 Cubemap 進行取樣。
3)Texel Size(Texture 2D 的寬高)
Texel Size 節點用於獲取 Texture 2D 的寬度和高度。
float _TexelSize_Width = Texture_TexelSize.z;
float _TexelSize_Height = Texture_TexelSize.w;
4)Split Texture Transform(Texture 2D 的縮放和偏移)
Split Texture Transform 節點用於 Texture 2D 的 Tiling(縮放)和 Offset(偏移)屬性。
5)Sampler State(取樣器的狀態設定)
Sampler State 節點用於設定取樣器的狀態。Filter 定義了取樣的濾波模式,選項有:Linear、Point、Trilinear;Wrap 定義了取樣的包裹模式,選項有:Repeat、Clamp、Mirror、MirrorOnce。
5 Math(數學)
Math 官方介紹詳見→Math Nodes,其中參照 Shader 中的函數釋義詳見→Shader常數、變數、結構體、函數。
5.1 Basic(基礎運算)
// 加法, Out=A+B
void Add(float4 A, float4 B, out float4 Out)
// 減法, Out=A-B
void Subtract(float4 A, float4 B, out float4 Out)
// 乘法
void Multiply(float4 A, float4 B, out float4 Out) // Out=A*B
void Multiply(float4 A, float4x4 B, out float4 Out) // Out=mul(A,B)
void Multiply(float4x4 A, float4x4 B, out float4x4 Out) // Out=mul(A,B)
// 除法, Out=A/B
void Divide(float4 A, float4 B, out float4 Out)
// 冪運算, Out=pow(A,B)
void Power(float4 A, float4 B, out float4 Out)
// *方根, Out=sqrt(In)
void SquareRoot(float4 In, out float4 Out)
5.2 Advanced(高階運算)
// 絕對值, Out=abs(In)
void Absolute(float4 In, out float4 Out)
// 取反, Out=-1*In
void Negate(float4 In, out float4 Out)
// 倒數
void Reciprocal(float4 In, out float4 Out) // Out=1.0/In
void Reciprocal_Fast(float4 In, out float4 Out) // Out=rcp(In)
// 取餘, Out=fmod(A,B)
void Modulo(float4 A, float4 B, out float4 Out)
// 指數
void Exponential(float4 In, out float4 Out) // Out=exp(In)
void Exponential2(float4 In, out float4 Out) // Out=exp2(In)
// 對數
void Log(float4 In, out float4 Out) // Out=log(In)
void Log2(float4 In, out float4 Out) // Out=log2(In)
void Log10(float4 In, out float4 Out) // Out=log10(In)
// 反*方根
void ReciprocalSquareRoot(float4 In, out float4 Out) // Out=rsqrt(In)
// 模長, Out=length(In)
void Length(float4 In, out float Out)
// 歸一化
void Normalize(float4 In, out float4 Out) // Out=normalize(In)
// 多色調分色顯示, Out=floor(In/(1/Steps))*(1/Steps)
void Posterize(float4 In, float4 Steps, out float4 Out)
5.3 Trigonometry(三角函數運算)
// 角度轉弧度, Out=radians(In)
void DegreesToRadians(float4 In, out float4 Out)
// 弧度轉角度, Out=degrees(In)
void RadiansToDegrees(float4 In, out float4 Out)
// 正弦, Out=sin(In)
void Sine(float4 In, out float4 Out)
// 餘弦, Out=cos(In)
void Cosine(float4 In, out float4 Out)
// 正切, Out=tan(In)
void Tangent(float4 In, out float4 Out)
// 反正弦, Out=asin(In)
void Arcsine(float4 In, out float4 Out)
// 反餘弦, Out=acos(In)
void Arccosine(float4 In, out float4 Out)
// 反正切
void Arctangent(float4 In, out float4 Out) // Out=atan(In)
void Arctangent2(float4 A, float4 B, out float4 Out) // Out=atan2(A,B)
// 雙曲正弦, Out=sinh(In)
void HyperbolicSine(float4 In, out float4 Out)
// 雙曲餘弦, Out=cosh(In)
void HyperbolicCosine(float4 In, out float4 Out)
// 雙曲正切, Out=tanh(In)
void HyperbolicTangent(float4 In, out float4 Out)
5.4 Range(範圍運算)
// 最大值, Out=max(A,B)
void Maximum(float4 A, float4 B, out float4 Out)
// 最小值, Out=min(A,B)
void Minimum(float4 A, float4 B, out float4 Out)
// 限界, Out=clamp(In,Min,Max)
void Clamp(float4 In, float4 Min, float4 Max, out float4 Out)
// 0-1限界, Out=saturate(In)
void Saturate(float4 In, out float4 Out)
// 取小數部分, Out=frac(In)
void Fraction(float4 In, out float4 Out)
// 1減, Out=1-In
void OneMinus(float4 In, out float4 Out)
// 重對映, Out=OutMinMax.x+(In-InMinMax.x)*(OutMinMax.y-OutMinMax.x)/(InMinMax.y-InMinMax.x)
void Remap(float4 In, float2 InMinMax, float2 OutMinMax, out float4 Out)
// 偽亂數生成器
void RandomRange(float2 Seed, float Min, float Max, out float Out) {
    float randomno = frac(sin(dot(Seed, float2(12.9898, 78.233)))*43758.5453);
    Out = lerp(Min, Max, randomno);
}

5.5 Round(取整運算)
// 正負符合, Out=sign(In)
void Sign(float4 In, out float4 Out)
// 取整數部分, Out=trunc(In)
void Truncate(float4 In, out float4 Out)
// 向上取整, Out=ceil(In)
void Ceiling(float4 In, out float4 Out)
// 向下取整, Out=floor(In)
void Floor(float4 In, out float4 Out)
// 四捨五入取整, Out=round(In)
void Round(float4 In, out float4 Out)
// 邊界判斷, Out=step(Edge,In), 即: In>=Edge時, 返回1, 否則返回0
void Step(float4 Edge, float4 In, out float4 Out)
5.6 Interpolation(插值運算)
// 插值, Out=lerp(A,B,T), 即: Out=(1-T)*A+T*B
void Lerp(float4 A, float4 B, float4 T, out float4 Out)
// 反插值, Out=(T-A)/(B-A)
void InverseLerp(float4 A, float4 B, float4 T, out float4 Out)
// *滑插值, Out=smoothstep(Edge1,Edge2,In), 即: k=saturate((In-Edge1)/(Edge2-Edge1)), Out=k*k*(3-2*k)
void Smoothstep(float4 Edge1, float4 Edge2, float4 In, out float4 Out)
5.7 Vector(向量運算)
// 兩點間距離, Out=distance(A,B)
void Distance(float4 A, float4 B, out float Out)
// 向量點乘, Out=dot(A,B)
void DotProduct(float4 A, float4 B, out float Out)
// 向量叉乘, Out=cross(A,B)
void CrossProduct(float3 A, float3 B, out float3 Out)
// 向量投影, Out=B*dot(A,B)/dot(B, B)
void Projection(float4 A, float4 B, out float4 Out)
// 向量反射, Out=reflect(In,Normal), In和Normal不需要歸一化
void Reflection(float4 In, float4 Normal, out float4 Out)
// 菲涅爾效應, Out=pow((1.0-saturate(dot(normalize(Normal),normalize(ViewDir)))),Power)
void FresnelEffect(float3 Normal, float3 ViewDir, float Power, out float Out)
// 繞軸旋轉
void RotateAboutAxis(float3 In, float3 Axis, float Rotation, out float3 Out)
// 球形遮罩, Out =1-saturate((distance(Coords,Center)-Radius)/(1-Hardness)), 即: 球內返回1, 求外返回零
void SphereMask(float4 Coords, float4 Center, float Radius, float Hardness, out float4 Out)
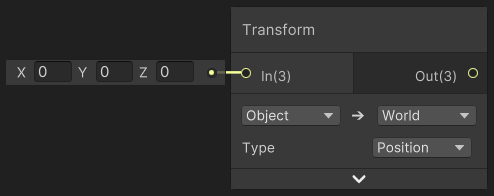
// 座標或向量空間變換, 可以進行Object、World、View、Tangent、Absolute World空間之間變換
void Transform(float4 In, out float4 Out)
5.8 Matrix(矩陣運算)

// 構建矩陣
void MatrixConstruction(float4 M0, float4 M1, float4 M2, float3 M3, out float4x4 Out4x4, out float3x3 Out3x3, out float2x2 Out2x2)
// 計算矩陣的秩, Out=determinant(In)
void MatrixDeterminant(float4x4 In, out float Out)
// 分離矩陣的行向量或列向量
void MatrixSplit(float4x4 In, out float4 M0, out float4 M1, out float4 M2, out float4 M3)
// 矩陣轉置, Out=transpose(In)
void MatrixTranspose(float4x4 In, out float4x4 Out)
5.9 Derivative(導數運算)
// Out=ddx(In)
void DDX(float4 In, out float4 Out)
// Out=ddxy(In)
void DDXY(float4 In, out float4 Out)
// Out=ddy(In)
void DDY(float4 In, out float4 Out)
5.10 Wave(波運算)

// 鋸齒波, Out=2*(In-floor(0.5 + In))
void SawtoothWave(float4 In, out float4 Out)
// 方波, Out=1.0-2.0*round(frac(In))
void SquareWave(float4 In, out float4 Out)
// 三角波, Out=2.0*abs(2*(In-floor(0.5+In)))-1.0
void TriangleWave(float4 In, out float4 Out)
// 帶噪聲的正弦波
void NoiseSineWave(float4 In, float2 MinMax, out float4 Out) {
    float sinIn = sin(In);
    float sinInOffset = sin(In + 1.0);
    float randomno =  frac(sin((sinIn - sinInOffset) * (12.9898 + 78.233))*43758.5453);
    float noise = lerp(MinMax.x, MinMax.y, randomno);
    Out = sinIn + noise;
}
6 Procedural(程式紋理)
Procedural 官方介紹詳見→Procedural Nodes。
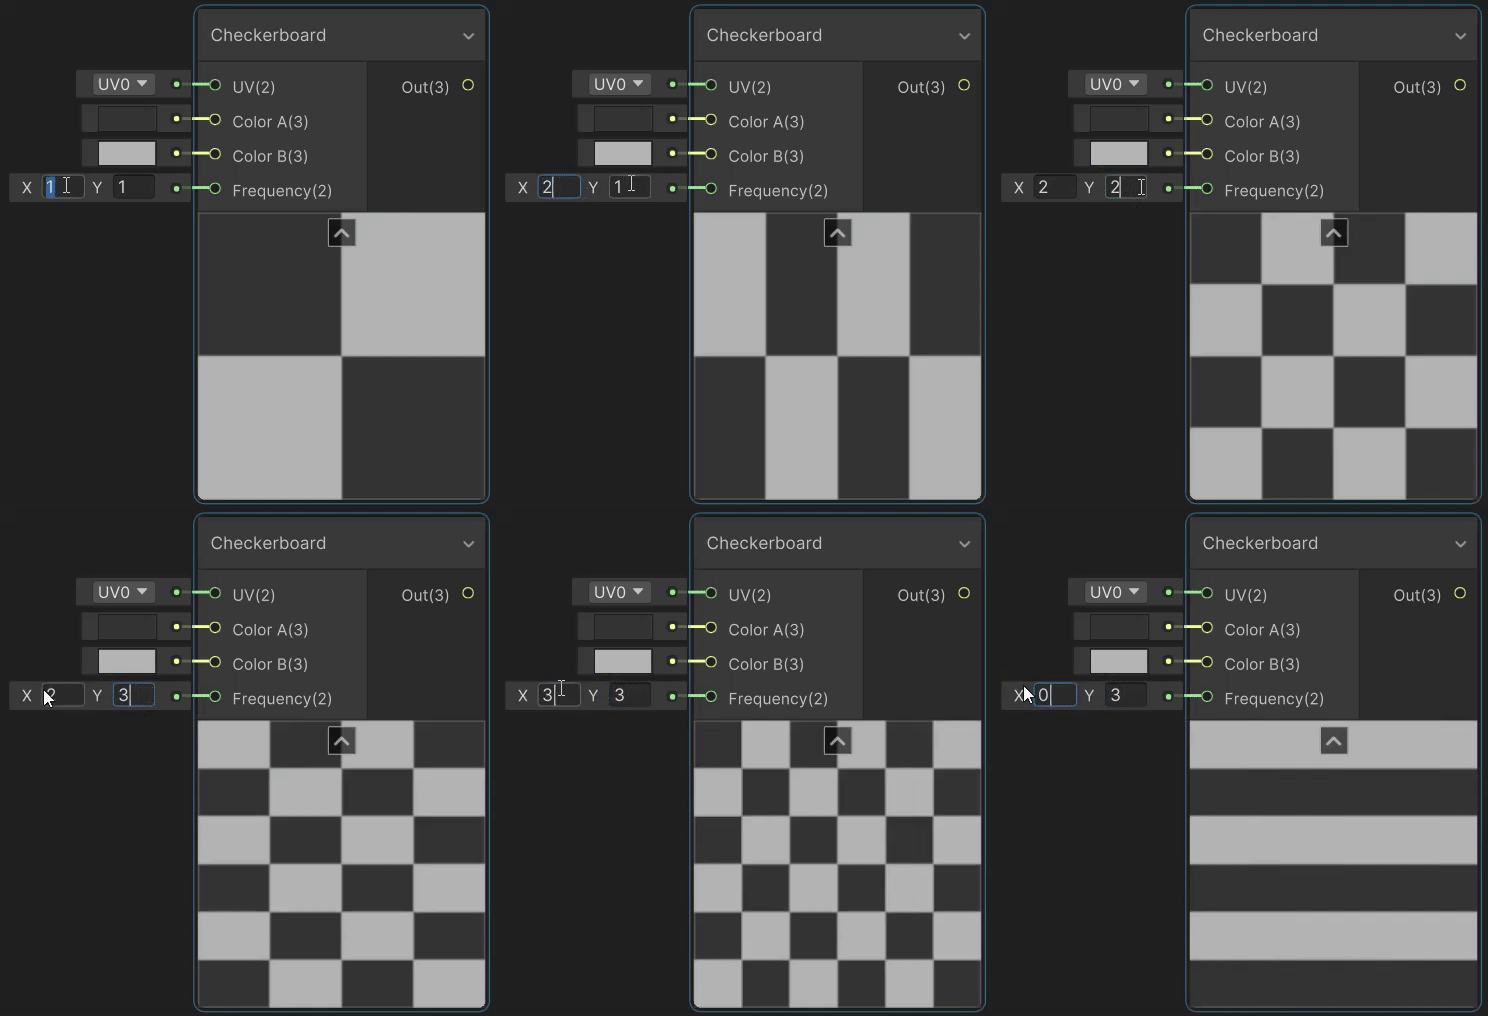
6.1 Checkerboard(棋盤紋理)
Checkerboard 節點用於用於繪製棋盤紋理,實現見→Checkerboard Node。
6.2 Noise(噪聲紋理)
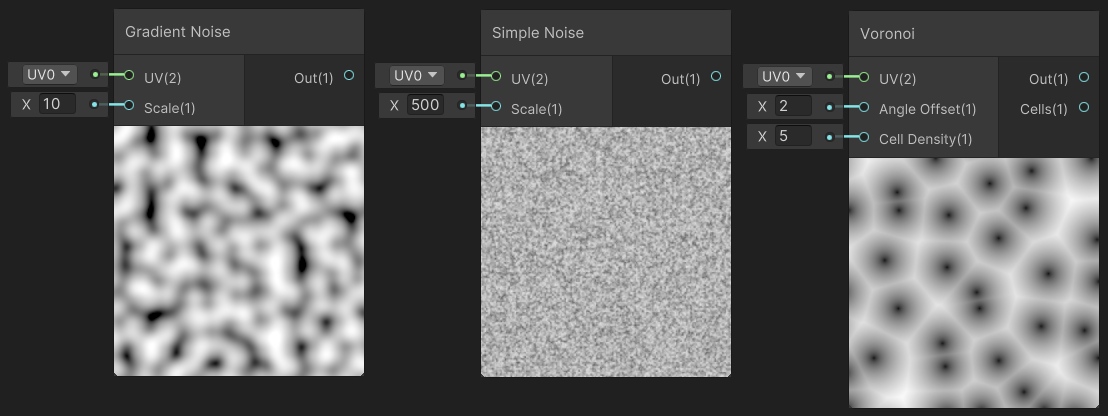
Noise 下面有 Gradient Noise(梯度噪聲)、Simple Noise(簡單噪聲)、Voronoi(泰森多邊形)。噪聲紋理應用:選中物體消融特效、消融特效、流動霧效。
6.3 Shapes(形狀紋理)
Shapes 下面有 Ellipse(橢圓)、Polygon(多邊形)、Rectangle(矩形)、Rounded Polygon(圓角多邊形)、Rounded Rectangle(圓角矩形)。

7 UV(UV 變換)
UV 官方介紹詳見→UV Nodes。
1)Flipbook(翻書 uv 變換)
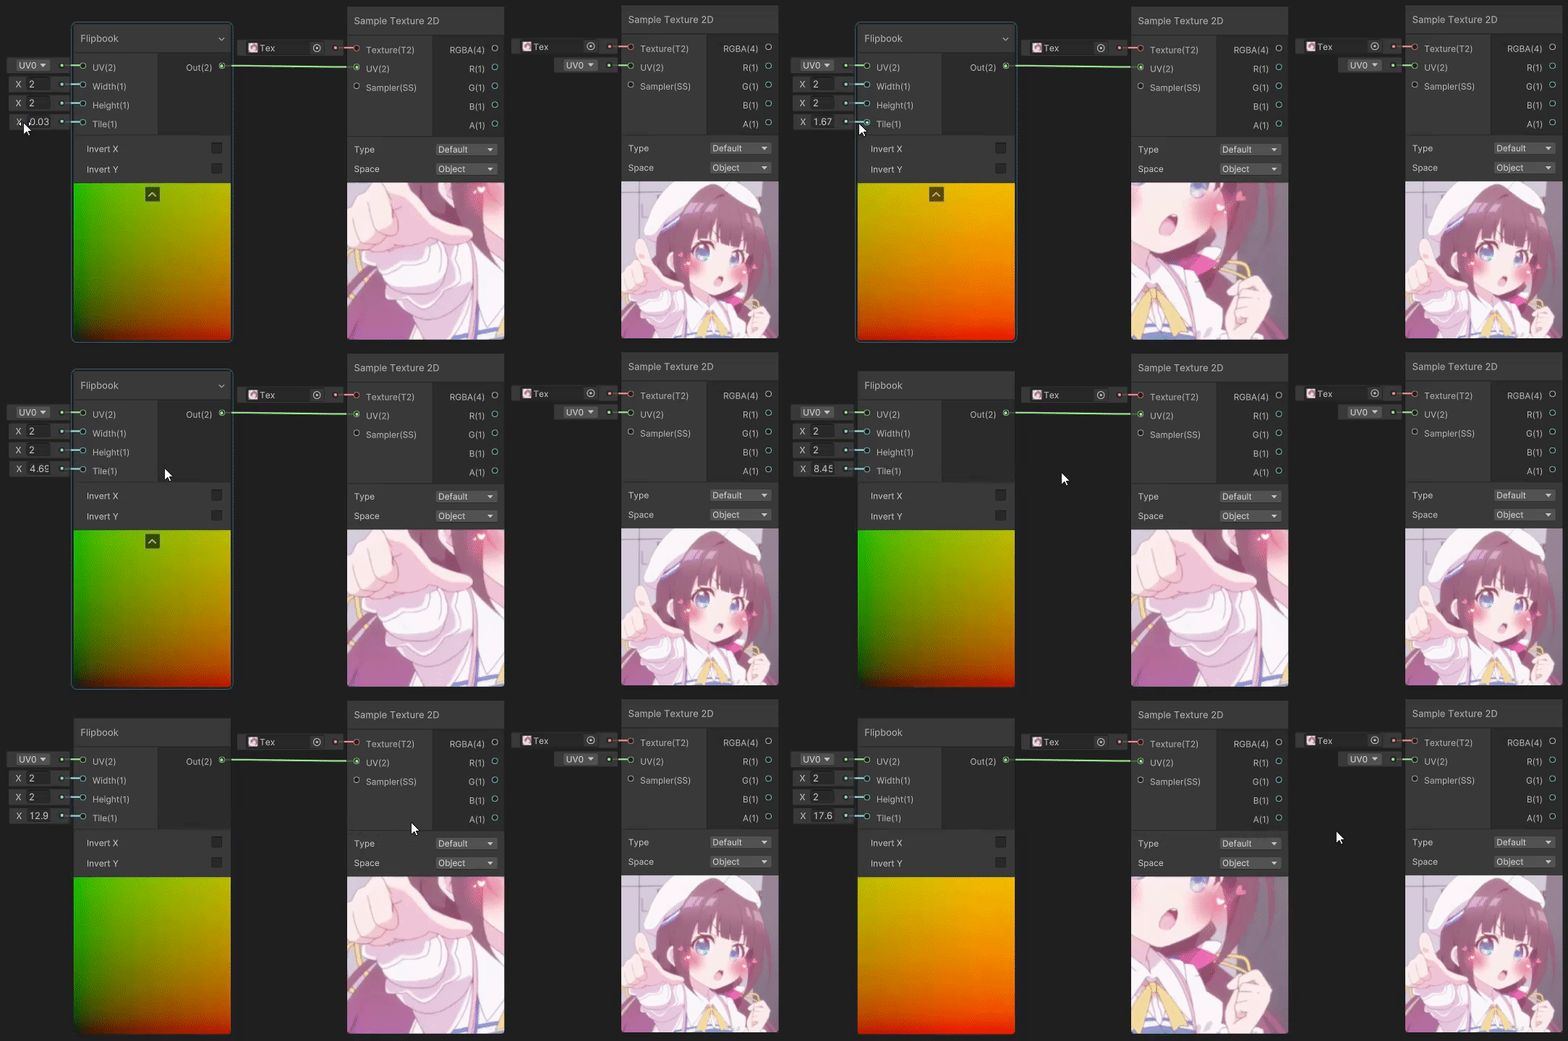
Flipbook 節點用於做翻書動畫,實現見→Flipbook Node,Width 和 Height 分別為水*和垂直區塊的數量,Tile 為當前區塊索引。
2)Polar Coordinates(極座標 uv 變換)
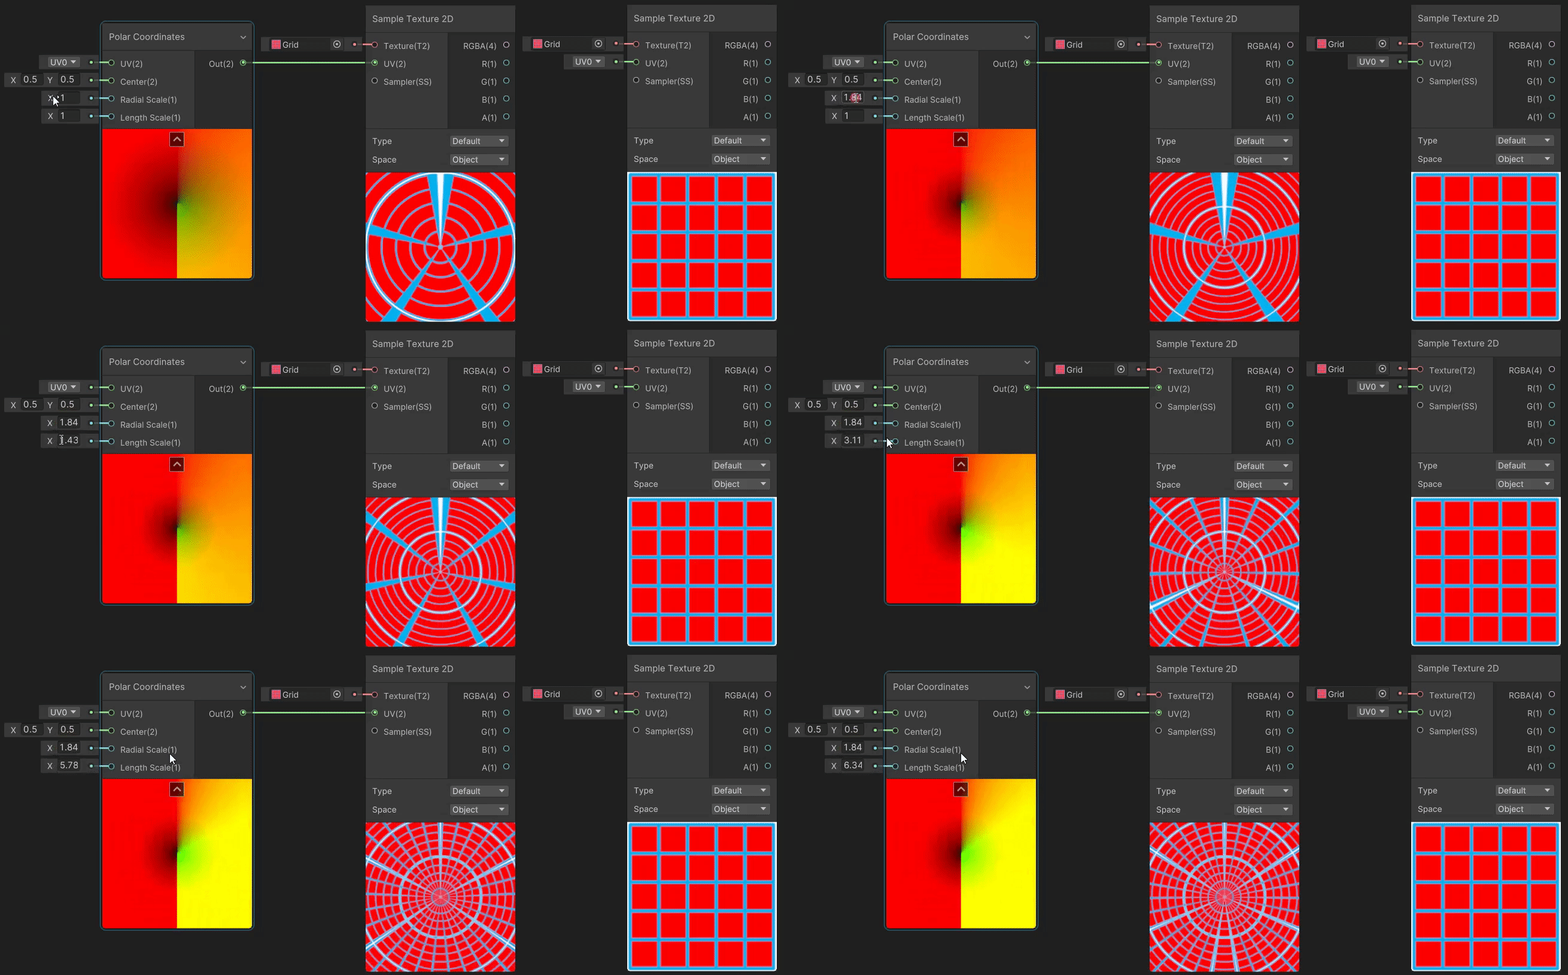
Polar Coordinates 節點用於將直角座標系下的 uv 座標轉換為極座標系下的座標,實現見→Polar Coordinates。
3)Radial Shear(徑向剪下 uv 變換)
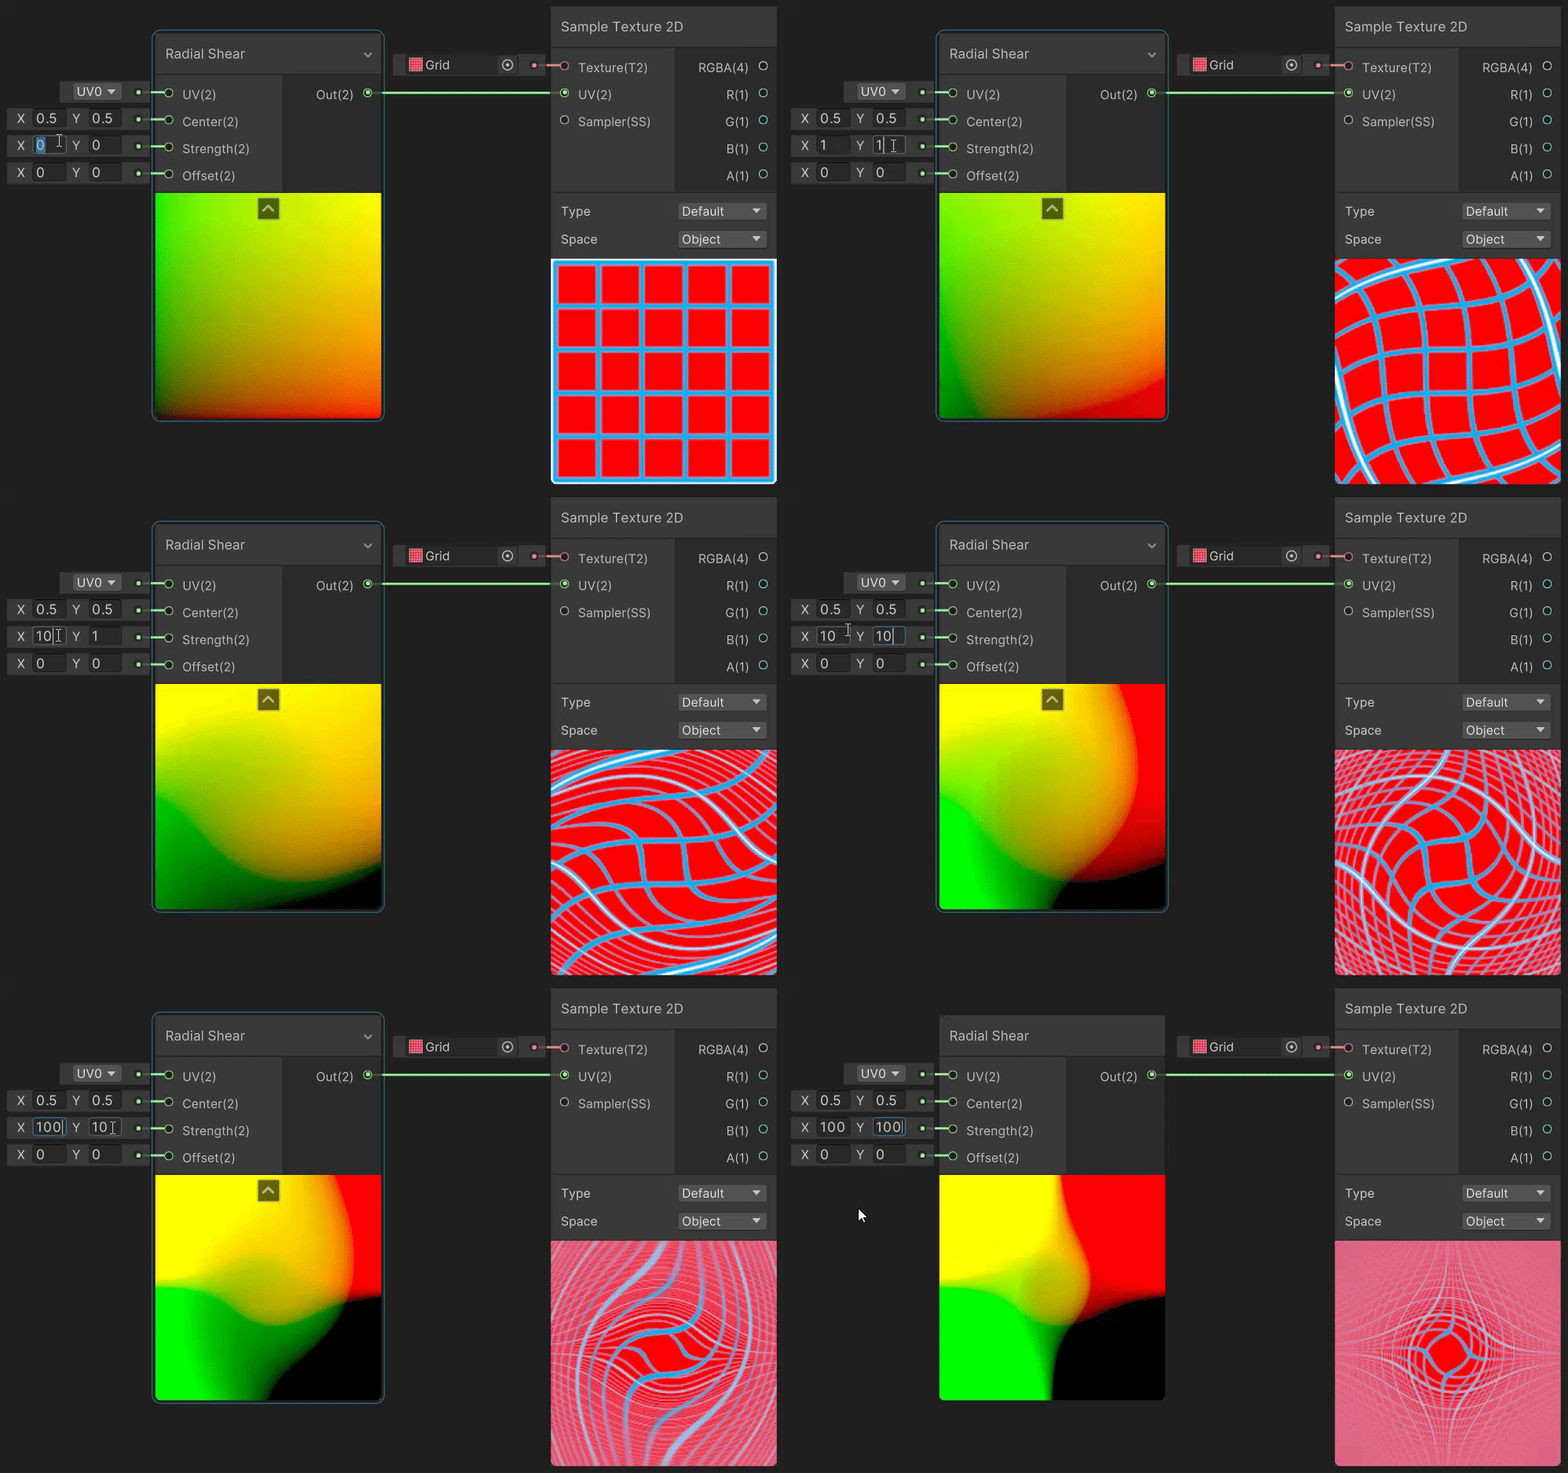
Radial Shear 節點用於模擬波的徑向剪下變形效果,實現見→Radial Shear Node。
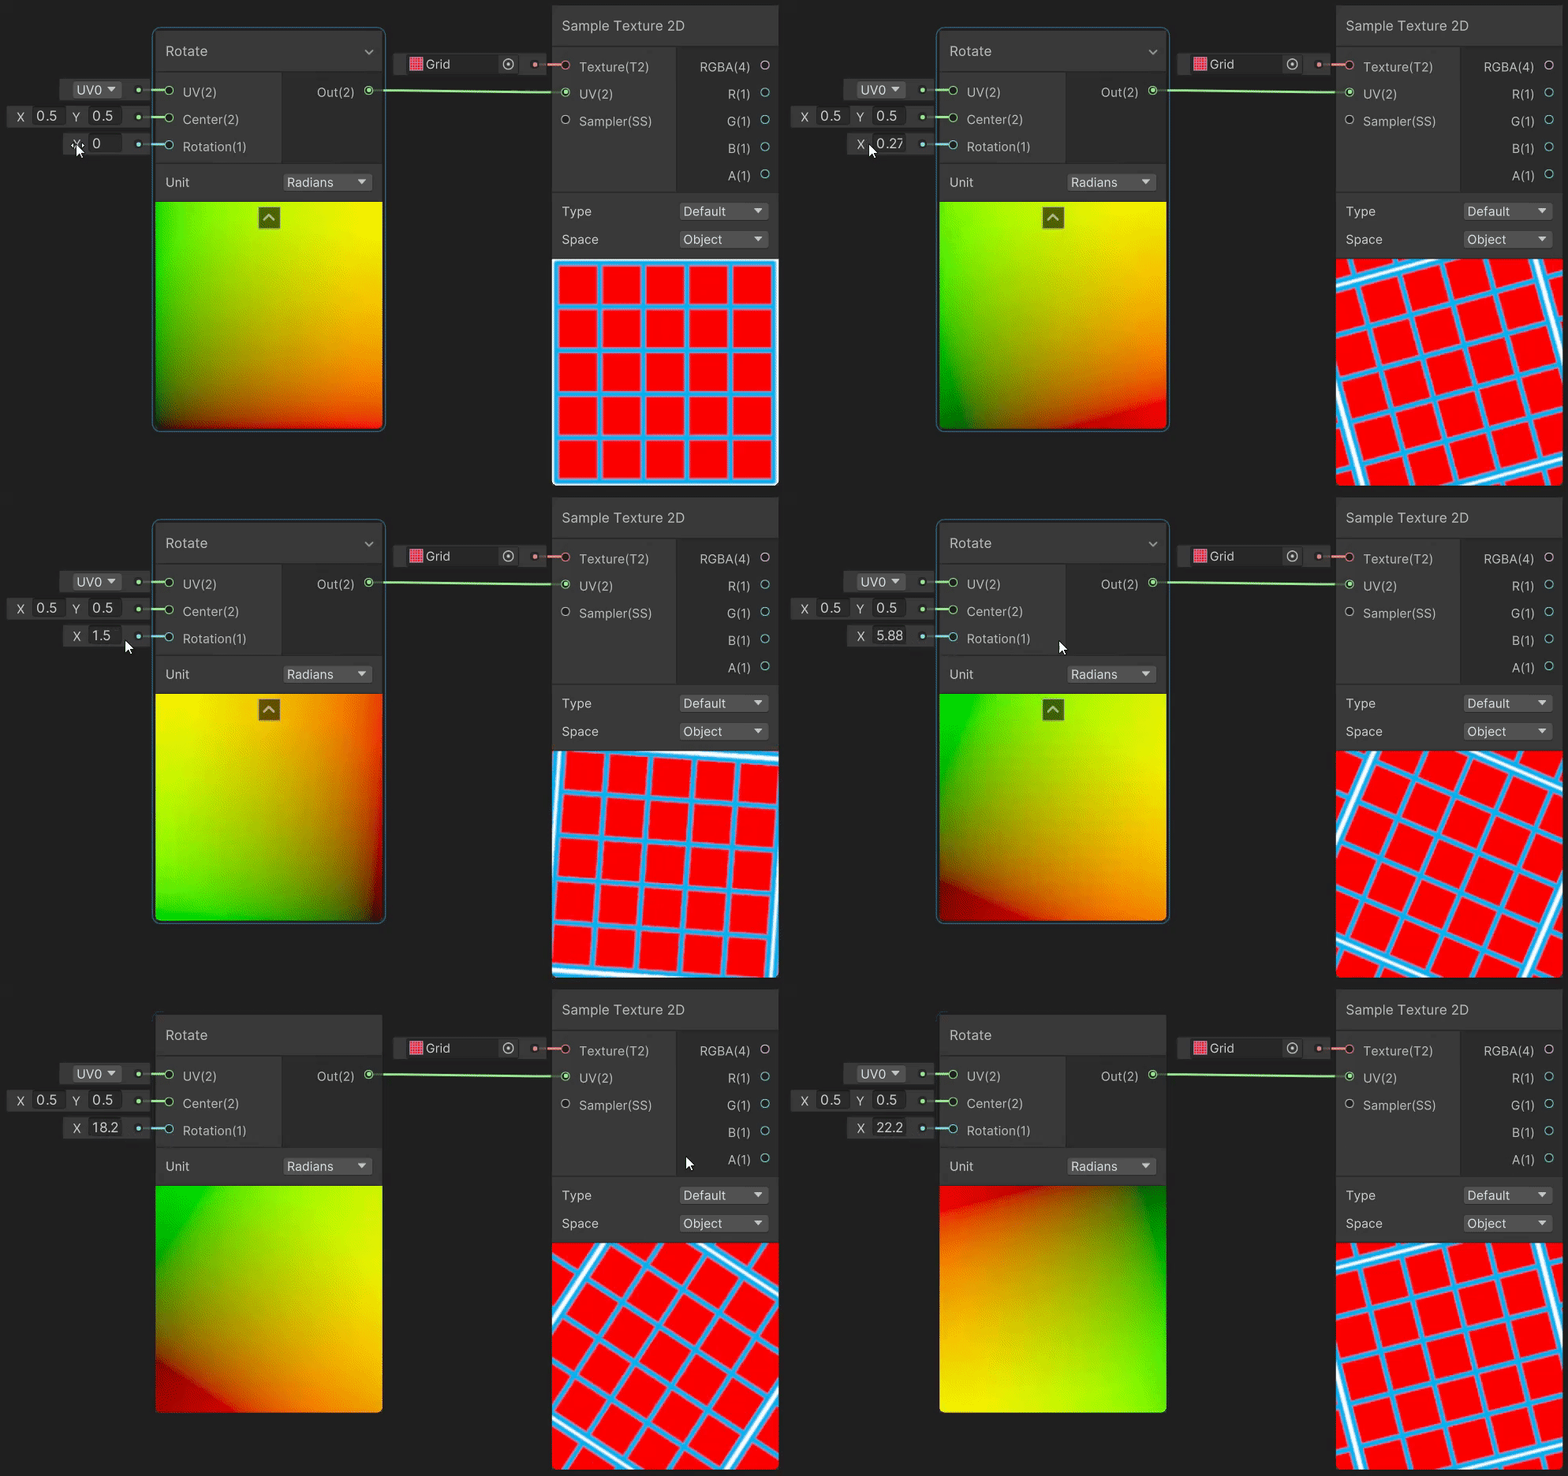
4)Rotate(旋轉 uv 變換)
Rotate 節點用於實現紋理旋轉效果,實現見→Rotate Node。
5)Spherize(球形變形 uv 變換)
Spherize 節點用於模擬魚眼鏡頭的球形變形效果,實現見→Spherize。

6)Tiling And Offset(縮放和偏移 uv 變換)
Tiling And Offset 節點用於縮放和偏移 uv 座標。
void TilingAndOffset(float2 UV, float2 Tiling, float2 Offset, out float2 Out) {
    Out = UV * Tiling + Offset;
}
7)Twirl(螺旋線 uv 變換)
Twirl 節點用於對 uv 座標進行螺旋線變換,實現見→Twirl Node。

8 Utility(實用工具)
Utility 官方介紹詳見→Utility Nodes。
8.1 Logic(邏輯判斷)
// 與運算, Out=A&&B
void And(float A, float B, out float Out)
// 或運算, Out=A||B
void Or(float In, out float Out)
// 非運算, Out=!In
void Not(float In, out float Out)
// 全true, Out=all(In), 即: 如果In中每個分量都不為零則返回1, 否則返回0
void All(float4 In, out float Out)
// 存在一true, Out=any(In), 即: 如果In中存在一個分量不為零則返回1, 否則返回0
void Any(float4 In, out float Out)
// 全非判斷, Out=!A&&!B
void Nand(float A, float B, out float Out)
// 無窮數判斷, Out = isinf(In)
void IsInfinite(float In, out float Out)
// 未知數判斷, Out=(In<0.0||In>0.0||In==0.0)?0:1
void IsNan(float In, out float Out)
// 分支, Out=Predicate?True:False
void Branch(float Predicate, float4 True, float4 False, out float4 Out)
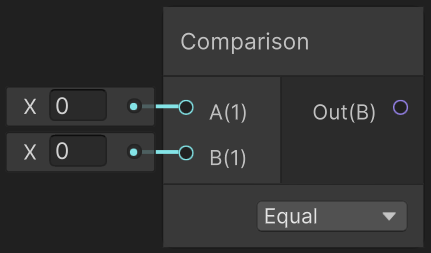
// 比較A和B的大小, 運運算元可以選擇: Equal、Not Equal、Less、Less Or Equal、Greater、Greater Or Equal
void Comparison(float A, float B, out float Out)
// 如果當前渲染正面則返回1,如果渲染背面則返回0
void IsFrontFaceNode(out float Out)
8.2 Custom Function(自定義函數)
自定義函數節點允許使用者通過指令碼自定義節點的運算邏輯,官方介紹見→Custom Function Node。
4.4 4)節提過,Shader Graph 13.1.9(2022.1+)版本才開始出現 Main Light Direction 節點,如果使用者想在低版本的 Shader Graph 中獲取燈光方向,可以通過 Custom Function 實現。下面將通過 Custom Function 實現 Main Light Direction 節點的功能。Shader Graph簡介 中基於自定義的 Main Light 實現了漫反射光照效果。
建立 Custom Function 節點,選中後,在 Node Settings 中設定如下,SHADERGRAPH_PREVIEW 用來判斷是否是預覽視窗。

#if SHADERGRAPH_PREVIEW
    Direction = half3(0.5, 0.5, 0);
    Color = half4(1, 0, 0, 1);
#else
    Light light = GetMainLight();
    Direction = light.direction;
    Color = light.color;
#endif
宣告:本文轉自【Unity3D】Shader Graph節點。