我在前端寫Java SpringBoot專案
前言
玩歸玩,鬧歸鬧,別拿 C端 開玩笑! 這裡不推薦大家把Node服務作為C端服務,畢竟它是單執行緒多工 機制。 這一特性是 Javascript 語言設計之初,就決定了它的使命 - Java >>>【Script】,這裡就不多解釋了,大家去看看 JavaScript 的歷史就知道啦~這也就決定了,它不能像後端語言那樣 多執行緒多工,使用者存取量小還能承受,一旦承受存取量大高並行,就得涼涼~
那為什麼我們還要去寫 Node 服務? 主要是方便快捷,對於小專案可以迅速完成建設,開發成本小。 其次,主要通過寫 Nest 完成下面收穫:
- 學習裝飾器語法,感受其簡潔優美;
- 自己學習一門新的開發框架,感受不同框架的優缺點,為以後開發選型打基礎;
- 感受伺服器端排查問題的複雜性,找找前端設計的靈感。
本篇文章主要是使用 NestJs + Sequelize + MySQL 完成基礎執行, 帶大家瞭解 Node 伺服器端的基礎搭建,也可以順便看看 Java SpringBoot 專案的基礎結構,它倆真的非常相似,不信你去問伺服器端開發同學。
養成好習慣,看文章先一鍵三連~【點贊,關注,轉發】,評論可以看完再吐槽~繼續完善填坑~
第一步、專案跑起來
在選擇伺服器端的時候,我之前使用過 Egg.js ,所以這次就不選它了。其次,Egg 也是繼承了 Koa 的開發基礎,加上 Express 也是基於 Koa 上創新的,兩者應該差不多,就不選擇 Koa 和 Express 。
所以,我想嘗試下 Nest.js 看語法跟 Java 是一樣的,加上之前也自己開發過 Java + SpringBoot 的專案,當然更古老的 SSH 2.0 也從無到有搭建過,即:Spring2.0 + Struts2+ Hibernate3.2,想想應該會很容易上手,順便懷舊下寫寫。
參考檔案:
- https://www.geeksforgeeks.org/best-nodejs-frameworks-for-app-development/
- https://anywhere.epam.com/business/best-node-js-frameworks
說下我的想法,首先我們剛入門,估計會有一堆不清楚的坑,我們先簡單點,後續我們再繼續加深。既然要搞伺服器端,要搞就多搞點,我們都去嚐鮮玩玩。我們打算使用 Nest 作為前端框架,Graphql 作為中間處理層。底層資料庫我們用傳統的 MySQL,比較穩定可靠,而且相對比較熟悉,這個就不玩新的了,畢竟資料庫是一切的基石 。
說下我們具體實現步驟:
-
【必須】沒有任何資料庫,完成介面請求執行,能夠跑起來;
-
【必須】建立基礎資料庫
MySQL,接入@nestjs/sequelize庫 完成增刪改查功能即:CRUD -
【可選】打算採取
Graphql處理 API 查詢,做到精確資料查詢,這個已經火了很多了,但是真正使用的很少,我們打算先感受下,後續可以直接用到業務。 -
【可選】接入
Swagger自動生成 API 檔案,快捷進行前端與後端服務聯調測試。
◦ Swagger是一個開源工具,用於設計、構建、記錄和使用RESTful web服務。
- 【可選】介面請求,資料庫優化處理
◦ 請求分流,資料庫寫入加鎖,處理並行流程
◦ 增加 middleware 中介軟體統一處理請求及響應,進行鑑權處理,請求攔截等操作
◦ 資料庫分割備份,資料庫融災處理,分為:主、備、災
◦ 資料庫讀寫分離,資料雙寫,建立資料庫快取機制,使用 redis 處理
也歡迎大家補充更多的優化點,我們一起探討~有興趣可以幫忙補充程式碼哈~
確定了大概方向,我們就開始整。先不追求一步到位,否則越多越亂,錦上添花的東西,我們可以後續增加,基礎功能我們要優先保障完成。Nest.js 官網:https://docs.nestjs.com/ ,話不多說,我們直接開整。
# 進入資料夾目錄
cd full-stack-demo/packages
# 安裝腳手架
npm i -g @nestjs/cli
# 建立基礎專案
nest new node-server-demo
# 進入專案
cd new node-server-demo
# 執行專案測試
npm run start:dev
我們移除一些不需要的東西,先簡單再複雜,別把自己搞暈了。接下來寫一個簡單範例感受下這個框架,之後完整的程式碼,我會公佈在後面。廢話不多說,開整!調整後目錄結構:
• common - 公用方法類
• config - 設定類檔案
• controller - 控制器,用於處理前端發起的各類請求
• service - 服務類,用於處理與資料庫互動邏輯
• dto - DTO(Data Transfer Object)可以用於驗證輸入資料、限制傳輸的欄位或格式。
• entities - 實體類,用於描述物件相關的屬性資訊
• module - 模組,用於註冊所有的服務類、控制器類,類似 Spring 裡面的 bean
◦ 這裡不能完全等同哈,兩個實現機制上就不同,只是幫助大家理解。
• main.ts - nest 啟動入口
• types - typescript 相關宣告型別

只是寫 demo, 搞快點就沒有怎麼寫註釋了,我感覺是一看就懂了,跟 Java SpringBoot 的寫法非常一致,部分程式碼展示:
- 控制器 controller
// packages/node-server-demo/src/controller/user/index.ts
import { Controller, Get, Query } from '@nestjs/common';
import UserServices from '@/service/user';
import { GetUserDto, GetUserInfoDto } from '@/dto/user';

@Controller('user')
export class UserController {
  constructor(private readonly userService: UserServices) {}

  // Get 請求 user/name?name=bricechou
  @Get('name')
  async findByName(@Query() getUserDto: GetUserDto) {
    return this.userService.read.findByName(getUserDto.name);
  }

  // Get 請求 user/info?id=123
  @Get('info')
  async findById(@Query() getUserInfoDto: GetUserInfoDto) {
    const user = await this.userService.read.findById(getUserInfoDto.id);
    return { gender: user.gender, job: user.job };
  }
}
// packages/node-server-demo/src/controller/log/add.ts
import { Controller, Post, Body } from '@nestjs/common';
import { AddLogDto } from '@/dto/log';
import LogServices from '@/service/log';

@Controller('log')
export class CreateLogController {
  constructor(private readonly logServices: LogServices) {}

  // post('/log/add')
  @Post('add')
  create(@Body() createLogDto: AddLogDto) {
    return this.logServices.create.create(createLogDto);
  }
}
- 資料轉換 Data Transfer Object
// packages/node-server-demo/src/dto/user.ts
export class CreateUserDto {
  name: string;
  age: number;
  gender: string;
  job: string;
}

// 可以分開寫,也可以合併
export class GetUserDto {
  id?: number;
  name: string;
}

// 可以分開寫,也可以合併
export class GetUserInfoDto {
  id: number;
}
- service 資料庫互動處理類
// packages/node-server-demo/src/service/user/read.ts
import { Injectable } from '@nestjs/common';
import { User } from '@/entities/User';

@Injectable()
export class ReadUserService {
  constructor() {}

  async findByName(name: string): Promise<User> {
    // 可以處理判空,從資料庫讀取/寫入資料,可能會被多個 controller 進行呼叫
    console.info('ReadUserService findByName > ', name);
    return Promise.resolve({ id: 1, name, job: '程式設計師', gender: 1, age: 18 });
  }

  async findById(id: number): Promise<User> {
    console.info('ReadUserService findById > ', id);
    return Promise.resolve({
      id: 1,
      name: 'BriceChou',
      job: '程式設計師',
      gender: 1,
      age: 18,
    });
  }
}
- module 模組註冊,服務類/控制類
// packages/node-server-demo/src/module/user.ts
import { Module } from '@nestjs/common';
import UserService, { ReadUserService } from '@/service/user';
import { UserController } from '@/controller/user';

@Module({
  providers: [UserService, ReadUserService],
  controllers: [UserController],
})
export class UserModule {}
// packages/node-server-demo/src/module/index.ts 根模組注入
import { Module } from '@nestjs/common';
import { UserModule } from './user';
import { LogModule } from './log';

@Module({
  imports: [
    UserModule,
    LogModule,
  ],
})
export class AppModule {}
- main.js 啟動註冊的所有類
// packages/node-server-demo/src/main.ts
import { AppModule } from '@/module';
import { NestFactory } from '@nestjs/core';
import { NestExpressApplication } from '@nestjs/platform-express';

async function bootstrap() {
  const app = await NestFactory.create<NestExpressApplication>(AppModule);
  // 監聽埠 3000
  await app.listen(3000);
}

bootstrap();
這樣一個單機的伺服器就啟動起來了,我們可以使用 Postwoman [https://hoppscotch.io/] 進行請求,瞅瞅看返回效果。

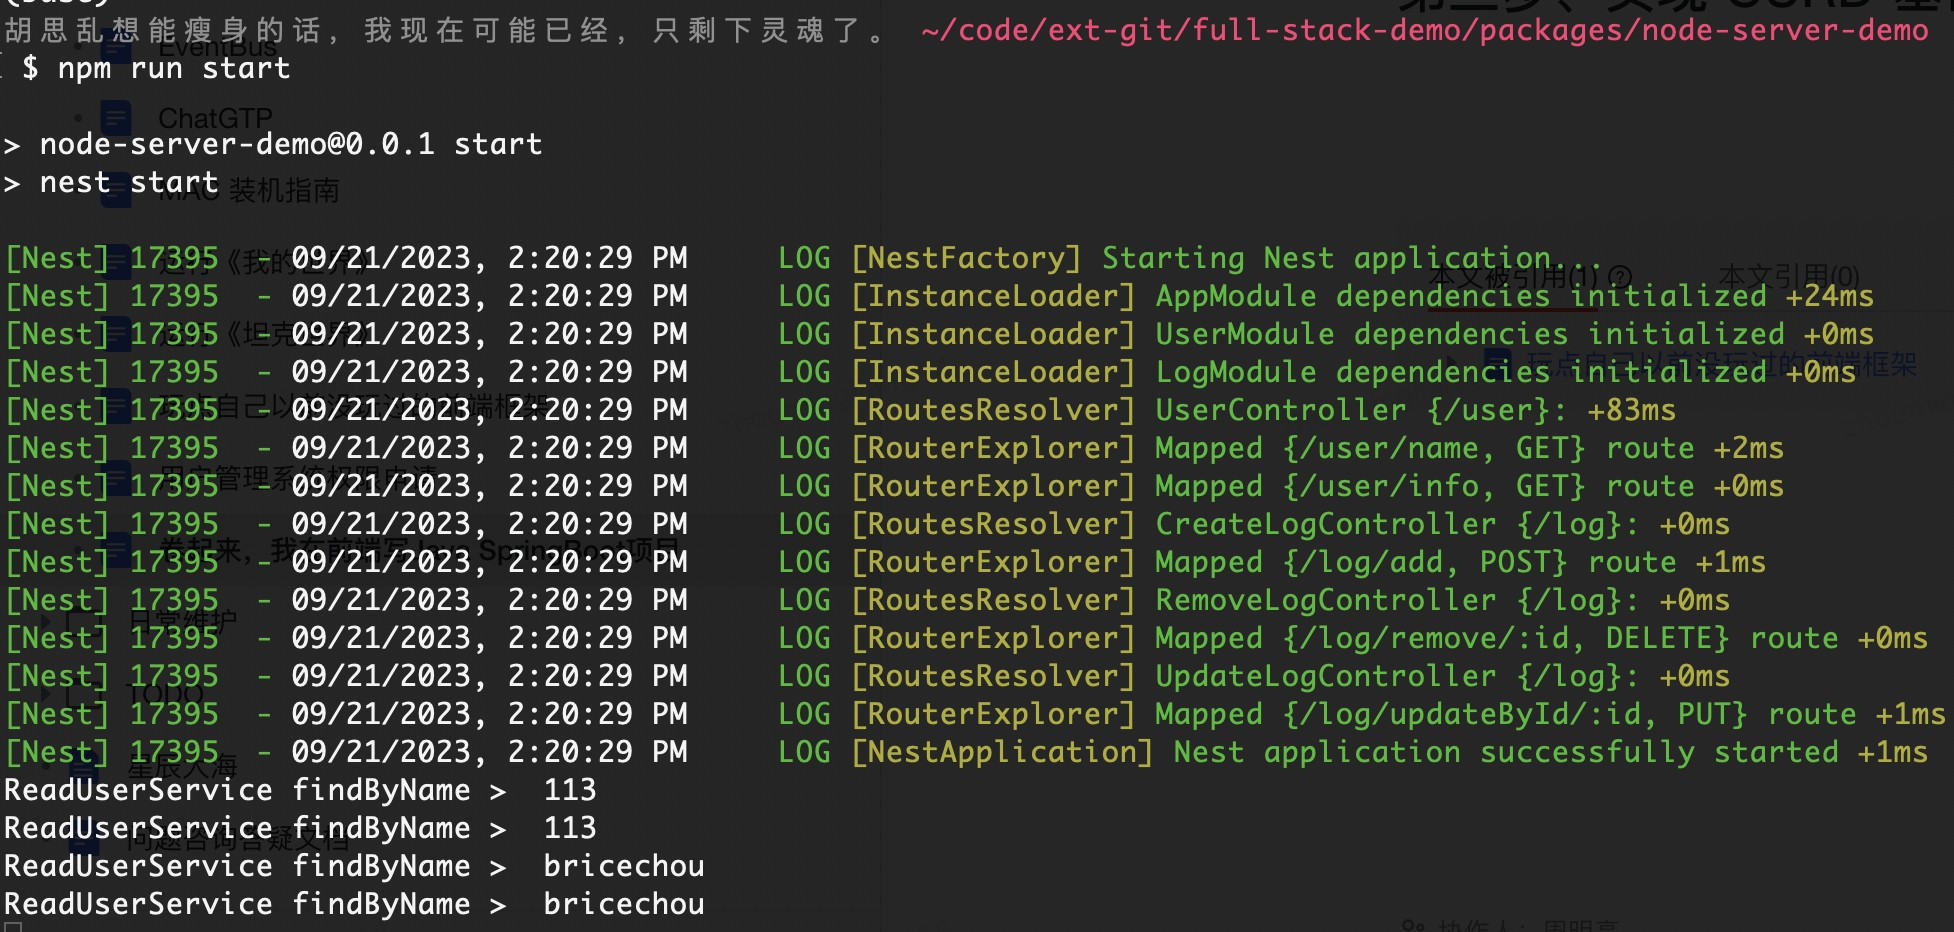
控制檯也收到紀錄檔了,後面可以把這些紀錄檔請求保留成 .log 檔案,這樣請求紀錄檔也有了,完美!下一步,我們開始連線資料庫,這樣就不用單機玩泥巴了~
第二步、設定 MySQL
MySQL 安裝其實很簡單,我電腦是 Mac 的,所以下面的截圖都是以 mac 為例,先下載對應的資料庫。
下載地址:https://dev.mysql.com/downloads/mysql/ 至於其他系統的,可以網上找教學,這個應該爛大街了,我就不重複搬運教學了。
- 注意:安裝的資料庫,一定要設定密碼,連線資料庫必須要有密碼,否則會導致連線資料庫失敗。
- MySQL 我們只安裝資料庫就行,熟悉指令的童鞋,就直接命令列操作就行。
- 不熟悉的話,那就下載圖形化管理工具。
◦ Mysql 官方控制檯 https://dev.mysql.com/downloads/workbench/
◦ Windows 也可以使用 https://www.heidisql.com/download.php?download=installer
PS:安裝 workbench 時發現要求 MacOS 13以上,我的電腦是 MacOS 12。
白白下載,所以只能 https://downloads.mysql.com/archives/workbench/ 從歸檔裡面找低版本 8.0.31。對於資料庫服務也有版本要求,大家按照自己電腦版本,選擇支援的版本即可。 https://downloads.mysql.com/archives/community/。我這邊選擇的是預設最新版本:8.0.34,下載好直接安裝,一路 Next 到底,記住自己輸入的 Root 密碼!!!
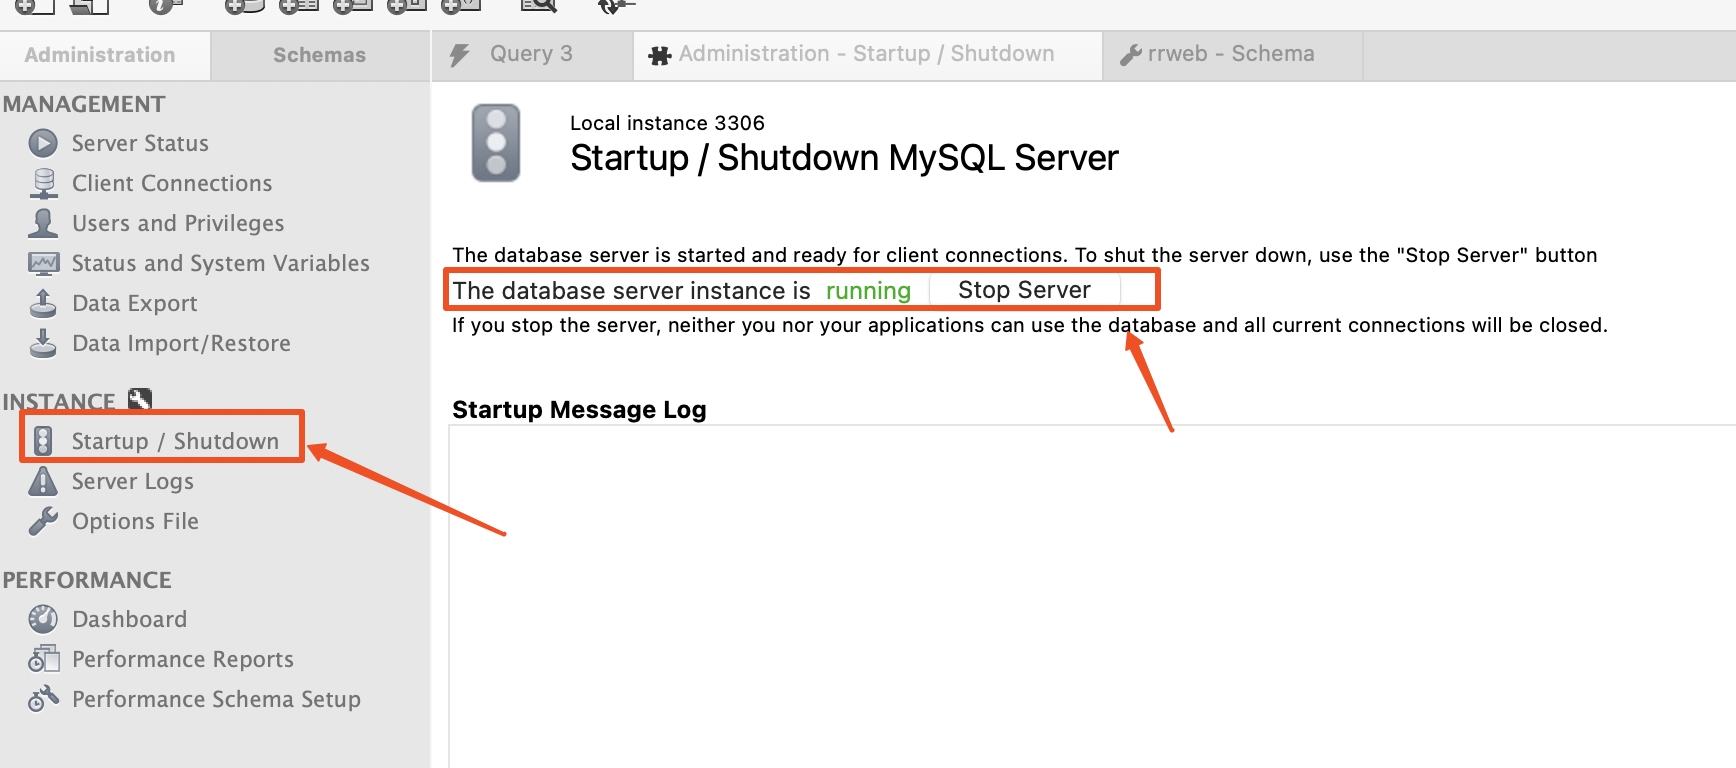
確認好當前資料庫是否已經執行起來了,啟動 Workbench 檢視狀態。
1.建立資料庫
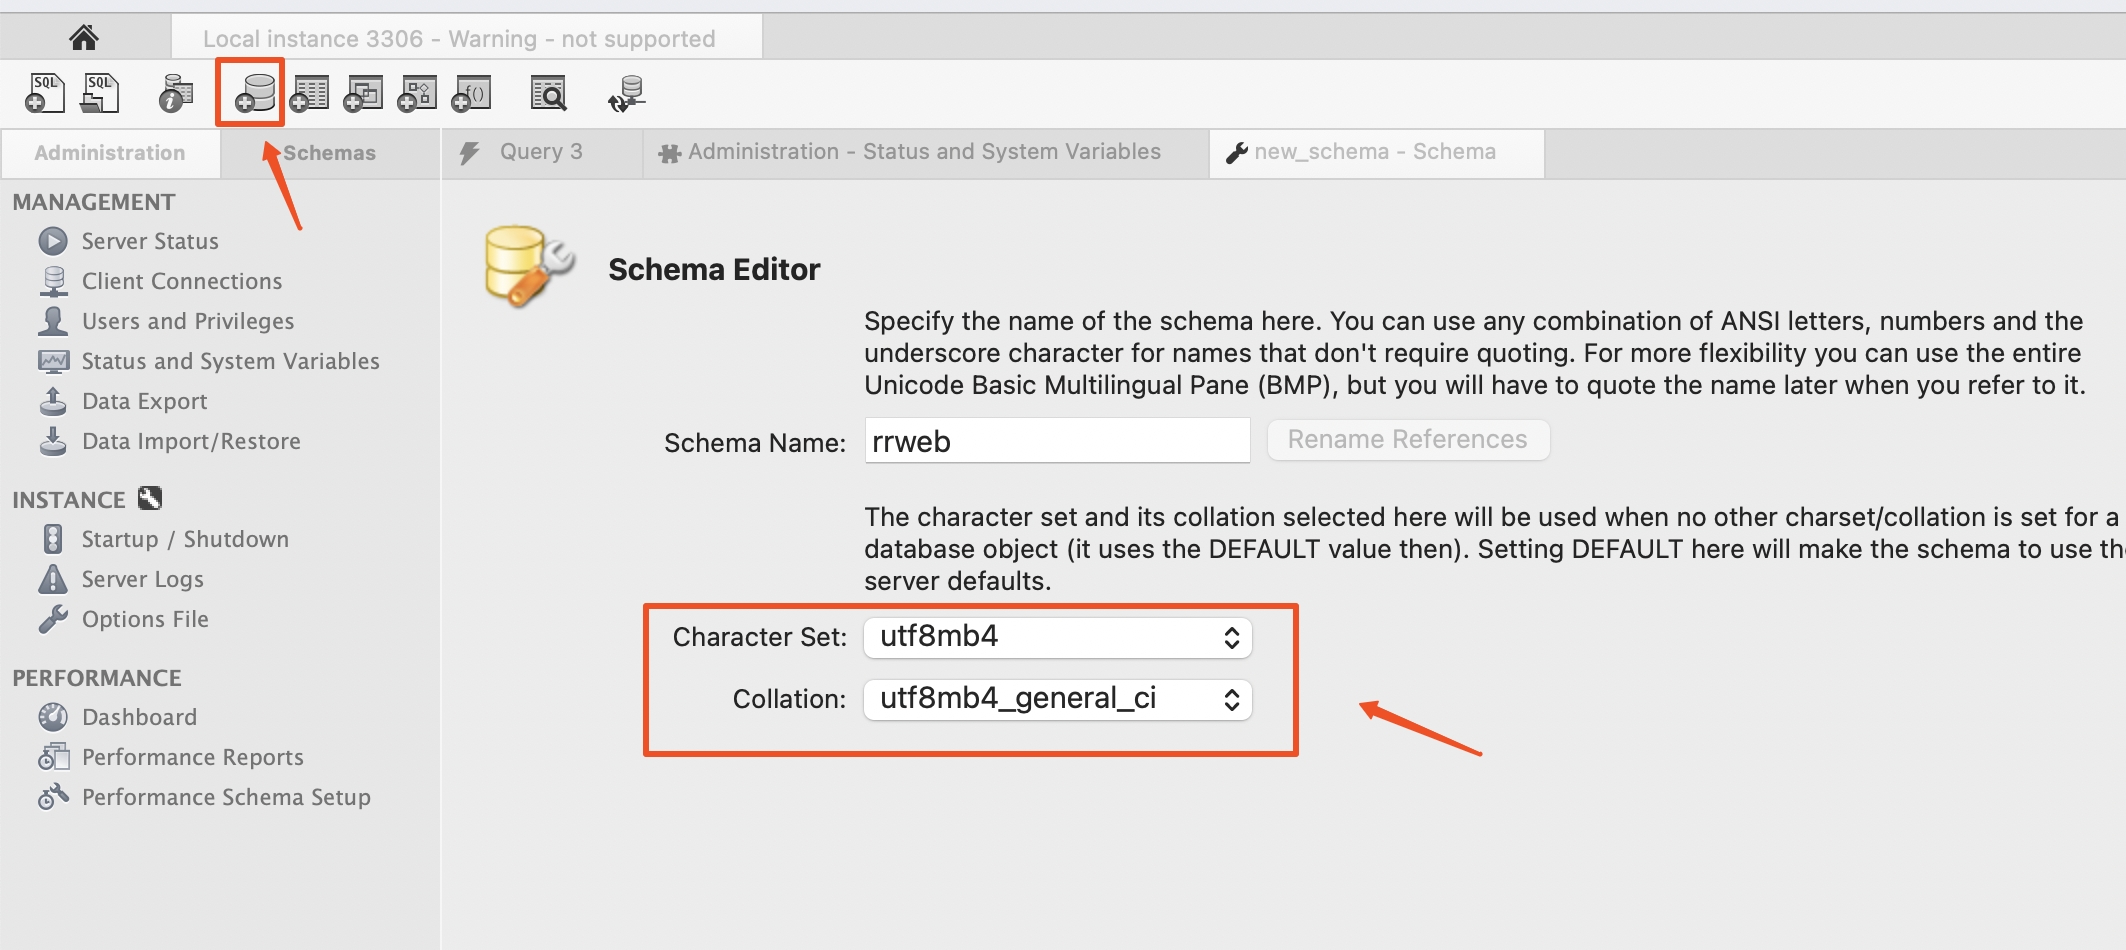
資料庫存在字元集選擇,不同的字元集和校驗規則,會對儲存資料產生影響,所以大家可以自行查詢,按照自己儲存資料原則選擇,我這裡預設選最廣泛的。確認好,就選擇右下角的應用按鈕。
- 建立表和屬性
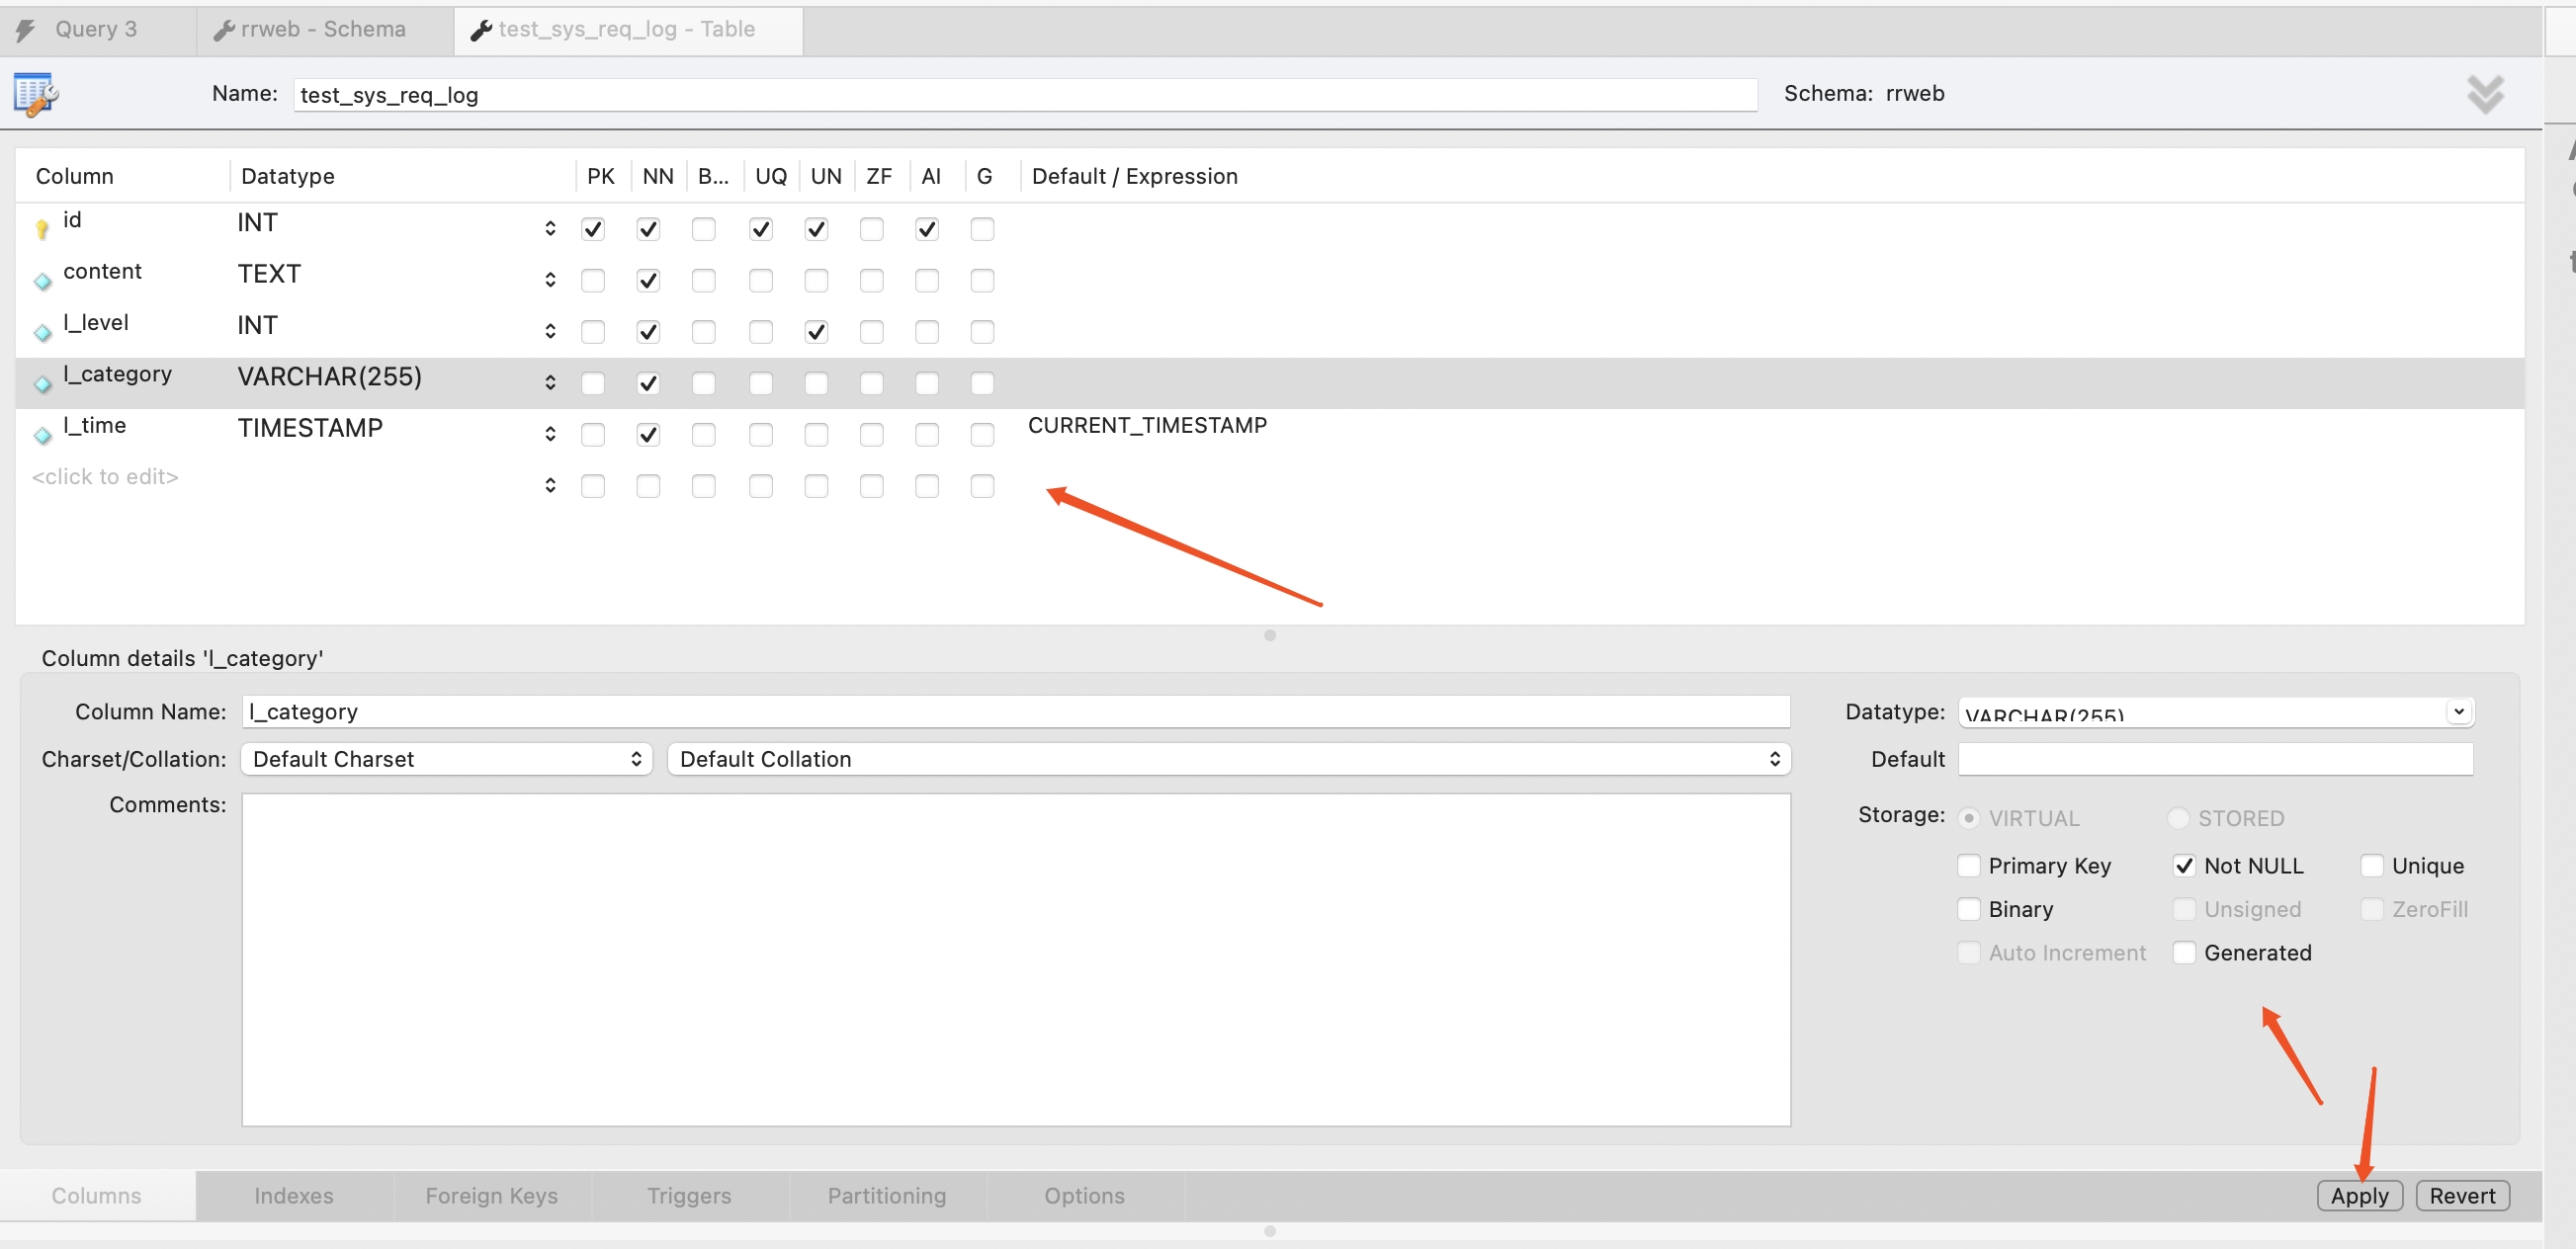
選項解答:
• PRIMARY KEY 是表中的一個或多個列的組合,它用於唯一標識表中的每一行。
• Not NULL 和 Unique 就不解釋,就是直譯的那個意思。
• GENERATED 生成列是表中的一種特殊型別的列,它的值不是從插入語句中獲取的,而是根據其他列的值通過一個表示式或函數生成的。
CREATE TABLE people (
    first_name VARCHAR(100),
    last_name VARCHAR(100),
    full_name VARCHAR(200) AS (CONCAT(first_name, ' ', last_name))
);
UNSIGNED這個數值型別就只能儲存正數(包括零),不會儲存負數。ZEROFILL將數值型別的欄位的前面填充零,他會自動使欄位變為UNSIGNED,直到該欄位達到宣告的長度,如:00007BINARY用於儲存二進位制字串,如宣告一個欄位為 BINARY(5),那麼儲存在這個欄位中的字串都將被處理為長度為 5 的二進位制字串。
◦ 如嘗試儲存一個長度為 3 的字串,那麼它將在右側用兩個空位元組填充。
◦ 如果你嘗試儲存一個長度為 6 的字串,那麼它將被截斷為長度為 5
◦ 主要用途是儲存那些需要按位元組進行比較的資料,例如加密雜湊值
- 此外也可順手傳建立一個索引,方便快速查詢。
CREATE TABLE `rrweb`.`test_sys_req_log` (
  `id` INT UNSIGNED NOT NULL AUTO_INCREMENT,
  `content` TEXT NOT NULL,
  `l_level` INT UNSIGNED NOT NULL,
  `l_category` VARCHAR(255) NOT NULL,
  `l_created_at` TIMESTAMP NOT NULL DEFAULT CURRENT_TIMESTAMP,
  `l_updated_at` TIMESTAMP NOT NULL DEFAULT CURRENT_TIMESTAMP,
  PRIMARY KEY (`id`),
  UNIQUE INDEX `id_UNIQUE` (`id` ASC) VISIBLE,
  INDEX `table_index` (`l_level` ASC, `l_category` ASC, `l_time` ASC) VISIBLE);
- 連線資料庫
由於目前 node-oracledb 官方尚未提供針對 Apple Silicon 架構的預編譯二進位制檔案。導致我們無法在 Mac M1 晶片上使用 TypeORM 連結資料庫操作,它目前只支援 Mac x86 晶片。哎~折騰老半天,查閱各種檔案,居然有這個坑,沒關係我們換個方式開啟。
我們不得不放棄,從而選用 https://docs.nestjs.com/techniques/database#sequelize-integration 哐哐哐~一頓操作猛如虎,盤它!
- 安裝
Sequelize
# 安裝連線庫
npm install --save @nestjs/sequelize sequelize sequelize-typescript mysql2
# 安裝 type
npm install --save-dev @types/sequelize
- 設定資料庫基礎資訊
// packages/node-server-demo/src/module/index.ts
import { Module } from '@nestjs/common';
import { UserModule } from './user';
import { LogModule } from './log';
import { Log } from '@/entities/Log';
import { SequelizeModule } from '@nestjs/sequelize';

@Module({
  imports: [
    SequelizeModule.forRoot({
      dialect: 'mysql',
      // 按資料庫實際設定
      host: '127.0.0.1',
      // 按資料庫實際設定
      port: 3306,
      // 按資料庫實際設定
      username: 'root',
      // 按資料庫實際設定
      password: 'hello',
      // 按資料庫實際設定
      database: 'world',
      synchronize: true,
      models: [Log],
      autoLoadModels: true,
    }),
    LogModule,
    UserModule,
  ],
})
export class AppModule {}
- 實體與資料庫一一對映處理
import { getNow } from '@/common/date';
import {
  Model,
  Table,
  Column,
  PrimaryKey,
  DataType,
} from 'sequelize-typescript';

@Table({ tableName: 'test_sys_req_log' })
export class Log extends Model<Log> {
  @PrimaryKey
  @Column({
    type: DataType.INTEGER,
    autoIncrement: true,
    field: 'id',
  })
  id: number;

  @Column({ field: 'content', type: DataType.TEXT })
  content: string;

  @Column({ field: 'l_level', type: DataType.INTEGER })
  level: number; // 3嚴重,2危險,1輕微

  @Column({ field: 'l_category' })
  category: string; // 模組分類/來源分類

  @Column({
    field: 'l_created_at',
    type: DataType.NOW,
    defaultValue: getNow(),
  })
  createdAt: number;

  @Column({
    field: 'l_updated_at',
    type: DataType.NOW,
    defaultValue: getNow(),
  })
  updatedAt: number;
}
- module 註冊實體
// packages/node-server-demo/src/module/log.ts
import { Module } from '@nestjs/common';
import { SequelizeModule } from '@nestjs/sequelize';
import { Log } from '@/entities/Log';
import LogServices, {
  CreateLogService,
  UpdateLogService,
  DeleteLogService,
  ReadLogService,
} from '@/service/log';
import {
  CreateLogController,
  RemoveLogController,
  UpdateLogController,
} from '@/controller/log';

@Module({
  imports: [SequelizeModule.forFeature([Log])],
  providers: [
    LogServices,
    CreateLogService,
    UpdateLogService,
    DeleteLogService,
    ReadLogService,
  ],
  controllers: [CreateLogController, RemoveLogController, UpdateLogController],
})
export class LogModule {}
- service 運算元據庫處理資料
import { Log } from '@/entities/Log';
import { Injectable } from '@nestjs/common';
import { AddLogDto } from '@/dto/log';
import { InjectModel } from '@nestjs/sequelize';
import { ResponseStatus } from '@/types/BaseResponse';
import { getErrRes, getSucVoidRes } from '@/common/response';

@Injectable()
export class CreateLogService {
  constructor(
    @InjectModel(Log)
    private logModel: typeof Log,
  ) {}

  async create(createLogDto: AddLogDto): Promise<ResponseStatus<null>> {
    console.info('CreateLogService create > ', createLogDto);
    const { level = 1, content = '', category = 'INFO' } = createLogDto || {};
    const str = content.trim();
    if (!str) {
      return getErrRes(500, '紀錄檔內容為空');
    }
    const item = {
      level,
      category,
      // Tips: 為防止外部資料進行資料注入,我們可以對內容進行 encode 處理。
      // content: encodeURIComponent(str),
      content: str,
    };
    await this.logModel.create(item);
    return getSucVoidRes();
  }
}
一路操作猛如虎,回頭一看嘿嘿嘿~終於,我們收到了來自外界的第一條資料! hello world!
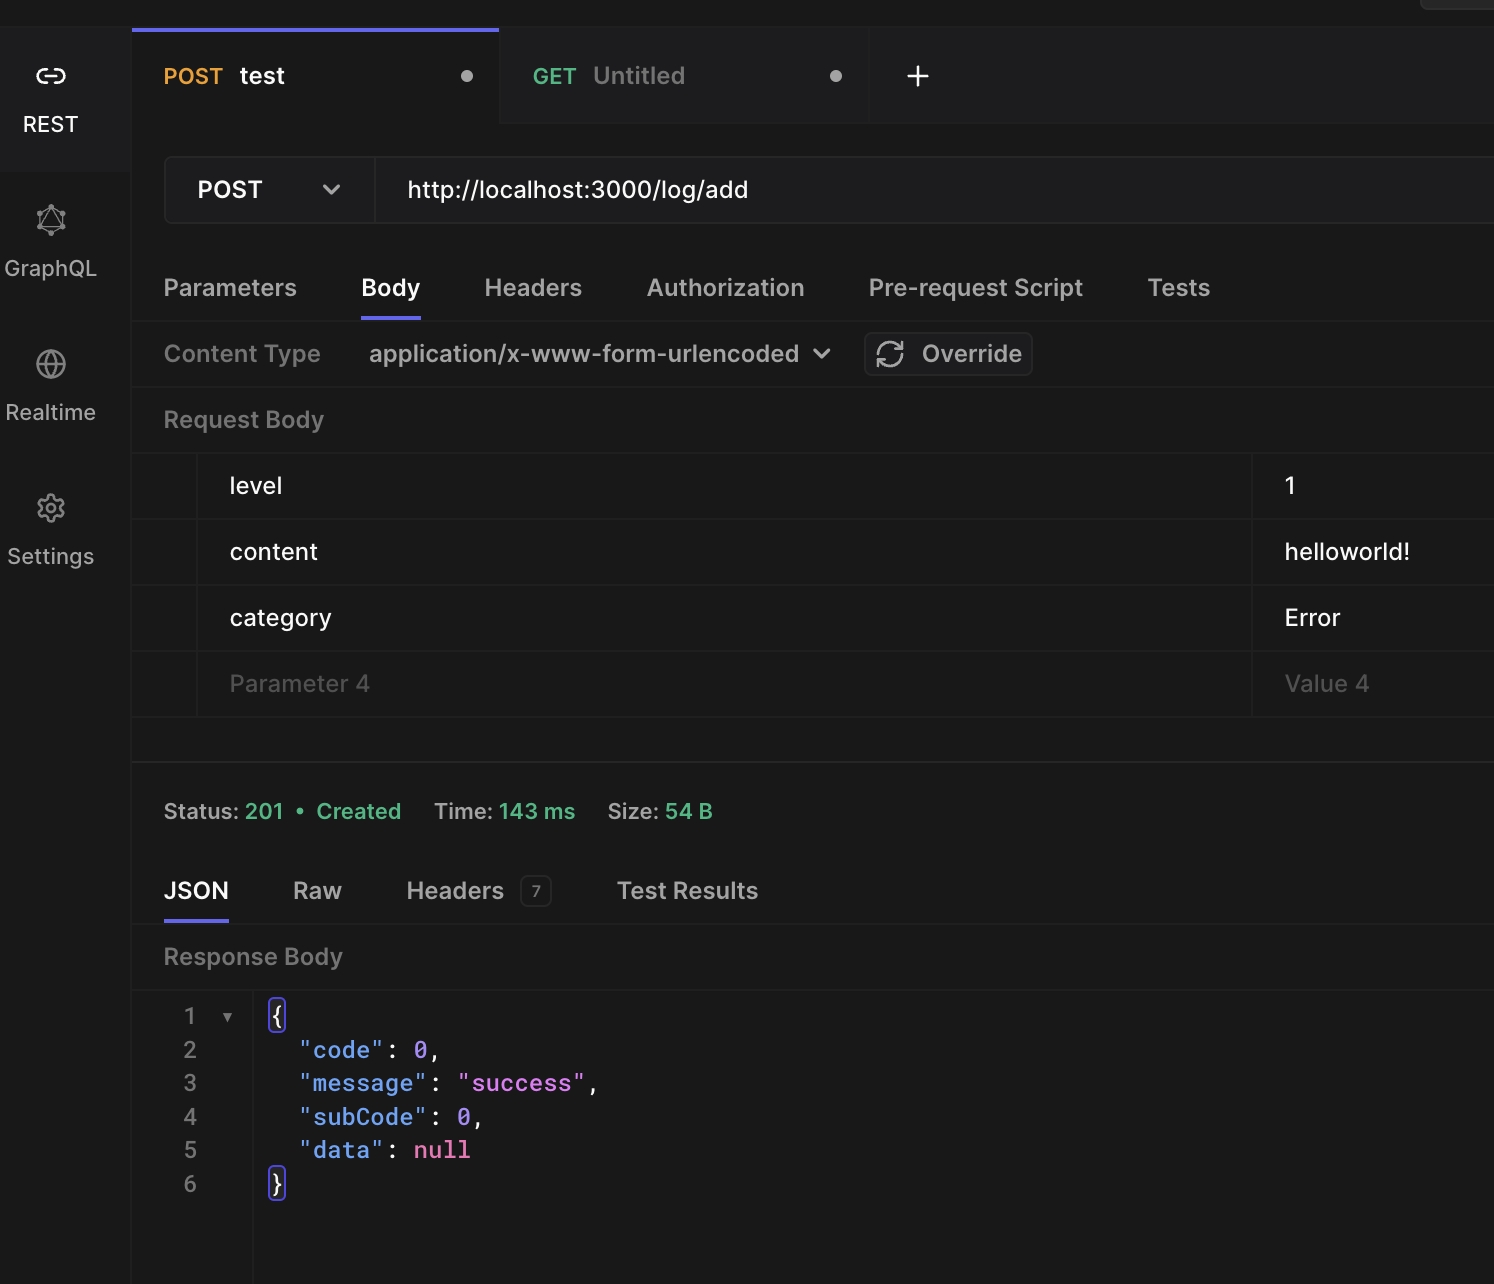
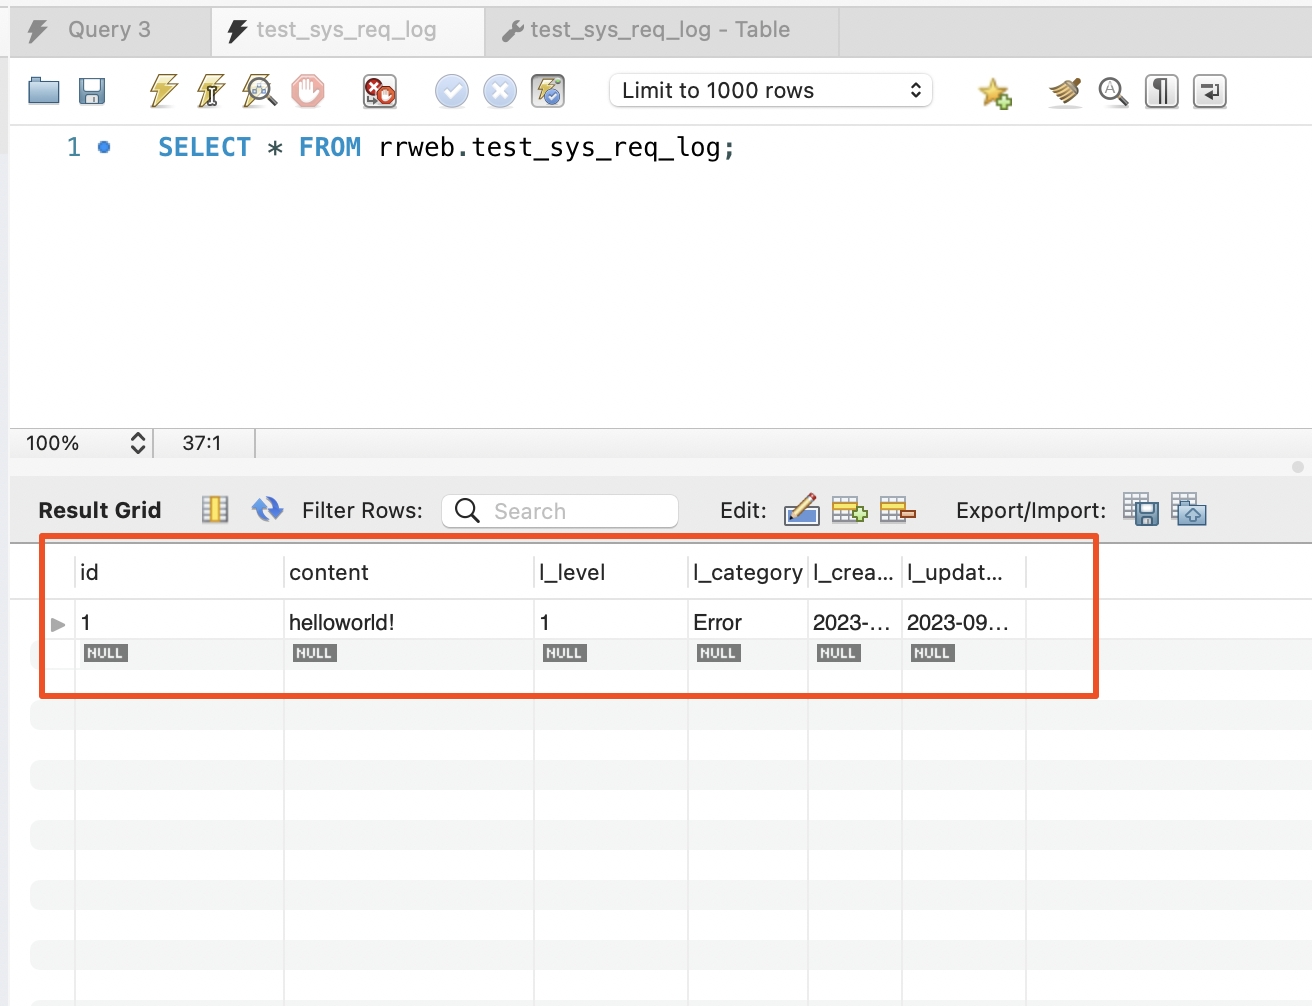
連線及建立資料成功!此時已經完成基礎功能啦~
第三步、實現 CRUD 基礎功能
剩下的內容,其實大家可以自行腦補了,就是呼叫資料庫的操作邏輯。先說說什麼是 CRUD
Ccreate 建立Rread 讀取Uupdate 更新Ddelete 刪除
下面給個簡單範例,大家看看,剩下就去找檔案,實現業務邏輯即可:
import { Injectable } from '@nestjs/common';
import { InjectModel } from '@nestjs/sequelize';
import { User } from './user.model';

@Injectable()
export class UserService {
  constructor(
    @InjectModel(User)
    private userModel: typeof User,
  ) {}
  // 建立新資料
  async create(user: User) {
    const newUser = await this.userModel.create(user);
    return newUser;
  }
  // 查詢所有資料
  async findAll() {
    return this.userModel.findAll();
  }
  // 按要求查詢單個
  async findOne(id: string) {
    return this.userModel.findOne({ where: { id } });
  }
  // 按要求更新
  async update(id: string, user: User) {
    await this.userModel.update(user, { where: { id } });
    return this.userModel.findOne({ where: { id } });
  }
  // 按要求刪除
  async delete(id: string) {
    const user = await this.userModel.findOne({ where: { id } });
    await user.destroy();
  }
}
Tips: 進行刪除的時候,我們可以進行假刪除,兩個資料庫,一個是備份資料庫,一個是主資料庫。主資料庫可以直接刪除或者增加標識表示刪除。備份資料庫,可以不用刪除只寫入和更新操作,這樣可以進行資料還原操作。
此外,為了防止 SQL 資料庫注入,大家需要對資料來源進行統一校驗處理或者直接進行 encode 處理,對於重要資料可以直接進行 MD5 加密處理,防止資料庫被直接下載洩露。關於 SQL 資料庫的安全處理,網上教學有很多,大家找一找就可以啦~
部署就比較簡單了,我們就不需要一一贅述了,資料庫可以用集團提供的雲資料庫,而 Nest 就是普通的 node 部署。
作者:京東零售 周明亮
來源:京東雲開發者社群 轉載請註明來源