docker 部署環境基本流程
2023-09-11 21:00:48
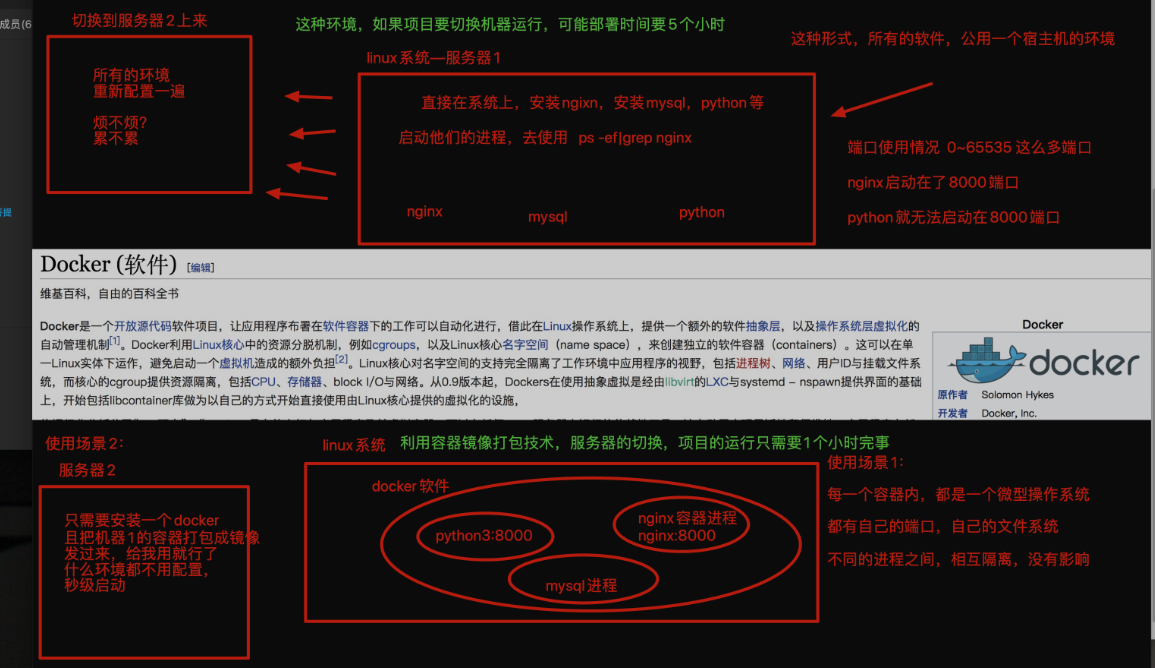
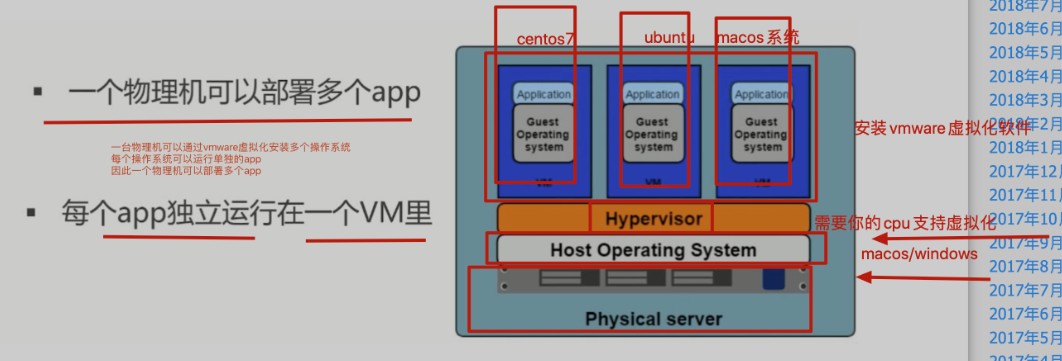
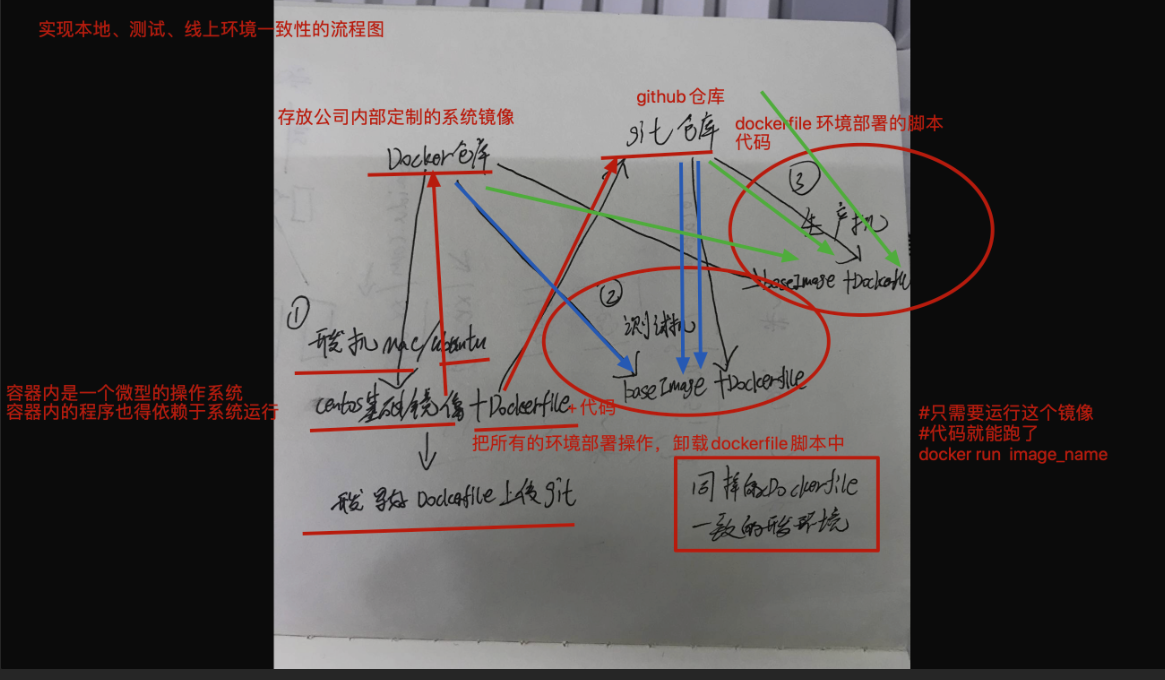
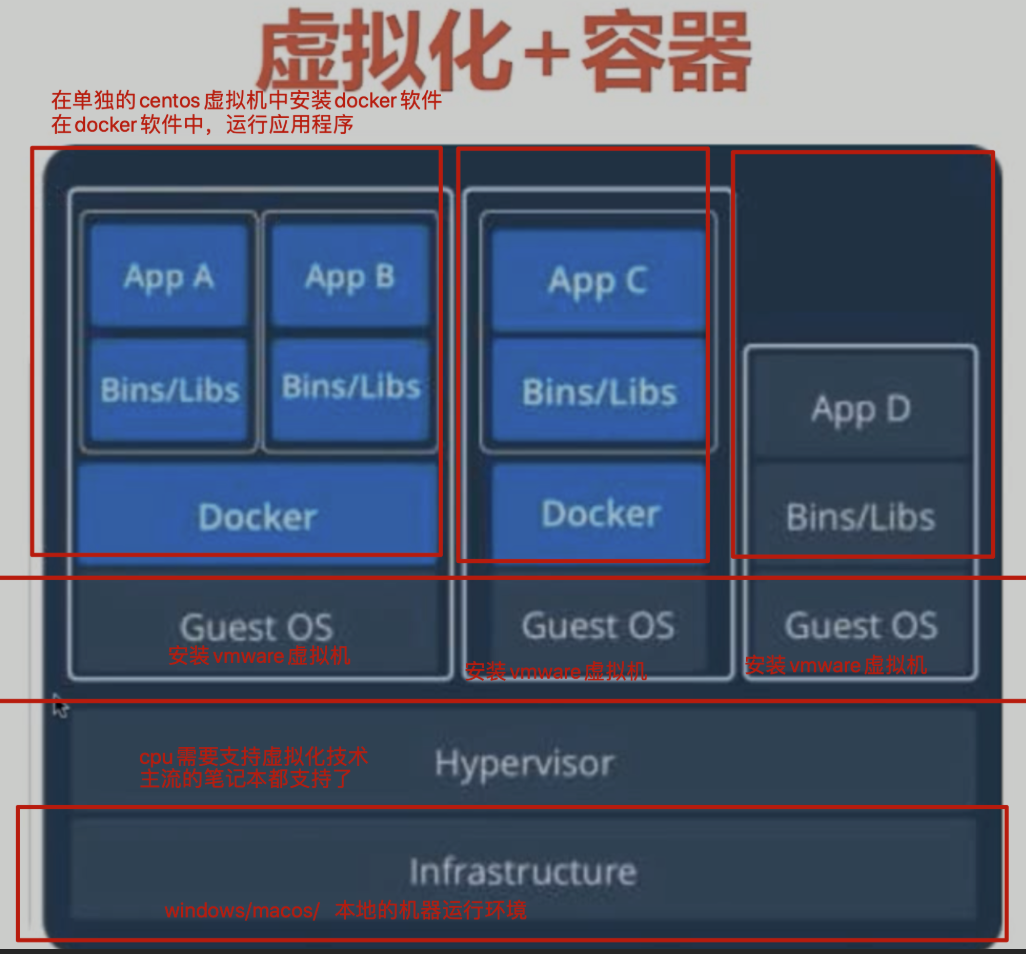
環境部署的問題,非常棘手,因此引入了容器技術
解決環境遷移的難題
1.利用虛擬機器器的模板克隆功能,將整個機器的環境複製一份,再丟給第二個機器去使用
2.最好是使用docker去部署環境
docker的生命週期概念
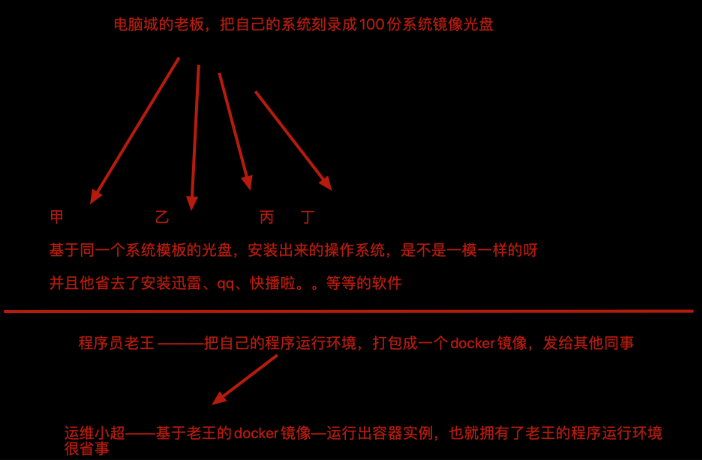
- 映象,是一個系統的唯讀模板,例如一個微型的centos系統映象
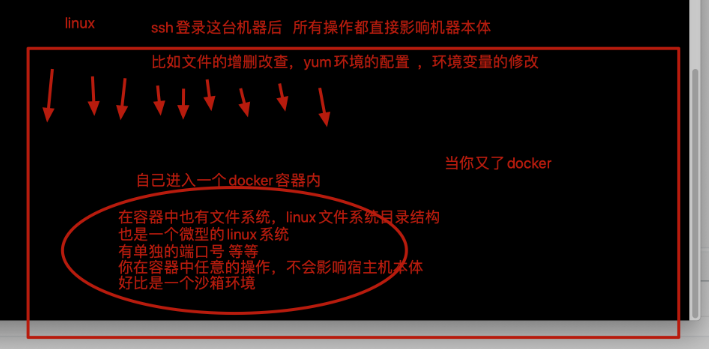
- 容器,容器程序,應用程式以後封裝在容器中去執行,相互隔離
- 倉庫,儲存映象的一個倉庫地址,便於和他人共用映象檔案的一個地方
基於映象執行處容器
基於一個映象,可以執行處N多個容器範例

以python的物件導向去理解的話
docker的映象---------理解為python的 class
docker的容器---------理解為class的範例化物件

class  Stu():
	 def __init__(self):
	 			self.age=18
	 			self.height=180
	 			self.weight=280
老王=Stu()
小李=Stu()
小張=Stu()
問,老王,小李,小張之間有什麼相同性嗎? 這3個物件,都有相同的Init裡面的範例化屬性

基於如上的概念理解,基於同一個映象檔案,執行出的容器範例,其容器內的環境,也是一模一樣的
安裝docker
1.安裝docker軟體
# 使用阿里雲的yum源,可以直接安裝docker軟體,阿里雲的docker軟體版本可能較低,如果要下載新的,去docker官網找
[root@localhost ~]# yum install docker -y
2.設定docker的映象加速器
加速系統映象的下載,預設是去國外下載,比較慢
能夠加速下載你所需要的各種映象,來自於如下提供的3個映象站點
比如你想快速的使用tornado模組去開發一些東西
- 編譯安裝python3
- 安裝tornado模組及依賴關係
- 加上你的程式碼才能夠執行
當你有了docker技術
docker search tornado # 直接搜尋和tornado有關的映象,是其他人制作好的映象
docker pull tornado # 直接下載該映象,和程式碼結合使用,docker解決了,省去了你設定環境的一些步驟
[root@localhost ~]# vim /etc/docker/daemon.json # 修改docker的組態檔,修改docker映象的下載地址,在國內下載比較快
{
  "registry-mirrors": [
    "https://dockerhub.azk8s.cn",
    "https://hub-mirror.c.163.com",
    "https://pee6w651.mirror.aliyuncs.com"
  ]
}
3.重啟docker,執行docker
[root@localhost ~]# systemctl restart docker
4.獲取一個centos的基礎映象
docker的系統映象,非常小,centos只有200M左右
[root@localhost ~]# docker pull centos
使用docker容器、映象的增刪改查命令
對於後端開發的程式設計師,只需要掌握Docker的容器,映象,倉庫的增刪改查命令即可
增
# 1.從dockerhub 倉庫中獲取docker的映象,從github獲取程式碼一個道理
docker pull centos  # 去docker倉庫中尋找centos系統映象
docker pull ubuntu  # 獲取ubuntu映象

# 2.獲取一個hello-world程序
[root@localhost ~]# docker pull hello-world

# 3.獲取一個ubuntu映象
[root@localhost ~]# docker pull ubuntu
[root@localhost ~]# docker images
REPOSITORY              TAG                 IMAGE ID            CREATED             SIZE
docker.io/hello-world   latest              9c7a54a9a43c        4 months ago        13.3 kB
docker.io/ubuntu        latest              ba6acccedd29        23 months ago       72.8 MB
docker.io/centos        latest              5d0da3dc9764        24 months ago       231 MB
[root@localhost ~]# docker run -it 9c7 /bin/bash
/usr/bin/docker-current: Error response from daemon: oci runtime error: container_linux.go:290: starting container process caused "exec: \"/bin/bash\": stat /bin/bash: no such file or directory".
[root@localhost ~]# docker run -it ba6 /bin/bash
root@afe83ed4db1b:/# cat /etc/os-release
NAME="Ubuntu"
VERSION="20.04.3 LTS (Focal Fossa)"
ID=ubuntu
ID_LIKE=debian
PRETTY_NAME="Ubuntu 20.04.3 LTS"
VERSION_ID="20.04"
HOME_URL="https://www.ubuntu.com/"
SUPPORT_URL="https://help.ubuntu.com/"
BUG_REPORT_URL="https://bugs.launchpad.net/ubuntu/"
PRIVACY_POLICY_URL="https://www.ubuntu.com/legal/terms-and-policies/privacy-policy"
VERSION_CODENAME=focal
UBUNTU_CODENAME=focal

# 4.搜尋相關的映象
[root@localhost ~]# docker search python3
INDEX       NAME                                                        DESCRIPTION                                     STARS     OFFICIAL   AUTOMATED
docker.io   docker.io/faucet/python3                                     Python3 docker image for amd64                 7
docker.io   docker.io/openwhisk/python3action                           Apache OpenWhisk runtime for Python 3 Actions   6
# 比如想用nginx,又不想修改宿主機的一個軟體環境,直接用docker安裝
[root@localhost ~]# docker search nginx
[root@localhost ~]# docker pull nginx
[root@localhost ~]# docker run nginx  # nginx伺服器就能夠執行在容器中,然後和宿主機有一個埠對映,就可以存取了
刪
# 1.刪除本地映象檔案
docker rmi 映象id
[root@localhost ~]# docker rmi 要刪除映象id的前3位  # 刪除映象id的前3位即可,必須要先刪除有相關依賴的容器程序記錄

# 2.刪除容器記錄的命令
[root@localhost ~]# docker rm 容器id前3位

# 3.批次清空無用的docker容器記錄,容器記錄非常容易建立docker run
# 批次刪除掛掉的容器記錄
[root@localhost ~]# docker rm `docker ps -aq`  # 把docker容器記錄的id號,儲存在反引號中,丟給docker rm實現批次刪除

# 4.批次刪除映象
[root@localhost ~]# docker rmi `docker iamges -aq`

# 5.批次停止容器
[root@localhost ~]# docker stop `docker ps -aq`
[root@localhost ~]# docker start 容器id  # 啟動暫停的容器
[root@localhost ~]# docker stop 容器id  # 暫停一個容器
[root@localhost ~]# docker restart 容器id  # 重啟容器
改
# 1.執行第一個docker的容器範例,執行映象檔案,產生容器程序
docker run 映象檔案的名字即可
[root@localhost ~]# docker run centos  # 執行centos基礎映象,如果docker容器中沒有在後臺執行的程序,容器會直接掛掉
# 如果你發現你的容器沒有啟動成功,說明容器內部出錯了,程式沒有執行

# 2.執行一個hello world容器程序
[root@localhost ~]# docker run hello-world

Hello from Docker!
This message shows that your installation appears to be working correctly.

To generate this message, Docker took the following steps:
 1. The Docker client contacted the Docker daemon.
 2. The Docker daemon pulled the "hello-world" image from the Docker Hub.
    (amd64)
 3. The Docker daemon created a new container from that image which runs the
    executable that produces the output you are currently reading.
 4. The Docker daemon streamed that output to the Docker client, which sent it
    to your terminal.

To try something more ambitious, you can run an Ubuntu container with:
 $ docker run -it ubuntu bash

Share images, automate workflows, and more with a free Docker ID:
 https://hub.docker.com/

For more examples and ideas, visit:
 https://docs.docker.com/get-started/


# 3.docker run指令還有一個功能是,當映象不存在的時候,會自動去下載該程序
[root@localhost ~]# docker run hello-world   # 有2個功能,下載映象,執行映象

# 4.互動式的執行一個存活的docker容器,centos
# -it引數  -i 是互動式的命令操作   -t 是開啟一個終端   /bin/bash 指定shell直譯器
# 容器空間內,有自己的檔案系統
# docker run -it centos /bin/bash  # 執行centos映象,且進入容器內,容器空間內是以容器id命名的
[root@localhost ~]# docker run -it centos /bin/bash
[root@e7b96652ac88 /]# cat /etc/os-release
NAME="CentOS Linux"
VERSION="8"
ID="centos"
ID_LIKE="rhel fedora"
VERSION_ID="8"
PLATFORM_ID="platform:el8"
PRETTY_NAME="CentOS Linux 8"
ANSI_COLOR="0;31"
CPE_NAME="cpe:/o:centos:centos:8"
HOME_URL="https://centos.org/"
BUG_REPORT_URL="https://bugs.centos.org/"
CENTOS_MANTISBT_PROJECT="CentOS-8"
CENTOS_MANTISBT_PROJECT_VERSION="8"
[root@e7b96652ac88 /]# exit
exit

# 5.執行出一個活著的容器,在後臺不斷執行程式的容器
# docker run  執行映象檔案
# -d 是讓容器後臺執行
# -c 指定一段shell程式碼
# 執行centos映象,生成容器範例,且有一段shell程式碼,在後臺不斷執行,死迴圈列印一句話,每秒鐘列印一次
[root@localhost ~]# docker run -d centos /bin/sh -c "while true;do echo 辛苦學習linux; sleep 1;done"
ae3c01990d86f42f11775bbfbfaa384bb6b3428f0e2eef16b289e2f16dd69a5c
[root@localhost ~]# docker ps
CONTAINER ID        IMAGE               COMMAND                  CREATED             STATUS              PORTS               NAMES
ae3c01990d86        centos              "/bin/sh -c 'while..."   16 seconds ago      Up 15 seconds                           angry_wing

# 6.執行docker容器,且指定名字,便於管理
# docker run --name "指定容器的執行名字「 -d centos /bin/sh -c "while true;do echo 辛苦學習linux; sleep 1;done"
[root@localhost ~]# docker run --name "test" -d centos /bin/sh -c "while true;do echo 辛苦學習linux; sleep 1;done"
d0beb2b2340bcd14e578938812e9394065974d5cf2af787a66630bf2b76422e1
[root@localhost ~]# docker ps
CONTAINER ID        IMAGE               COMMAND                  CREATED             STATUS              PORTS               NAMES
d0beb2b2340b        centos              "/bin/sh -c 'while..."   26 seconds ago      Up 25 seconds                           test
e3db5a209d69        centos              "/bin/sh -c 'while..."   40 seconds ago      Up 39 seconds                           stoic_edison
ae3c01990d86        centos              "/bin/sh -c 'while..."   4 minutes ago       Up 4 minutes                            angry_wing

# 7.進入一個正在執行的容器空間,進入一個線上正在執行的容器程式,修改其內部的資料
# docker exec -it 容器id /bin/bash
[root@localhost ~]# docker ps
CONTAINER ID        IMAGE               COMMAND                  CREATED             STATUS              PORTS               NAMES
d0beb2b2340b        centos              "/bin/sh -c 'while..."   4 minutes ago       Up 4 minutes                            test
e3db5a209d69        centos              "/bin/sh -c 'while..."   5 minutes ago       Up 5 minutes                            stoic_edison
ae3c01990d86        centos              "/bin/sh -c 'while..."   8 minutes ago       Up 8 minutes                            angry_wing
[root@localhost ~]# docker exec -it ae3 /bin/bash
[root@localhost ~]# docker exec -it ae3 /bin/bash
[root@ae3c01990d86 /]# ps -ef
UID         PID   PPID  C STIME TTY          TIME CMD
root          1      0  0 07:26 ?        00:00:00 /bin/sh -c while true;do echo ????????????linux; sleep 1;done
root        595      0  0 07:35 ?        00:00:00 /bin/bash
root        627      1  0 07:36 ?        00:00:00 /usr/bin/coreutils --coreutils-prog-shebang=sleep /usr/bin/sleep 1
root        628    595  0 07:36 ?        00:00:00 ps -ef

# 8.如何進入容器空間內,修改容器內的環境,以及程式碼等內容,修改軟體等操作,且提交映象,傳送給其他人
# --8.1 進入容器空間內,安裝一個vim或是python3等步驟
[root@localhost ~]# docker run -it centos /bin/bash
[root@300d9440c4d1 /]# vi /etc/resolv.conf
# Generated by NetworkManager
search localdomain
nameserver 10.0.0.2
nameserver 223.5.5.5
nameserver 119.29.29.29
[root@300d9440c4d1 /]# yum install vim -y
# 報錯參考下方地址
# https://blog.csdn.net/weixin_43252521/article/details/124409151

# --8.2  安裝好vim後,退出容器空間
[root@localhost ~]# exit
exit

# --8.3 提交該容器,生成新的映象檔案
[root@localhost ~]# docker ps -a
CONTAINER ID        IMAGE               COMMAND                  CREATED              STATUS                          PORTS               NAMES
89efe007cff2        centos              "/bin/bash"              About a minute ago   Exited (127) 2 seconds ago                          modest_wright
[root@localhost ~]# docker commit 89efe007cff2 s25-centos-vim
sha256:c73dfef4b276d4fb84e8778f672e6280952e1907eb2d0f21e713f638f6d40896
[root@localhost ~]# docker images
REPOSITORY              TAG                 IMAGE ID            CREATED             SIZE
s25-centos-vim          latest              c73dfef4b276        29 seconds ago      231 MB
docker.io/hello-world   latest              9c7a54a9a43c        4 months ago        13.3 kB
docker.io/ubuntu        latest              ba6acccedd29        23 months ago       72.8 MB
docker.io/centos        latest              5d0da3dc9764        24 months ago       231 MB

# 9.匯出你的docker映象,可以傳送給同事,或是其他人使用
# docker save  映象id > 映象的壓縮檔案
# 官方檔案解釋的是,docker save用的是tar命令壓縮,應該是沒有其他壓縮格式的
[root@localhost ~]# docker save c73dfef4b276 > /opt/s25-centos-vim.tar.gz
[root@localhost ~]# ll -h /opt/
total 253M
drwxr-xr-x.  4 root root   68 Sep  4 22:57 mysite
drwxr-xr-x.  6 root root   56 Sep  4 21:06 python369
drwxr-xr-x. 18  501  501 4.0K Sep  4 21:05 Python-3.6.9
-rw-r--r--.  1 root root  22M Jul  3  2019 Python-3.6.9.tgz
drwxr-xr-x.  3 root root   18 Sep 10 14:11 redis
-rw-r--r--.  1 root root 228M Sep 11 16:35 s25-centos-vim.tar.gz
drwxrwxr-x. 14 root root 4.0K Sep  6 00:04 tengine-2.3.2
-rw-r--r--.  1 root root 2.8M Jul 21 16:33 tengine-2.3.2.tar.gz
drwxr-xr-x.  9 root root  141 Sep  5 11:06 tf_crm
drwxr-xr-x. 11 root root  151 Sep  6 00:14 tngx232
drwxr-xr-x.  4 root root   64 Sep  4 23:29 venv1
drwxr-xr-x.  3 root root   60 Sep  4 23:40 venv1_dj119
drwxr-xr-x.  4 root root   64 Sep  4 23:45 venv2
drwxr-xr-x.  3 root root   60 Sep  4 23:52 venv2_dj201
# 你可以刪掉原生的映象,然後重新匯入該壓縮檔案,模擬傳送給同事的操作
[root@localhost ~]# docker rmi c73
Untagged: s25-centos-vim:latest
Deleted: sha256:c73dfef4b276d4fb84e8778f672e6280952e1907eb2d0f21e713f638f6d40896
Deleted: sha256:45322746ea754e77d102f1a90fbbf061d7a71b432a14646dd3730923badad9e8

# 10.如何進行docker映象匯入
# 比如小李運維同志,他收到了該docker映象壓縮檔案,在他的機器上匯入該映象
[root@localhost ~]# docker images
REPOSITORY              TAG                 IMAGE ID            CREATED             SIZE
docker.io/hello-world   latest              9c7a54a9a43c        4 months ago        13.3 kB
docker.io/ubuntu        latest              ba6acccedd29        23 months ago       72.8 MB
docker.io/centos        latest              5d0da3dc9764        24 months ago       231 MB
[root@localhost ~]# docker load < /opt/s25-centos-vim.tar.gz
390029cde3d2: Loading layer [==================================================>] 4.096 kB/4.096 kB
Loaded image ID: sha256:c73dfef4b276d4fb84e8778f672e6280952e1907eb2d0f21e713f638f6d40896
[root@localhost ~]# docker images
REPOSITORY              TAG                 IMAGE ID            CREATED             SIZE
<none>                  <none>              c73dfef4b276        5 minutes ago       231 MB
docker.io/hello-world   latest              9c7a54a9a43c        4 months ago        13.3 kB
docker.io/ubuntu        latest              ba6acccedd29        23 months ago       72.8 MB
docker.io/centos        latest              5d0da3dc9764        24 months ago       231 MB
# 首次匯入該進項的時候,發現丟失了映象tag標籤,重新賦予一個即可
[root@localhost ~]# docker tag c73dfef4b276 s25-new-centos-vim
[root@localhost ~]# docker images
REPOSITORY              TAG                 IMAGE ID            CREATED             SIZE
s25-new-centos-vim      latest              c73dfef4b276        7 minutes ago       231 MB
docker.io/hello-world   latest              9c7a54a9a43c        4 months ago        13.3 kB
docker.io/ubuntu        latest              ba6acccedd29        23 months ago       72.8 MB
docker.io/centos        latest              5d0da3dc9764        24 months ago       231 MB

# 11.如何在docker內,執行一個python web的程式,需要用到埠對映知識
# -d 後臺執行
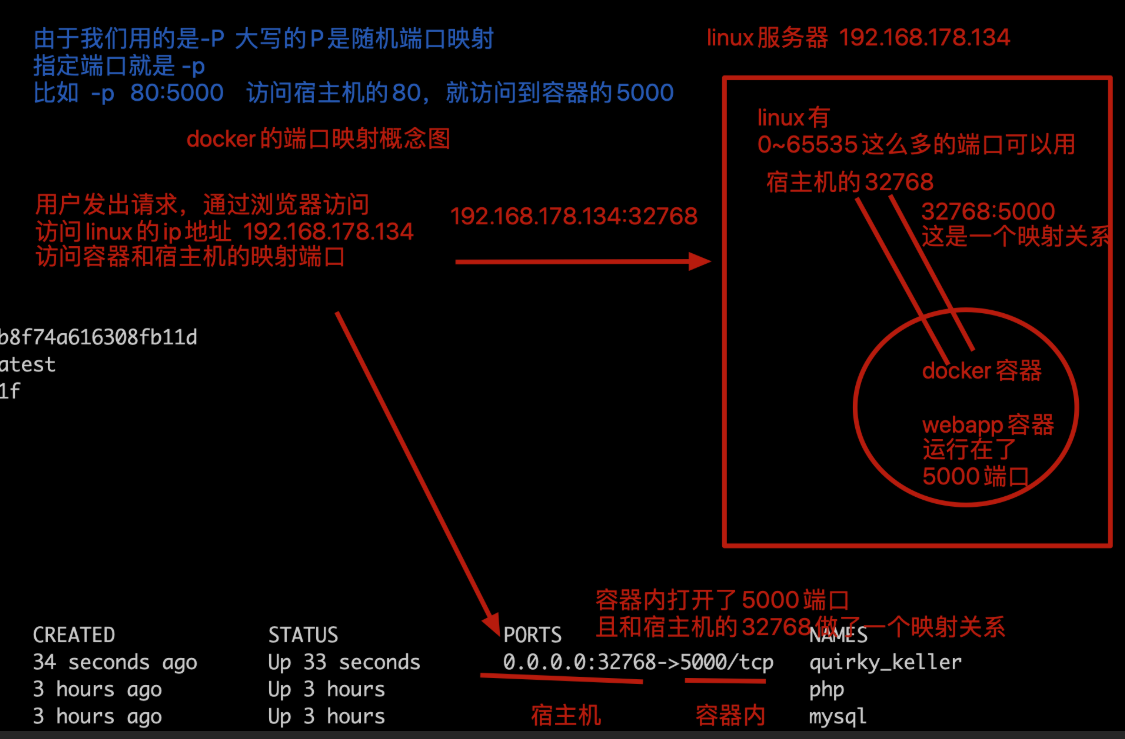
# -P  大寫的P引數,作用是隨機的埠對映
# training/webapp 是映象的名字,預設沒有會去線上下載
# python app.py   代表啟動容器後,讓容器執行的命令是它
# 因此這個命令作用是,啟動一個webapp映象,且在容器中執行 python app.py
# -p 6000:5000  存取宿主機的6000,就是存取容器的5000了
[root@localhost ~]# docker run --name "s25webdocker" -d -p 6000:5000 training/webapp python app.py
Unable to find image 'training/webapp:latest' locally
Trying to pull repository docker.io/training/webapp ...
latest: Pulling from docker.io/training/webapp
e190868d63f8: Downloading [==================================================>] 65.77 MB/65.77 MB
909cd34c6fd7: Downloading [==================================================>] 71.48 kB/71.48 kB
0b9bfabab7c1: Downloading [==================================================>]    682 B/682 B
a3ed95caeb02: Download complete
10bbbc0fc0ff: Download complete
fca59b508e9f: Download complete
e7ae2541b15b: Download complete
9dd97ef58ce9: Download complete
a4c1b0cb7af7: Download complete
latest: Pulling from docker.io/training/webapp
e190868d63f8: Pull complete
909cd34c6fd7: Pull complete
0b9bfabab7c1: Pull complete
a3ed95caeb02: Pull complete
10bbbc0fc0ff: Pull complete
fca59b508e9f: Pull complete
e7ae2541b15b: Pull complete
9dd97ef58ce9: Pull complete
a4c1b0cb7af7: Pull complete
Digest: sha256:06e9c1983bd6d5db5fba376ccd63bfa529e8d02f23d5079b8f74a616308fb11d
Status: Downloaded newer image for docker.io/training/webapp:latest
4a18674efa8e4b28639695bd0b144a07644e05fbe4f0e6725a02f311d18d034d
[root@localhost ~]# docker ps
CONTAINER ID        IMAGE               COMMAND             CREATED             STATUS              PORTS                    NAMES
4a18674efa8e        training/webapp     "python app.py"     38 seconds ago      Up 37 seconds       0.0.0.0:6000->5000/tcp   s25webdocker
[root@localhost ~]# docker port 4a1
5000/tcp -> 0.0.0.0:6000
[root@localhost ~]# curl 127.0.0.1:6000
Hello world![root@localhost ~]#

# 12.進入該webapp的容器,檢視裡面的內容
# docker exec -it 容器id /bin/bash  # 進入容器內,可以進行相應的修改操作
# docker restart 容器id  # 改動程式碼後需要重啟該容器,重新讀取程式碼,方可生效
[root@localhost ~]# docker exec -it 4a18674efa8e /bin/bash
root@4a18674efa8e:/opt/webapp# ls
Procfile  app.py  requirements.txt  tests.py
root@4a18674efa8e:/opt/webapp# cat requirements.txt
Flask
Jinja2
Werkzeug
distribute
wsgiref
root@4a18674efa8e:/opt/webapp# vi app.py
root@4a18674efa8e:/opt/webapp# exit
exit
[root@localhost ~]# curl 127.0.0.1:6000
Hello world![root@localhost ~]# docker restart 4a18674efa8e
4a18674efa8e
[root@localhost ~]# docker ps
CONTAINER ID        IMAGE               COMMAND             CREATED             STATUS              PORTS                    NAMES
4a18674efa8e        training/webapp     "python app.py"     17 minutes ago      Up 6 seconds        0.0.0.0:6000->5000/tcp   s25webdocker
[root@localhost ~]# curl 127.0.0.1:6000
Hello zylyehuo world![root@localhost ~]#
查
# 1.檢視本地機器,所有的映象檔案內容
[root@localhost ~]# docker images
REPOSITORY          TAG                 IMAGE ID            CREATED             SIZE
docker.io/centos    latest              5d0da3dc9764        24 months ago       231 MB

# 2.檢視docker正在執行的程序
[root@localhost ~]# docker ps
CONTAINER ID        IMAGE               COMMAND             CREATED             STATUS              PORTS               NAMES

# 3.檢視所有執行,以及掛掉的容器程序
[root@localhost ~]# docker ps -a
CONTAINER ID        IMAGE               COMMAND             CREATED             STATUS                     PORTS               NAMES
494ae785d793        centos              "/bin/bash"         2 minutes ago       Exited (0) 2 minutes ago                       stoic_dubinsky

# 4.檢視容器內的執行紀錄檔
# docker logs 容器id
# docker logs -f 容器id  # 實時重新整理容器內的紀錄檔,例如檢測nginx等紀錄檔資訊
[root@localhost ~]# docker ps
CONTAINER ID        IMAGE               COMMAND                  CREATED             STATUS              PORTS               NAMES
d0beb2b2340b        centos              "/bin/sh -c 'while..."   26 seconds ago      Up 25 seconds                           test
e3db5a209d69        centos              "/bin/sh -c 'while..."   40 seconds ago      Up 39 seconds                           stoic_edison
ae3c01990d86        centos              "/bin/sh -c 'while..."   4 minutes ago       Up 4 minutes                            angry_wing
[root@localhost ~]# docker logs ae3
辛苦學習linux
辛苦學習linux
辛苦學習linux
辛苦學習linux
辛苦學習linux
辛苦學習linux
[root@localhost ~]# docker logs -f ae3
辛苦學習linux
辛苦學習linux

# 5.檢視容器內的埠轉發情況
docker port 容器id  # 檢視容器的埠轉發
[root@localhost ~]# docker port 4a1
5000/tcp -> 0.0.0.0:6000
dockerfile
手寫一個dockerfile,執行出python的應用
dockerfile常用指令學習
FROM 指令表示,告訴該dockerfile以哪個映象為基礎
比如你的技術老大,要求你們程式執行在ubuntu中
# FROM  ubuntu
# FROM  centos
FROM scratch  # 製作base image 基礎映象,儘量使用官方的image作為base image
FROM centos  # 使用base image
FROM ubuntu:14.04  # 帶有tag的base image
LABEL標籤,定義變數,定義作者資訊等
LABEL version=「1.0」  # 容器元資訊,幫助資訊,Metadata,類似於程式碼註釋
LABEL maintainer=「[email protected]"
RUN是一個完成指令,你可以用它在docker中執行任意的命令
RUN就是告訴容器要做哪些設定
用RUN指令告訴dockerfile他該去做什麼事
RUN mkdir  /s25牛批
RUN cd  /s25牛批
RUN cd
RUN pwd  # 會輸出什麼? 因此在容器中會輸出使用者家目錄
# 對於複雜的RUN命令,避免無用的分層,多條命令用反斜線換行,合成一條命令!
# 要修改centos基礎映象的環境問題
RUN yum update && yum install -y vim \
    Python-dev  # 反斜線換行
RUN /bin/bash -c "source $HOME/.bashrc;echo $HOME」
WORKDIR,相當於linux的cd命令
WORKDIR /root  # 相當於linux的cd命令,改變目錄,儘量使用絕對路徑,不要用RUN cd
WORKDIR /test  # 如果沒有就自動建立
WORKDIR demo  # 再進入demo資料夾
RUN pwd  # 列印結果應該是/test/demo
# 案例
WORKDIR /s25很棒
WORKDIR  我們要說goodbay了
RUN  pwd  # 會輸出什麼? /s25很棒/我們要說goodbay了  此時進入了2層目錄
ADD指令,用於新增宿主機的檔案,放入到容器空間內
# 宿主機有自己的檔案系統,資料夾,檔案,目錄等
# 容器內也有一套自己的檔案系統,獨立的檔案資訊
# 把宿主機的程式碼,拷貝到容器內
# ADD還有解壓縮的功能,這是一個坑,需要注意
ADD hello.txt /opt  # 把宿主機的hello.txt拷貝到容器內的/opt目錄下
ADD test.tar.gz /opt /opt/test
RUN tar -zxvf test.tar.gz  # 直接報錯,檔案不存在,因為上一步,ADD指令已經對tar.gz壓縮包解壓縮了
COPY
WORKDIR /root
ADD hello test/  # 進入/root/ 新增hello可執行命令到test目錄下,也就是/root/test/hello 一個絕對路徑
COPY hello test/  # 等同於上述ADD效果
# dockerfile,用於從宿主機拷貝檔案到容器內有2個指令一個ADD,一個COPY,COPY僅僅就是拷貝,儘量用COPY
ADD與COPY
   - 優先使用COPY命令
    -ADD除了COPY功能還有解壓功能

# 新增遠端檔案/目錄使用curl或wget
ENV,設定環境變數
# ENV用於設定環境變數,使用ENV能夠增加可維護性
ENV MYSQL_VERSION 8.0
RUN yum install -y mysql-server=「${MYSQL_VERSION}」
dockfile實戰,寫一個flask容器指令碼
構建映象的步驟
1.準備好一個flask程式碼,檢查需要哪些依賴步驟
[root@localhost ~]# mkdir /s25docker
[root@localhost ~]# cd /s25docker/
[root@localhost s25docker]# vim s25_flask.py

from flask import Flask
app=Flask(__name__)
@app.route('/')
def hello():
    return "linux即將結束"
if __name__=="__main__":
    app.run(host='0.0.0.0',port=8080)
2.在宿主機環境檢查如何能夠執行該指令碼
# 需要安裝flask模組
pip3 install -i https://pypi.tuna.tsinghua.edu.cn/simple flask
# 檢查執行
[root@localhost s25docker]# python3 s25_flask.py
 * Serving Flask app 's25_flask' (lazy loading)
 * Environment: production
   WARNING: This is a development server. Do not use it in a production deployment.
   Use a production WSGI server instead.
 * Debug mode: off
 * Running on all addresses.
   WARNING: This is a development server. Do not use it in a production deployment.
 * Running on http://10.0.0.129:8080/ (Press CTRL+C to quit)
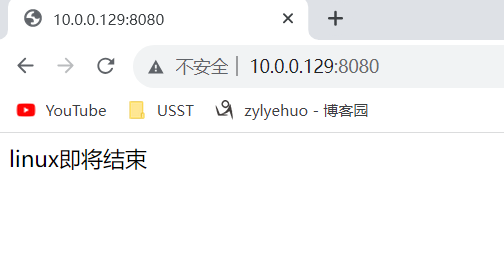
# 瀏覽器存取 10.0.0.129:8080
3.編寫dockerfile指令碼,注意名字必須是 大寫Dockerfile
[root@localhost s25docker]# vim Dockerfile
# 寫入如下的內容
註釋版
FROM python  # 指定映象,dockerhub提供好的python映象,已經安裝好了python3,很好用
RUN pip3 install -i https://pypi.douban.com/simple flask  # 在容器內安裝flask模組
ADD s25_flask.py /opt  # 把宿主機的程式碼,拷貝到容器的/opt目錄下
WORKDIR /opt  # 容器內進行目錄切換
EXPOSE 8080  # 開啟容器的8080埠,用於和宿主機進行對映
CMD ["python3","s25_flask.py"]  # 在容器啟動後,內部自動執行的命令是什麼
無註釋版
FROM python
RUN pip3 install -i https://pypi.tuna.tsinghua.edu.cn/simple flask
ADD s25_flask.py /opt
WORKDIR /opt
EXPOSE 8080
CMD ["python3","s25_flask.py"]
4.檢查準備的指令碼程式碼,以及Dockerfile檔案
[root@localhost s25docker]# ls
Dockerfile  s25_flask.py
5.構建該dockerfile,生成映象
[root@localhost s25docker]# docker build .
...
Successfully built 0b8358ccc202
...
6.檢查docker的映象,是否生成docker images
[root@localhost s25docker]# docker images
REPOSITORY                  TAG                 IMAGE ID            CREATED             SIZE
<none>                      <none>              0b8358ccc202        59 seconds ago      928 MB
s25-new-centos-vim          latest              c73dfef4b276        About an hour ago   231 MB
docker.io/hello-world       latest              9c7a54a9a43c        4 months ago        13.3 kB
docker.io/python            latest              a5d7930b60cc        20 months ago       917 MB
docker.io/ubuntu            latest              ba6acccedd29        23 months ago       72.8 MB
docker.io/centos            latest              5d0da3dc9764        24 months ago       231 MB
docker.io/training/webapp   latest              6fae60ef3446        8 years ago         349 MB
# 可以修改一下映象的標籤
[root@localhost s25docker]# docker tag 0b8 s25-flask
[root@localhost s25docker]# docker images
REPOSITORY                  TAG                 IMAGE ID            CREATED             SIZE
s25-flask                   latest              0b8358ccc202        2 minutes ago       928 MB
s25-new-centos-vim          latest              c73dfef4b276        About an hour ago   231 MB
docker.io/hello-world       latest              9c7a54a9a43c        4 months ago        13.3 kB
docker.io/python            latest              a5d7930b60cc        20 months ago       917 MB
docker.io/ubuntu            latest              ba6acccedd29        23 months ago       72.8 MB
docker.io/centos            latest              5d0da3dc9764        24 months ago       231 MB
docker.io/training/webapp   latest              6fae60ef3446        8 years ago         349 MB
7.執行該映象檔案,檢視是否能夠執行容器內的flask
[root@localhost s25docker]# docker run -d -p 8000:8080 0b8
888a9aab9fd44544706846345a43cf37a10cfd42456d6d54f5dcb33bdaf6ba71
[root@localhost s25docker]# docker ps
CONTAINER ID        IMAGE               COMMAND                  CREATED             STATUS              PORTS                    NAMES
888a9aab9fd4        0b8                 "python3 s25_flask.py"   21 seconds ago      Up 21 seconds       0.0.0.0:8000->8080/tcp   condescending_boyd
4a18674efa8e        training/webapp     "python app.py"          About an hour ago   Up About an hour    0.0.0.0:6000->5000/tcp   s25webdocker
8.存取宿主機埠,檢視容器內的應用
# 存取方式一
[root@localhost s25docker]# curl 127.0.0.1:8000
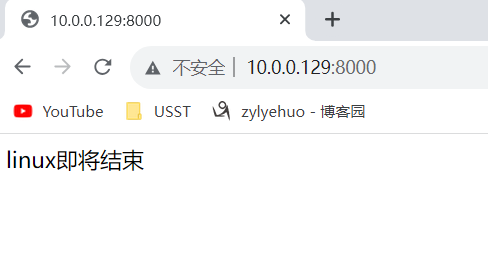
linux即將結束[root@localhost s25docker]#

# 存取方式二
# 瀏覽器存取 10.0.0.129:8000
9.可以修改容器內的程式碼,重啟容器
[root@localhost s25docker]# docker exec -it 888 /bin/bash
root@888a9aab9fd4:/opt#

# 修改容器內的程式碼
root@888a9aab9fd4:/opt# sed -i "s/linux即將結束/linux結束/" s25_flask.py
root@888a9aab9fd4:/opt# cat s25_flask.py
from flask import Flask
app=Flask(__name__)
@app.route('/')
def hello():
    return "linux結束"
if __name__=="__main__":
    app.run(host='0.0.0.0',port=8080)
10.重啟容器
root@888a9aab9fd4:/opt# exit
exit
[root@localhost s25docker]# docker restart 888
11.再次存取容器內應用,檢視更新的程式碼內容
# 存取方式一
[root@localhost s25docker]# curl 127.0.0.1:8000
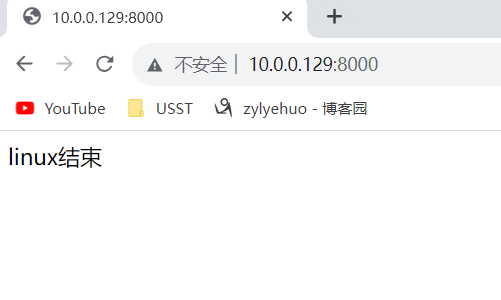
linux結束[root@localhost s25docker]#

# 存取方式二
# 瀏覽器存取 10.0.0.129:8000
dockerhub倉庫
dockerhub倉庫就是和github一樣的概念
github---託管程式設計師的程式碼
dockerhub----託管程式設計師編寫的docker映象
1.docker提供了一個類似於github的倉庫dockerhub,
網址 https://hub.docker.com/ 需要註冊使用

2.註冊docker id後,在linux中登入dockerhub,會提示讓你輸入賬號密碼,正確登入之後,本臺機器就和dockerhub繫結賬號了,你的映象推播就能夠推播到該賬戶的dockerhub中
docker login

3.準備映象推播
注意要保證image的tag是dockerhub賬戶名,如果映象名字不對,需要改一下tag
docker tag 映象id dockerhub的賬號/centos-vim
語法是:   docker tag 倉庫名 yuchao163/倉庫名

4.推播docker image到dockerhub,好比你準備git push推播程式碼一樣
docker push dockerhub賬號/centos-vim

5.在dockerhub中檢查映象,檢視個人賬戶中的映象檔案
https://hub.docker.com/

6.刪除本地映象,測試下載pull 映象檔案
docker pull yuchao163/centos-vim
yaml組態檔
不同的組態檔,遵循的語法也不一樣
- json
- Conf-----nginx.conf ,my.cnf
- ini -----uwsgi.ini
- xml------xml格式的組態檔
- yaml-----新式組態檔,用在docker、salt、k8s等組態檔中,遵循python的縮排語法
yaml語法規則
    大小寫敏感
    使用縮排表示層級關係
    縮排時禁止tab鍵,只能空格
    縮排的空格數不重要,相同層級的元素左側對其即可
    # 表示註釋行

yaml支援的資料結構
    物件: 鍵值對,也稱作對映 mapping 雜湊hashes  字典 dict    冒號表示 key: value   key冒號後必須有
    陣列: 一組按次序排列的值,又稱為序列sequence  列表list     短橫線  - list1
    純量: 單個不可再分的值
    物件:鍵值對
python的字典套字典,資料結構表示如下
{
	"s25":{
			"男同學":["寶元","太白","馬jj"],
			"女同學":["景女神","alex"]
	}
}
用yaml表示上述資料結構
"s25":
  "男同學":
     - "寶元"
     - "太白"
     - "馬jj"
  "女同學":
       - "景女神"
       - "alex"
