Spring Boot 中使用 Poi-tl 渲染資料並生成 Word 檔案
本文 Demo 已收錄到 demo-for-all-in-java 專案中,歡迎大家
star支援!後續將持續更新!
前言
產品經理急衝衝地走了過來。「現在需要將按這些資料生成一個 Word 報告檔案,你來安排下」
專案中有這麼一個需求,需要將使用者填寫的資料填充到一個 Word 檔案中,而這個 Word 檔案是人家給定了的。換句話說,讓你按照這個檔案的內容格式生成新的檔案。
什麼是 Poi-tl ?
poi-tl(poi template language)是一種 Word 模板引擎,可以基於 Word 模板和資料生成新的檔案,它的底層是通過 Apache POI 來實現的。
Apache POI 不僅封裝了易用的檔案 API (文字、圖片、表格、頁首、頁尾、圖表等),也可以在底層直接操作檔案XML結構。
poi-tl 擁有如下特性(瞭解瞄一眼就行):
| 內容 | 描述 |
|---|---|
| 文字 | 將標籤渲染為文字 |
| 圖片 | 將標籤渲染為圖片 |
| 表格 | 將標籤渲染為表格 |
| 列表 | 將標籤渲染為列表 |
| 圖表 | 條形圖(3D條形圖)、柱形圖(3D柱形圖)、面積圖(3D面積圖)、折線圖(3D折線圖)、雷達圖、餅圖(3D餅圖)等圖表渲染 |
| If Condition判斷 | 隱藏或者顯示某些檔案內容(包括文字、段落、圖片、表格、列表、圖表等) |
| Foreach Loop迴圈 | 迴圈某些檔案內容(包括文字、段落、圖片、表格、列表、圖表等) |
| Loop表格行 | 迴圈渲染表格的某一行 |
| Loop表格列 | 迴圈渲染表格的某一列 |
| Loop有序列表 | 支援有序列表的迴圈,同時支援多級列表 |
| 圖片替換 | 將原有圖片替換成另一張圖片 |
| 書籤、錨點、超連結 | 支援設定書籤,檔案內錨點和超連結功能 |
| 強大的表示式 | 完全支援SpringEL表示式,可以擴充套件更多的表示式:OGNL, MVEL… |
| 標籤客製化 | 支援自定義標籤前字尾 |
| 文字方塊 | 文字方塊內標籤支援 |
| 樣式 | 模板即樣式,同時程式碼也可以設定樣式 |
| 模板巢狀 | 模板包含子模板,子模板再包含子模板 |
| 合併 | Word合併Merge,也可以在指定位置進行合併 |
| 使用者自定義函數(外掛) | 在檔案任何位置執行函數 |
我們就可以使用這個它來實現這個需求。
如何使用 Poi-tl ?
本篇文章將以 Spring Boot 專案作為演示,螢幕前的朋友們可以一起跟著我的步驟來,實踐一番!
- 首先建立一個 Spring Boot 專案,版本目前我的 Demo 是 2.2.1,你可以更改你的 Spring Boot 版本,那現在我這裡已經建立好了。
其中, pom.xml 只有兩個依賴項,一個 web 和一個 test :
<dependency>
    <groupId>org.springframework.boot</groupId>
    <artifactId>spring-boot-starter-web</artifactId>
</dependency>
<!-- Spring Boot Test 依賴 -->
<dependency>
    <groupId>org.springframework.boot</groupId>
    <artifactId>spring-boot-starter-test</artifactId>
    <scope>test</scope>
</dependency>
- 接著在
pom.xml中引入 Poi-tl 的依賴項:
<!-- Poi-tl Word 模板引擎-->
<dependency>
    <groupId>com.deepoove</groupId>
    <artifactId>poi-tl</artifactId>
    <version>1.9.1</version>
</dependency>
- 準備一個 Word 模板
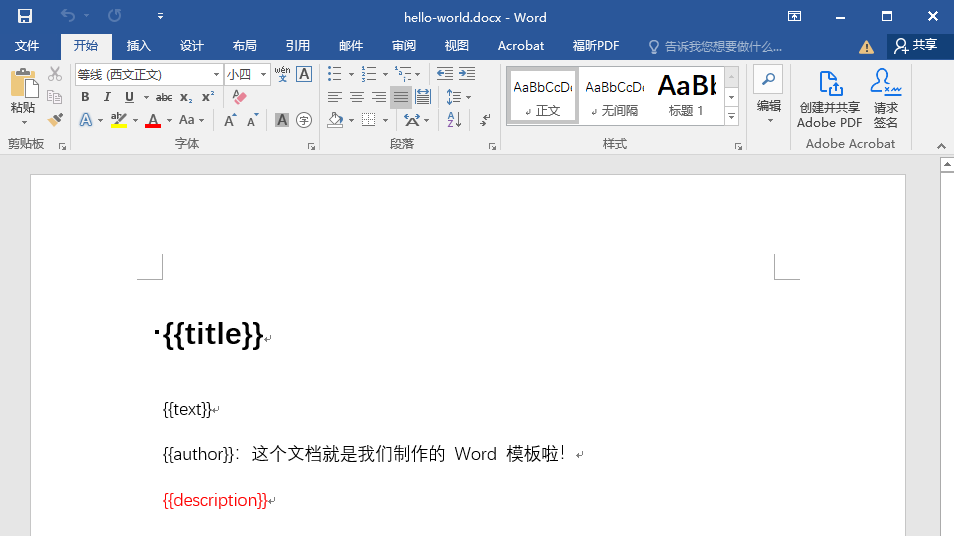
這一步你可以自己動手做一個 Word 模板,這裡我先演示下。就先建立一個名為 Hello World.docx 的 Word 檔案,模板內容如下:

找一個你喜歡的位置存放這個模板,我現在把它放到專案的 resource 目錄。
{{title}}這種由兩個大括號包住的,目前可以看成預留位置,這個模板中有 4 個預留位置,後續的資料就渲染到這些地方上。
- 獲取模板所在的路徑,並將資料渲染到模板上
渲染只需一行程式碼,就是使用 XWPFTemplate 的 API 就可以了,通過 complie 和 render 方法,就可以將資料渲染到模板中,得到渲染好的新檔案。
@SpringBootTest
public class PoiTlApplicationTest {

    @Test
    public void test() {
        // 獲取 Word 模板所在路徑
        String filepath = this.getClass().getClassLoader().getResource("hello-world.docx").getPath();
        // 通過 XWPFTemplate 編譯檔案並渲染資料到模板中
        XWPFTemplate template = XWPFTemplate.compile(filepath).render(
                new HashMap<String, Object>(){{
                    put("title", "Hello, poi-tl Word模板引擎");
                    put("text", "Hello World");
                    put("author", "god23bin");
                    put("description", "這還不關注 god23bin ?再不關注我可要求你關注了!");
                }});
        try {
            // 將完成資料渲染的檔案寫出
            template.writeAndClose(new FileOutputStream("output.docx"));
        } catch (IOException e) {
            e.printStackTrace();
        }
    }

}
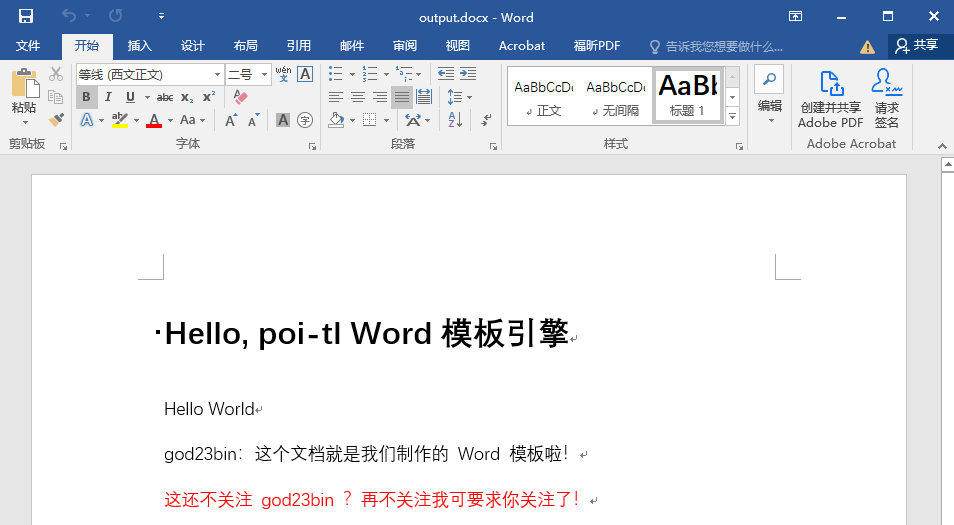
執行這個單元測試,就可以看到在專案所在目錄下輸出了新的檔案 output.docx,開啟這個檔案,我們就可以看到如下圖所示的內容:

大功告成,這就是渲染好的新檔案了,是不是很簡單,一行程式碼就完成了根據模板進行資料的渲染!
相關概念
模板
模板是 Docx 格式的 Word 檔案,我們可以使用 Microsoft office、WPS Office 等軟體來製作模板。
標籤
上面說到 {{title}} 這種理解成預留位置,實際上,官方是稱之為「標籤」。
所有的標籤都是以 {{ 開頭,以 }} 結尾,標籤可以出現在任何位置,包括頁首,頁尾,表格內部,文字方塊等。
表格佈局可以設計出很多優秀專業的檔案,推薦使用表格佈局。
poi-tl 模板遵循 所見即所得 的設計,模板和標籤的樣式會被完全保留,就如我上面演示的,一級標題和字型顏色的樣式就被保留下來了。
資料模型
資料模型,也就是我們需要渲染到模板中的資料,可以是雜湊表,也可以是普通的 Java 物件。
- 雜湊表(key 名是標籤名):
Map<String, Object> data = new HashMap<>();
data.put("title", "Hello, poi-tl Word模板引擎");
data.put("text", "Hello World");
data.put("author", "god23bin");
data.put("description", "這還不關注 god23bin ?再不關注我可要求你關注了!");
- Java 物件(屬性名是標籤名):
public class DataModel {
    private String title;
    private String text;
    private String author;
    private String description;
    // 省略 getter 和 setter
}

DataModel data = new DataModel();
data.setTitle("Hello, poi-tl Word模板引擎");
data.setText("Hello World");
data.setAuthor("god23bin");
data.setDescription("這還不關注 god23bin ?再不關注我可要求你關注了!");
有了雜湊表和或者 Java 物件的資料模型後,將這個資料丟給渲染的 API,就可以完成資料的渲染了。
標籤的寫法
poi-tl 裡只有標籤,那麼我們需要知道標籤的寫法是怎樣的。在 Word 檔案裡,可以有:文字、圖片、表格、列表等元素,那麼對應的,咱們的標籤也有這些。
文字標籤 {{var}}
簡單粗暴,直接 {{標籤名}} 就是文字標籤了。
圖片標籤 {{@var}}
{{@標籤名}} 就是圖片標籤,@ 標識了這個標籤的型別是圖片,其他的也是同理,不同的符號標識不同型別的標籤。
表格標籤 {{#var}}
使用 # 標識這是一個表格標籤。
列表標籤 {{*var}}
使用 * 標識這是一個列表標籤。
其餘的標籤
剩下的標籤還有很多,詳細的內容你可以閱讀官方檔案,這裡就不一一介紹了。
下面我將寫下我用過的內容。
外掛
外掛,又稱為自定義函數,它允許我們在模板標籤位置處執行預先定義好的函數。由於外掛機制的存在,我們幾乎可以在模板的任何位置執行任意操作。
外掛是 poi-tl 的核心,預設的標籤和參照標籤都是通過外掛載入。
預設外掛
poi-tl 預設提供了八個策略外掛,用來處理文字、圖片、列表、表格、檔案巢狀、參照圖片、參照多系列圖表、參照單系列圖表等:
- TextRenderPolicy
- PictureRenderPolicy
- NumberingRenderPolicy
- TableRenderPolicy
- DocxRenderPolicy
- MultiSeriesChartTemplateRenderPolicy
- SingleSeriesChartTemplateRenderPolicy
- DefaultPictureTemplateRenderPolicy
由於這 8 個外掛是經常用到的,所以這些外掛被註冊為不同的標籤型別,也就是我們看到過的 {{var}}、{{@var}}、{{#var}} 等不同型別的標籤,從而搭建了 poi-tl 的標籤體系。
除了這 8 個通用的策略外掛外,還內建了一些額外用途的外掛:
DynamicTableRenderPolicy |
動態表格外掛,允許直接操作表格物件 | 範例-動態表格 |
|---|---|---|
HackLoopTableRenderPolicy |
迴圈表格行,下文會詳細介紹 | 範例-表格行迴圈 |
LoopColumnTableRenderPolicy |
迴圈表格列 | 範例-表格列迴圈 |
BookmarkRenderPolicy |
書籤和錨點 | 範例-Swagger檔案 |
JSONRenderPolicy |
高亮顯示JSON程式碼塊 | 範例-Swagger檔案 |
AbstractChartTemplateRenderPolicy |
參照圖表外掛,允許直接操作圖表物件 | |
ParagraphRenderPolicy |
渲染一個段落,可以包含不同樣式文字,圖片等 | |
DocumentRenderPolicy |
渲染多個段落和表格 | |
TOCRenderPolicy |
Beta實驗功能:目錄,開啟檔案時需要更新域 |
使用外掛
為了讓外掛在某個標籤處執行,我們需要將外掛與標籤繫結。
當我們有個模板標籤為 {{description}},預設是文字標籤,如果希望在這個位置做些不一樣或者更復雜的事情,我們可以將外掛應用到這個模板標籤,比如渲染 HTML:
ConfigureBuilder builder = Configure.builder();
builder.bind("description", new HtmlRenderPolicy());
此時,{{description}} 將不再是一個文字標籤,而是一個自定義的支援 HTML 渲染的標籤。
當然,這裡的 HTML 渲染的外掛,預設是沒有提供的,需要引入以下的依賴項,才能支援 HTML 的渲染。
<!-- 支援渲染 HTML 的外掛 -->
<dependency>
    <groupId>io.github.draco1023</groupId>
    <artifactId>poi-tl-ext</artifactId>
    <version>0.3.3</version>
</dependency>
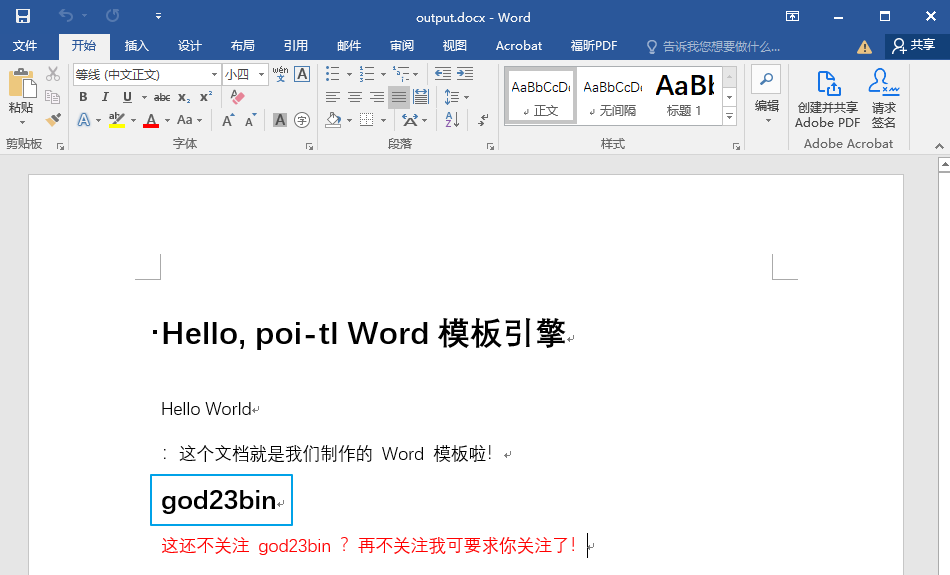
範例:我們對 {{author}} 這個標籤繫結上支援 HTML 渲染的外掛,這樣就能渲染 HTML 的文字了。
@SpringBootTest
public class PoiTlApplicationTest {

    @Test
    public void test() {
        // 獲取 Word 模板所在路徑
        String filepath = this.getClass().getClassLoader().getResource("hello-world.docx").getPath();
        // 給標籤繫結外掛
        Configure configure = Configure.builder().bind("author", new HtmlRenderPolicy()).build();
        // 通過 XWPFTemplate 編譯檔案並渲染資料到模板中
        XWPFTemplate template = XWPFTemplate.compile(filepath, configure).render(
                new HashMap<String, Object>(){{
                    put("title", "Hello, poi-tl Word模板引擎");
                    put("text", "Hello World");
                    put("author", "<h2>god23bin</h2>");
                    put("description", "這還不關注 god23bin ?再不關注我可要求你關注了!");
                }});
        try {
            // 將完成資料渲染的檔案寫出
            template.writeAndClose(new FileOutputStream("output.docx"));
        } catch (IOException e) {
            e.printStackTrace();
        }
    }

}
生成的 Word 檔案如下圖所示,可以看到 {{author}} 這個標籤的 HTML 文字已經渲染成功了!(藍框框)

表格行迴圈
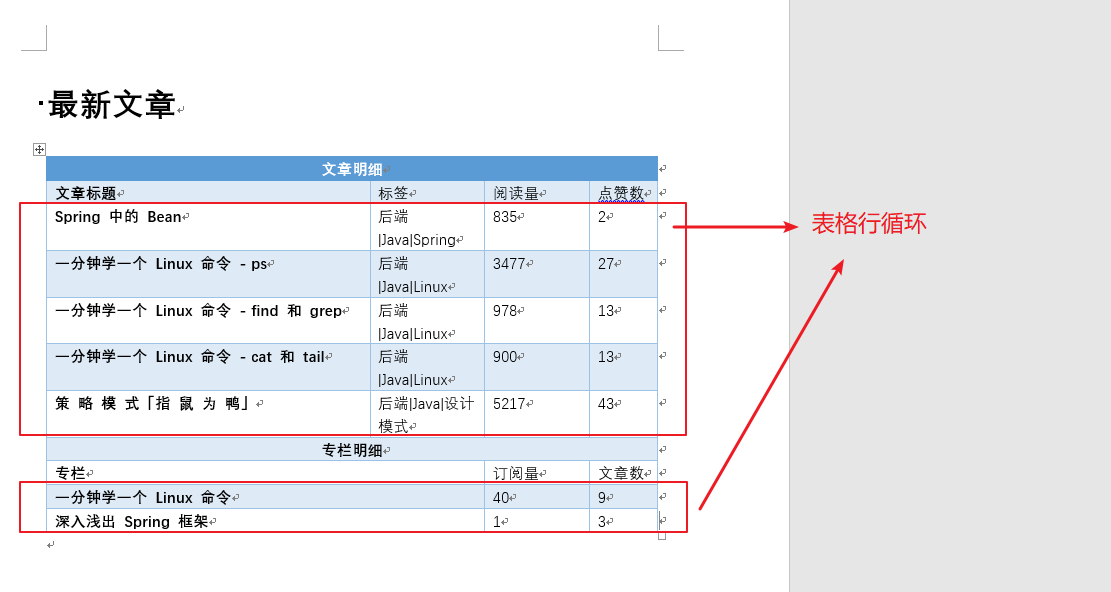
當有類似如下需求的時候,在表格裡展示多行同型別的資料,那麼就需要用到表格的行迴圈了。

這裡也是涉及到外掛的,具體就是使用 HackLoopTableRenderPolicy 這個外掛策略,這個策略能夠根據集合資料進行迴圈渲染,這樣就渲染資料到表格的行上了,集合有多少個元素,那麼就有多少行。
我們來看下這個表格行迴圈的模板是怎樣寫的,是這樣的:

可以看到 {{articles}} 和 {{columns}} 是標準的文字標籤,我們這裡將這兩個標籤置於迴圈行的上一行,迴圈行裡設定要回圈的標籤和內容,注意這裡的標籤是使用 [] 的,以此來區分標準的標籤語法。
同時 {{articles}} 和 {{columns}} 標籤對應的資料就是文章和專欄的集合。
我們寫一個該模板的資料模型,以 Java 物件來寫,同時模擬資料從資料庫中讀取。
資料模型:AcWordModel
public class AcWordModel {
    /**
     * 文章明細資料模型-表格行迴圈
     */
    private List<Article> articles;
    /**
     * 專欄明細資料模型
     */
    private List<SpecialColumn> columns;
    // 省略 getter 和 setter
}
其中的 Article 和 SpecialColumn 模型如下:
public class Article {
    private String title;
    private String tags;
    private Integer reading;
    private Integer likes;
    // 省略 getter 和 setter
}
public class SpecialColumn {
    private String name;
    private Integer subscription;
    private Integer nums;
    // 省略 getter 和 setter
}
進行測試,獲取資料和模板,讓標籤和表格行迴圈的外掛進行繫結
    @Test
    public void rowLoopTest() {
        // 獲取資料,這裡假裝是從資料庫中查詢得到的
        AcWordModel data = getFromDB();
        // 獲取 Word 模板所在路徑
        String filepath = this.getClass().getClassLoader().getResource("table-row-loop.docx").getPath();
        // 給標籤繫結外掛,這裡就係結表格行迴圈的外掛
        Configure configure = Configure.builder()
                .bind("articles", new HackLoopTableRenderPolicy())
                .bind("columns", new HackLoopTableRenderPolicy())
                .build();
        // 通過 XWPFTemplate 編譯檔案並渲染資料到模板中
        XWPFTemplate template = XWPFTemplate.compile(filepath, configure).render(data);
        try {
            // 將完成資料渲染的檔案寫出
            template.writeAndClose(new FileOutputStream("ac-word.docx"));
        } catch (IOException e) {
            e.printStackTrace();
        }
    }
這樣,就能實現表格的行迴圈了!
封裝 Word 渲染生成新檔案的工具
我們可以再封裝下這個 API,寫一個工具類,如下:
package cn.god23bin.demo.util;

import com.deepoove.poi.XWPFTemplate;
import com.deepoove.poi.config.Configure;

import java.io.FileOutputStream;
import java.io.IOException;
import java.util.Map;

public class WordUtil {

    /**
     * 生成 word 檔案
     * @param wordTemplatePath    word 模板路徑
     * @param targetWordFilePath  生成目標檔案路徑
     * @param data                待渲染的資料模型-雜湊表形式
     */
    public static void generateWordFile(String wordTemplatePath, String targetWordFilePath, Map<String, Object> data) {
        XWPFTemplate template = XWPFTemplate.compile(wordTemplatePath).render(data);
        try {
            template.writeAndClose(new FileOutputStream(targetWordFilePath));
        } catch (IOException e) {
            e.printStackTrace();
        }
    }

    /**
     * 生成 word 檔案
     * @param wordTemplatePath    word 模板路徑
     * @param targetWordFilePath  生成目標檔案路徑
     * @param data                待渲染的資料模型-Java物件形式
     */
    public static void generateWordFile(String wordTemplatePath, String targetWordFilePath, Object data) {
        XWPFTemplate template = XWPFTemplate.compile(wordTemplatePath).render(data);
        try {
            template.writeAndClose(new FileOutputStream(targetWordFilePath));
        } catch (IOException e) {
            e.printStackTrace();
        }
    }

    /**
     * 生成 word 檔案
     * @param wordTemplatePath    word 模板路徑
     * @param targetWordFilePath  生成目標檔案路徑
     * @param data                待渲染的資料模型-雜湊表形式
     * @param configure           渲染設定
     */
    public static void generateWordFile(String wordTemplatePath, String targetWordFilePath, Map<String, Object> data, Configure configure) {
        XWPFTemplate template = XWPFTemplate.compile(wordTemplatePath, configure).render(data);
        try {
            template.writeAndClose(new FileOutputStream(targetWordFilePath));
        } catch (IOException e) {
            e.printStackTrace();
        }
    }

    /**
     * 生成 word 檔案
     * @param wordTemplatePath    word 模板路徑
     * @param targetWordFilePath  生成目標檔案路徑
     * @param data                待渲染的資料模型-Java物件形式
     * @param configure           渲染設定
     */
    public static void generateWordFile(String wordTemplatePath, String targetWordFilePath, Object data, Configure configure) {
        XWPFTemplate template = XWPFTemplate.compile(wordTemplatePath, configure).render(data);
        try {
            template.writeAndClose(new FileOutputStream(targetWordFilePath));
        } catch (IOException e) {
            e.printStackTrace();
        }
    }
}
最後的最後
希望各位螢幕前的靚仔靚女們給個三連!你輕輕地點了個贊,那將在我的心裡世界增添一顆明亮而耀眼的星!
咱們下期再見!