[Maven] maven外掛系列之maven-shade-plugin
[Maven] maven外掛系列之maven-shade-plugin
0 序言/背景
- 最近兩天遇到一個【包衝突】的坑:
common-resource-sdk 工程
  依賴: nacos-client
    依賴: http-client:4.5.3

bdp-business-data-integration-service 工程
  依賴: common-resource-sdk
  依賴: elasticsearch-rest-client
    依賴: http-client:4.5.10
在bdp-business-data-integration-service工程中排除了common-resource的http-client包,但其打出的JAR包中依舊含有http-client:4.5.3。

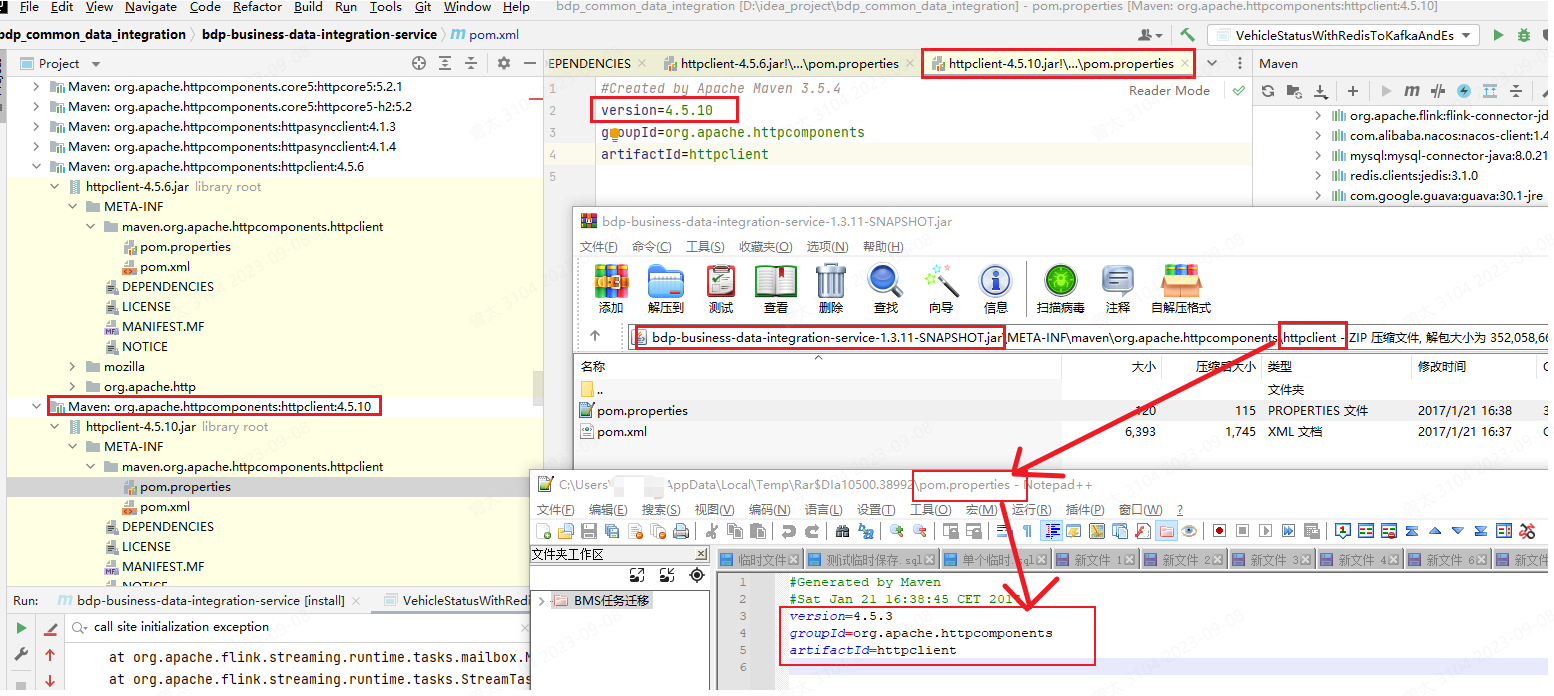
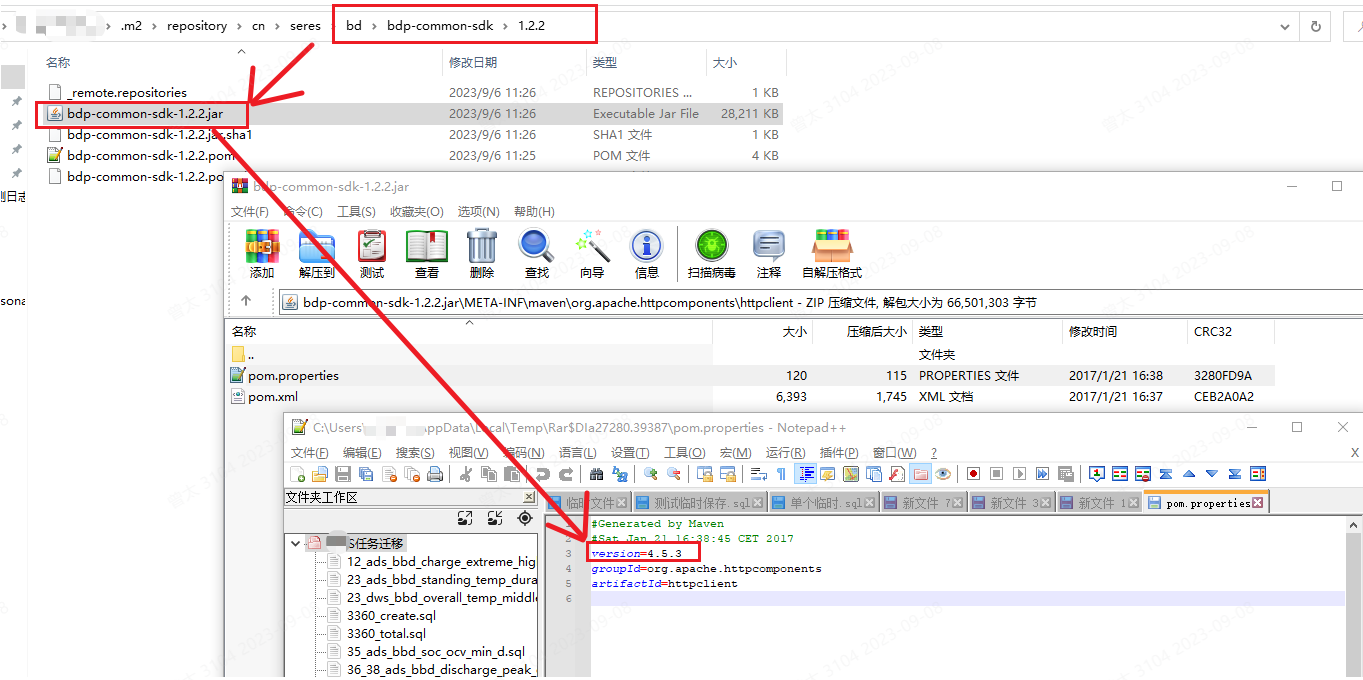
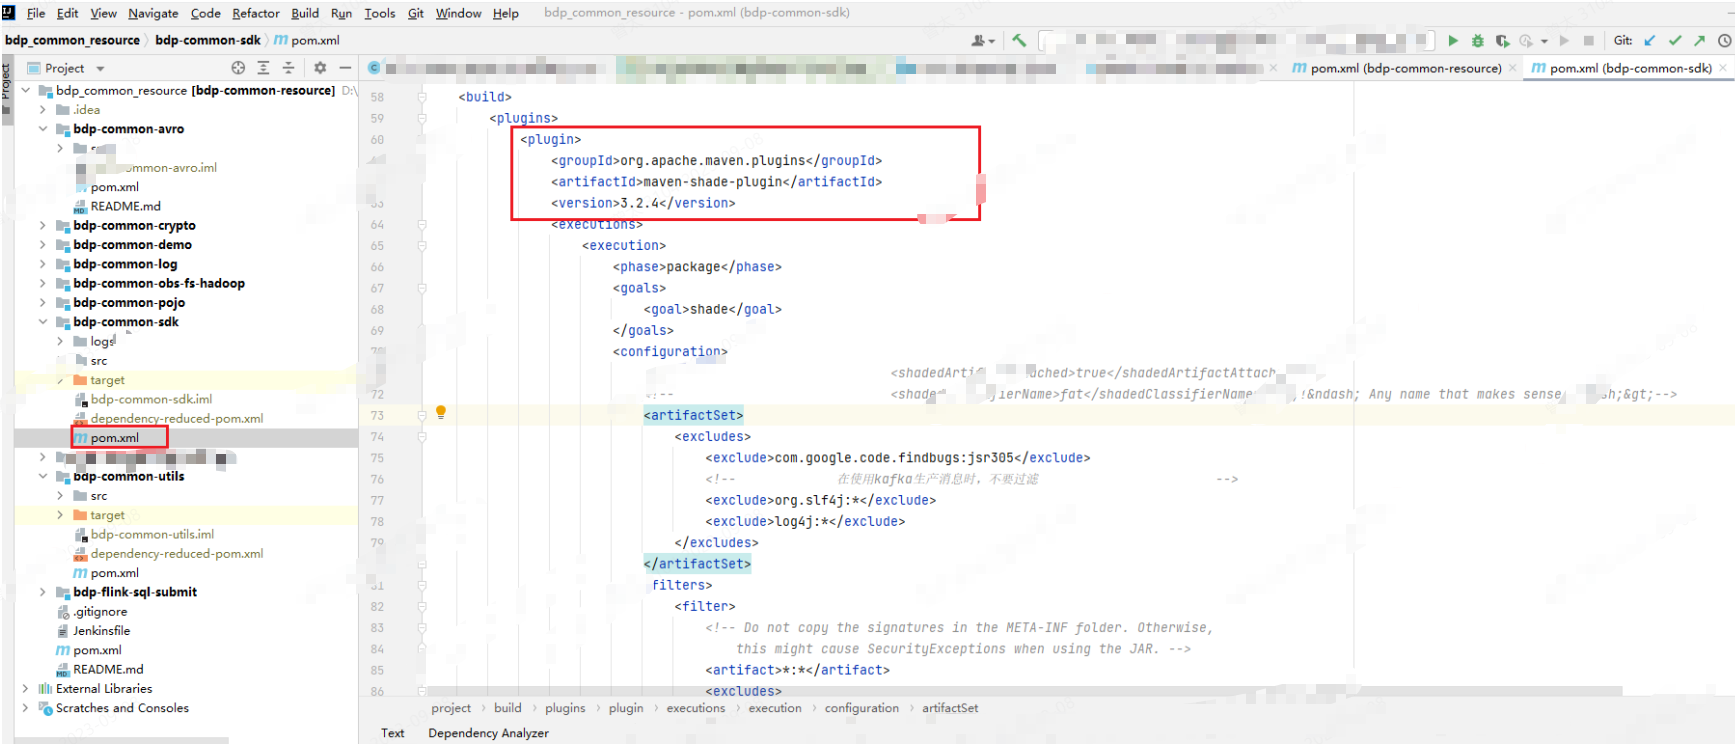
為何排包失敗了呢?
本質原因:
common-resurce打包方式是jar-with-dependencies
- 基於此,本文好好聊聊maven打包外掛:
maven-shade-plugin
1 外掛簡述/Plugin Overview
1.1 定義與目的/Definition & Goals
- Official Definition
Apache Maven : maven-shade-plugin
This plugin provides the capability to package the artifact in an uber-jar, including its dependencies and to shade - i.e. rename - the packages of some of the dependencies.(該外掛提供了將工件打包到uber jar中的功能,包括其依賴項,並對一些依賴項的包進行著色(即重新命名)。)
- Goals Overview
The Shade Plugin has a single goal: (Shade外掛只有一個目標:)
shade:shade is bound to the package phase and is used to create a shaded jar. (shade:shade繫結到封裝階段,用於建立一個shaded jar。)
- Sample Explain/簡單解釋:
maven-plugin-shade 外掛提供了2個能力:
把整個專案(包含它的依賴)都打包到一個 「uber-jar」 中 shade - 即重新命名某些依賴的包。也由此引出了兩個問題:
+ 什麼是 uber-jar ?
+ 這中打包後帶依賴的 Jar 包一般稱為uber-jar或fat-jar或者jar-with-dependencies;意思就是包含依賴的 jar。
+ 什麼是 shade ?
+ shade 意為遮擋,在此處可理解為:對依賴的 jar 包的重定向(主要通過重新命名的方式)。
shade
	n. 燈罩;陰涼處;(樹)蔭;色度;痕跡,影子,遺風;一點;差別;背陰;暗部;陰魂;濃淡深淺
	vt. 給…遮擋(光線);畫陰影;加燈罩;把…塗暗;險勝

uber
	adj.超級的;極其的;最好的;
1.2 版本/Version
If you like to use minimizeJar this means you have to use JDK8+. This is based on a required upgrade of dependencies.
如果你喜歡使用minimizeJar,這意味著你必須使用JDK8+。這是基於所需的依賴項升級。
Latest version(最新版本) = 3.5.0
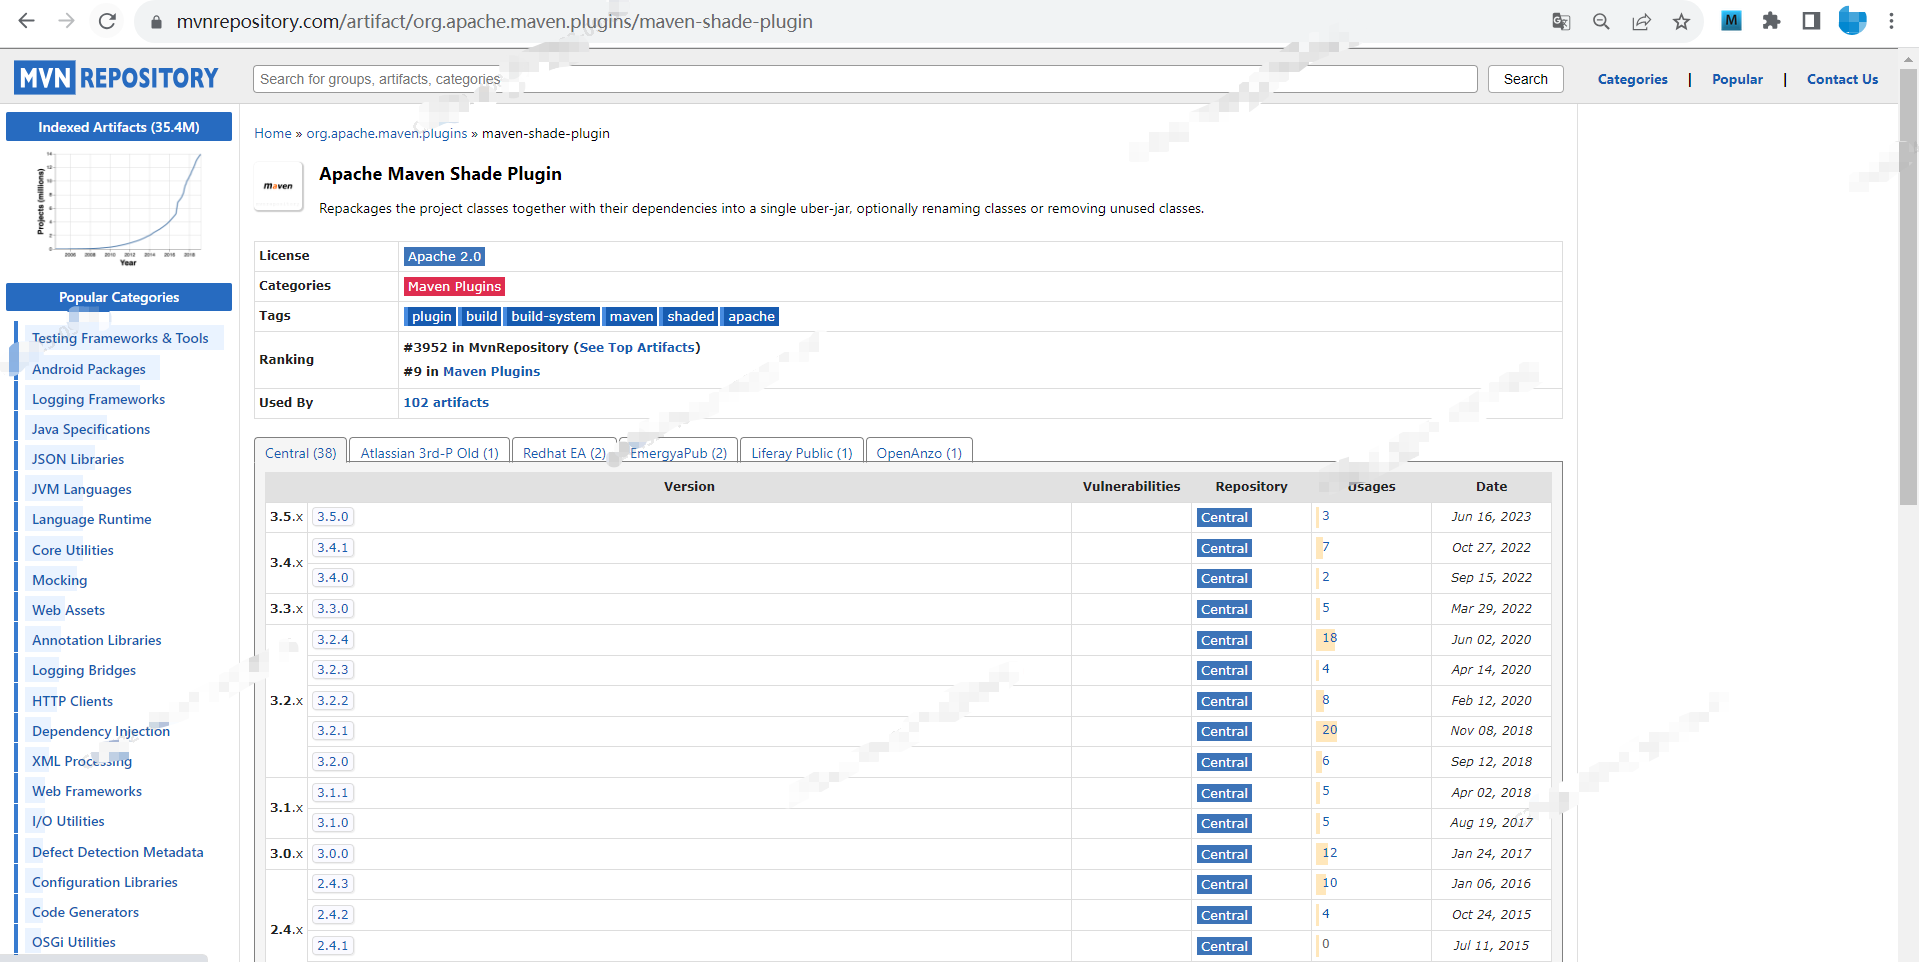
https://mvnrepository.com/artifact/org.apache.maven.plugins/maven-shade-plugin
2 實踐與使用/Usage
2.1 官方外掛說明
Official Document/官方檔案
General instructions on how to use the Shade Plugin can be found on the usage page. Some more specific use cases are described in the examples given below.
有關如何使用Shade外掛的一般說明可以在使用頁面上找到。下面給出的範例中描述了一些更具體的用例。

In case you still have questions regarding the plugin's usage, please feel free to contact the user mailing list. The posts to the mailing list are archived and could already contain the answer to your question as part of an older thread. Hence, it is also worth browsing/searching the mail archive.
如果您對外掛的使用仍有疑問,請隨時聯絡使用者郵寄清單。郵寄清單中的貼文已存檔,可能已經包含了您問題的答案,作為舊執行緒的一部分。因此,瀏覽/搜尋郵件檔案也是值得的。

If you feel like the plugin is missing a feature or has a defect, you can fill a feature request or bug report in our issue tracker. When creating a new issue, please provide a comprehensive description of your concern. Especially for fixing bugs it is crucial that the developers can reproduce your problem. For this reason, entire debug logs, POMs or most preferably little demo projects attached to the issue are very much appreciated. Of course, patches are welcome, too. Contributors can check out the project from our source repository and will find supplementary information in the guide to helping with Maven.
如果你覺得外掛缺少功能或有缺陷,你可以在我們的問題跟蹤器中填寫功能請求或錯誤報告。建立新問題時,請對您關心的問題進行全面描述。特別是對於修復錯誤,開發人員能夠重現您的問題是至關重要的。出於這個原因,非常感謝整個偵錯紀錄檔、POM,或者最好是附加到該問題的小演示專案。當然,修補程式也是受歡迎的。參與者可以從我們的原始碼庫中檢視該專案,並在幫助使用Maven的指南中找到補充資訊。
2.2 基本使用 : build>plugin
2.2.0 maven-shade-plguin 的基本使用
- maven-plugin-shade 必須和 Maven 構建生命週期中的 package 階段繫結。
也就是說,當執行
mvn package時會自動觸發shade。
- 要使用
maven-shade-plugin,只需要在pom.xml的<plugins>標籤下新增它的設定即可,範例如下:
<project>
    //...

    <build>
        <plugins>
            <plugin>
                <groupId>org.apache.maven.plugins</groupId>
                <artifactId>maven-shade-plugin</artifactId>
                <version>3.2.4</version>
                <configuration>
                    <!-- 此處按需編寫更具體的設定 -->
                </configuration>
                <executions>
                    <execution>
                        <!-- 和 package 階段繫結 -->
                        <phase>package</phase>
                        <goals>
                            <goal>shade</goal>
                        </goals>
                    </execution>
                </executions>
            </plugin>
        </plugins>
    </build>

    // ...
</project>
預設情況下,會把專案所有的依賴都包含進最終的 jar 包中。當然,我們也可在 <configuration> 標籤內設定更具體的規則。
2.2.1 測試驗證(maven-shade-plugin)
- pom.xml
<?xml version="1.0" encoding="UTF-8"?>
<project xmlns="http://maven.apache.org/POM/4.0.0"
         xmlns:xsi="http://www.w3.org/2001/XMLSchema-instance"
         xsi:schemaLocation="http://maven.apache.org/POM/4.0.0 http://maven.apache.org/xsd/maven-4.0.0.xsd">
<!--
    <parent>
        <artifactId>johnny-webapp-quickstart</artifactId>
        <groupId>cn.johnnyzen</groupId>
        <version>1.0.0-SNAPSHOT</version>
    </parent>
-->
    <modelVersion>4.0.0</modelVersion>

    <version>1.0.0-SNAPSHOT</version>
    <groupId>cn.johnnyzen</groupId>
    <artifactId>study-maven</artifactId>

    <properties>
        <maven.compiler.source>8</maven.compiler.source>
        <maven.compiler.target>8</maven.compiler.target>
        <project.build.sourceEncoding>UTF-8</project.build.sourceEncoding>
        <maven-shade-plugin.version>3.5.0</maven-shade-plugin.version>

        <fastjson.version>2.0.3</fastjson.version>
    </properties>

    <dependencies>
        <dependency>
            <groupId>com.alibaba</groupId>
            <artifactId>fastjson</artifactId>
            <version>${fastjson.version}</version>
        </dependency>
    </dependencies>

    <build>
        <plugins>
            <plugin>
                <groupId>org.apache.maven.plugins</groupId>
                <artifactId>maven-shade-plugin</artifactId>
                <version>${maven-shade-plugin.version}</version>
                <configuration>
                    <!-- 此處按需編寫更具體的設定 -->
                </configuration>
                <executions>
                    <execution>
                        <!-- 和 package 階段繫結 -->
                        <phase>package</phase>
                        <goals>
                            <goal>shade</goal>
                        </goals>
                    </execution>
                </executions>
            </plugin>
        </plugins>
    </build>
</project>
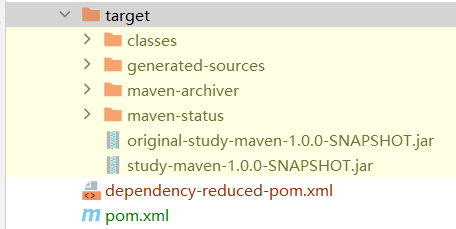
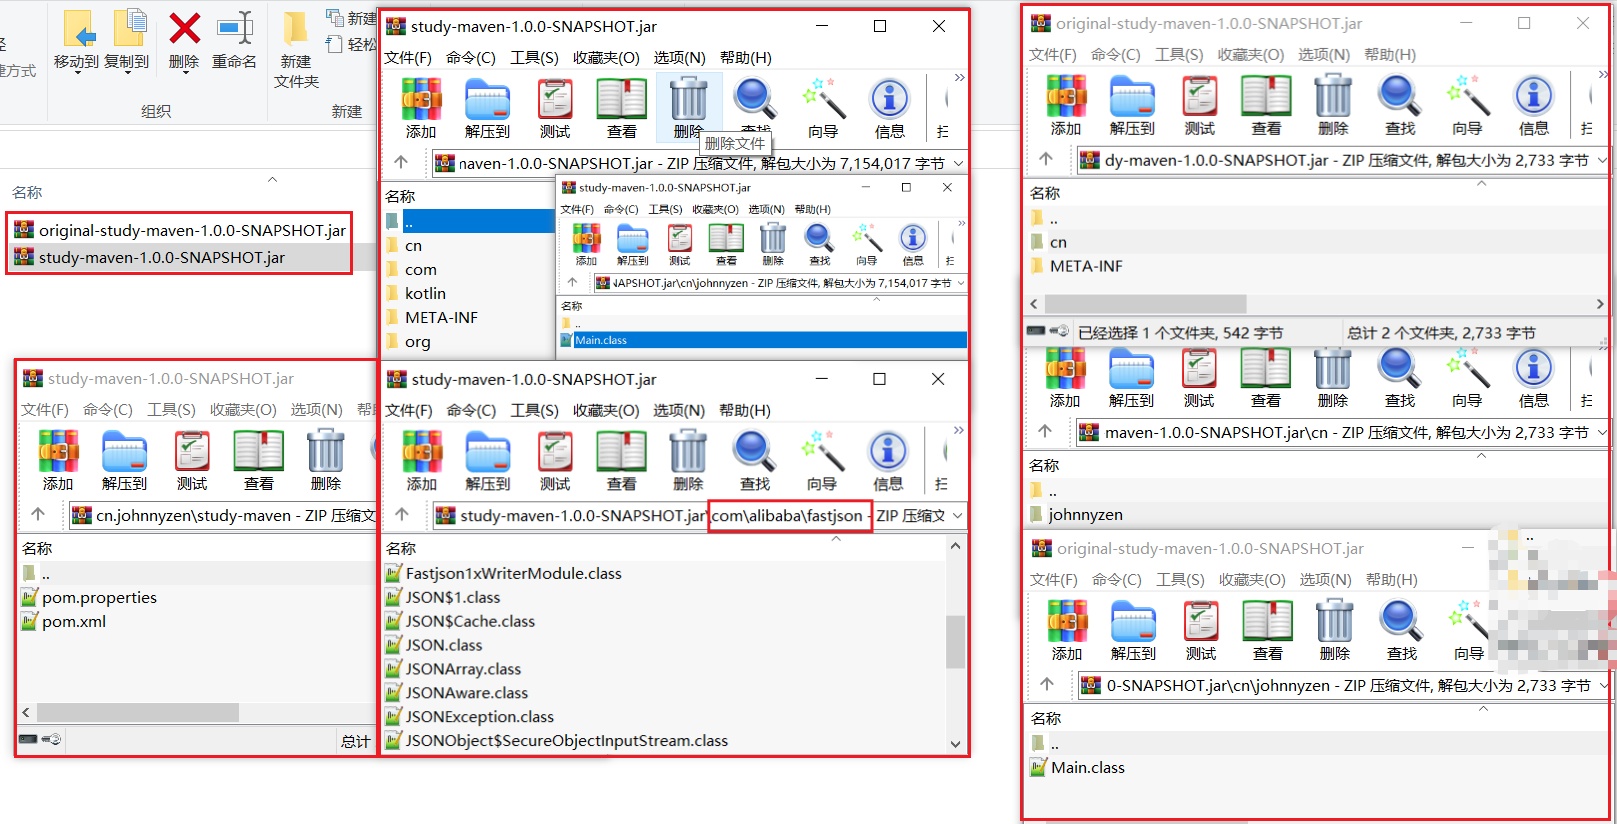
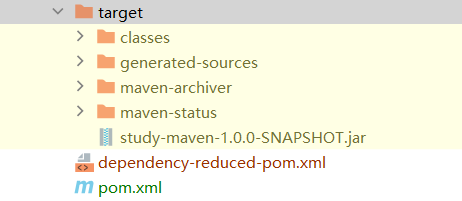
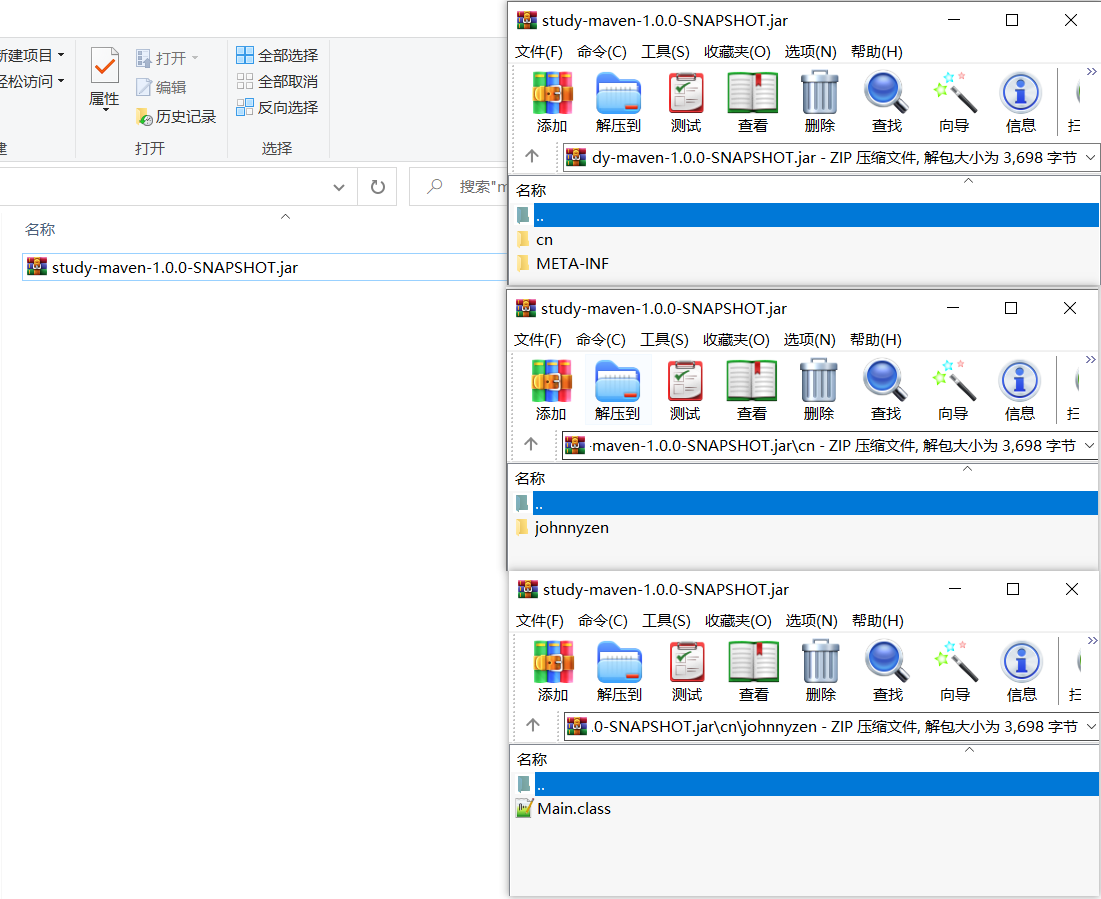
- 打包結果
mvn clean install
2.2.2 測試驗證(maven-compile-plugin)
- pom.xml
<?xml version="1.0" encoding="UTF-8"?>
<project xmlns="http://maven.apache.org/POM/4.0.0"
         xmlns:xsi="http://www.w3.org/2001/XMLSchema-instance"
         xsi:schemaLocation="http://maven.apache.org/POM/4.0.0 http://maven.apache.org/xsd/maven-4.0.0.xsd">
<!--
    <parent>
        <artifactId>johnny-webapp-quickstart</artifactId>
        <groupId>cn.johnnyzen</groupId>
        <version>1.0.0-SNAPSHOT</version>
    </parent>
-->
    <modelVersion>4.0.0</modelVersion>

    <version>1.0.0-SNAPSHOT</version>
    <groupId>cn.johnnyzen</groupId>
    <artifactId>study-maven</artifactId>

    <properties>
        <java.jdk.version>1.8</java.jdk.version>
        <maven.compiler.source>8</maven.compiler.source>
        <maven.compiler.target>8</maven.compiler.target>
        <project.build.sourceEncoding>UTF-8</project.build.sourceEncoding>

        <maven-shade-plugin.version>3.5.0</maven-shade-plugin.version>
        <maven-compiler-plugin.version>3.8.0</maven-compiler-plugin.version>
        <fastjson.version>2.0.3</fastjson.version>
    </properties>

    <dependencies>
        <dependency>
            <groupId>com.alibaba</groupId>
            <artifactId>fastjson</artifactId>
            <version>${fastjson.version}</version>
        </dependency>
    </dependencies>

    <build>
        <plugins>
            <plugin>
                <groupId>org.apache.maven.plugins</groupId>
                <artifactId>maven-compiler-plugin</artifactId>
                <version>${maven-compiler-plugin.version}</version>
                <configuration>
                    <source>${java.jdk.version}</source>
                    <target>${java.jdk.version}</target>
                    <!--<encoding>${project.build.outputEncoding}</encoding>-->
                    <!-- <skipTests>true</skipTests> --><!-- 跳過測試 -->
                    <!--<verbose>true</verbose>-->                    <!--<showWarnings>true</showWarnings>-->                    <!--<fork>true</fork>--><!-- 要使compilerVersion標籤生效,還需要將fork設為true,用於明確表示編譯版本設定的可用 -->
                    <!--<executable>--><!-- path-to-javac --><!--</executable>--><!-- 使用指定的javac命令,例如:<executable>${JAVA_1_4_HOME}/bin/javac</executable> -->
                    <!--<compilerVersion>${java.version}</compilerVersion>--><!-- 指定外掛將使用的編譯器的版本 -->
                    <!--<meminitial>128m</meminitial>--><!-- 編譯器使用的初始記憶體 -->
                    <!--<maxmem>512m</maxmem>--><!-- 編譯器使用的最大記憶體 -->
                    <!--<compilerArgument>-verbose -bootclasspath ${java.home}\lib\rt.jar</compilerArgument>--><!-- 這個選項用來傳遞編譯器自身不包含但是卻支援的引數選項 -->
                </configuration>
            </plugin>
        </plugins>
    </build>
</project>
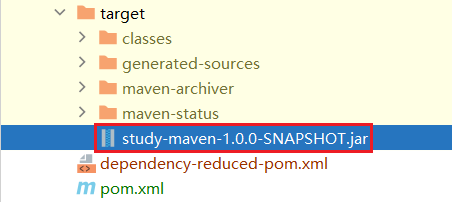
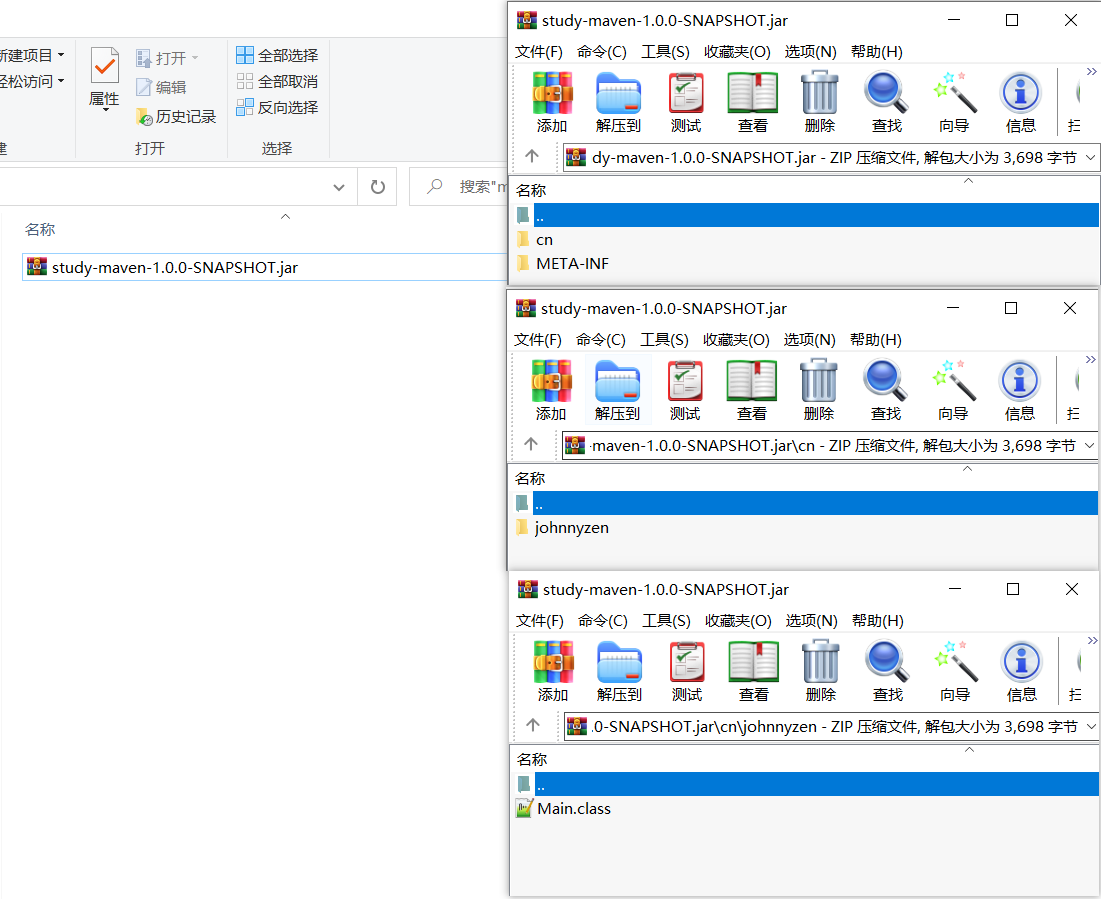
- 打包效果
mvn clean install
2.2.3 測試驗證(build is empty)
- pom.xml
<?xml version="1.0" encoding="UTF-8"?>
<project xmlns="http://maven.apache.org/POM/4.0.0"
         xmlns:xsi="http://www.w3.org/2001/XMLSchema-instance"
         xsi:schemaLocation="http://maven.apache.org/POM/4.0.0 http://maven.apache.org/xsd/maven-4.0.0.xsd">
<!--
    <parent>
        <artifactId>johnny-webapp-quickstart</artifactId>
        <groupId>cn.johnnyzen</groupId>
        <version>1.0.0-SNAPSHOT</version>
    </parent>
-->
    <modelVersion>4.0.0</modelVersion>

    <version>1.0.0-SNAPSHOT</version>
    <groupId>cn.johnnyzen</groupId>
    <artifactId>study-maven</artifactId>

    <properties>
        <java.jdk.version>1.8</java.jdk.version>
        <maven.compiler.source>8</maven.compiler.source>
        <maven.compiler.target>8</maven.compiler.target>
        <project.build.sourceEncoding>UTF-8</project.build.sourceEncoding>

        <maven-shade-plugin.version>3.5.0</maven-shade-plugin.version>
        <maven-compiler-plugin.version>3.8.0</maven-compiler-plugin.version>
        <fastjson.version>2.0.3</fastjson.version>
    </properties>

    <dependencies>
        <dependency>
            <groupId>com.alibaba</groupId>
            <artifactId>fastjson</artifactId>
            <version>${fastjson.version}</version>
        </dependency>
    </dependencies>

    <build>
    </build>
</project>
- 打包效果
mvn clean install
2.3 擴充套件設定: build>plugin>configuration
2.3.1 include/exclude : 按需選擇要新增到最終 jar 包中依賴
- 支援
include/exclude2 種操作 - 支援執行萬用字元匹配目標依賴JAR包:
'*' 、'?' - 設定格式:
groupId:artifactId[[:type]:classfier]
- 樣例設定
<configuration>
    <artifactSet>
        <excludes>
            <exclude>classworlds:classworlds</exclude>
            <exclude>junit:junit</exclude>
            <exclude>jmock:*</exclude>
            <exclude>*:xml-apis</exclude>
            <exclude>org.apache.maven:lib:tests</exclude>
            <exclude>log4j:log4j:jar:</exclude>
        </excludes>
    </artifactSet>
</configuration>
2.3.2 filter : 過濾
- 使用
<filters>結合<includes>&<excludes>標籤可實現更靈活的依賴選擇。 - 樣例設定:
<configuration>
    <filters>
        <filter>
            <artifact>junit:junit</artifact>
            <includes>
                <include>junit/framework/**</include>
                <include>org/junit/**</include>
            </includes>
            <excludes>
                <exclude>org/junit/experimental/**</exclude>
                <exclude>org/junit/runners/**</exclude>
            </excludes>
        </filter>
        <filter>
            <artifact>*:*</artifact>
            <excludes>
                <exclude>META-INF/*.SF</exclude>
                <exclude>META-INF/*.DSA</exclude>
                <exclude>META-INF/*.RSA</exclude>
            </excludes>
        </filter>
    </filters>
</configuration>
2.3.3 minimizeJar : 最小化JAR包體積
- 除了可以通過自定義的 filters 來過濾依賴,此外掛還支援自動移除專案中沒有使用到的依賴,以此來最小化 jar 包的體積,只需要新增一項設定即可。範例如下:
<configuration>
    <minimizeJar>true</minimizeJar>
</configuration>
2.3.4 relocations : 重定位 class 檔案
如果最終的 jar 包被其他的專案所依賴的話,直接地參照此 jar 包中的類可能會導致類載入衝突,這是因為 classpath 中可能存在重複的 class 檔案。為了解決這個問題,我們可以使用 shade 提供的重定位功能,把部分類移動到一個全新的包中。範例如下:
<configuration>
    <relocations>
        <relocation>
            <pattern>org.codehaus.plexus.util</pattern>
            <shadedPattern>org.shaded.plexus.util</shadedPattern>
            <excludes>
                <exclude>org.codehaus.plexus.util.xml.Xpp3Dom</exclude>
                <exclude>org.codehaus.plexus.util.xml.pull.*</exclude>
            </excludes>
        </relocation>
    </relocations>
</configuration>
涉及標籤:
	<pattern>:原始包名
	<shadedPattern>:重新命名後的包名
	<excludes>:原始包內不需要重定位的類,類名支援萬用字元

例如,在上述範例中,我們把 org.codehaus.plexus.util 包內的所有子包及 class 檔案(除了 ~.xml.Xpp3Dom 和 ~.xml.pull 包下的所有 class 檔案)重定位到了 org.shaded.plexus.util 包內。
當然,如果包內的大部分類我們都不需要,一個個排除就顯得很繁瑣了。
此時我們也可以使用 <includes> 標籤來指定我們僅需要的類,範例如下:
<project>
    ...
    <relocation>
        <pattern>org.codehaus.plexus.util</pattern>
        <shadedPattern>org.shaded.plexus.util</shadedPattern>
        <includes>
            <include>org.codehaud.plexus.util.io.*</include>
        </includes>
    </relocation>
    ...
</project>
2.3.5 mainClass:生成可執行 jar 包
- 使用 maven-shade-plugin 後,最終生成的 jar 包可以包含所有專案所需要的依賴。
我們會想,能不能直接執行這個 uber-jar 呢?答案是當然可以,並且十分簡單,只需要指定<mainClass>啟動類就可以了。 - 範例如下:
<project>
    ...
    <configuration>
        <transformers>
            <transformer implementation="org.apache.maven.plugins.shade.resource.ManifestResourceTransformer">
                <mainClass>org.sonatype.haven.HavenCli</mainClass>
            </transformer>
        </transformers>
    </configuration>
    ...
</project>

熟悉 jar 包的朋友們都知道,jar 包中預設會包含一個 MANIFEST.MF 檔案,裡面描述了一些 jar 包的資訊。
使用 java 自帶的 jar 命令打包的時候可以指定 MANIFEST.MF,其中也可以指定 Main-Class 來使得 jar 包可執行。
那麼使用 shade 來指定和直接在 MANIFEST.MF 檔案中指定有什麼區別呢?
答案是沒有區別,細心的讀者會發現 <mainClass> 標籤的父標籤是 <transformer> 有一個 implementation 屬性,其值為 「~.ManifestResourceTransformer」,意思是 Manifest 資原始檔轉換器。
上述範例只自指定了啟動類,因此 shade 會為我們自動生成一個包含 Main-Class 的 MANIFEST.MF 檔案,然後在打 jar 包時指定這個檔案。
那如果我們想要完全客製化 MANIFEST.MF 檔案內容怎麼辦呢?我們可以使用 <manifestEntries> 標籤,範例如下:
<project>
    ...
    <configuration>
        <transformers>
            <transformer implementation="org.apache.maven.plugins.shade.resource.ManifestResourceTransformer">
                <manifestEntries>
                    <Main-Class>org.sonatype.haven.ExodusCli</Main-Class>
                    <Build-Number>123</Build-Number>
                </manifestEntries>
            </transformer>
        </transformers>
    </configuration>
    ...
</project>
可執行jar包通過 java -jar 命令啟動
2.3.6 生成資原始檔
專案中涉及到的依賴可能會有它們所必需的資原始檔,使用 shade 可以把它們聚合在同一個 jar 包中。
預設地,shade 為我們提供了 12 個 ResourceTransformer 類:
| 類名 | 作用 |
|---|---|
| ApacheLicenseResourceTransformer | 防止 LICENSE 檔案重複 |
| ApacheNoticeResourceTransformer | 準備合併的 NOTICE |
| AppendingTransformer | 為某個資原始檔附加內容 |
| ComponentsXmlResourceTransformer | 聚合 Plexus components.xml |
| DontIncludeResourceTransformer | 防止包含指定的資源 |
| GroovyResourceTransformer | 合併 Apache Groovy 的擴充套件模組 |
| IncludeResourceTransformer | 新增專案中的檔案為資原始檔 |
| ManifestResourceTransformer | 自定義 MANIFEST 檔案 |
| PluginXmlResourceTransformer | 聚合 Maven 的 plugin.xml 設定 |
| ResourceBundleAppendingTransformer | 合併 ResourceBundles |
| ServicesResourceTransformer | 重定位且合併 META-INF/services 資原始檔中的 class 檔案 |
| XmlAppendingTransformer | 為 XML 資原始檔附加內容 |
如果上述 12 個類都不能夠滿足我們的需求,我們可以實現 shade 提供的介面,按需自定義一個 ResourceTransformer,實現方法詳見官網 Using your own Shader implementation。
X 參考文獻/Reference Document
- Apache Maven:maven-shade-plugin
- maven-plugin-shade 詳解 - CSDN (推薦)
- Maven uber-jar(帶依賴的打包外掛) spring-boot-maven-plugin - CSDN
- maven整合遠端jar包和本地jar包打包部署 - CSDN

本文連結: https://www.cnblogs.com/johnnyzen
關於博文:評論和私信會在第一時間回覆,或直接私信我。
版權宣告:本部落格所有文章除特別宣告外,均採用 BY-NC-SA 許可協定。轉載請註明出處!
日常交流:巨量資料與軟體開發-QQ交流群: 774386015 【入群二維條碼】參見左下角。您的支援、鼓勵是博主技術寫作的重要動力!