誰家面試往死裡問 Swagger 啊?
大家好,我是小富~
前言
說個挺奇葩的事,有個老鐵給我發私信吐槽了一下它的面試經歷,他去了個國企單位面試,然後面試官跟他就Swagger的問題聊了半個多小時。額~ 面試嘛這些都不稀奇,總能遇到是千奇百怪的人,千奇百怪的問題。不過,我分析這個面試官是不太好意思直接讓他走,哈哈哈!

什麼是Swagger?
Swagger目前是比較主流的RESTful風格的API檔案工具,做過開發的人應該都用過它吧!

它提供了一套工具和規範,讓開發人員能夠更輕鬆地建立和維護可讀性強、易於使用和互動的API檔案(官方口吻)。
title: Swagger
desc: Swagger 官方網站
logo: https://static1.smartbear.co/swagger/media/assets/images/swagger_logo.svg
link: https://swagger.io/
為什麼用Swagger?
以往在沒有這樣的API檔案工具,開發人員需要手動編寫和維護功能API的檔案。而且,由於API變更往往難以及時更新到檔案中,這可能會給依賴檔案的開發者帶來困惑。
說幾個Swagger的特點:
-
最重要的一點可以根據程式碼註解自動生成API檔案,
能生成的絕對不手寫,而且API檔案與API定義會同步更新。 -
它提供了一個可執行的Web介面,支援API線上測試,可以直接在介面上直接設定引數測試,不用額外的測試工具或外掛。
-
支援多種程式語言,
Java、PHP、Python等語言都支援,喜歡什麼語言構建API都行。
總的來說,Swagger可以讓我們更多時間在專注於編寫程式碼(摸魚),而不是花費額外精力來維護檔案,實踐出真知先跑個demo試試。
Swagger搭建
maven 依賴
目前使用的版本是Swagger3.0、Springboot 2.7.6,Swagger2.0與3.0依賴包名稱的變化有些大,需要特別注意一下。
<dependency>
    <groupId>org.springframework.boot</groupId>
    <artifactId>spring-boot-starter-web</artifactId>
    <version>2.7.6</version>
</dependency>

<dependency>
    <groupId>io.springfox</groupId>
    <artifactId>springfox-boot-starter</artifactId>
    <version>3.0.0</version>
</dependency>
設定類
首先我們建立一個控制器TestController類,裡邊只有一個最簡單的請求 /test。
@RestController
public class TestController {

    @RequestMapping("/test")
    public String test(String name) {
        return name;
    }
}
接下來建立設定類SwaggerConfig,類標註@EnableSwagger2註解是關鍵,到這最簡單的Swagger檔案環境就搭建好了。
import org.springframework.context.annotation.Configuration;
import springfox.documentation.swagger2.annotations.EnableSwagger2;

@Configuration
@EnableSwagger2
public class SwaggerConfig {

}
啟動報錯
啟動時可能會報如下的錯誤,這是由於高版本的Springboot與Swagger版本使用的路徑匹配策略衝突導致的。
Springfox使用的路徑匹配規則為AntPathMatcher的,而SpringBoot2.7.6使用的是PathPatternMatcher,兩者衝突了。
org.springframework.context.ApplicationContextException: Failed to start bean 'documentationPluginsBootstrapper'; nested exception is java.lang.NullPointerException
	at org.springframework.context.support.DefaultLifecycleProcessor.doStart(DefaultLifecycleProcessor.java:181) ~[spring-context-5.3.24.jar:5.3.24]
	at org.springframework.context.support.DefaultLifecycleProcessor.access$200(DefaultLifecycleProcessor.java:54) ~[spring-context-5.3.24.jar:5.3.24]
	at org.springframework.context.support.DefaultLifecycleProcessor$LifecycleGroup.start(DefaultLifecycleProcessor.java:356) ~[spring-context-5.3.24.jar:5.3.24]
	at java.lang.Iterable.forEach(Iterable.java:75) ~[na:1.8.0_341]
	at org.springframework.context.support.DefaultLifecycleProcessor.startBeans(DefaultLifecycleProcessor.java:155) ~[spring-context-5.3.24.jar:5.3.24]
	at org.springframework.context.support.DefaultLifecycleProcessor.onRefresh(DefaultLifecycleProcessor.java:123) ~[spring-context-5.3.24.jar:5.3.24]
	at org.springframework.context.support.AbstractApplicationContext.finishRefresh(AbstractApplicationContext.java:935) ~[spring-context-5.3.24.jar:5.3.24]
	at org.springframework.context.support.AbstractApplicationContext.refresh(AbstractApplicationContext.java:586) ~[spring-context-5.3.24.jar:5.3.24]
	at org.springframework.boot.web.servlet.context.ServletWebServerApplicationContext.refresh(ServletWebServerApplicationContext.java:147) ~[spring-boot-2.7.6.jar:2.7.6]
	at org.springframework.boot.SpringApplication.refresh(SpringApplication.java:731) [spring-boot-2.7.6.jar:2.7.6]
	at org.springframework.boot.SpringApplication.refreshContext(SpringApplication.java:408) [spring-boot-2.7.6.jar:2.7.6]
	at org.springframework.boot.SpringApplication.run(SpringApplication.java:307) [spring-boot-2.7.6.jar:2.7.6]
	at org.springframework.boot.SpringApplication.run(SpringApplication.java:1303) [spring-boot-2.7.6.jar:2.7.6]
	at org.springframework.boot.SpringApplication.run(SpringApplication.java:1292) [spring-boot-2.7.6.jar:2.7.6]
	at com.springboot101.SwaggerApplication.main(SwaggerApplication.java:10) [classes/:na]
解決方案
這個錯誤的解決辦法比較多,我整理了四種解決此問題的方案,你看哪個更合適你。
1、降低版本
SpringBoot版本降低到2.5.X 、springfox降到3.X 以下可以解決問題,不過不推薦這麼做,畢竟降設定做相容顯得有點傻。
2、統一路徑匹配策略
將SpringMVC的匹配URL路徑的策略改為ant_path_matcher,application.yml檔案增加如下的設定:
spring:
  mvc:
    pathmatch:
      matching-strategy: ant_path_matcher
3、@EnableWebMvc註解
在設定類SwaggerConfig上標註@EnableWebMvc註解也可以解決。
Swagger框架需要通過解析和掃描帶有註解的Controller類和方法來生成API檔案。@EnableWebMvc註解會註冊一個RequestMappingHandlerMapping的Bean,並將其作為預設的請求對映處理器,以確保這些Controller類和方法能夠被正確處理,可以與Swagger的路徑設定規則相匹配,從而使得Swagger能夠成功生成API檔案。
@EnableWebMvc
@Configuration
@EnableSwagger2
public class SwaggerConfig {

}
4、註冊 BeanPostProcessor
也可以自行實現相容邏輯來解決這個問題,我們可以在Spring容器中註冊一個BeanPostProcessor,在該處理器中對 HandlerMappings 進行客製化。
通過過濾掉已存在PatternParser的對映,意味著我們可以將Swagger特定的HandlerMappings新增到HandlerMappings列表中,從而使用自定義的設定來替代原有的HandlerMappings。
這樣修復了可能導致Swagger無法正常使用的問題。
@Bean
public static BeanPostProcessor springfoxHandlerProviderBeanPostProcessor() {
    return new BeanPostProcessor() {

        @Override
        public Object postProcessAfterInitialization(Object bean, String beanName) throws BeansException {
            if (bean instanceof WebMvcRequestHandlerProvider || bean instanceof WebFluxRequestHandlerProvider) {
                customizeSpringfoxHandlerMappings(getHandlerMappings(bean));
            }
            return bean;
        }

        private <T extends RequestMappingInfoHandlerMapping> void customizeSpringfoxHandlerMappings(List<T> mappings) {
            List<T> copy = mappings.stream()
                    .filter(mapping -> mapping.getPatternParser() == null)
                    .collect(Collectors.toList());
            mappings.clear();
            mappings.addAll(copy);
        }

        @SuppressWarnings("unchecked")
        private List<RequestMappingInfoHandlerMapping> getHandlerMappings(Object bean) {
            try {
                Field field = ReflectionUtils.findField(bean.getClass(), "handlerMappings");
                field.setAccessible(true);
                return (List<RequestMappingInfoHandlerMapping>) field.get(bean);
            } catch (IllegalArgumentException | IllegalAccessException e) {
                log.warn("修改WebMvcRequestHandlerProvider的屬性:handlerMappings出錯,可能導致swagger不可用", e);
                throw new IllegalStateException(e);
            }
        }
    };
}
存取 swagger-ui
到這,問題解決!我們存取Swagger檔案路徑 http://127.0.0.1:9002/swagger-ui/index.html ,能夠看到我們寫的 API 資訊以及一些Swagger 檔案的預設設定資訊。

注意到我們只寫了一個 /test介面,但這裡確把這個方法的所有請求方式都列了出來,因為我們在 controller 方法中使用了@RequestMapping註解,並沒有具體的指定介面的請求方式,所以避免檔案冗餘,儘量指定請求方式或者使用指定請求方式的 @XXXMapping 註解。
指定請求方式後:

API檔案設定
上邊我們存取的檔案中展示的資料都是預設的設定,現在咱們來客製化化一下檔案。
Springfox提供了一個Docket物件,供我們靈活的設定Swagger的各項屬性。Docket物件內提供了很多的方法來設定檔案,下邊介紹下常用的設定項。
select
select()返回一個ApiSelectorBuilder物件,是使用apis()、paths()兩個方法的前提,用於指定Swagger要掃描的介面和路徑。
apis
預設情況下,Swagger會掃描整個專案中的介面,通過 apis()方法,你可以傳入一個RequestHandlerSelector物件範例來指定要包含的介面所在的包路徑。
@Bean
public Docket docket(Environment environment) {
    return new Docket(DocumentationType.SWAGGER_2)
            .select()
            .apis(RequestHandlerSelectors.basePackage("com.springboot101.controller"))
            .build();
}
paths
僅將某些特定請求路徑的API展示在Swagger檔案中,例如路徑中包含/test。可以使用 apis() 和 paths()方法一起來過濾介面。
@Bean
public Docket docket(Environment environment) {
    return new Docket(DocumentationType.SWAGGER_2)
            .select()
            .paths(PathSelectors.ant("/test/**"))
            .build();
}
groupName
為生成的Swagger檔案指定分組的名稱,用來區分不同的檔案組。
@Bean
public Docket docket(Environment environment) {
    return new Docket(DocumentationType.SWAGGER_2)
            .groupName("使用者分組")
            .build();
}

實現檔案的多個分組,則需建立多個 Docket 範例,設定不同的組名,和組內過濾 API 的條件。
@Bean
public Docket docket1(Environment environment) {
    return new Docket(DocumentationType.SWAGGER_2)
            .groupName("商家分組")
            .select()
            .paths(PathSelectors.ant("/test1/**"))
            .build();
}

apiInfo
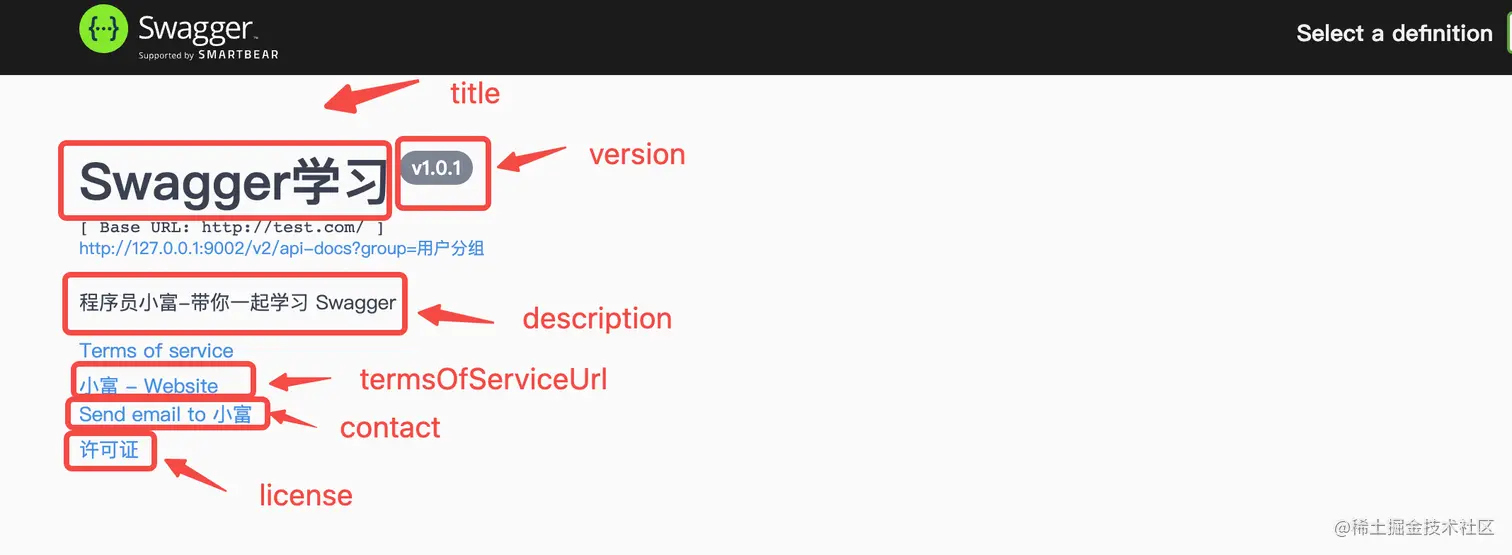
設定API檔案的基本資訊,例如標題、描述、版本等。你可以使用ApiInfo物件自定義資訊。
@Bean
public Docket docket(Environment environment) {
    return new Docket(DocumentationType.SWAGGER_2)
            .apiInfo(apiInfo()); // 檔案基礎設定
}

private ApiInfo apiInfo() {
    Contact contact = new Contact("小富", "http://fire100.top", "[email protected]");
    return new ApiInfoBuilder()
            .title("Swagger學習")
            .description("程式設計師小富-帶你一起學習 Swagger")
            .version("v1.0.1")
            .termsOfServiceUrl("http://fire100.top")
            .contact(contact)
            .license("許可證")
            .licenseUrl("許可連結")
            .extensions(Arrays.asList(
                    new StringVendorExtension("我是", "小富"),
                    new StringVendorExtension("你是", "誰")
            ))
            .build();
}
對應的Swagger檔案頁面上展示的位置

enable
啟用或禁用Swagger檔案的生成,有時測試環境會開放API檔案,但在生產環境則要禁用,可以根據環境變數控制是否顯示。
@Bean
public Docket docket(Environment environment) {
    // 可顯示 swagger 檔案的環境
    Profiles of = Profiles.of("dev", "test","pre");
    boolean enable = environment.acceptsProfiles(of);

    return new Docket(DocumentationType.SWAGGER_2)
            .enable(enable)
            .apiInfo(apiInfo()); // 檔案基礎設定
}
host
API檔案顯示的主機名稱或IP地址,即在測試執行介面時使用的IP或域名。
@Bean
public Docket docket(Environment environment) {
    return new Docket(DocumentationType.SWAGGER_2)
            .host("http://test.com") // 請求地址
            .apiInfo(apiInfo()); // 檔案基礎設定
}
securitySchemes
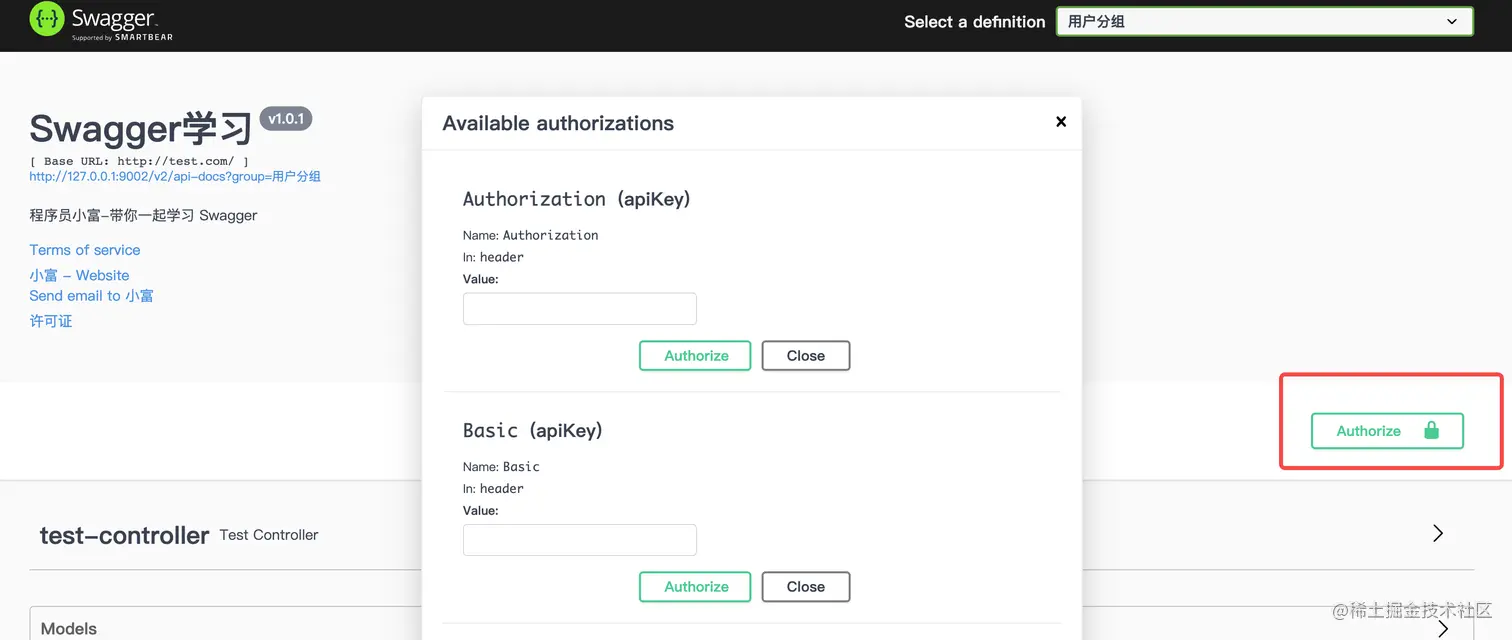
設定API安全認證方式,比如常見的在header中設定如Bearer、Authorization、Basic等鑑權欄位,ApiKey物件中欄位含義分別是別名、鑑權欄位key、鑑權欄位新增的位置。
@Bean
public Docket docket(Environment environment) {
    return new Docket(DocumentationType.SWAGGER_2)
            .securitySchemes(
                    Arrays.asList(
                            new ApiKey("Bearer鑑權", "Bearer", "header"),
                            new ApiKey("Authorization鑑權", "Authorization", "header"),
                            new ApiKey("Basic鑑權", "Basic", "header")
                    )
            );
}
這樣設定後,Swagger檔案將會包含一個Authorize按鈕,供使用者輸入我們設定的Bearer 、Authorization、Basic進行身份驗證。

securityContexts
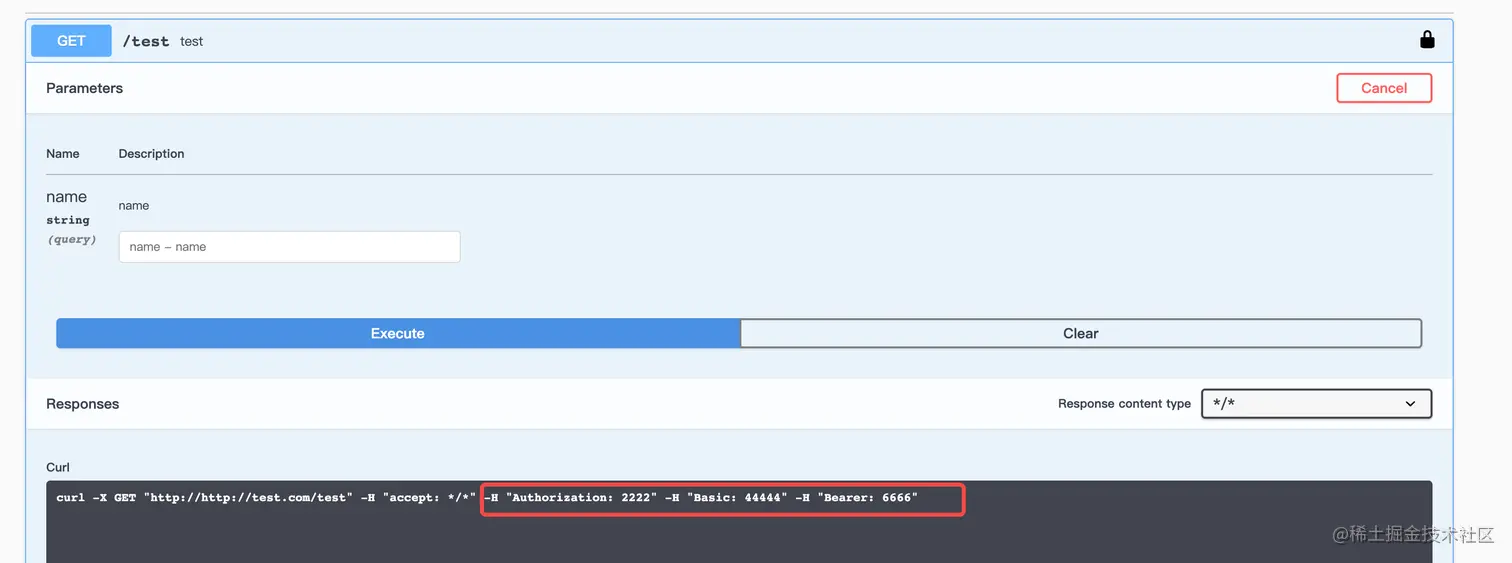
securitySchemes方法中雖然設定了鑑權欄位,但此時在測試介面的時候不會自動在 header中加上鑑權欄位和值,還要設定API的安全上下文,指定哪些介面需要進行安全認證。
@Bean
public Docket docket(Environment environment) {
    return new Docket(DocumentationType.SWAGGER_2)
            .securitySchemes(
                    Arrays.asList(
                            new ApiKey("Bearer鑑權", "Bearer", "header"),
                            new ApiKey("Authorization鑑權", "Authorization", "header"),
                            new ApiKey("Basic鑑權", "Basic", "header")
                    )
            )
            .securityContexts(Collections.singletonList(securityContext()));
}

private SecurityContext securityContext() {
    return SecurityContext.builder()
            .securityReferences(
                    Arrays.asList(
                            new SecurityReference("Authorization", new AuthorizationScope[0]),
                            new SecurityReference("Bearer", new AuthorizationScope[0]),
                            new SecurityReference("Basic", new AuthorizationScope[0])))
            .build();
}
現在在測試呼叫API介面時,header中可以正常加上鑑權欄位和值了。

tags
為API檔案中的介面新增標籤,標籤可以用來對API進行分類或分組,並提供更好的組織和導航功能。
@Bean
public Docket docket(Environment environment) {
    return new Docket(DocumentationType.SWAGGER_2)
            .tags(new Tag("小富介面", "小富相關的測試介面"))
}
授權登入
出於對系統安全性的考慮,通常我們還會為API檔案增加登入功能。
引入maven依賴
swagger的安全登入是基於security實現的,引入相關的maven依賴。
<dependency>
    <groupId>org.springframework.boot</groupId>
    <artifactId>spring-boot-starter-security</artifactId>
</dependency>
登入設定
application.yml檔案中設定登入swagger的使用者名稱和密碼。
spring:
  security:
    user:
      name: admin
      password: 123456
再次存取檔案就會出現如下的登入頁

檔案註解
當我們希望在Swagger檔案中提供詳細和完整的內容時,還可以使用其他許多Swagger內建註解來進一步豐富和客製化API檔案。
@ApiIgnore
上邊我們提到可以根據指定路徑或者包路徑來提供API,也可以使用粒度更細的@ApiIgnore註解,來實現某個API在檔案中忽略。
@ApiIgnore
@GetMapping("/user2/{id}")
public User test2(@PathVariable Integer id, @RequestBody User user) {
    return user;
}
@ApiModel
在我們的介面中,只要使用實體作為引數或響應體,Swagger就會自動掃描到它們,但你會發現目前這些實體缺乏詳細的描述資訊。為了讓使用者通俗易懂,需要使用swagger提供的註解為這些實體新增詳細的描述。

@ApiModel註解的使用在實體類上,提供對Swagger Model額外資訊的描述。

@ApiModelProperty
@ApiModelProperty 註解為實體類中的屬性新增描述,提供了欄位名稱、是否必填、欄位範例等描述資訊。
@ApiModel(value = "使用者實體類", description = "用於存放使用者登入資訊")
@Data
public class User {

    @ApiModelProperty(value = "使用者名稱欄位", required = true, example = "#公眾號:程式設計師小富")
    private String name;

    @ApiModelProperty(value = "年齡", required = true, example = "19")
    private Integer age;

    @ApiModelProperty(value = "郵箱", required = true, example = "#公眾號:程式設計師小富")
    private String email;
}
@Api
@Api 註解用於標記一個控制器(controller)類,並提供介面的詳細資訊和設定項。
value:API 介面的描述資訊,由於版本swagger版本原因,value可能會不生效可以使用descriptionhidden:該 API 是否在 Swagger 檔案中隱藏tags:API 的標籤,如果此處與new Docket().tags中設定的標籤一致,則會將該 API 放入到這個標籤組內authorizations:鑑權設定,配合@AuthorizationScope註解控制許可權範圍或者特定金鑰才能存取該API。produces:API的響應內容型別,例如 application/json。consumes:API的請求內容型別,例如 application/json。protocols:API支援的通訊協定。
@Api(value = "使用者管理介面描述",
        description = "使用者管理介面描述",
        hidden = false,
        produces = "application/json",
        consumes = "application/json",
        protocols = "https",
        tags = {"使用者管理"},
        authorizations = {
                @Authorization(value = "apiKey", scopes = {
                        @AuthorizationScope(scope = "read:user", description = "讀許可權"),
                        @AuthorizationScope(scope = "write:user", description = "寫許可權")
                }),
                @Authorization(value = "basicAuth")
        })
@RestController
public class TestController {

}
@ApiOperation
@ApiOperation該註解作用在介面方法上,用來對一個操作或HTTP方法進行描述。
value:對介面方法的簡單說明notes:對操作的詳細說明。httpMethod:請求方式code:狀態碼,預設為 200。可以傳入符合標準的HTTP Status Code Definitions。hidden:在檔案中隱藏該介面response:返回的物件tags:使用該註解後,該介面方法會單獨進行分組produces:API的響應內容型別,例如 application/json。consumes:API的請求內容型別,例如 application/json。protocols:API支援的通訊協定。authorizations:鑑權設定,配合@AuthorizationScope註解控制許可權範圍或者特定金鑰才能存取該API。responseHeaders:響應的header內容
@ApiOperation(
        value = "獲取使用者資訊",
        notes = "通過使用者ID獲取使用者的詳細資訊",
        hidden = false,
        response = UserDto.class,
        tags = {"使用者管理"},
        produces = "application/json",
        consumes = "application/json",
        protocols = "https",
        authorizations = {
                @Authorization(value = "apiKey", scopes = {@AuthorizationScope(scope = "read:user", description = "讀許可權")}),
                @Authorization(value = "Basic")
        },
        responseHeaders = {@ResponseHeader(name = "X-Custom-Header", description = "Custom header", response = String.class)},
        code = 200,
        httpMethod = "GET"
)
@GetMapping("/user1")
public UserDto user1(@RequestBody User user) {
    return new UserDto();
}
@ApiImplicitParams
@ApiImplicitParams註解用在方法上,以陣列方式儲存,配合@ApiImplicitParam 註解使用。
@ApiImplicitParam
@ApiImplicitParam註解對API方法中的單一引數進行註解。
注意這個註解
@ApiImplicitParam必須被包含在註解@ApiImplicitParams之內。
name:引數名稱value:引數的簡短描述required:是否為必傳引數dataType:引數型別,可以為類名,也可以為基本型別(String,int、boolean等)paramType:引數的傳入(請求)型別,可選的值有 path、query、body、header、form。
@ApiImplicitParams({
        @ApiImplicitParam(name = "使用者名稱", value = "使用者名稱稱資訊", required = true, dataType = "String", paramType = "query")
})
@GetMapping("/user")
public String user(String name) {
    return name;
}
@ApiParam()
@ApiParam()也是對API方法中的單一引數進行註解,其內部屬性和@ApiImplicitParam註解相似。
@GetMapping("/user4")
public String user4(@ApiParam(name = "主鍵ID", value = "@ApiParam註解測試", required = true) String id) {
    return id;
}
@ApiResponses
@ApiResponses註解可用於描述請求的狀態碼,作用在方法上,以陣列方式儲存,配合 @ApiResponse註解使用。
@ApiResponse
@ApiResponse註解描述一種請求的狀態資訊。
code:HTTP請求響應碼。message:響應的文字訊息response:返回型別資訊。responseContainer:如果返回型別為容器型別,可以設定相應的值。有效值為 "List"、 "Set"、"Map"其他任何無效的值都會被忽略。
@ApiResponses(value = {
        @ApiResponse(code = 200, message = "@ApiResponse註解測試通過", response = String.class),
        @ApiResponse(code = 401, message = "可能引數填的有問題", response = String.class),
        @ApiResponse(code = 404, message = "可能請求路徑寫的有問題", response = String.class)
})
@GetMapping("/user4")
public String user4(@ApiParam(name = "主鍵ID", value = "@ApiParam註解測試", required = true) String id) {
    return id;
}
總結
儘管在面試中不會過多考察Swagger這類工具,但作為開發者,養成良好的檔案規範習慣是非常重要的,無論使用Swagger還是其他檔案工具,編寫清晰、詳盡的API檔案都應該是我們的素養之一。
程式碼範例
https://github.com/chengxy-nds/Springboot-Notebook/tree/master/springboot101/通用功能/springboot-swagger