在.NET Framework中使用RocketMQ(阿里雲版)實戰【第一章】
章節
第一章:https://www.cnblogs.com/kimiliucn/p/17662052.html
第二章:
作者:西瓜程式猿
主頁傳送門:https://www.cnblogs.com/kimiliucn/
開發背景
在開發某一個需求的時候,領導要求使用RocketMQ(阿里雲版) 作為訊息佇列。使用的版本是5.x,目前也已經沒有4.x購買的入口了,所以只能買5.x系列。公司專案還是用的比較老的技術.NET Framework 4.8,生產者主要有WebAPI/MVC/JOB(控制檯應用程式),然後消費者採用的是Windows服務進行長連結消費資訊。這期間因為各種原因踩過很多坑,然後諮詢了客服說RocketMQ(阿里雲版)5.0不支援.NET Framework,但最終操作下來竟然能使用(只支援叢集模式,不支援訂閱模式),那今天[西瓜程式猿]來記錄一下如何使用RocketMQ(阿里雲版),給各位小夥伴作為參考防止踩坑。
環境版本
阿里雲RocketMQ版本:5.0系列

.NET版本:.NET Framework 4.8
.NET版本:生產端(WebAPI/MVC/JOB)、消費端(Windows服務)

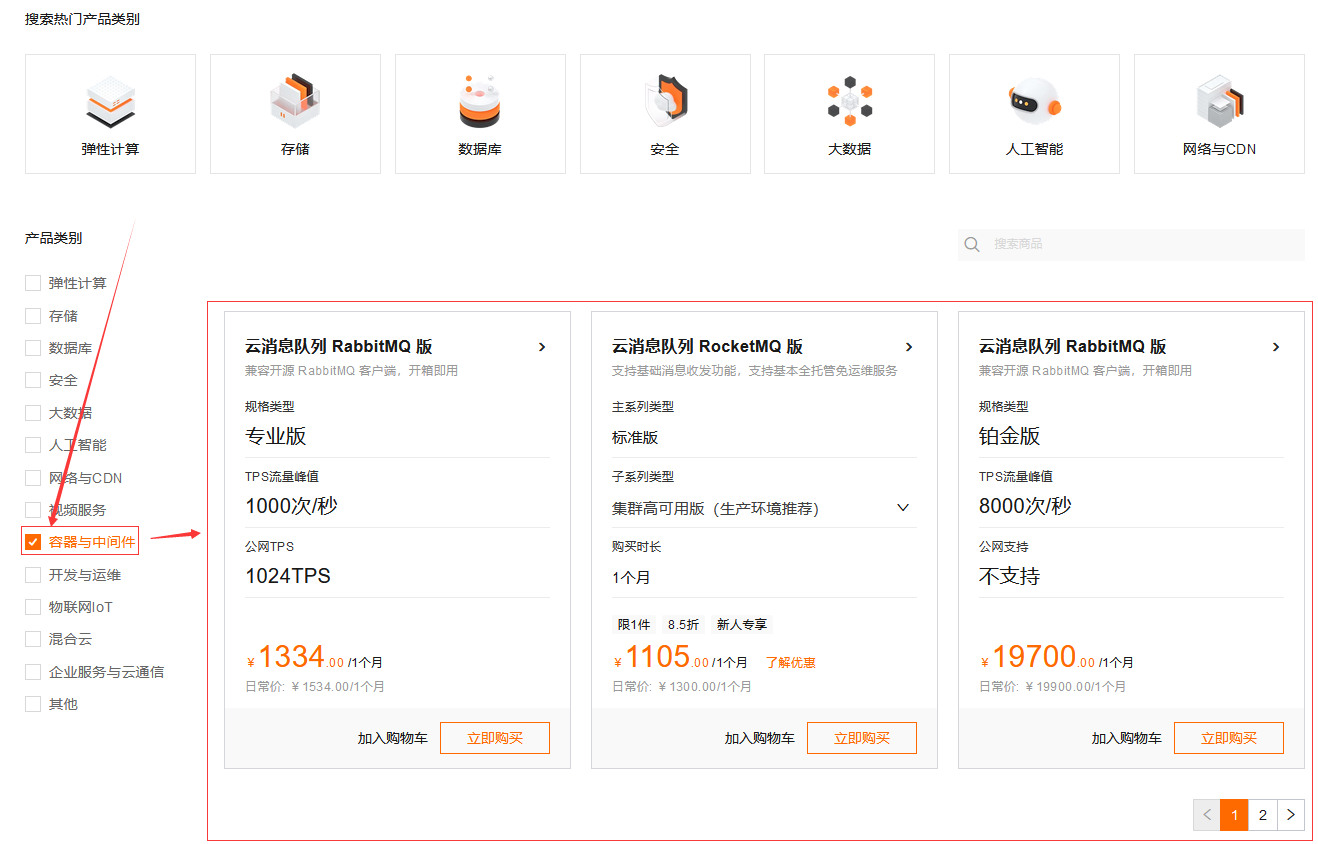
如果不知道怎麼選,或者不知道怎麼買雲訊息佇列RocketMQ(阿里雲版)?可以聯絡我[西瓜程式猿],如果需要特價購買可以通過下面地址存取:
一、RocketMQ基本介紹
官網地址:http://rocketmq.apache.org
RocketMQ阿里雲-官方檔案:https://help.aliyun.com/zh/apsaramq-for-rocketmq/cloud-message-queue-rocketmq-5-x-series/product-overview/basic-concepts?spm=a2c4g.11186623.0.0.513c5b3aztI6tB
1.1-RocketMQ簡介
RocketMQ(Apache RocketMQ)是一個開源的分散式訊息中介軟體系統,由阿里巴巴集團旗下的阿里雲端計算平臺團隊開發和維護。它最初是為滿足阿里巴巴內部大規模分散式訊息傳遞需求而設計的,後來成為 Apache 基金會的頂級開源專案之一。
1.2-RocketMQ優勢
在眾多應用場景中廣泛應用,如電子商務、物流配送、金融支付、巨量資料處理等。它被許多企業用於構建高效能和可靠的訊息佇列系統,實現非同步通訊和解耦應用程式元件。RocketMQ 提供了可靠、可延伸和高效能的訊息傳遞解決方案,具備以下特點:
- 非同步通訊:RocketMQ 支援釋出-訂閱和對等兩種訊息通訊模式,以滿足不同場景下的需求。
- 高可靠性:提供多種儲存選項,包括本地檔案儲存和遠端共用儲存,以確保訊息的可靠傳輸和持久化。
- 高吞吐量:支援水平擴充套件,可以輕鬆應對大規模訊息傳遞和高並行的需求。
- 嚴格有序性:支援訊息按照傳送順序和消費順序進行有序處理,保證訊息的順序性。
- 分散式架構:採用分散式架構,具備良好的橫向擴充套件能力和高可用性。
1.3-RocketMQ基本概念
主題(Topic):雲訊息佇列 RocketMQ 版中訊息傳輸和儲存的頂層容器,用於標識同一類業務邏輯的訊息。主題通過TopicName來做唯一標識和區分。
訊息型別(MessageType):雲訊息佇列 RocketMQ 版中按照訊息傳輸特性的不同而定義的分類,用於型別管理和安全校驗。雲訊息佇列 RocketMQ 版支援的訊息型別有普通訊息、順序訊息、事務訊息和定時/延時訊息。
訊息佇列(MessageQueue):佇列是雲訊息佇列 RocketMQ 版中訊息儲存和傳輸的實際容器,也是訊息的最小儲存單元。雲訊息佇列 RocketMQ 版的所有主題都是由多個佇列組成,以此實現佇列數量的水平拆分和佇列內部的流式儲存。佇列通過QueueId來做唯一標識和區分。
訊息(Message):訊息是雲訊息佇列 RocketMQ 版中的最小資料傳輸單元。生產者將業務資料的負載和拓展屬性包裝成訊息傳送到雲訊息佇列 RocketMQ 版伺服器端,伺服器端按照相關語意將訊息投遞到消費端進行消費。
訊息檢視(MessageView):訊息檢視是雲訊息佇列 RocketMQ 版面向開發視角提供的一種訊息唯讀介面。通過訊息檢視可以讀取訊息內部的多個屬性和負載資訊,但是不能對訊息本身做任何修改。
訊息標籤(MessageTag):訊息標籤是雲訊息佇列 RocketMQ 版提供的細粒度訊息分類屬性,可以在主題層級之下做訊息型別的細分。消費者通過訂閱特定的標籤來實現細粒度過濾。
訊息位點(MessageQueueOffset):訊息是按到達雲訊息佇列 RocketMQ 版伺服器端的先後順序儲存在指定主題的多個佇列中,每條訊息在佇列中都有一個唯一的Long型別座標,這個座標被定義為訊息位點。
消費位點(ConsumerOffset):一條訊息被某個消費者消費完成後不會立即從佇列中刪除,雲訊息佇列 RocketMQ 版會基於每個消費者分組記錄消費過的最新一條訊息的位點,即消費位點。
訊息索引(MessageKey):訊息索引是雲訊息佇列 RocketMQ 版提供的訊息導向的索引屬性。通過設定的訊息索引可以快速查詢到對應的訊息內容。
生產者(Producer):生產者是雲訊息佇列 RocketMQ 版系統中用來構建並傳輸訊息到伺服器端的執行實體。生產者通常被整合在業務系統中,將業務訊息按照要求封裝成雲訊息佇列 RocketMQ 版的訊息並行送至伺服器端。
事務檢查器(TransactionChecker):雲訊息佇列 RocketMQ 版中生產者用來執行本地事務檢查和異常事務恢復的監聽器。事務檢查器應該通過業務側資料的狀態來檢查和判斷事務訊息的狀態。
事務狀態(TransactionResolution):雲訊息佇列 RocketMQ 版中事務訊息傳送過程中,事務提交的狀態標識,伺服器端通過事務狀態控制事務訊息是否應該提交和投遞。事務狀態包括事務提交、事務回滾和事務未決。
消費者分組(ConsumerGroup):消費者分組是雲訊息佇列 RocketMQ 版系統中承載多個消費行為一致的消費者的負載均衡分組。和消費者不同,消費者分組並不是執行實體,而是一個邏輯資源。在雲訊息佇列 RocketMQ 版中,通過消費者分組內初始化多個消費者實現消費效能的水平擴充套件以及高可用容災。
消費者(Consumer):消費者是雲訊息佇列 RocketMQ 版中用來接收並處理訊息的執行實體。消費者通常被整合在業務系統中,從雲訊息佇列 RocketMQ 版伺服器端獲取訊息,並將訊息轉化成業務可理解的資訊,供業務邏輯處理。
消費結果(ConsumeResult):雲訊息佇列 RocketMQ 版中PushConsumer消費監聽器處理訊息完成後返回的處理結果,用來標識本次訊息是否正確處理。消費結果包含消費成功和消費失敗。
訂閱關係(Subscription):訂閱關係是雲訊息佇列 RocketMQ 版系統中消費者獲取訊息、處理訊息的規則和狀態設定。訂閱關係由消費者分組動態註冊到伺服器端系統,並在後續的訊息傳輸中按照訂閱關係定義的過濾規則進行訊息匹配和消費進度維護。
訊息過濾:消費者可以通過訂閱指定訊息標籤(Tag)對訊息進行過濾,確保最終只接收被過濾後的訊息合集。過濾規則的計算和匹配在雲訊息佇列 RocketMQ 版的伺服器端完成。
重置消費位點:以時間軸為座標,在訊息持久化儲存的時間範圍內,重新設定消費者分組對已訂閱主題的消費進度,設定完成後消費者將接收設定時間點之後,由生產者傳送到雲訊息佇列 RocketMQ 版伺服器端的訊息。
訊息軌跡:在一條訊息從生產者發出到消費者接收並處理過程中,由各個相關節點的時間、地點等資料匯聚而成的完整鏈路資訊。通過訊息軌跡,您能清晰定位訊息從生產者發出,經由雲訊息佇列 RocketMQ 版伺服器端,投遞給消費者的完整鏈路,方便定位排查問題。
訊息堆積:生產者已經將訊息傳送到雲訊息佇列 RocketMQ 版的伺服器端,但由於消費者的消費能力有限,未能在短時間內將所有訊息正確消費掉,此時在雲訊息佇列 RocketMQ 版的伺服器端儲存著未被消費的訊息,該狀態即訊息堆積。
事務訊息:事務訊息是雲訊息佇列 RocketMQ 版提供的一種高階訊息型別,支援在分散式場景下保障訊息生產和本地事務的最終一致性。
定時/延時訊息:定時/延時訊息是雲訊息佇列 RocketMQ 版提供的一種高階訊息型別,訊息被傳送至伺服器端後,在指定時間後才能被消費者消費。通過設定一定的定時時間可以實現分散式場景的延時排程觸發效果。
順序訊息:順序訊息是雲訊息佇列 RocketMQ 版提供的一種高階訊息型別,支援消費者按照傳送訊息的先後順序獲取訊息,從而實現業務場景中的順序處理。
二、RocketMQ前期準備
首先需要下載相關.NET相關的SDK,然後在阿里雲後臺找到【範例使用者名稱】【範例密碼】【接入點連結資訊】等資訊,最後還需要建立【Group ID】和【Topic】用於給我們呼叫。
2.1-下載資源包及SDK
[西瓜程式猿]給正在看這篇文章的小夥伴提供了資源包,【ONSClient4CPP】資料夾裡面包含使用RocketMQ阿里雲版本要依賴的DLL檔案,【RocketMQ_SDK】資料夾包含了.NET Framework使用RocketMQ阿里雲版本要用到的SDK檔案,【vcredistx64】資料夾包含了Visual C++ 2015執行時環境安裝包,因為C++ DLL檔案需要依賴這個,這個需要進行安裝。還包含其他輔助的工具及程式碼。
可以存取下載(如果失效了,請聯絡我)。
下載地址(編碼:stalua6n):https://yongteng.lanzoub.com/ice5a16p978h
密碼:1q81
檔案截圖: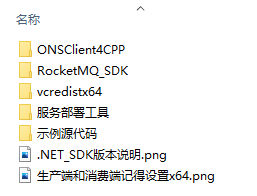
2.2-查詢基本設定資訊
(1)首先點選下面連結進入訊息佇列RocketMQ工作臺,如果沒有登入首先要進行登入。然後在【資源分佈】裡面找到要操作的地域列表,點選【地域名稱】。
訊息佇列RocketMQ(阿里雲版):https://ons.console.aliyun.com/overview

(2)然後可以看到範例列表,找到要操作的範例,點選【詳情】。
(3)然後在【執行資訊】中找到【範例使用者名稱】和【範例密碼】,注意不是範例ID/範例名稱。
(4)然後還在當前頁面,往下翻到【TCP 協定接入點】中找到接入點和網路資訊。如果大家需要在外網存取自行開通公網存取,好像需要另外付費。[西瓜程式猿]這邊只能通過【VPC專有網路】存取,也就是隻能在內網存取。所以我以VPC專有網路來介紹。
那我們就把必要的資訊都集齊全了,分別是【範例使用者名稱】【範例密碼】【TCP 協定接入點連線】。
2.3-設定Topic和Group
那什麼是Topic呢?雲訊息佇列 RocketMQ 版中訊息傳輸和儲存的頂層容器,用於標識同一類業務邏輯的訊息。主題通過TopicName來做唯一標識和區分。可以理解為不同的系統、不同的釋出環境設定不同的Topic。然後來說一下如何配Topic和GroupID。
(1)在左側導航欄找到【Topic管理】,然後點選【建立Topic】。名稱和描述都是必填的,訊息型別根據自己業務場景選擇。[西瓜程式猿]這邊要求訊息按照順序傳送和消費,所以選擇【順序訊息】。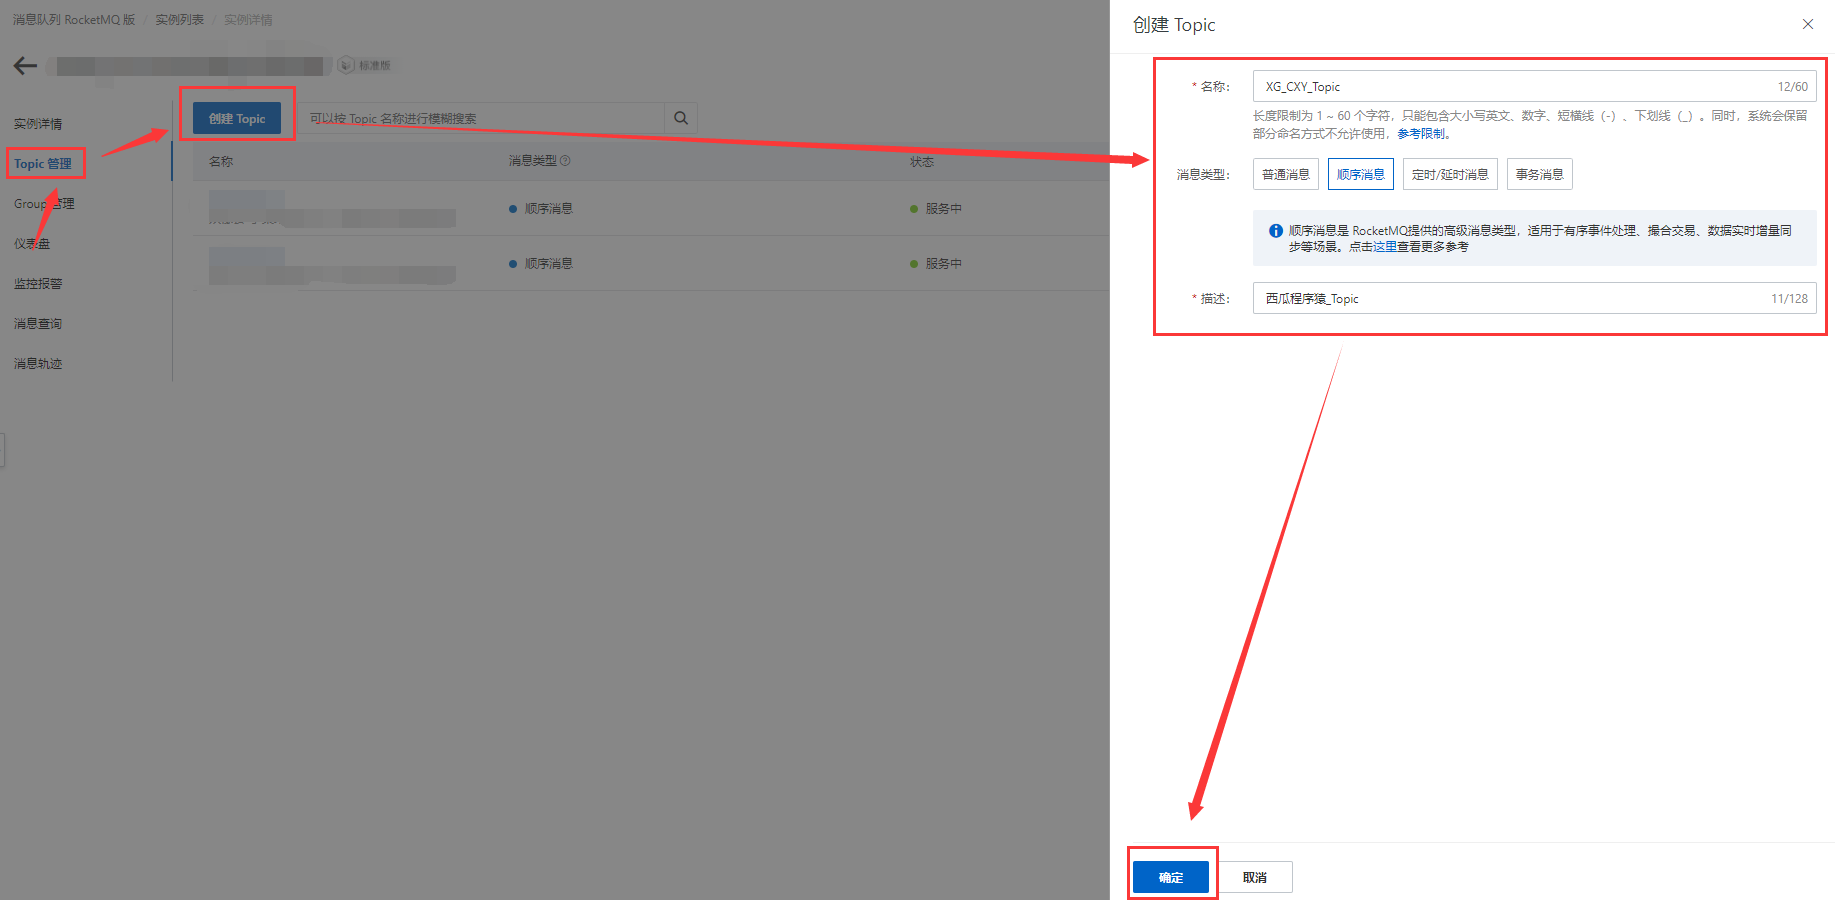
(2)然後再來建立GroupID。一個 Group ID 代表一個 Consumer 範例群組。同一個消費者 Group ID 下所有的 Consumer 範例必須保證訂閱的 Topic 一致,並且也必須保證訂閱 Topic 時設定的過濾規則(Tag)一致。否則您的訊息可能會丟失。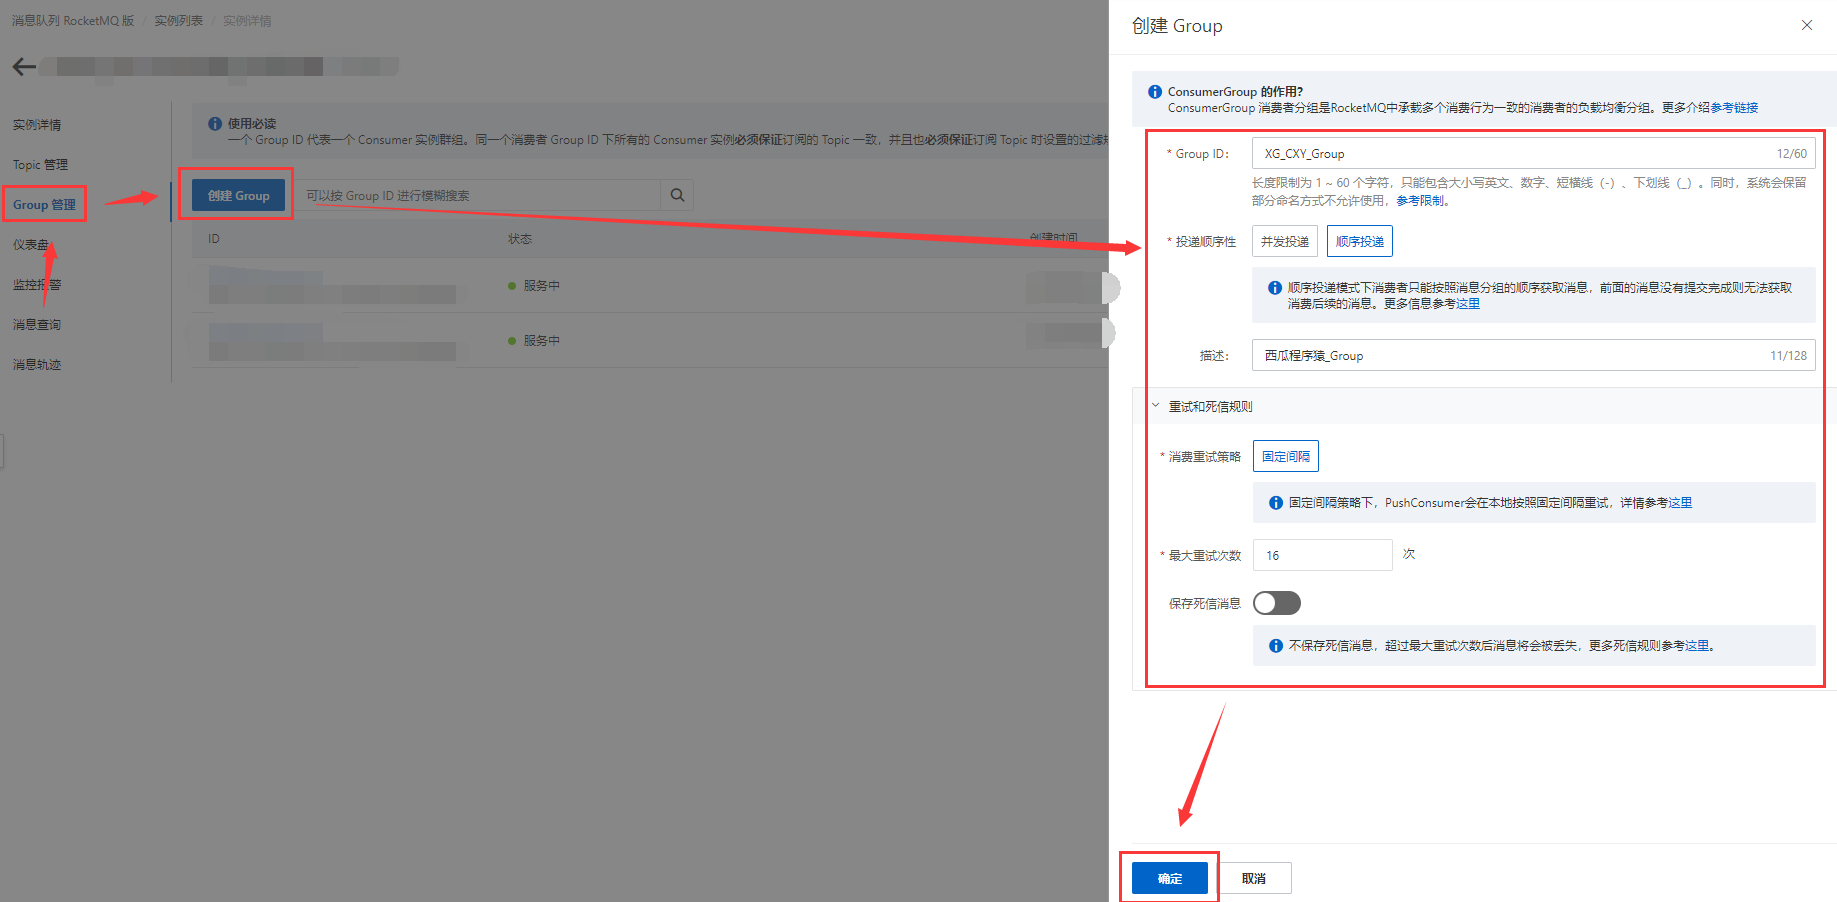
那我們就把必要的資源都建立好了,分別是【Topic名稱】【GroupID】。
Topic名稱:
GroupID:
二、RockeetMQ核心部分封裝
2.1-建立類庫專案
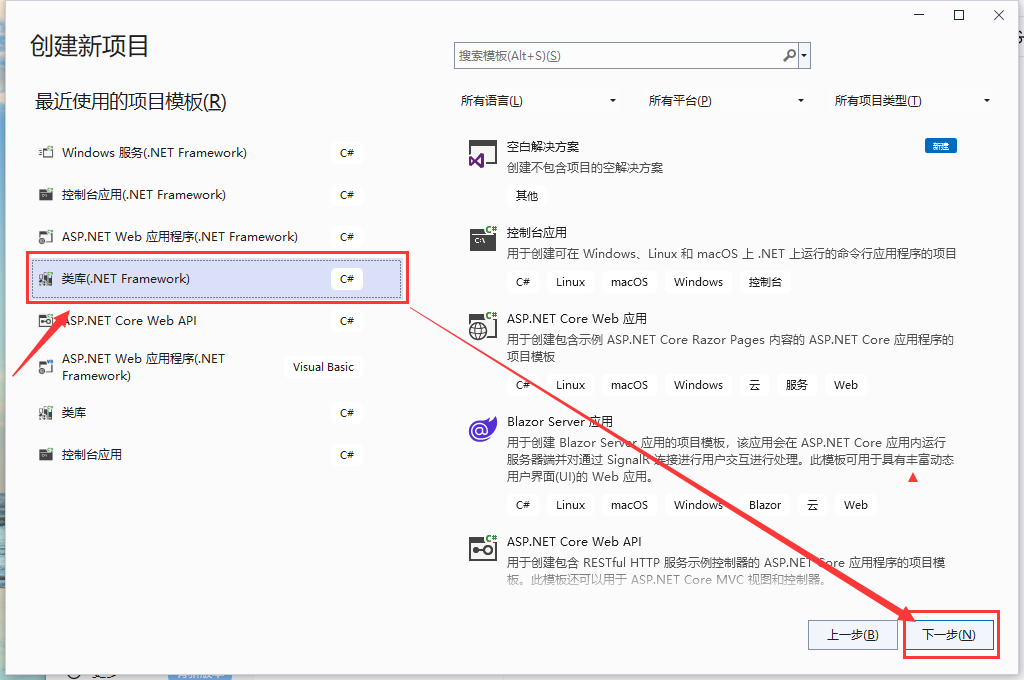
(1)點選【建立新專案】,然後選擇【類庫(.NET Framework)】。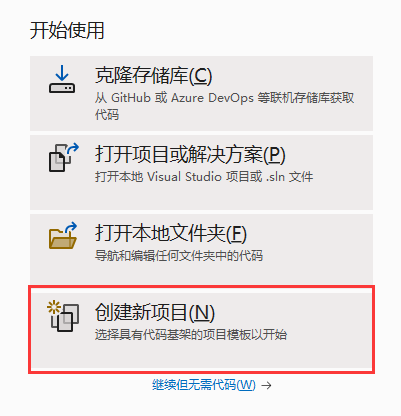
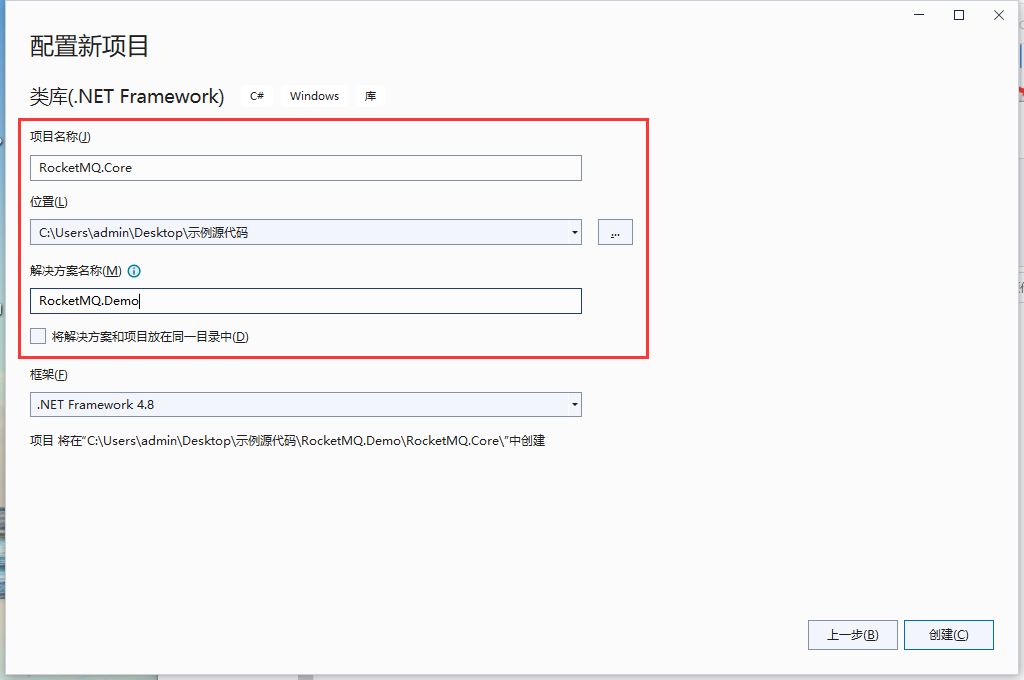
目錄: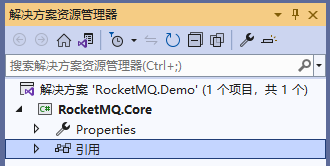
(2)然後新建一個【SDK】資料夾,將下載好的資源包裡面資料夾【RocketMQ_SDK】的檔案,複製到專案中【SDK】資料夾裡面。
資源包: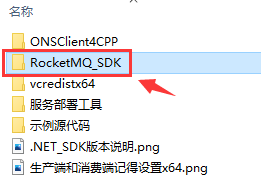
專案: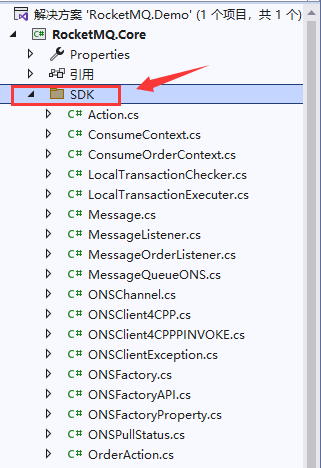
(3)然後就安裝相關的包,分別是【log4net】用來記錄紀錄檔,【Newtonsoft.Json】用來做JSON序列化和反序列化。(如果自己專案中有紀錄檔系統和反序列化工具,也可以不安裝,根據自己專案依賴公共輔助層去使用)
(4)建立了一個【Helper】資料夾寫一個JSON反序列化的幫助類(根據自己業務需要建立)。
目錄: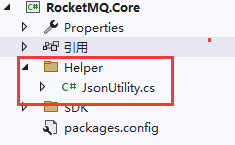
程式碼;
 public class JsonUtility
    {
        /// <summary>
        /// 將實體類序列化為JSON
        /// </summary>
        /// <typeparam name="T"></typeparam>
        /// <param name="data"></param>
        /// <returns></returns>
        static public string SerializeJSON<T>(T data)
        {
            return Newtonsoft.Json.JsonConvert.SerializeObject(data);
        }

        /// <summary>
        /// 反序列化JSON
        /// </summary>
        /// <typeparam name="T"></typeparam>
        /// <param name="json"></param>
        /// <returns></returns>
        static public T DeserializeJSON<T>(string json)
        {
            return Newtonsoft.Json.JsonConvert.DeserializeObject<T>(json);
        }

        /// <summary>
        /// 將IEnumerable<T,V>序列化為JSON
        /// </summary>
        /// <param name="value"></param>
        /// <returns></returns>
        static public string SerializeDictionary(IEnumerable<KeyValuePair<string, string>> value)
        {
            return Newtonsoft.Json.JsonConvert.SerializeObject(value.Select(I => new { label = I.Key, value = I.Value }));
        }
    }
(5)然後在建立一個【Attributes】資料夾。在裡面新建兩個Attribute特性,一個【ConsumerTagAttribute】用來區分Tag標籤,另一個【EventTypeAttribute】用來區分事件型別。
目錄: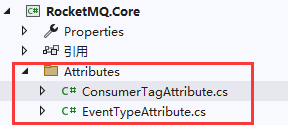
程式碼:
    /// <summary>
    /// Tag標籤
    /// </summary>
    public class ConsumerTagAttribute : Attribute
    {
        public string Tag { get; set; }

        public ConsumerTagAttribute(string tag)
        {
            Tag = tag;
        }
    }


  /// <summary>
    /// 事件型別
    /// </summary>
    public class EventTypeAttribute : Attribute
    {
        public string EventType { get; set; }

        public EventTypeAttribute(string eventType)
        {
            EventType = eventType;
        }
    }
2.2-封裝傳輸實體模型
然後我們需要設計生產者和消費者直接需要傳輸共同的訊息時哪些。
目前想到的(如果有好的建議可以在評論區討論哈):
MessageId:訊息id
Tag:對應RocketMQ中Tag
SendTime:傳送時間
Source:訊息來源
EventType:事件型別
Body:訊息體
目錄: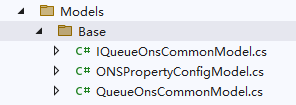
(1)建立一個【Models】資料夾,用來存相關的實體。然後建立【IQueueOnsCommonModel】生產者/消費者公共模型介面,然後建立【QueueOnsCommonModel】檔案實現IQueueOnsCommonModel介面。
IQueueOnsCommonModel:
/// <summary>
    /// 生產者/消費者公共模型介面
    /// </summary>
    public interface IQueueOnsCommonModel
    {
        /// <summary>
        /// 訊息id
        /// </summary>
        string MessageId { get; set; }

        /// <summary>
        /// 對應RocketMQ中Tag
        /// </summary>
        string Tag { get; set; }

        /// <summary>
        /// 傳送時間
        /// </summary>
        DateTime SendTime { get; set; }

        /// <summary>
        /// 訊息來源
        /// </summary>
        string Source { get; set; }

        /// <summary>
        /// 事件型別
        /// </summary>
        string EventType { get; set; }

        /// <summary>
        /// 訊息體
        /// </summary>
        string Body { get; set; }
    }
QueueOnsCommonModel:
/// <summary>
    /// 生產者/消費者公共模型實現
    /// </summary>
    public class QueueOnsCommonModel : IQueueOnsCommonModel
    {
        /// <summary>
        /// 訊息id
        /// </summary>
        public string MessageId { get; set; }

        /// <summary>
        /// 對應RocketMQ中Tag
        /// </summary>
        public string Tag { get; set; }

        /// <summary>
        /// 傳送時間
        /// </summary>
        public DateTime SendTime { get; set; }

        /// <summary>
        /// 訊息來源
        /// </summary>
        public string Source { get; set; }

        /// <summary>
        /// 事件型別
        /// </summary>
        public string EventType { get; set; }

        /// <summary>
        /// 訊息體
        /// </summary>
        public string Body { get; set; }
    }
(2)建立一個【ONSPropertyConfigModel】檔案,用來做組態檔的實體。
      /// <summary>
    /// RocketMQ設定屬性
    /// </summary>
    public class ONSPropertyConfigModel
    {
        /// <summary>
        /// 設定為雲訊息佇列 RocketMQ 版控制檯範例詳情頁的範例使用者名稱。
        /// </summary>
        public string AccessKey { get; set; }

        /// <summary>
        /// 設定為雲訊息佇列 RocketMQ 版控制檯範例詳情頁的範例密碼。
        /// </summary>
        public string SecretKey { get; set; }

        /// <summary>
        /// 設定為您在雲訊息佇列 RocketMQ 版控制檯建立的Group ID。
        /// </summary>
        public string GroupId { get; set; }

        /// <summary>
        /// 您在雲訊息佇列 RocketMQ 版控制檯建立的Topic。
        /// </summary>
        public string Topics { get; set; }

        /// <summary>
        /// 設定為您從雲訊息佇列 RocketMQ 版控制檯獲取的接入點資訊,類似「rmq-cn-XXXX.rmq.aliyuncs.com:8080」
        /// </summary>
        public string NAMESRV_ADDR { get; set; }

        /// <summary>
        /// 消費者/生產者目標來源
        /// </summary>
        public string OnsClientCode { get; set; }
    }
(3)然後建立一個【QueueTagConsts】檔案,用來訂單訊息佇列Tag常數,和一個【QueueOnsEventType】檔案,用來定義事件型別。
目錄: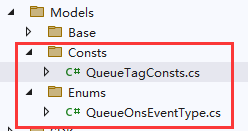
QueueTagConsts:
 /// <summary>
    /// 訊息佇列Tag常數定義
    /// 命名規範:專案名_自定義業務名_Tag
    /// </summary>
    public class QueueTagConsts
    {
        /// <summary>
        /// 測試Sample
        /// </summary>
        public const string XG_Blog_Sample_Tag = "XG_Blog_Sample_Tag";
    }
QueueOnsEventType:
    /// <summary>
    /// 訊息佇列-事件型別
    /// </summary>
    public class QueueOnsEventType
    {
        /// <summary>
        /// RocketMQ測試
        /// </summary>
        public const string RocketMQ_TEST = "RocketMQ_TEST";
    }
2.3-封裝連線RocketMQ
建立一個【Core】資料夾,然後建立一個【IConsumerMsg】消費介面,和一個【QueueOnsProducer】檔案用來封裝RocketMQ生產者連線。
目錄: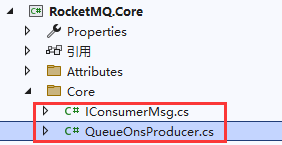
IConsumerMsg:
 /// <summary>
    /// 消費介面
    /// </summary>
    public interface IConsumerMsg
    {
        void Consume(QueueOnsCommonModel model);
    }
QueueOnsProducer:
 /// <summary>
    /// 訊息佇列-RocketMQ生產者
    /// </summary>
    public class QueueOnsProducer
    {
        private static Producer _producer;
        private static PushConsumer _consumer;
        private readonly static ILog logger = LogManager.GetLogger(typeof(QueueOnsProducer));
        private static string Ons_Topic = "";
        private static string Ons_AccessKey = "";
        private static string Ons_SecretKey = "";
        private static string Ons_GroupId = "";
        private static string Ons_NameSrv = "";
        private static int Ons_ConsumptionPattern = 1;
        private static string Ons_Client_Code = "Test_RocketMQ_Producer";
        private const string Ons_LogPath = "C://rocket_mq_logs";

        public static string getOnsTopic
        {
            get
            {
                return Ons_Topic;
            }
        }

        public static string getOnsClientCode
        {
            get
            {
                return Ons_Client_Code;
            }
        }

        private static ONSFactoryProperty getFactoryPropertyProducer()
        {
            ONSFactoryProperty factoryInfo = new ONSFactoryProperty();
            factoryInfo.setFactoryProperty(ONSFactoryProperty.AccessKey, Ons_AccessKey);
            factoryInfo.setFactoryProperty(ONSFactoryProperty.SecretKey, Ons_SecretKey);
            factoryInfo.setFactoryProperty(ONSFactoryProperty.ConsumerId, Ons_GroupId);
            factoryInfo.setFactoryProperty(ONSFactoryProperty.ProducerId, Ons_GroupId);
            factoryInfo.setFactoryProperty(ONSFactoryProperty.PublishTopics, Ons_Topic);
            factoryInfo.setFactoryProperty(ONSFactoryProperty.NAMESRV_ADDR, Ons_NameSrv);
            factoryInfo.setFactoryProperty(ONSFactoryProperty.LogPath, Ons_LogPath);
            return factoryInfo;
        }

        private static ONSFactoryProperty getFactoryPropertyConsumer()
        {
            ONSFactoryProperty factoryInfo = new ONSFactoryProperty();
            factoryInfo.setFactoryProperty(ONSFactoryProperty.AccessKey, Ons_AccessKey);
            factoryInfo.setFactoryProperty(ONSFactoryProperty.SecretKey, Ons_SecretKey);
            factoryInfo.setFactoryProperty(ONSFactoryProperty.ConsumerId, Ons_GroupId);
            factoryInfo.setFactoryProperty(ONSFactoryProperty.PublishTopics, Ons_Topic);
            factoryInfo.setFactoryProperty(ONSFactoryProperty.NAMESRV_ADDR, Ons_NameSrv);
            factoryInfo.setFactoryProperty(ONSFactoryProperty.LogPath, Ons_LogPath);
            //消費模式(1:叢集消費、2:廣播消費)
            if (Ons_ConsumptionPattern == 1)
            {
                factoryInfo.setFactoryProperty(ONSFactoryProperty.MessageModel, ONSFactoryProperty.CLUSTERING);
            }
            else if (Ons_ConsumptionPattern == 2)
            {
                factoryInfo.setFactoryProperty(ONSFactoryProperty.MessageModel, ONSFactoryProperty.BROADCASTING);
            }
            return factoryInfo;
        }

        public static void CreateProducer(ONSPropertyConfigModel config)
        {
            if (config == null) { throw new ArgumentNullException("config is null"); }
            if (string.IsNullOrEmpty(config.AccessKey)) { throw new ArgumentNullException("AccessKey is null"); }
            if (string.IsNullOrEmpty(config.SecretKey)) { throw new ArgumentNullException("SecretKey is null"); }
            if (string.IsNullOrEmpty(config.GroupId)) { throw new ArgumentNullException("GroupId is null"); }
            if (string.IsNullOrEmpty(config.Topics)) { throw new ArgumentNullException("Topics is null"); }
            if (string.IsNullOrEmpty(config.NAMESRV_ADDR)) { throw new ArgumentNullException("NAMESRV_ADDR is null"); }
            if (string.IsNullOrEmpty(config.OnsClientCode)) { throw new ArgumentNullException("OnsClientCode is null"); }

            Ons_AccessKey = config.AccessKey;
            Ons_SecretKey = config.SecretKey;
            Ons_GroupId = config.GroupId;
            Ons_Topic = config.Topics;
            Ons_NameSrv = config.NAMESRV_ADDR;
            Ons_Client_Code = config.OnsClientCode;
            _producer = ONSFactory.getInstance().createProducer(getFactoryPropertyProducer());
        }

        public static void StartProducer()
        {
            if (_producer != null)
            {
                _producer.start();
                string msg = $"【{Ons_Topic}】-【{Ons_Client_Code}】:[{DateTime.Now}]生產者 啟動 成功!";
                logger.Info(msg);
            }
            else
            {
                throw new ArgumentNullException("_producer is null,請先執行[CreateProducer]建立生產者後啟動");
            }
        }

        public static void ShutdownProducer()
        {
            if (_producer != null)
            {
                _producer.shutdown();
                string msg = $"【{Ons_Topic}】-【{Ons_Client_Code}】:[{DateTime.Now}]生產者 已關閉連線!";
                logger.Info(msg);
            }
        }

        public static string SendMessage(QueueOnsCommonModel model, string tag = "RegisterLog")
        {
            if (model == null) { throw new ArgumentNullException("model is null"); }

            model.SendTime = DateTime.Now;
            model.Source = Ons_Client_Code;
            var send_str = JsonUtility.SerializeJSON(model);
            byte[] bytes = Encoding.UTF8.GetBytes(send_str);
            string str_new_msg = Encoding.Default.GetString(bytes);
            logger.Info("【傳送佇列訊息】訊息內容:" + str_new_msg);

            string msg_key = model.MessageId;
            string msg_id = string.Empty;
            Message msg = new Message(Ons_Topic, tag, str_new_msg);
            msg.setKey(msg_key);
            try
            {
                SendResultONS sendResult = _producer.send(msg);
                msg_id = sendResult.getMessageId();
                logger.Info("【傳送佇列訊息】訊息ID:" + msg_id);
            }
            catch (Exception ex)
            {
                logger.Error($"【傳送佇列訊息】發生異常了:{ex.Message}", ex);
                throw ex;
            }
            return msg_id;
        }

        public static void CreatePushConsumer(ONSPropertyConfigModel config)
        {
            if (config == null) { throw new ArgumentNullException("config is null"); }
            if (string.IsNullOrEmpty(config.AccessKey)) { throw new ArgumentNullException("AccessKey is null"); }
            if (string.IsNullOrEmpty(config.SecretKey)) { throw new ArgumentNullException("SecretKey is null"); }
            if (string.IsNullOrEmpty(config.GroupId)) { throw new ArgumentNullException("GroupId is null"); }
            if (string.IsNullOrEmpty(config.Topics)) { throw new ArgumentNullException("Topics is null"); }
            if (string.IsNullOrEmpty(config.NAMESRV_ADDR)) { throw new ArgumentNullException("NAMESRV_ADDR is null"); }
            if (string.IsNullOrEmpty(config.OnsClientCode)) { throw new ArgumentNullException("OnsClientCode is null"); }

            // 叢集消費。
            Ons_ConsumptionPattern = 1;
            // 廣播消費。
            //Ons_ConsumptionPattern = 2;

            Ons_AccessKey = config.AccessKey;
            Ons_SecretKey = config.SecretKey;
            Ons_GroupId = config.GroupId;
            Ons_Topic = config.Topics;
            Ons_NameSrv = config.NAMESRV_ADDR;
            Ons_Client_Code = config.OnsClientCode;
            _consumer = ONSFactory.getInstance().createPushConsumer(getFactoryPropertyConsumer());
        }

        public static void SetPushConsumer(MessageListener listener, string subExpression = "*")
        {
            _consumer.subscribe(Ons_Topic, subExpression, listener);
        }

        public static void StartPushConsumer()
        {
            _consumer.start();
            string msg = $"【{Ons_Topic}】-【{Ons_Client_Code}】:[{DateTime.Now}]消費者 啟動 成功!";
            logger.Info(msg);
        }

        public static void ShutdownPushConsumer()
        {
            if (_consumer != null)
            {
                _consumer.shutdown();
                string msg = $"【{Ons_Topic}】-【{Ons_Client_Code}】:[{DateTime.Now}]消費者 已關閉連線!";
                logger.Info(msg);
            }
        }
    }
三、生產端實現
3.1-建立生產者
3.1.1-建立MVC專案
(1)然後建立一個生產者,可以建立WebAPI/MVC/JOB(控制檯應用程式)等等,那[西瓜程式猿]以MVC專案作為例子來介紹一下,建立一個名為【RocketMQ.Producer】專案。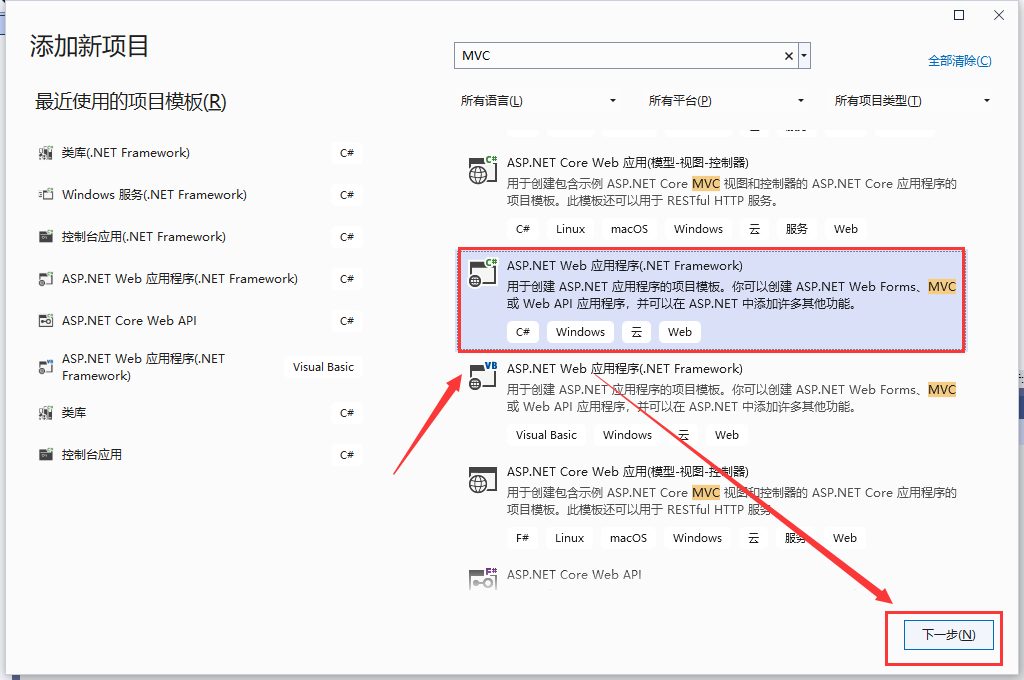
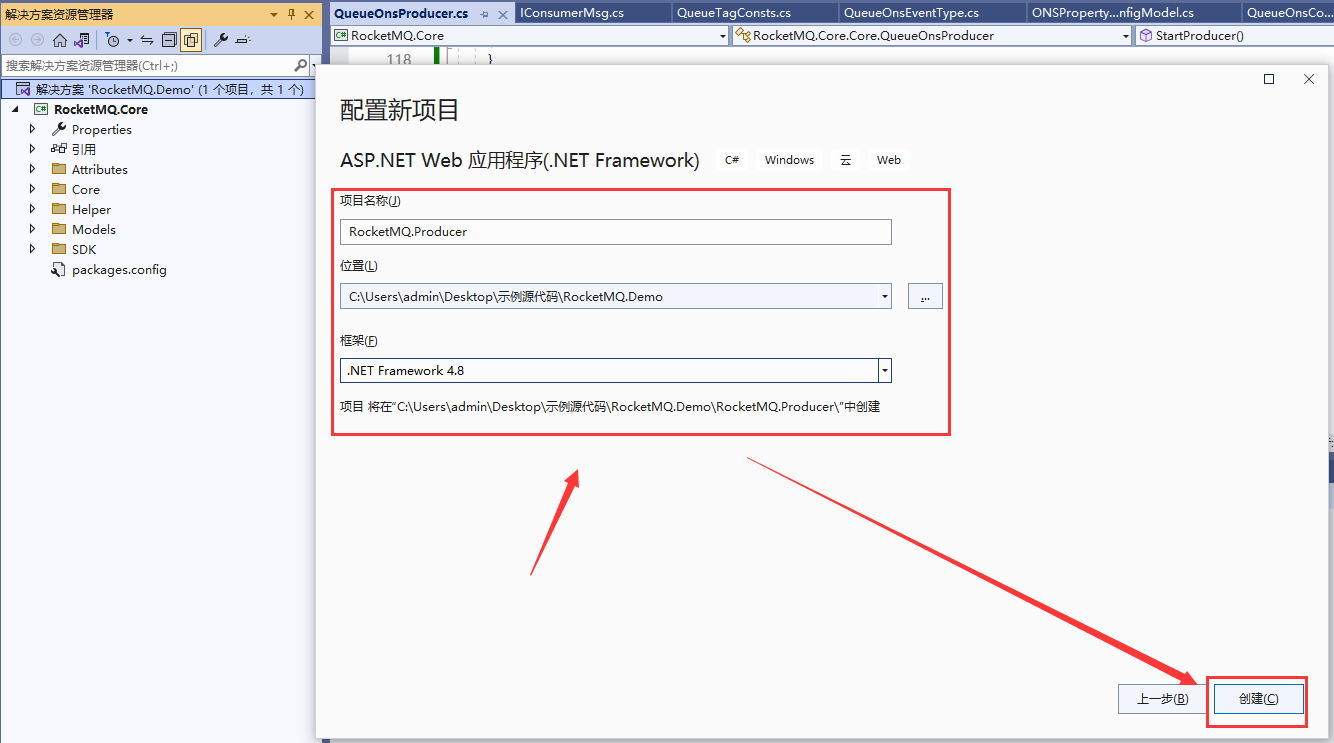
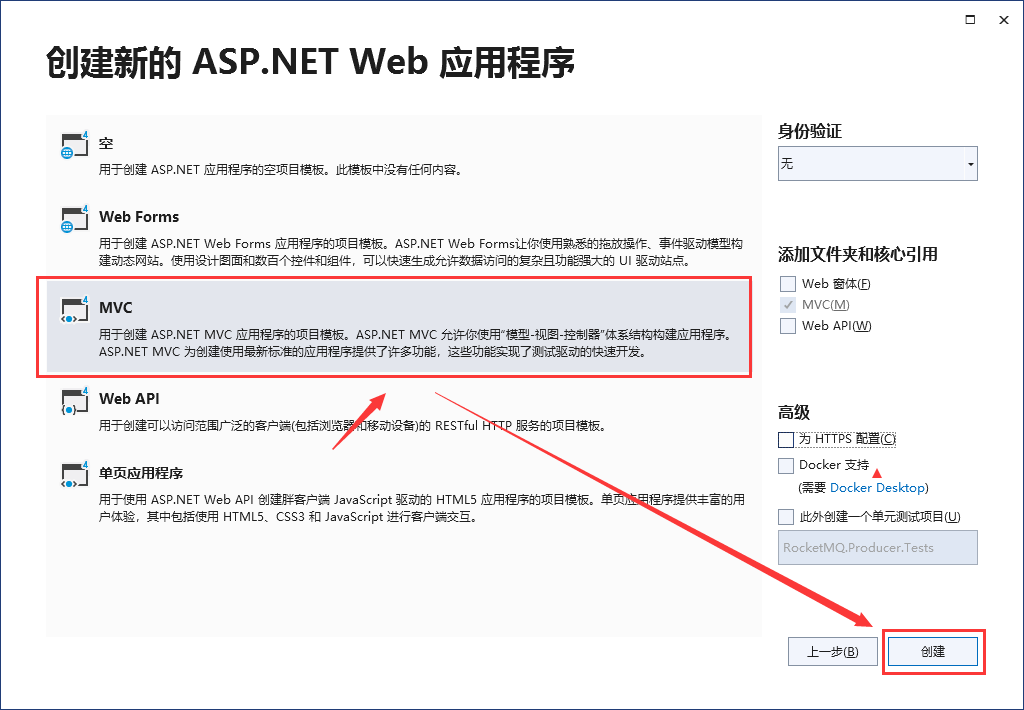
執行測試一下: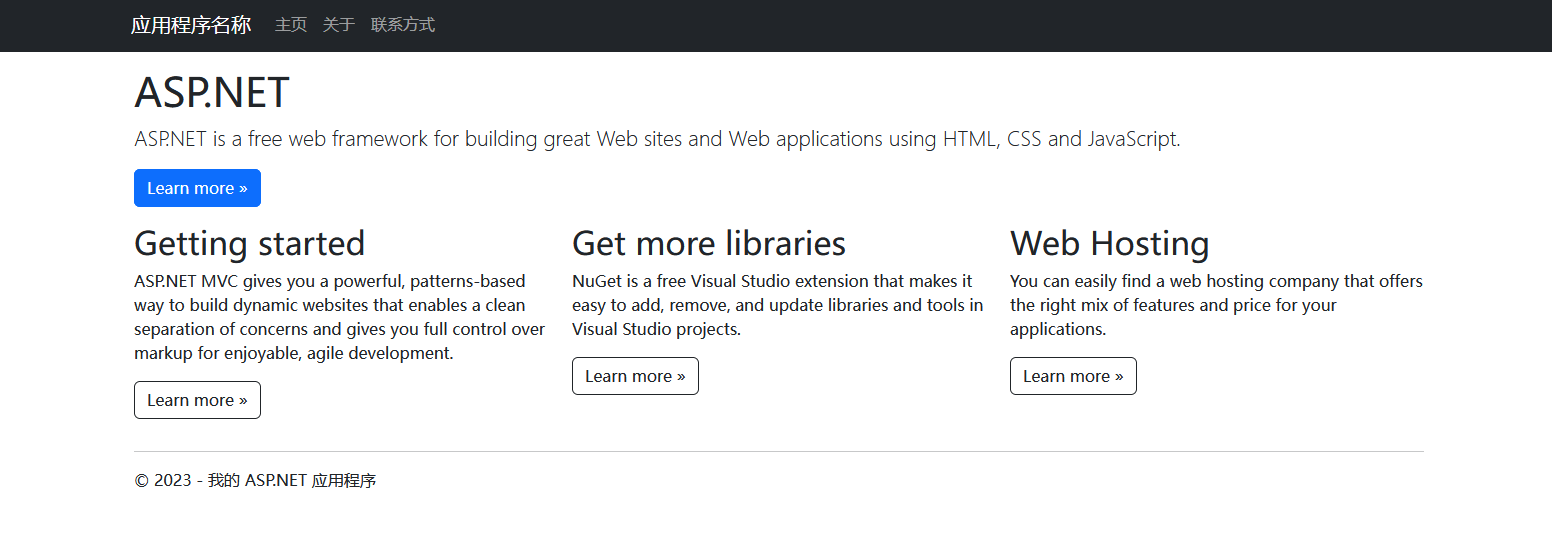
3.1.2-專案依賴設定
阿里雲提供的.NET版本是基於雲訊息佇列 RocketMQ 版的CPP版本的託管封裝,這樣能保證.NET完全不依賴於Windows.NET公共庫。內部採用C++多執行緒並行處理,保證.NET版本的高效穩定。
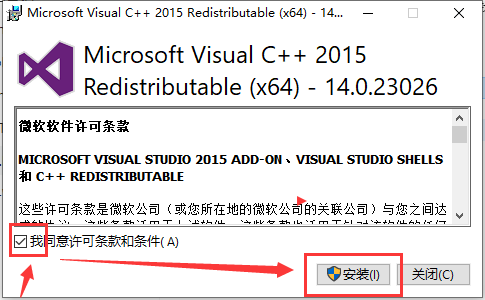
(1)底層的C++ DLL相關檔案,以及Visual C++ 2015執行時環境安裝包。如果沒有安裝Visual Studio 2015執行時環境,需要在資源包找到【vc_redist.x64.exe】檔案進行安裝。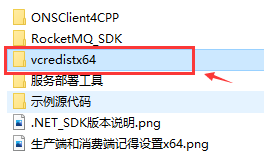
(2)在使用Visual Studio(VS)開發.NET的應用程式和類庫時,預設的目標平臺為「Any CPU」。但是.NET SDK僅支援Windows 64-bit作業系統,所以需要自行設定。先右擊【RocketMQ.Producer】專案,然後點選【屬性】。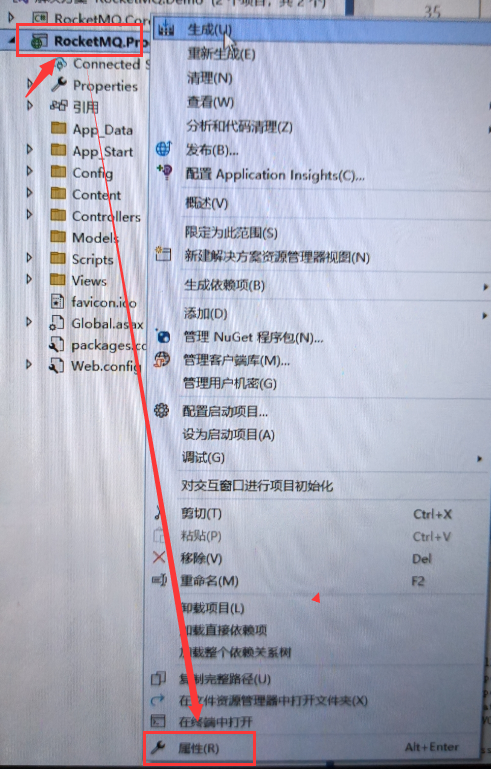
(3)點選左側選項的【生成】,然後將目標平臺改為【x64】。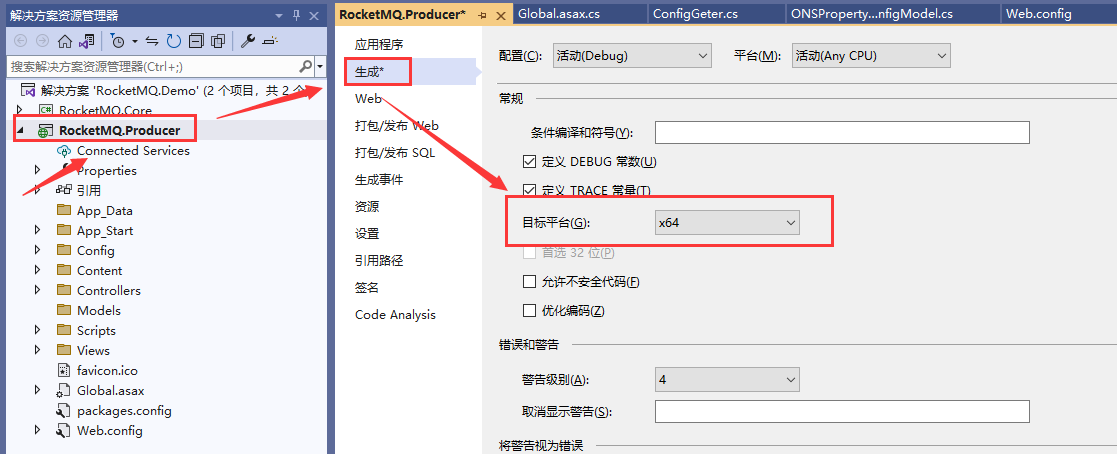
(4)將資源包【ONSClient4CPP】資料夾裡面所有的檔案,複製到【bin】目錄下。
資源包: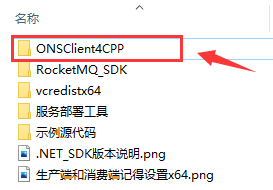
專案: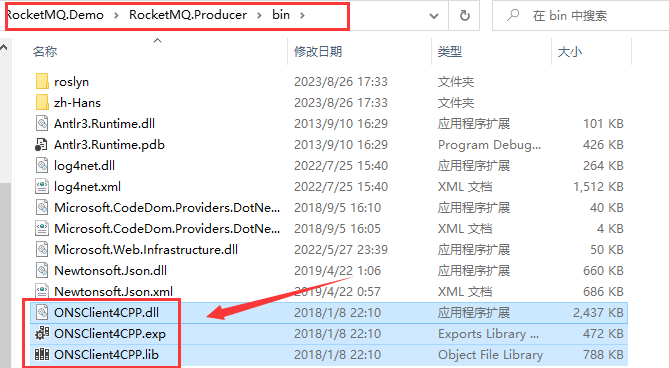
3.1.3-使用log4net
(1)使用lo4net輸出紀錄檔,大家也可以用別的紀錄檔框架,記得在用到寫入紀錄檔的地方自行進行修改。那[西瓜程式猿]使用log4net來介紹。我們在專案的根目錄下建立一個檔案為【log4net.config】。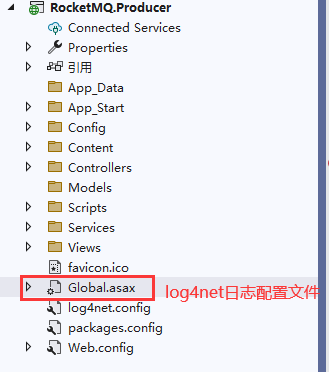
(2)【log4net.config】內容如下。
<?xml version="1.0" encoding="utf-8"?>
<configuration>
	<configSections>
		<section name="log4net" type="log4net.Config.Log4NetConfigurationSectionHandler, log4net"/>
	</configSections>

	<system.web>
		<compilation debug="true" targetFramework="4.5.2" />
		<httpRuntime targetFramework="4.5.2" />
	</system.web>
	<log4net>
		<!--錯誤紀錄檔:::記錄錯誤紀錄檔-->
		<!--按日期分割紀錄檔檔案 一天一個-->
		<!-- appender 定義紀錄檔輸出方式   將紀錄檔以回滾檔案的形式寫到檔案中。-->
		<appender name="ErrorAppender" type="log4net.Appender.RollingFileAppender">
			<!--儲存路徑:下面路徑專案啟動的時候自動在C槽中建立log、logError檔案-->
			<file value="log/error/error_" />
			<!-- 如果想在本專案中新增路徑,那就直接去掉C:\\  只設定log\\LogError   專案啟動中預設建立檔案 -->
			<appendToFile value="true"/>
			<!--按照何種方式產生多個紀錄檔檔案(日期[Date],檔案大小[Size],混合[Composite])-->
			<rollingStyle value="Date"/>
			<!--這是按日期產生資料夾-->
			<datePattern value="yyyy-MM-dd'.log'"/>
			<!--是否只寫到一個檔案中-->
			<staticLogFileName value="false"/>
			<!--保留的log檔案數量 超過此數量後 自動刪除之前的   好像只有在 按Size分割時有效 設定值value="-1"為不限檔案數-->
			<param name="MaxSizeRollBackups" value="100"/>
			<!--每個檔案的大小。只在混合方式與檔案大小方式下使用。超出大小後在所有檔名後自動增加正整數重新命名,數位最大的最早寫入。可用的單位:KB|MB|GB。不要使用小數,否則會一直寫入當前紀錄檔-->
			<maximumFileSize value="50MB" />
			<!-- layout 控制Appender的輸出格式,也可以是xml  一個Appender只能是一個layout-->
			<layout type="log4net.Layout.PatternLayout">
				<!--每條紀錄檔末尾的文字說明-->
				<!--輸出格式 模板-->
				<!-- <param name="ConversionPattern"  value="記錄時間:%date 執行緒ID:[%thread] 紀錄檔級別:%-5level 記錄類:%logger
        操作者ID:%property{Operator} 操作型別:%property{Action}%n  當前機器名:%property%n當前機器名及登入使用者:%username %n
        記錄位置:%location%n 訊息描述:%property{Message}%n   異常:%exception%n 訊息:%message%newline%n%n" />-->

				<!--樣例:2008-03-26 13:42:32,111 [10] INFO  Log4NetDemo.MainClass [(null)] - info-->
				<!--<conversionPattern value="%newline %n記錄時間:%date %n執行緒ID:[%thread] %n紀錄檔級別: %-5level %n錯誤描述:%message%newline %n"/>-->
				<conversionPattern value="%n==========
                                  %n【紀錄檔級別】%-5level
                                  %n【記錄時間】%date
                                  %n【執行時間】[%r]毫秒
                                  %n【出錯檔案】%F
                                  %n【出錯行號】%L
                                  %n【出錯的類】%logger 屬性[%property{NDC}]
                                  %n【錯誤描述】%message
                                  %n【錯誤詳情】%newline"/>
			</layout>
			<filter type="log4net.Filter.LevelRangeFilter,log4net">
				<levelMin value="ERROR" />
				<levelMax value="FATAL" />
			</filter>
		</appender>

		<!--DEBUG:::記錄DEBUG紀錄檔-->
		<!--按日期分割紀錄檔檔案 一天一個-->
		<!-- appender 定義紀錄檔輸出方式   將紀錄檔以回滾檔案的形式寫到檔案中。-->
		<appender name="DebugAppender" type="log4net.Appender.RollingFileAppender">
			<!--儲存路徑:下面路徑專案啟動的時候自動在C槽中建立log、logError檔案-->
			<file value="log/debug/debug_" />
			<!-- 如果想在本專案中新增路徑,那就直接去掉C:\\  只設定log\\LogError   專案啟動中預設建立檔案 -->
			<appendToFile value="true"/>
			<!--按照何種方式產生多個紀錄檔檔案(日期[Date],檔案大小[Size],混合[Composite])-->
			<rollingStyle value="Date"/>
			<!--這是按日期產生資料夾-->
			<datePattern value="yyyy-MM-dd'.log'"/>
			<!--是否只寫到一個檔案中-->
			<staticLogFileName value="false"/>
			<!--保留的log檔案數量 超過此數量後 自動刪除之前的   好像只有在 按Size分割時有效 設定值value="-1"為不限檔案數-->
			<param name="MaxSizeRollBackups" value="100"/>
			<!--每個檔案的大小。只在混合方式與檔案大小方式下使用。超出大小後在所有檔名後自動增加正整數重新命名,數位最大的最早寫入。可用的單位:KB|MB|GB。不要使用小數,否則會一直寫入當前紀錄檔-->
			<maximumFileSize value="50MB" />
			<!-- layout 控制Appender的輸出格式,也可以是xml  一個Appender只能是一個layout-->
			<layout type="log4net.Layout.PatternLayout">
				<!--每條紀錄檔末尾的文字說明-->
				<!--輸出格式 模板-->
				<!-- <param name="ConversionPattern"  value="記錄時間:%date 執行緒ID:[%thread] 紀錄檔級別:%-5level 記錄類:%logger
        操作者ID:%property{Operator} 操作型別:%property{Action}%n  當前機器名:%property%n當前機器名及登入使用者:%username %n
        記錄位置:%location%n 訊息描述:%property{Message}%n   異常:%exception%n 訊息:%message%newline%n%n" />-->

				<!--樣例:2008-03-26 13:42:32,111 [10] INFO  Log4NetDemo.MainClass [(null)] - info-->
				<!--<conversionPattern value="%newline %n記錄時間:%date %n執行緒ID:[%thread] %n紀錄檔級別: %-5level %n錯誤描述:%message%newline %n"/>-->
				<conversionPattern value="%n==========
                                  %n【紀錄檔級別】%-2level
                                  %n【記錄時間】%date
                                  %n【執行時間】[%r]毫秒
                                  %n【debug檔案】%F
                                  %n【debug行號】%L
                                  %n【debug類】%logger 屬性[%property{NDC}]
                                  %n【debug描述】%message"/>
			</layout>
			<filter type="log4net.Filter.LevelRangeFilter,log4net">
				<levelMin value="DEBUG" />
				<levelMax value="WARN" />
			</filter>
		</appender>


		<!--INFO:::記錄INFO紀錄檔-->
		<!--按日期分割紀錄檔檔案 一天一個-->
		<!-- appender 定義紀錄檔輸出方式   將紀錄檔以回滾檔案的形式寫到檔案中。-->
		<appender name="INFOAppender" type="log4net.Appender.RollingFileAppender">
			<!--儲存路徑:下面路徑專案啟動的時候自動在C槽中建立log、logError檔案-->
			<file value="log/info/info_" />
			<!-- 如果想在本專案中新增路徑,那就直接去掉C:\\  只設定log\\LogError   專案啟動中預設建立檔案 -->
			<appendToFile value="true"/>
			<!--按照何種方式產生多個紀錄檔檔案(日期[Date],檔案大小[Size],混合[Composite])-->
			<rollingStyle value="Date"/>
			<!--這是按日期產生資料夾-->
			<datePattern value="yyyy-MM-dd'.log'"/>
			<!--是否只寫到一個檔案中-->
			<staticLogFileName value="false"/>
			<!--保留的log檔案數量 超過此數量後 自動刪除之前的   好像只有在 按Size分割時有效 設定值value="-1"為不限檔案數-->
			<param name="MaxSizeRollBackups" value="100"/>
			<!--每個檔案的大小。只在混合方式與檔案大小方式下使用。超出大小後在所有檔名後自動增加正整數重新命名,數位最大的最早寫入。可用的單位:KB|MB|GB。不要使用小數,否則會一直寫入當前紀錄檔-->
			<maximumFileSize value="50MB" />
			<!-- layout 控制Appender的輸出格式,也可以是xml  一個Appender只能是一個layout-->
			<layout type="log4net.Layout.PatternLayout">
				<!--每條紀錄檔末尾的文字說明-->
				<!--輸出格式 模板-->
				<!-- <param name="ConversionPattern"  value="記錄時間:%date 執行緒ID:[%thread] 紀錄檔級別:%-5level 記錄類:%logger
        操作者ID:%property{Operator} 操作型別:%property{Action}%n  當前機器名:%property%n當前機器名及登入使用者:%username %n
        記錄位置:%location%n 訊息描述:%property{Message}%n   異常:%exception%n 訊息:%message%newline%n%n" />-->

				<!--樣例:2008-03-26 13:42:32,111 [10] INFO  Log4NetDemo.MainClass [(null)] - info-->
				<!--<conversionPattern value="%newline %n記錄時間:%date %n執行緒ID:[%thread] %n紀錄檔級別: %-5level %n錯誤描述:%message%newline %n"/>-->
				<conversionPattern value="%n==========
                                  %n【紀錄檔級別】%-2level
                                  %n【記錄時間】%date
                                  %n【執行時間】[%r]毫秒
                                  %n【info檔案】%F
                                  %n【info行號】%L
                                  %n【info類】%logger 屬性[%property{NDC}]
                                  %n【info描述】%message"/>
			</layout>
			<filter type="log4net.Filter.LevelRangeFilter,log4net">
				<levelMin value="INFO" />
				<levelMax value="WARN" />
			</filter>
		</appender>

		<!--Set root logger level to DEBUG and its only appender to A1-->
		<root>
			<!--控制級別,由低到高: ALL|DEBUG|INFO|WARN|ERROR|FATAL|OFF-->
			<level value="ALL" />
			<appender-ref ref="DebugAppender" />
			<appender-ref ref="ErrorAppender" />
			<appender-ref ref="INFOAppender" />
		</root>
	</log4net>
</configuration>
 (3)並且右擊【log4net.config】檔案,點選【屬性】,然後將[複製到輸出目錄]設定為【始終複製】。
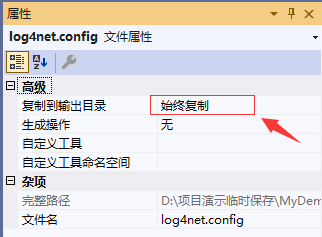
(4)然後安裝log4net。在專案目錄中右擊【參照】,然後點選【管理NuGet程式包】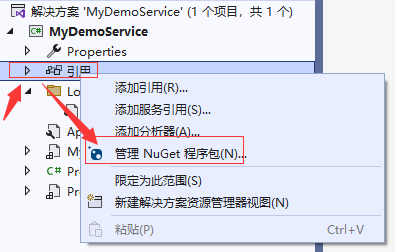
 (5)然後點選瀏覽,搜尋【log4net】,右側點選安裝即可。
(6)然後在【Global.asax】檔案中註冊log4net。
        protected void Application_Start()
        {
            XmlConfigurator.Configure(new System.IO.FileInfo(Server.MapPath("~/log4net.config")));
        }
3.1.4-封裝傳送訊息
(1)在當前專案新建一個【Services】資料夾,作為服務層。大家也可以將Services建立為單獨的類庫,然後在這個專案上去引入【RocketMQ.Core】,在用【RocketMQ.Producer】專案區引入【Services】。那[西瓜程式猿]為了方便就直接在當前專案寫了。然後再【Services】資料夾裡面建立【BaseProducerService】檔案,用於封裝生產者傳送訊息服務。
目錄: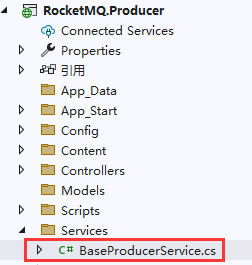
程式碼:
 /// <summary>
    /// 生產者服務
    /// </summary>
    public class BaseProducerService
    {
        private readonly ILog logger = log4net.LogManager.GetLogger(typeof(BaseProducerService));

        public void SendQueueOnsProducer(string body, string msg_tag, string mgs_eventType)
        {
            if (string.IsNullOrEmpty(body)) { throw new ArgumentNullException("body is null"); }
            if (string.IsNullOrEmpty(msg_tag)) { throw new ArgumentNullException("msg_tag is null"); }
            if (string.IsNullOrEmpty(mgs_eventType)) { throw new ArgumentNullException("mgs_eventType is null"); }

            string ons_topic = QueueOnsProducer.getOnsTopic;
            string ons_client_code = QueueOnsProducer.getOnsClientCode;

            //TODO:這裡需要生成唯一ID
            string businessId = "MQ_1001";

            logger.Info($"【傳送RocketMQ訊息佇列訊息】準備開始執行了:(訊息key:{businessId})(tag:{msg_tag})(event_type:{mgs_eventType})");
            logger.Info($"【傳送RocketMQ訊息佇列訊息】訊息內容:{body}");

            // TODO:在這裡可以持久化生產者訊息
            logger.Info($"【傳送RocketMQ訊息佇列訊息】訊息持久化成功!(訊息主鍵id:{businessId})");

            Task.Run(() =>
            {
                try
                {
                    QueueOnsProducer.SendMessage(new QueueOnsCommonModel()
                    {
                        MessageId = businessId,
                        Tag = msg_tag,
                        EventType = mgs_eventType,
                        Body = body
                    }, msg_tag);
                    logger.Info($"【傳送RocketMQ訊息佇列訊息】訊息傳送成功!");
                }
                catch (Exception ex)
                {
                    logger.Error($"【傳送RocketMQ訊息佇列訊息】發生異常:{ex.Message}", ex);
                }
            });
        }
    }
3.2-設定連線資訊
(1)然後右擊【RocketMQ.Producer】專案下,點選【參照】,然後將【RocketMQ.Core】專案勾選上確定。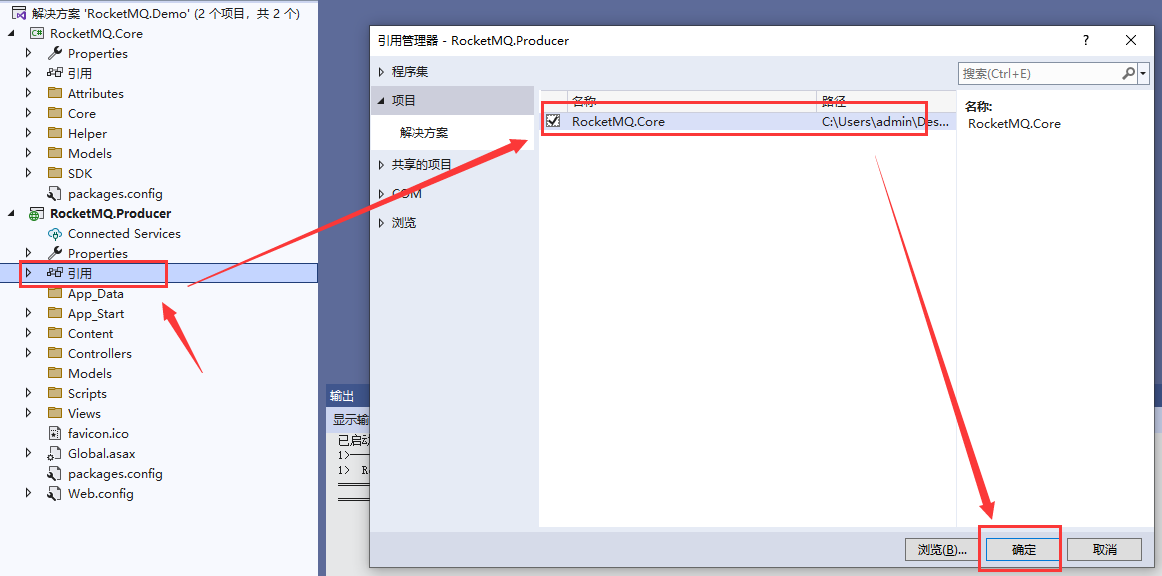
(2)然後將前期準備的基本資訊放在組態檔中。在【Web.config】檔案進行設定。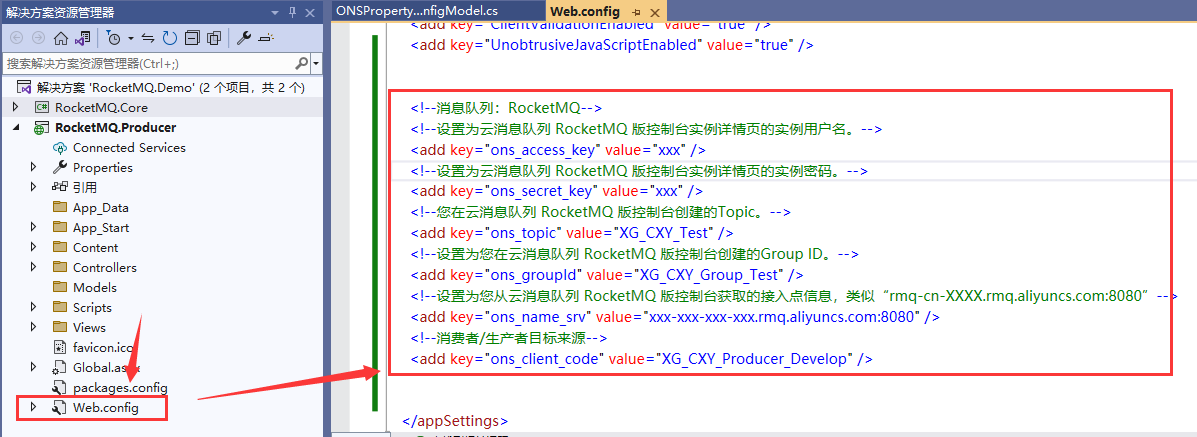
程式碼:
    <!--訊息佇列:RocketMQ-->
    <!--設定為雲訊息佇列 RocketMQ 版控制檯範例詳情頁的範例使用者名稱。-->
    <add key="ons_access_key" value="xxx" />
    <!--設定為雲訊息佇列 RocketMQ 版控制檯範例詳情頁的範例密碼。-->
    <add key="ons_secret_key" value="xxx" />
    <!--您在雲訊息佇列 RocketMQ 版控制檯建立的Topic。-->
    <add key="ons_topic" value="XG_CXY_Test" />
    <!--設定為您在雲訊息佇列 RocketMQ 版控制檯建立的Group ID。-->
    <add key="ons_groupId" value="XG_CXY_Group_Test" />
    <!--設定為您從雲訊息佇列 RocketMQ 版控制檯獲取的接入點資訊,類似「rmq-cn-XXXX.rmq.aliyuncs.com:8080」-->
    <add key="ons_name_srv" value="xxx-xxx-xxx-xxx.rmq.aliyuncs.com:8080" />
    <!--消費者/生產者目標來源-->
    <add key="ons_client_code" value="XG_CXY_Producer_Develop" />
(3)然後建立一個【Config】資料夾,寫一個獲得【ConfigGeter】組態檔的幫助類。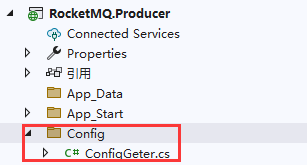
程式碼:
    /// <summary>
    /// 組態檔
    /// </summary>
    public class ConfigGeter
    {
        private static T TryGetValueFromConfig<T>(Func<string, T> parseFunc, Func<T> defaultTValueFunc, [CallerMemberName] string key = "", string supressKey = "")
        {
            try
            {
                if (!string.IsNullOrWhiteSpace(supressKey))
                {
                    key = supressKey;
                }

                var node = ConfigurationManager.AppSettings[key];
                return !string.IsNullOrEmpty(node) ? parseFunc(node) : defaultTValueFunc();
            }
            catch (Exception ex)
            {
                return default(T);
            }
        }

        #region 訊息佇列:RocketMQ
        /// <summary>
        /// 設定為雲訊息佇列 RocketMQ 版控制檯範例詳情頁的範例使用者名稱。
        /// </summary>
        public static string ons_access_key
        {
            get
            {
                return TryGetValueFromConfig(_ => _, () => string.Empty);
            }
        }

        /// <summary>
        /// 設定為雲訊息佇列 RocketMQ 版控制檯範例詳情頁的範例密碼。
        /// </summary>
        public static string ons_secret_key
        {
            get
            {
                return TryGetValueFromConfig(_ => _, () => string.Empty);
            }
        }

        /// <summary>
        ///  您在雲訊息佇列 RocketMQ 版控制檯建立的Topic。
        /// </summary>
        public static string ons_topic
        {
            get
            {
                return TryGetValueFromConfig(_ => _, () => string.Empty);
            }
        }

        /// <summary>
        /// 設定為您在雲訊息佇列 RocketMQ 版控制檯建立的Group ID。
        /// </summary>
        public static string ons_groupId
        {
            get
            {
                return TryGetValueFromConfig(_ => _, () => string.Empty);
            }
        }

        /// <summary>
        /// 設定為您從雲訊息佇列 RocketMQ 版控制檯獲取的接入點資訊,類似「rmq-cn-XXXX.rmq.aliyuncs.com:8080」。
        /// </summary>
        public static string ons_name_srv
        {
            get
            {
                return TryGetValueFromConfig(_ => _, () => string.Empty);
            }
        }

        /// <summary>
        /// 訊息來源(生產者/消費端使用者端編碼)
        /// </summary>
        public static string ons_client_code
        {
            get
            {
                return TryGetValueFromConfig(_ => _, () => string.Empty);
            }
        }
        #endregion
    }
3.3-啟動生產者
3.3.1-MVC/WebAPI專案
在【Global.asax】檔案Application_Start方法中建立生產者,主要就是從組態檔中獲得設定資訊,然後呼叫【QueueOnsProducer.CreateProducer】方法建立訊息佇列生產者,通過呼叫【QueueOnsProducer.StartProducer】方法來啟動生產者。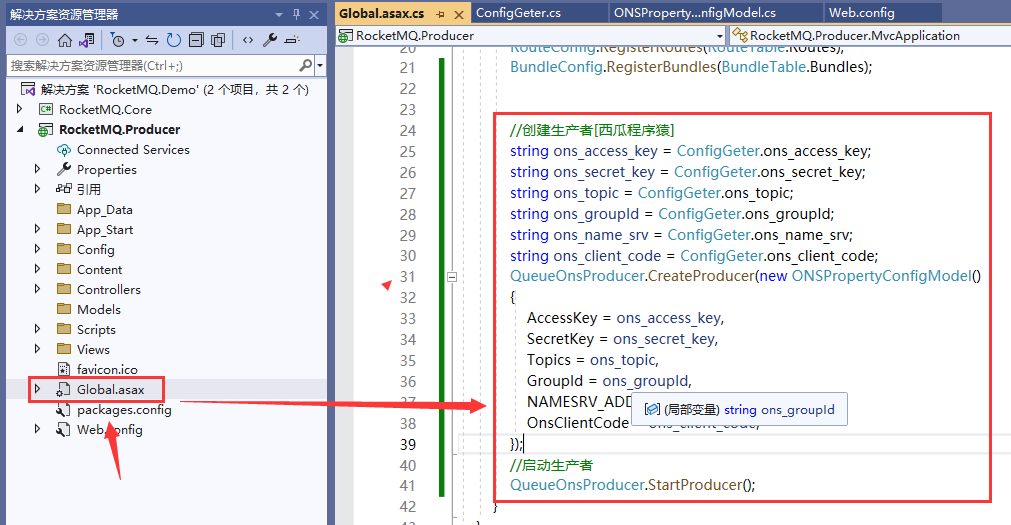
程式碼:
protected void Application_Start()
        {
            //建立生產者[西瓜程式猿]
            string ons_access_key = ConfigGeter.ons_access_key;
            string ons_secret_key = ConfigGeter.ons_secret_key;
            string ons_topic = ConfigGeter.ons_topic;
            string ons_groupId = ConfigGeter.ons_groupId;
            string ons_name_srv = ConfigGeter.ons_name_srv;
            string ons_client_code = ConfigGeter.ons_client_code;
            QueueOnsProducer.CreateProducer(new ONSPropertyConfigModel()
            {
                AccessKey = ons_access_key,
                SecretKey = ons_secret_key,
                Topics = ons_topic,
                GroupId = ons_groupId,
                NAMESRV_ADDR = ons_name_srv,
                OnsClientCode = ons_client_code,
            });
            //啟動生產者
            QueueOnsProducer.StartProducer();
        }
3.3.2-JOB(控制檯應用程式)專案
在【Program.cs】專案啟動檔案的Main方法中建立生產者,主要就是從組態檔中獲得設定資訊,然後呼叫【QueueOnsProducer.CreateProducer】方法建立訊息佇列生產者,通過呼叫【QueueOnsProducer.StartProducer】方法來啟動生產者。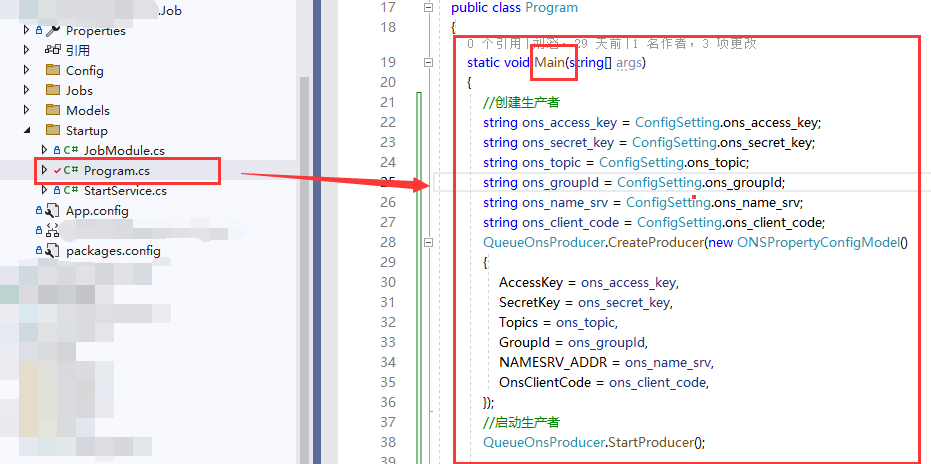
3.4-傳送訊息
(1)先設計好訊息傳輸內容(Body)實體,比如我這邊需要根據姓名/賬號做一些非同步業務處理,那我這筆就新建一個名為【RocketMQSampleModel】類。
目錄: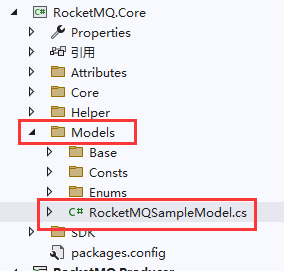
程式碼:
    /// <summary>
    /// 傳送RocketMQ測試訊息實體
    /// </summary>
    public class RocketMQSampleModel
    {
        public string user_name { get; set; }
        public string user_account { get; set; }
    }
(2)然後就開始建立具體的傳送RocketMQ訊息的服務,可以根據自己的業務去建立,那[西瓜程式猿]這邊就建立一個名為【SampleProducerService】的傳送RocketMQ訊息服務,然後繼承【BaseProducerService】類。
目錄: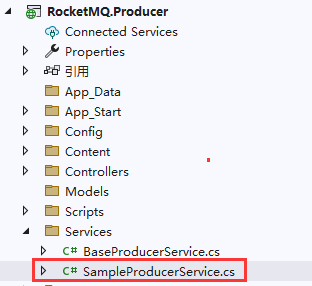
程式碼:
public class SampleProducerService : BaseProducerService
    {
        /// <summary>
        /// 傳送RocketMQ測試訊息
        /// </summary>
        /// <param name="model"></param>
        public void SendTestMessageHandle(RocketMQSampleModel model)
        {
            if (model == null) return;
            string msg_body = JsonUtility.SerializeJSON<RocketMQSampleModel>(model);
            if (msg_body != null)
            {
                SendQueueOnsProducer(msg_body, QueueTagConsts.XG_Blog_Sample_Tag, QueueOnsEventType.RocketMQ_TEST);
            }
        }
    }
(3)然後我們在Controller裡面去呼叫一下傳送訊息。[西瓜程式猿]這裡以【Home/Index】裡面進行使用。
截圖: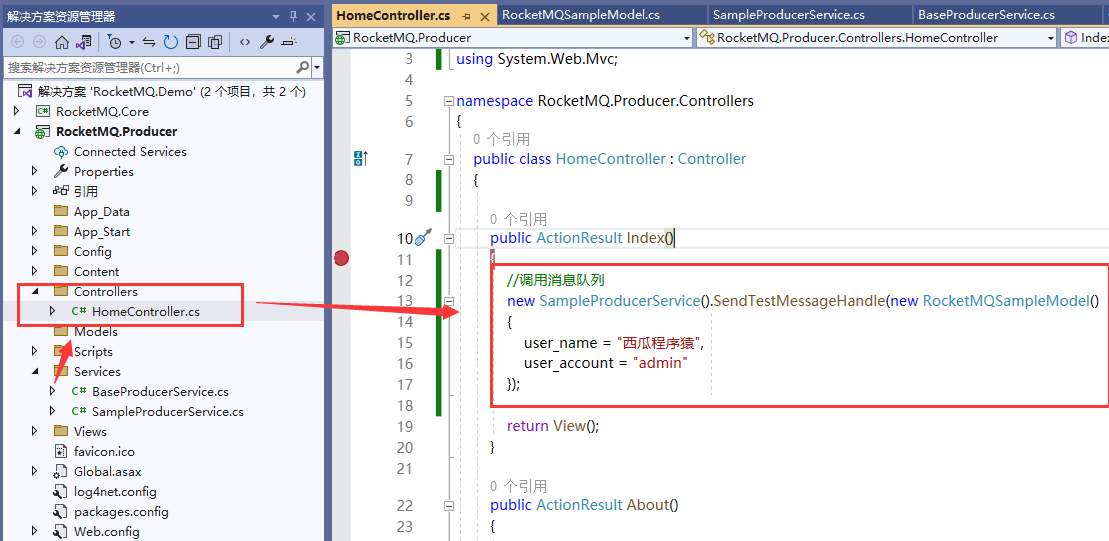
程式碼:
 //呼叫訊息佇列
            new SampleProducerService().SendTestMessageHandle(new RocketMQSampleModel()
            {
                user_name = "西瓜程式猿",
                user_account = "admin"
            });
(4)然後執行一下,看看能不能成功訊息訊息(預設就會執行到Home/Index)。[西瓜程式猿]這邊需要先發布到伺服器上才能呼叫,因為只能在伺服器內網存取,那我這邊釋出一下。
注意:釋出到伺服器上後,也需要將資源包中的【ONSClient4CPP】所有檔案拷貝到伺服器站點的【bin】目錄下。
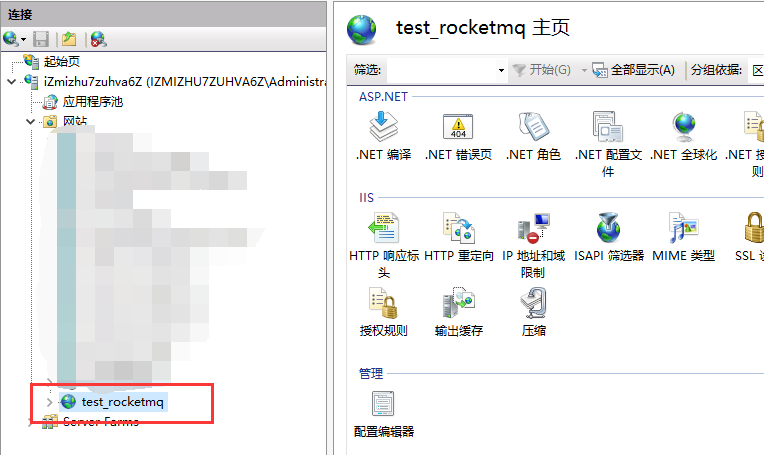
(5)釋出好了,然後執行一下,可以看到是成功了。
然後我們在來看看紀錄檔,提示傳送成功了。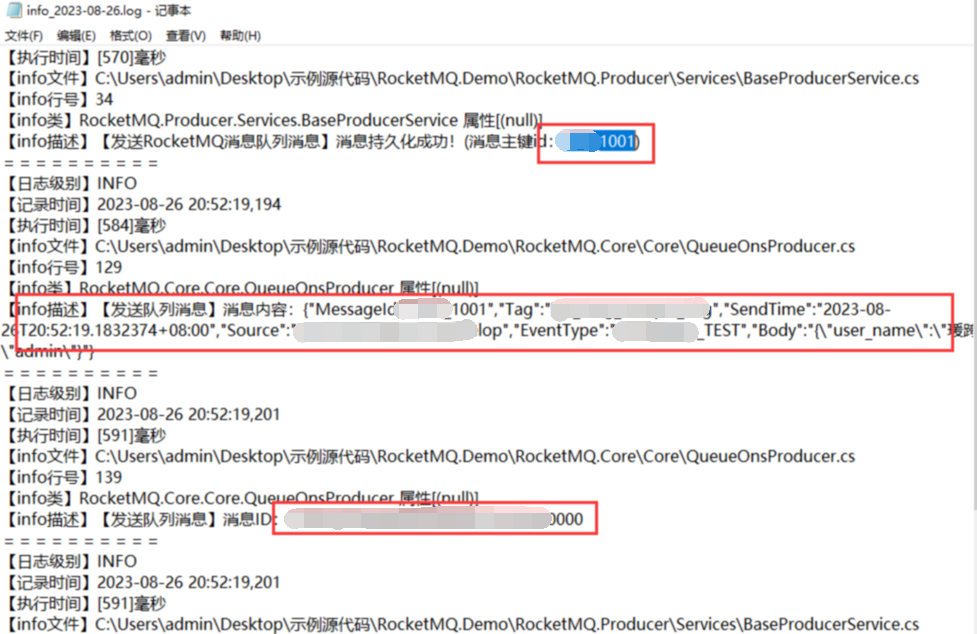
最後在去阿里雲後臺查詢一下是否有這條訊息記錄。可以根據訊息Key和訊息ID兩種方式進行查詢。可以在後臺看到是真正傳送成功了。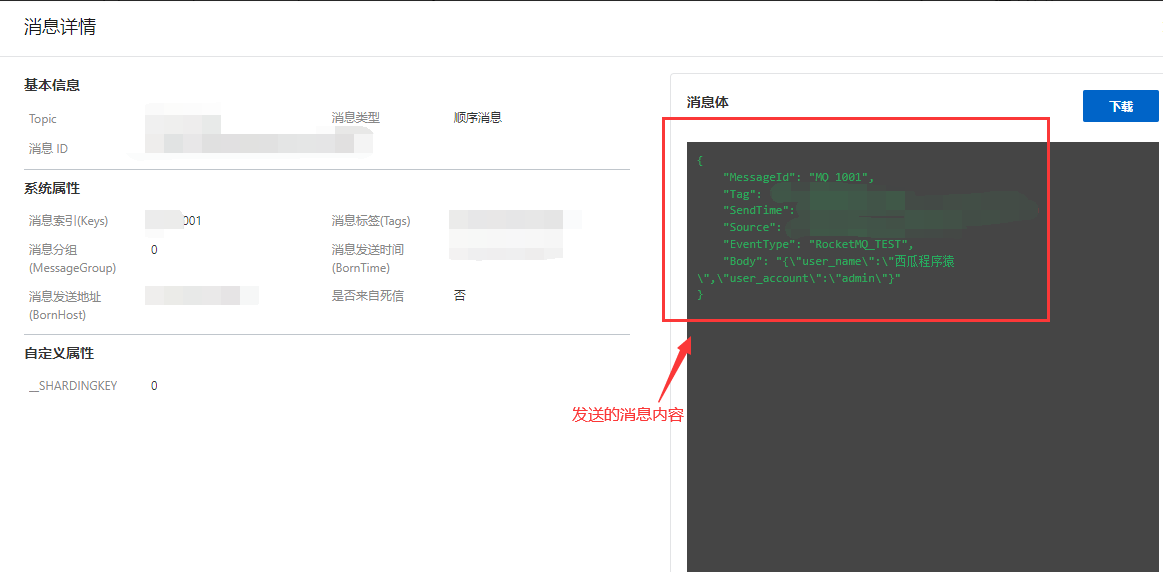
部落格對於圖文有數量限制要求,那這一節先寫到這裡,持續更新中,下一章節有消費者的實現、防踩坑指南等等!
我是西瓜程式猿,感謝大家的閱讀。編寫不易,如果對大家有幫助,用您發財的小手點個贊和關注唄,非常感謝!有問題歡迎聯絡我一起學習與探討~
下一章節:
版權宣告:本文為原創文章,版權歸 [西瓜程式猿] 所有,轉載請註明出處,有任何疑問請私信諮詢。
原文連結:https://www.cnblogs.com/kimiliucn/p/17662052.html