深度學習(十二)——神經網路:搭建小實戰和Sequential的使用
一、torch.nn.Sequential程式碼栗子
# Using Sequential to create a small model. When `model` is run,
# input will first be passed to `Conv2d(1,20,5)`. The output of
# `Conv2d(1,20,5)` will be used as the input to the first
# `ReLU`; the output of the first `ReLU` will become the input
# for `Conv2d(20,64,5)`. Finally, the output of
# `Conv2d(20,64,5)` will be used as input to the second `ReLU`
model = nn.Sequential(
          nn.Conv2d(1,20,5),
          nn.ReLU(),
          nn.Conv2d(20,64,5),
          nn.ReLU()
        )
-
在第一個變數名model中,依次執行
nn.Convd2d(1,20,5)、nn.ReLU()、nn.Conv2d(20,64,5)、nn.ReLU()四個函數。這樣寫起來的好處是使程式碼更簡潔。 -
由此可見,函數\(Sequential\)的主要作用為依次執行括號內的函數
二、神經網路搭建實戰
採用\(CIFAR10\)中的資料,並對其進行簡單的分類。以下圖為例:

- 輸入:3通道,32×32 → 經過一個5×5的折積 → 變成32通道,32×32的影象 → 經過2×2的最大池化 → 變成32通道,16×16的影象.... → ... → 變成64通道,4×4的影象 → 把影象展平(Flatten)→ 變成64通道,1×1024 (64×4×4) 的影象 → 通過兩個線性層,最後\(out\_feature=10\) → 得到最終影象
以上,就是CIFAR10模型的結構。本節的程式碼也基於CIFAR10 model的結構構建。
1. 神經網路中的引數設計及計算
(1)折積層的引數設計(以第一個折積層conv1為例)
-
輸入影象為3通道,輸出影象為32通道,故:\(in\_channels=3\);\(out\_channels=32\)
-
折積核尺寸為\(5×5\)
-
影象經過折積層conv1前後的尺寸均為32×32,根據公式:
\[H_{out}=⌊\frac{H_{in}+2×padding[0]−dilation[0]×(kernel\_size[0]−1)−1}{stride[0]}+1⌋ \]\[W_{out}=⌊\frac{W_{in}+2×padding[1]−dilation[1]×(kernel\_size[1]−1)−1}{stride[1]}+1⌋ \]可得:
\[H_{out}=⌊\frac{32+2×padding[0]−1×(5−1)−1}{stride[0]}+1⌋=32 \]\[W_{out}=⌊\frac{32+2×padding[1]−1×(5−1)−1}{stride[1]}+1⌋=32 \]即:
\[\frac{27+2×padding[0]}{stride[0]}=31 \]\[\frac{27+2×padding[1]}{stride[1]}=31 \]若\(stride[0]\)或\(stride[1]\)設定為2,那麼上面的\(padding\)也會隨之擴充套件為一個很大的數,這很不合理。所以這裡設定:\(stride[0]=stride[1]=1\),由此可得:\(padding[0]=padding[1]=2\)
其餘折積層的引數設計及計算方法均同上。
(2)最大池化操作的引數設計(以第一個池化操作maxpool1為例)
- 由圖可得,\(kennel\_size=2\)
其餘最大池化引數設計方法均同上。
(3)線性層的引數設計
-
通過三次折積和最大池化操作後,影象尺寸變為64通道4×4。之後使用\(Flatten()\)函數將影象展成一列,此時影象尺寸變為:1×(64×4×4),即\(1×1024\)
-
因此,之後通過第一個線性層,\(in\_features=1024\),\(out\_features=64\)
-
通過第二個線性層,\(in\_features=64\),\(out\_features=10\)
2. 構建神經網路實戰
import torch
from torch import nn
from torch.nn import Conv2d, MaxPool2d, Flatten, Linear

class Demo(nn.Module):
    def __init__(self):
        super(Demo,self).__init__()

        # 搭建第一個折積層:in_channels=3,out_channels=32,折積核尺寸為5×5,通過計算得出:padding=2;stride預設情況下為1,不用設定
        self.conv1=Conv2d(3,32,5,padding=2)

        # 第一個最大池化操作,kennel_size=2
        self.maxpool1=MaxPool2d(2)

        # 第二個折積層及最大池化操作
        self.conv2=Conv2d(32,32,5,padding=2)
        self.maxpool2=MaxPool2d(2)

        # 第三個折積層及最大池化操作
        self.conv3=Conv2d(32,64,5,padding=2)
        self.maxpool3=MaxPool2d(2)

        # 展開影象
        self.flatten=Flatten()

        # 線性層引數設計
        self.linear1=Linear(1024,64)
        self.linear2=Linear(64,10)

        # 如果是預測概率,那麼取輸出結果的最大值(它代表了最大概率)

    def forward(self,x):
        x = self.conv1(x)
        x = self.maxpool1(x)
        x = self.conv2(x)
        x = self.maxpool2(x)
        x = self.conv3(x)
        x = self.maxpool3(x)
        x = self.flatten(x)
        x = self.linear1(x)   #如果線性層的1024和64不會計算,可以在self.flatten之後print(x.shape)檢視尺寸,以此設定linear的引數
        x = self.linear2(x)
        return x

demo=Demo()
print(demo)
"""
[Run]
Demo(
  (conv1): Conv2d(3, 32, kernel_size=(5, 5), stride=(1, 1), padding=(2, 2))
  (maxpool1): MaxPool2d(kernel_size=2, stride=2, padding=0, dilation=1, ceil_mode=False)
  (conv2): Conv2d(32, 32, kernel_size=(5, 5), stride=(1, 1), padding=(2, 2))
  (maxpool2): MaxPool2d(kernel_size=2, stride=2, padding=0, dilation=1, ceil_mode=False)
  (conv3): Conv2d(32, 64, kernel_size=(5, 5), stride=(1, 1), padding=(2, 2))
  (maxpool3): MaxPool2d(kernel_size=2, stride=2, padding=0, dilation=1, ceil_mode=False)
  (flatten): Flatten(start_dim=1, end_dim=-1)
  (linear1): Linear(in_features=1024, out_features=64, bias=True)
  (linear2): Linear(in_features=64, out_features=10, bias=True)
)

可以看出,網路還是有模有樣的
"""

#構建輸入,測試神經網路
input=torch.ones((64,3,32,32))  #構建影象,batch_size=64,3通道,32×32
output=demo(input)
print(output.shape)  #[Run] torch.Size([64, 10])
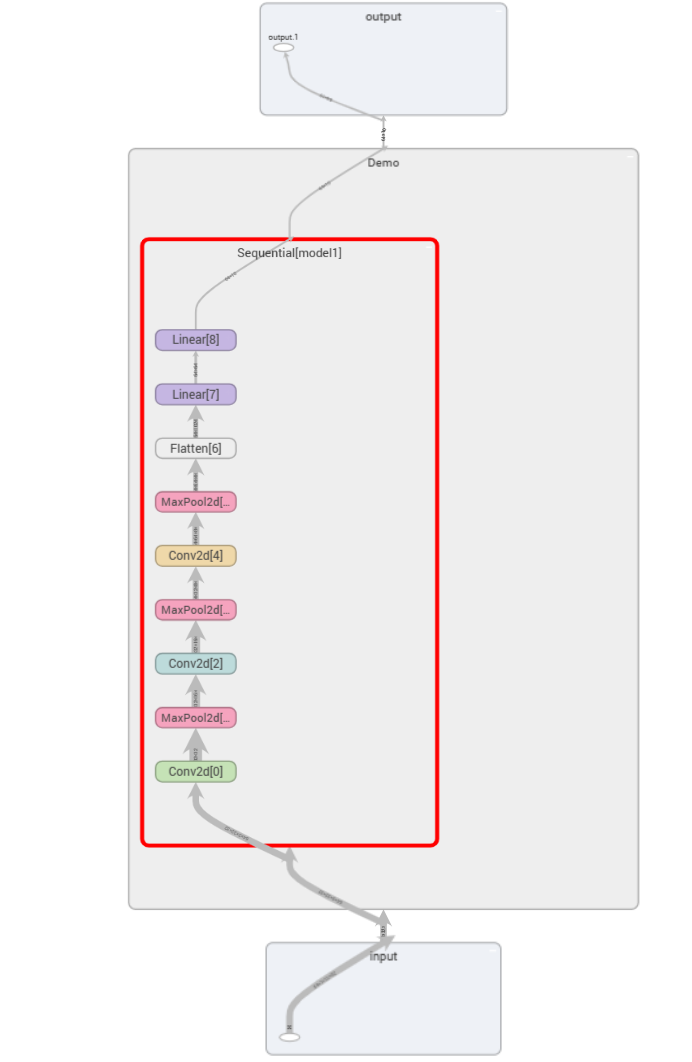
這裡的\(forward\)函數寫的有點煩,這時候\(Sequential\)函數的優越就體現出來了(墨鏡黃豆)。下面是\(class\) \(Demo\)優化後的程式碼:
class Demo(nn.Module):
    def __init__(self):
        super(Demo,self).__init__()

        self.model1=Sequential(
            Conv2d(3,32,5,padding=2),
            MaxPool2d(2),
            Conv2d(32, 32, 5, padding=2),
            MaxPool2d(2),
            Conv2d(32, 64, 5, padding=2),
            MaxPool2d(2),
            Flatten(),
            Linear(1024, 64),
            Linear(64, 10)
        )

    def forward(self,x):
        x=self.model1(x)
        return x
極簡主義者看過後表示很滿意ε٩(๑> ₃ <)۶з
3. 視覺化神經網路
from torch.utils.tensorboard import SummaryWriter
writer=SummaryWriter("logs_seq")
writer.add_graph(demo,input)
writer.close()
這樣就可以清晰地看到神經網路的相關引數啦
