麵霸的自我修養:Java執行緒專題
王有志,一個分享硬核Java技術的互金摸魚俠
加入Java人的提桶跑路群:共同富裕的Java人
平時我在網上衝浪的時候,收集了不少八股文和麵試文,內容雖然多,但質量上良莠不齊,主打一個不假思索的互相抄,使得很多錯誤內容一代代得「傳承」了下來。所以,我對收集的內容做了歸納和整理,通過查閱資料重新做了解答,並給出了每道八股文評分。
好了,廢話不多說我們進入正題,今天的主題是 Java 面試中執行緒相關的八股文,主要涉及以下內容:
- 並行程式設計的基礎概念
- 執行緒的基礎概念
- Java 中的 Thread ,Runnable,Callable
由於本人水平有限,解答過程中難免出現錯誤,還請大家以批評指正為主,儘量不要噴~~
Tips:
- 八股文通常出現在面試第一二輪,是面試的敲門磚,第三輪的重點是如何講好做過的專案;
- 八股文的主要來源是各機構(Java 之父和繼父,某靈,某泡,某客等)及各個博主的檔案;
- 小部分八股文來自我個人及朋友真實面試經歷,題目上會有「真」的標註;
- 本文已完成 PDF 檔案的製作,提取關鍵字【麵霸的自我修養】。
概念篇
這部分是並行程式設計中的基礎概念和理論基礎,整體難度較低,並且當你有了一定的工作年限後,很少會涉及這類問題,大家以瞭解為主。
並行與並行
並行,在作業系統中,是指一個時間段中有幾個程式都處於已啟動執行到執行完畢之間,且這幾個程式都是在同一個處理機上執行,但任一個時刻點上只有一個程式在處理機上執行。
並行,在作業系統中是指,一組程式按獨立非同步的速度執行,無論從微觀還是宏觀,程式都是一起執行的。對比地,並行是指:在同一個時間段內,兩個或多個程式執行,有時間上的重疊(宏觀上是同時,微觀上仍是順序執行)
並行在宏觀上是同時執行,但微觀上是交替執行,而並行無論是宏觀還是微觀,都是同時執行。
Tips:打個比方,並行像是開啟了兩盞燈,它們同時處於亮起的狀態;而並行就是一盞燈,肉眼看起來是「常亮」狀態,但實際在交流電的作用下,燈一直再閃爍,只是肉眼無法觀察到。
同步與非同步
同步:同步,可以理解為在通訊時、函數呼叫時、協定棧的相鄰層協定互動時等場景下,發信方與收信方、主調與被調等雙方的狀態是否能及時保持狀態一致。如果一方完成一個動作後,另一方立即就修改了自己的狀態,就是同步。
非同步:是指呼叫方發出請求就立即返回,請求甚至可能還沒到達接收方,比如說放到了某個緩衝區中,等待對方取走或者第三方轉交;而呼叫結果是通過接收方主動推播,或呼叫方輪詢來得到。
參考資料:同步(維基百科)
阻塞與非阻塞
阻塞與非阻塞指的是程式在等待呼叫結果時的狀態。
阻塞(Blocking):被呼叫時,執行緒會被掛起/暫停/阻塞,直到該操作完成,返回結果後再執行後續操作。此時,程式無法進行其它操作,會一直等到呼叫結果返回。
非阻塞(Non-blocking):被呼叫時,即便操作尚未完成和拿到結果,執行緒也不會被掛起/暫停/阻塞,程式可以繼續執行後序操作。
執行緒與程序
程序(process),曾經是分時系統的基本運作單位。在面向程序設計的系統中,是程式的基本執行實體;在面向執行緒設計的系統中,程序本身不是基本執行單位,而是執行緒的容器。
執行緒(thread),在電腦科學中,是將程序劃分為兩個或多個執行緒(範例)或子程序,由單處理器(單執行緒)或多處理器(多執行緒)或多核處理系統並行執行。
程序與執行緒之間的差別:
| 程序 | 執行緒 |
|---|---|
| 程序擁有自己的記憶體空間,檔案控制程式碼,系統訊號和環境變數等 | 所有執行緒共用程序的資源,包括記憶體空間,檔案控制程式碼,系統訊號等 |
| 程序是獨立的執行單元,擁有自己的堆疊空間,需要使用程序間通訊機制進行資料交換 | 執行緒是程序內部的執行單元,共用程序的地址空間,可以直接存取程序的全域性變數和堆空間 |
| 程序間切換開銷較大。程序間的切換比執行緒間的切換耗時和開銷都大得多,因為程序切換需要儲存和恢復更多的狀態資訊,如記憶體映像、檔案控制程式碼、系統訊號等 | 執行緒間切換開銷較小。執行緒的切換隻需要儲存和恢復少量的暫存器和堆疊資訊 |
| 程序間資源隔離明顯,程序間安全性較高 | 執行緒間共用資源,容易引起競態條件,執行緒間安全性較低 |
並行程式設計的3要素
原子性:指事務的不可分割性,一個事務的所有操作要麼不間斷地全部被執行,要麼一個也沒有執行;
可見性:軟體工程中,是指物件間的可見性,含義是一個物件能夠看到或者能夠參照另一個物件的能力;
有序性:有序性是指對於多個執行緒或程序執行的操作,其執行順序與程式程式碼中的順序保持一致或符合預期的規則。
Tips:未在維基百科和百度百科中查詢到有序性的解釋,這裡採用了 ChatGPT 的解釋。
參考資料:關於執行緒你必須知道的8個問題(上),原子性(百度百科),可見性(百度百科)
執行緒飢餓
執行緒飢餓(Thread Starvation),指的是在多執行緒的競爭環境中,某個執行緒長時間無法獲取所需資源,或長時間無法得到排程,導致任務無法完成的狀態。
常見產生的執行緒飢餓的原因如下:
- 資源競爭,多個執行緒競爭必須資源,某個執行緒長時間無法獲取到資源;
- 執行緒優先順序,執行緒優先順序設定不當,導致優先順序較低的執行緒長時間無法得到排程;
- 鎖競爭,同資源競爭,只不過此時競爭的是保護資源的鎖。
上下文切換
多個執行緒共用同一個 CPU 時,CPU 時間從一個執行緒切換到另一個執行緒的過程。在這個過程中,需要儲存執行緒的上下文資訊(如:程式計數器,暫存器狀態,堆疊指標等),同時載入另一個執行緒的上線文資訊,使得系統能夠正確執行。
Tips:
參考資料:上下文切換(維基百科)
真:死鎖及解決死鎖
面試公司:蘇寧,質數金融,網易
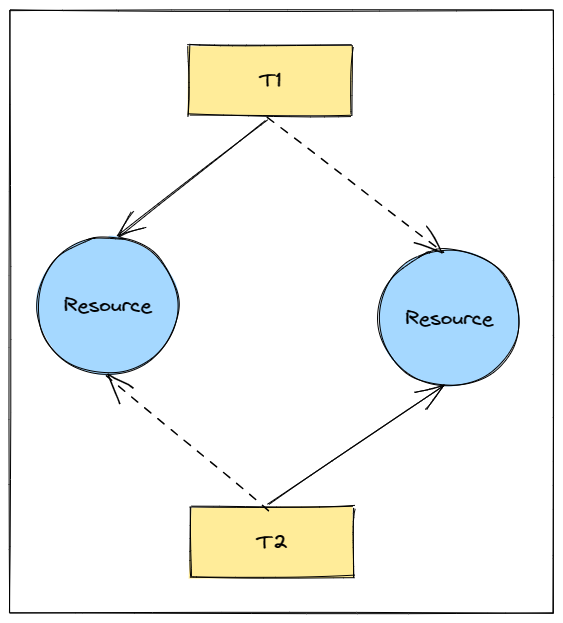
死鎖(deadlock),當兩個以上的運算單元,雙方都在等待對方停止執行,以獲取系統資源,但是沒有一方提前退出時,就稱為死鎖。
形成死鎖需要 4 個條件:
- 互斥條件(Mutual Exclusion):資源只能被一個程序/執行緒佔用。當一個程序/執行緒獲取了資源,其他程序/執行緒無法存取該資源,只能等待資源被釋放;
- 請求與保持條件(Hold and Wait):程序/執行緒在持有資源的同時,繼續請求其他資源,並不釋放持有的資源;
- 不剝奪條件(No Preemption):已經被持有的資源不能被強制剝奪,只有程序/執行緒主動釋放後才能被其他程序/執行緒獲取;
- 迴圈等待條件(Circular Wait):存在一組程序/執行緒,互相請求彼此所持有的資源,執行緒了迴圈等待的環路。

解決死鎖問題的核心是打破4項條件其中的一項即可:
- 破壞互斥條件:允許資源被同時存取;
- 破壞請求與保持條件:申請其它資源前,進行/執行緒需要釋放當前資源,避免阻塞其它執行緒;
- 破壞不可剝奪條件:允許優先順序較高的程序/執行緒,強制剝奪其它執行緒持有的資源;
- 破壞迴圈等待條件:對資源進行編號,強制獲取資源時按照編號順序進行獲取。
參考資料:死鎖(維基百科),關於執行緒你必須知道的8個問題(下)
真:執行緒通訊
面試公司:有利網
並行程式設計領域常見的 2 個執行緒間通訊模型:共用記憶體和訊息傳遞。
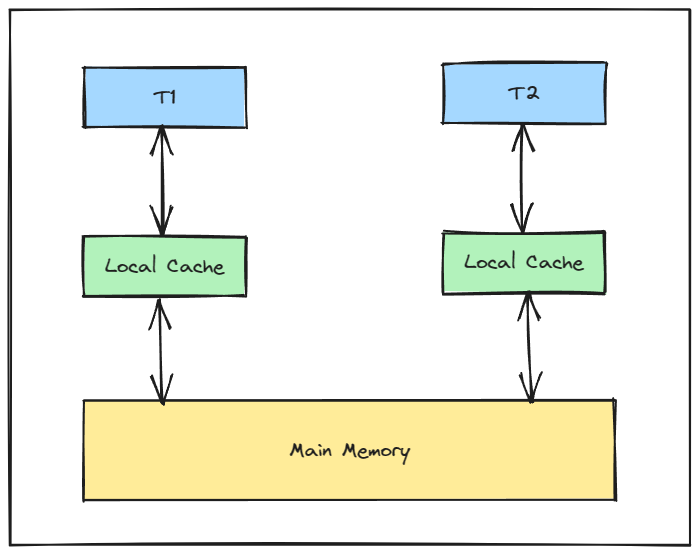
共用記憶體:指的是多個執行緒執行在不同核心上,任何核心快取上的資料修改後,重新整理到主記憶體後,其他核心更新自己的快取。

訊息傳遞:多個執行緒可以通過訊息佇列進行通訊,執行緒可以將訊息傳送到佇列中,其他執行緒可以從佇列中獲取訊息並進行處理。
傳統物件導向程式語言通常會採用共用記憶體的方式進行執行緒間的通訊,如 Java,C++等。但 Java 可以通過 Akka 實現 Actor 模型的訊息傳遞。Golang 則是訊息傳遞的忠實擁躉,《Go Proverbs》中第一句便是:
Don't communicate by sharing memory, share memory by communicating.
參考資料:共用記憶體(維基百科),訊息傳遞(維基百科),管道(維基百科),共用記憶體(百度百科),訊息傳遞(百度百科)
真:多執行緒優勢與挑戰
面試公司:蘇寧
運用多執行緒的根本原因是「壓榨」硬體效能,提高程式效率。
- 發揮多核 CPU 的優勢:多核 CPU 下,單執行緒程式同一時間只會使用一個核心,其餘核心處於空閒狀態,造成了資源的浪費;
- 提高系統資源的用率:即便是單核場景下,程式在等待響應或檔案 IO 操作時 CPU 長時間空閒,此時利用多執行緒可以充分利用 CPU。
但引入多執行緒也帶來了一些挑戰:
- 上下文切換:具體請參考上文;
- 死鎖:具體請參考上文;
- 資源限制:過多的執行緒會消耗大量的記憶體,以及產生更多的 CPU 競爭,會影響程式的效能。設計時應該根據硬體和程式合理的控制執行緒數量;
- 執行緒安全問題:如果對共用資源進行並行存取,可能會造成資料一致性問題,或其他意料之外的結果。
- 程式設計難度的提升:因為執行緒是並行執行的,並存在不確定行為,如:執行緒的執行順序導致結果的差異,這種情況會造成開發與偵錯的困難。
參考資料:關於執行緒你必須知道的8個問題(下),Java並行程式設計的藝術(豆瓣)
執行緒安全
執行緒安全:指某個函數、函數庫在多執行緒環境中被呼叫時,能夠正確地處理多個執行緒之間的公用變數,使程式功能正確完成。
通俗點可以理解為,程式在多執行緒環境中與單執行緒環境中的執行結果一致。
Tips:這與 JMM 中提到的終極目標 as-if-serial 語意稍有差別,as-if-serial 語意強調無論如何重排序,單執行緒場景下的語意不能被改變(或者說執行結果不變)。
參考資料:執行緒安全(維基百科),執行緒安全(百度百科),深入理解JMM和Happens-Before
原理篇
接下來是 Java 應用篇,主要是關於 Java 中執行緒,Thread 類,Runnable 介面,Callable 介面以及 Future 介面的內容。
Java 中的執行緒
早期的 Linux 系統並不支援執行緒,但可以通過程式語言模擬實現「執行緒」,但其本質還是程序,這時我們認為 Java 中的執行緒是使用者執行緒。到了 2003 年,RedHat 初步完成了 NPTL(Native POSIX Thread Library)專案,通過輕量級程序實現了服務號 POSIX 標準的執行緒,這時 Java 中的執行緒是核心執行緒。因此執行在現代伺服器上的 Java 程式,使用的 Java 執行緒都會對映的到一個核心執行緒上。
所以我們可以得到這樣一個式子:\(Java執行緒 \approx 作業系統核心執行緒 \approx 作業系統輕量級程序\)。
那麼對於執行緒的排程方式來說,我們可以得到:\(Java執行緒的排程方式 \approx 作業系統程序的排程方式\)。
恰好,Linux中使用了搶佔式程序排程方式。因此,並不是JVM中實現了搶佔式執行緒排程方式,而是Java使用了Linux的程序排程方式,Linux選擇了搶佔式程序排程方式。
參考資料:關於執行緒你必須知道的8個問題(下)
真:建立執行緒的方式
面試公司:蘇寧
Java 中只有一種建立執行緒的方式。從 Java 層面來看,可以認為執行Thread thread = new Thread()就建立了執行緒;而呼叫Thread#start則是作業系統層面的執行緒建立於啟動。
// 建立Java層面的執行緒
Thread thread = new Thread();
// 建立系統層面的執行緒
thread.start();
Tips:通常網上會給出至少 4 種建立執行緒的方式:
- 繼承Thread類
- 實現Runnable介面
- 實現Callable介面
- 通過執行緒池建立
但這是一個錯誤的結論,實現Runnable介面或是實現Callable介面,其主要目的是為了重寫Runnable#run方法,以實現業務邏輯,而要真正的建立並啟動一個 Java 執行緒還是要建立 Thread 物件,並呼叫Thread#start方法。
Tips:還有的資料中搞出了 6 種建立執行緒的方式~~
參考資料:關於執行緒你必須知道的8個問題(上)
真:執行緒的狀態與狀態轉換
面試公司:京東,百度
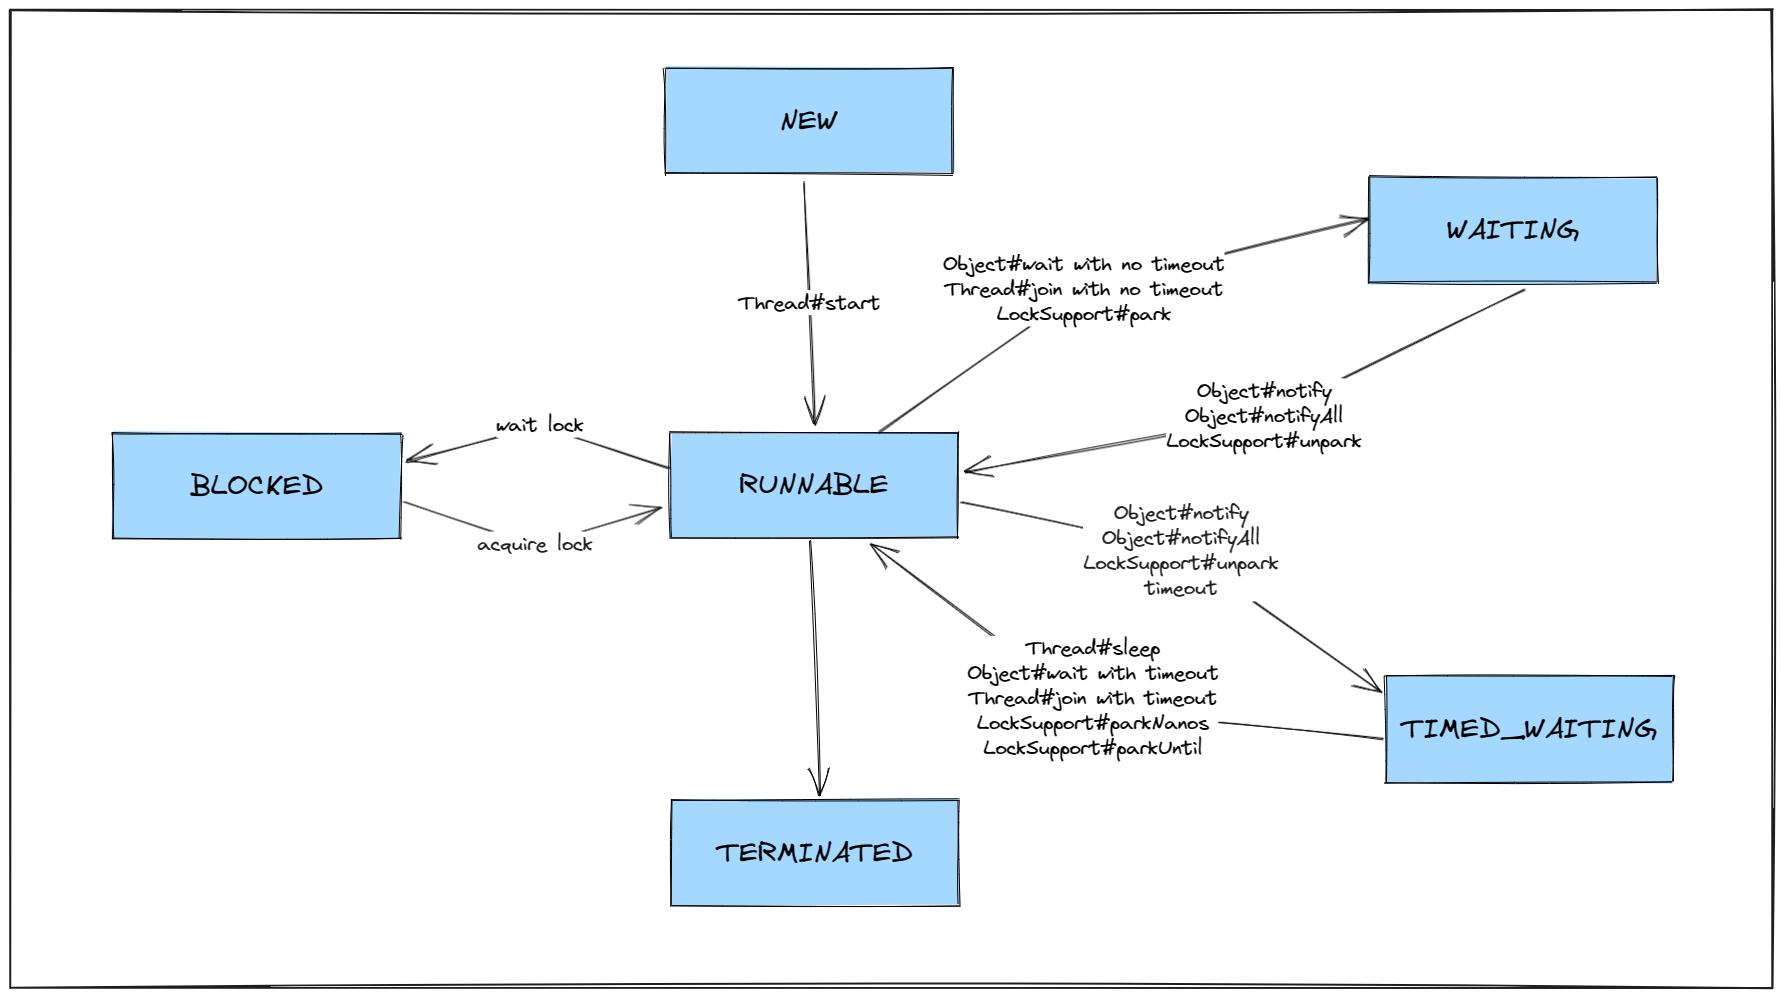
Java 中定義了 6 種執行緒狀態:
- NEW(新建):建立執行緒後尚未啟動(未呼叫Thread.start方法);
- RUNNABLE(可執行):可執行狀態的執行緒在Java虛擬機器器中等待排程執行緒選中獲取CPU時間片;
- BLOCKED(阻塞):等待監視器鎖而阻塞的執行緒狀態,處於阻塞狀態的執行緒正在等待監視器鎖進入同步的程式碼塊/方法,或者在呼叫Object.wait之後重新進入同步的程式碼塊/方法;
- WAITING(等待):執行緒處於等待狀態,處於等待狀態的執行緒正在等待另一個執行緒執行的特定操作(通知或中斷);
- TIMED_WAITING(超時等待):執行緒處於超時等待狀態,與等待狀態不同的是,在指定時間後,執行緒會被自動喚醒;
- TERMINATED(終止):執行緒執行結束。
執行緒狀態定義為 Thread 的內部類 state:
public enum State {
  NEW,
  RUNNABLE,
  BLOCKED,
  WAITING,
  TIMED_WAITING,
  TERMINATED;
}
執行緒狀態的轉換請參考下圖:

參考資料:關於執行緒你必須知道的8個問題(上)
真:Object#wait 方法的作用
面試公司:蘇寧
Object#wait 使執行緒等待,同時釋放鎖,執行緒進入 WAITING 或 TIMED_WAITING 狀態。Object#wait有 3 個過載方法:
public final void wait() throws InterruptedException;

public final native void wait(long timeoutMillis) throws InterruptedException;

public final void wait(long timeoutMillis, int nanos) throws InterruptedException;
由於Object#wait釋放鎖,因此需要在同步塊(synchronized 塊)中呼叫,因為只有先獲得鎖,才有的釋放。
Tips:面試中常常用來與Thread#sleep進行比較。
參考資料:關於執行緒你必須知道的8個問題(中)
Object#notify/Object#notifyAll 方法的作用
Object#notify與Object#notifyAll都是用來喚醒執行緒的。Object#notify隨機喚醒一個等待中的執行緒,Object#notifyAll喚醒所有等待中的執行緒。通過Object#notify與Object#notifyAll喚醒的執行緒並不會立即執行,而是加入了爭搶內建鎖的佇列,只有成功獲取到鎖的執行緒才會繼續執行。
參考資料:關於執行緒你必須知道的8個問題(中)
為什麼要在迴圈中呼叫Object#wait方法?
如果不在迴圈中檢查等待條件,等待狀態中的執行緒可能會被錯誤的喚醒,此時跳過等待條件的檢查可能會造成意想不到的問題。例如:生產者與消費者的場景。
    public static void main(String[] args) {
      Product product = new Product(0);
      new Thread(() -> {
        for (int i = 0; i < 3; i++) {
          try {
            product.decrement();
          } catch (InterruptedException e) {
            throw new RuntimeException(e);
          }
        }
        System.out.println(Thread.currentThread().getName() + ",狀態:" + Thread.currentThread().getState());
      }, "consumer-1").start();

      new Thread(() -> {
        for (int i = 0; i < 3; i++) {
          try {
            product.decrement();
          } catch (InterruptedException e) {
            throw new RuntimeException(e);
          }
        }
      }, "consumer-2").start();

      new Thread(() -> {
        for (int i = 0; i < 3; i++) {
          try {
            product.decrement();
          } catch (InterruptedException e) {
            throw new RuntimeException(e);
          }
        }
      }, "consumer-3").start();

      new Thread(() -> {
        for (int i = 0; i < 9; i++) {
          try {
            product.increment();
          } catch (InterruptedException e) {
            throw new RuntimeException(e);
          }
        }
        , "producer").start();
    }

    static class Product {
        private int count;
        private Product(int count) {
            this.count = count;
        }
        /**
         * 生產
         */
        private synchronized void increment() throws InterruptedException {
            if (this.count > 0) {
                this.wait();
            }
            count++;
            System.out.println("[" + Thread.currentThread().getName() + "]生產產品,當前總數:" + this.count);
            this.notifyAll();
        }
        /**
         * 消費
         */
        private synchronized void decrement() throws InterruptedException {
            if (this.count == 0) {
                this.wait();
            }
            count--;
            System.out.println("[" + Thread.currentThread().getName() + "]消費產品,當前總數:" + this.count);
            this.notifyAll();
        }
    }
修改方案非常簡單,只需要在迴圈中檢進入等待的條件即可,程式碼修改後如下:
    static class Product {

      private synchronized void increment() throws InterruptedException {
        while (this.count > 0) {
          this.wait();
        }
        count++;
        System.out.println("[" + Thread.currentThread().getName() + "]生產產品,當前總數:" + this.count);
        this.notifyAll();
      }

      private synchronized void decrement() throws InterruptedException {
        while (this.count == 0) {
          this.wait();
        }
        count--;
        System.out.println("[" + Thread.currentThread().getName() + "]消費產品,當前總數:" + this.count);
        this.notifyAll();
      }
    }
參考資料:關於執行緒你必須知道的8個問題(中)
為什麼 Object#wait,Object#notify 和 Object#notifyAll 方法不放在 Thread 類中?
Java 提供的內建鎖(ObjectMonitor)是物件級別的,即每個物件都有一個內建鎖。而Obejct#wait,Obejct#notify和Obejct#notifyAll涉及到內建鎖的操作,這與執行緒無關,只與物件有關,因此將它們放在所有物件的父類別 Object 中。
參考資料:關於執行緒你必須知道的8個問題(中)
為什麼 Object#wait,Object#notify和Object#notifyAll這些方法要在同步塊中呼叫?
因為這 3 個方法都涉及到對內建鎖的操作。
Object#wait方法釋放鎖,而Object#notify和Object#notifyAll用於通知其它執行緒當前鎖可用,而執行這些操作的奇譚提是持有鎖,或知道鎖的狀態,因此必須在 synchronized 中呼叫。
參考資料:關於執行緒你必須知道的8個問題(中)
Thread#start 與 Thread#run 的區別
Thread#start建立了作業系統層面的執行緒,並啟動執行緒呼叫Thread#run。而Thread#run只是Runnable介面的實現,並不會建立並啟動執行緒。
    public synchronized void start() {
      if (threadStatus != 0)
        throw new IllegalThreadStateException();
      group.add(this);
      boolean started = false;
      try {
        // 呼叫JNI方法,建立系統層面執行緒
        start0();
        started = true;
      } finally {
        try {
          if (!started) {
            group.threadStartFailed(this);
          }
        } catch (Throwable ignore) {
        }
      }
    }
第 8 行中呼叫了 JNI 方法private native void start0(),在 JVM 的實現中,該方法建立了作業系統層面的執行緒。
    private Runnable target;

    @Override
    public void run() {
      if (target != null) {
        target.run();
      }
    }
Thread#run只是對Runnable介面的實現,並呼叫了成員變數 target 的 run 方法。
參考資料:關於執行緒你必須知道的8個問題(中)
真:多次呼叫 Thread#start 會發生什麼?
面試公司:蘇寧
多次呼叫Thread#start方法會丟擲IllegalThreadStateException異常。
Thread#start方法的原始碼:
    public synchronized void start() {
      if (threadStatus != 0)
        throw new IllegalThreadStateException();
      group.add(this);
      boolean started = false;
      try {
        start0();
        started = true;
      } finally {
        try {
          if (!started) {
            group.threadStartFailed(this);
          }
        } catch (Throwable ignore) {
        }
      }
    }
呼叫Thread#start方法,會先對threadStatus進行判斷,只有當threadStatus == 0時,Thread#start才能正常執行,否則丟擲IllegalThreadStateException異常。
threadStatus實際上是 Thread 內部類 state 的對映,以下涉及java.lang.Thread類和jdk.internal.misc.VM類的相關程式碼:
    public class Thread implements Runnable {
      public State getState() {
        return jdk.internal.misc.VM.toThreadState(threadStatus);
      }

      public enum State {
        NEW,
        RUNNABLE,
        BLOCKED,
        WAITING,
        TIMED_WAITING,
        TERMINATED;
      }
    }

    public class VM {
      private static final int JVMTI_THREAD_STATE_ALIVE = 0x0001;                    // 1   , 0000 0000 0001
      private static final int JVMTI_THREAD_STATE_TERMINATED = 0x0002;               // 2   , 0000 0000 0010
      private static final int JVMTI_THREAD_STATE_RUNNABLE = 0x0004;                 // 4   , 0000 0000 0100
      private static final int JVMTI_THREAD_STATE_BLOCKED_ON_MONITOR_ENTER = 0x0400; // 1024, 0100 0000 0000
      private static final int JVMTI_THREAD_STATE_WAITING_INDEFINITELY = 0x0010;     // 16  , 0000 0001 0000
      private static final int JVMTI_THREAD_STATE_WAITING_WITH_TIMEOUT = 0x0020;     // 32  , 0000 0010 0000

      public static Thread.State toThreadState(int threadStatus) {
        if ((threadStatus & JVMTI_THREAD_STATE_RUNNABLE) != 0) {
          return RUNNABLE;
        } else if ((threadStatus & JVMTI_THREAD_STATE_BLOCKED_ON_MONITOR_ENTER) != 0) {
          return BLOCKED;
        } else if ((threadStatus & JVMTI_THREAD_STATE_WAITING_INDEFINITELY) != 0) {
          return WAITING;
        } else if ((threadStatus & JVMTI_THREAD_STATE_WAITING_WITH_TIMEOUT) != 0) {
          return TIMED_WAITING;
        } else if ((threadStatus & JVMTI_THREAD_STATE_TERMINATED) != 0) {
          return TERMINATED;
        } else if ((threadStatus & JVMTI_THREAD_STATE_ALIVE) == 0) {
          return NEW;
        } else {
          return RUNNABLE;
        }
      }
    }
參考資料:關於執行緒你必須知道的8個問題(中)
可以直接呼叫Thread#run方法麼?
可以直接呼叫Thread#run方法,和呼叫普通方法一樣,會在呼叫執行緒中執行,例如:
    public static void main(String[] args) {
      Thread t1 = new Thread(()-> System.out.println("直接呼叫run方法"));
      t1.run();
    }
上述程式碼中,Thread#run方法由主執行緒執行,並不會啟動新執行緒,因為Thread#run只是對介面方法Runnable#run的實現:
    public class Thread implements Runnable {
      private Runnable target;

      @Override
      public void run() {
        if (target != null) {
          target.run();
        }
      }
    }
參考資料:關於執行緒你必須知道的8個問題(中)
真:Thread#sleep 方法的作用
面試公司:蘇寧
Thread#sleep使執行緒進入休眠,但不會釋放鎖(鎖指的是 synchronized 中使用的 Java 內建錯,即 ObjectMonitor),執行緒進入 TIMED_WATING 狀態。確切的說,Thread#sleep在 JVM 的實現中,並不執行鎖相關操作的邏輯,所以實際中也談不上釋放不釋放。
Thread#sleep有 2 個過載方法:
    public static native void sleep(long millis) throws InterruptedException;

    public static void sleep(long millis, int nanos) throws InterruptedException;
Object#wait與Thread#sleep的區別:
| Object#wait | Thread#sleep | |
|---|---|---|
| 作用 | 執行緒進入暫停狀態(WAITING/TIMED_WAITING) | 執行緒進入休眠狀態(TIMED_WATING) |
| CPU 資源 | 釋放 | 釋放 |
| 內建鎖(ObjectMonitor) | 釋放 | 不釋放 |
重點關注在 CPU 資源和內建鎖的持有與釋放上的差別即可。
參考資料:關於執行緒你必須知道的8個問題(中)
Thread#sleep(0) 有什麼作用?
呼叫Thread#sleep(0)會真實的讓出 CPU 時間,從而觸發 CPU 時間片的競爭。
jvm.cpp 原始碼:
    JVM_ENTRY(void, JVM_Sleep(JNIEnv* env, jclass threadClass, jlong millis))
      HOTSPOT_THREAD_SLEEP_BEGIN(millis);
      EventThreadSleep event;
      if (millis == 0) {
        os::naked_yield();
      } else {
        ThreadState old_state = thread->osthread()->get_state();
        thread->osthread()->set_state(SLEEPING);
        if (os::sleep(thread, millis, true) == OS_INTRPT) {
          if (!HAS_PENDING_EXCEPTION) {
            if (event.should_commit()) {
              post_thread_sleep_event(&event, millis);
            }
            HOTSPOT_THREAD_SLEEP_END(1);
          }
        }
        thread->osthread()->set_state(old_state);
      }
      HOTSPOT_THREAD_SLEEP_END(0);
    JVM_END
第 4 行判斷millis == 0成功後會執行os::naked_yield(),此時作用與Thread#yield相同。
參考資料:關於執行緒你必須知道的8個問題(中)
Thread#yield 方法的作用
呼叫Thread#yield使當前執行緒讓出 CPU 時間,從而觸發 CPU 時間片的競爭。另外,與Thread#sleep一樣,Thread#yield也不會釋放鎖。
JVM 中的實現:
    JVM_ENTRY(void, JVM_Yield(JNIEnv *env, jclass threadClass))
      if (os::dont_yield()) {
        return;
      }
      os::naked_yield();
    JVM_END
與呼叫Thread#sleep(0)的實現一樣。
Tips:Thread#yield只是讓出了時間片,但又可能會立即搶奪回來,例如:所有執行緒必須持有鎖才能執行,持有鎖的執行緒呼叫Thread#yield讓出 CPU 時間片,但並未釋放鎖,其他執行緒無法執行,只能持有執行緒的鎖繼續獲取 CPU 時間片。
參考資料:關於執行緒你必須知道的8個問題(中)
Thread#join 方法的作用
Thread#join等待其他執行緒執行結束,執行緒進入 WAITING 或TIMED_WAITING 狀態。假如我們右如下程式碼:
    Thread t1 = new Thread(()- >{
      // 業務邏輯
    });

    Thread t2 = new Thread(()- >{
      t1.join();
      // 業務邏輯
    });

    t1.start();
    t2.start();
上述程式碼中,主執行緒啟動執行緒 t1 和 t2 後,執行緒 t2 會等待執行緒 t1 執行結束後再繼續執行,即誰執行了執行緒 t2 執行了t1.join後等待執行緒 t1 執行完畢後再執行。
參考資料:關於執行緒你必須知道的8個問題(中)
Thread#interrupt 方法的作用
Thread#interrupt方法表示中斷執行緒,但 JVM 並不會立即中斷執行緒,僅僅是將執行緒標記為中斷狀態,隨後嘗試喚醒處於 sleep/wait/park 中的執行緒,真正的中斷執行緒的執行是在作業系統獲取到該執行緒的中斷狀態標記開始的。
需要注意,當執行緒呼叫了Object#wait,Thread#join或Thread#sleep方法後再呼叫Thread#interrupt方法會丟擲異常 InterruptedException。這點在 Java 原始碼的註釋上也有說明:
If this thread is blocked in an invocation of the wait(), wait(long), or wait(long, int) methods of the Object class, or of the join(), join(long), join(long, int), sleep(long), or sleep(long, int), methods of this class, then its interrupt status will be cleared and it will receive an InterruptedException.
Thread#interrupt0方法在JVM的核心原始碼位於 thread.cpp 中:
    void os::interrupt(Thread* thread) {
      OSThread* osthread = thread->osthread();
      if (!osthread->interrupted()) {
        osthread->set_interrupted(true);
        OrderAccess::fence();
        ParkEvent * const slp = thread->_SleepEvent ;
        if (slp != NULL)
          slp->unpark() ;
      }
      if (thread->is_Java_thread())
        ((JavaThread*)thread)->parker()->unpark();

      ParkEvent * ev = thread->_ParkEvent ;
      if (ev != NULL)
        ev->unpark() ;
    }
參考資料:關於執行緒你必須知道的8個問題(中),thread.cpp
如何停止一個正在執行的執行緒?
- 使用
Thread#interrupt方法 - 使用
Thread#stop方法(該方法已被廢棄)
Runnable介面和Callable介面
Runnable 和 Callable 都是執行緒中用來執行業務邏輯方法的介面。
Runnable 介面:
    @FunctionalInterface
    public interface Runnable {
      public abstract void run();
    }

Callable 介面:

    public interface Callable<V> {
        V call() throws Exception;
    }
Runnable 介面沒有返回值,而 Callable 介面是有返回值的,可以藉助 Futur 或 FutureTask 獲取執行緒執行的結果,舉個例子:
    public class ByCallable  {
      public static void main(String[] args) throws ExecutionException, InterruptedException {
        System.out.println("main的執行緒:" + Thread.currentThread().getName());
        Callable<String> callable = new MyCallable();
        FutureTask <String> futureTask = new FutureTask<>(callable);
        new Thread(futureTask).start();
        System.out.println("MyCallable的執行執行緒:" + futureTask.get());
      }

      static class MyCallable implements Callable<String> {
        @Override
        public String call() {
          System.out.println("MyCallable的執行緒:" + Thread.currentThread().getName());
          return Thread.currentThread().getName();
        }
      }
    }
應用篇
這部分是考察執行緒相關內容的應用,常見的是對執行緒的等待與喚醒的使用。
使用3個執行緒交替列印100次字母abc。
方法 1:引入同步狀態(AtomicInteger)
建立變數同步狀態 state,通過同步狀態確認何時列印對應的字母:
- 當state % 3 == 1時列印字母A,同時更新同步狀態;
- 當state % 3 == 2時列印字母B,同時更新同步狀態;
- 當state % 3 == 0時列印字母C,同時更新同步狀態。
程式碼實現如下:
    private static final AtomicInteger STATE = new AtomicInteger(1);

    private static void useAtomicSyncState() {
      new Thread(() -> {
        for (int i = 0; i < 100; ) {
          if (STATE.get() % 3 == 1) {
            System.out.print("A,");
            STATE.compareAndSet(i * 3 + 1, i * 3 + 2);
            i++;
          }
        }
      }).start();

      new Thread(() -> {
        for (int i = 0; i < 100; ) {
          if (STATE.get() % 3 == 2) {
            System.out.print("B,");
            STATE.compareAndSet(i * 3 + 2, i * 3 + 3);
            i++;
          }
        }
      }).start();

      new Thread(() -> {
        for (int i = 0; i < 100; ) {
          if (STATE.get() % 3 == 0) {
            System.out.print("C");
            System.out.println();
            STATE.compareAndSet(i * 3 + 3, i * 3 + 4);
            i++;
          }
        }
      }).start();
    }
Tips:使用AtomicInteger型別是出於以下兩點考慮:
- private static int state,這種同步狀態會導致可見性問題;
- private volatile static int state,操作state ++不是原子操作。
方法 2:同步狀態 + synchronized
如果要使用private static int state型別的同步狀態,我們可以引入synchronized,程式碼如下:
    private static int state = 1;

    private static final Object OBJ_LOCK = new Object();

    private static void useSynchronized() {
      new Thread(() -> {
        for (int i = 0; i < 100; ) {
          synchronized (OBJ_LOCK) {
            while (state % 3 == 1) {
              System.out.print("A,");
              state++;
              i++;
            }
          }
        }
      }).start();

      new Thread(() -> {
        for (int i = 0; i < 100; ) {
          synchronized (OBJ_LOCK) {
            while (state % 3 == 2) {
              System.out.print("B,");
              state++;
              i++;
            }
          }
        }
      }).start();

      new Thread(() -> {
        for (int i = 0; i < 100; ) {
          synchronized (OBJ_LOCK) {
            while (state % 3 == 0) {
              System.out.print("C");
              System.out.println();
              state++;
              i++;
            }
          }
        }
      }).start();
    }
Tips:synchronized保證了修飾程式碼塊中內容的可見性和原子性。
方法 3:同步狀態 + synchronized + Object#wait與Object#notifyAll
以上方法的問題是,每個執行緒都會執行大量的「空轉」,state 不滿足進入 while 迴圈的情況,變數 i 尚未發生變化時,導致 for 迴圈成為「死迴圈」。通過引入等待Object#wait與喚醒Object#notifyAll來減少「空轉」的次數,程式碼如下:
    private static int state = 1;

    private static final Object OBJ_LOCK = new Object();

    private static void useSynchronizedWithNotify() {
      new Thread(() -> {
        synchronized (OBJ_LOCK) {
          for (int i = 0; i < 100; i++) {
            while (state % 3 != 1) {
              try {
                OBJ_LOCK.wait();
              } catch (InterruptedException e) {
                throw new RuntimeException(e);
              }
            }
            System.out.print("A,");
            state++;
            OBJ_LOCK.notifyAll();
          }
        }
      }).start();

      new Thread(() -> {
        synchronized (OBJ_LOCK) {
          for (int i = 0; i < 100; i++) {
            while (state % 3 != 2) {
              try {
                OBJ_LOCK.wait();
              } catch (InterruptedException e) {
                throw new RuntimeException(e);
              }
            }
            System.out.print("B,");
            state++;
            OBJ_LOCK.notifyAll();
          }
        }
      }).start();

      new Thread(() -> {
        synchronized (OBJ_LOCK) {
          for (int i = 0; i < 100; i++) {
            while (state % 3 != 0) {
              try {
                OBJ_LOCK.wait();
              } catch (InterruptedException e) {
                throw new RuntimeException(e);
              }
            }
            System.out.print("C");
            System.out.println();
            state++;
            OBJ_LOCK.notifyAll();
          }
        }
      }).start();
    }
方法 4:同步狀態 + ReentrantLock + Condition
與方法 3 基本一致,ReentrantLock 代替synchronized,Condition#await和Condition#signalAll代替Object#wait與Object#notifyAll,程式碼如下:
    private static int state = 1;

    private static final ReentrantLock REENTRANT_LOCK = new ReentrantLock();

    private static final Condition CONDITION = REENTRANT_LOCK.newCondition();

    private static void useReentrantLockWithCondition() {
      new Thread(() -> {
        for (int i = 0; i < 100; i++) {
          try {
            REENTRANT_LOCK.lock();
            while (state % 3 != 1) {
              CONDITION.await();
            }
            System.out.print("A,");
            state++;
            CONDITION.signalAll();
          } catch (InterruptedException e) {
            throw new RuntimeException(e);
          } finally {
            REENTRANT_LOCK.unlock();
          }
        }
      }).start();

      new Thread(() -> {
        for (int i = 0; i < 100; i++) {
          try {
            REENTRANT_LOCK.lock();
            while (state % 3 != 1) {
              CONDITION.await();
            }
            System.out.print("B,");
            state++;
            CONDITION.signalAll();
          } catch (InterruptedException e) {
            throw new RuntimeException(e);
          } finally {
            REENTRANT_LOCK.unlock();
          }
        }
      }).start();

      new Thread(() -> {
        for (int i = 0; i < 100; i++) {
          try {
            REENTRANT_LOCK.lock();
            while (state % 3 != 1) {
              CONDITION.await();
            }
            System.out.print("C");
            System.out.println();
            state++;
            CONDITION.signalAll();
          } catch (InterruptedException e) {
            throw new RuntimeException(e);
          } finally {
            REENTRANT_LOCK.unlock();
          }
        }
      }).start();
    }
Tips:除了以上 4 中方法外,還可以通過其它的同步工具實現,如:Semphore,CountDownLatch,CyclicBarrier 等。
參考資料:關於執行緒你必須知道的8個問題(中),詳解AQS家族的成員:Semaphore,詳解AQS家族的成員:CountDownLatch,AQS家族的「外門弟子」:CyclicBarrier
使用4個執行緒交替列印數位1~100。
上一題的翻版,我這裡只演示 ReentrantLock 的實現方式,程式碼如下:
    static int state = 1;

    static ReentrantLock reentrantLock = new ReentrantLock();

    static Condition condition = reentrantLock.newCondition();

    public static void main(String[] args) {
      new Thread(() -> {
        for (int i = 0; i < 25; i++) {
          try {
            reentrantLock.lock();
            if (state % 4 != 1) {
              condition.await();
            }
            System.out.println("Thread-1 :" + state);
            state++;
            condition.signalAll();
          } catch (InterruptedException e) {
            throw new RuntimeException(e);
          } finally {
            reentrantLock.unlock();
          }
        }
      }).start();

      new Thread(() -> {
        for (int i = 0; i < 25; i++) {
          try {
            reentrantLock.lock();
            if (state % 4 != 2) {
              condition.await();
            }
            System.out.println("Thread-2 :" + state);
            state++;
            condition.signalAll();
          } catch (InterruptedException e) {
            throw new RuntimeException(e);
          } finally {
            reentrantLock.unlock();
          }
        }
      }).start();

      new Thread(() -> {
        for (int i = 0; i < 25; i++) {
          try {
            reentrantLock.lock();
            if (state % 4 != 3) {
              condition.await();
            }
            System.out.println("Thread-3 :" + state);
            state++;
            condition.signalAll();
          } catch (InterruptedException e) {
            throw new RuntimeException(e);
          } finally {
            reentrantLock.unlock();
          }
        }
      }).start();

      new Thread(() -> {
        for (int i = 0; i < 25; i++) {
          try {
            reentrantLock.lock();
            if (state % 4 != 0) {
              condition.await();
            }
            System.out.println("Thread-4 :" + state);
            state++;
            condition.signalAll();
          } catch (InterruptedException e) {
            throw new RuntimeException(e);
          } finally {
            reentrantLock.unlock();
          }
        }
      }).start();
    }
參考資料:關於執行緒你必須知道的8個問題(中)
如保證 3 個執行緒按照執行的順序執行?
可以使用Thread#join方法,線上程中啟動另一個執行緒,同時阻塞當前執行緒,程式碼如下:
    Thread t1 = new Thread(()-> System.out.println("執行緒[t1]執行!"));
    Thread t2 = new Thread(()-> {
        try {
            t1.join();
        } catch (InterruptedException e) {
            throw new RuntimeException(e);
        }
        System.out.println("執行緒[t2]執行!");
    });
    Thread t3 = new Thread(()-> {
        try {
            t2.join();
        } catch (InterruptedException e) {
            throw new RuntimeException(e);
        }
        System.out.println("執行緒[t3]執行!");
    });

    t3.start();
    t2.start();
    t1.start();
Thread#join方法的作用是,阻塞執行執行緒,等待呼叫 join 方法的執行緒執行完畢。如:在上述程式碼中,t2 中執行t1.join(),那麼執行緒 t2 就需要等待執行緒 t1 執行完畢後再執行。
參考資料:關於執行緒你必須知道的8個問題(中)
如何實現一個執行緒執行完畢後執行另一個執行緒
面試公司:美團
參考「如保證 3 個執行緒按照執行的順序執行?」的解答。
參考資料:關於執行緒你必須知道的8個問題(中)
如果本文對你有幫助的話,還請多多點贊支援。如果文章中出現任何錯誤,還請批評指正。最後歡迎大家關注分享硬核技術的金融摸魚俠王有志,我們下次再見!