從零玩轉系列之SpringBoot3-快速入門
一、簡介

1.前置知識
● Java17
● Spring、SpringMVC、MyBatis
● Maven、IDEA
2.環境要求
| 環境&工具 | 版本(or later) |
|---|---|
| SpringBoot | 3.1.x |
| IDEA | 2023.x |
| Java | 17+ |
| Maven | 3.5+ |
| Tomcat | 10.0+ |
| Servlet | 5.0+ |
| GraalVM Community | 22.3+ |
| Native Build Tools | 0.9.19+ |
3. SpringBoot是什麼
SpringBoot 幫我們簡單、快速地建立一個獨立的、生產級別的 Spring 應用(說明:SpringBoot底層是Spring)
大多數 SpringBoot 應用只需要編寫少量設定即可快速整合 Spring 平臺以及第三方技術
特性:
快速建立獨立 Spring 應用
-
- SSM:導包、寫設定、啟動執行
直接嵌入Tomcat、Jetty or Undertow(無需部署 war 包)【Servlet容器】
-
- linux java tomcat mysql: war 放到 tomcat 的 webapps下
- jar: java環境; java -jar
重點:提供可選的starter,簡化應用整合
-
- 場景啟動器(starter):web、json、郵件、oss(物件儲存)、非同步、定時任務、快取...
- 導包一堆,控制好版本。
- 為每一種場景準備了一個依賴; web-starter。mybatis-starter
**重點:**按需自動設定 Spring 以及 第三方庫
-
- 如果這些場景我要使用(生效)。這個場景的所有設定都會自動設定好。
- 約定大於設定:每個場景都有很多預設設定。
- 自定義:組態檔中修改幾項就可以
提供生產級特性:如 監控指標、健康檢查、外部化設定等
-
- 監控指標、健康檢查(k8s)、外部化設定
無程式碼生成、無xml
總結:簡化開發,簡化設定,簡化整合,簡化部署,簡化監控,簡化運維。
二、快速體驗
場景:瀏覽器傳送**/hello**請求,返回"Hello,Spring Boot 3!"
開發流程
1. 建立專案
maven 專案
<!--    所有springboot專案都必須繼承自 spring-boot-starter-parent -->
    <parent>
        <groupId>org.springframework.boot</groupId>
        <artifactId>spring-boot-starter-parent</artifactId>
        <version>3.0.5</version>
    </parent>
2. 匯入場景
場景啟動器
    <dependencies>
			<!-- web開發的場景啟動器 -->
        <dependency>
            <groupId>org.springframework.boot</groupId>
            <artifactId>spring-boot-starter-web</artifactId>
        </dependency>
    </dependencies>
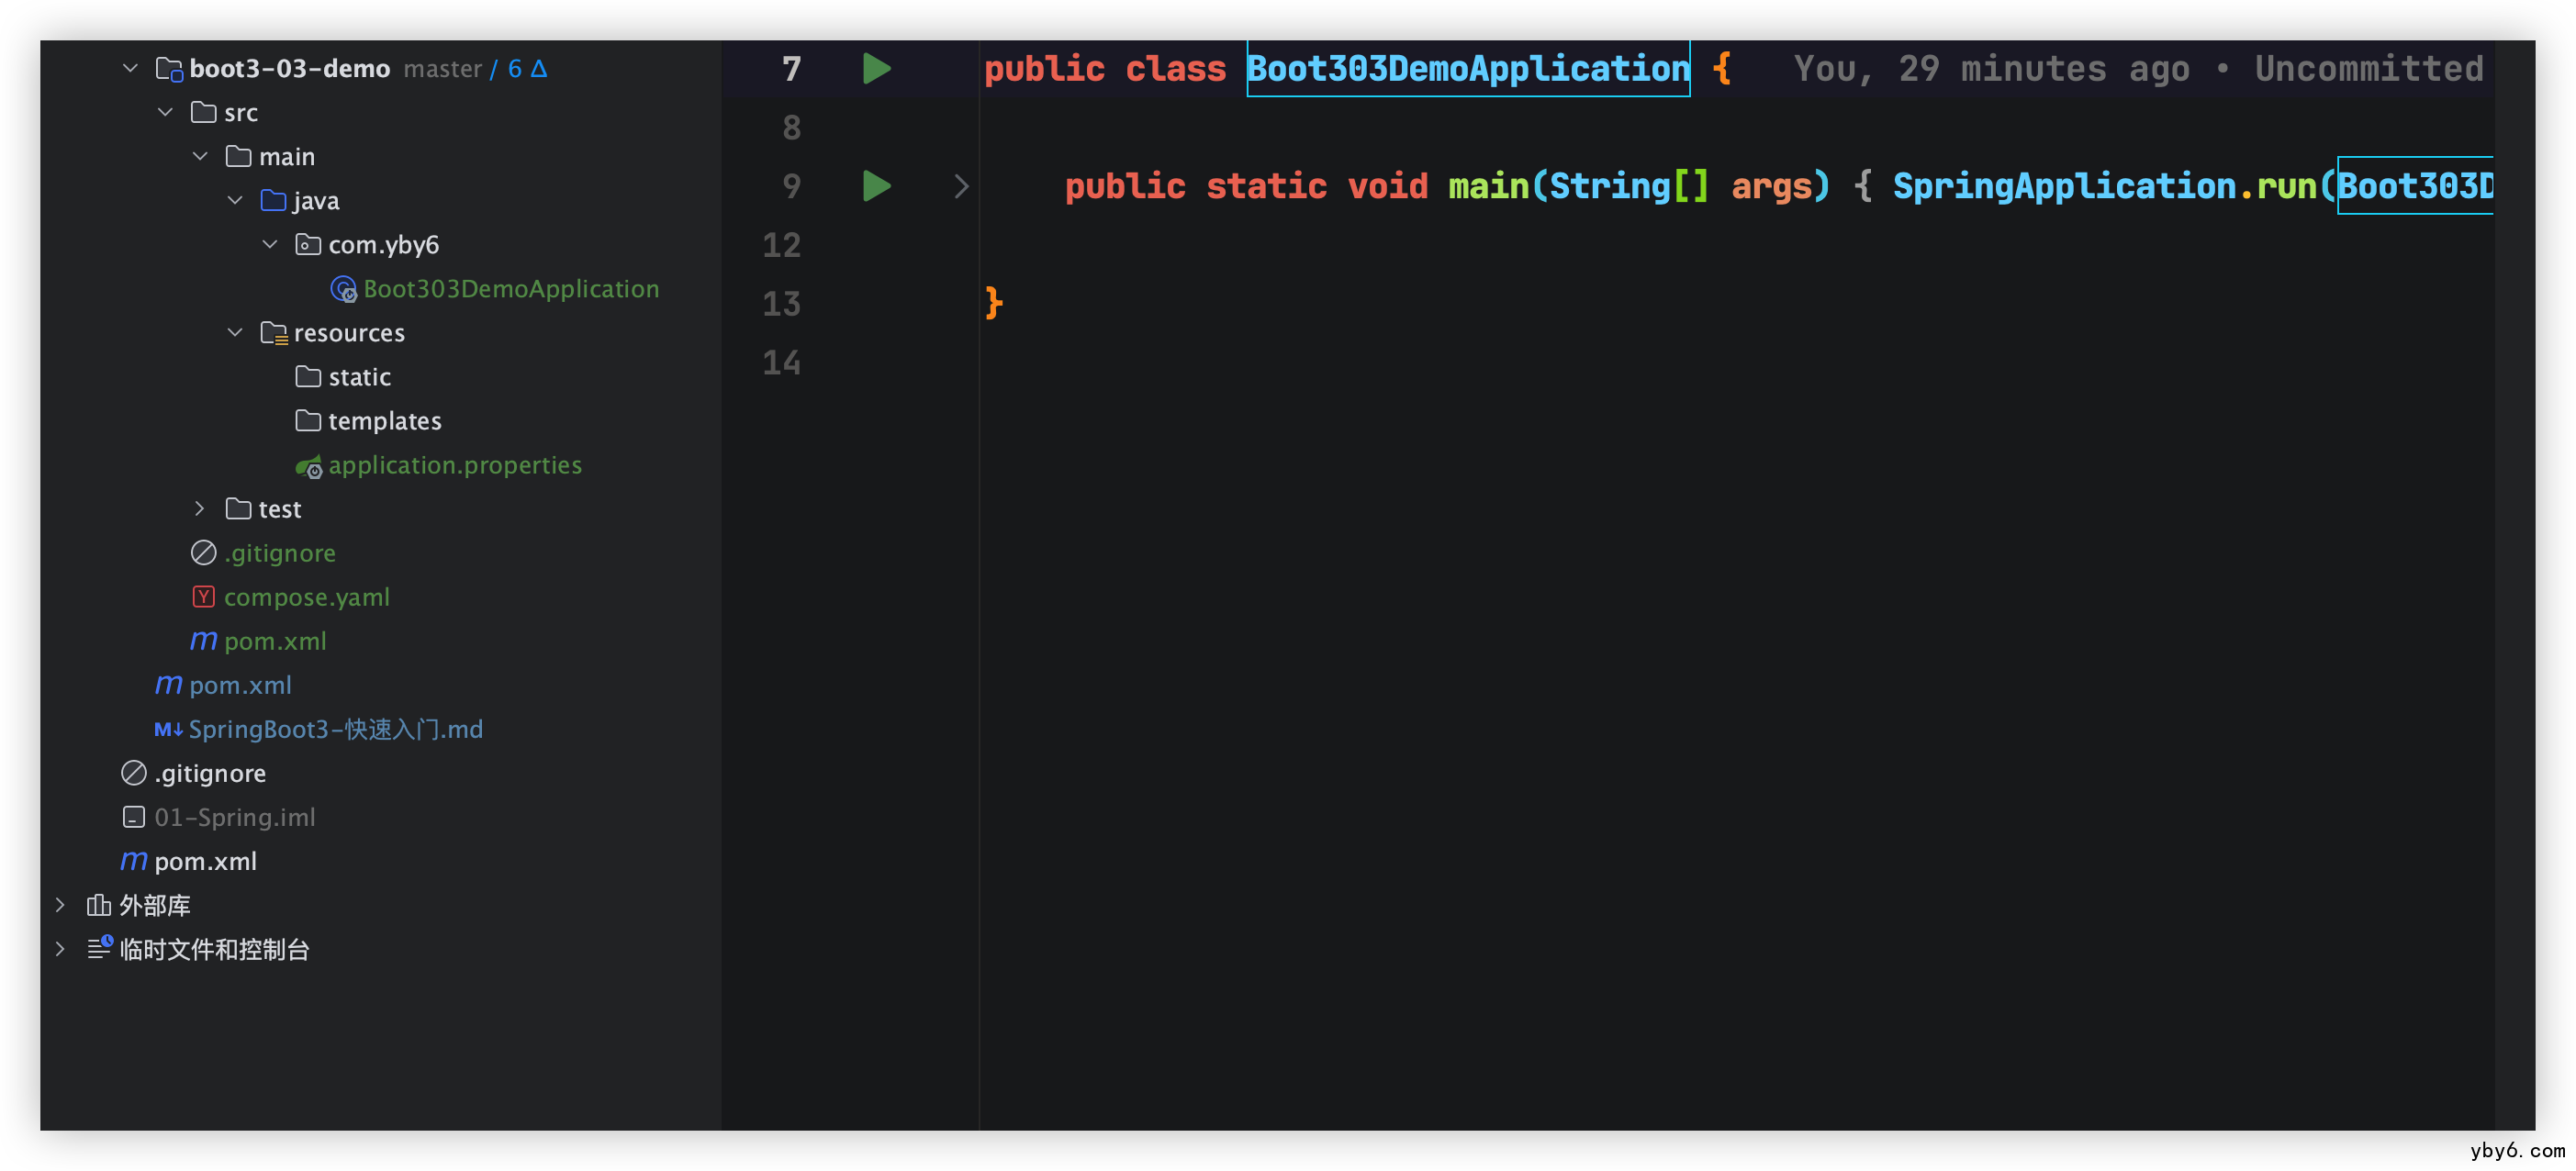
3. 主程式
@SpringBootApplication
public class MainApplication {

    public static void Test(String[] args) {
        SpringApplication.run(MainApplication.class,args);
    }
}
4. 業務
@RestController
public class HelloController {

    @GetMapping("/hello")
    public String hello(){

        return "Hello,Spring Boot 3!";
    }

}
5. 測試
預設啟動存取: localhost:8080
6. 打包
<!--    SpringBoot應用打包外掛-->
    <build>
        <plugins>
            <plugin>
                <groupId>org.springframework.boot</groupId>
                <artifactId>spring-boot-maven-plugin</artifactId>
            </plugin>
        </plugins>
    </build>
mvn clean package把專案打成可執行的jar包
java -jar demo.jar啟動專案
三、 特性小結
1. 簡化整合
匯入相關的場景,擁有相關的功能。場景啟動器
預設支援的所有場景:https://docs.spring.io/spring-boot/docs/current/reference/html/using.html
- 官方提供的場景:命名為:
spring-boot-starter-* - 第三方提供場景:命名為:
*-spring-boot-starter
場景一匯入,萬物皆就緒
2. 簡化開發
無需編寫任何設定,直接開發業務
3. 簡化設定
application.properties:
- 集中式管理設定。只需要修改這個檔案就行 。
- 設定基本都有預設值
- 能寫的所有設定都在: https://docs.spring.io/spring-boot/docs/current/reference/html/application-properties.html
4. 簡化部署
打包為可執行的jar包。
linux伺服器上有java環境。
5. 簡化運維
修改設定(外部放一個application.properties檔案)、監控、健康檢查。
3. Spring Initializr 建立嚮導
一鍵建立好整個專案結構

四、應用分析
1. 依賴管理機制
思考:
1、為什麼匯入starter-web所有相關依賴都匯入進來?
- 開發什麼場景,匯入什麼場景啟動器。
- maven依賴傳遞原則。A-B-C: A就擁有B和C
- 匯入 場景啟動器。 場景啟動器 自動把這個場景的所有核心依賴全部匯入進來
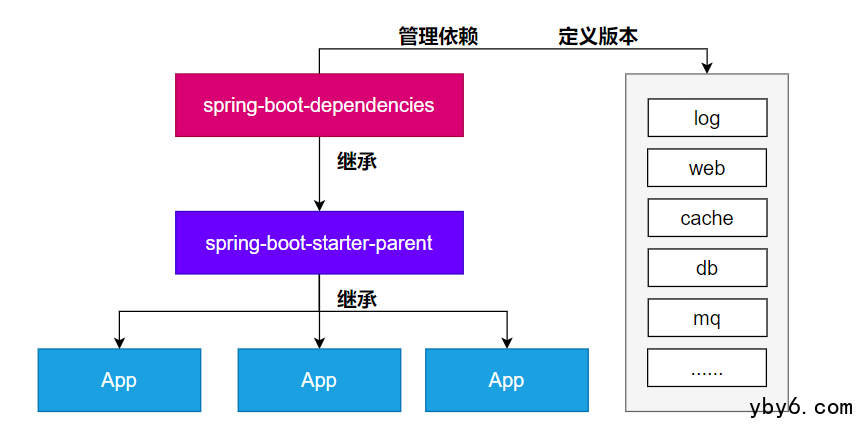
2、為什麼版本號都不用寫?
- 每個boot專案都有一個父專案
spring-boot-starter-parent - parent的父專案是
spring-boot-dependencies - 父專案 版本仲裁中心,把所有常見的jar的依賴版本都宣告好了。
- 比如:
mysql-connector-j
3、自定義版本號
利用maven的就近原則
-
- 直接在當前專案
properties標籤中宣告父專案用的版本屬性的key - 直接在匯入依賴的時候宣告版本
- 直接在當前專案
4、第三方的jar包
- boot父專案沒有管理的需要自行宣告對應的依賴並且帶上版本號
<!-- https://mvnrepository.com/artifact/com.alibaba/druid -->
<dependency>
    <groupId>com.alibaba</groupId>
    <artifactId>druid</artifactId>
    <version>1.2.16</version>
</dependency>
maven管理圖

2. 自動設定機制
1. 初步理解
自動設定的 Tomcat、SpringMVC 等
-
- 匯入場景,容器中就會自動設定好這個場景的核心元件。
- 以前:DispatcherServlet、ViewResolver、CharacterEncodingFilter....
- 現在:自動設定好的這些元件
- 驗證:容器中有了什麼元件,就具有什麼功能
    public static void main(String[] args) {

        //java10: 區域性變數型別的自動推斷
        var ioc = SpringApplication.run(MainApplication.class, args);

        //1、獲取容器中所有元件的名字
        String[] names = ioc.getBeanDefinitionNames();
        //2、挨個遍歷:
        // dispatcherServlet、beanNameViewResolver、characterEncodingFilter、multipartResolver
        // SpringBoot把以前設定的核心元件現在都給我們自動設定好了。
        for (String name : names) {
            System.out.println(name);
        }

    }
預設的包掃描規則
-
@SpringBootApplication標註的類就是主程式類- SpringBoot只會掃描主程式所在的包及其下面的子包,自動的component-scan功能
- 自定義掃描路徑
-
-
- @SpringBootApplication(scanBasePackages = "com.yby6")
@ComponentScan("com.yby6")直接指定掃描的路徑
-
設定預設值
-
- 組態檔的所有設定項是和某個類的物件值進行一一系結的。
- 繫結了組態檔中每一項值的類: 屬性類。
- 比如:
-
-
ServerProperties繫結了所有Tomcat伺服器有關的設定MultipartProperties繫結了所有檔案上傳相關的設定- ....參照官方檔案:或者參照 繫結的 屬性類。
-
按需載入自動設定
-
- 匯入場景
spring-boot-starter-web - 場景啟動器除了會匯入相關功能依賴,匯入一個
spring-boot-starter,是所有starter的starter,基礎核心starter spring-boot-starter匯入了一個包spring-boot-autoconfigure。包裡面都是各種場景的AutoConfiguration自動設定類- 雖然全場景的自動設定都在
spring-boot-autoconfigure這個包,但是不是全都開啟的。
- 匯入場景
-
-
- 匯入哪個場景就開啟哪個自動設定 參考本章節的
條件註解
- 匯入哪個場景就開啟哪個自動設定 參考本章節的
-
總結: 匯入場景啟動器、觸發 spring-boot-autoconfigure這個包的自動設定生效、容器中就會具有相關場景的功能
2. 完整流程
思考:
1、SpringBoot怎麼實現導一個
**starter**、寫一些簡單設定,應用就能跑起來,我們無需關心整合2、為什麼Tomcat的埠號可以設定在
application.properties中,並且Tomcat能啟動成功?3、匯入場景後哪些自動設定能生效?

自動設定流程細節梳理:
1、 匯入starter-web:匯入了web開發場景
- 1、場景啟動器匯入了相關場景的所有依賴:
starter-json、starter-tomcat、springmvc - 2、每個場景啟動器都引入了一個
spring-boot-starter,核心場景啟動器。 - 3、核心場景啟動器引入了
spring-boot-autoconfigure包。 - 4、
spring-boot-autoconfigure裡面囊括了所有場景的所有設定。 - 5、只要這個包下的所有類都能生效,那麼相當於SpringBoot官方寫好的整合功能就生效了。
- 6、SpringBoot預設卻掃描不到
spring-boot-autoconfigure下寫好的所有設定類。(這些設定類給我們做了整合操作),預設只掃描主程式所在的包。
2、主程式:@SpringBootApplication
1、
@SpringBootApplication由三個註解組成@SpringBootConfiguration、@EnableAutoConfiguratio、@ComponentScan2、SpringBoot預設只能掃描自己主程式所在的包及其下面的子包,掃描不到
spring-boot-autoconfigure包中官方寫好的設定類3、
@EnableAutoConfiguration:SpringBoot 開啟自動設定的核心。-
- \1. 是由
@Import(AutoConfigurationImportSelector.class)提供功能:批次給容器中匯入元件。 - \2. SpringBoot啟動會預設載入 142個設定類。
- \3. 這142個設定類來自於
spring-boot-autoconfigure下META-INF/spring/**org.springframework.boot.autoconfigure.AutoConfiguration**.imports檔案指定的 - 專案啟動的時候利用 @Import 批次匯入元件機制把
autoconfigure包下的142xxxxAutoConfiguration類匯入進來(自動設定類) - 雖然匯入了
142個自動設定類
- \1. 是由
4、按需生效:
-
- 並不是這
146個自動設定類都能生效 3.1.x 版本 - 每一個自動設定類,都有條件註解
@ConditionalOnxxx,只有條件成立,才能生效
- 並不是這
3、xxxxAutoConfiguration自動設定類
- 1、給容器中使用@Bean 放一堆元件。
- 2、每個自動設定類都可能有這個註解
@EnableConfigurationProperties(ServerProperties.class),用來把組態檔中配的指定字首的屬性值封裝到xxxProperties屬性類中 - 3、以Tomcat為例:把伺服器的所有設定都是以
server開頭的。設定都封裝到了屬性類中。 - 4、給容器中放的所有元件的一些核心引數,都來自於
xxxProperties、xxxProperties都是和組態檔繫結。 - 只需要改組態檔的值,核心元件的底層引數都能修改
4、寫業務,全程無需關心各種整合(底層這些整合寫好了,而且也生效了)
核心流程總結:
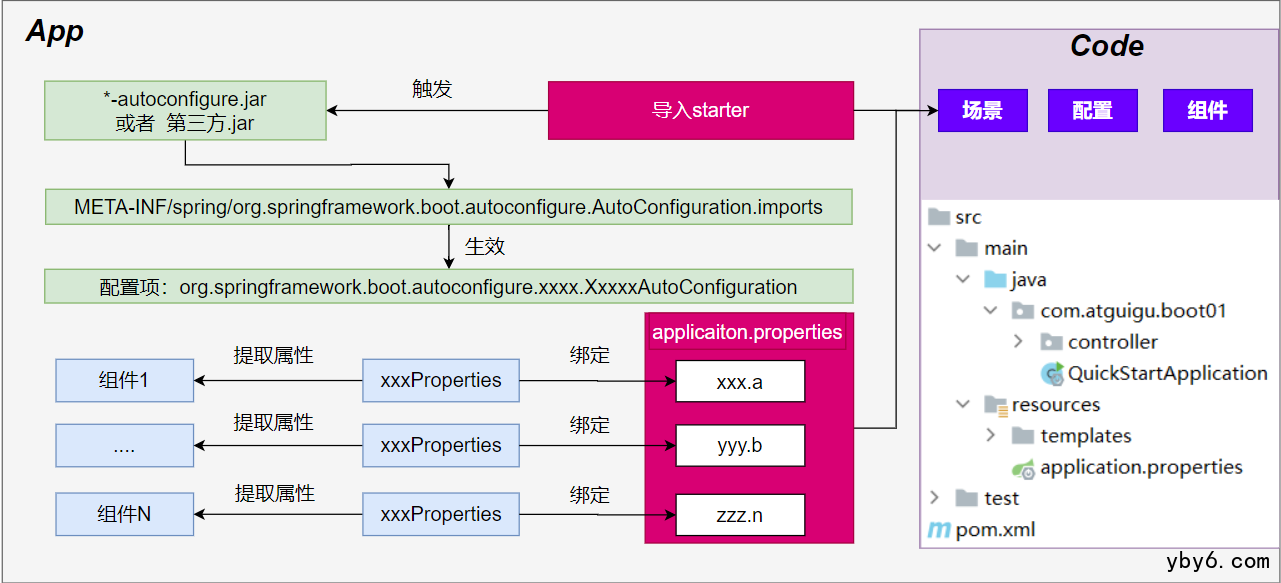
1、匯入starter,就會匯入autoconfigure包。
2、autoconfigure 包裡面 有一個檔案 META-INF/spring/org.springframework.boot.autoconfigure.AutoConfiguration.imports,裡面指定的所有啟動要載入的自動設定類
3、@EnableAutoConfiguration 會自動的把上面檔案裡面寫的所有自動設定類都匯入進來。xxxAutoConfiguration 是有條件註解進行按需載入
4、xxxAutoConfiguration給容器中匯入一堆元件,元件都是從 xxxProperties中提取屬性值
5、xxxProperties又是和組態檔進行了繫結
**效果:**匯入starter、修改組態檔,就能修改底層行為。
3. 如何學好SpringBoot
框架的框架、底層基於Spring。能調整每一個場景的底層行為。100%專案一定會用到底層自定義
攝影:
- 傻瓜:自動設定好。
- 單反:焦距、光圈、快門、感光度....
- 傻瓜+單反:
理解自動設定原理
-
- 匯入starter --> 生效xxxxAutoConfiguration --> 元件 --> xxxProperties -->組態檔
理解其他框架底層
-
- 攔截器
可以隨時客製化化任何元件
-
- 組態檔
- 自定義元件
普通開發:匯入starter,Controller、Service、Mapper、偶爾修改組態檔
高階開發:自定義元件、自定義設定、自定義starter
核心:
- 這個場景自動設定匯入了哪些元件,我們能不能Autowired進來使用
- 能不能通過修改設定改變元件的一些預設引數
- 需不需要自己完全定義這個元件
- 場景客製化化
‼️ 最佳實戰:
選場景,匯入到專案
-
- 官方:starter
- 第三方:去倉庫搜
寫設定,改組態檔關鍵項
-
- 資料庫引數(連線地址、賬號密碼...)
分析這個場景給我們匯入了哪些能用的元件
-
- 自動裝配這些元件進行後續使用
- 不滿意boot提供的自動配好的預設元件
-
-
- 客製化化
-
-
-
-
- 改設定
- 自定義元件
-
-
整合redis:
選場景:
spring-boot-starter-data-redis-
- 場景AutoConfiguration 就是這個場景的自動設定類
寫設定:
-
- 分析到這個場景的自動設定類開啟了哪些屬性繫結關係
@EnableConfigurationProperties(RedisProperties.class)- 修改redis相關的設定
分析元件:
-
- 分析到
RedisAutoConfiguration給容器中放了StringRedisTemplate - 給業務程式碼中自動裝配
StringRedisTemplate
- 分析到
客製化化
-
- 修改組態檔
- 自定義元件,自己給容器中放一個
StringRedisTemplate
4、核心技能
1. 常用註解
SpringBoot摒棄XML設定方式,改為全註解驅動
1. 元件註冊
@Configuration、@SpringBootConfiguration
@Bean、@Scope
@Controller、 @Service、@Repository、@Component
@Import
@ComponentScan
步驟:
1、@Configuration 編寫一個設定類
2、在設定類中,自定義方法給容器中註冊元件。配合@Bean
3、或使用@Import 匯入第三方的元件自己寫的類可以使用
@Bean和@Component,而其他包,沒有原始碼所以自己加入不了註解,只能採用@Import註解
2. 條件註解
***@ConditionalOnXxx***如果註解指定的條件成立,則觸發指定行為
@ConditionalOnClass:如果類路徑中存在這個類,則觸發指定行為
@ConditionalOnMissingClass:如果類路徑中不存在這個類,則觸發指定行為
@ConditionalOnBean:如果容器中存在這個Bean(元件),則觸發指定行為
@ConditionalOnMissingBean:如果容器中不存在這個Bean(元件),則觸發指定行為
場景:
如果存在
FastsqlException這個類,給容器中放一個Cat元件,名cat01, 否則,就給容器中放一個
Dog元件,名dog01 如果系統中有
dog01這個元件,就給容器中放一個 User元件,名zhangsan 否則,就放一個User,名叫lisi
@ConditionalOnBean(value=元件型別,name=元件名字):判斷容器中是否有這個型別的元件,並且名字是指定的值
條件註解列表:
@ConditionalOnRepositoryType (org.springframework.boot.autoconfigure.data)
@ConditionalOnDefaultWebSecurity (org.springframework.boot.autoconfigure.security)
@ConditionalOnSingleCandidate (org.springframework.boot.autoconfigure.condition)
@ConditionalOnWebApplication (org.springframework.boot.autoconfigure.condition)
@ConditionalOnWarDeployment (org.springframework.boot.autoconfigure.condition)
@ConditionalOnJndi (org.springframework.boot.autoconfigure.condition)
@ConditionalOnResource (org.springframework.boot.autoconfigure.condition)
@ConditionalOnExpression (org.springframework.boot.autoconfigure.condition)
@ConditionalOnClass (org.springframework.boot.autoconfigure.condition)
@ConditionalOnEnabledResourceChain (org.springframework.boot.autoconfigure.web)
@ConditionalOnMissingClass (org.springframework.boot.autoconfigure.condition)
@ConditionalOnNotWebApplication (org.springframework.boot.autoconfigure.condition)
@ConditionalOnProperty (org.springframework.boot.autoconfigure.condition)
@ConditionalOnCloudPlatform (org.springframework.boot.autoconfigure.condition)
@ConditionalOnBean (org.springframework.boot.autoconfigure.condition)
@ConditionalOnMissingBean (org.springframework.boot.autoconfigure.condition)
@ConditionalOnMissingFilterBean (org.springframework.boot.autoconfigure.web.servlet)
@Profile (org.springframework.context.annotation)
@ConditionalOnInitializedRestarter (org.springframework.boot.devtools.restart)
@ConditionalOnGraphQlSchema (org.springframework.boot.autoconfigure.graphql)
@ConditionalOnJava (org.springframework.boot.autoconfigure.condition)
3. 屬性繫結
@ConfigurationProperties: 宣告元件的屬性和組態檔哪些字首開始項進行繫結
@EnableConfigurationProperties:快速註冊註解:
- **場景:**SpringBoot預設只掃描自己主程式所在的包。如果匯入第三方包,即使元件上標註了 @Component、@ConfigurationProperties 註解,也沒用。因為元件都掃描不進來,此時使用這個註解就可以快速進行屬性繫結並把元件註冊進容器
這個一點倒是很重要,SpringBoot預設掃描當前專案主程式包及其子包,再加上自動設定類,那麼屬性類是不會掃描到的,此時就算加上@Component註解也是沒有任何用處,所以一般是在屬性類上面使用**@ConfigurationProperties註解,而在相應的自動設定類上面使用@EnableConfigurationProperties註解,從而讓屬性類繫結生效**
將容器中任意元件(Bean)的屬性值和組態檔的設定項的值進行繫結
- 1、給容器中註冊元件(@Component、@Bean)
- 2、使用**@ConfigurationProperties 宣告元件和組態檔的哪些設定項進行繫結**
推薦學習註解課程參照:Spring註解驅動開發【1-26集】
2. YAML組態檔
痛點:SpringBoot 集中化管理設定,
application.properties問題:設定多以後難閱讀和修改,層級結構辨識度不高
YAML 是 "YAML Ain't a Markup Language"(YAML 不是一種標示語言)。在開發的這種語言時,YAML 的意思其實是:"Yet Another Markup Language"(是另一種標示語言)。
- 設計目標,就是方便人類讀寫
- 層次分明,更適合做組態檔
- 使用
.yaml或.yml作為檔案字尾
1. 基本語法
- 大小寫敏感
- 使用縮排表示層級關係,k: v,使用空格分割k,v
- 縮排時不允許使用Tab鍵,只允許使用空格。換行
- 縮排的空格數目不重要,只要相同層級的元素左側對齊即可
- # 表示註釋,從這個字元一直到行尾,都會被解析器忽略。
支援的寫法:
- 物件:鍵值對的集合,如:對映(map)/ 雜湊(hash) / 字典(dictionary)
- 陣列:一組按次序排列的值,如:序列(sequence) / 列表(list)
- 純量:單個的、不可再分的值,如:字串、數位、bool、日期
2. 範例
@Component
@ConfigurationProperties(prefix = "person") //和組態檔person字首的所有設定進行繫結
@Data //自動生成JavaBean屬性的getter/setter
//@NoArgsConstructor //自動生成無參構造器
//@AllArgsConstructor //自動生成全參構造器
public class Person {
    private String name;
    private Integer age;
    private Date birthDay;
    private Boolean like;
    private Child child; //巢狀物件
    private List<Dog> dogs; //陣列(裡面是物件)
    private Map<String,Cat> cats; //表示Map
}

@Data
public class Dog {
    private String name;
    private Integer age;
}

@Data
public class Child {
    private String name;
    private Integer age;
    private Date birthDay;
    private List<String> text; //陣列
}

@Data
public class Cat {
    private String name;
    private Integer age;
}
properties表示法
person.name=張三
person.age=18
person.birthDay=2010/10/12 12:12:12
person.like=true
person.child.name=李四
person.child.age=12
person.child.birthDay=2018/10/12
person.child.text[0]=abc
person.child.text[1]=def
person.dogs[0].name=小黑
person.dogs[0].age=3
person.dogs[1].name=小白
person.dogs[1].age=2
person.cats.c1.name=小藍
person.cats.c1.age=3
person.cats.c2.name=小灰
person.cats.c2.age=2
Yaml 表示法
person:
  name: 張三
  age: 18
  birthDay: 2010/10/10 12:12:12
  like: true
  child:
    name: 李四
    age: 20
    birthDay: 2018/10/10
    text: ["abc","def"]
  dogs:
    - name: 小黑
      age: 3
    - name: 小白
      age: 2
  cats:
    c1:
      name: 小藍
      age: 3
    c2: {name: 小綠,age: 2} #物件也可用{}表示
3. 細節
birthDay 推薦寫為 birth-day
文字:
-
- 單引號不會跳脫【\n 則為普通字串顯示】
- 雙引號會跳脫【\n會顯示為換行符】
大文字
-
|開頭,大文字寫在下層,保留文字格式,換行符正確顯示>開頭,大文字寫在下層,摺疊換行符
多檔案合併
-
- 使用
---可以把多個yaml檔案合併在一個檔案中,每個檔案區依然認為內容獨立
- 使用
4. 小技巧:lombok
簡化JavaBean 開發。自動生成構造器、getter/setter、自動生成Builder模式等
<dependency>
    <groupId>org.projectlombok</groupId>
    <artifactId>lombok</artifactId>
    <scope>compile</scope>
</dependency>
使用@Data等註解

感興趣紀錄檔框架關係與起源可參考:https://www.bilibili.com/video/BV1gW411W76m 視訊 21~27集
1. 簡介
- Spring使用commons-logging作為內部紀錄檔,但底層紀錄檔實現是開放的。可對接其他紀錄檔框架。
- spring5及以後 commons-logging被spring直接自己寫了。
- 支援 jul,log4j2,logback。SpringBoot 提供了預設的控制檯輸出設定,也可以設定輸出為檔案。
- logback是預設使用的。
- 雖然紀錄檔框架很多,但是我們不用擔心,使用 SpringBoot 的預設設定就能工作的很好。
SpringBoot怎麼把紀錄檔預設設定好的
1、每個starter場景,都會匯入一個核心場景spring-boot-starter
2、核心場景引入了紀錄檔的所用功能spring-boot-starter-logging
3、預設使用了logback + slf4j 組合作為預設底層紀錄檔
4、紀錄檔是系統一啟動就要用,xxxAutoConfiguration是系統啟動好了以後放好的元件,後來用的。
5、紀錄檔是利用監聽器機制設定好的。ApplicationListener。
6、紀錄檔所有的設定都可以通過修改組態檔實現。以logging開始的所有設定。
2. 紀錄檔格式
2023-03-31T13:56:17.511+08:00  INFO 4944 --- [           main] o.apache.catalina.core.StandardService   : Starting service [Tomcat]
2023-03-31T13:56:17.511+08:00  INFO 4944 --- [           main] o.apache.catalina.core.StandardEngine    : Starting Servlet engine: [Apache Tomcat/10.1.7]
預設輸出格式:
- 時間和日期:毫秒級精度
- 紀錄檔級別:ERROR, WARN, INFO, DEBUG, or TRACE.
- 程序 ID
- ---: 訊息分割符
- 執行緒名: 使用[]包含
- Logger 名: 通常是產生紀錄檔的類名
- 訊息: 紀錄檔記錄的內容
注意: logback 沒有FATAL級別,對應的是ERROR
預設值:參照:spring-boot包additional-spring-configuration-metadata.json檔案
預設輸出格式值:%clr(%d{${LOG_DATEFORMAT_PATTERN:-yyyy-MM-dd'T'HH:mm:ss.SSSXXX}}){faint} %clr(${LOG_LEVEL_PATTERN:-%5p}) %clr(${PID:- }){magenta} %clr(---){faint} %clr([%15.15t]){faint} %clr(%-40.40logger{39}){cyan} %clr(:){faint} %m%n${LOG_EXCEPTION_CONVERSION_WORD:-%wEx}
可修改為:'%d{yyyy-MM-dd HH:mm:ss.SSS} %-5level [%thread] %logger{15} ===> %msg%n'
4. 紀錄檔級別
由低到高:
ALL,TRACE, DEBUG, INFO, WARN, ERROR,FATAL,OFF;-
- 只會列印指定級別及以下級別的紀錄檔
- ALL:列印所有紀錄檔
- TRACE:追蹤框架詳細流程紀錄檔,一般不使用
- DEBUG:開發偵錯細節紀錄檔
- INFO:關鍵、感興趣資訊紀錄檔
- WARN:警告但不是錯誤的資訊紀錄檔,比如:版本過時
- ERROR:業務錯誤紀錄檔,比如出現各種異常
- FATAL:致命錯誤紀錄檔,比如jvm系統崩潰
- OFF:關閉所有紀錄檔記錄
不指定級別的所有類,都使用root指定的級別作為預設級別
SpringBoot紀錄檔預設級別是 INFO
- 在application.properties/yaml中設定logging.level.
= 指定紀錄檔級別 - level可取值範圍:
TRACE, DEBUG, INFO, WARN, ERROR, FATAL, or OFF,定義在LogLevel類中 - root 的logger-name叫root,可以設定logging.level.root=warn,代表所有未指定紀錄檔級別都使用 root 的 warn 級別
5. 紀錄檔分組
比較有用的技巧是:
將相關的logger分組在一起,統一設定。SpringBoot 也支援。比如:Tomcat 相關的紀錄檔統一設定
logging.group.tomcat=org.apache.catalina,org.apache.coyote,org.apache.tomcat
logging.level.tomcat=trace
SpringBoot 預定義兩個組
| Name | Loggers |
|---|---|
| web | org.springframework.core.codec, org.springframework.http, org.springframework.web, org.springframework.boot.actuate.endpoint.web, org.springframework.boot.web.servlet.ServletContextInitializerBeans |
| sql | org.springframework.jdbc.core, org.hibernate.SQL, org.jooq.tools.LoggerListener |
6. 檔案輸出
SpringBoot 預設只把紀錄檔寫在控制檯,如果想額外記錄到檔案,可以在application.properties中新增logging.file.name or logging.file.path設定項。
| logging.file.name | logging.file.path | 範例 | 效果 |
|---|---|---|---|
| 未指定 | 未指定 | 僅控制檯輸出 | |
| 指定 | 未指定 | my.log | 寫入指定檔案。可以加路徑 |
| 未指定 | 指定 | /var/log | 寫入指定目錄,檔名為spring.log |
| 指定 | 指定 | 以logging.file.name為準 |
7. 檔案歸檔與捲動切割
歸檔:每天的紀錄檔單獨存到一個檔案中。
切割:每個檔案10MB,超過大小切割成另外一個檔案。
- 每天的紀錄檔應該獨立分割出來存檔。如果使用logback(SpringBoot 預設整合),可以通過application.properties/yaml檔案指定紀錄檔卷動規則。
- 如果是其他紀錄檔系統,需要自行設定(新增log4j2.xml或log4j2-spring.xml)
- 支援的捲動規則設定如下
| 設定項 | 描述 |
|---|---|
| logging.logback.rollingpolicy.file-name-pattern | 紀錄檔存檔的檔名格式(預設值:$.%d.%i.gz) |
| logging.logback.rollingpolicy.clean-history-on-start | 應用啟動時是否清除以前存檔(預設值:false) |
| logging.logback.rollingpolicy.max-file-size | 存檔前,每個紀錄檔檔案的最大大小(預設值:10MB) |
| logging.logback.rollingpolicy.total-size-cap | 紀錄檔檔案被刪除之前,可以容納的最大大小(預設值:0B)。設定1GB則磁碟儲存超過 1GB 紀錄檔後就會刪除舊紀錄檔檔案 |
| logging.logback.rollingpolicy.max-history | 紀錄檔檔案儲存的最大天數(預設值:7). |
8. 自定義設定
通常我們設定 application.properties 就夠了。當然也可以自定義。比如:
| 紀錄檔系統 | 自定義 |
|---|---|
| Logback | logback-spring.xml, logback-spring.groovy, logback.xml, or logback.groovy |
| Log4j2 | log4j2-spring.xml or log4j2.xml |
| JDK (Java Util Logging) | logging.properties |
如果可能,我們建議您在紀錄檔設定中使用-spring 變數(例如,logback-spring.xml 而不是 logback.xml)。如果您使用標準組態檔,spring 無法完全控制紀錄檔初始化。
最佳實戰:自己要寫設定,組態檔名加上 xx-spring.xml
9. 切換紀錄檔組合
<dependency>
    <groupId>org.springframework.boot</groupId>
    <artifactId>spring-boot-starter-web</artifactId>
</dependency>
<dependency>
    <groupId>org.springframework.boot</groupId>
    <artifactId>spring-boot-starter</artifactId>
    <exclusions>
        <exclusion>
            <groupId>org.springframework.boot</groupId>
            <artifactId>spring-boot-starter-logging</artifactId>
        </exclusion>
    </exclusions>
</dependency>
<dependency>
    <groupId>org.springframework.boot</groupId>
    <artifactId>spring-boot-starter-log4j2</artifactId>
</dependency>
log4j2支援yaml和json格式的組態檔
| 格式 | 依賴 | 檔名 |
|---|---|---|
| YAML | com.fasterxml.jackson.core:jackson-databind + com.fasterxml.jackson.dataformat:jackson-dataformat-yaml | log4j2.yaml + log4j2.yml |
| JSON | com.fasterxml.jackson.core:jackson-databind | log4j2.json + log4j2.jsn |
10. 最佳實戰
- 匯入任何第三方框架,先排除它的紀錄檔包,因為Boot底層控制好了紀錄檔
- 修改
application.properties組態檔,就可以調整紀錄檔的所有行為。如果不夠,可以編寫紀錄檔框架自己的組態檔放在類路徑下就行,比如logback-spring.xml,log4j2-spring.xml - 如需對接專業紀錄檔系統,也只需要把 logback 記錄的紀錄檔灌倒 kafka之類的中介軟體,這和SpringBoot沒關係,都是紀錄檔框架自己的設定,修改組態檔即可
- 業務中使用slf4j-api記錄紀錄檔。不要再 sout 了