構建 JavaScript ChatGPT 外掛
聊天外掛系統是一種令人興奮的新方式,可以擴充套件ChatGPT的功能,納入您自己的業務資料,併為客戶與您的業務互動增加另一個渠道。在這篇文章中,我將解釋什麼是聊天外掛,它們能做什麼,以及你如何用JavaScript建立你自己的聊天外掛。
這篇文章(或OpenAI所稱的"訓練資料")提供了一個快速入門指南,來建立你的第一個ChatGPT外掛,並將其與ChatGPT介面整合。
聊天外掛是否會成為改變生活的賈維斯般的體驗,或者只是一個昂貴的Alexa-for-your-browser,目前還沒有定論。讓我們通過看看外掛能提供什麼,需要注意什麼,以及如何製作你自己的外掛,來決定我們自己的想法。
目錄
-
什麼是聊天外掛?
- 外掛組成部分
- 聊天外掛生態系統的新機遇
- 外掛開發的考量和侷限
-
構建第一個JavaScript ChatGPT 外掛
- 設定專案
- 新增OpenAI清單和API規範
- 建立伺服器
- 設定強制性的外掛路由
- 設定Todo路由
- 驗證和測試外掛
- (可選)將該伺服器作為代理
-
下一步
什麼是聊天外掛?
"聊天外掛"允許ChatGPT模型使用並與第三方應用程式互動。從本質上講,它是一套指令和規範,語言模型可以遵循這些指令和規範在聊天對話中建立API的呼叫和操作。與第三方系統的整合為ChatGPT的使用者提供了一系列新的功能:
- 建立、更新和修改我們自己的業務資料和資料庫(如銷售、行銷系統)
- 從外部服務中獲取資訊(如金融、天氣API)
- 執行操作(例如,傳送Slack訊息)
外掛組成部分
建立一個能與AI互動的應用程式似乎是一個令人生畏的複雜系統,然而,一旦你開始做,你會發現它非常簡單。一個"外掛"是一套簡單的指令,它告訴ChatGPT模型你的API是做什麼的,以及如何和何時存取它。
這可以歸結為兩個重要檔案:
ai-plugin.json:外掛清單,包含外掛的基本後設資料。這包括名稱、作者、描述、認證和聯絡等細節。該清單被ChatGPT用來理解外掛的作用。openapi.yaml:在OpenAPI規範中,你的API路由和模式的規範。也可以以json檔案的形式提供。這將告訴ChatGPT可以使用哪些API,出於什麼原因,以及請求和響應會是什麼樣子。
外掛服務的基礎功能和託管由你決定。你的API可以託管在任何地方,使用任何REST API或程式語言。
聊天外掛生態系統的新機遇
聊天外掛的到來為開發者、設計師、企業和企業家帶來了一系列的機會:
- 互動可以更"聰明"和更"流暢" :外掛引入了人性化、假設和上下文的能力,並結合請求提供這些能力。這為互動增加了一個流動性的元素,而這是一個死板的GUI或結構化的資料API所不能滿足的。例如,"我今天應該穿外套嗎?"這個提示將導致API呼叫一個基於你的位置的天氣服務,對天氣的解釋,以及對原始問題的回答:"是的,你應該穿一件夾克。今天的溫度是12度,有80%的機會下雨。"。
- 新的客戶渠道:ChatGPT在2023年4月以1.73億活躍使用者創造了增長最快的使用者記錄。毫無疑問,在這個平臺上佔有一席之地,為你提供了接觸大量潛在客戶的機會。它還提供了一種潛在的更容易、更直觀、更容易與使用它的現有客戶互動的方式。
- 人工智慧介面(A.I.I.)的崛起:使用者現在無需點選"按鈕"就可以執行復雜的操作。從理論上講,一個外掛可以提供一個驚人的服務,而不需要像傳統的使用者介面那樣需要關注介面才行(或根本不需要)。一個直觀的規範可能變得和一個直觀的網路應用一樣重要。
- 新的商業機會:人工智慧在提供工作的同時也會帶走工作。如果成功的話,外掛生態系統將為外掛開發者、人工智慧API開發者,以及為企業託管、認證和管理外掛的全新垂直業務創造新的機會和空間。
外掛開發的考量和侷限
直觀和無程式碼介面的好處帶來了一系列挑戰。承認生態系統、邏輯和介面會隨著時間的推移而發展,在構建外掛時,我們仍然需要記住一些事情。特別是如果你想把它們作為一項業務來建立。
- 響應速度慢:解釋自然語言、選擇外掛、建立請求和解釋響應都需要時間。對於簡單的資訊請求或操作,自己做就可以更快。根據上面的例子,我看一下我的手機主螢幕比等待15秒讓ChatGPT解釋天氣並寫給我要快得多。
- 成本高:使用者將花費token來與任何外掛互動。這增加了潛在的成本,即使你是免費提供給他們的東西。你還必須為託管和運營這些API的基礎設施付費。
- 不同方式:在內部,與外掛的互動仍然是REST API,只能執行我們與其他使用者端相同的操作。外掛更像是一個與企業互動的新渠道,而不是目前讓人工智慧為我們服務的新正規化。
- 可操縱性:由於使用者在預設情況下看不到API響應,誤導性資訊和其他惡意策略可能會被外掛製造商用來歪曲答案。
- 不可預測性:讓生成模型負責決策是有風險的,行為是不可靠的。有很多推理和猜測工作在幕後發生,以根據人類書面聊天提示建立API請求。打字不規範的資訊或含糊不清的描述可能會導致呼叫錯誤的API或做出錯誤的行動。
構建第一個JavaScript ChatGPT 外掛
我們將為我們的聊天外掛建立自己的express伺服器。這不僅是一個容易上手的方法,而且express可以被擴充套件到包括中介軟體、認證和所有其他你想要的生產級的東西。
以下是我們將在下列步驟中建立和新增程式碼的所有檔案。如果你感到困惑,可以回到這裡,或者克隆這裡的原始碼。
my-chat-plugin/
├─ .well-known/
│  ├─ ai-plugin.json  <- 外掛後設資料
├─ routes/
│  ├─ todos.js        <- 處理Todo請求的路由
│  ├─ openai.js       <- 處理openAI請求的路由
openapi.yaml          <- Open API規範
index.js              <- 外掛入口
先決條件
設定專案
建立一個名為my-chat-plugin的資料夾,執行下面的命令來開始:
## 1. Create the directory and open it
mkdir my-chat-plugin && cd my-chat-plugin

## 2. Initialize a project with the default values
npm init --yes

## 3. Install our dependencies
npm install axios express cors js-yaml
新增OpenAI清單和API規範
現在,我們要建立所需的聊天外掛清單和OpenAPI規範。ChatGPT會在你伺服器的特定路由上請求這些檔案,所以我們要把它們放在:
/.well-known/ai-plugin.json/openapi.yaml
這些檔案中的描述是非常重要的!如果你在summary和description_for_model欄位中的語言含糊不清,你可能會讓ChatGPT對何時和如何使用你的外掛感到困惑。請遵循以下步驟:
- 建立一個名為
.well-known的資料夾,並在其中新增一個名為ai-plugin.json的檔案。通過終端進行操作:
mkdir .well-known && touch .well-known/ai-plugin.json
貼上下面程式碼到ai-plugin.json中:
{
    "schema_version": "v1",
    "name_for_human": "My ChatGPT To Do Plugin",
    "name_for_model": "todo",
    "description_for_human": "Plugin for managing a To Do list. You can add, remove and view your To Dos.",
    "description_for_model": "Plugin for managing a To Do list. You can add, remove and view your ToDos.",
    "auth": {
        "type": "none"
    },
    "api": {
        "type": "openapi",
        "url": "<http://localhost:3000/openapi.yaml>",
        "is_user_authenticated": false
    },
    "logo_url": "<http://localhost:3000/logo.png>",
    "contact_email": "[email protected]",
    "legal_info_url": "<http://www.yourdomain.com/legal>"
}
- 在專案根路徑下建立一個名為
openapi.yaml,並且新增下列程式碼到檔案中。
這是OpenAPI規範,ChatGPT會用它來理解您的API路由的作用(注意每個路由的summary)以及請求和響應的格式。如果ChatGPT在使用您的API時遇到問題,十有八九是因為這個規範與您的API的響應不一致。
openapi: 3.0.1
info:
  title: TODO Plugin
  description: A plugin that allows the user to create and manage a To Do list using ChatGPT.
  version: 'v1'
servers:
  - url: <http://localhost:3000>
paths:
  /todos:
    get:
      operationId: getTodos
      summary: Get the list of todos
      responses:
        "200":
          description: OK
          content:
            application/json:
              schema:
                type: array
                items:
                  $ref: '#/components/schemas/Todo'
    post:
      operationId: addTodo
      summary: Add a todo to the list
      requestBody:
        required: true
        content:
          application/json:
            schema:
              $ref: '#/components/schemas/Todo'
      responses:
        "201":
          description: Created
          content:
            application/json:
              schema:
                $ref: '#/components/schemas/Todo'
  /todos/{id}:
    delete:
      operationId: removeTodo
      summary: Delete a todo from the list when it is complete, or no longer required.
      parameters:
        - name: id
          in: path
          required: true
          schema:
            type: integer
      responses:
        "204":
          description: No Content
components:
  schemas:
    Todo:
      type: object
      properties:
        id:
          type: integer
          format: int64
        task:
          type: string
      required:
        - id
        - task
建立伺服器
我們的下一步是建立我們的主檔案,也就是我們外掛的入口。在專案根目錄下,新增一個名為index.js的檔案,並新增以下程式碼。
注意:ChatGPT檔案顯示openapi.yaml和openapi.json都有一個路由。本地測試顯示只有yaml檔案被請求,但值得把它們都放在那裡,因為以後可能會用到。
貼上下面程式碼到index.js中:
const express = require('express');
const cors = require('cors');
const todoRouter = require('./routes/todos');
const openaiRoutes = require('./routes/openai');

const app = express();
const PORT = 3000;

// Setting CORS to allow chat.openapi.com is required for ChatGPT to access your plugin
app.use(cors({ origin: [`http://localhost:${PORT}`, '<https://chat.openai.com>'] }));
app.use(express.json());

// Simple request logging to see if your plugin is being called by ChatGPT
app.use((req, res, next) => {
  console.log(`Request received: ${req.method}: ${req.path}`)
  next()
})

// OpenAI Required Routes
app.use(openaiRoutes);

// The dummy todos API
app.use('/todos', todoRouter);

app.listen(PORT, () => {
  console.log(`Plugin server listening on port ${PORT}`);
});
上述程式碼做了下列事情:
- 匯入
express和cors所需的庫 - 匯入我們的路由特定邏輯,在下一步新增
- 新增紀錄檔中介軟體,將任何傳入的請求列印到控制檯中
- 提供一個通用的轉發函數,如果你已經有一個API服務就可以使用
設定強制性的外掛路由
在這一步中,我們將為OpenAI / ChatGPT新增強制性的路由,來獲取所需檔案。我們將把所有具體的路由邏輯放在一個"routes"目錄中。這就是我們將儲存外掛路由以及其他自定義路由的地方。
(你可能希望用額外的資料夾(控制器、中介軟體、服務等)擴充套件這個結構,或者建立你自己的結構)。
- 建立
/routes資料夾 - 建立名為
openai.js的檔案 - 貼上下列程式碼到
routes/openai.js中:
const express = require('express');
const router = express.Router();
const fs = require('fs');
const path = require('path');
const yaml = require('js-yaml');

router.get('/openapi.yaml', async function(req, res) {
  try {
    const yamlData = fs.readFileSync(path.join(process.cwd(), 'openapi.yaml'), 'utf8');
    const jsonData = yaml.load(yamlData);
    res.json(jsonData);

  } catch(e) {
    console.log(e.message)
    res.status(500).send({ error: 'Unable to fetch manifest.' });
  }
});

router.get('/.well-known/ai-plugin.json', function(req, res) {
  res.sendFile(path.join(process.cwd(), '/.well-known/ai-plugin.json'));
});

router.get('/logo.png', function(req, res) {
  res.sendFile(path.join(process.cwd(), 'logo.png'));
})

module.exports = router;
上述程式碼做了下列事情:
- 定義了兩個路由,供外掛檢索你的清單和API規範。
- 定義了一個路由,讓外掛在聊天中檢索並顯示你的外掛標識。
- 匯出所有的路由,以便我們可以在
index.js中匯入它們。
設定Todo路由
現在我們將建立一些簡單的路由來模擬一個簡單的建立、更新、刪除功能。我們通常避免使用todo教學,但考慮到檔案中使用這個作為指南,我們希望儘可能保持它的可轉移性。
- 在你的路由資料夾中,建立一個名為
todos.js的新檔案 - 將以下程式碼貼上到
routes/todos.js中:
const express = require('express');
const router = express.Router();

let todos = [
    { id: 1, task: 'Wake up' },
    { id: 2, task: 'Grab a brush'},
    { id: 3, task: 'Put a little makeup'},
    { id: 4, task: 'Build a Chat Plugin'}
]; // placeholder todos

let currentId = 5; // to assign unique ids to new todos

getTodos = async function(req, res) {
    res.json(todos);
}

addTodo = async function(req, res) {
    const { task } = req.body;
    const newTodo = { id: currentId, task };
    todos.push(newTodo);
    currentId++;
    res.json(newTodo);
}

removeTodo = async function(req, res) {
    const { id } = req.params;
    todos = todos.filter(todo => todo.id !== Number(id));
    res.json({ "message" : "Todo successfully deleted" });
}

router.get('/', getTodos);
router.post('/', addTodo);
router.delete('/:id', removeTodo);

module.exports = router;
上述程式碼做了下列事情:
- 建立3條路由,從一個簡單的todo專案列表中獲取、建立和刪除。
- 將這些路由匯出,匯入到我們的
index.js檔案。
驗證和測試外掛
現在,有趣的部分來了。我們已經有了所有必要的程式碼和設定,可以在ChatGPT上手動建立和執行一個本地外掛了!我們開始吧:
- 開啟服務
在終端中輸入node index.js。這會在終端中開啟服務並列印’Plugin server listening on port 3000’。
- 將其連線到ChatGPT本地外掛
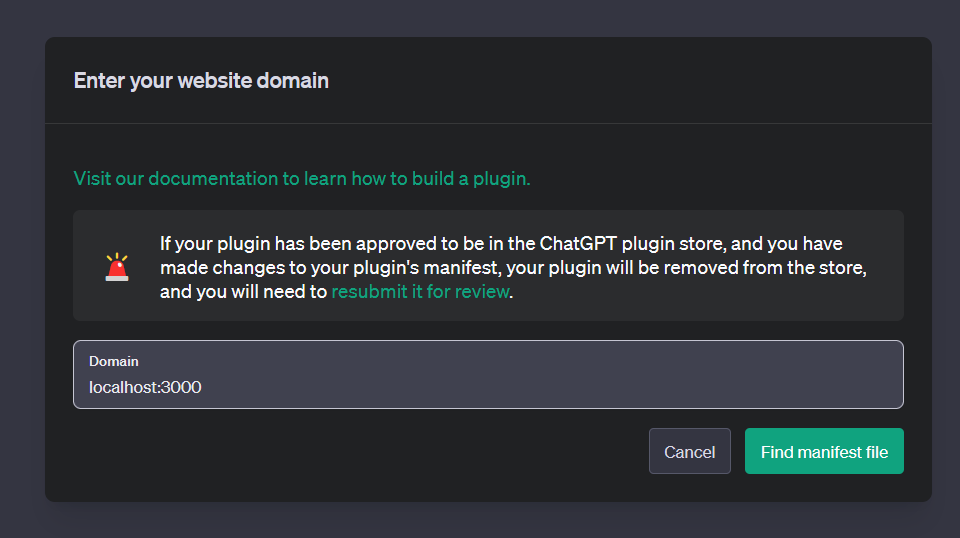
進入chat.openai.com,在你的賬戶中開啟一個新的聊天視窗。點選GPT-4下拉式選單,Plugins > Plugin Store > 點選Develop Your Own Plugin > 輸入localhost:3000 > 點選Find manifest file。

- 測試外掛
你應該看到一條驗證資訊,即ChatGPT能夠獲得你的清單檔案,這樣你就可以開始了。如果沒有,請檢查你的終端,伺服器正在執行,並且正在接收傳入的請求。
試試下面的一些命令:
- "
what are my todos?" I have woken up(你不需要說出確切的Todo任務,它就能理解你指的是什麼)
(可選)將該伺服器作為代理
如果你已經有一個在本地或外部執行的API來傳送請求,你可以把這個伺服器作為一個代理,把請求轉發給它。這是一個值得推薦的選項,因為它使你能夠快速測試和迭代如何處理清單和規範檔案,而不必重新部署或更新你現有的程式碼庫。
在你建立的路由下的index.js中新增以下程式碼:
// PASTE IN BEFORE app.listen(...

// Proxy server to an existing API
const api_url = '<http://localhost>';

app.all('/:path', async (req, res) => {
  const { path } = req.params;
  const url = `${api_url}/${path}`;

  console.log(`Forwarding call: ${req.method} ${path} -> ${url}`);

  const headers = {
    'Content-Type': 'application/json',
  };

  try {
    const response = await axios({
      method: req.method,
      url,
      headers,
      params: req.query,
      data: req.body,
    });

    res.send(response.data);
  } catch (error) {
    console.error(`Error in forwarding call: ${error}`);
    res.status(500).send('Error in forwarding call');
  }
});
下一步
這個基本教學應該是你開始建立自己的基於JavaScript的成熟聊天外掛所需要的。將你的應用程式部署到生產環境中,需要一些額外的認證和部署步驟。教學中沒有提到這些,但我推薦以下資源來完成這些工作:
以上就是本文的全部內容,感謝閱讀。