【.NET深呼吸】將XAML放到WPF程式之外
上一篇水文中,老周說了一下純程式碼編寫 WPF 的大概過程。不過,還是不夠的,本篇水文中咱們還要更進一步。
XAML 檔案預設是作為資源打包程序式中的,而純程式碼編寫又導致一些常改動的東西變成寫死了。為了取得二者平衡,咱們還要把一些經常修改的東西放到 XAML 檔案中,不過 XAML 檔案不編譯程序式裡,而是放到外部,執行階段載入。比如一些物件屬性、畫刷、樣式、字型之類的,直接改檔案儲存就行,修改之後不用重新編譯專案。
要在執行階段載入 XAML,咱們只需認識一個類就OK—— XamlReader,呼叫它的 Load 方法就能從 XAML 檔案載入物件了。
下面老周就邊演示邊嘮叨一下相關的問題。
一、新建專案。可以參照上一篇中的做法,用控制檯應用程式專案,然後修改專案檔案。也可以直接建 WPF 專案。都可以。
二、自定義視窗類,從 Window 派生。當然,你直接用 Window 類也可以的。
public class MyWindow : Window
{
    const string XAML_FILE = "MyWindow.xaml";

    public MyWindow()
    {
        Title = "載入外部XAML";
        Height = 150;
        Width = 225;
        // 從XAML檔案載入
        using FileStream fsIn = new(XAML_FILE, FileMode.Open, FileAccess.Read);
        FrameworkElement layout = (FrameworkElement)XamlReader.Load(fsIn);
        // 兩個按鈕要處理事件
        Button btn1 = (Button)layout.FindName("btn1");
        Button btn2 = (Button)layout.FindName("btn2");
        btn1.Click += OnClick1;
        btn2.Click += OnClick2;
        Content = layout;
    }

    private void OnClick2(object sender, RoutedEventArgs e)
    {
        MessageBox.Show("第二個按鈕");
    }

    private void OnClick1(object sender, RoutedEventArgs e)
    {
        MessageBox.Show("第一個按鈕");
    }
}
這個不復雜,咱們關注載入 XAML 部分。通過檔案流 FileStream 讀取檔案,而後在 XamlReader.Load 中載入。Load 方法返回的是 object 型別的物件,咱們要適當地進行型別轉換。這個例子裡面其實載入上來的是 Grid 類,但這裡我只轉換為 FrameworkElement 就可以了,畢竟我後面只用到了 FindName 方法。Find 出來的是兩個 Button 物件,最後處理一下 Click 事件。
三、在專案中新增 MyWindow.xaml 檔案。
<Grid xmlns="http://schemas.microsoft.com/winfx/2006/xaml/presentation"
      Margin="12">
    <Grid.RowDefinitions>
        <RowDefinition Height="auto"/>
        <RowDefinition Height="auto"/>
    </Grid.RowDefinitions>
    <Button Name="btn1" Grid.Row="0" Margin="5,8">按鈕A</Button>
    <Button Name="btn2" Grid.Row="1" Margin="5,8">按鈕B</Button>
</Grid>
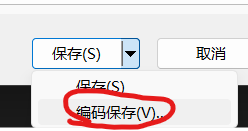
這裡順便說一下,儲存 XAML 檔案時最好用 UTF-8 編碼,不然可能會報錯。方法是在 VS 裡,【檔案】-【XXX 另存為】。在儲存檔案對話方塊中,點「儲存」按鈕右邊的箭頭,選擇「編碼儲存」。
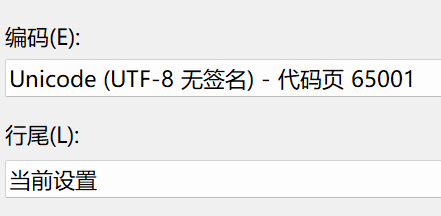
編碼選 UTF-8 無簽名(或帶簽名的也行)。
另一種方法是用記事本開啟,再以 UTF-8 儲存。
四、在專案中新增 styles.xaml。
<ResourceDictionary xmlns="http://schemas.microsoft.com/winfx/2006/xaml/presentation">
    <Style TargetType="Button">
        <Setter Property="Background" Value="Red"/>
        <Setter Property="Foreground" Value="White"/>
        <Setter Property="Padding" Value="5"/>
        <Setter Property="FontFamily" Value="楷體"/>
        <Setter Property="FontSize" Value="17"/>
        <Setter Property="HorizontalContentAlignment" Value="Center"/>
        <Setter Property="BorderThickness" Value="1"/>
        <Setter Property="BorderBrush" Value="Yellow"/>
        <Setter Property="Template">
            <Setter.Value>
                <ControlTemplate TargetType="Button">
                    <Border Background="{TemplateBinding Background}"
                            BorderBrush="{TemplateBinding BorderBrush}"
                            BorderThickness="{TemplateBinding BorderThickness}"
                            CornerRadius="5">
                        <ContentPresenter HorizontalAlignment="{TemplateBinding HorizontalContentAlignment}"
                                          VerticalAlignment="{TemplateBinding VerticalContentAlignment}"
                                          Margin="{TemplateBinding Padding}"/>
                    </Border>
                </ControlTemplate>
            </Setter.Value>
        </Setter>
        <Style.Triggers>
            <Trigger Property="IsMouseOver" Value="True">
                <Setter Property="Background" Value="Green"/>
            </Trigger>
            <Trigger Property="IsPressed" Value="True">
                <Setter Property="Background" Value="DarkSlateGray"/>
            </Trigger>
        </Style.Triggers>
    </Style>
</ResourceDictionary>
裡面包含一個 Button 控制元件模板。
五、在 Main 方法中,初始化 Application 類,並且從外部 XAML 中載入資源字典。
[STAThread]
static void Main(string[] args)
{
    Application app = new();
    using FileStream extFile = new FileStream("styles.xaml", FileMode.Open, FileAccess.Read);
    ResourceDictionary dic = (ResourceDictionary)XamlReader.Load(extFile);
    app.Resources = dic;
    app.Run(new MyWindow());
}
由於是在 app 處載入的資源,所以按鈕樣式會應用到整個程式。
六、開啟專案檔案(*.csproj),我們要做點手腳。
<ItemGroup>
    <Page Remove="*.xaml"/>
    <None Include="*.xaml"/>
</ItemGroup>
<Target Name="PostBuild" AfterTargets="PostBuildEvent">
    <Exec Command="copy /y *.xaml $(OutDir)" />
</Target>
老周解釋一下加了顏色的部分。
1、Page 表示XAML檔案最終生成二進位制檔案,且塞進目標程式集中。加了 Remove 表示排除這一行為。說人話就是:本專案不編譯 XAML 檔案。
2、None 表示該專案中 XAML 檔案「啥也不是」,編譯時不做任何處理。
3、PostBuild 任務指定一條命令,在生成專案之後執行。此處是把專案目錄下的 XAML 檔案複製到輸出目錄。$(OutDir) 在 VS 中表示宏(也是 MSBuild 的屬性)。在命令實際執行時,替換為實際目錄路徑,如 bin\Debug\net7.0-windows。
也可以用 $(TargetDir),不過 TargetDir 替換的是完整路徑,OutDir 是用相對路徑的。
現在生成一下專案,若沒有問題,在輸出目錄下除了程式檔案,還有那兩個 XAML 檔案。執行一下。
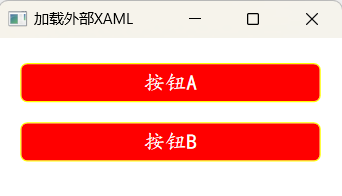
關閉程式,用記事本開啟 styles.xaml 檔案,把按鈕的背景色改成橙色。

儲存並關閉檔案,重新執行程式。
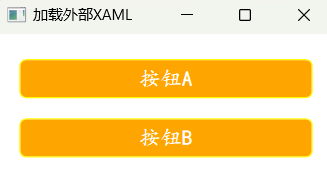
咱們並沒有重新編譯程式。接下來用記事本開啟 MyWindow.xaml 檔案,改一下按鈕上的文字。

儲存並關閉檔案,不用編譯程式碼,再次執行程式。
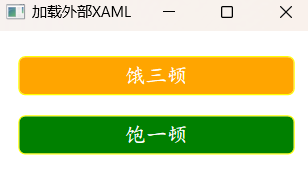
這樣就很方便修改了,不必每次都重新編譯。
下一篇老周還會說說純程式碼寫 WPF 的模板問題。三維圖形就看心情了。因為 3D 圖形的構造和一般控制元件應用差不多,就是用程式碼建立 WPF 物件樹。