從0搭建Vue3元件庫(十):如何搭建一個 Cli 腳手架
本篇文章將實現一個名為create-easyest腳手架的開發,只需一個命令npm init easyest就可以將整個元件庫開發框架拉到本地。
建立 Cli 包
首先,我們在 packages 目錄下新建 cli 目錄,同執行pnpm init進行初始化,然後將包名改為create-easyest
這裡需要知道的是當我們執行
npm init xxx或者npm create xxx的時候,實際上是執行npx create-xxx,所以當我們執行npm init easyest的時候實際上就是執行npx create-easyest
當我們執行create-easyest時會執行 package.json 下的 bin 對應的路徑,因此我們將package.json修改為
{
  "name": "create-easyest",
  "version": "1.0.0",
  "description": "",
  "bin": "index.js",
  "keywords": [],
  "author": "",
  "license": "MIT"
}
同時新建 index.js 作為入口檔案,注意開頭要加上#! /usr/bin/env node
#! /usr/bin/env node
使用 command-line-args 處理使用者輸入命令
其實處理使用者輸入引數的外掛有很多,比如 CAC,Yargs,Commander.js,command-line-args 等,但是就我看來 command-line-args 使用起來是最簡單的,所以這裡使用 command-line-args 進行使用者引數解析
pnpm add command-line-args
新建一個 cli.js 用於處理我們腳手架的邏輯,這裡簡單寫一個-v 版本命令
import commandLineArgs from "command-line-args";
import { readFile } from "fs/promises";

const pkg = JSON.parse(
  await readFile(new URL("./package.json", import.meta.url))
);
//設定命令引數
const optionDefinitions = [{ name: "version", alias: "v", type: Boolean }];
const options = commandLineArgs(optionDefinitions);
if (options.version) {
  console.log(`v${pkg.version}`);
}

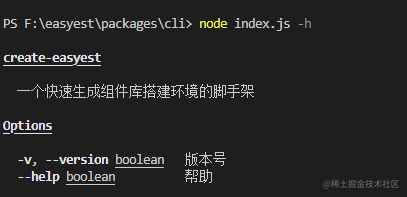
我們還可以使用 command-line-usage 外掛讓它為我們提供幫助命令
pnpm add command-line-usage
這裡只貼了相關程式碼
import commandLineArgs from "command-line-args"
import commandLineUsage from "command-line-usage"
...

//幫助命令
const helpSections = [
  {
    header: 'create-easyest',
    content: '一個快速生成元件庫搭建環境的腳手架',
  },
  {
    header: 'Options',
    optionList: [
      {
        name: 'version',
        alias: 'v',
        typeLabel: '{underline boolean}',
        description: '版本號',
      },
      {
        name: 'help',
        alias: 'h',
        typeLabel: '{underline boolean}',
        description: '幫助',
      }
    ],
  },
];


if (options.help) {
  console.log(commandLineUsage(helpSections))
  return
}

互動式命令
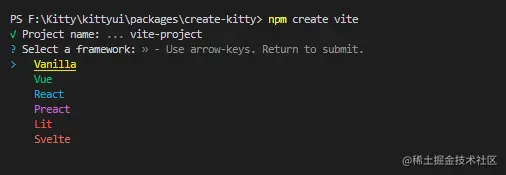
當我們使用一些腳手架的時候,比如 create-vite,它會讓我們一些選項讓我們選擇

所以我們的腳手架也要有這個功能,但是這個應該怎麼實現呢?
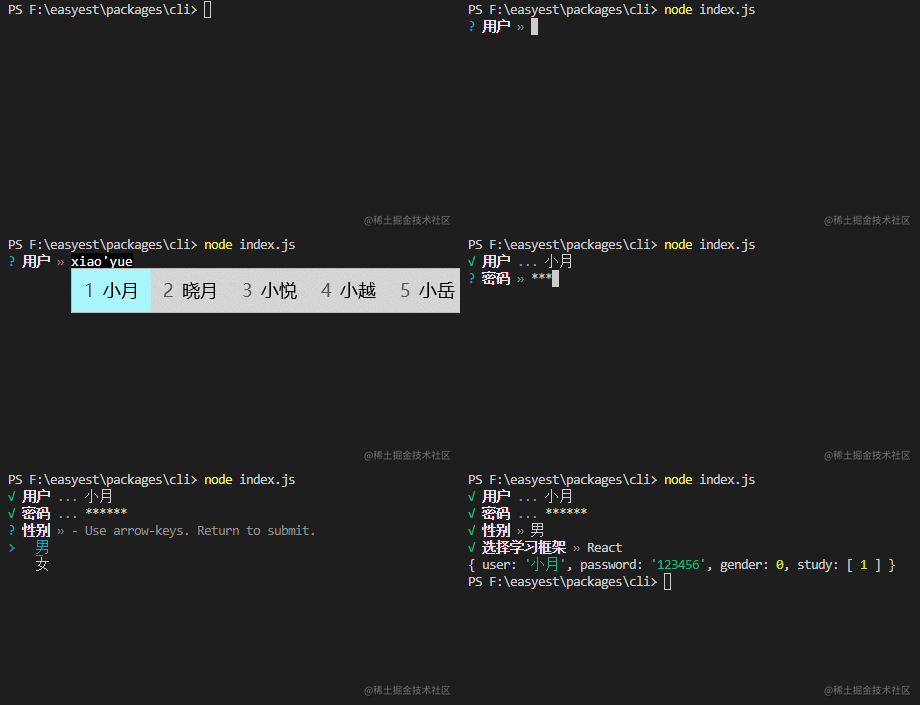
其實很簡單,我們只需要 prompts 外掛即可,它可以設定使用者輸入哪些東西以及單選還是多選等,首先安裝 prompts
pnpm add prompts
然後在 cli.js 中
import prompts from "prompts";
const promptsOptions = [
  {
    type: "text",
    name: "user",
    message: "使用者",
  },
  {
    type: "password",
    name: "password",
    message: "密碼",
  },
  {
    type: "select", //單選
    name: "gender",
    message: "性別",
    choices: [
      { title: "男", value: 0 },
      { title: "女", value: 1 },
    ],
  },
  {
    type: "multiselect", //多選
    name: "study",
    message: "選擇學習框架",
    choices: [
      { title: "Vue", value: 0 },
      { title: "React", value: 1 },
      { title: "Angular", value: 2 },
    ],
  },
];

const getUserInfo = async () => {
  const res = await prompts(promptsOptions);
  console.log(res);
};
getUserInfo();

然後我們就可以根據對應的值處理不同的邏輯了,當然我們的腳手架不需要這麼多引數,我們改成下面選項即可
const promptsOptions = [
  {
    type: "text",
    name: "project-name",
    message: "請輸入專案名稱",
  },
  {
    type: "select", //單選
    name: "template",
    message: "請選擇一個模板",
    choices: [
      { title: "kitty-ui", value: 0 },
      { title: "easyest", value: 1 },
    ],
  },
];
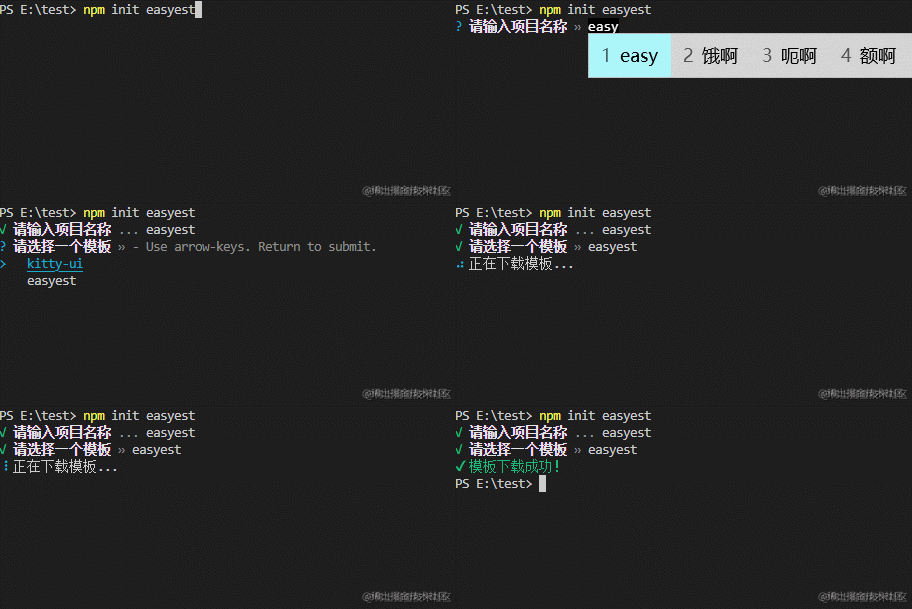
然後我們就可以根據使用者的選擇來拉取不同的倉庫了
拉取遠端倉庫模板
拉取遠端倉庫我們可以使用 download-git-repo 工具,然後使用它的 clone 方法即可,同時我們需要安裝一個 loading 外掛 ora 以及 log 顏色外掛 chalk
pnpm add download-git-repo ora chalk
//gitClone.js

import download from "download-git-repo";
import chalk from "chalk";
import ora from "ora";

export default (remote, name, option) => {
  const downSpinner = ora("正在下載模板...").start();
  return new Promise((resolve, reject) => {
    download(remote, name, option, (err) => {
      if (err) {
        downSpinner.fail();
        console.log("err", chalk.red(err));
        reject(err);
        return;
      }
      downSpinner.succeed(chalk.green("模板下載成功!"));
      resolve();
    });
  });
};

//cli.js
const remoteList = {
  1: "https://gitee.com/geeksdidi/kittyui.git",
  2: "https://github.com/qddidi/easyest.git",
};
const getUserInfo = async () => {
  const res = await prompts(promptsOptions);
  if (!res.name || !res.template) return;
  gitClone(`direct:${remoteList[res.template]}`, res.name, {
    clone: true,
  });
};
然後執行完成後目錄下就有我們的模板啦

最後將我們的create-easyest釋出即可,釋出這裡前面已經介紹過,就不多贅述了。這裡我已經發布過了,我們隨便找個資料夾執行npm create easyest試一下

同時我們發現了easyest專案也被克隆了下來
本篇文章程式碼地址:如何搭建一個 Cli 腳手架,歡迎star一下