揭祕Spring依賴注入和SpEL表示式
摘要:在本文中,我們深入探討了Spring框架中的屬性注入技術,包括setter注入、構造器注入、註解式屬性注入,以及使用SpEL表示式進行屬性注入。
本文分享自華為雲社群《Spring高手之路3——揭祕Spring依賴注入和SpEL表示式》,作者:磚業洋__ 。
在本文中,我們深入探討了Spring框架中的屬性注入技術,包括setter注入、構造器注入、註解式屬性注入,以及使用SpEL表示式進行屬性注入。我們通過XML和註解兩種方式,詳細講解了如何進行屬性注入,並給出了完整的程式碼範例。無論你是Spring新手,還是有一定經驗的開發者,本文都將幫助你理解並掌握Spring中的屬性注入技術。
1. setter屬性注入
1.1 使用XML進行setter方法注入
我們在前面的文章中已經使用過XML進行setter方法的屬性注入了,下面讓我們再來回顧一下:
<bean id="userSetter" class="com.example.demo.bean.User">
 <property name="username" value="example-username-setter"/>
 <property name="age" value="25"/>
</bean>
1.2 使用@Bean註解進行setter方法注入
我們在前面的文章中也學習過如何在bean建立時通過程式設計方式設定屬性:
@Bean
public User user() {
    User user = new User();
 user.setUsername("example-username-anno-setter");
 user.setAge(25);
 return user;
}
1.3 setter方法注入完整程式碼範例
- 使用XML進行setter方法注入
首先,我們需要建立一個User類,並在其中包含username和age兩個屬性,以及相應的getter、setter方法和構造器。
public class User {
 private String username;
 private Integer age;
 public User() {
 }
 // 為了節省篇幅,getter和setter方法省略......
    @Override
 public String toString() {
 return "User{username='" + username + "', age=" + age + "}";
 }
}
對於XML方式的setter注入和構造器注入,我們需要建立一個組態檔,比如叫applicationContext.xml。
<beans xmlns="http://www.springframework.org/schema/beans"
 xmlns:xsi="http://www.w3.org/2001/XMLSchema-instance"
 xsi:schemaLocation="http://www.springframework.org/schema/beans
                           http://www.springframework.org/schema/beans/spring-beans.xsd">
 <!-- setter方法注入 -->
 <bean id="userSetter" class="com.example.demo.bean.User">
 <property name="username" value="example-username-setter"/>
 <property name="age" value="25"/>
 </bean>
</beans>
然後,我們需要建立一個DemoApplication類,使用ApplicationContext來載入組態檔並獲取Bean:
import com.example.demo.bean.User;
import org.springframework.context.ApplicationContext;
import org.springframework.context.support.ClassPathXmlApplicationContext;
public class DemoApplication {
 public static void main(String[] args) {
 ApplicationContext context = new ClassPathXmlApplicationContext("applicationContext.xml");
        User userSetter = (User) context.getBean("userSetter");
 System.out.println(userSetter);
 }
}
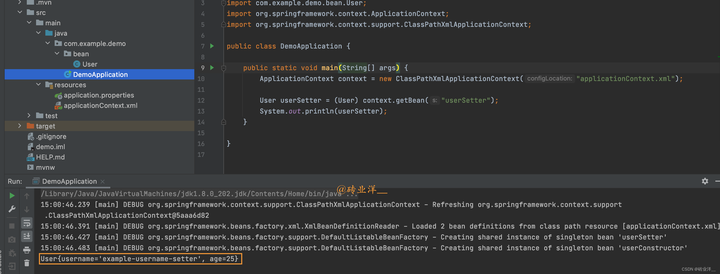
執行結果如下:
- 使用@Bean註解進行setter方法注入
我們需要建立一個設定類,例如叫AppConfig.java:
import org.springframework.context.annotation.Bean;
import org.springframework.context.annotation.Configuration;
@Configuration
public class AppConfig {
    @Bean
 public User userSetter() {
        User user = new User();
 user.setUsername("example-username-anno-setter");
 user.setAge(25);
 return user;
 }
}
使用@Bean註解來定義Bean。每個@Bean方法對應於XML設定中的一個<bean>元素。這個方法的名稱就是Bean的id,方法的返回值就是Bean的型別
然後修改主程式,這裡使用AnnotationConfigApplicationContext來建立Spring的應用上下文,並載入設定類。Spring會自動從設定類中獲取所有的Bean定義,並建立相應的Bean範例。
package com.example.demo;
import com.example.demo.bean.User;
import com.example.demo.configuration.AppConfig;
import org.springframework.context.ApplicationContext;
import org.springframework.context.annotation.AnnotationConfigApplicationContext;
public class DemoApplication {
 public static void main(String[] args) {
 ApplicationContext context = new AnnotationConfigApplicationContext(AppConfig.class);
        User userSetter = (User) context.getBean("userSetter");
 System.out.println(userSetter);
 }
}
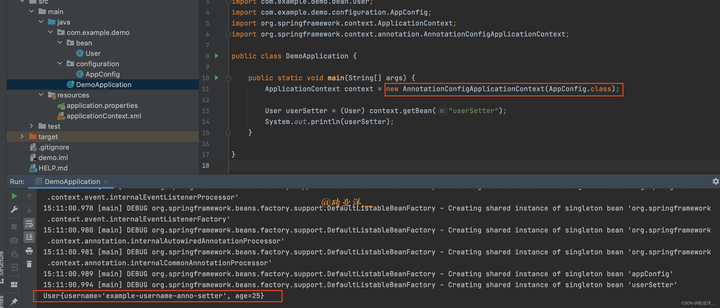
執行結果如下
注意:XML設定方式已經相對陳舊,而且在Spring Boot專案中,主流的做法是使用註解和Java設定方式。對於setter注入,有時會引發迴圈依賴的問題。在Spring中,可以使用構造器注入來避免這種情況,這裡瞭解即可。
2. 構造器注入
setter注入是一種在物件被範例化之後(通過呼叫無參構造器建立範例)再通過setter方法注入依賴的方式。構造器注入則是在建立物件範例的時候就通過構造器引數來注入依賴。
為了演示構造器注入,我們需要給User新增一個全引數構造器:
public User(String username, Integer age) {
 this.username = username;
 this.age = age;
}
新增這個構造器後,Java不再提供預設的無參構造器,這會導致我們之前的<bean>標籤建立時失敗,因為它找不到預設的構造器。
2.1 使用XML進行構造器注入
我們可以在<bean>標籤內部宣告一個子標籤:constructor-arg。它用於指定構造器的引數,來進行屬性注入。constructor-arg標籤的編寫規則如下:
<bean id="userConstructor" class="com.example.demo.bean.User">
 <constructor-arg index="0" value="example-username-constructor"/>
 <constructor-arg index="1" value="25"/>
</bean>
index屬性表示建構函式引數的位置,它的值是一個非負整數,其中0表示第一個引數,1表示第二個引數,以此類推。雖然value屬性的值總是一個字串,但是Spring會嘗試將它轉換為建構函式引數所需的型別。例如建構函式的第二個引數是int型別,那麼Spring會嘗試將字串"25"轉換為整數25。
使用index屬性來指定建構函式引數的位置在大多數情況下是可以的,但是如果建構函式的引數數量或者順序發生了改變,就可能會出錯。另外一種更為可靠的方式是使用name屬性來指定引數的名稱,如:
<bean id="userConstructor" class="com.example.demo.bean.User">
 <constructor-arg name="username" value="example-username-constructor"/>
 <constructor-arg name="age" value="25"/>
</bean>
這樣無論引數的順序如何,只要引數名稱不變,就不會出錯。
2.2 使用@Bean註解進行構造器屬性注入
在註解驅動的bean註冊中,我們也可以直接使用程式設計方式賦值:
@Bean
public User user() {
 return new User("example-username-anno-constructor", 25);
}
2.3 構造器注入的完整程式碼範例
- 使用XML進行構造器注入
首先,我們需要建立一個User類,並在其中包含username和age兩個屬性,以及相應的getter、setter方法和構造器。
public class User {
 private String username;
 private Integer age;
 public User() {
 }
 public User(String username, Integer age) {
 this.username = username;
 this.age = age;
 }
 // 為了節省篇幅,getter和setter方法省略......
    @Override
 public String toString() {
 return "User{username='" + username + "', age=" + age + "}";
 }
}
對於XML方式的構造器注入,我們需要建立一個組態檔,比如叫applicationContext.xml,這裡保留setter注入方便大家對比
<beans xmlns="http://www.springframework.org/schema/beans"
 xmlns:xsi="http://www.w3.org/2001/XMLSchema-instance"
 xsi:schemaLocation="http://www.springframework.org/schema/beans
                           http://www.springframework.org/schema/beans/spring-beans.xsd">
 <!-- setter方法注入 -->
 <!-- setter方法注入 -->
<!-- <bean id="userSetter" class="com.example.demo.bean.User">-->
<!-- <property name="username" value="example-username-setter"/>-->
<!-- <property name="age" value="25"/>-->
<!-- </bean>-->
 <!-- 構造器注入 -->
 <bean id="userConstructor" class="com.example.demo.bean.User">
 <constructor-arg name="username" value="example-username-constructor"/>
 <constructor-arg name="age" value="25"/>
 </bean>
</beans>
然後,我們需要建立一個DemoApplication類,使用ApplicationContext來載入組態檔並獲取Bean:
package com.example.demo;
import com.example.demo.bean.User;
import org.springframework.context.ApplicationContext;
import org.springframework.context.support.ClassPathXmlApplicationContext;
public class DemoApplication {
 public static void main(String[] args) {
 ApplicationContext context = new ClassPathXmlApplicationContext("applicationContext.xml");
//        User userSetter = (User) context.getBean("userSetter");
//        System.out.println(userSetter);
        User userConstructor = (User) context.getBean("userConstructor");
 System.out.println(userConstructor);
 }
}
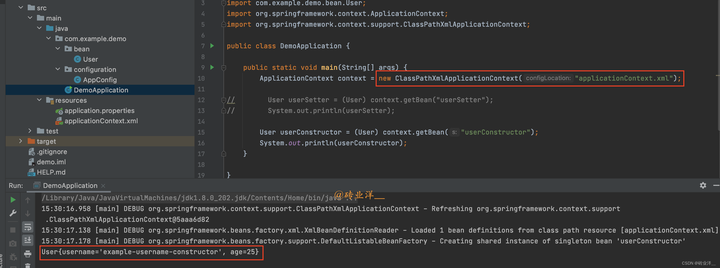
執行結果如下:
- 使用@Bean註解進行構造器屬性注入
我們需要建立一個設定類,例如叫AppConfig.java:
import com.example.demo.bean.User;
import org.springframework.context.annotation.Bean;
import org.springframework.context.annotation.Configuration;
@Configuration
public class AppConfig {
//    @Bean
//    public User userSetter() {
//        User user = new User();
//        user.setUsername("example-username-anno-setter");
//        user.setAge(25);
//        return user;
//    }
    @Bean
 public User userConstructor() {
 return new User("example-username-anno-constructor", 25);
 }
}
同樣,我們需要建立一個DemoApplication類,使用AnnotationConfigApplicationContext來載入設定類並獲取Bean:
import com.example.demo.bean.User;
import com.example.demo.configuration.AppConfig;
import org.springframework.context.ApplicationContext;
import org.springframework.context.annotation.AnnotationConfigApplicationContext;
public class DemoApplication {
 public static void main(String[] args) {
 ApplicationContext context = new AnnotationConfigApplicationContext(AppConfig.class);
//        User userSetter = (User) context.getBean("userSetter");
//        System.out.println(userSetter);
        User userConstructor = (User) context.getBean("userConstructor");
 System.out.println(userConstructor);
 }
}
執行結果:
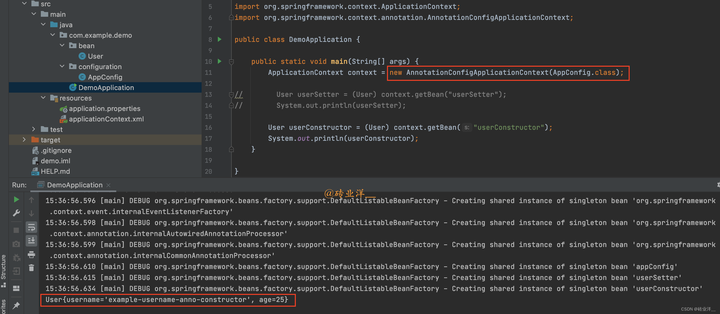
注意:如果在類中同時使用構造器注入和setter注入,需要注意它們注入的順序:先進行構造器注入,然後是setter注入。
3. 註解式屬性注入
上面我們已經說過註解式的setter和構造器注入。我們又是如何處理那些通過@Component掃描而註冊的bean的屬性的呢?我們來仔細說說這個問題,同時展示如何在xml中進行相同的操作。
3.1 @Value註解式屬性注入的應用
首先,讓我們從最簡單的屬性注入方法:@Value開始。建立一個新的White類,並宣告一些欄位,但是這次我們不會設定setter方法:
@Component
public class White {
    @Value("white-value-annotation")
 private String title;
    @Value("1")
 private Integer rank;
    @Override
 public String toString() {
 return "White{" + "title='" + title + '\'' + ", rank=" + rank + '}';
 }
}
要實現註解式屬性注入,我們可以直接在需要注入的欄位上新增@Value註解:
@Value("white-value-annotation")
private String title;
@Value("1")
private Integer rank;
要注意的是,如果使用 @Value 註解來注入一個不存在的屬性,那麼應用程式會在啟動時丟擲異常。
然後,我們將通過元件掃描方式將這個White類掃描到IOC容器中,並將其取出並列印:
public class DemoApplication {
 public static void main(String[] args) throws Exception {
 ApplicationContext ctx = new AnnotationConfigApplicationContext(White.class);
        White white = ctx.getBean(White.class);
 System.out.println("Injected value : " + white);
 }
}
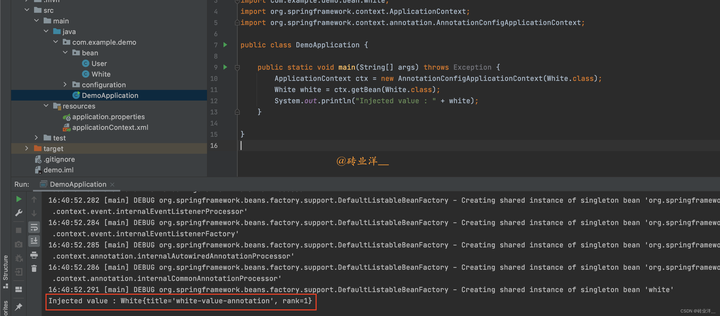
執行main方法會看到White的欄位已經成功注入:
Injected value : White{
   title='white-value-annotation', rank=1}
3.2 引入外部組態檔@PropertySource
如果我們需要在Spring中使用properties檔案,我們應該怎麼辦呢?Spring考慮到了這一點,並擴充套件了一個用於匯入外部組態檔的註解:@PropertySource。
- 建立Bean和組態檔
建立一個新的Blue類,其結構與White類完全相同。然後在專案的resources目錄下建立一個新的blue.properties檔案,用於儲存Blue類的屬性設定:
blue.title=blue-value-properties
blue.rank=2
- 引入組態檔
使用@PropertySource註解將properties檔案匯入到設定類:
@Configuration
@ComponentScan("com.example")
@PropertySource("classpath:blue.properties")
public class InjectValueConfiguration {
}
這個blue.properties檔案是一個鍵值對的列表,Spring 將這些鍵值對載入到 Environment 中,我們可以通過 @Value 註解或者 Environment 類的方法來獲取這些屬性值。
@Value 註解和 Environment 類都可以用於讀取 Spring 上下文中的屬性值。這些屬性值可能來自於多個不同的源,包括但不限於:
- Spring Boot 的預設組態檔(application.properties 或 application.yml)。
- 通過 @PropertySource 註解載入的屬性檔案。
- 系統環境變數。
- Java 系統屬性(可以通過 -D 命令列引數設定)。
如果你想通過 @Value 註解來獲取屬性值,如下:
@Component
public class BlueConfig {
    @Value("${blue.title}")
 private String title;
    @Value("${blue.rank}")
 private int rank;
 // getters and setters...
}
在 Spring 應用中使用 @PropertySource 註解來載入一個 .properties 檔案時,這個檔案中的所有設定項都會被讀取,並儲存在一個內部的 Map 結構中。這個 Map 的鍵是設定項的名稱,值是設定項的值。Spring 中的一些內建設定項也會被新增到這個 Map 中。
當我們使用 ${...}` 預留位置語法來參照一個設定項時,`Spring` 會查詢這個 `Map`,取出與預留位置名稱相應的設定項的值。例如有一個設定項 `blue.title=blue-value-properties`,我們可以在程式碼中使用 `${blue.title} 預留位置來參照這個設定項的值。
如果想通過 Environment 類的方法來獲取屬性值,可以像下面這樣做:
@Component
public class SomeComponent {
    @Autowired
 private Environment env;
 public void someMethod() {
        String title = env.getProperty("blue.title");
        int rank = Integer.parseInt(env.getProperty("blue.rank"));
 // ...
 }
}
在上述程式碼中,Environment 類的 getProperty 方法用於獲取屬性值。注意,getProperty 方法返回的是 String,所以如果屬性是非字串型別(如 int),則需要將獲取的屬性值轉換為適當的型別。
注意:@PropertySource 無法載入 YAML 格式的檔案,只能載入 properties 格式的檔案。如果需要載入 YAML 格式的檔案,而且使用的是 Spring Boot框架,那麼可以使用@ConfigurationProperties或@Value註解。例如以下的YAML檔案:
application.yml
appTest:
  name: MyApp
  version: 1.0.0
可以使用@ConfigurationProperties來載入這些屬性:
@Configuration
@ConfigurationProperties(prefix = "appTest")
public class AppConfig {
 private String name;
 private String version;
 // getters and setters...
}
@ConfigurationProperties註解主要用於指定設定屬性的字首,@ConfigurationProperties註解本身並不直接指定組態檔的位置, 而是由Spring Boot的自動設定機制處理的。
這樣,name欄位就會被自動繫結到appTest.name設定屬性,version欄位就會被自動繫結到appTest.version設定屬性。
預設情況下,Spring Boot會在啟動時自動載入src/main/resources目錄下的application.properties或application.yml檔案。我們可以通過設定spring.config.name和spring.config.location屬性來改變預設的組態檔名或位置。
注意:@ConfigurationProperties註解需要配合@EnableConfigurationProperties註解或@Configuration註解使用,以確保Spring能夠發現並處理這些註解。
或者,你也可以使用@Value註解來載入這些屬性:
@Component
public class AppConfig {
    @Value("${appTest.name}")
 private String name;
    @Value("${appTest.version}")
 private String version;
 // getters and setters...
}
- Blue類的屬性注入
對於properties型別的屬性,我們這裡選擇@Value註解和預留位置來注入屬性:
@Value("${blue.title}")
private String title;
@Value("${blue.rank}")
private Integer rank;
如果你熟悉jsp的el表示式,會發現這和它非常相似!
- 測試啟動類
修改啟動類,將設定類引入,然後取出並列印Blue:
public static void main(String[] args) throws Exception {
 ApplicationContext ctx = new AnnotationConfigApplicationContext(InjectValueConfiguration.class);
    Blue blue = ctx.getBean(Blue.class);
 System.out.println("Properties value : " + blue);
}
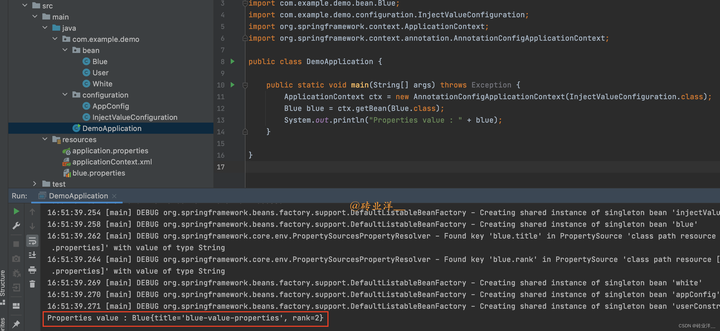
執行main方法會看到控制檯已經成功列印出了組態檔的屬性:
Properties value : Blue{
   title='blue-value-properties', rank=2}
3.3 在XML中引入外部組態檔
在xml中,我們可以和@Value相同的方式使用預留位置:
<?xml version="1.0" encoding="UTF-8"?>
<beans xmlns="http://www.springframework.org/schema/beans"
 xmlns:xsi="http://www.w3.org/2001/XMLSchema-instance"
 xsi:schemaLocation="http://www.springframework.org/schema/beans
       http://www.springframework.org/schema/beans/spring-beans.xsd
       http://www.springframework.org/schema/context
       http://www.springframework.org/schema/context/spring-context.xsd"
 xmlns:context="http://www.springframework.org/schema/context">
 <!-- 相當於註解中的 @PropertySource("classpath:blue.properties") -->
 <context:property-placeholder location="classpath:blue.properties"/>
 <bean class="com.example.demo.bean.Blue">
 <property name="title" value="${blue.title}"/>
 <property name="rank" value="${blue.rank}"/>
 </bean>
</beans>
3.4 註解式屬性注入完整程式碼範例
- @Value註解式屬性注入的應用
建立White類:
package com.example.demo.bean;
import org.springframework.beans.factory.annotation.Value;
import org.springframework.stereotype.Component;
@Component
public class White {
    @Value("white-value-annotation")
 private String title;
    @Value("1")
 private Integer rank;
    @Override
 public String toString() {
 return "White{" + "title='" + title + '\'' + ", rank=" + rank + '}';
 }
}
建立啟動類InjectValueAnnotationApplication:
package com.example.demo;
import com.example.demo.bean.White;
import org.springframework.context.ApplicationContext;
import org.springframework.context.annotation.AnnotationConfigApplicationContext;
public class DemoApplication {
 public static void main(String[] args) throws Exception {
 ApplicationContext ctx = new AnnotationConfigApplicationContext(White.class);
        White white = ctx.getBean(White.class);
 System.out.println("Injected value : " + white);
 }
}
執行結果如下:
- 引入外部組態檔@PropertySource
建立Blue類和組態檔,沒有setter和getter方法:
package com.example.demo.bean;
import org.springframework.beans.factory.annotation.Value;
import org.springframework.stereotype.Component;
@Component
public class Blue {
    @Value("${blue.title}")
 private String title;
    @Value("${blue.rank}")
 private Integer rank;
    @Override
 public String toString() {
 return "Blue{" + "title='" + title + '\'' + ", rank=" + rank + '}';
 }
}
resources目錄下的blue.properties檔案:
blue.title=blue-value-properties
blue.rank=2
建立設定類InjectValueConfiguration:
package com.example.demo.configuration;
import org.springframework.context.annotation.ComponentScan;
import org.springframework.context.annotation.Configuration;
import org.springframework.context.annotation.PropertySource;
@Configuration
@ComponentScan("com.example")
@PropertySource("classpath:blue.properties")
public class InjectValueConfiguration {
}
修改啟動類,引入設定類:
package com.example.demo;
import com.example.demo.bean.Blue;
import com.example.demo.configuration.InjectValueConfiguration;
import org.springframework.context.ApplicationContext;
import org.springframework.context.annotation.AnnotationConfigApplicationContext;
public class DemoApplication {
 public static void main(String[] args) throws Exception {
 ApplicationContext ctx = new AnnotationConfigApplicationContext(InjectValueConfiguration.class);
        Blue blue = ctx.getBean(Blue.class);
 System.out.println("Properties value : " + blue);
 }
}
執行結果如下:
- 在xml中引入外部組態檔
在使用XML設定的情況下,我們需要建立一個XML檔案來替代InjectValueConfiguration類,我們可以先註釋掉InjectValueConfiguration類的所有內容
下面是相應的XML檔案內容:
<?xml version="1.0" encoding="UTF-8"?>
<beans xmlns="http://www.springframework.org/schema/beans"
 xmlns:xsi="http://www.w3.org/2001/XMLSchema-instance"
 xsi:schemaLocation="http://www.springframework.org/schema/beans
       http://www.springframework.org/schema/beans/spring-beans.xsd
       http://www.springframework.org/schema/context
       http://www.springframework.org/schema/context/spring-context.xsd"
 xmlns:context="http://www.springframework.org/schema/context">
 <!-- 相當於註解中的 @PropertySource("classpath:blue.properties") -->
 <context:property-placeholder location="classpath:blue.properties"/>
 <bean class="com.example.demo.bean.Blue">
 <property name="title" value="${blue.title}"/>
 <property name="rank" value="${blue.rank}"/>
 </bean>
</beans>
在這裡我們使用了context:property-placeholder標籤來匯入外部的properties檔案,然後使用${...}預留位置語法來參照組態檔中的屬性值。這樣無論是選擇用註解方式還是XML方式,都可以方便地在Spring中使用外部組態檔。
這裡還需要修改下Blue類,因為通過XML方法注入屬性需要提供相應的setter方法,修改後的Blue類如下:
package com.example.demo.bean;
import org.springframework.beans.factory.annotation.Value;
import org.springframework.stereotype.Component;
@Component
public class Blue {
    @Value("${blue.title}")
 private String title;
    @Value("${blue.rank}")
 private Integer rank;
 public String getTitle() {
 return title;
 }
 public void setTitle(String title) {
 this.title = title;
 }
 public Integer getRank() {
 return rank;
 }
 public void setRank(Integer rank) {
 this.rank = rank;
 }
    @Override
 public String toString() {
 return "Blue{" + "title='" + title + '\'' + ", rank=" + rank + '}';
 }
}
然後,我們需要修改啟動類,使用XmlApplicationContext代替AnnotationConfigApplicationContext:
package com.example.demo;
import com.example.demo.bean.Blue;
import org.springframework.context.ApplicationContext;
import org.springframework.context.annotation.ComponentScan;
import org.springframework.context.support.ClassPathXmlApplicationContext;
@ComponentScan("com.example")
public class DemoApplication {
 public static void main(String[] args) throws Exception {
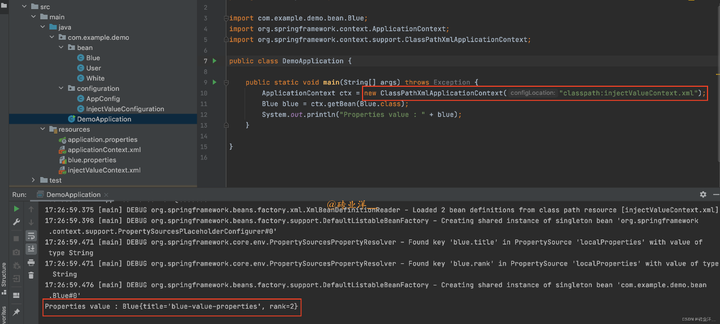
 ApplicationContext ctx = new ClassPathXmlApplicationContext("classpath:injectValueContext.xml");
        Blue blue = ctx.getBean(Blue.class);
 System.out.println("Properties value : " + blue);
 }
}
執行結果如下:
4. SpEL表示式
當我們談到屬性注入的時候,我們可能會遇到一些複雜的需求,例如我們需要參照另一個Bean的屬性,或者我們需要動態處理某個屬性值。這種需求無法通過使用${}的預留位置方式實現,我們需要一個更強大的工具:SpEL表示式。
Spring Expression Language(SpEL)是從Spring框架 3.0開始支援的強大工具。SpEL不僅是Spring框架的重要組成部分,也可以獨立使用。它的功能豐富,包括呼叫屬性值、屬性引數、方法呼叫、陣列儲存以及邏輯計算等。它與開源專案OGNL(Object-Graph Navigation Language)相似,但SpEL是Spring框架推出的,並預設內嵌在Spring框架中。
4.1 使用@Value註解和SpEL表示式實現屬性注入
SpEL的表示式用#{}表示,花括號中就是我們要編寫的表示式。
我們建立一個Bean,命名為Azure,同樣地,我們宣告屬性name和priority,並提供getter和setter方法以及toString()方法。然後我們使用@Component註解標註它。
使用@Value配合SpEL完成屬性注入,如下:
@Component
public class Azure {
    @Value("#{'spel-for-azure'}")
 private String name;
    @Value("#{10}")
 private Integer priority;
}
我們修改啟動類,從IOC容器中獲取Azure並列印,可以看到屬性被成功注入:
Azure{
   name='spel-for-azure', priority=10}
SpEL的功能遠不止這些,它還可以獲取IOC容器中其他Bean的屬性,讓我們來展示一下。
我們已經註冊了Azure Bean,現在我們再建立一個Bean,命名為Emerald。我們按照上述方法對欄位和方法進行宣告,然後使用@Component註解標註。
我們希望name屬性直接複製Azure的name屬性,而priority屬性則希望比Azure的priority屬性大1,我們可以這樣編寫:
@Component
public class Emerald {
    @Value("#{'copy of ' + azure.name}")
 private String name;
    @Value("#{azure.priority + 1}")
 private Integer priority;
}
在Spring的SpEL中可以通過bean的名稱存取到對應的bean,並通過.操作符存取bean的屬性。在這個例子中,azure就是一個bean的名稱,它對應的bean就是Azure類的範例。所以,azure.name就是存取Azure類範例的name屬性。
如果你在一個不涉及Spring的環境中使用SpEL,這個特性是不會生效的。這是因為這個特性依賴於Spring的IoC容器。
我們修改啟動類,測試執行,可以看到Azure的屬性已經成功被複制:
use spel bean property : Emerald{
   name='copy of spel-for-azure', priority=11}
SpEL表示式不僅可以參照物件的屬性,還可以直接參照類的常數,以及呼叫物件的方法。下面我們通過範例進行演示。
我們新建一個Bean,命名為Ivory。我們按照上述方法初始化屬性、toString()方法、註解。
假設我們有一個需求,讓name取azure屬性的前3個字元,priority取Integer的最大值。那麼我們可以使用SpEL這樣寫:
@Component
public class Ivory {
    @Value("#{azure.name.substring(0, 3)}")
 private String name;
    @Value("#{T(java.lang.Integer).MAX_VALUE}")
 private Integer priority;
}
注意,直接參照類的屬性,需要在類的全限定名外面使用T()包圍。
我們修改啟動類,測試執行,可以看到Ivory的屬性已經是處理之後的值:
use spel methods : Ivory{
   name='spe', priority=2147483647}
4.2 在XML中使用SpEL表示式實現屬性注入:
<bean id="ivory" class="com.example.demo.bean.Ivory">
 <property name="name" value="#{azure.name.substring(0, 3)}" />
 <property name="priority" value="#{T(java.lang.Integer).MAX_VALUE}" />
</bean>
學習SpEL表示式不需要花費大量的精力,掌握基礎的使用方法即可。
4.3 SpEL表示式屬性注入完整程式碼範例
- 使用@Value註解和SpEL表示式實現屬性注入
建立三個SpEL表示式屬性注入的Bean:Azure.java、Emerald.java和Ivory.java。
Azure.java:
package com.example.demo.bean;
import org.springframework.beans.factory.annotation.Value;
import org.springframework.stereotype.Component;
@Component
public class Azure {
    @Value("#{'spel-for-azure'}")
 private String name;
    @Value("#{10}")
 private Integer priority;
 public String getName() {
 return name;
 }
 public void setName(String name) {
 this.name = name;
 }
 public Integer getPriority() {
 return priority;
 }
 public void setPriority(Integer priority) {
 this.priority = priority;
 }
    @Override
 public String toString() {
 return "Azure{" +
 "name='" + name + '\'' +
 ", priority=" + priority +
 '}';
 }
}
Emerald.java:
package com.example.demo.bean;
import org.springframework.beans.factory.annotation.Value;
import org.springframework.stereotype.Component;
@Component
public class Emerald {
    @Value("#{'copy of ' + azure.name}")
 private String name;
    @Value("#{azure.priority + 1}")
 private Integer priority;
 public String getName() {
 return name;
 }
 public void setName(String name) {
 this.name = name;
 }
 public Integer getPriority() {
 return priority;
 }
 public void setPriority(Integer priority) {
 this.priority = priority;
 }
    @Override
 public String toString() {
 return "Emerald{" +
 "name='" + name + '\'' +
 ", priority=" + priority +
 '}';
 }
}
Ivory.java:
package com.example.demo.bean;
import org.springframework.beans.factory.annotation.Value;
import org.springframework.stereotype.Component;
@Component
public class Ivory {
    @Value("#{azure.name.substring(0, 3)}")
 private String name;
    @Value("#{T(java.lang.Integer).MAX_VALUE}")
 private Integer priority;
 public String getName() {
 return name;
 }
 public void setName(String name) {
 this.name = name;
 }
 public Integer getPriority() {
 return priority;
 }
 public void setPriority(Integer priority) {
 this.priority = priority;
 }
    @Override
 public String toString() {
 return "Ivory{" +
 "name='" + name + '\'' +
 ", priority=" + priority +
 '}';
 }
}
MyBean.java
@Component
public class MyBean {
    @Autowired
 private Azure azure;
    @Autowired
 private Emerald emerald;
    @Autowired
 private Ivory ivory;
 public void init() {
 System.out.println(azure);
 System.out.println(emerald);
 System.out.println(ivory);
 }
}
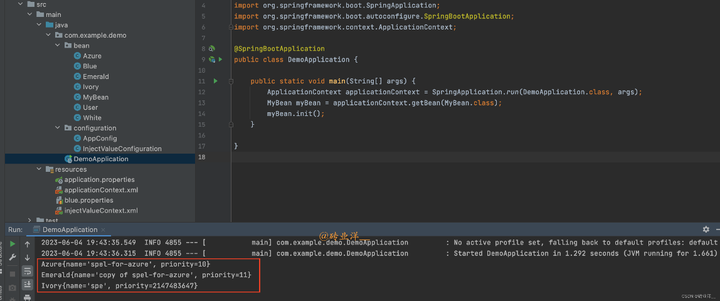
MyBean是一個用於展示如何在Spring中通過SpEL表示式來注入屬性的類,它聚合了三個物件Azure, Emerald和Ivory,並通過Spring的依賴注入機制將這三個物件注入到了MyBean類的範例中
主程式DemoApplication
@SpringBootApplication
public class DemoApplication {
 public static void main(String[] args) {
 ApplicationContext applicationContext = SpringApplication.run(DemoApplication.class, args);
 MyBean myBean = applicationContext.getBean(MyBean.class);
 myBean.init();
 }
}
執行結果:
- 在XML中使用SpEL表示式實現屬性注入
對於XML設定,Spring還支援在bean定義中使用SpEL。
首先,需要建立一個Spring XML組態檔,我們將其命名為app-config.xml:
<?xml version="1.0" encoding="UTF-8"?>
<beans xmlns="http://www.springframework.org/schema/beans"
 xmlns:xsi="http://www.w3.org/2001/XMLSchema-instance"
 xmlns:context="http://www.springframework.org/schema/context"
 xsi:schemaLocation="http://www.springframework.org/schema/beans
       http://www.springframework.org/schema/beans/spring-beans.xsd
       http://www.springframework.org/schema/context
       http://www.springframework.org/schema/context/spring-context.xsd">
 <context:component-scan base-package="com.example" />
 <bean id="azure" class="com.example.demo.bean.Azure">
 <property name="name" value="#{
 'spel-for-azure'}" />
 <property name="priority" value="#{10}" />
 </bean>
 <bean id="emerald" class="com.example.demo.bean.Emerald">
 <property name="name" value="#{
 'copy of ' + azure.name}" />
 <property name="priority" value="#{azure.priority + 1}" />
 </bean>
 <bean id="ivory" class="com.example.demo.bean.Ivory">
 <property name="name" value="#{azure.name.substring(0, 3)}" />
 <property name="priority" value="#{T(java.lang.Integer).MAX_VALUE}" />
 </bean>
</beans>
注意:在XML中使用SpEL需要使用#{},而不是${}。
然後修改這3個Bean,如果是使用XML來設定Spring的Bean的話,那麼在Java類中就不需要使用@Component註解了。因為XML組態檔已經明確地告訴Spring這些類是Spring Bean。
同樣的,如果在XML檔案中定義了Bean的屬性值,那麼在Java類中就不需要使用@Value註解來注入這些值了。因為XML組態檔已經明確地為這些屬性賦了值。
Azure.java
package com.example.demo.bean;
public class Azure {
 private String name;
 private Integer priority;
 public String getName() {
 return name;
 }
 public void setName(String name) {
 this.name = name;
 }
 public Integer getPriority() {
 return priority;
 }
 public void setPriority(Integer priority) {
 this.priority = priority;
 }
    @Override
 public String toString() {
 return "Azure{" +
 "name='" + name + '\'' +
 ", priority=" + priority +
 '}';
 }
}
Emerald.java
package com.example.demo.bean;
public class Emerald {
 private String name;
 private Integer priority;
 public String getName() {
 return name;
 }
 public void setName(String name) {
 this.name = name;
 }
 public Integer getPriority() {
 return priority;
 }
 public void setPriority(Integer priority) {
 this.priority = priority;
 }
    @Override
 public String toString() {
 return "Emerald{" +
 "name='" + name + '\'' +
 ", priority=" + priority +
 '}';
 }
}
Ivory.java
package com.example.demo.bean;
public class Ivory {
 private String name;
 private Integer priority;
 public String getName() {
 return name;
 }
 public void setName(String name) {
 this.name = name;
 }
 public Integer getPriority() {
 return priority;
 }
 public void setPriority(Integer priority) {
 this.priority = priority;
 }
    @Override
 public String toString() {
 return "Ivory{" +
 "name='" + name + '\'' +
 ", priority=" + priority +
 '}';
 }
}
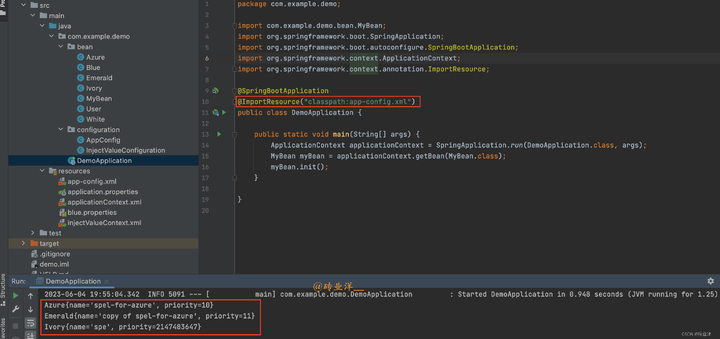
然後需要在主程式中匯入這個XML組態檔,這可以通過在主程式中新增@ImportResource註解實現:
package com.example.demo;
import com.example.demo.bean.MyBean;
import org.springframework.boot.SpringApplication;
import org.springframework.boot.autoconfigure.SpringBootApplication;
import org.springframework.context.ApplicationContext;
import org.springframework.context.annotation.ImportResource;
@SpringBootApplication
@ImportResource("classpath:app-config.xml")
public class DemoApplication {
 public static void main(String[] args) {
 ApplicationContext applicationContext = SpringApplication.run(DemoApplication.class, args);
 MyBean myBean = applicationContext.getBean(MyBean.class);
 myBean.init();
 }
}
這樣就可以在Spring的XML組態檔中使用SpEL了。
執行結果如下:
