野火指南者(STM32F103VET6)應用:實現USB虛擬串列埠(CDC_VPC)
MCU:STM32F103VET6
開發環境:STM32CubeMX+MDK5
實現USB的虛擬串列埠不需要去理解USB的底層驅動,只需要STM32CubeMX去設定生成工程即可。在野火的指南者中,是沒有這一類的視訊和範例的,博主使用這款開發板實現USB虛擬串列埠。
首先需要開啟STM32CubeMX工具。輸入開發板MCU對應型號,找到開發板對應封裝的MCU型號,雙擊開啟(圖中第三)。
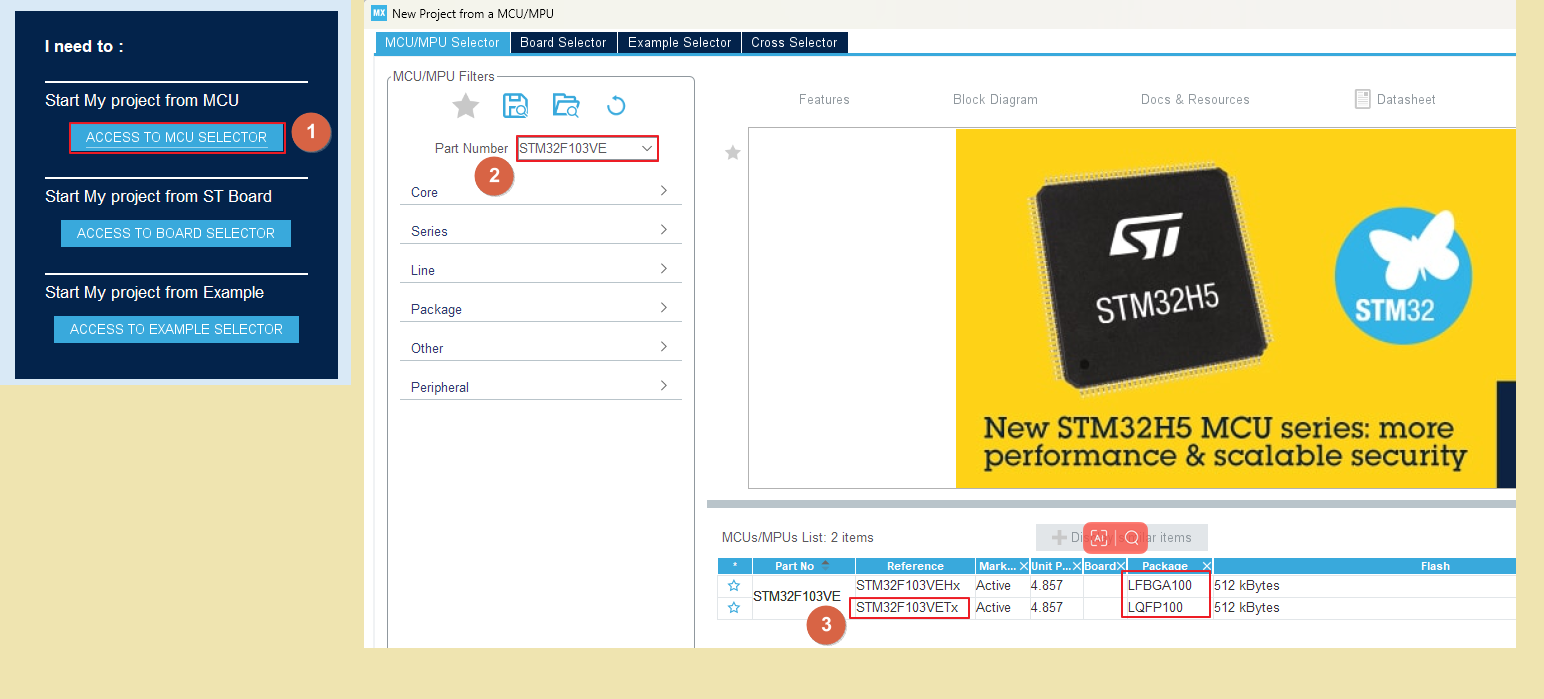
此時,雙擊完後會關閉此介面,然後開啟一個新介面。
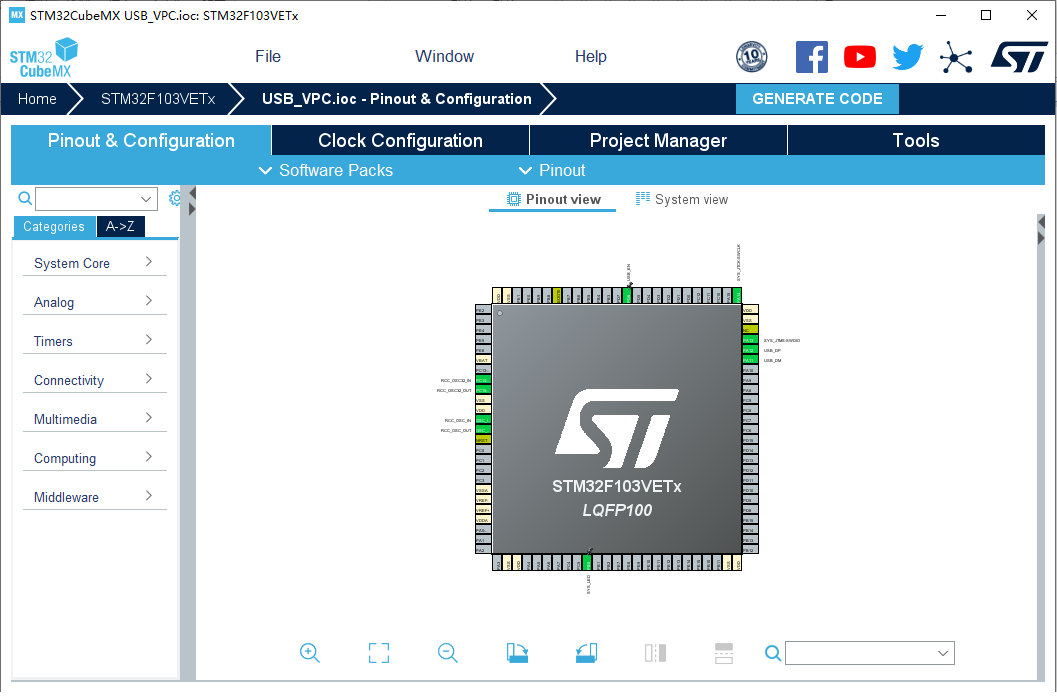
然後,我們開始基本設定。

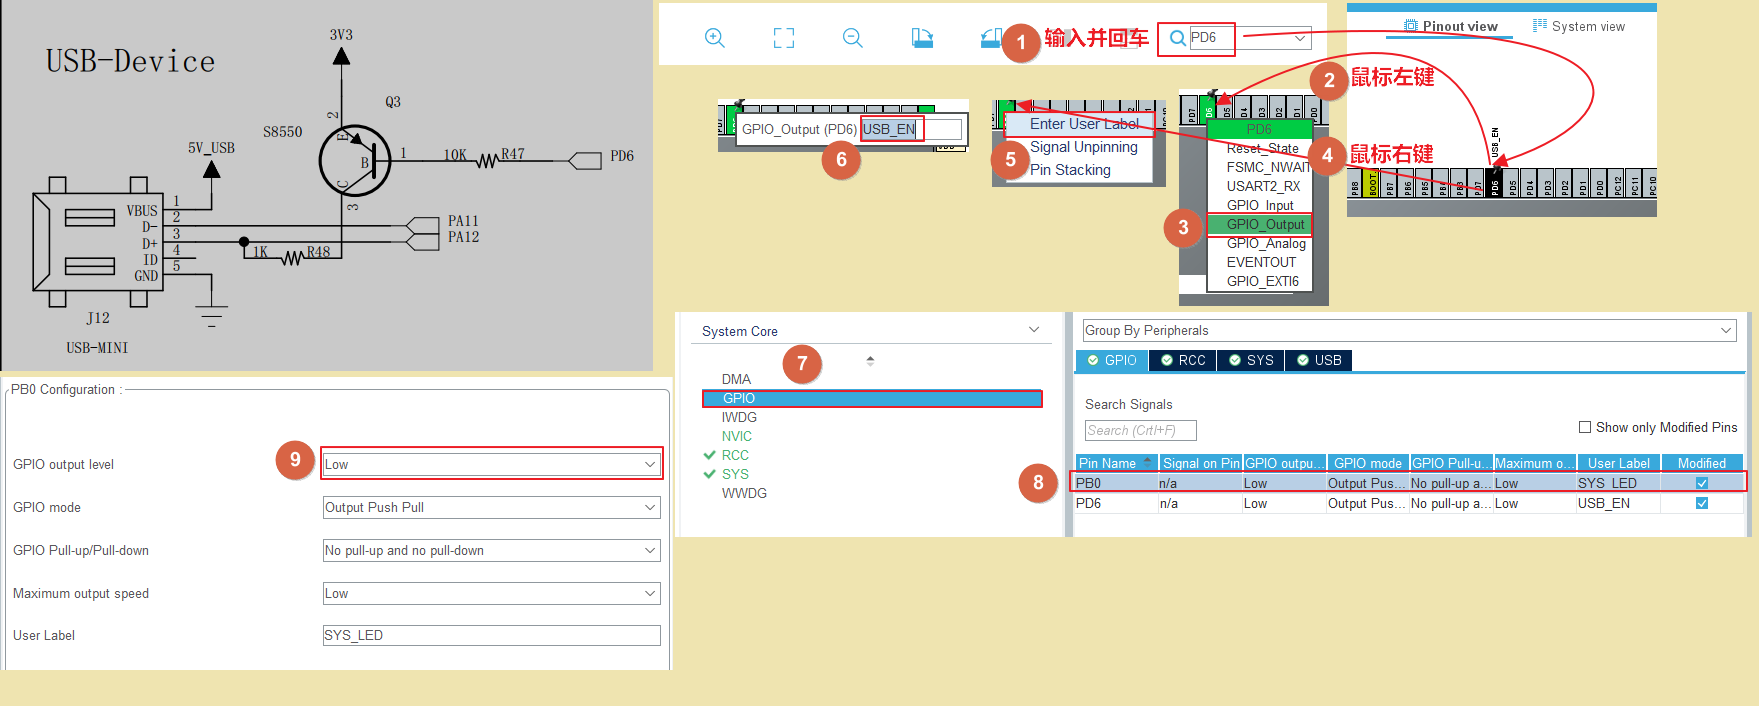
現在我們選擇一個LED作為系統LED,該步驟可以忽略,只是本人喜歡這樣子。以硬體原理圖的綠燈為例子。
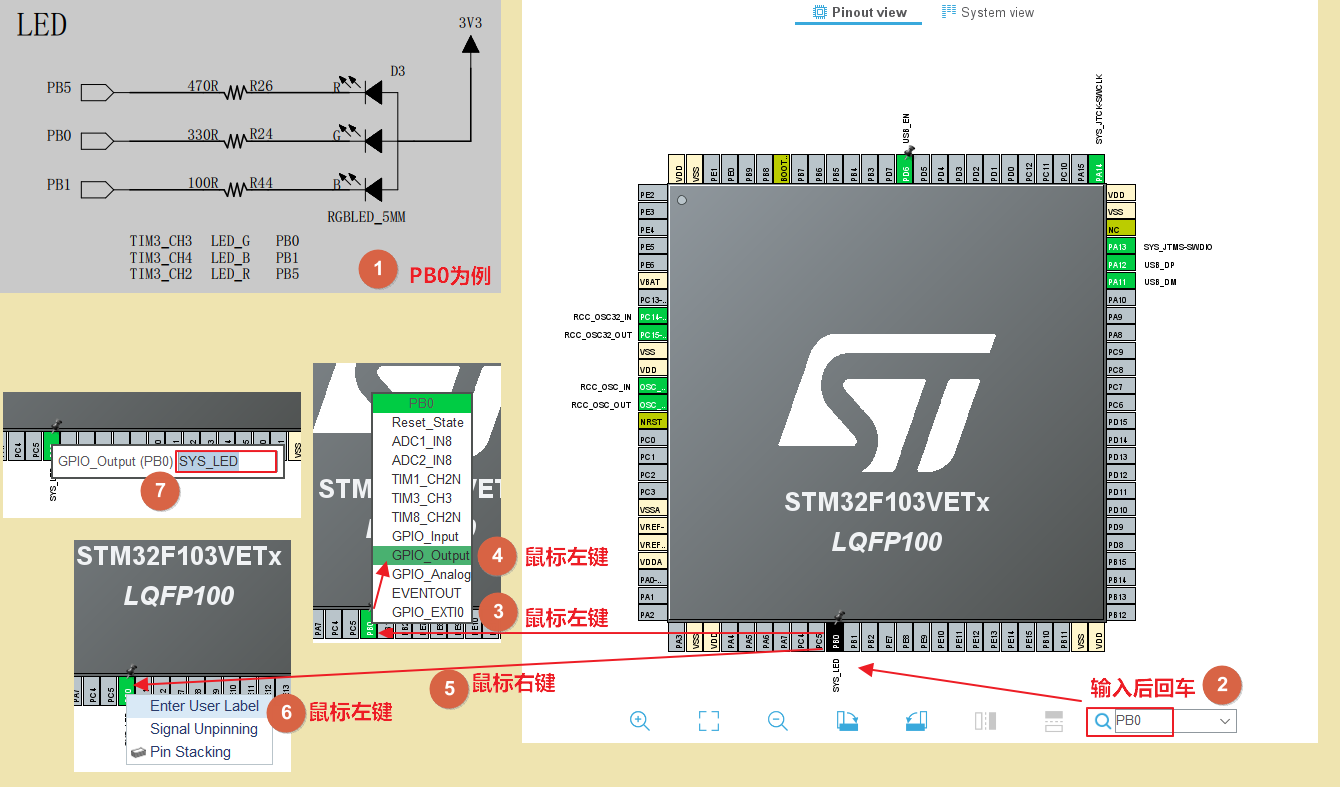
基本設定除了時鐘樹外,基本上已經設定好了。
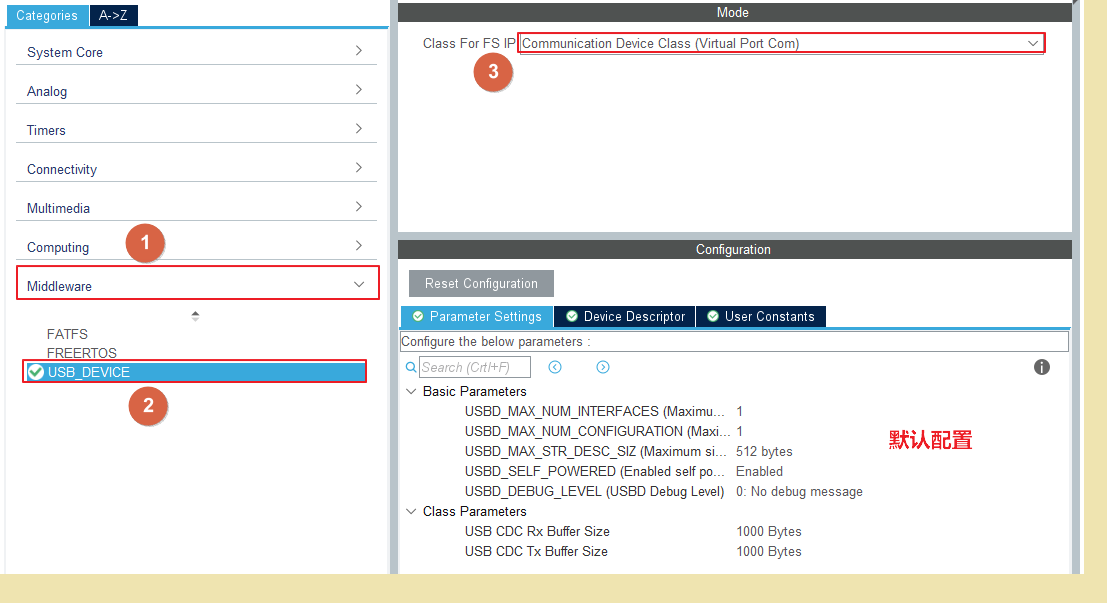
現在來設定USB_Device。STM32F1系列USB只支援USB_Device。
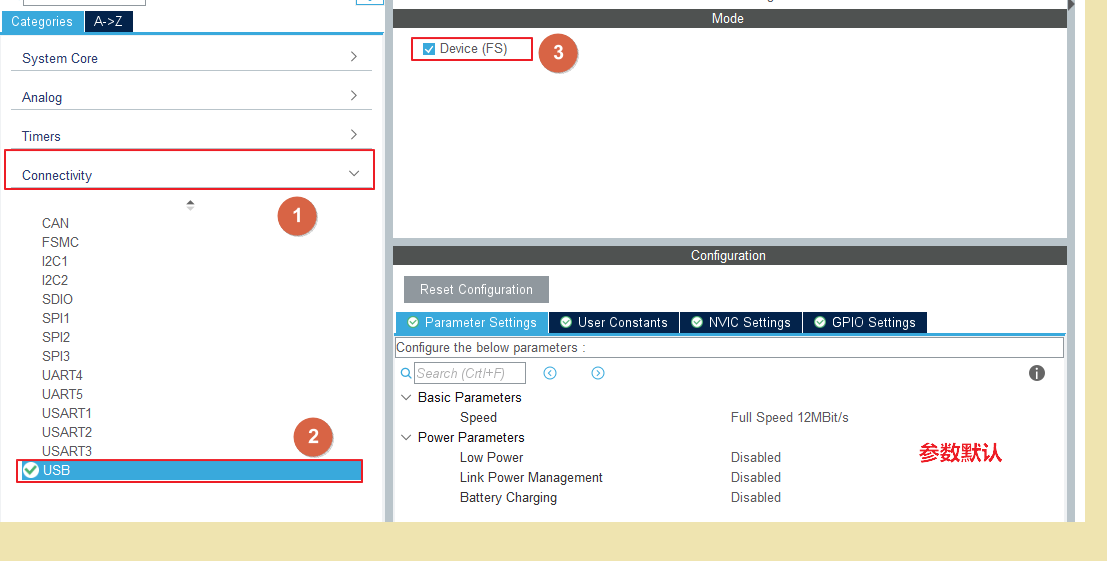
選中USB型別後,還需要細化其中的型別。
一切設定都是基於硬體原理圖的。硬體設定除常規設定外,還是需要看硬體原理圖的。在硬體原理圖中,可以看到只有PD6拉低時,USB才使能。(針對野火指南者開發板)
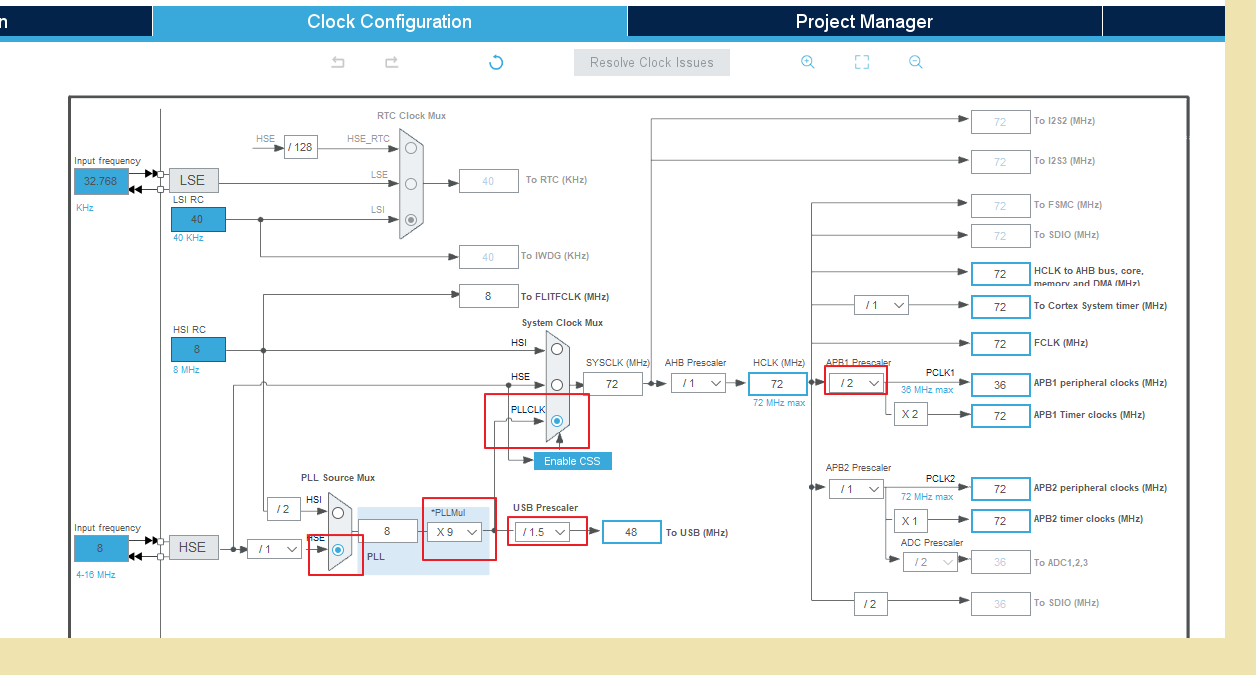
現在設定時鐘樹
設定完成,完善工程,生成工程。
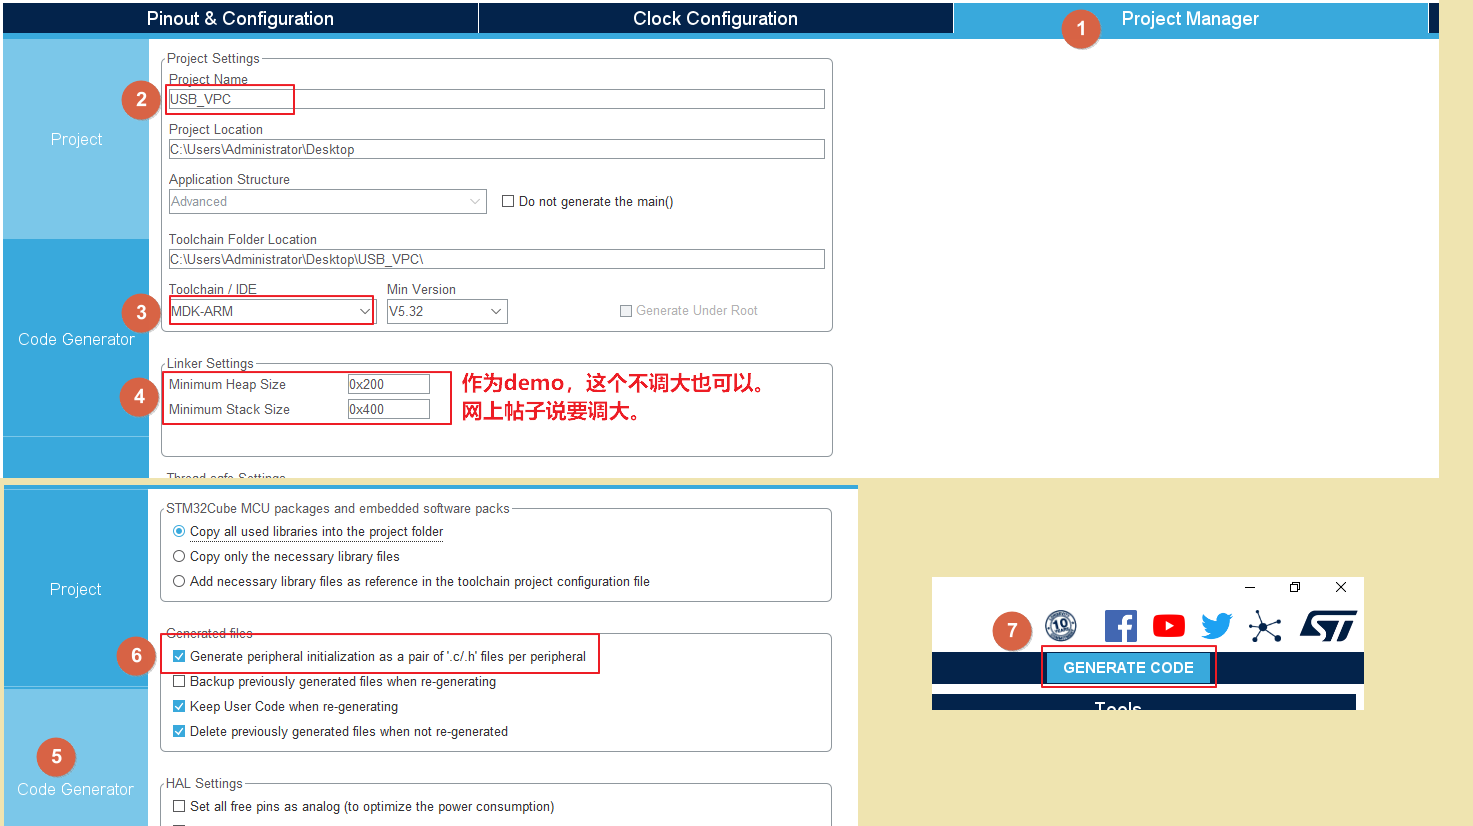
到此,STM32CubeMX工具的使用結束!可以發現在桌面已經生成了USB_VPC工程。
USB虛擬串列埠還需要裝驅動才能被是識別到,在Win7、Win8機型PC中需要到ST官網下載。win10及以上機型在本地已有驅動,無需安裝。
使用MDK5開啟USB_VPC工程開啟。點選魔法棒,勾選微庫。選擇對應的下載器,勾選下載完復位允許。USB線一端接開發板USB_Device,一端接PC。
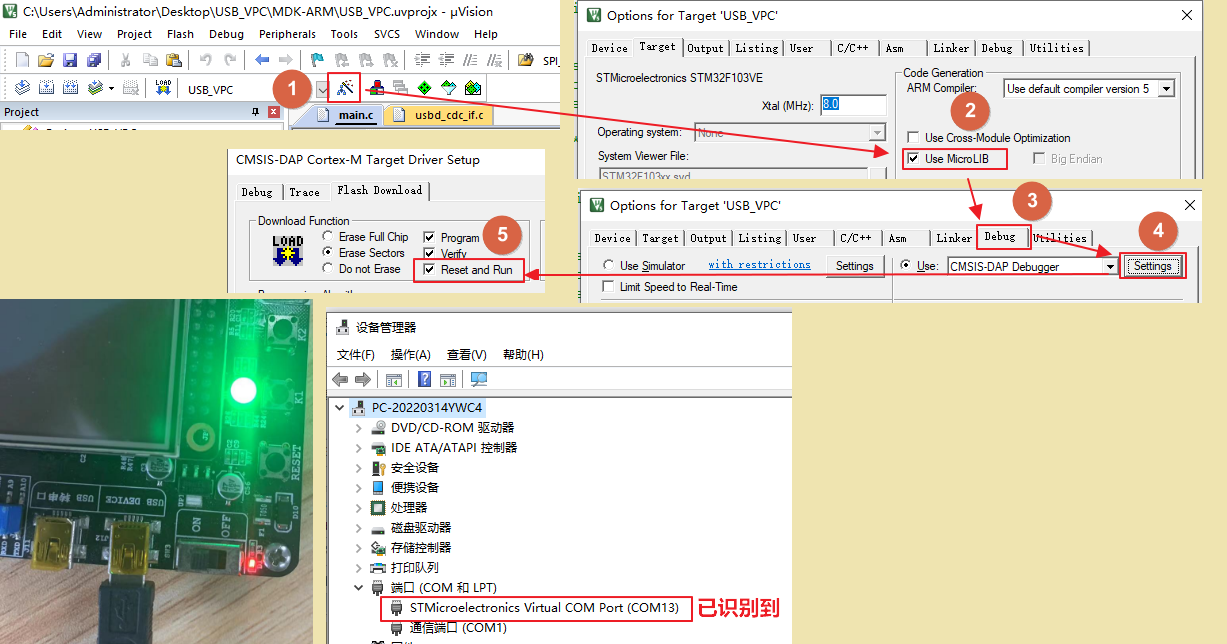
現在可以開始實驗了,實現VPC的傳送與回傳,並重定向printf函數。
在此之前,簡單描述一下生成的USB檔案以及重要函數。

然後再插播一條,看貼文說是,剛下載完程式時,是識別不出埠的。需要在上電的情況下從PC那拔插一次USB線。然後可以使用一個函數解決這個問題。可以在gpio.c中寫入函數,然後記得在標頭檔案宣告。使用要在MX_USB_DEVICE_Iint()之前。
(我沒遇到這個問題,但是我還是放到工程了,但是我沒用這函數。)
 1 /* USER CODE BEGIN 2 */
 2 /*USB 重新列舉函數*/
 3 void USB_Reset(void)
 4 {
 5     GPIO_InitTypeDef GPIO_InitStruct = {0};
 6
 7     __HAL_RCC_GPIOA_CLK_ENABLE();
 8
 9     GPIO_InitStruct.Pin = GPIO_PIN_12;
10     GPIO_InitStruct.Mode = GPIO_MODE_OUTPUT_PP;
11     GPIO_InitStruct.Pull = GPIO_NOPULL;
12     GPIO_InitStruct.Speed = GPIO_SPEED_FREQ_LOW;
13     HAL_GPIO_Init(GPIOA, &GPIO_InitStruct);
14
15     HAL_GPIO_WritePin(GPIOA,GPIO_PIN_12,GPIO_PIN_RESET);
16     HAL_Delay(100);
17     HAL_GPIO_WritePin(GPIOA,GPIO_PIN_12,GPIO_PIN_SET);
18 }
19 /* USER CODE END 2 */
實驗環節:傳送與回傳
在main.c中(擷取片段,修改部分)
 1 /* Private includes ----------------------------------------------------------*/
 2 /* USER CODE BEGIN Includes */
 3 #include "usbd_cdc_if.h"
 4 /* USER CODE END Includes */
 5
 6 /* Private typedef -----------------------------------------------------------*/
 7 /* USER CODE BEGIN PTD */
 8
 9 /* USER CODE END PTD */
10
11 /* Private define ------------------------------------------------------------*/
12 /* USER CODE BEGIN PD */
13 /* USER CODE END PD */
14
15 /* Private macro -------------------------------------------------------------*/
16 /* USER CODE BEGIN PM */
17
18 /* USER CODE END PM */
19
20 /* Private variables ---------------------------------------------------------*/
21
22 /* USER CODE BEGIN PV */
23
24 /* USER CODE END PV */
25
26 /* Private function prototypes -----------------------------------------------*/
27 void SystemClock_Config(void);
28 /* USER CODE BEGIN PFP */
29
30 /* USER CODE END PFP */
31
32 /* Private user code ---------------------------------------------------------*/
33 /* USER CODE BEGIN 0 */
34
35 /* USER CODE END 0 */
36
37 /**
38   * @brief  The application entry point.
39   * @retval int
40   */
41 int main(void)
42 {
43   /* USER CODE BEGIN 1 */
44     char str[] = "Hello World!\r\n";
45   /* USER CODE END 1 */
46
47   /* MCU Configuration--------------------------------------------------------*/
48
49   /* Reset of all peripherals, Initializes the Flash interface and the Systick. */
50   HAL_Init();
51
52   /* USER CODE BEGIN Init */
53
54   /* USER CODE END Init */
55
56   /* Configure the system clock */
57   SystemClock_Config();
58
59   /* USER CODE BEGIN SysInit */
60 //    USB_Reset();
61   /* USER CODE END SysInit */
62
63   /* Initialize all configured peripherals */
64   MX_GPIO_Init();
65   MX_USB_DEVICE_Init();
66   /* USER CODE BEGIN 2 */
67
68   /* USER CODE END 2 */
69
70   /* Infinite loop */
71   /* USER CODE BEGIN WHILE */
72   while (1)
73   {
74     /* USER CODE END WHILE */
75     CDC_Transmit_FS((uint8_t*)str, 14);
76     HAL_Delay(2000);
77     /* USER CODE BEGIN 3 */
78   }
79   /* USER CODE END 3 */
80 }
在usbd_cdc_if.c中(擷取片段,修改部分)
 1 /**
 2   * @brief  Data received over USB OUT endpoint are sent over CDC interface
 3   *         through this function.
 4   *
 5   *         @note
 6   *         This function will issue a NAK packet on any OUT packet received on
 7   *         USB endpoint until exiting this function. If you exit this function
 8   *         before transfer is complete on CDC interface (ie. using DMA controller)
 9   *         it will result in receiving more data while previous ones are still
10   *         not sent.
11   *
12   * @param  Buf: Buffer of data to be received
13   * @param  Len: Number of data received (in bytes)
14   * @retval Result of the operation: USBD_OK if all operations are OK else USBD_FAIL
15   */
16 static int8_t CDC_Receive_FS(uint8_t* Buf, uint32_t *Len)
17 {
18   /* USER CODE BEGIN 6 */
19     CDC_Transmit_FS(Buf, *Len);
20
21   USBD_CDC_SetRxBuffer(&hUsbDeviceFS, &Buf[0]);
22   USBD_CDC_ReceivePacket(&hUsbDeviceFS);
23   return (USBD_OK);
24   /* USER CODE END 6 */
25 }
實驗結果(波特率隨意選)
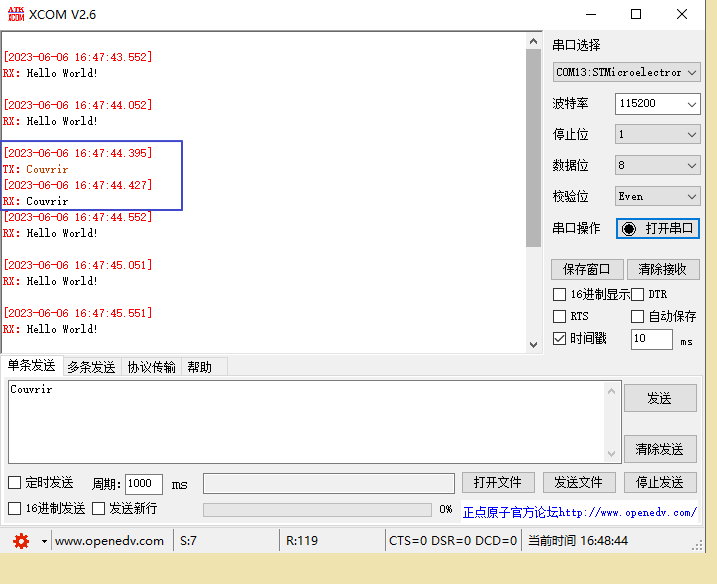
實驗環節:列印重定向
在usbd_cdc_if.c中(擷取片段,修改部分),宣告在usbd_cdc_if.h檔案。
 1 /* USER CODE BEGIN PRIVATE_FUNCTIONS_IMPLEMENTATION */
 2 #include "stdarg.h"
 3 #include "stdio.h"
 4
 5 uint8_t usbtemp[64];
 6 void usbvcom_printf(const char *format,...)
 7 {
 8     uint16_t     len;
 9     va_list     args;
10
11     va_start(args, format);
12     len = vsnprintf((char *)usbtemp, sizeof(usbtemp)+1, (char *)format, args);
13     va_end(args);
14
15     CDC_Transmit_HS(usbtemp, len);
16 }
17
18 /* USER CODE END PRIVATE_FUNCTIONS_IMPLEMENTATION */
然後就可以像printf那樣使用了,實測過是正常的!
時代越來越好,開發效率越來越高,希望能幫助到你!!!
還有就是,開源萬歲。