看看Angular有啥新玩法!手把手教你在Angular15中整合報表外掛
摘要:本文由葡萄城技術團隊於部落格園原創並首發。葡萄城為開發者提供專業的開發工具、解決方案和服務,賦能開發者。
Angular15新特性
Angular框架(以下簡稱「Angular」)作為一款由谷歌開發的Web應用程式框架,其強大的依賴注入系統、可重複使用的模組化開發理念和響應式程式設計模式等特點讓Angular一問世便取得了巨大的關注和流量。 截止目前為止,Angular已經迭代了15個版本,而Angular15又有哪些新的亮眼表現呢?小編為大家簡單介紹幾個Angular15的新特性(以下特性源於Angular官網):
- 獨立API脫離開發者預覽版
在Angular14版本的更新中使用了獨立的API,使得開發者能夠在不使用 NgModules 的情況下構建應用程式。在Angular15中將這些API已經更新成為了穩定版,並且以後將通過語意版本去控制獨立 APIs 的發展。
- 基於MDC的元件釋出到穩定版
Angular15優化了基於Material Design Components for Web(MDC)中Angular material對於元件的重構,這樣使得 Angular更加接近Material Design的規範。對於大部分元件,Angular更新了樣式和DOM結構。對於新元件,Angular保留了一部分TypeScript API和元件/指令選擇器。
-
語言服務中的自動匯入
在Angular15中,可以自動匯入在模板中使用但是沒有新增到NgModule中的組
件或獨立元件。
既然Angular都升級了,咱們是不是可以嘗試一些新的玩法?想要在Angular15中整合一個報表,但不知道該怎麼做?
沒關係,今天小編來告訴你。
Angular15中引入報表外掛
大家都知道Excel作為一款統計、分析資料資訊的辦公軟體,在大家日常工作和生活中起到了非常重要的作用。傳統的報表需要從瀏覽器下載之後再用Excel開啟才能修改資料,那麼,有沒有一種外掛可以實現直接在瀏覽器中修改Excel報表資料呢?答案是肯定的。
下面將介紹如何在Angular15中整合Excel報表外掛並實現簡單的檔案上傳和下載。
在本教學中,我們將使用node.js,請確保已安裝最新版本。除此之外還需要使用軟體Visual Studio Code(以下簡稱「VSCode」)作為程式設計環境,請您以管理員身份執行它。
- Angular整合報表外掛:
新建一個資料夾用來存放工作區程式碼(資料夾路徑最好是英文)。
使用指令初始化Angular工程(用命令提示字元CMD輸入指令)。
//安裝 Angular CLI globally
npm install -g @angular/cli
//通過Angular CLI 建立一個新專案
ng new spread-sheets-app
(初始化一個Angular工程)
將下面的表格資源貼上到package.json檔案中的dependencies標籤,並使用npm install指令下載和ng serve指令執行。
"@angular/animations": "\^15.2.9",

"@angular/common": "\^15.2.9",

"@angular/compiler": "\^15.2.9",

"@angular/core": "\^15.2.9",

"@angular/forms": "\^15.2.9",

"@angular/platform-browser": "\^15.2.9",

"@angular/platform-browser-dynamic": "\^15.2.9",

"@grapecity/spread-sheets-resources-zh": "15.1.0",

"@angular/router": "\^15.2.9",

"@grapecity/spread-excelio": "\^15.2.5",

"@grapecity/spread-sheets": "\^15.2.5",

"@grapecity/spread-sheets-angular": "\^15.2.5",

"@grapecity/spread-sheets-charts": "\^15.1.1",

"@grapecity/spread-sheets-designer": "15.1.2",

"@grapecity/spread-sheets-designer-resources-cn": "15.1.2",

"@grapecity/spread-sheets-designer-angular": "15.1.2",

"file-saver": "\^2.0.5",

"rxjs": "\~7.5.0",

"tslib": "\^2.3.0",

"zone.js": "\~0.11.4"
(Angular工程中引入表格外掛資源)
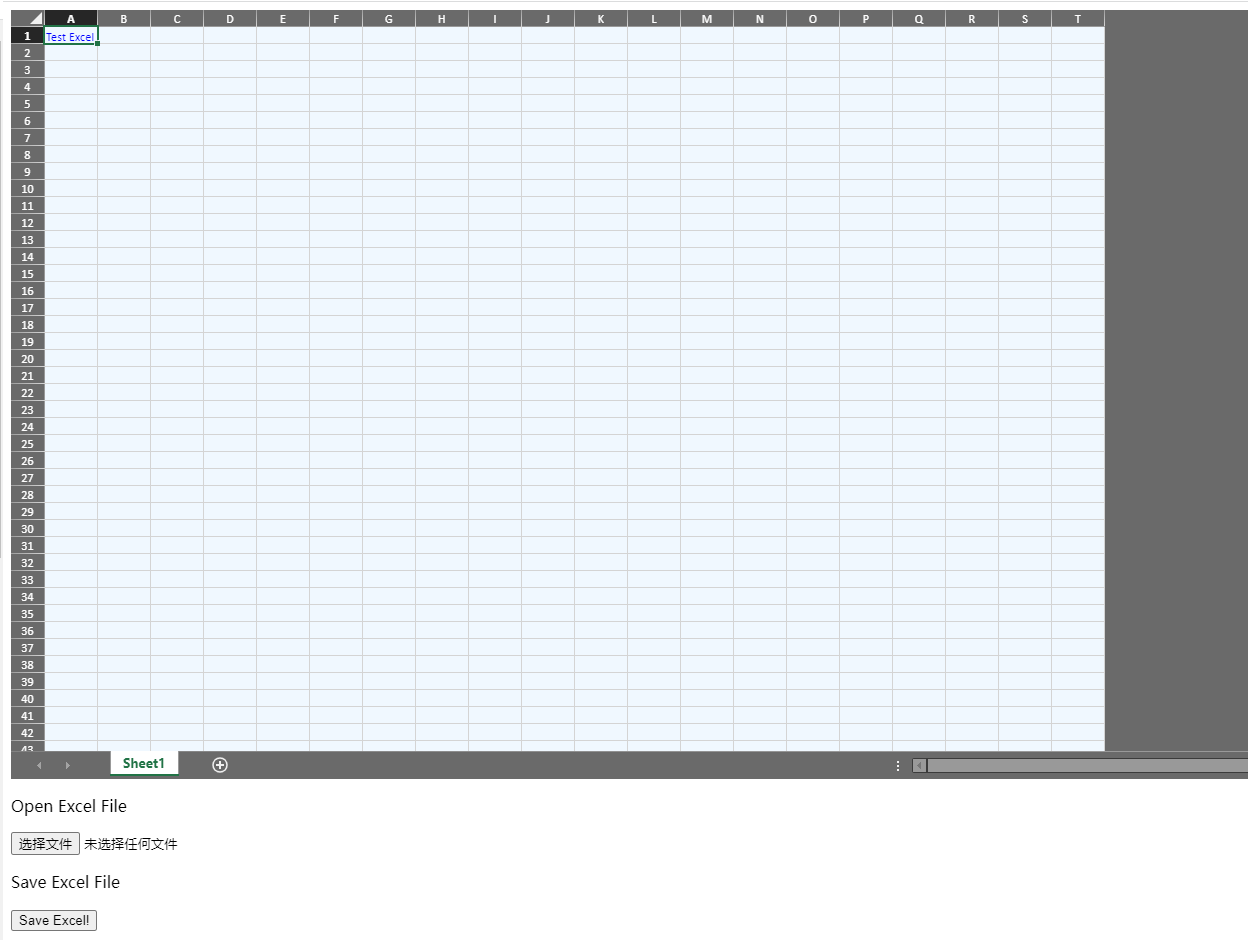
範例化表格元件並初始化表格物件內容。
在src/app/app.component.html中初始化範例表格:
\<div class='maincontainer'\>

\<gc-spread-sheets [backColor]="spreadBackColor" [hostStyle]="hostStyle" (workbookInitialized)="workbookInit(\$event)"\>

\</gc-spread-sheets\>

\</div\>
(初始化範例表格)
在src/app/app.component.ts中設定表格的大小和內容:
//設定內容長度寬度格式
export class AppComponent {

spreadBackColor = 'aliceblue';

hostStyle = {

width: '95vw',

height: '80vh'

};

private spread;

private excelIO;

//建立Excel.IO物件

constructor() {

this.spread = new GC.Spread.Sheets.Workbook();

this.excelIO = new Excel.IO();

}

//初始化物件

workbookInit(args: any) {

//表格物件內容

//舉例:設定第一個表格的內容為「Test Excel」且背景顏色為藍色。

//const self = this;

// self.spread = args.spread;

// const sheet = self.spread.getActiveSheet();

// sheet.getCell(0, 0).text('Test Excel').foreColor('blue');

}

(設
置表格大小和內容)
2.設定上傳和下載按鈕。
在src/app/app.component.html中初始化上傳、下載按鈕:
\<div class='maincontainer'\>

\<!--初始化上傳按鈕--\>

\<div class='loadExcelInput'\>

\<p\>Open Excel File\</p\>

\<input type="file" name="files[]" multiple id="jsonFile" accept=".xlsx" (change)="onFileChange(\$event)" /\>

\</div\>

\<!--初始化下載按鈕--\>

\<div class='exportExcel'\>

\<p\>Save Excel File\</p\>

\<button (click)="onClickMe(\$event)"\>Save Excel!\</button\>

\</div\>

\</div\>

(初始化上傳、下載按鈕)

在src/app/app.component.ts中新增上傳、下載按鈕的方法:

//上傳檔案程式碼

onFileChange(args: any) {

const self = this, file = args.srcElement && args.srcElement.files && args.srcElement.files[0];

if (self.spread && file) {

self.excelIO.open(file, (json: any) =\> {

self.spread.fromJSON(json, {});

setTimeout(() =\> {

alert('load successfully');

}, 0);

}, (error: any) =\> {

alert('load fail');

});

}

}

//下載檔案程式碼

onClickMe(args: any) {

const self = this;

const filename = 'exportExcel.xlsx';

const json = JSON.stringify(self.spread.toJSON());

self.excelIO.save(json, function (blob: any) {

saveAs(blob, filename);

}, function (error: any) {

console.log(error);

});

}
(新增上傳、下載按鈕的方法)
現在可以使用ng serve指令啟動專案並在瀏覽器中測試上傳檔案、修改檔案內容和下載檔案的操作了。

程式碼地址: