[MAUI程式設計] 用Handler實現自定義跨平臺控制元件
@
今天來談一談MAUI跨平臺技術的核心概念——跨平臺控制元件。
無論是MAUI,Xamarin.Forms還是其它的跨平臺技術,他們是多個不同平臺功能的抽象層,利用通用的方法實現所謂「一次開發,處處執行」。
跨平臺框架需要考慮通用方法在各平臺的相容,但由於各原生平臺(官方將原生稱為本機)功能的差異,可能不能滿足特定平臺的所有功能。
比如,眾所周知,MAUI的手勢識別器沒有提供長按(LongPress)手勢的識別, TapGestureRecognizer也僅僅是按下和擡起的識別,沒有提供長按的識別。
這時候就需要開發者自己實現特定平臺的功能,這就是自定義控制元件。
要想重寫控制元件,或增強預設控制元件的功能或視覺效果,最基礎的功能就是要拿到跨平臺控制元件,和本機控制元件。
通過跨平臺控制元件定義的屬性傳遞到本機控制元件,在本機控制元件中響應和處理自定義屬性的變化。達到自定義控制元件的目的。
接下來介紹在MAUI新增的特性:控制器(Handler),好用但知道的人不多 。
Handler
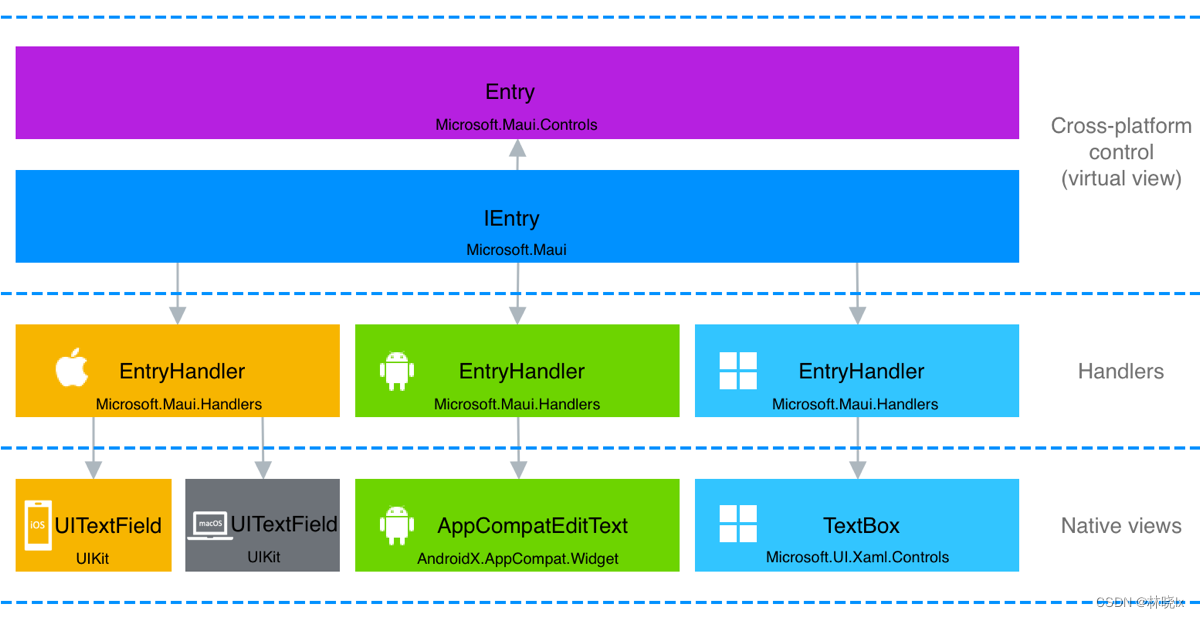
因為跨平臺控制元件的實現由本機檢視在每個平臺上提供的,MAUI為每個控制元件建立了介面用於抽象控制元件。 實現這些介面的跨平臺控制元件稱為 虛擬檢視。 處理程式 將這些虛擬檢視對映到每個平臺上的控制元件,這些控制元件稱為 本機檢視。
在VisualElement中的Handler物件是一個實現了IElementHandler介面的類,通過它可以存取 虛擬檢視和 本機檢視。
public interface IViewHandler : IElementHandler
{
    bool HasContainer { get; set; }
    object? ContainerView { get; }
    IView? VirtualView { get; }

    Size GetDesiredSize(double widthConstraint, double heightConstraint);
    void PlatformArrange(Rect frame);
}
每個控制元件有各自的Handler以及介面,請檢視官方檔案。
它可以通過註冊全域性的對映器,作為特定本機平臺上實現自定義控制元件的功能的入口。
然後結合.NET 6 條件編譯的語言特性,可以更加方便在但檔案上,為每個平臺編寫自定義處理程式。
Entry是實現IEntry介面的單行文字輸入控制元件,它對應的Handler是EntryHandler。

如果我們想要在Entry控制元件獲取焦點時,自動全選文字。
  Microsoft.Maui.Handlers.EntryHandler.Mapper.AppendToMapping("MyCustomization", (handler, view) =>
        {
#if ANDROID
            handler.PlatformView.SetSelectAllOnFocus(true);
#elif IOS || MACCATALYST
            handler.PlatformView.EditingDidBegin += (s, e) =>
            {
                handler.PlatformView.PerformSelector(new ObjCRuntime.Selector("selectAll"), null, 0.0f);
            };
#elif WINDOWS
            handler.PlatformView.GotFocus += (s, e) =>
            {
                handler.PlatformView.SelectAll();
            };
#endif
        });
或者,可以使用分部類將程式碼組織到特定於平臺的資料夾和檔案中。 有關條件編譯的詳細資訊,請參考官方檔案。
與Xamarin.Forms實現的區別
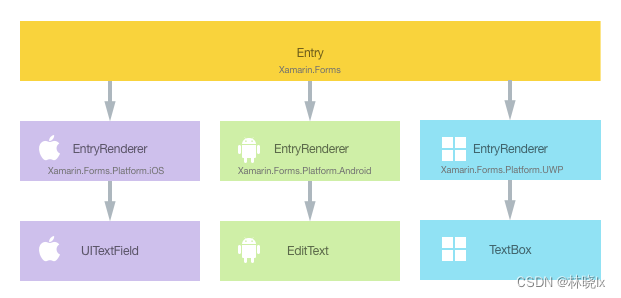
在Xamarin.Forms時代,已經提供了一套自定義控制元件的機制,呈現器(Renderer)。
Xamarin.Forms的控制元件,比如Entry是通過在封裝於特定平臺下的EntryRenderer的類中渲染的。

通過重寫控制元件預設Renderer,可以完全改變控制元件的外觀和行為方式。
- Element,Xamarin.Forms 元素
- Control,本機檢視、小元件或控制元件物件
為什麼要用Handler代替Renderer
雖然Renderer功能非常強大,但是絕大部分場景來說,不是每次都需要重寫控制元件,而僅僅是給控制元件新增一些特定平臺的增強功能,如果還需要重寫OnElementPropertyChanged 將跨平臺控制元件的屬性值傳輸到本機控制元件,這種方式太過於複雜。
以我的理解,Handler是對Renderer的一種優化,它解決了Renderer的這些問題:Renderer和跨平臺控制元件的耦合,對自定義控制元件的生命週期管理,和對自定義控制元件的更細粒度控制。
解耦
在Xamarin.Froms的Render中,要想拿到跨平臺控制元件的屬性,需要通過直接參照跨平臺型別,這樣就導致了Renderer和跨平臺控制元件的耦合。
在MAUI中,處理程式會將平臺控制元件與框架分離。平臺控制元件只需處理框架的需求。這樣的好處是處理程式也適用於其他框架(如 Comet 和 Fabulous)重複使用。
生命週期管理
可以通過處理程式的對映器(Mapper)在應用中的任意位置進行處理程式自定義。 自定義處理程式後,它將影響在應用中任意位置的該型別所有控制元件。
可以通過控制元件HandlerChanged 和HandlerChanging,管理Handler的生命週期,通過其引數可以獲取控制元件掛載、移除Handler的時機,可以在這裡做一些初始化和清理工作。
更細粒度的控制
因為實現了全域性對映器註冊,這樣的好處還有不用重寫子類控制元件,我們可以通過獲取跨平臺控制元件的某屬性,或註解屬性,拿到需要進行處理的控制元件。實現自由的面向切面的過濾。
用Effect來實現呢?
或者我們僅僅想更改控制元件外觀,可以通過Effect來實現。但無論是Effect還是Renderer,他們只能是全域性的,在需要狀態維護的業務邏輯中,比如長按,實際上是按下,擡起的過程,沒有按下的控制元件不要響應擡起,正因為這樣要記錄哪些控制元件已經按下,可能需要用一個字典維護所有的自定義控制元件。
而MAUI的自定義對映器實際上就是一個字典,減少了程式碼的複雜度。
在MAUI中,官方建議遷移到Handler。Renderer雖仍然可以在MAUI中使用,但是它們屬於相容方案(Compatibility名稱空間),並且不提供ExportRenderer標籤,需要在CreateMauiApp中手動新增:
.ConfigureMauiHandlers((handlers) =>
        {
#if ANDROID
            handlers.AddHandler(typeof(PressableView), typeof(XamarinCustomRenderer.Droid.Renderers.PressableViewRenderer));
#elif IOS
            handlers.AddHandler(typeof(PressableView), typeof(XamarinCustomRenderer.iOS.Renderers.PressableViewRenderer));
#endif
        });
從Renderer遷移到Handler的詳細步驟,請參考官方檔案
剛才說到,MAUI缺少長按的手勢控制,
所謂長按(LongPress),實際上是將手指接觸螢幕到離開螢幕的動作分解。當手指接觸螢幕時,觸發按下(Pressed)事件,當手指離開螢幕時,觸發擡起(Released)事件。如果在按下和擡起之間的時間間隔超過一定的時間,就認為是長按。
對於這樣簡單的功能,MAUI團隊並不打算將它加入到手勢識別中。可能將這個需求下放給社群來實現,我在CommunityToolkit找到了這個issue(https://github.com/CommunityToolkit/Maui/issues/86)但是到目前為止,官方僅有的只是用Effect實現的手勢識別案例(https://docs.microsoft.com/xamarin/xamarin-forms/app-fundamentals/effects/touch-tracking)
那麼我們參考這個官方案例,在MAUI上實現一個長按的手勢控制吧
自定義手勢監聽控制元件
定義可以監聽的手勢類別,分別是按下、移動、擡起、取消、進入、退出
 public enum TouchActionType
    {
        Entered,
        Pressed,
        Moved,
        Released,
        Exited,
        Cancelled
    }
新增手勢監聽器TouchRecognizer,它將提供一個事件OnTouchActionInvoked,用觸發手勢動作。
public partial class TouchRecognizer: IDisposable
{
    public event EventHandler<TouchActionEventArgs> OnTouchActionInvoked;
    public partial void Dispose();
}
EventArg類TouchActionEventArgs,用於傳遞手勢動作的引數
public long Id { private set; get; }

public TouchActionType Type { private set; get; }

public Point Location { private set; get; }

public bool IsInContact { private set; get; }
在各平臺上實現TouchRecognizer
使用分佈類(partial class)的方式,建立TouchRecognizer.iOS.cs、TouchRecognizer.Android.cs和TouchRecognizer.Windows.cs檔案,分別在各平臺上實現TouchRecognizer。在各平臺上的實現程式碼不會混在一起,便於維護。
iOS中的實現
public partial class TouchRecognizer : UIGestureRecognizer, IDisposable
{
    UIView iosView;

    public TouchRecognizer(UIView view)
    {
        this.iosView = view;
    }

    public override void TouchesBegan(NSSet touches, UIEvent evt)
    {
        base.TouchesBegan(touches, evt);

        foreach (UITouch touch in touches.Cast<UITouch>())
        {
            long id = touch.Handle.Handle.ToInt64();
            InvokeTouchActionEvent(this, id, TouchActionType.Pressed, touch, true);
        }


    }

    public override void TouchesMoved(NSSet touches, UIEvent evt)
    {
        base.TouchesMoved(touches, evt);

        foreach (UITouch touch in touches.Cast<UITouch>())
        {
            long id = touch.Handle.Handle.ToInt64();

            InvokeTouchActionEvent(this, id, TouchActionType.Moved, touch, true);

        }
    }

    public override void TouchesEnded(NSSet touches, UIEvent evt)
    {
        base.TouchesEnded(touches, evt);

        foreach (UITouch touch in touches.Cast<UITouch>())
        {
            long id = touch.Handle.Handle.ToInt64();

            InvokeTouchActionEvent(this, id, TouchActionType.Released, touch, false);

        }
    }

    public override void TouchesCancelled(NSSet touches, UIEvent evt)
    {
        base.TouchesCancelled(touches, evt);

        foreach (UITouch touch in touches.Cast<UITouch>())
        {
            long id = touch.Handle.Handle.ToInt64();

            InvokeTouchActionEvent(this, id, TouchActionType.Cancelled, touch, false);

        }
    }


    void InvokeTouchActionEvent(TouchRecognizer recognizer, long id, TouchActionType actionType, UITouch touch, bool isInContact)
    {
        var cgPoint = touch.LocationInView(recognizer.View);
        var xfPoint = new Point(cgPoint.X, cgPoint.Y);
        OnTouchActionInvoked?.Invoke(this, new TouchActionEventArgs(id, actionType, xfPoint, isInContact));
    }
}
Android中的實現
public partial class TouchRecognizer : IDisposable
{
    Android.Views.View androidView;
    Func<double, double> fromPixels;
    int[] twoIntArray = new int[2];
    private Point _oldscreenPointerCoords;

    public TouchRecognizer(Android.Views.View view)
    {
        this.androidView = view;
        if (view != null)
        {
            fromPixels = view.Context.FromPixels;
            view.Touch += OnTouch;
        }
    }

    public partial void Dispose()
    {
        androidView.Touch -= OnTouch;
    }

    void OnTouch(object sender, Android.Views.View.TouchEventArgs args)
    {
        var senderView = sender as Android.Views.View;
        var motionEvent = args.Event;
        var pointerIndex = motionEvent.ActionIndex;
        var id = motionEvent.GetPointerId(pointerIndex);
        senderView.GetLocationOnScreen(twoIntArray);
        var screenPointerCoords = new Point(twoIntArray[0] + motionEvent.GetX(pointerIndex),
                                                twoIntArray[1] + motionEvent.GetY(pointerIndex));


        switch (args.Event.ActionMasked)
        {
            case MotionEventActions.Down:
            case MotionEventActions.PointerDown:
                InvokeTouchActionEvent(this, id, TouchActionType.Pressed, screenPointerCoords, true);
                break;

            case MotionEventActions.Move:
                for (pointerIndex = 0; pointerIndex < motionEvent.PointerCount; pointerIndex++)
                {
                    id = motionEvent.GetPointerId(pointerIndex);


                    senderView.GetLocationOnScreen(twoIntArray);

                    screenPointerCoords = new Point(twoIntArray[0] + motionEvent.GetX(pointerIndex),
                                                    twoIntArray[1] + motionEvent.GetY(pointerIndex));


                    if (IsOutPit(senderView, screenPointerCoords))
                    {
                        if (_oldscreenPointerCoords != default)
                        {
                            InvokeTouchActionEvent(this, id, TouchActionType.Exited, screenPointerCoords, true);
                            _oldscreenPointerCoords=default;
                        }

                    }
                    else
                    {
                        if (_oldscreenPointerCoords == default
                                                    ||screenPointerCoords!= _oldscreenPointerCoords)
                        {
                            _oldscreenPointerCoords=screenPointerCoords;
                            InvokeTouchActionEvent(this, id, TouchActionType.Moved, screenPointerCoords, true);
                        }
                    }


                }
                break;

            case MotionEventActions.Up:
            case MotionEventActions.Pointer1Up:
                InvokeTouchActionEvent(this, id, TouchActionType.Released, screenPointerCoords, false);
                break;

            case MotionEventActions.Cancel:

                InvokeTouchActionEvent(this, id, TouchActionType.Cancelled, screenPointerCoords, false);
                break;
        }
    }

    private bool IsOutPit(Android.Views.View senderView, Point screenPointerCoords)
    {
        return (screenPointerCoords.X<twoIntArray[0]||screenPointerCoords.Y<twoIntArray[1])
                                    ||(screenPointerCoords.X>twoIntArray[0]+senderView.Width||screenPointerCoords.Y>twoIntArray[1]+senderView.Height);
    }

    void InvokeTouchActionEvent(TouchRecognizer touchEffect, int id, TouchActionType actionType, Point pointerLocation, bool isInContact)
    {
        touchEffect.androidView.GetLocationOnScreen(twoIntArray);
        double x = pointerLocation.X - twoIntArray[0];
        double y = pointerLocation.Y - twoIntArray[1];
        var point = new Point(fromPixels(x), fromPixels(y));
        OnTouchActionInvoked?.Invoke(this, new TouchActionEventArgs(id, actionType, point, isInContact));
    }

}
Windows中的實現
public partial class TouchRecognizer : IDisposable
{
    FrameworkElement windowsView;

    public TouchRecognizer(FrameworkElement view)
    {
        this.windowsView = view;
        if (this.windowsView != null)
        {
            this.windowsView.PointerEntered += View_PointerEntered;
            this.windowsView.PointerPressed += View_PointerPressed;
            this.windowsView.Tapped +=View_Tapped;
            this.windowsView.PointerMoved += View_PointerMoved;
            this.windowsView.PointerReleased += View_PointerReleased;
            this.windowsView.PointerExited += View_PointerExited;
            this.windowsView.PointerCanceled += View_PointerCancelled;
        }
    }

    public partial void Dispose()
    {
        windowsView.PointerEntered -= View_PointerEntered;
        windowsView.PointerPressed -= View_PointerPressed;
        windowsView.Tapped -=View_Tapped;
        windowsView.PointerMoved -= View_PointerMoved;
        windowsView.PointerReleased -= View_PointerReleased;
        windowsView.PointerExited -= View_PointerEntered;
        windowsView.PointerCanceled -= View_PointerCancelled;
    }
    private void View_Tapped(object sender, TappedRoutedEventArgs args)
    {
        //var windowsPoint = args.GetPosition(sender as UIElement);
        //Point point = new Point(windowsPoint.X, windowsPoint.Y);
        //InvokeTouchActionEvent(TouchActionType.Pressed, point, 0, true);

    }
    private void View_PointerEntered(object sender, PointerRoutedEventArgs args)
    {
        Point point = GetPoint(sender, args);
        var id = args.Pointer.PointerId;
        var isInContact = args.Pointer.IsInContact;
        InvokeTouchActionEvent(TouchActionType.Entered, point, id, isInContact);
    }

    private void View_PointerPressed(object sender, PointerRoutedEventArgs args)
    {
        Point point = GetPoint(sender, args);
        var id = args.Pointer.PointerId;
        var isInContact = args.Pointer.IsInContact;
        InvokeTouchActionEvent(TouchActionType.Pressed, point, id, isInContact);
        (sender as FrameworkElement).CapturePointer(args.Pointer);
    }

    private void View_PointerMoved(object sender, PointerRoutedEventArgs args)
    {
        Point point = GetPoint(sender, args);
        var id = args.Pointer.PointerId;
        var isInContact = args.Pointer.IsInContact;
        InvokeTouchActionEvent(TouchActionType.Moved, point, id, isInContact);
    }

    private void View_PointerReleased(object sender, PointerRoutedEventArgs args)
    {
        Point point = GetPoint(sender, args);
        var id = args.Pointer.PointerId;
        var isInContact = args.Pointer.IsInContact;
        InvokeTouchActionEvent(TouchActionType.Released, point, id, isInContact);
    }

    private void View_PointerExited(object sender, PointerRoutedEventArgs args)
    {
        Point point = GetPoint(sender, args);
        var id = args.Pointer.PointerId;
        var isInContact = args.Pointer.IsInContact;
        InvokeTouchActionEvent(TouchActionType.Exited, point, id, isInContact);
    }

    private void View_PointerCancelled(object sender, PointerRoutedEventArgs args)
    {
        Point point = GetPoint(sender, args);
        var id = args.Pointer.PointerId;
        var isInContact = args.Pointer.IsInContact;
        InvokeTouchActionEvent(TouchActionType.Cancelled, point, id, isInContact);
    }

    private void InvokeTouchActionEvent(TouchActionType touchActionType, Point point, uint id, bool isInContact)
    {
        OnTouchActionInvoked?.Invoke(this, new TouchActionEventArgs(id, touchActionType, point, isInContact));

    }

    private static Point GetPoint(object sender, PointerRoutedEventArgs args)
    {
        var pointerPoint = args.GetCurrentPoint(sender as UIElement);
        Windows.Foundation.Point windowsPoint = pointerPoint.Position;
        Point point = new Point(windowsPoint.X, windowsPoint.Y);
        return point;
    }
}
建立控制元件
建立手勢監聽控制元件TouchContentView,它繼承於ContentView。
注意:儘量避免在建構函式中呼叫ViewHandler.ViewMapper.AppendToMapping,它將導致從頁面的XAML根元素開始,遞迴遍歷所有IView虛擬檢視子元素,將其新增到ViewMapper中
我們用HandlerChanging監聽Handler改變,當OldHandler屬性不為空時,表示即將從跨平臺控制元件中刪除現有的本機控制元件,此時我們需要將TouchRecognizer移除,以免記憶體漏失。
public class TouchContentView : ContentView
{
    private TouchRecognizer touchRecognizer;

    public event EventHandler<TouchActionEventArgs> OnTouchActionInvoked;


    public TouchContentView()
    {
        this.HandlerChanged+=TouchContentView_HandlerChanged;
        this.HandlerChanging+=TouchContentView_HandlerChanging;
    }


    private void TouchContentView_HandlerChanged(object sender, EventArgs e)
    {

        var handler = this.Handler;
        if (handler != null)
        {
#if WINDOWS
            touchRecognizer = new TouchRecognizer(handler.PlatformView as Microsoft.UI.Xaml.FrameworkElement);
            touchRecognizer.OnTouchActionInvoked += TouchRecognizer_OnTouchActionInvoked;
#endif
#if ANDROID
            touchRecognizer = new TouchRecognizer(handler.PlatformView as Android.Views.View);
            touchRecognizer.OnTouchActionInvoked += TouchRecognizer_OnTouchActionInvoked;

#endif

#if IOS|| MACCATALYST
            touchRecognizer = new TouchRecognizer(handler.PlatformView as UIKit.UIView);
            touchRecognizer.OnTouchActionInvoked += TouchRecognizer_OnTouchActionInvoked;

            (handler.PlatformView as UIKit.UIView).UserInteractionEnabled = true;
            (handler.PlatformView as UIKit.UIView).AddGestureRecognizer(touchRecognizer);
#endif
        }

    }

    private void TouchContentView_HandlerChanging(object sender, HandlerChangingEventArgs e)
    {


        if (e.OldHandler != null)
        {
            var handler = e.OldHandler;

#if WINDOWS
            touchRecognizer.OnTouchActionInvoked -= TouchRecognizer_OnTouchActionInvoked;
#endif
#if ANDROID
            touchRecognizer.OnTouchActionInvoked -= TouchRecognizer_OnTouchActionInvoked;

#endif

#if IOS|| MACCATALYST
            touchRecognizer.OnTouchActionInvoked -= TouchRecognizer_OnTouchActionInvoked;

            (handler.PlatformView as UIKit.UIView).UserInteractionEnabled = false;
            (handler.PlatformView as UIKit.UIView).RemoveGestureRecognizer(touchRecognizer);
#endif


        }
    }

    private void TouchRecognizer_OnTouchActionInvoked(object sender, TouchActionEventArgs e)
    {
        OnTouchActionInvoked?.Invoke(this, e);
        Debug.WriteLine(e.Type + " is Invoked, position:" + e.Location);
    }
}
使用控制元件
在Xaml中參照TouchContentView所在的名稱空間
xmlns:controls="clr-namespace:Lession2.TouchRecognizer;assembly=Lession2"
將你的控制元件放在TouchContentView中,然後監聽TouchContentView的OnTouchActionInvoked事件即可。
注意:對於Button這樣的點選控制元件,點選事件不會向下傳遞,因此如果包裹了Button,那麼OnTouchActionInvoked事件將不會被觸發。
<controls:TouchContentView Style="{StaticResource HoldDownButtonStyle}"

                            Grid.Column="0"
                            OnTouchActionInvoked="TouchContentView_OnTouchActionInvoked">
    <BoxView CornerRadius="10" Color="Red"></BoxView>

</controls:TouchContentView>


<controls:TouchContentView Style="{StaticResource HoldDownButtonStyle}"

                            Grid.Column="1"
                            OnTouchActionInvoked="TouchContentView_OnTouchActionInvoked">
    <Image Source="./dotnet_bot.svg"></Image>

</controls:TouchContentView>


<controls:TouchContentView Style="{StaticResource HoldDownButtonStyle}"

                            Grid.Column="2"
                            OnTouchActionInvoked="TouchContentView_OnTouchActionInvoked">
    <Label Text="假裝我是一個按鈕"></Label>

</controls:TouchContentView>
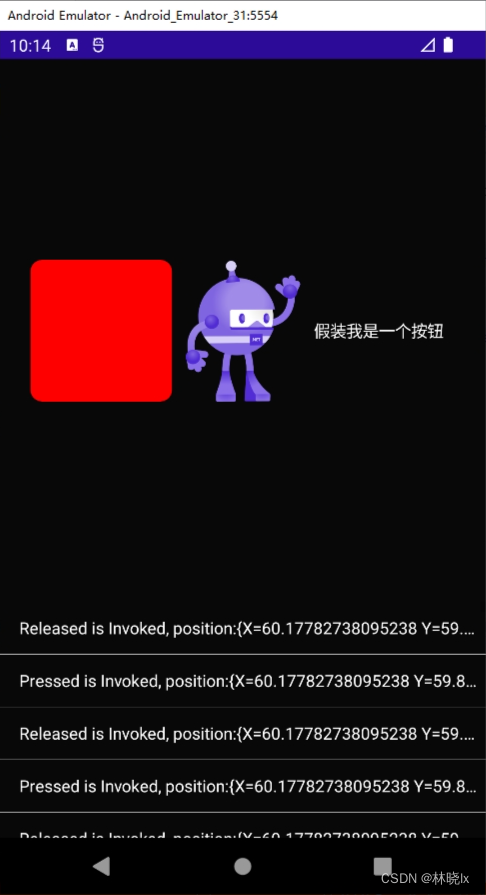
最終效果
在控制元件中將應用手勢監聽。

專案地址
本文來自部落格園,作者:林曉lx,轉載請註明原文連結:https://www.cnblogs.com/jevonsflash/p/17456091.html