百度飛槳(PaddlePaddle)- 張量(Tensor)
張量(Tensor)、標量(scalar)、向量(vector)、矩陣(matrix)
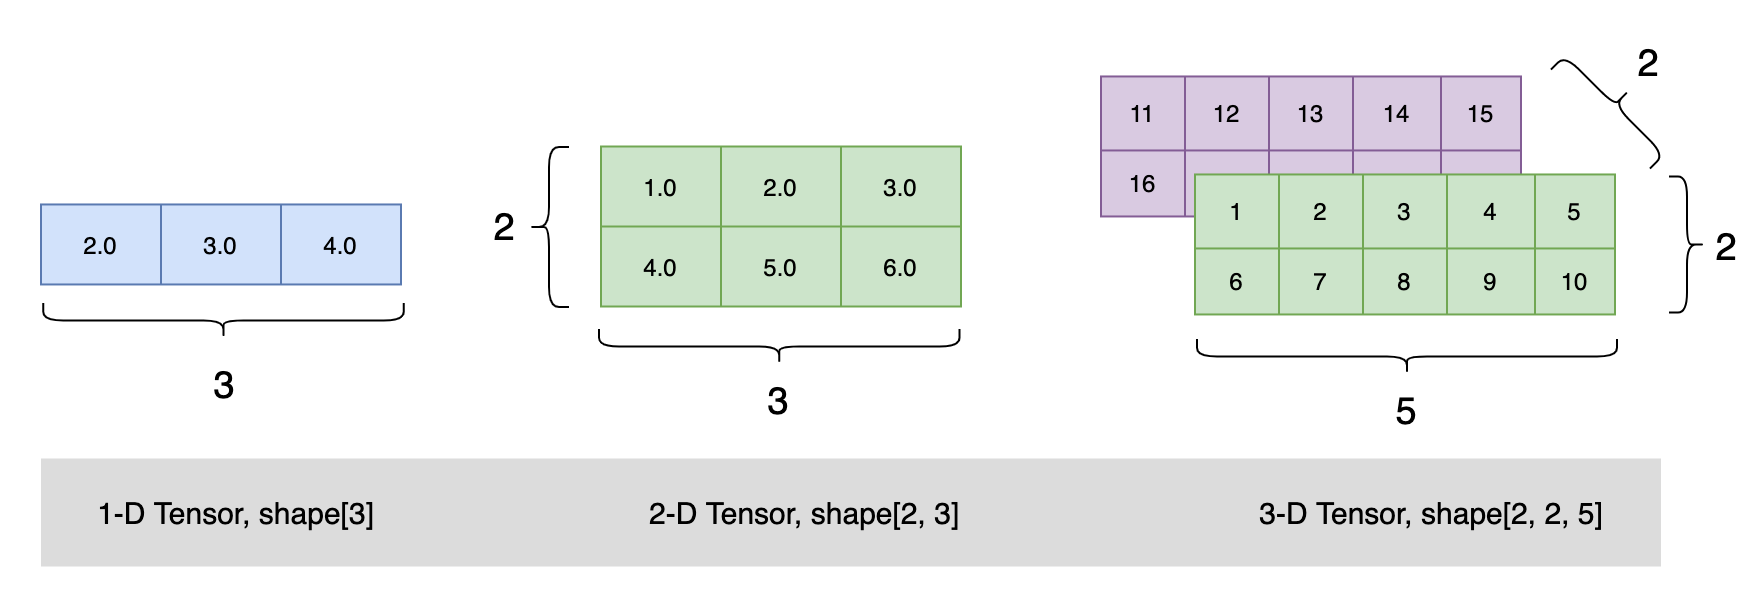
飛槳 使用張量(Tensor) 來表示神經網路中傳遞的資料,Tensor 可以理解為多維陣列,類似於 Numpy 陣列(ndarray) 的概念。與 Numpy 陣列相比,Tensor 除了支援執行在 CPU 上,還支援執行在 GPU 及各種 AI 晶片上,以實現計算加速;此外,飛槳基於 Tensor,實現了深度學習所必須的反向傳播功能和多種多樣的組網運算元,從而可更快捷地實現深度學習組網與訓練等功能。
Tensor 必須形如矩形,即在任何一個維度上,元素的數量必須相等,否則會丟擲異常
Tensor 的建立
指定資料建立
import paddle

# 建立類似向量(vector)的 1 維 Tensor:
ndim_1_Tensor = paddle.to_tensor([2.0, 3.0, 4.0])
print(ndim_1_Tensor)

# 建立類似矩陣(matrix)的 2 維 Tensor:
ndim_2_Tensor = paddle.to_tensor([[1.0, 2.0, 3.0],
                                  [4.0, 5.0, 6.0]])
print(ndim_2_Tensor)

# 建立 3 維 Tensor:
ndim_3_Tensor = paddle.to_tensor([[[1, 2, 3, 4, 5],
                                   [6, 7, 8, 9, 10]],
                                  [[11, 12, 13, 14, 15],
                                   [16, 17, 18, 19, 20]]])
print(ndim_3_Tensor)
輸出
"D:\Program Files\Python38\python.exe" D:/OpenSource/PaddlePaddle/Tensor.py
Tensor(shape=[3], dtype=float32, place=Place(cpu), stop_gradient=True,
       [2., 3., 4.])
Tensor(shape=[2, 3], dtype=float32, place=Place(cpu), stop_gradient=True,
       [[1., 2., 3.],
        [4., 5., 6.]])
Tensor(shape=[2, 2, 5], dtype=int64, place=Place(cpu), stop_gradient=True,
       [[[1 , 2 , 3 , 4 , 5 ],
         [6 , 7 , 8 , 9 , 10]],

        [[11, 12, 13, 14, 15],
         [16, 17, 18, 19, 20]]])

Process finished with exit code 0

指定形狀建立
paddle.zeros([m, n])             # 建立資料全為 0,形狀為 [m, n] 的 Tensor
paddle.ones([m, n])              # 建立資料全為 1,形狀為 [m, n] 的 Tensor
paddle.full([m, n], 10)          # 建立資料全為 10,形狀為 [m, n] 的 Tensor
paddle.ones([2,3])
輸出
Tensor(shape=[2, 3], dtype=float32, place=Place(gpu:0), stop_gradient=True,
       [[1., 1., 1.],
        [1., 1., 1.]])
指定區間建立
如果要在指定區間內建立 Tensor,可以使用paddle.arange、 paddle.linspace 實現。
paddle.arange(start, end, step)  # 建立以步長 step 均勻分隔區間[start, end)的 Tensor
paddle.linspace(start, stop, num) # 建立以元素個數 num 均勻分隔區間[start, stop)的 Tensor
paddle.arange(start=1, end=5, step=1)
輸出
Tensor(shape=[4], dtype=int64, place=Place(gpu:0), stop_gradient=True,
       [1, 2, 3, 4])
指定影象、文字資料建立
在常見深度學習任務中,資料樣本可能是圖片(image)、文字(text)、語音(audio)等多種型別,在送入神經網路訓練或推理前,這些資料和對應的標籤均需要建立為 Tensor。以下是影象場景和 NLP 場景中手動轉換 Tensor 方法的介紹。
- 對於影象場景,可使用 paddle.vision.transforms.ToTensor 直接將 PIL.Image 格式的資料轉為 Tensor,使用 paddle.to_tensor 將影象的標籤(Label,通常是 Python 或 Numpy 格式的資料)轉為 Tensor。
- 對於文字場景,需將文字資料解碼為數位後,再通過 paddle.to_tensor 轉為 Tensor。不同文字任務標籤形式不一樣,有的任務標籤也是文字,有的則是數位,均需最終通過 paddle.to_tensor 轉為 Tensor。
下面以影象場景為例介紹,以下範例程式碼中將隨機生成的圖片轉換為 Tensor。
import numpy as np
from PIL import Image
import paddle.vision.transforms as T
import paddle.vision.transforms.functional as F

fake_img = Image.fromarray((np.random.rand(224, 224, 3) * 255.).astype(np.uint8)) # 建立隨機圖片
transform = T.ToTensor()
tensor = transform(fake_img) # 使用 ToTensor()將圖片轉換為 Tensor
print(tensor)
自動建立 Tensor 的功能介紹
除了手動建立 Tensor 外,實際在飛槳框架中有一些 API 封裝了 Tensor 建立的操作,從而無需使用者手動建立 Tensor。例如 paddle.io.DataLoader 能夠基於原始 Dataset,返回讀取 Dataset 資料的迭代器,迭代器返回的資料中的每個元素都是一個 Tensor。另外在一些高層 API,如 paddle.Model.fit 、paddle.Model.predict ,如果傳入的資料不是 Tensor,會自動轉為 Tensor 再進行模型訓練或推理。
paddle.Model.fit、paddle.Model.predict 等高層 API 支援傳入 Dataset 或 DataLoader,如果傳入的是 Dataset,那麼會用 DataLoader 封裝轉為 Tensor 資料;如果傳入的是 DataLoader,則直接從 DataLoader 迭代讀取 Tensor 資料送入模型訓練或推理。因此即使沒有寫將資料轉為 Tensor 的程式碼,也能正常執行,提升了程式設計效率和容錯性。
以下範例程式碼中,分別列印了原始資料集的資料,和送入 DataLoader 後返回的資料,可以看到資料結構由 Python list 轉為了 Tensor。
import paddle

from paddle.vision.transforms import Compose, Normalize

transform = Compose([Normalize(mean=[127.5],
                               std=[127.5],
                               data_format='CHW')])

test_dataset = paddle.vision.datasets.MNIST(mode='test', transform=transform)
print(test_dataset[0][1]) # 列印原始資料集的第一個資料的 label
loader = paddle.io.DataLoader(test_dataset)
for data in enumerate(loader):
    x, label = data[1]
    print(label) # 列印由 DataLoader 返回的迭代器中的第一個資料的 label
    break
Tensor 的屬性
在前文中,可以看到列印 Tensor 時有 shape、dtype、place 等資訊,這些都是 Tensor 的重要屬性,想要了解如何操作 Tensor 需要對其屬性有一定了解,接下來分別展開介紹 Tensor 的屬性相關概念。
Tensor(shape=[3], dtype=float32, place=Place(gpu:0), stop_gradient=True,
       [2., 3., 4.])
Tensor 的形狀(shape)
(1)形狀的介紹
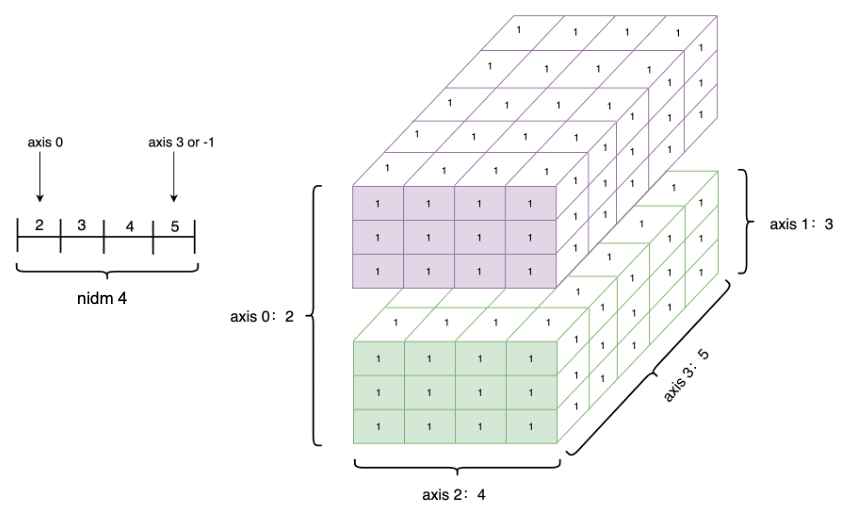
形狀是 Tensor 的一個重要的基礎屬性,可以通過 Tensor.shape 檢視一個 Tensor 的形狀,以下為相關概念:
- shape:描述了 Tensor 每個維度上元素的數量。
- ndim: Tensor 的維度數量,例如向量的維度為 1,矩陣的維度為 2,Tensor 可以有任意數量的維度。
- axis 或者 dimension:Tensor 的軸,即某個特定的維度。
- size:Tensor 中全部元素的個數。
建立 1 個四維 Tensor ,並通過圖形來直觀表達以上幾個概念之間的關係:
ndim_4_Tensor = paddle.ones([2, 3, 4, 5])
print("Data Type of every element:", ndim_4_Tensor.dtype)
print("Number of dimensions:", ndim_4_Tensor.ndim)
print("Shape of Tensor:", ndim_4_Tensor.shape)
print("Elements number along axis 0 of Tensor:", ndim_4_Tensor.shape[0])
print("Elements number along the last axis of Tensor:", ndim_4_Tensor.shape[-1])

(2)重置 Tensor 形狀(Reshape) 的方法
重新設定 Tensor 的 shape 在深度學習任務中比較常見,如一些計算類 API 會對輸入資料有特定的形狀要求,這時可通過 paddle.reshape 介面來改變 Tensor 的 shape,但並不改變 Tensor 的 size 和其中的元素資料。
以下範例程式碼中,建立 1 個 shape=[3] 的一維 Tensor,使用 reshape 功能將該 Tensor 重置為 shape=[1, 3] 的二維 Tensor。這種做法經常用在把一維的標籤(label)資料擴充套件為二維,由於飛槳框架中神經網路通常需要傳入一個 batch 的資料進行計算,因此可將資料增加一個 batch 維,方便後面的資料計算。
ndim_1_Tensor = paddle.to_tensor([1, 2, 3])
print("the shape of ndim_1_Tensor:", ndim_1_Tensor.shape)

reshape_Tensor = paddle.reshape(ndim_1_Tensor, [1, 3])
print("After reshape:", reshape_Tensor.shape)
在指定新的 shape 時存在一些技巧:
- -1 表示這個維度的值是從 Tensor 的元素總數和剩餘維度自動推斷出來的。因此,有且只有一個維度可以被設定為 -1。
- 0 表示該維度的元素數量與原值相同,因此 shape 中 0 的索引值必須小於 Tensor 的維度(索引值從 0 開始計,如第 1 維的索引值是 0,第二維的索引值是 1)。
origin:[3, 2, 5] reshape:[3, 10]      actual: [3, 10] # 直接指定目標 shape
origin:[3, 2, 5] reshape:[-1]         actual: [30] # 轉換為 1 維,維度根據元素總數推斷出來是 3*2*5=30
origin:[3, 2, 5] reshape:[-1, 5]      actual: [6, 5] # 轉換為 2 維,固定一個維度 5,另一個維度根據元素總數推斷出來是 30÷5=6
origin:[3, 2, 5] reshape:[0, -1]         actual: [3, 6] # reshape:[0, -1]中 0 的索引值為 0,按照規則,轉換後第 0 維的元素數量與原始 Tensor 第 0 維的元素數量相同,為 3;第 1 維的元素數量根據元素總值計算得出為 30÷3=10。
origin:[3, 2] reshape:[3, 1, 0]          error: # reshape:[3, 1, 0]中 0 的索引值為 2,但原 Tensor 只有 2 維,無法找到與第 3 維對應的元素數量,因此出錯。
(3)原位(Inplace)操作和非原位元運算的區別
飛槳框架的 API 有原位(Inplace)操作和非原位元運算之分,原位元運算即在原 Tensor 上儲存操作結果,輸出 Tensor 將與輸入 Tensor 共用資料,並且沒有 Tensor 資料拷貝的過程。非原位元運算則不會修改原 Tensor,而是返回一個新的 Tensor。通過 API 名稱區分兩者,如 paddle.reshape 是非原位元運算,paddle.reshape_ 是原位元運算。
Tensor 的資料型別(dtype)
(1)指定資料型別的介紹
Tensor 的資料型別 dtype 可以通過 Tensor.dtype 檢視,支援型別包括:bool、float16、float32、float64、uint8、int8、int16、int32、int64、complex64、complex128。
同一 Tensor 中所有元素的資料型別均相同,通常通過如下方式指定:
(2)修改資料型別的方法
飛槳框架提供了paddle.cast 介面來改變 Tensor 的 dtype:
float32_Tensor = paddle.to_tensor(1.0)

float64_Tensor = paddle.cast(float32_Tensor, dtype='float64')
print("Tensor after cast to float64:", float64_Tensor.dtype)

int64_Tensor = paddle.cast(float32_Tensor, dtype='int64')
print("Tensor after cast to int64:", int64_Tensor.dtype)
Tensor 的裝置位置(place)
Tensor 的名稱(name)
Tensor 的 stop_gradient 屬性
Tensor 的操作
索引和切片
索引或切片的第一個值對應第 0 維,第二個值對應第 1 維,依次類推,如果某個維度上未指定索引,則預設為 :
Python Numpy 切片
import paddle

# 建立 3 維 Tensor:
ndim_3_Tensor = paddle.to_tensor([[[[1, 2, 3, 4, 5],
                                    [6, 7, 8, 9, 10],
                                    [11, 12, 13, 14, 15]],
                                   [[21, 22, 23, 24, 25],
                                    [26, 27, 28, 29, 30],
                                    [31, 32, 33, 34, 35]]],

                                  [[[1, 2, 3, 4, 5],
                                    [6, 7, 8, 9, 10],
                                    [11, 12, 13, 14, 15]],
                                   [[29, 22, 23, 24, 25],
                                    [26, 57, 28, 29, 30],
                                    [31, 32, 33, 34, 59]]]])


print("Origin Tensor:", ndim_3_Tensor.ndim)
print("Tensor Shape:", ndim_3_Tensor.shape) # [2, 2, 3, 5]
print("Slice:", ndim_3_Tensor[1, 1, 2, 4].numpy()) # 對應 shape


print("First row:", ndim_3_Tensor[0].numpy())
print("First row:", ndim_3_Tensor[1, 1, 2, 4].numpy())
print("First column:", ndim_3_Tensor[:, 0].numpy())
print("Last column:", ndim_3_Tensor[:, -1].numpy())
print("All element:", ndim_3_Tensor[:].numpy())
print("First row and second column:", ndim_3_Tensor[1, 0].numpy())
運算
Tensor 的廣播機制
飛槳 Tensor 的廣播機制
Python NumPy 廣播(Broadcast)