機器學習(七):梯度下降解決分類問題——perceptron感知機演演算法與SVM支援向量機演演算法進行二維點分類
2023-04-26 12:00:29
實驗2 感知機演演算法與支援向量機演演算法
一、預備知識
1.感知機演演算法

二、實驗目的
-
掌握感知機演演算法的原理及設計;
-
掌握利用感知機演演算法解決分類問題。
三、實驗內容
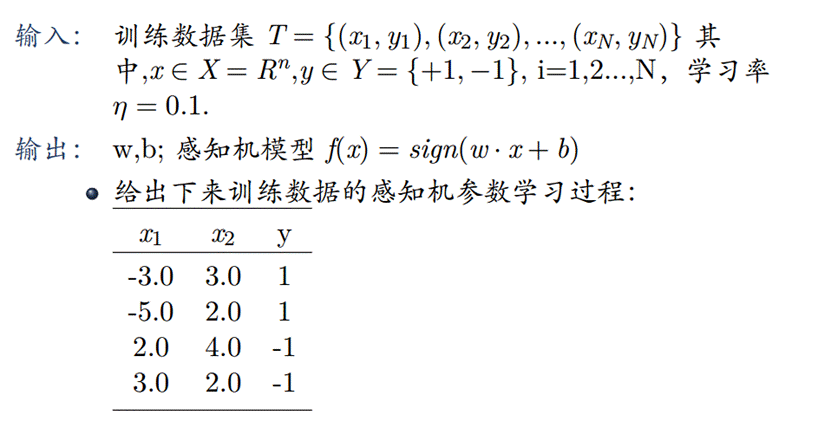
- 設計感知機演演算法求解,

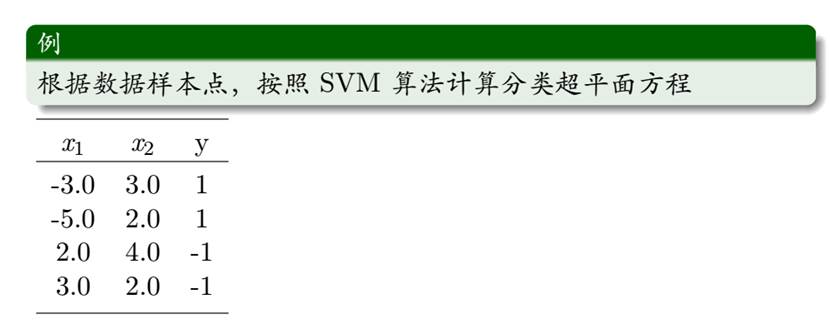
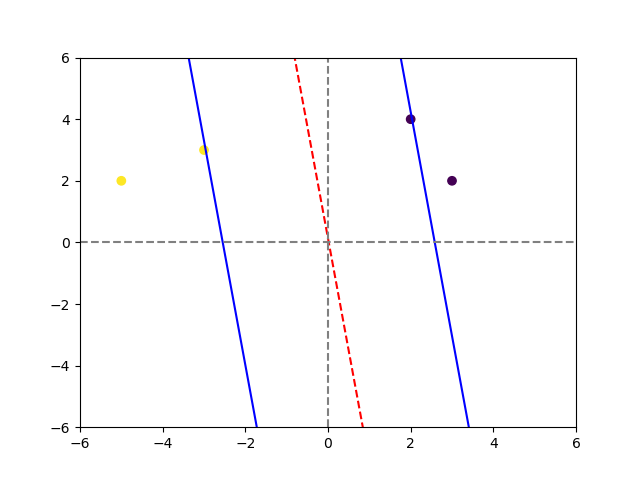
- 設計SVM演演算法求解(可呼叫函數庫),請找出支援向量和決策超平面。

四、操作方法和實驗步驟
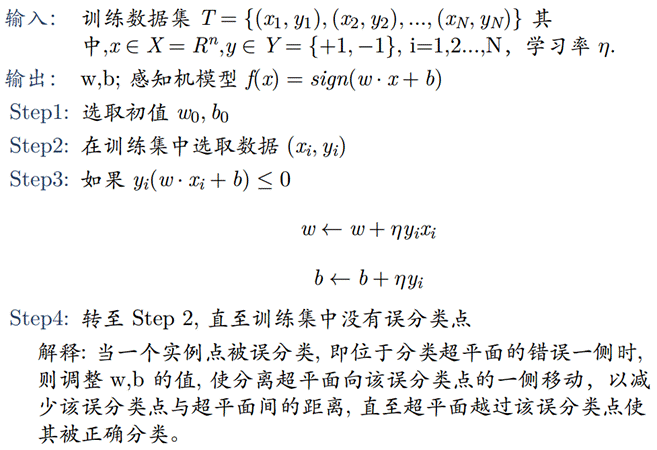
1.感知機演演算法求解
採用while迴圈判斷當前權重w和截距b是否會產生誤分類點,如果不產生誤分類則直接返回w和b.
import numpy as np
def percep_classify_array(data_arr,label_arr,eta=0.1):
    w=np.array([0,0])
    b=0
    m=len(data_arr)
    error_data = True
    while error_data:               #利用收斂特性不採用迭代方式進行,採用while迴圈
        error_data = False
        for i in range(m):
            judge = label_arr[i]*(np.dot(w,data_arr[i])+b)
            if judge <=0:
                error_data=True
                w=w+eta*(label_arr[i]*data_arr[i])
                b=b+eta*label_arr[i]
                print('w=',w,'b=',b,'誤分類點:x_'+str(i+1))

    return w,b
input_vecs = [[-3,3],[-5,2],[2,4],[3,2]]
input_labels = [[1],[1],[-1],[-1]]
input_vecs = np.array(input_vecs)
input_labels = np.array(input_labels)
weight,bias = percep_classify_array(input_vecs,input_labels)
print('weight=',weight,'bias=',bias,'沒有誤分類點了')
結果:
w= [-0.3  0.3] b= [0.1] 誤分類點:x_1
w= [-0.5 -0.1] b= [0.] 誤分類點:x_3
weight= [-0.5 -0.1] bias= [0.] 沒有誤分類點了
2.SVM演演算法求解
import numpy as np
from sklearn import datasets
import matplotlib.pyplot as plt

class SVM:
    def __init__(self, learning_rate=0.001,lambda_param=0.0001,n_iters=10000):
        self.a=learning_rate
        self.lambda_param=lambda_param
        self.epoch=n_iters
        self.w=None
        self.b=None

    def fit(self,X,y):
        n_samples,n_features=X.shape
        y_=np.where(y<=0,-1,1)

        self.w=np.zeros(n_features)
        self.b=0
        for epoch in range(self.epoch):
            for idx,x_i in enumerate(X):
                condition=y_[idx]*(np.dot(x_i,self.w)-self.b)>=1
                if condition:
                    self.w=self.w-self.a*(2*self.lambda_param*self.w)
                else:
                    self.w=self.w-self.a*(2*self.lambda_param*self.w-np.dot(x_i,y_[idx]))
                    self.b=self.b-self.a*y_[idx]

    def predict(self,X):
        linear_output=np.dot(X,self.w)-self.b
        return np.sign(linear_output)
#模擬資料
# X,y=datasets.make_blobs(n_samples=50,n_features=2,centers=2,cluster_std=1.05,random_state=40)
# y=np.where(y==0,-1,1)
#題目資料
X = np.array([[-3, 3], [-5, 2], [2, 4], [3, 2]])
y = np.array([1, 1, -1, -1])
clf=SVM()
clf.fit(X,y)
print(clf.w,clf.b)

def visualize_svm():
    def get_hyperplane_value(x,w,b,v):
        return (-w[0]*x-b+v)/w[1]
    fig=plt.figure()
    ax=fig.add_subplot(1,1,1)
    plt.scatter(X[:,0],X[:,1],marker='o',c=y)
    # x0_1=np.amin(X[:,0])
    # x0_2=np.amax(X[:,0])
    x0_1=-6
    x0_2=6
    x1_1=get_hyperplane_value(x0_1,clf.w,clf.b,0)
    x1_2=get_hyperplane_value(x0_2,clf.w,clf.b,0)
    x1_1_m=get_hyperplane_value(x0_1,clf.w,clf.b,-1)
    x1_2_m=get_hyperplane_value(x0_2,clf.w,clf.b,-1)
    x1_1_p=get_hyperplane_value(x0_1,clf.w,clf.b,1)
    x1_2_p=get_hyperplane_value(x0_2,clf.w,clf.b,1)
    ax.plot([x0_1,x0_2],[x1_1,x1_2],'r--')
    ax.plot([x0_1,x0_2],[x1_1_m,x1_2_m],'b')
    ax.plot([x0_1,x0_2],[x1_1_p,x1_2_p],'b')
    plt.axhline(y=0, color='gray', linestyle='--')
    plt.axvline(x=0, color='gray', linestyle='--')
    # x1_min=np.amin(X[:,1])
    # x1_max=np.amax(X[:,1])
    # ax.set_ylim([x1_min-3,x1_max+3])
    plt.xlim(-6, 6)
    plt.ylim(-6, 6)
    plt.show()

visualize_svm()
結果:
[-0.38987422 -0.05357053] 0.007
