pytorch在有限的資源下部署大語言模型(以ChatGLM-6B為例)
pytorch在有限的資源下部署大語言模型(以ChatGLM-6B為例)
Part1知識準備
在PyTorch中載入預訓練的模型時,通常的工作流程是這樣的:
my_model = ModelClass(...)
state_dict =
torch.load(checkpoint_file)
用簡單的話來說,這些步驟是:
用隨機初始化的權重建立模型。 從磁碟上載入模型權重(在一個通常被稱為狀態字典的字典中)。 在模型中載入這些權重。
雖然這對常規大小的模型來說非常有效,但當我們處理一個巨大的模型時,這個工作流程有一些明顯的侷限性:在第1步,我們在RAM中載入一個完整版本的模型,並花一些時間隨機初始化權重(這將在第3步被丟棄)。在第2步,我們在RAM中載入另一個完整版本的模型,並使用預訓練的權重。如果你正在載入一個具有60億個引數的模型,這意味著你需要為每個模型的副本提供24GB的RAM,所以總共需要48GB(其中一半用於在FP16中載入模型)。
1使用accelerate
上下文管理器
引入accelerate處理大模型的第一個工具是上下文管理器init_empty_weights(),它可以幫助你在不使用任何RAM的情況下初始化一個模型,這樣,步驟1就可以可以在任何尺寸的模型上進行。以下是它的工作原理:
from accelerate import init_empty_weights

with init_empty_weights():
    my_model = ModelClass(...)
例如:
with init_empty_weights():
    model = nn.Sequential(*[nn.Linear(10000, 10000) for _ in range(1000)])
初始化一個空的模型,引數略多於100B。這有賴於PyTorch 1.9中引入的元裝置(meta device)。在上下文管理器下的初始化過程中,每次建立一個引數時,它都會移動到該裝置上。
分散式檢查點
你的模型有可能大到即使是一個副本也無法裝入RAM。這並不意味著它不能被載入:如果你有一個或幾個GPU,這將有更多的記憶體可用於儲存你的模型。在這種情況下,如果你的檢查點被分割成幾個較小的檔案,我們稱之為檢查點碎片,效果會更好。
accelerate將處理分片檢查點,只要你遵循以下格式:你的檢查點應該在一個資料夾中,有幾個檔案包含部分狀態字典,應該有一個JSON格式的索引,包含一個字典將引數名稱對映到包含其權重的檔案。例如,我們可以有一個包含以下內容的資料夾:
first_state_dict.bin
index.json
second_state_dict.bin
與index.json是以下檔案:
{
  "linear1.weight": "first_state_dict.bin",
  "linear1.bias": "first_state_dict.bin",
  "linear2.weight": "second_state_dict.bin",
  "linear2.bias": "second_state_dict.bin"
}
first_state_dict.bin包含 "linear1.weight "和 "linear1.bias "的權重。second_state_dict.bin是 "linear2.weight "和 "linear2.bias "的權重。
載入權重
第二個工具是引入了一個函數load_checkpoint_and_dispatch(),它將允許你在你的空模型中載入一個檢查點。這支援完整的檢查點(一個單個檔案包含整個狀態描述)以及分片檢查點。它還會在你可用的裝置(GPU、CPURAM)上自動分配這些權重,所以如果你正在載入一個分片檢查點,最大的RAM使用量將是最大分片的大小。
from accelerate import init_empty_weights
from transformers import AutoConfig, AutoModelForCausalLM

checkpoint = "EleutherAI/gpt-j-6B"
config = AutoConfig.from_pretrained(checkpoint)

with init_empty_weights():
    model = AutoModelForCausalLM.from_config(config)
請注意,在transformer中用from_config載入模型並不繫結權重,這在載入不包含繫結權重的重複鍵的檢查點時可能導致問題。所以你應該在載入檢查點之前繫結權重。
model.tie_weights()
然後載入我們剛剛下載的檢查點:
model = load_checkpoint_and_dispatch(
    model, "sharded-gpt-j-6B", device_map="auto", no_split_module_classes=["GPTJBlock"]
)
通過傳遞device_map="auto",根據可用的資源,我們告訴模型的每一層放置在哪裡。
首先,我們使用GPU上的最大可用空間。 如果我們仍然需要空間,我們將剩餘的權重儲存在CPU上。 如果沒有足夠的RAM,我們將剩餘的權重作為記憶體對映的張量儲存在硬碟上。
no_split_module_classes=["GPTJBlock"] 表示屬於GPTJBlock的模組不應該在不同的裝置上被分割。你應該在這裡設定所有包括某種residual(殘差連線)的塊。
你可以通過hf_device_map來檢視accelearte挑選的裝置圖。
model.hf_device_map
{'transformer.wte': 0,
 'transformer.drop': 0,
 'transformer.h.0': 0,
 'transformer.h.1': 0,
 'transformer.h.2': 0,
 'transformer.h.3': 0,
 'transformer.h.4': 0,
 'transformer.h.5': 0,
 'transformer.h.6': 0,
 'transformer.h.7': 0,
 'transformer.h.8': 0,
 'transformer.h.9': 0,
 'transformer.h.10': 0,
 'transformer.h.11': 0,
 'transformer.h.12': 0,
 'transformer.h.13': 0,
 'transformer.h.14': 0,
 'transformer.h.15': 0,
 'transformer.h.16': 0,
 'transformer.h.17': 0,
 'transformer.h.18': 0,
 'transformer.h.19': 0,
 'transformer.h.20': 0,
 'transformer.h.21': 0,
 'transformer.h.22': 0,
 'transformer.h.23': 0,
 'transformer.h.24': 1,
 'transformer.h.25': 1,
 'transformer.h.26': 1,
 'transformer.h.27': 1,
 'transformer.ln_f': 1,
 'lm_head': 1}
如果你喜歡明確地決定每層的位置,你也可以自己設計你的裝置圖。在這種情況下,上面的命令變成了:
model = load_checkpoint_and_dispatch(model, "sharded-gpt-j-6B", device_map=my_device_map)
執行模型
現在我們已經做到了這一點,我們的模型位於幾個裝置之間,也許還有硬碟。但它仍然可以作為一個普通的PyTorch模型使用:
from transformers import AutoTokenizer

tokenizer = AutoTokenizer.from_pretrained(checkpoint)
inputs = tokenizer("Hello, my name is", return_tensors="pt")
inputs = inputs.to(0)
output = model.generate(inputs["input_ids"])
tokenizer.decode(output[0].tolist())
在幕後,accelerate為模型新增了勾點,因此:
在每一層,輸入被放在正確的裝置上(因此,即使你的模型分散在幾個GPU上,它也能工作)。 對於解除安裝在CPU上的權重,就在向前傳遞之前,它們被放在GPU上,並在之後被清理掉。 對於解除安裝在硬碟上的權重,它們被載入在RAM中,然後在向前傳遞之前被放在GPU上,並在之後被清理掉。 這樣,即使你的模型不適合在某個GPU或CPU RAM上執行,你也可以執行推理!
設計一個裝置圖
你可以通過以下選項"auto", "balanced", "balanced_low_0", "sequential"讓acclerate處理裝置圖的計算,或自己建立一個。如果你想更多地控制每個層應該去哪裡,你可以在一個元裝置上的模型上推匯出模型的所有尺寸(從而計算出一個裝置圖)。
當你沒有足夠的GPU記憶體來容納整個模型時,所有的選項都會產生相同的結果(也就是把所有能裝的東西都裝到GPU上,然後把重量卸到CPU上,如果沒有足夠的記憶體,甚至卸到磁碟上)。
當你有比模型大小更多的GPU記憶體可用時,這裡是每個選項之間的區別:
"auto"和"balanced"在所有可用的GPU上平均分配模型,使你有可能使用大於1的批次大小。 "balanced_low_0 "將模型均勻地分割到所有的GPU上,除了第一個GPU之外,並且只將不適合其他GPU的部分放在GPU 0上。當你需要使用GPU 0對輸出進行一些處理時,這個選項是非常好的,比如使用transformers的生成函數時。 "順序 "將在GPU 0上安裝它可以安裝的東西,然後在GPU 1上移動,以此類推(所以如果不需要,就不會使用最後的GPU)。
首先注意,你可以通過使用max_memory引數(在fer_auto_device_map()和所有使用該參 的函數中可用)限制每個GPU上使用的記憶體。當設定max_memory時,你應該傳遞一個包含GPU識別符號(例如0、1等)和 "cpu "鍵的字典,用於你希望用於CPU解除安裝的最大RAM。這些值可以是一個整數(以位元組為單位),也可以是一個代表數位及其單位的字串,例如 "10GiB "或 "10GB"。
這裡有一個例子,我們不希望在兩個GPU上各使用超過10GiB,而在模型權重上不超過30GiB的CPU記憶體:
from accelerate import infer_auto_device_map

device_map = infer_auto_device_map(my_model, max_memory={0: "10GiB", 1: "10GiB", "cpu": "30GiB"})
當PyTorch發生首次分配時,它會載入CUDA核心,根據GPU的情況,它需要大約1-2GB的記憶體。因此,你的可用記憶體總是少於GPU的實際大小。要檢視實際使用了多 少記憶體,請執行torch.ones(1).cuda()並檢視記憶體使用情況。因此,當你用max_memory建立記憶體對映時,確保相應地調整可用的記憶體,以避免出先OOM。
此外,如果你對你的輸出做一些額外的操作而不把它們放回CPU(例如在transformer的生成方法裡面),如果你把你的輸入放在一個GPU上,這個GPU將比其他的消耗更多的記憶體(加速器總是把輸出放回輸入的裝置)。因此,如果你想優化最大的批次處理量,並且你有很多GPU,給第一個GPU較少的記憶體。例如在8x80 A100設定上使用BLOOM-176B,接近理想的對映是:
max_memory = {0: "30GIB", 1: "46GIB", 2: "46GIB", 3: "46GIB", 4: "46GIB", 5: "46GIB", 6: "46GIB", 7: "46GIB"}
你可以看到,我們給其餘7個GPU的記憶體比GPU 0多了50%。
如果你選擇自己完全設計裝置對映,它應該是一個字典,鍵是你的模型的模組名稱,值是一個有效的裝置識別符號(例如GPU是一個整數)或CPU解除安裝的 "cpu",磁碟解除安裝的 "disc"。鍵需要覆蓋整個模型,然後你可以按照你的意願定義你的裝置對映:例如,如果你的模型有兩個塊(比方說block1和block2),它們各自包含三個線性層(比方 說線性1、線性2和線性3),一個有效的裝置對映可以是:
device_map = {"block1": 0, "block2": 1}
另一個有效的可能是:
device_map = {"block1": 0, "block2.linear1": 0, "block2.linear2": 1, "block2.linear3": 1}
另一方面,這個是無效的,因為它沒有涵蓋模型的每個引數:
device_map = {"block1":0, "block2.linear1":1, "block2.linear2":1}
為了達到最高的效率,請確保你的裝置對映以連續的方式將引數放在GPU上(例如 ,不要將第一個權重放在GPU 0上,然後將權重放在GPU 1上,最後一個權重再放 回GPU 0),以避免在GPU之間進行多次資料傳輸。
限制和進一步發展
我們知道目前API的侷限性:
雖然理論上這隻可以在一個CPU上工作,並有潛在的磁碟解除安裝,但你至少需要一個GPU來執行這個API。這將在進一步的開發中得到解決。 infer_auto_device_map() (或load_checkpoint_and_dispatch()中的 device_map="auto")試圖在你執行它的時候最大化它所看到的GPU和CPU RAM。雖然PyTorch在有效地管理GPU RAM方面非常出色(當不需要時就會歸還),但對於Python和CPU RAM來說,這並不完全正確。因此,自動計算的裝置圖可能對CPU來說過於緊張。如果你因記憶體不足而出現崩潰,請將一些模組移到磁碟裝置上。 infer_auto_device_map()(或者load_checkpoint_and_dispatch()中的device_map="auto")是按順序屬性裝置的(以避免來回移動東西),所以如果你的第一層比你的GPU的大小大,最後會把所有東西都放在CPU/磁碟上。 load_checkpoint_and_dispatch()和load_checkpoint_in_model()目前沒有對你的狀態描述與你的模型相比的正確性進行任何檢查(這將在未來的版本中被修復),所以如果你試圖載入一個鍵不匹配或丟失的檢查點,你可能會得到一些奇怪的錯誤。 當你的模型被分割到幾個GPU上時,所使用的模型並行性是天真的,沒有經過優化,這意味著在某個時間只有一個GPU在工作,而另一個則處於閒置狀態。 當權重被解除安裝在CPU/硬碟上時,沒有預取(還沒有,我們會在未來的版本中努力做到這一點),這意味著權重在需要時被放到GPU上,而不是之前。 如果你執行的硬體沒有磁碟和CPU之間的快速通訊(如NVM),硬碟解除安裝可能會非常慢.
Part2部署ChatGLM-6B
基礎環境:
torch==2.0.0+cu118
transformers==4.28.1
accelerate==0.18.0
Tesla T4 15.3G
記憶體:11.8G
下載相關檔案:
git clone https://github.com/THUDM/ChatGLM-6B
cd ChatGLM-6B

git clone --depth=1 https://huggingface.co/THUDM/chatglm-6b THUDM/chatglm-6b
git clone --depth=1 https://huggingface.co/THUDM/chatglm-6b-int4 THUDM/chatglm-6b-int4

pip install -r requirements.txt
pip install gradio
pip install accelerate
正常情況下,我們使用Chat-GLM需要的視訊記憶體大於13G,記憶體沒有評估過,但上述的肯定是不夠的,16G應該可以。
2第一種方案
直接使用量化以後的模型:
from accelerate import infer_auto_device_map, init_empty_weights, load_checkpoint_and_dispatch
from transformers import AutoConfig, AutoModel, AutoModelForCausalLM, AutoTokenizer
import gradio as gr
import torch
import time

tokenizer = AutoTokenizer.from_pretrained("./THUDM/chatglm-6b-int4", trust_remote_code=True)
model = AutoModel.from_pretrained("./THUDM/chatglm-6b-int4", trust_remote_code=True).half().cuda()

model = model.eval()

def predict(input, history=None):
    print(f'predict started: {time.time()}');
    if history is None:
        history = []
    response, history = model.chat(tokenizer, input, history)
    return response, history

while True:
  text = input(">>使用者:")
  response, history = model.chat(tokenizer, input, history)
  print(">>CHatGLM:", response)
GPU使用4.9G,記憶體使用5.5G。
3第二種方案
使用acclerate,只有一塊GPU。
%cd /content/ChatGLM-6B

from accelerate import infer_auto_device_map, init_empty_weights, load_checkpoint_and_dispatch
from transformers import AutoConfig, AutoModel, AutoModelForCausalLM, AutoTokenizer
import gradio as gr
import torch
import time


tokenizer = AutoTokenizer.from_pretrained("./THUDM/chatglm-6b", trust_remote_code=True)
config = AutoConfig.from_pretrained("./THUDM/chatglm-6b", trust_remote_code=True)
with init_empty_weights():
  model = AutoModel.from_config(config, trust_remote_code=True)

for name, _ in model.named_parameters():
  print(name)
# device_map = infer_auto_device_map(model, no_split_module_classes=["GLMBlock"])
# print(device_map)
device_map = {'transformer.word_embeddings': 0, 'transformer.layers.0': 0, 'transformer.layers.1': 0, 'transformer.layers.2': 0, 'transformer.layers.3': 0, 'transformer.layers.4': 0, 'transformer.layers.5': 0, 'transformer.layers.6': 0, 'transformer.layers.7': 0, 'transformer.layers.8': 0, 'transformer.layers.9': 0, 'transformer.layers.10': 0, 'transformer.layers.11': 0, 'transformer.layers.12': 0, 'transformer.layers.13': 0, 'transformer.layers.14': 0, 'transformer.layers.15': 0, 'transformer.layers.16': 0, 'transformer.layers.17': 0, 'transformer.layers.18': 0, 'transformer.layers.19': 0, 'transformer.layers.20': 0, 'transformer.layers.21': 'cpu', 'transformer.layers.22': 'cpu', 'transformer.layers.23': 'cpu', 'transformer.layers.24': 'cpu', 'transformer.layers.25': 'cpu', 'transformer.layers.26': 'cpu', 'transformer.layers.27': 'cpu', 'transformer.final_layernorm': 'cpu', 'lm_head': 'cpu'}
model = load_checkpoint_and_dispatch(model, "./THUDM/chatglm-6b", device_map=device_map, offload_folder="offload", offload_state_dict=True, no_split_module_classes=["GLMBlock"]).half()

def predict(input, history=None):
    print(f'predict started: {time.time()}');
    if history is None:
        history = []
    response, history = model.chat(tokenizer, input, history)
    return response, history

while True:
  history = None
  text = input(">>使用者:")
  response, history = model.chat(tokenizer, text, history)
  print(">>CHatGLM:", response)
GPU使用9.7G,記憶體使用5.9G。第一輪輸入你好後GPU使用11.2G。
4第三種方案
使用accelerate,多塊GPU。
環境:windwos下。GPU:4*4090 24G。記憶體:128G。python>=3.8,torch==2.0+117,transformers==4.28.1,acclerate==0.18.0。
import os
os.environ["cuda_visible_devices"] = "0,1"

from accelerate import infer_auto_device_map, init_empty_weights, load_checkpoint_and_dispatch
from transformers import AutoConfig, AutoModel, AutoModelForCausalLM, AutoTokenizer
# import gradio as gr
# import torch
import time


tokenizer = AutoTokenizer.from_pretrained(".\\chatglm-6b\\", trust_remote_code=True)
config = AutoConfig.from_pretrained(".\\chatglm-6b\\", trust_remote_code=True)
with init_empty_weights():
  model = AutoModel.from_config(config, trust_remote_code=True)

for name, _ in model.named_parameters():
  print(name)
# device_map = infer_auto_device_map(model, no_split_module_classes=["GLMBlock"])
# print(device_map)
# device_map = {'transformer.word_embeddings': 0, 'transformer.layers.0': 0, 'transformer.layers.1': 0, 'transformer.layers.2': 0, 'transformer.layers.3': 0, 'transformer.layers.4': 0, 'transformer.layers.5': 0, 'transformer.layers.6': 0, 'transformer.layers.7': 0, 'transformer.layers.8': 0, 'transformer.layers.9': 0, 'transformer.layers.10': 0, 'transformer.layers.11': 0, 'transformer.layers.12': 0, 'transformer.layers.13': 0, 'transformer.layers.14': 0, 'transformer.layers.15': 0, 'transformer.layers.16': 0, 'transformer.layers.17': 0, 'transformer.layers.18': 0, 'transformer.layers.19': 0, 'transformer.layers.20': 0, 'transformer.layers.21': 'cpu', 'transformer.layers.22': 'cpu', 'transformer.layers.23': 'cpu', 'transformer.layers.24': 'cpu', 'transformer.layers.25': 'cpu', 'transformer.layers.26': 'cpu', 'transformer.layers.27': 'cpu', 'transformer.final_layernorm': 'cpu', 'lm_head': 'cpu'}
model = load_checkpoint_and_dispatch(model, ".\\chatglm-6b\\", device_map="balanced", offload_folder="offload", offload_state_dict=True, no_split_module_classes=["GLMBlock"]).half()

def predict(input, history=None):
    print(f'predict started: {time.time()}')
    if history is None:
        history = []
    response, history = model.chat(tokenizer, input, history)
    return response, history

while True:
  history = None
  text = input(">>使用者:")
  response, history = model.chat(tokenizer, text, history)
  print(">>CHatGLM:", response)
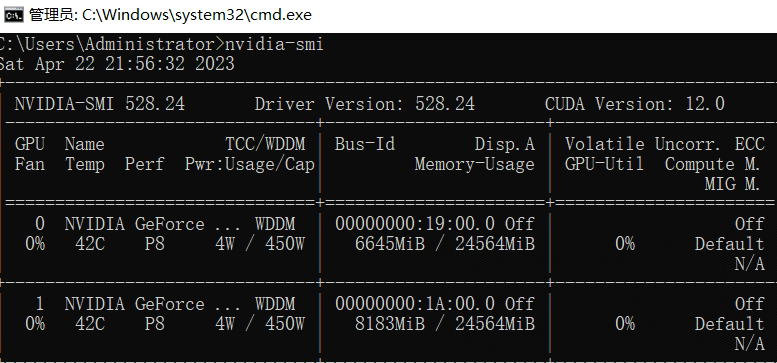
注意,這裡我們設定裝置對映為balanced,並只使用前兩塊GPU。顯示卡佔用情況:

會發現平均分配了視訊記憶體,當然GPU 0分配得更多些、至此,關於如何進行大模型推理就全部完成了。
Part3參考
https://huggingface.co/docs/accelerate/usage_guides/big_modeling
https://github.com/THUDM/ChatGLM-6B/issues/69
https://github.com/THUDM/ChatGLM-6B/issues/200