SpringBoot專案中使用快取Cache的正確姿勢!!!
前言
快取可以通過將經常存取的資料儲存在記憶體中,減少底層資料來源如資料庫的壓力,從而有效提高系統的效能和穩定性。我想大家的專案中或多或少都有使用過,我們專案也不例外,但是最近在review公司的程式碼的時候寫的很蠢且low, 大致寫法如下:
public User getById(String id) {
	User user = cache.getUser();
    if(user != null) {
        return user;
    }
    // 從資料庫獲取
    user = loadFromDB(id);
    cahce.put(id, user);
	return user;
}
其實Spring Boot 提供了強大的快取抽象,可以輕鬆地向您的應用程式新增快取。本文就講講如何使用 Spring 提供的不同快取註解實現快取的最佳實踐。
歡迎關注個人公眾號【JAVA旭陽】交流學習!
啟用快取@EnableCaching
現在大部分專案都是是SpringBoot專案,我們可以在啟動類新增註解@EnableCaching來開啟快取功能。
@SpringBootApplication
@EnableCaching
public class SpringCacheApp {

    public static void main(String[] args) {
        SpringApplication.run(Cache.class, args);
    }
}
既然要能使用快取,就需要有一個快取管理器Bean,預設情況下,@EnableCaching 將註冊一個ConcurrentMapCacheManager的Bean,不需要單獨的 bean 宣告。ConcurrentMapCacheManager將值儲存在ConcurrentHashMap的範例中,這是快取機制的最簡單的執行緒安全實現。
自定義快取管理器
預設的快取管理器並不能滿足需求,因為她是儲存在jvm記憶體中的,那麼如何儲存到redis中呢?這時候需要新增自定義的快取管理器。
- 新增依賴
<dependency>
  <groupId>org.springframework.boot</groupId>
  <artifactId>spring-boot-starter-data-redis</artifactId>
</dependency>
- 設定Redis快取管理器
@Configuration
@EnableCaching
public class CacheConfig {

    @Bean
    public RedisConnectionFactory redisConnectionFactory() {
        return new LettuceConnectionFactory();
    }

    @Bean
    public CacheManager cacheManager() {
        RedisCacheConfiguration redisCacheConfiguration = RedisCacheConfiguration.defaultCacheConfig()
            .disableCachingNullValues()
            .serializeValuesWith(SerializationPair.fromSerializer(new GenericJackson2JsonRedisSerializer()));

        RedisCacheManager redisCacheManager = RedisCacheManager.builder(redisConnectionFactory())
            .cacheDefaults(redisCacheConfiguration)
            .build();

        return redisCacheManager;
    }
}
現在有了快取管理器以後,我們如何在業務層面操作快取呢?
我們可以使用@Cacheable、@CachePut 或@CacheEvict 註解來操作快取了。
@Cacheable
該註解可以將方法執行的結果進行快取,在快取時效內再次呼叫該方法時不會呼叫方法本身,而是直接從快取獲取結果並返回給呼叫方。

例子1:快取資料庫查詢的結果。
@Service
public class MyService {

    @Autowired
    private MyRepository repository;

    @Cacheable(value = "myCache", key = "#id")
    public MyEntity getEntityById(Long id) {
        return repository.findById(id).orElse(null);
    }
}
在此範例中,@Cacheable 註解用於快取 getEntityById()方法的結果,該方法根據其 ID 從資料庫中檢索 MyEntity 物件。
但是如果我們更新資料呢?舊資料仍然在快取中?
@CachePut
然後@CachePut 出來了, 與 @Cacheable 註解不同的是使用 @CachePut 註解標註的方法,在執行前不會去檢查快取中是否存在之前執行過的結果,而是每次都會執行該方法,並將執行結果以鍵值對的形式寫入指定的快取中。@CachePut 註解一般用於更新快取資料,相當於快取使用的是寫模式中的雙寫模式。
@Service
public class MyService {

    @Autowired
    private MyRepository repository;

    @CachePut(value = "myCache", key = "#entity.id")
    public void saveEntity(MyEntity entity) {
        repository.save(entity);
    }
}
@CacheEvict
標註了 @CacheEvict 註解的方法在被呼叫時,會從快取中移除已儲存的資料。@CacheEvict 註解一般用於刪除快取資料,相當於快取使用的是寫模式中的失效模式。

@Service
public class MyService {

    @Autowired
    private MyRepository repository;

     @CacheEvict(value = "myCache", key = "#id")
    public void deleteEntityById(Long id) {
        repository.deleteById(id);
    }
}
@Caching
@Caching 註解用於在一個方法或者類上,同時指定多個 Spring Cache 相關的註解。

例子1:@Caching註解中的evict屬性指定在呼叫方法 saveEntity 時失效兩個快取。
@Service
public class MyService {

    @Autowired
    private MyRepository repository;

    @Cacheable(value = "myCache", key = "#id")
    public MyEntity getEntityById(Long id) {
        return repository.findById(id).orElse(null);
    }

    @Caching(evict = {
        @CacheEvict(value = "myCache", key = "#entity.id"),
        @CacheEvict(value = "otherCache", key = "#entity.id")
    })
    public void saveEntity(MyEntity entity) {
        repository.save(entity);
    }

}
例子2:呼叫getEntityById方法時,Spring會先檢查結果是否已經快取在myCache快取中。如果是,Spring 將返回快取的結果而不是執行該方法。如果結果尚未快取,Spring 將執行該方法並將結果快取在 myCache 快取中。方法執行後,Spring會根據@CacheEvict註解從otherCache快取中移除快取結果。
@Service
public class MyService {

    @Caching(
        cacheable = {
            @Cacheable(value = "myCache", key = "#id")
        },
        evict = {
            @CacheEvict(value = "otherCache", key = "#id")
        }
    )
    public MyEntity getEntityById(Long id) {
        return repository.findById(id).orElse(null);
    }

}
例子3:當呼叫saveData方法時,Spring會根據@CacheEvict註解先從otherCache快取中移除資料。然後,Spring 將執行該方法並將結果儲存到資料庫或外部 API。
方法執行後,Spring 會根據@CachePut註解將結果新增到 myCache、myOtherCache 和 myThirdCache 快取中。Spring 還將根據@Cacheable註解檢查結果是否已快取在 myFourthCache 和 myFifthCache 快取中。如果結果尚未快取,Spring 會將結果快取在適當的快取中。如果結果已經被快取,Spring 將返回快取的結果,而不是再次執行該方法。
@Service
public class MyService {

    @Caching(
        put = {
            @CachePut(value = "myCache", key = "#result.id"),
            @CachePut(value = "myOtherCache", key = "#result.id"),
            @CachePut(value = "myThirdCache", key = "#result.name")
        },
        evict = {
            @CacheEvict(value = "otherCache", key = "#id")
        },
        cacheable = {
            @Cacheable(value = "myFourthCache", key = "#id"),
            @Cacheable(value = "myFifthCache", key = "#result.id")
        }
    )
    public MyEntity saveData(Long id, String name) {
        // Code to save data to a database or external API
        MyEntity entity = new MyEntity(id, name);
        return entity;
    }

}
@CacheConfig
通過@CacheConfig 註解,我們可以將一些快取設定簡化到類級別的一個地方,這樣我們就不必多次宣告相關值:
@CacheConfig(cacheNames={"myCache"})
@Service
public class MyService {

    @Autowired
    private MyRepository repository;

    @Cacheable(key = "#id")
    public MyEntity getEntityById(Long id) {
        return repository.findById(id).orElse(null);
    }

    @CachePut(key = "#entity.id")
    public void saveEntity(MyEntity entity) {
        repository.save(entity);
    }

    @CacheEvict(key = "#id")
    public void deleteEntityById(Long id) {
        repository.deleteById(id);
    }
}
Condition & Unless
condition作用:指定快取的條件(滿足什麼條件才快取),可用SpEL表示式(如#id>0,表示當入參 id 大於 0 時才快取)unless作用 : 否定快取,即滿足unless指定的條件時,方法的結果不進行快取,使用unless時可以在呼叫的方法獲取到結果之後再進行判斷(如 #result == null,表示如果結果為 null 時不快取)
//when id >10, the @CachePut works.
@CachePut(key = "#entity.id", condition="#entity.id > 10")
public void saveEntity(MyEntity entity) {
	repository.save(entity);
}


//when result != null, the @CachePut works.
@CachePut(key = "#id", condition="#result == null")
public void saveEntity1(MyEntity entity) {
	repository.save(entity);
}
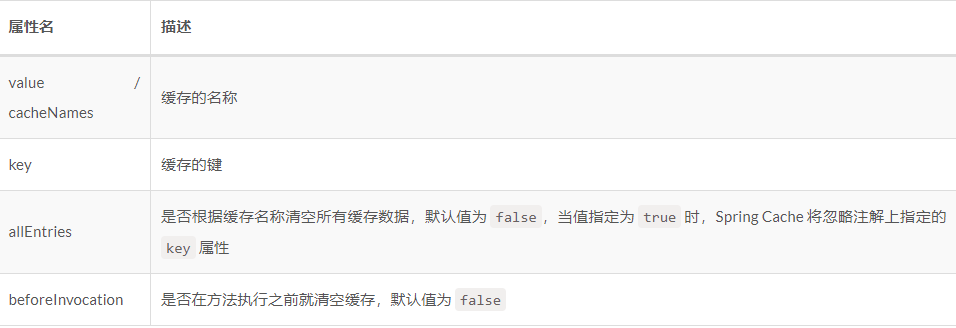
清理全部快取
通過allEntries、beforeInvocation屬性可以來清除全部快取資料,不過allEntries是方法呼叫後清理,beforeInvocation是方法呼叫前清理。
//方法呼叫完成之後,清理所有快取
@CacheEvict(value="myCache",allEntries=true)
public void delectAll() {
    repository.deleteAll();
}

//方法呼叫之前,清除所有快取
@CacheEvict(value="myCache",beforeInvocation=true)
public void delectAll() {
    repository.deleteAll();
}
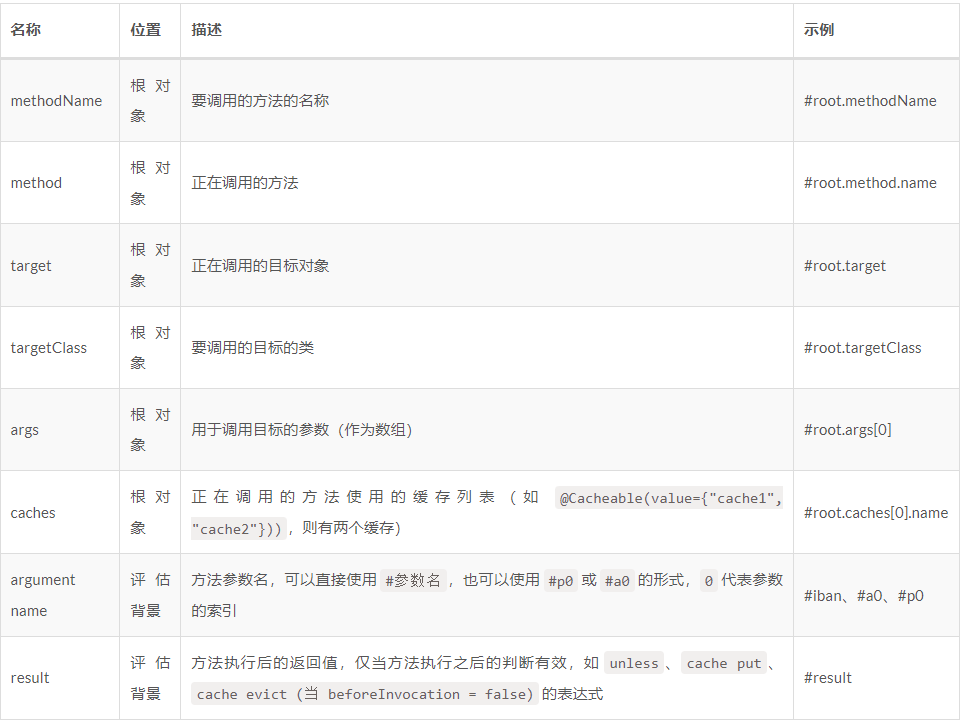
SpEL表示式
Spring Cache註解中頻繁用到SpEL表示式,那麼具體如何使用呢?
SpEL 表示式的語法

Spring Cache可用的變數

最佳實踐
通過Spring快取註解可以快速優雅地在我們專案中實現快取的操作,但是在雙寫模式或者失效模式下,可能會出現快取資料一致性問題(讀取到髒資料),Spring Cache 暫時沒辦法解決。最後我們再總結下Spring Cache使用的一些最佳實踐。
- 只快取經常讀取的資料:快取可以顯著提高效能,但只快取經常存取的資料很重要。很少或從不存取的快取資料會佔用寶貴的記憶體資源,從而導致效能問題。
- 根據應用程式的特定需求選擇合適的快取提供程式和策略。
SpringBoot支援多種快取提供程式,包括Ehcache、Hazelcast和Redis。 - 使用快取時請注意潛在的執行緒安全問題。對快取的並行存取可能會導致資料不一致或不正確,因此選擇執行緒安全的快取提供程式並在必要時使用適當的同步機制非常重要。
- 避免過度快取。快取對於提高效能很有用,但過多的快取實際上會消耗寶貴的記憶體資源,從而損害效能。在快取頻繁使用的資料和允許垃圾收集不常用的資料之間取得平衡很重要。
- 使用適當的快取逐出策略。使用快取時,重要的是定義適當的快取逐出策略以確保在必要時從快取中刪除舊的或陳舊的資料。
- 使用適當的快取鍵設計。快取鍵對於每個資料項都應該是唯一的,並且應該考慮可能影響快取資料的任何相關引數,例如使用者 ID、時間或位置。
- 常規資料(讀多寫少、即時性與一致性要求不高的資料)完全可以使用 Spring Cache,至於寫模式下快取資料一致性問題的解決,只要快取資料有設定過期時間就足夠了。
- 特殊資料(讀多寫多、即時性與一致性要求非常高的資料),不能使用 Spring Cache,建議考慮特殊的設計(例如使用 Cancal 中介軟體等)。
歡迎關注個人公眾號【JAVA旭陽】交流學習!
本文來自部落格園,作者:JAVA旭陽,轉載請註明原文連結:https://www.cnblogs.com/alvinscript/p/17303010.html