odoo 開發入門教學系列-新增修飾
新增修飾
我們的房地產模組現在從商業角度來看是有意義的。我們建立了特定的檢視,新增了幾個操作按鈕和約束。然而,我們的使用者介面仍然有點粗糙。我們希望為列表檢視新增一些顏色,並使一些欄位和按鈕有條件地消失。例如,當房產已出售或取消時,「已售出」和「取消」按鈕應消失,因為此時不再允許更改狀態。
參考: 檔案關聯的主題可以檢視 Views.
內聯檢視(Inline Views)
在房地產模組中,我們為房產新增了一個報價列表。我們通過以下程式碼簡單地新增了offer_ids欄位:
<field name="offer_ids"/>
該欄位使用estate.properties.offer的特定檢視。在某些情況下,我們希望定義一個僅在表單檢視上下文中使用的特定列表檢視。例如,我們希望顯示連結到房產型別的房產列表。然而,為了清楚起見,我們只想顯示3個欄位:名稱、預期價格和狀態。
為此,我們可以定義內聯列表檢視。內聯列表檢視直接在表單檢視中定義。例如:
from odoo import fields, models

class TestModel(models.Model):
    _name = "test.model"
    _description = "Test Model"

    description = fields.Char()
    line_ids = fields.One2many("test.model.line", "model_id")


class TestModelLine(models.Model):
    _name = "test.model.line"
    _description = "Test Model Line"

    model_id = fields.Many2one("test.model")
    field_1 = fields.Char()
    field_2 = fields.Char()
    field_3 = fields.Char()
<form>
    <field name="description"/>
    <field name="line_ids">
        <tree>
            <field name="field_1"/>
            <field name="field_2"/>
        </tree>
    </field>
</form>
在test.model的表單檢視中,我們使用 field_1 和field_2為 test.model.line 定義了列表檢視
        <record id="event_tag_category_view_form" model="ir.ui.view">
            <field name="name">event.tag.category.view.form</field>
            <field name="model">event.tag.category</field>
            <field name="arch" type="xml">
                <form string="Event Category">
                    <sheet>
                        <div class="oe_title">
                            <h1><field nolabel="1" name="name"/></h1>
                        </div>
                        <group>
                            <field name="tag_ids" context="{'default_category_id': active_id}">
                                <tree string="Tags" editable="bottom">
                                    <field name="sequence" widget="handle"/>
                                    <field name="name"/>
                                    <field name="color" widget="color_picker"/>
                                </tree>
                            </field>
                        </group>
                    </sheet>
                </form>
            </field>
        </record>
練習--新增一個內聯檢視
-
新增
One2many欄位property_ids到estate.property.type模型 -
在
estate.property.type表單檢視中新增欄位,如下圖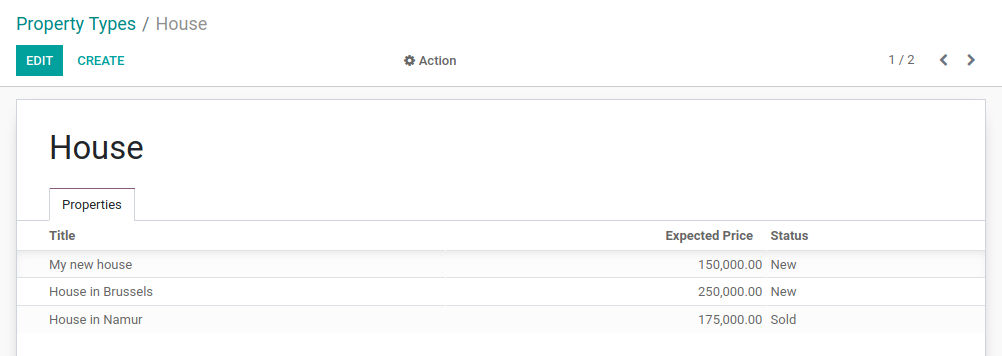
修改odoo14\custom\estate\models\estate_property_type.py
property_ids = fields.One2many('estate.property', 'property_type_id')
修改odoo14\custom\estate\views\estate_property_type_views.xml,新增estate_property_type_view_form
    <record id="estate_property_type_view_form" model="ir.ui.view">
        <field name="name">estate.property.type.form</field>
        <field name="model">estate.property.type</field>
        <field name="arch" type="xml">
            <form string="Property Type">
                <sheet>
                    <div class="oe_title">
                        <h1><field nolabel="1" name="name"/></h1>
                    </div>
                    <field name="property_ids">
                        <tree string="Properties" editable="bottom">
                            <field name="name" string="Title"/>
                            <field name="expected_price" string="Expected Price"/>
                            <field name="state" string="Status"/>
                        </tree>
                    </field>
                </sheet>
            </form>
        </field>
    </record>
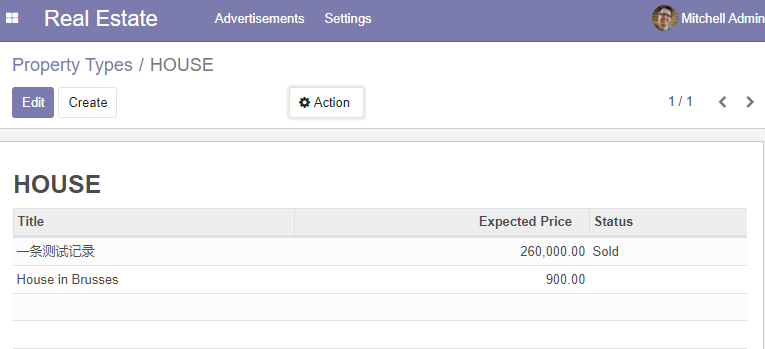
重啟服務,驗證效果
元件(Widget)
參考: 檢視本節主題關聯檔案Field Widgets.
每當我們將欄位新增到模型中時,我們(幾乎)從來不用擔心這些欄位在使用者介面中會是什麼樣子。例如,為Date欄位提供的日期選擇器,One2many欄位自動顯示為列表。Odoo根據欄位型別選擇正確的「widget」。
然而,在某些情況下,我們需要某個欄位的特定表示,這種特定表示的實現,歸功於widget屬性。在使用widget=「many2many_tags」屬性時,我們已經將其用於tag_ids欄位。如果我們沒有使用它,那麼該欄位將顯示為列表。
每個欄位型別都有一系列元件,可用於微調其顯示。一些元件也有額外的選項。在Field Widgets中可以找到詳盡的列表。
練習--使用狀態列元件
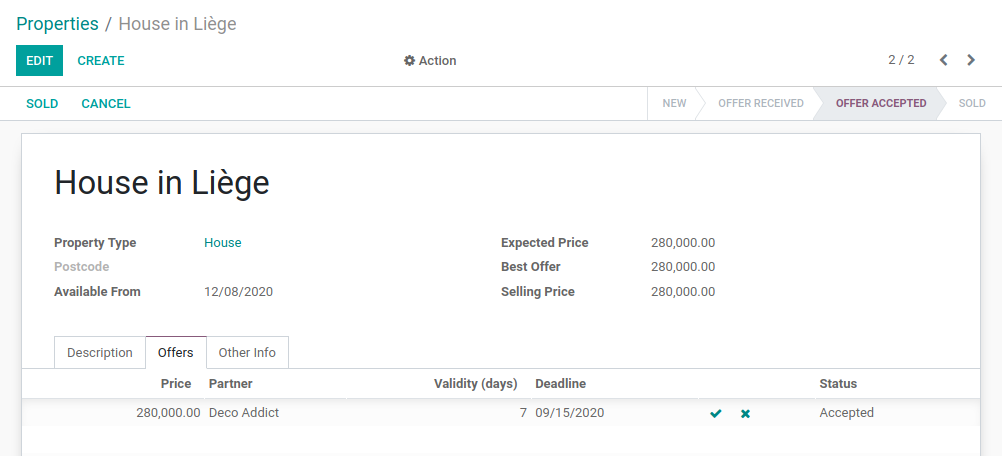
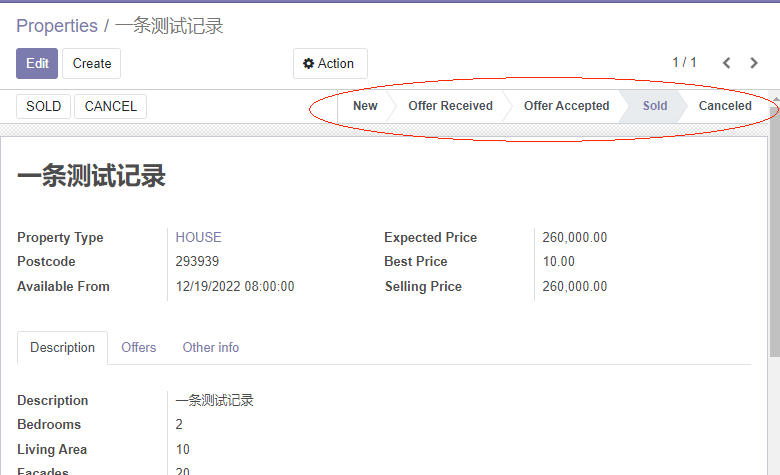
使用 statusbar 元件來展示的 estate.property 的state ,如下圖:
提示: 一個簡單的範例.
<field name="state" widget="statusbar" statusbar_visible="open,posted,confirm"/>
警告
相同欄位,只能在列表或表單檢視中只新增一次,不支援多次新增。
同一個欄位,如果展示多次,會以最後一次的樣式統一展示。
編輯odoo14\custom\estate\views\estate_property_views.xml
修改estate_property_view_form表單檢視的<header>元素
                <header>
                    <button name="set_property_sold" type="object" string="SOLD"></button>
                    <button name="set_property_canceled" type="object" string="CANCEL"></button>
                    <!-- <field>元素為本次新增內容 -->
                    <field name="state" widget="statusbar" statusbar_visible="New,Offer Received,Offer Accepted,Sold,Canceled"/>
                </header>
去掉<sheet>元素中的state欄位
<field name="state" string="Status"></field>
注意:如果不去掉上述程式碼,這裡的樣式將會覆蓋statusbar的state欄位樣式,如下:

說明:statusbar_visible屬性值為state欄位可選值(欄位值的selection列表中二元組、單元組中的value,即元組第一個元素)字串列表,控制狀態列顯示那些狀態,如果statusbar_visible值不為空字串,則僅顯示位於statusbar_visible屬性值中指定的狀態,以及檢視歸屬模型中對應欄位(例中為state)的default屬性指定的狀態(不管預設值是否在statusbar_visible屬性值中),否則展示全部狀態。此外,屬性值在檢視中的展示順序,取決於欄位可選值在public.ir_model_fields_selection表中對應sequence欄位值大小,按該欄位大小從左到右升序排序屬性值
重新整理瀏覽器,驗證效果:
列表排序
參考: 本節主題關聯檔案Models.
在前面的練習中,我們建立了幾個列表檢視。然而,我們沒有指定預設情況下記錄必須按哪個順序展示。對於許多業務案例來說,這是一件非常重要的事情。例如,在我們的房地產模組中,我們希望在列表頂部顯示最高報價
Model
odoo提供了幾種設定預設順序的方法。最常見的方法是直接在模型中定義_order屬性。這樣,檢索到的記錄將遵循確定性順序,該順序在所有檢視中都是一致的,包括以程式設計方式搜尋記錄時。預設情況下,沒有指定順序,因此將根據不確定的順序檢索記錄,取決於PostgreSQL。
_order屬性接收一個字串,該字串包含將用於排序的欄位列表。它將轉換為SQL中的order_by子句。例如:
from odoo import fields, models

class TestModel(models.Model):
    _name = "test.model"
    _description = "Test Model"
    _order = "id desc"

    description = fields.Char()
如上,記錄將按id降序排序,意味著最高的排在最上面。
練習--新增模型排序
在對應模型中新增一下排序
| Model | Order |
|---|---|
estate.property |
按 ID降序 |
estate.property.offer |
按Price降序 |
estate.property.tag |
Name |
estate.property.type |
Name |
此處練習比較簡單,我就不貼實踐程式碼了,參考上述範例
重啟服務,驗證效果
View
可以在模型級別進行排序,它有個優點,即即在檢索記錄列表的任何地方都有一致的順序。也可以通過default_order直接在檢視中定義指定排序順序 (範例)。
        <record id="crm_activity_report_view_tree" model="ir.ui.view">
            <field name="name">crm.activity.report.tree</field>
            <field name="model">crm.activity.report</field>
            <field name="arch" type="xml">
                <tree default_order="date desc">
                    <field name="date"/>
                    <field name="author_id"/>
                    <field name="mail_activity_type_id"/>
                    <field name="body"/>
                    <field name="company_id" groups="base.group_multi_company"/>
                </tree>
            </field>
        </record>
手工(Manual)
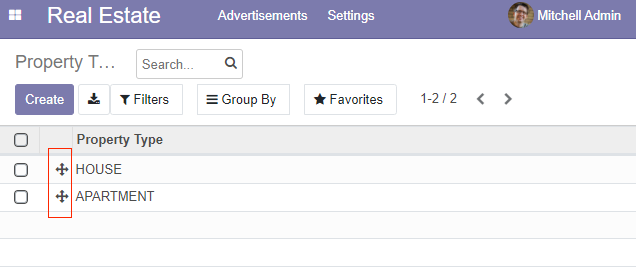
模型排序和檢視排序都允許在排序記錄時具有靈活性,但仍有一種情況需要考慮:手動排序。使用者可能希望根據業務邏輯對記錄進行排序。例如,在我們的房地產模組中,我們希望手動對房產型別進行排序。將最常用的型別顯示在列表的頂部確實很有用。如果我們的房地產經紀公司主要銷售房子,那麼在「公寓(Apartment)」之前出現「房子(House)」會更方便。
為此,將sequence欄位與handle元件結合使用。顯然,sequence欄位必須是_order屬性中的第一個欄位。
練習--新增手工排序
- 新增以下排序欄位
| Model | Field | Type |
|---|---|---|
estate.property.type |
Sequence | Integer |
- 使用正確的元件,新增
sequence到estate.property.type列表檢視
sequence = fields.Integer('Sequence', default=1, help="Used to order stages. Lower is better.")
    <record id="crm_stage_tree" model="ir.ui.view">
        <field name="name">crm.stage.tree</field>
        <field name="model">crm.stage</field>
        <field name="arch" type="xml">
            <tree string="Stages" multi_edit="1">
                <field name="sequence" widget="handle"/>
                <field name="name" readonly="1"/>
                <field name="is_won"/>
                <field name="team_id"/>
            </tree>
        </field>
    </record>
修改odoo14\custom\estate\models\estate_property_type.py
#!/usr/bin/env python
# -*- coding:utf-8 -*-

from odoo import models, fields

class EstatePropertyType(models.Model):
    _name = 'estate.property.type'
    _description = 'estate property type'
    _order = 'sequence,name'

    name = fields.Char(string='name', required=True)
    property_ids = fields.One2many('estate.property', 'property_type_id')
    sequence = fields.Integer('Sequence', default=1, help="Used to order type")
    _sql_constraints = [('check_name', 'unique(name)', 'Type name must be unique !')]
修改odoo14\custom\estate\views\estate_property_type_views.xml中estate_property_type_view_tree
    <record id="estate_property_type_view_tree" model="ir.ui.view">
        <field name="name">estate.property.type.tree</field>
        <field name="model">estate.property.type</field>
        <field name="arch" type="xml">
            <tree string="PropertyTypes">
                <field name="sequence" widget="handle"/>
                <field name="name"/>
            </tree>
        </field>
    </record>
重啟服務,驗證效果(可手工拖動記錄排序)
屬性和選項(Attributes and options)
詳細說明所有允許對檢視外觀進行微調的可用特性是令人望而卻步的。因此,我們將挑選最常見的特性進行說明。
表單(Form)
目標: 本節末尾中,地產表單檢視將擁有以下:
- 有條件的顯示按鈕和欄位
- 標籤顏色
預期效果動畫地址:https://www.odoo.com/documentation/14.0/zh_CN/_images/form.gif
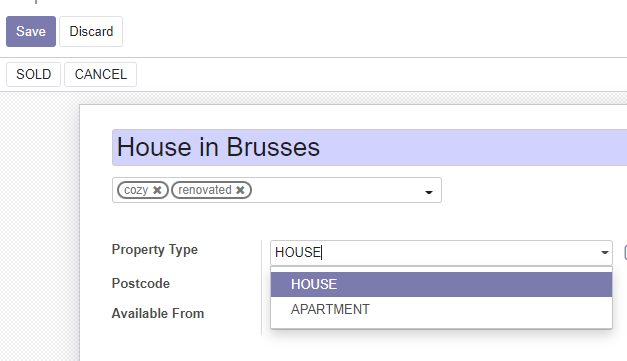
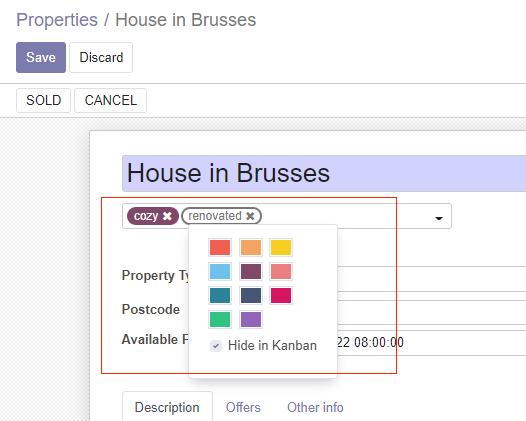
在我們的房地產模組中,我們希望修改某些欄位的行為。例如,我們不希望能夠從表單檢視建立或編輯房產型別。相反,我們希望在其相應的選單中處理型別。我們還想給標籤增加一種顏色。為了新增這些客製化化行為,我們可以將options屬性新增到幾個欄位元件中。
練習--新增元件選項
- 新增合適的選項到
property_type_id欄位,避免在房產表單檢視中建立活編輯房產型別。檢視Many2one元件檔案 獲取更多資訊 - 新增以下欄位:
| Model | Field | Type |
|---|---|---|
estate.property.tag |
Color | Integer |
然後新增合適的選項到 tag_ids 欄位以便在標籤上新增顏色選擇器。檢視FieldMany2ManyTags元件檔案 獲取更多詳細資訊
編輯odoo14\custom\estate\models\estate_property.py
修改
property_type_id = fields.Many2one("estate.property.type", string="PropertyType")
為
property_type_id = fields.Many2one("estate.property.type", string="PropertyType", options="{'no_create_edit': True}")
重啟服務,驗證效果
如下,看不到建立和編輯入口了
編輯odoo14\custom\estate\models\estate_property_tag.py,新增color欄位:
color = fields.Integer(string='Color')
修改odoo14\custom\estate\views\estate_property_views.xml estate_property_view_form中
<field name="tag_ids" widget="many2many_tags"/>
為
<field name="tag_ids" widget="many2many_tags" options="{'color_field': 'color'}"/>
重啟服務,驗證效果
在"一些使用者介面"章節中,我們看到保留欄位用於特定行為。例如,active欄位用於自動篩選出非活動記錄。我們還新增了state作為保留欄位。現在是使用它的時候了!state欄位與檢視中的states屬性結合使用,以有條件地顯示按鈕。
練習--有條件的顯示按鈕
使用states屬性來顯示有條件的顯示頭部按鈕,如本節目標中所述(注意修改狀態時「已售出」和「取消」按鈕的變化)
提示: 請不要猶豫在Odoo XML檔案中搜尋states=以獲得一些範例
修改odoo14\custom\estate\views\estate_property_views.xml 表單檢視中的<header>
<header>
    <button name="set_property_sold" type="object" states="Offer Accepted" string="SOLD"></button>
    <button name="set_property_canceled" type="object" states="New,Offer Received,Offer Accepted"  string="CANCEL"></button>
    <field name="state" widget="statusbar" statusbar_visible="New,Offer Received,Offer Accepted,Sold,Canceled"/>
</header>
說明:
第一個按鈕的states設定,意為僅在當前記錄state的值Offer Accepted時顯示該按鈕
第一個按鈕的states設定,意為僅在當前記錄state的值New、Offer Received、Offer Accepted時顯示該按鈕
重新整理瀏覽器驗證(可通過修改資料庫中對應記錄的state值來觀察按鈕的顯示變化)
更普遍的,多虧attrs屬性,可以根據其他欄位的值使字謀個欄位 不可見(invisible)、唯讀(readonly)或必需(required 。注意, invisible也可以應用於檢視的其他元素,如按鈕( button )或組( group)。
attrs 為一個以屬性為key,以domain為值的字典。 domain給出了應用該屬性的條件。例如:
<form>
    <field name="description" attrs="{'invisible': [('is_partner', '=', False)]}"/>
    <field name="is_partner" invisible="1"/>
</form>
這意味著當 is_partner 為 False 時description欄位不可見。需要注意的是,attrs中使用的欄位必須出現在檢視中。如果它不應該顯示給使用者,我們可以使用invisible屬性來隱藏它。
練習--使用 attrs
- 當沒有花園(garden)時,設定
estate.property表單檢視中的花園面積(garden area)和朝向(garden orientation)不可見 - 一單設定了報價狀態,設定’Accept’ 和‘Refuse’ 按鈕不可見
- 當房產狀態為
Offer Accepted,Sold或Canceled時,不允許新增報價。為此使用readonlyattrs.
警告
在檢視中使用(條件)
readonly屬性可能有助於防止資料輸入錯誤,但請記住,它不會提供任何級別的安全性!伺服器端沒有進行檢查,因此始終可以通過RPC呼叫在欄位上進行寫入。
修改odoo14\custom\estate\views\estate_property_views.xml表單檢視
<page string="Description">
    <group>
        <field name="description"></field>
        <field name="bedrooms"></field>
        <field name="living_area"></field>
        <field name="facades"></field>
        <field name="garage"></field>
        <field name="garden"></field>
        <field name="garden_area" attrs="{'invisible': [('garden', '=', False)]}"></field>
        <field name="garden_orientation" attrs="{'invisible': [('garden', '=', False)]}"></field>
        <field name="total_area" string="Total Area"></field>
    </group>
</page>
修改offer_ids屬性
<page string="Offers">
    <field name="offer_ids" attrs="{'readonly': [('state', 'in', ['Offer Accepted','Sold','Canceled'])]}"/>
</page>
說明: in 表示在列表中,反之使用 not in
修改odoo14\custom\estate\views\estate_property_offer_views.xml 給button新增屬性
            <tree string="PropertyOffers">
                <field name="price" string="Price"/>
                <field name="partner_id" string="partner ID"/>
                <field name="validity" string="Validity(days)"/>
                <field name="date_deadline" string="Deadline"/>
                <button name="action_accept_offer" string=""  type="object" icon="fa-check" attrs="{'invisible': [('status', 'in', ['Accepted','Refused'])]}"/>
                <button name="action_refuse_offer" string=""  type="object" icon="fa-times" attrs="{'invisible': [('status', 'in', ['Accepted','Refused'])]}"/>
                <field name="status" string="Status"/>
            </tree>
重新整理瀏覽器,驗證效果
列表(List)
當模型只有幾個欄位時,可以通過列表檢視直接編輯記錄,而不必開啟表單檢視。在房地產範例中,不需要開啟表單檢視來新增報價或建立新標籤。這可以通過editable 屬性實現。
練習--使列表檢視可編輯
讓estate.properties.offer和estate.properties.tag列表檢視可編輯。
此外,當一個模型有很多欄位時,很可能會在列表檢視中新增太多欄位,使其變得不清晰。另一種方法是新增欄位,並讓這些欄位可以有選擇的被隱藏。這可以通過optional 屬性實現。
練習-使欄位成為可選欄位
預設情況下,將estate.properties列表檢視中的欄位date_availability設定為可選,預設隱藏。
修改odoo14\custom\estate\views\estate_property_offer_views.xml中的tree檢視中的<tree>元素,增加editable屬性:
<tree string="PropertyOffers" editable="top">
重新整理瀏覽器檢視
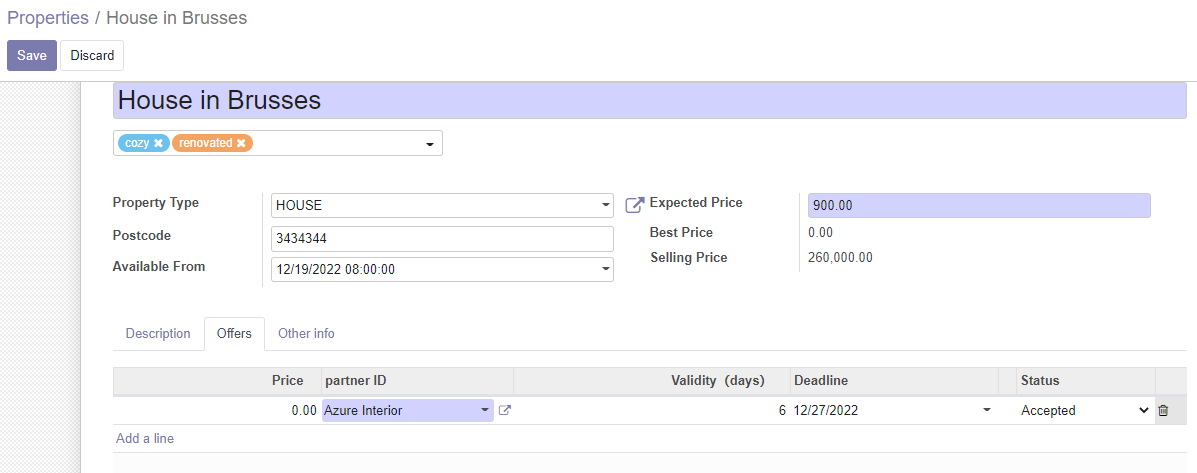
修改odoo14\custom\estate\views\estate_property_views.xml estate_property_view_tree中的<tree>元素
            <tree string="estate property" editable="top"><!--editable屬性為本次新增-->
                <field name="name" string="Title"/>
                <field name="postcode" string="Postcode"/>
                <field name="tag_ids" string="Tags" widget="many2many_tags" options="{'color_field': 'color'}"/><!--本次新增欄位-->
                <field name="bedrooms" string="Bedrooms"/>
                <field name="living_area" string="Living Area"/>
                <field name="expected_price" string="Expected Price"/>
                <field name="selling_price" string="Selling Price"/>
                <field name="date_availability" string="Avalilable Form" optional="hide"/>
                <field name="property_type_id" string="Property Type"/>
            </tree>
說明:
editable="value",其中value可選值為top|bottom,表示點選建立記錄時,待建立記錄出現在列表的頂部(value=top)還是底部(value=bottom)。optional="value",value可選值為hide(隱藏),show(顯示)
重新整理瀏覽器驗證


最後,顏色程式碼有助於直觀地強調記錄。例如,在房地產模組中,我們希望以紅色顯示拒絕的報價,以綠色顯示接受的報價。這可以通過 decoration-{$name}屬性實現(有關完整列表,請參閱 decorations):
<tree decoration-success="is_partner==True">
    <field name="name">
    <field name="is_partner" invisible="1">
</tree>
is_partner為True的記錄將顯示為綠色。
練習--新增一些裝飾
在 estate.property 列表檢視中:
- 收到報價的房產顯示為綠色
- 已接受報價的房產顯示為綠色,並加粗顯示
- 已出售房產顯示為禁用(
muted)
修改odoo14\custom\estate\views\estate_property_views.xml,給列表檢視<tree>元素增加decoration-x屬性:
<tree string="estate property" editable="top" decoration-success="state in ['Offer Received','Offer Accepted']" decoration-bf="state == 'Offer Accepted'" decoration-muted="state == 'Sold'">
重新整理瀏覽器驗證

搜尋(Search)
Reference: 檢視主題關聯檔案Search 和 Search defaults
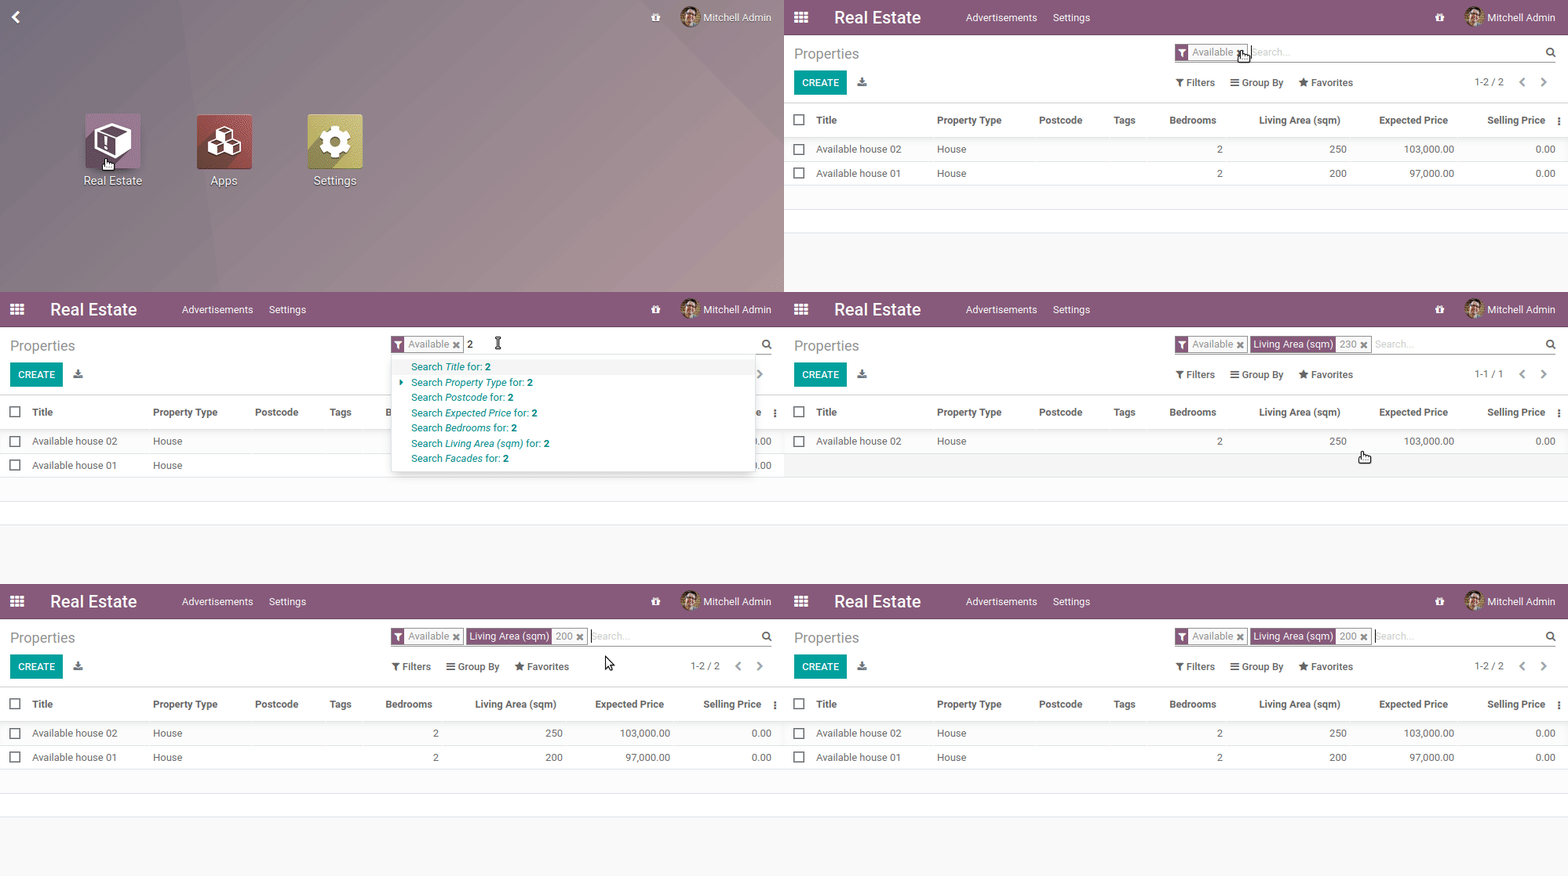
本章目標:在本節結束時,預設情況下將過濾可用的屬性,搜尋居住區域將返回面積大於給定數位的結果。
預期效果動畫地址:https://www.odoo.com/documentation/14.0/zh_CN/_images/search.gif
最後但並非最不重要的是,我們希望在搜尋時應用一些調整。首先,我們希望在存取房產列表時預設應用「Avaliable」篩選器。為了實現這一點,我們需要使用search_default_{$name}操作上下文,其中{$name}為過濾器名稱,即搜尋檢視中定義的<field>、<filter>元素的name屬性值。這意味著我們可以在操作級別定義預設啟用的過濾器。
        <!-- Opportunities by user and team Search View -->
        <record id="crm_opportunity_report_view_search" model="ir.ui.view">
            <field name="name">crm.lead.search</field>
            <field name="model">crm.lead</field>
            <field name="priority">32</field>
            <field name="arch" type="xml">
                <search string="Opportunities Analysis">
                    ...
                    <filter name="opportunity" string="Opportunity" domain="[('type','=','opportunity')]" help="Show only opportunity"/>
                    ...
        <record id="crm_opportunity_report_action" model="ir.actions.act_window">
            <field name="name">Pipeline Analysis</field>
            <field name="res_model">crm.lead</field>
            <field name="view_mode">pivot,graph,tree,form</field>
            <field name="search_view_id" ref="crm.crm_opportunity_report_view_search"/>
            <field name="context">{'search_default_opportunity': True, 'search_default_current': True}</field>
            ...
練習--新增預設過濾器
在estate.properties action中,預設選擇‘Available’篩選器。
修改odoo14\custom\estate\views\estate_property_views.xml link_estate_property_action
    <record id="link_estate_property_action" model="ir.actions.act_window">
        <field name="name">Properties</field>
        <field name="res_model">estate.property</field>
        <field name="view_mode">tree,form</field>
        <field name="context">{'search_default_state': True}</field><!--新增內容-->
    </record>
重啟服務,重新整理瀏覽器驗證

我們模組的另一個有用的改進是能夠按居住面積高效搜尋。實際上,使用者需要搜尋「至少」給定面積的房產。期望使用者能夠找到一個精確居住面積的房產是不現實的。總是可以進行自定義搜尋,但這很不方便。
搜尋檢視的<field>元素可以包含一個filter_domain,它會覆蓋為搜尋給定欄位而生成的domain。在給定domain中,self表示使用者輸入的值。在下面的範例中,它用於搜尋 name 和 description 欄位。
<search string="Test">
    <field name="description" string="Name and description"
           filter_domain="['|', ('name', 'ilike', self), ('description', 'ilike', self)]"/>
    </group>
</search>
練習--改變居住面積搜尋
新增一個 filter_domain 到居住面積,以搜尋面積大於等於給值的房產。
修改odoo14\custom\estate\views\estate_property_views.xml estate_property_search_view,增加living_area欄位
            <search string="Estate Property">
                <!-- 搜尋 -->
                <field name="name" string="Title" />
                <field name="postcode" string="Postcode"></field>
                <field name="living_area" string="LivingArea"  filter_domain="[('living_area', '>=', self)]"/> <!--本次新增-->
                <separator/>
                <!-- 篩選 -->
                <filter string="Available" name="state" domain="['|',('state', '=', 'New'),('state', '=', 'Offer Received')]"></filter>
                <filter name="bedrooms" domain="[('bedrooms', '>', 3)]"></filter>
                <filter name="bedrooms and selling_price" domain="[('bedrooms', '>', 2),('selling_price', '>=', 1000)]"></filter>
                <!-- 分組 -->
                <group expand="1" string="Group By">
                    <filter string="朝向" name="garden_orientation" context="{'group_by':'garden_orientation'}"/>
                </group>
            </search>
重啟服務,重新整理頁面後驗證

統計按鈕(Stat Buttons)
在本節的末尾,房產型別表單檢視上會有一個統計按鈕,當單擊該按鈕時,它會顯示與給定型別的房產相關的所有報價的列表。
預期效果動畫地址:https://www.odoo.com/documentation/14.0/zh_CN/_images/stat_button.gif
在我們的房地產模組中,我們希望快速連結到與給定房產型別相關的報價,正如目標描述中展示的那樣。
提示:通過在Odoo程式碼庫中查詢「oe_stat_button」,以獲取一些範例。
本次練習將引入Related fields的概念。理解它的最簡單方法是將其視為計算的欄位的特殊情況。以下description欄位的定義:
...
partner_id = fields.Many2one("res.partner", string="Partner")
description = fields.Char(related="partner_id.name")
等價於:
...
partner_id = fields.Many2one("res.partner", string="Partner")
description = fields.Char(compute="_compute_description")

@api.depends("partner_id.name")
def _compute_description(self):
    for record in self:
        record.description = record.partner_id.name
每當partner的name改變時,description也會被改變。
練習--新增統計按鈕到房產型別
- 新增
property_type_id到estate.property.offer。 我們可以將其定義為property_id.property_type_id上的關聯欄位,並將其設定為儲存。
因為此欄位,報價將在建立時連結到房產型別。您可以將該欄位新增到報價列表檢視中,以確保其正常工作。.
- 新增
offer_ids到estate.property.type,該欄位為前面步驟定義的欄位的One2manyinverse - 新增
offer_count到estate.property.type。該欄位為一個計算的欄位,用於統計給定房產型別的報價的數量 (使用offer_ids進行計算)。
此時,你已經掌握了了解有多少報價連結到一個房產型別的所有必要的資訊。如果有疑問,請將offer_ids和offer_count直接新增到檢視中。下一步是在單擊統計按鈕時顯示列表。
- 在
estate.properties.type上建立一個統計按鈕,指向estate.property.offeraction。這意味著你應該使用type=「action」屬性
此時,點選統計按鈕,應該顯示所有報價。我們仍然需要過濾的報價。
-
在
estate.property.offeraction中新增一個domain, 將property_type_id定義為等於active_id(=當前記錄, 這裡是一個範例)<record id="act_event_registration_from_event" model="ir.actions.act_window"> <field name="res_model">event.registration</field> <field name="name">Attendees</field> <field name="view_mode">kanban,tree,form,calendar,graph</field> <field name="domain">[('event_id', '=', active_id)]</field> ... </record>
編輯odoo14\custom\estate\models\estate_property_offer.py,修改
from odoo import models, fields
為
from odoo import models, fields, api
新增以下欄位:
property_type_id = fields.Many2one(related="property_id.property_type_id", store=True)
修改odoo14\custom\estate\models\estate_property_type.py,新增offer_ids,offer_count欄位,新增_compute_offer_count函數
#!/usr/bin/env python
# -*- coding:utf-8 -*-

from odoo import models, fields, api

class EstatePropertyType(models.Model):
    _name = 'estate.property.type'
    _description = 'estate property type'
    _order = 'sequence, name'

    sequence = fields.Integer('Sequence', default=1, help="Used to order type")
    name = fields.Char(string='name', required=True)
    property_ids = fields.One2many('estate.property', 'property_type_id')
    offer_ids = fields.One2many('estate.property.offer', 'property_type_id')
    offer_count = fields.Integer(compute='_compute_offer_count')
    _sql_constraints = [('check_name', 'unique(name)', 'Type name must be unique !')]

    @api.depends('offer_ids.price')
    def _compute_offer_count(self):
        for record in self:
            record.offer_count = sum(record.mapped('offer_ids.price'))
修改odoo14\custom\estate\views\estate_property_type_views.xml,新增display_offers_for_given_estate_property_action,button_box div元素
<?xml version="1.0"?>
<odoo>
    <record id="estate_property_type_action" model="ir.actions.act_window">
        <field name="name">Property Types</field>
        <field name="res_model">estate.property.type</field>
        <field name="view_mode">tree,form</field>
    </record>
    <!--display_offers_for_given_estate_property_action為本次新增元素-->
    <record id="display_offers_for_given_estate_property_action" model="ir.actions.act_window">
        <field name="name">Property Offers</field>
        <field name="type">ir.actions.act_window</field>
        <field name="res_model">estate.property.offer</field>
        <field name="view_mode">tree</field>
        <field name="domain">[('property_type_id', '=', active_id)]</field>
        <field name="context">{'default_event_id': active_id}</field>
    </record>

    <record id="estate_property_type_view_tree" model="ir.ui.view">
        <field name="name">estate.property.type.tree</field>
        <field name="model">estate.property.type</field>
        <field name="arch" type="xml">
            <tree>
                <field name="sequence" widget="handle"></field>
                <field name="name" string="Property Type"/>
            </tree>
        </field>
    </record>

    <record id="estate_property_type_view_form" model="ir.ui.view">
        <field name="name">estate.property.type.form</field>
        <field name="model">estate.property.type</field>
        <field name="arch" type="xml">
            <form string="Property Type">
                <sheet>
                    <!--button_box為本次新增元素-->
                    <div class="oe_button_box" name="button_box" >
                        <button class="oe_stat_button" name="%(display_offers_for_given_estate_property_action)d"
                                string="" type="action" icon="fa-money">
                            <field string="Offers" widget="statinfo" name="offer_count"></field>
                        </button>
                    </div>
                    <div class="oe_title">
                        <h1><field nolabel="1" name="name"/></h1>
                    </div>
                    <field name="property_ids">
                        <tree string="Properties" editable="bottom">
                            <field name="name" string="Title"/>
                            <field name="expected_price" string="Expected Price"/>
                            <field name="state" string="Status"/>
                        </tree>
                    </field>
                </sheet>
            </form>
        </field>
    </record>
</odoo>
重啟服務,重新整理瀏覽器驗證
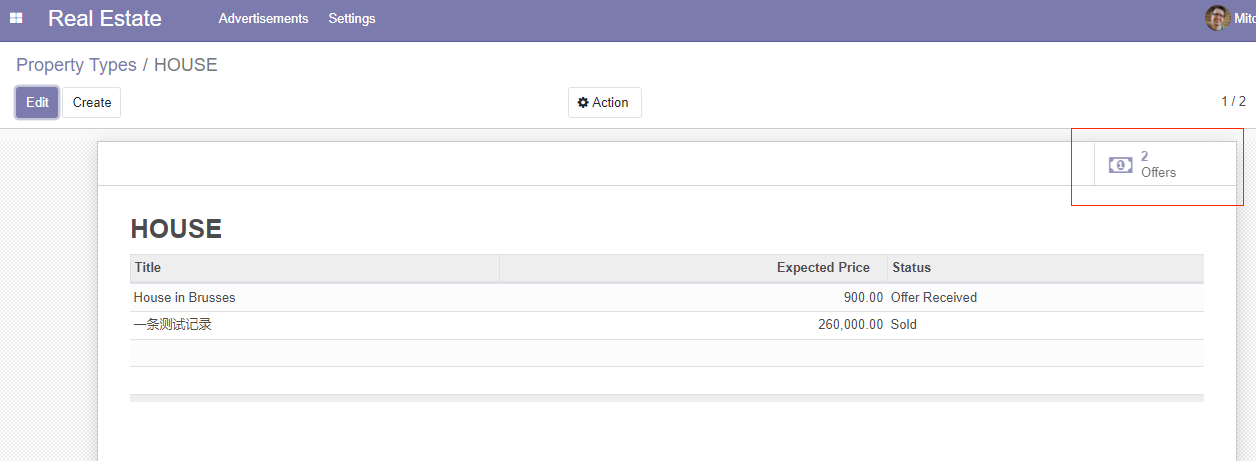

通過按鈕跳轉後帶來的問題
點選瀏覽器回退鍵,麵包屑顯重複顯示了,如下,暫時未找到解決方案

作者:授客
微信/QQ:1033553122
全國軟體測試QQ交流群:7156436
Git地址:https://gitee.com/ishouke
友情提示:限於時間倉促,文中可能存在錯誤,歡迎指正、評論!
作者五行缺錢,如果覺得文章對您有幫助,請掃描下邊的二維條碼打賞作者,金額隨意,您的支援將是我繼續創作的源動力,打賞後如有任何疑問,請聯絡我!!!
微信打賞
支付寶打賞 全國軟體測試交流QQ群


