超詳細!手把手教你用 JaCoCo 生成單測覆蓋率報告!
我們都知道 Spock 是一個單測框架,其特點是語法簡明。但當我們使用 Spock 寫了一堆單元測試之後,如何生成對應的單測覆蓋率報告呢?一般來說,我們會使用兩個外掛來一起完成單測覆蓋率報告的生成,分別是:
- Maven Surefire Plugin
- JaCoCo Plugin
其中 Maven Surefire Plugin 是用來在 Maven 的編譯階段執行單測程式碼,而 JaCoCo 則是用來生成具體的單測覆蓋率報告。本文將新建一個非 Web 專案來演示如何生成 Spock 的單測覆蓋率報告。
初始化專案
這裡初始化專案一個普通的 Java 專案,並引入對應的 Spock 依賴,如下程式碼所示:
<!-- spock 依賴-->
<dependency>
    <groupId>org.spockframework</groupId>
    <artifactId>spock-core</artifactId>
    <version>2.0-M2-groovy-3.0</version>
    <scope>test</scope>
</dependency>
<dependency>
    <groupId>org.junit.jupiter</groupId>
    <artifactId>junit-jupiter-engine</artifactId>
    <version>5.6.2</version>
    <scope>test</scope>
</dependency>
接著寫一個計算器類,用於演示單測覆蓋率,如下程式碼所示:
package tech.shuyi;

public class AdvancedCalculator {
    Integer add(int a, int b) {
        return a + b;
    }

    Integer subtract(int a, int b) {
        return a - b;
    }

    Integer multi(int a, int b) {
        return a * b;
    }

    Integer divide(int a, int b) {
        return a / b;
    }
}
接著在 test.groovy.tech.shuyi 目錄寫一個 Groovy 單測,如下程式碼所示:
package tech.shuyi

import spock.lang.Specification

class AdvancedCalculatorTest extends Specification {

    def calendar = new AdvancedCalculator()

    def "Add"() {
        expect: calendar.add(1, 2) == 3
    }

    def "Substract"() {
        expect: calendar.subtract(2, 1) == 1
    }

    def "Multi"() {
        expect: calendar.multi(2, 3) == 6
    }

    def "Divide"() {
        expect: calendar.divide(16, 4) == 4
    }
}
接著我們嘗試執行一下單測檔案,如無異常應該是成功的。
引入外掛
在這裡,我們要引入對應的兩個外掛,並做一些簡單地設定。
首先,在 pom.xml 檔案引入 Surefire 外掛設定,如下程式碼所示:
<!-- surefire plugin with spock and junit -->
<plugin>
    <groupId>org.codehaus.gmavenplus</groupId>
    <artifactId>gmavenplus-plugin</artifactId>
    <version>1.9.0</version>
    <executions>
        <execution>
            <goals>
                <goal>compileTests</goal>
            </goals>
        </execution>
    </executions>
</plugin>
<plugin>
    <groupId>org.apache.maven.plugins</groupId>
    <artifactId>maven-surefire-plugin</artifactId>
    <version>3.0.0-M7</version>
    <configuration>
        <!-- 設定單測失敗幾次後停止執行 -->
        <skipAfterFailureCount>0</skipAfterFailureCount>
        <!-- 不允許跳過單測 -->
        <skipTests>false</skipTests>
    </configuration>
</plugin>
接著引入 JaCoCo Plugin 的設定,如下程式碼所示:
<!-- JaCoCo plugin -->
<plugin>
    <groupId>org.jacoco</groupId>
    <artifactId>jacoco-maven-plugin</artifactId>
    <version>0.8.7</version>
    <configuration>
        <includes>
            <include>tech/**/*</include>
        </includes>
    </configuration>
    <executions>
        <execution>
            <id>pre-test</id>
            <goals>
                <goal>prepare-agent</goal>
            </goals>
        </execution>
        <execution>
            <id>post-test</id>
            <phase>test</phase>
            <goals>
                <goal>report</goal>
            </goals>
        </execution>
    </executions>
</plugin>
生成報告
做好上述報告後,直接執行 mvn test 就可以生成單測覆蓋率報告了。如果沒有什麼異常的話,程式會生成單測覆蓋率報告檔案,地址為: target/site/jacoco/index.html。
我們使用瀏覽器開啟該檔案可以瀏覽到單測覆蓋率情況,如下圖所示:

疑問
關於如何設定這兩個外掛的資料很多,但都執行不起來。後面我參考了官網的設定,就成功設定好了。
- Surefire Plugin 官網檔案:Maven Surefire Plugin – Introduction
- JaCoCo Plugin 官網檔案:JaCoCo - Maven Plug-in
但對於這兩個外掛,我還是有一定疑問的,例如:
- 這兩個外掛到底都是啥作用?
- 是否一定要搭配一起使用?
通過 Surefire 外掛官網,我們可以大概知道其作用為:在編譯的 test 階段,用於執行程式的單元測試,最終生成 txt 和 xml 格式的報告,存放地址為 ${basedir}/target/surefire-reports/TEST-*.xml。
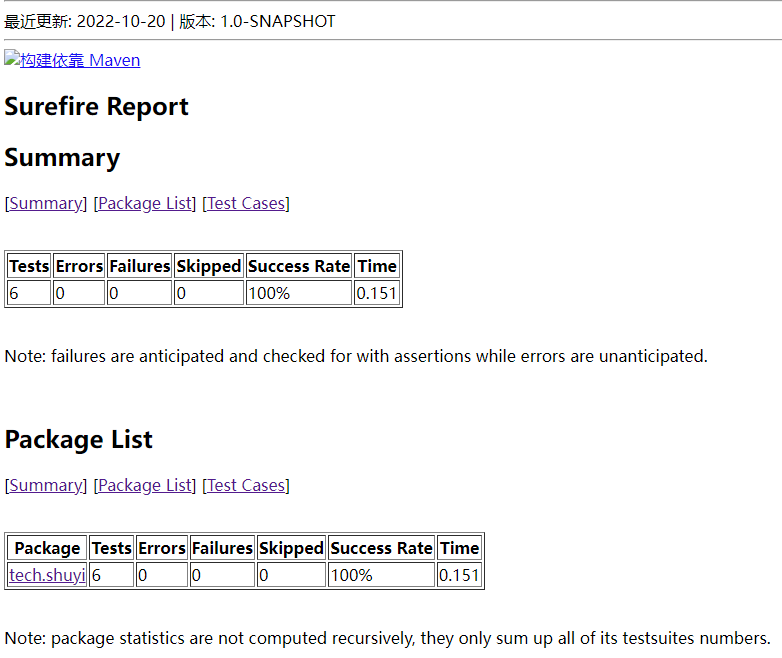
由此可見,Surefire 的主要作用還是用於執行程式的單測程式,而不是生成報告。當然,官網檔案也說了,你可以使用 Maven Surefire Report Plugin 來生成 HTML 格式的報告。我根據這個檔案(Maven Surefire Report Plugin – Usage)設定了一下 surefire-report 外掛,成功地生成 HTML 格式的報告,如下圖所示。

可以看到 surefire-report 外掛生成的 HTML 報告還是比較簡陋的,跟 JaCoCo 外掛生成的相比,顯然後者更加視覺化一些。
看到這裡,我相信大家應該能弄明白前面兩個問題了:
- 這兩個外掛到底都是啥作用?
- 是否一定要搭配一起使用?
簡單地說,Surefire 外掛主要是執行單測,生成單測資料。對於 JaCoCo 外掛而言,其作用是基於 Surefire 外掛去生成視覺化的報告。JaCoCo 外掛需要基於 Surefire 外掛使用,如果去掉 Surefire 外掛,JaCoCo 就生成不了報告了。
參考資料
