golang pprof 監控系列(4) —— goroutine thread 統計原理
golang pprof 監控系列(4) —— goroutine thread 統計原理
大家好,我是藍胖子。
在之前 golang pprof監控 系列文章裡我分別介紹了go trace以及go pprof工具對memory,block,mutex這些維度的統計原理,今天我們接著來介紹golang pprof工具對於goroutine 和thread的統計原理。
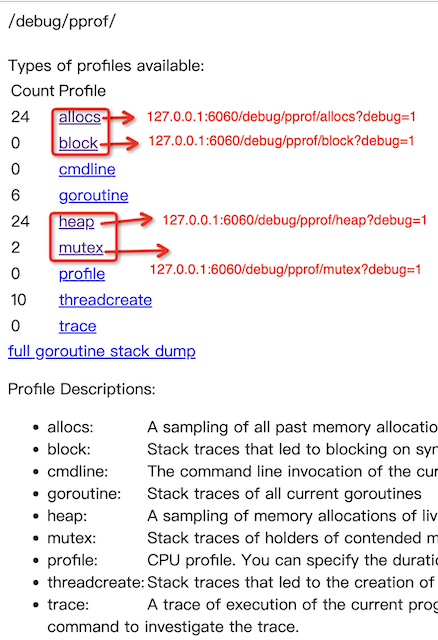
還記得在golang pprof監控系列(2) —— memory,block,mutex 使用 文章裡,通過http介面的方式暴露的方式展現 指標資訊那個網頁圖嗎?

這一節,我將會介紹其中的goroutine部分和threadcreate部分。
老規矩,在介紹統計原理前,先來看看http介面暴露的方式暴露了哪些資訊。
http 介面暴露的方式
讓我們點選網頁的goroutine 連結。。。
goroutine profile 輸出資訊介紹

進入到了一個這樣的介面,我們挨個分析下網頁展現出來的資訊:
首先位址列 /debug/pprof/goroutine?debug= 1 代表這是在存取goroutine指標資訊,debug =1 代表存取的內容將會以文字可讀的形式展現出來。 debug=0 則是會下載一個goroutine指標資訊的二進位制檔案,這個檔案可以通過go tool pprof 工具去進行分析,關於go tool pprof 的使用網上也有相當多的資料,這裡就不展開了。 debug = 2 將會把當前所有協程的堆疊資訊以文字可讀形式展示在網頁上。如下圖所示:

debug =2 時的 如上圖所示,41代表協程的id,方括號內running代表了協程的狀態是執行中,接著就是該協程此時的堆疊資訊了。
讓我們再回到debug = 1的分析上面去,剛才分析完了位址列裡的debug引數,接著,我們看輸出的第一行
goroutine profile: total 6
1 @ 0x102ad6c60 0x102acf7f4 0x102b04de0 0x102b6e850 0x102b6e8dc 0x102b6f79c 0x102c27d04 0x102c377c8 0x102d0fc74 0x102bea72c 0x102bebec0 0x102bebf4c 0x102ca4af0 0x102ca49dc 0x102d0b084 0x102d10f30 0x102d176a4 0x102b09fc4
#	0x102b04ddf	internal/poll.runtime_pollWait+0x5f		/Users/xiongchuanhong/goproject/src/go/src/runtime/netpoll.go:303
#	0x102b6e84f	internal/poll.(*pollDesc).wait+0x8f		/Users/xiongchuanhong/goproject/src/go/src/internal/poll/fd_poll_runtime.go:84

......
goroutine profile 表明了這個profile的型別。
total 6 代表此時一共有6個協程。
接著是下面一行,1 代表了在這個堆疊上,只有一個協程在執行。但其實在計算出數位1時,並不僅僅按堆疊去做區分,還依據了協程labels值,也就是 協程的堆疊和lebels標籤值 共同構成了一個key,而數位1就是在遍歷所有協程資訊時,對相同key進行累加計數得來的。
我們可以通過下面的方式為協程設定labels。
pprof.SetGoroutineLabels(pprof.WithLabels(context.Background(), pprof.Labels("name", "lanpangzi", "age", "18")))
通過上述程式碼,我可以為當前協程設定了兩個標籤值,分別是name和age,設定label值之後,再來看debug=1後的網頁輸出,可以發現 設定的labels出現了。
1 @ 0x104f86c60 0x104fb7358 0x105236368 0x104f867ec 0x104fba024
# labels: {"age":"18", "name":"lanpangzi"}
#	0x104fb7357	time.Sleep+0x137	/Users/xiongchuanhong/goproject/src/go/src/runtime/time.go:193
#	0x105236367	main.main+0x437		/Users/xiongchuanhong/goproject/src/go/main/main.go:46
#	0x104f867eb	runtime.main+0x25b	/Users/xiongchuanhong/goproject/src/go/src/runtime/proc.go:255
而數位1之後,就是協程正在執行的堆疊資訊了。至此,goroutine指標的輸出資訊介紹完畢。
threadcreate 輸出資訊介紹
介紹完goroutine指標的輸出資訊後,再來看看threadcreate 執行緒建立指標的 輸出資訊。

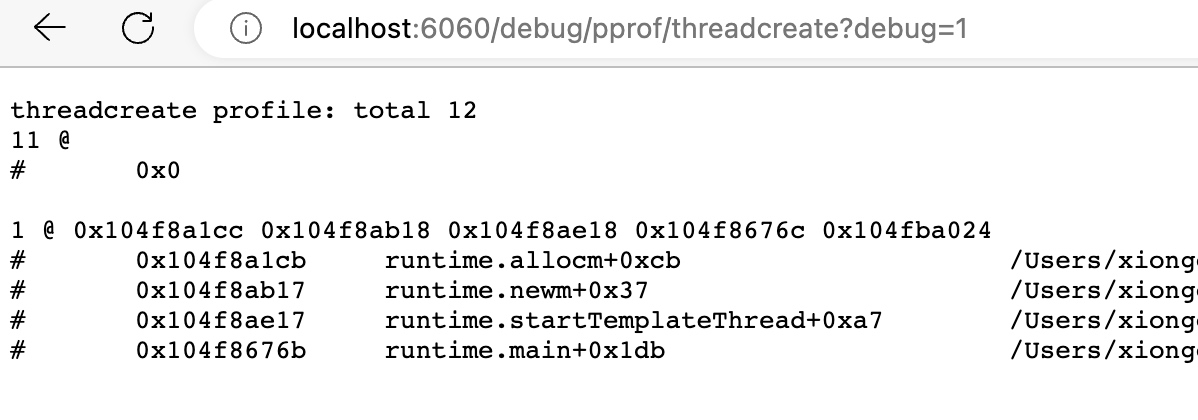
老規矩,先看位址列,debug=1代表 輸出的是文字可讀的資訊,threadcreate 就沒有debug=2的特別輸出了,debug=0時 同樣也會下載一個可供go tool pprof分析的二進位制檔案。
接著threadcreate pfofile表明了profile的型別, total 12 代表了此時總共有12個執行緒被建立,然後緊接著是11 代表了在這個總共有11個執行緒是在這個堆疊的程式碼段上被建立的,注意這裡後面沒有堆疊內容,說明runtime在建立執行緒時,並沒有把此時的堆疊記錄下來,原因有可能是 這個執行緒是runtime自己使用的,堆疊沒有必要展示給使用者,所以乾脆不記錄了,具體原因這裡就不深入研究了。
下面輸出的內容可以看到在main方法裡面建立了一個執行緒,runtime.newm 方法內部,runtime會啟動一個系統執行緒。
threadcreate 輸出內容比較簡單,沒有過多可以講的。
程式程式碼暴露指標資訊
看完了http介面暴露著兩類指標的方式,我們再來看看如何通過程式碼來暴露他們。
還記得在golang pprof監控系列(2) —— memory,block,mutex 使用 是如何通過程式程式碼 暴露memory block mutex 指標的嗎,goroutine 和 threadcreate 和他們一樣,也是通過pprof.Lookup方法進行暴露的。
os.Remove("goroutine.out")
	f, _ := os.Create("goroutine.out")
	defer f.Close()
	err := pprof.Lookup("goroutine").WriteTo(f, 1)
	if err != nil {
		log.Fatal(err)
	}

	....

	os.Remove("threadcreate.out")
	f, _ := os.Create("threadcreate.out")
	defer f.Close()
	err := pprof.Lookup("threadcreate").WriteTo(f, 1)
	if err != nil {
		log.Fatal(err)
	}
無非就是將pprof.Lookup的傳入的引數值改成對應的指標名即可。
接著我們來看看runtime內部是如何對這兩種型別的指標進行統計的,好的,正戲開始。
統計原理介紹
無論是 goroutine 還是threadcreate 的指標資訊的輸出,都是呼叫了同一個方法writeRuntimeProfile。 golang 原始碼版本 go1.17.12。
// src/runtime/pprof/pprof.go:708
func writeRuntimeProfile(w io.Writer, debug int, name string, fetch func([]runtime.StackRecord, []unsafe.Pointer) (int, bool)) error {
	var p []runtime.StackRecord
	var labels []unsafe.Pointer
	n, ok := fetch(nil, nil)
	for {
		p = make([]runtime.StackRecord, n+10)
		labels = make([]unsafe.Pointer, n+10)
		n, ok = fetch(p, labels)
		if ok {
			p = p[0:n]
			break
		}
	}
	return printCountProfile(w, debug, name, &runtimeProfile{p, labels})
}
讓我們來分析下這個函數,函數會傳遞一個fetch 方法,goroutine和threadcreate資訊在輸出時選擇了不同的fetch方法來獲取到各自的資訊。
為了對主幹程式碼有比較清晰的認識,先暫時不看fetch方法的具體實現,此時我們只需要知道,fetch方法可以將需要的指標資訊 獲取到,並且將資訊的堆疊存到變數名為p的堆疊型別的切片裡,然後將labels資訊,儲存到
變數名為labels的切片裡。
注意: 只有goroutine型別的指標才有labels資訊
獲取到了堆疊資訊,labels 資訊,接著就是要將這些資訊進行輸出了,進行輸出的函數是 上述原始碼裡的最後一行 中 的printCountProfile 函數。
printCountProfile 函數的邏輯比較簡單,我簡單概括下,輸出的時候會將 printCountProfile 引數中的堆疊資訊連同labels構成的結構體 進行遍歷, 堆疊資訊和labels資訊組合作為key,對相同key的內容進行累加計數。最後 printCountProfile 將根據debug的值的不同選擇不同的輸出方式,例如debug=0是二進位制檔案下載 方式 ,debug=1則是 網頁文字可讀方式進行輸出
至此,對goroutine和threadcreate 指標資訊的輸出過程應該有了解了,即通過fetch方法獲取到指標資訊,然後通過printCountProfile 方法對指標資訊進行輸出。
fetch 方法的具體實現,我們還沒有開始介紹,現在來看看,goroutine和threadcreate資訊在輸出時選擇了不同的fetch方法來獲取到各自的資訊。
原始碼如下:
// src/runtime/pprof/pprof.go:661
func writeThreadCreate(w io.Writer, debug int) error {
	return writeRuntimeProfile(w, debug, "threadcreate", func(p []runtime.StackRecord, _ []unsafe.Pointer) (n int, ok bool) {
		return runtime.ThreadCreateProfile(p)
	})
}

// src/runtime/pprof/pprof.go:680
func writeGoroutine(w io.Writer, debug int) error {
	if debug >= 2 {
		return writeGoroutineStacks(w)
	}
	return writeRuntimeProfile(w, debug, "goroutine", runtime_goroutineProfileWithLabels)
}
goroutine 指標資訊在輸出時,會選擇runtime_goroutineProfileWithLabels函數來獲取goroutine指標,而threadcreate 則會呼叫 runtime.ThreadCreateProfile(p) 去獲取threadcreate指標資訊。
goroutine fetch 函數實現
runtime_goroutineProfileWithLabels 方法的實現是由go:linkname 標籤連結過去的,實際底層實現的方法是 runtime_goroutineProfileWithLabels。
// src/runtime/mprof.go:744
//go:linkname runtime_goroutineProfileWithLabels runtime/pprof.runtime_goroutineProfileWithLabels
func runtime_goroutineProfileWithLabels(p []StackRecord, labels []unsafe.Pointer) (n int, ok bool) {
	return goroutineProfileWithLabels(p, labels)
}
goroutineProfileWithLabels 就是實際獲取goroutine堆疊和標籤的方法了。
我們往goroutineProfileWithLabels 傳遞了兩個陣列,分別用於儲存堆疊資訊,和labels資訊,而goroutineProfileWithLabels 則負責將兩個陣列填充上對應的資訊。
goroutineProfileWithLabels 的邏輯也比較容易,我這裡僅僅簡單概括下,其內部會通過一個全域性變數allgptr 去遍歷所有的協程,allgptr 儲存了程式中所有的協程的地址, 而協程的結構體g內部,有一個叫做label的屬性,這個值就代表協程的標籤值,在遍歷協程時,通過該屬性便可以獲取到標籤值了。
threadcreate fetch 函數實現
runtime.ThreadCreateProfile 是 獲取threadcreate 指標的方法。
原始碼如下:
func ThreadCreateProfile(p []StackRecord) (n int, ok bool) {
	first := (*m)(atomic.Loadp(unsafe.Pointer(&allm)))
	for mp := first; mp != nil; mp = mp.alllink {
		n++
	}
	if n <= len(p) {
		ok = true
		i := 0
		for mp := first; mp != nil; mp = mp.alllink {
			p[i].Stack0 = mp.createstack
			i++
		}
	}
	return
}
首先是獲取到allm變數的地址,allm是一個全域性變數,它其實是 儲存所有m連結串列 的表頭元素。
// src/runtime/runtime2.go:1092
var (
	allm       *m
	.....
在golang裡,每建立一個m結構便會在底層建立一個系統執行緒,所以你可以簡單的認為m就是代表了一個執行緒。可以之後深入瞭解下gpm模型。
for mp := first; mp != nil; mp = mp.alllink {
			p[i].Stack0 = mp.createstack
			i++
		}
然後 ThreadCreateProfile 裡 這段邏輯就是遍歷了整個m連結串列,將m結構體儲存的堆疊資訊賦值給 引數p,p則是我們需要填充的堆疊資訊陣列,在m結構體裡,alllink是一個指向連結串列下一個元素的指標,每次新建立m時,會將新m插入到表頭位置,然後更新allm變數。
總結
至此,goroutine 和threadcreate的使用和原理都介紹完了,他們比起之前的memory,block之類的統計相對來說比較簡單,簡而言之就是遍歷一個全域性變數allgptr或者allm ,遍歷時獲取到協程或者執行緒的堆疊資訊和labels資訊,然後將這些資訊進行輸出即可。