器學習演演算法(六)基於天氣資料集的XGBoost分類預測
1.機器學習演演算法(六)基於天氣資料集的XGBoost分類預測
1.1 XGBoost的介紹與應用
XGBoost是2016年由華盛頓大學陳天奇老師帶領開發的一個可延伸機器學習系統。嚴格意義上講XGBoost並不是一種模型,而是一個可供使用者輕鬆解決分類、迴歸或排序問題的軟體包。它內部實現了梯度提升樹(GBDT)模型,並對模型中的演演算法進行了諸多優化,在取得高精度的同時又保持了極快的速度,在一段時間內成為了國內外資料探勘、機器學習領域中的大規模殺傷性武器。
更重要的是,XGBoost在系統優化和機器學習原理方面都進行了深入的考慮。毫不誇張的講,XGBoost提供的可延伸性,可移植性與準確性推動了機器學習計算限制的上限,該系統在單臺機器上執行速度比當時流行解決方案快十倍以上,甚至在分散式系統中可以處理十億級的資料。
XGBoost在機器學習與資料探勘領域有著極為廣泛的應用。據統計在2015年Kaggle平臺上29個獲獎方案中,17只隊伍使用了XGBoost;在2015年KDD-Cup中,前十名的隊伍均使用了XGBoost,且整合其他模型比不上調節XGBoost的引數所帶來的提升。這些實實在在的例子都表明,XGBoost在各種問題上都可以取得非常好的效果。
同時,XGBoost還被成功應用在工業界與學術界的各種問題中。例如商店銷售額預測、高能物理事件分類、web文字分類;使用者行為預測、運動檢測、廣告點選率預測、惡意軟體分類、災害風險預測、線上課程退學率預測。雖然領域相關的資料分析和特性工程在這些解決方案中也發揮了重要作用,但學習者與實踐者對XGBoost的一致選擇表明了這一軟體包的影響力與重要性。
1.2 原理介紹
XGBoost底層實現了GBDT演演算法,並對GBDT演演算法做了一系列優化:
- 對目標函數進行了泰勒展示的二階展開,可以更加高效擬合誤差。
- 提出了一種估計分裂點的演演算法加速CART樹的構建過程,同時可以處理稀疏資料。
- 提出了一種樹的並行策略加速迭代。
- 為模型的分散式演演算法進行了底層優化。
XGBoost是基於CART樹的整合模型,它的思想是串聯多個決策樹模型共同進行決策。
那麼如何串聯呢?XGBoost採用迭代預測誤差的方法串聯。舉個通俗的例子,我們現在需要預測一輛車價值3000元。我們構建決策樹1訓練後預測為2600元,我們發現有400元的誤差,那麼決策樹2的訓練目標為400元,但決策樹2的預測結果為350元,還存在50元的誤差就交給第三棵樹……以此類推,每一顆樹用來估計之前所有樹的誤差,最後所有樹預測結果的求和就是最終預測結果!
XGBoost的基模型是CART迴歸樹,它有兩個特點:(1)CART樹,是一顆二元樹。(2)迴歸樹,最後擬合結果是連續值。
XGBoost模型可以表示為以下形式,我們約定$f_t(x)$表示前$t$顆樹的和,$h_t(x)$表示第$t$顆決策樹,模型定義如下:
$f_{t}(x)=\sum_{t=1}^{T} h_{t}(x)$
由於模型遞迴生成,第$t$步的模型由第$t-1$步的模型形成,可以寫成:
$f_{t}(x)=f_{t-1}(x)+h_{t}(x)$
每次需要加上的樹$h_t(x)$是之前樹求和的誤差:
$r_{t, i}=y_{i}-f_{m-1}\left(x_{i}\right)$
我們每一步只要擬合一顆輸出為$r_{t,i}$的CART樹加到$f_{t-1}(x)$就可以了。
1.3 相關流程
- 瞭解 XGBoost 的引數與相關知識
- 掌握 XGBoost 的Python呼叫並將其運用到天氣資料集預測
Part1 基於天氣資料集的XGBoost分類實踐
- Step1: 庫函數匯入
- Step2: 資料讀取/載入
- Step3: 資料資訊簡單檢視
- Step4: 視覺化描述
- Step5: 對離散變數進行編碼
- Step6: 利用 XGBoost 進行訓練與預測
- Step7: 利用 XGBoost 進行特徵選擇
- Step8: 通過調整引數獲得更好的效果
3.基於天氣資料集的XGBoost分類實戰
3.1 EDA探索性分析
在實踐的最開始,我們首先需要匯入一些基礎的函數庫包括:numpy (Python進行科學計算的基礎軟體包),pandas(pandas是一種快速,強大,靈活且易於使用的開源資料分析和處理工具),matplotlib和seaborn繪圖。
#匯入需要用到的資料集
!wget https://tianchi-media.oss-cn-beijing.aliyuncs.com/DSW/7XGBoost/train.csv
--2023-03-22 17:33:53--  https://tianchi-media.oss-cn-beijing.aliyuncs.com/DSW/7XGBoost/train.csv
正在解析主機 tianchi-media.oss-cn-beijing.aliyuncs.com (tianchi-media.oss-cn-beijing.aliyuncs.com)... 49.7.22.39
正在連線 tianchi-media.oss-cn-beijing.aliyuncs.com (tianchi-media.oss-cn-beijing.aliyuncs.com)|49.7.22.39|:443... 已連線。
已發出 HTTP 請求,正在等待迴應... 200 OK
長度: 11476379 (11M) [text/csv]
正在儲存至: 「train.csv.2」

train.csv.2         100%[===================>]  10.94M  8.82MB/s    in 1.2s

2023-03-22 17:33:55 (8.82 MB/s) - 已儲存 「train.csv.2」 [11476379/11476379])
Step1:函數庫匯入
##  基礎函數庫
import numpy as np
import pandas as pd

## 繪圖函數庫
import matplotlib.pyplot as plt
import seaborn as sns
本次我們選擇天氣資料集進行方法的嘗試訓練,現在有一些由氣象站提供的每日降雨資料,我們需要根據歷史降雨資料來預測明天會下雨的概率。樣例涉及到的測試集資料test.csv與train.csv的格式完全相同,但其RainTomorrow未給出,為預測變數。
資料的各個特徵描述如下:
| 特徵名稱 | 意義 | 取值範圍 |
|---|---|---|
| Date | 日期 | 字串 |
| Location | 氣象站的地址 | 字串 |
| MinTemp | 最低溫度 | 實數 |
| MaxTemp | 最高溫度 | 實數 |
| Rainfall | 降雨量 | 實數 |
| Evaporation | 蒸發量 | 實數 |
| Sunshine | 光照時間 | 實數 |
| WindGustDir | 最強的風的方向 | 字串 |
| WindGustSpeed | 最強的風的速度 | 實數 |
| WindDir9am | 早上9點的風向 | 字串 |
| WindDir3pm | 下午3點的風向 | 字串 |
| WindSpeed9am | 早上9點的風速 | 實數 |
| WindSpeed3pm | 下午3點的風速 | 實數 |
| Humidity9am | 早上9點的溼度 | 實數 |
| Humidity3pm | 下午3點的溼度 | 實數 |
| Pressure9am | 早上9點的大氣壓 | 實數 |
| Pressure3pm | 早上3點的大氣壓 | 實數 |
| Cloud9am | 早上9點的雲指數 | 實數 |
| Cloud3pm | 早上3點的雲指數 | 實數 |
| Temp9am | 早上9點的溫度 | 實數 |
| Temp3pm | 早上3點的溫度 | 實數 |
| RainToday | 今天是否下雨 | No,Yes |
| RainTomorrow | 明天是否下雨 | No,Yes |
Step2:資料讀取/載入
## 我們利用Pandas自帶的read_csv函數讀取並轉化為DataFrame格式

data = pd.read_csv('train.csv')
Step3:資料資訊簡單檢視
## 利用.info()檢視資料的整體資訊
data.info()
<class 'pandas.core.frame.DataFrame'>
RangeIndex: 106644 entries, 0 to 106643
Data columns (total 23 columns):
 #   Column         Non-Null Count   Dtype
---  ------         --------------   -----
 0   Date           106644 non-null  object
 1   Location       106644 non-null  object
 2   MinTemp        106183 non-null  float64
 3   MaxTemp        106413 non-null  float64
 4   Rainfall       105610 non-null  float64
 5   Evaporation    60974 non-null   float64
 6   Sunshine       55718 non-null   float64
 7   WindGustDir    99660 non-null   object
 8   WindGustSpeed  99702 non-null   float64
 9   WindDir9am     99166 non-null   object
 10  WindDir3pm     103788 non-null  object
 11  WindSpeed9am   105643 non-null  float64
 12  WindSpeed3pm   104653 non-null  float64
 13  Humidity9am    105327 non-null  float64
 14  Humidity3pm    103932 non-null  float64
 15  Pressure9am    96107 non-null   float64
 16  Pressure3pm    96123 non-null   float64
 17  Cloud9am       66303 non-null   float64
 18  Cloud3pm       63691 non-null   float64
 19  Temp9am        105983 non-null  float64
 20  Temp3pm        104599 non-null  float64
 21  RainToday      105610 non-null  object
 22  RainTomorrow   106644 non-null  object
dtypes: float64(16), object(7)
memory usage: 18.7+ MB
## 進行簡單的資料檢視,我們可以利用 .head() 頭部.tail()尾部
data.head()
| Date | Location | MinTemp | MaxTemp | Rainfall | Evaporation | Sunshine | WindGustDir | WindGustSpeed | WindDir9am | ... | Humidity9am | Humidity3pm | Pressure9am | Pressure3pm | Cloud9am | Cloud3pm | Temp9am | Temp3pm | RainToday | RainTomorrow | |
|---|---|---|---|---|---|---|---|---|---|---|---|---|---|---|---|---|---|---|---|---|---|
| 0 | 2012/1/19 | MountGinini | 12.1 | 23.1 | 0.0 | NaN | NaN | W | 30.0 | N | ... | 60.0 | 54.0 | NaN | NaN | NaN | NaN | 17.0 | 22.0 | No | No |
| 1 | 2015/4/13 | Nhil | 10.2 | 24.7 | 0.0 | NaN | NaN | E | 39.0 | E | ... | 63.0 | 33.0 | 1021.9 | 1017.9 | NaN | NaN | 12.5 | 23.7 | No | Yes |
| 2 | 2010/8/5 | Nuriootpa | -0.4 | 11.0 | 3.6 | 0.4 | 1.6 | W | 28.0 | N | ... | 97.0 | 78.0 | 1025.9 | 1025.3 | 7.0 | 8.0 | 3.9 | 9.0 | Yes | No |
| 3 | 2013/3/18 | Adelaide | 13.2 | 22.6 | 0.0 | 15.4 | 11.0 | SE | 44.0 | E | ... | 47.0 | 34.0 | 1025.0 | 1022.2 | NaN | NaN | 15.2 | 21.7 | No | No |
| 4 | 2011/2/16 | Sale | 14.1 | 28.6 | 0.0 | 6.6 | 6.7 | E | 28.0 | NE | ... | 92.0 | 42.0 | 1018.0 | 1014.1 | 4.0 | 7.0 | 19.1 | 28.2 | No | No |
5 rows × 23 columns
這裡我們發現資料集中存在NaN,一般的我們認為NaN在資料集中代表了缺失值,可能是資料採集或處理時產生的一種錯誤。這裡我們採用-1將缺失值進行填補,還有其他例如「中位數填補、平均數填補」的缺失值處理方法有興趣的同學也可以嘗試。
data = data.fillna(-1)
data.tail()
| Date | Location | MinTemp | MaxTemp | Rainfall | Evaporation | Sunshine | WindGustDir | WindGustSpeed | WindDir9am | ... | Humidity9am | Humidity3pm | Pressure9am | Pressure3pm | Cloud9am | Cloud3pm | Temp9am | Temp3pm | RainToday | RainTomorrow | |
|---|---|---|---|---|---|---|---|---|---|---|---|---|---|---|---|---|---|---|---|---|---|
| 106639 | 2011/5/23 | Launceston | 10.1 | 16.1 | 15.8 | -1.0 | -1.0 | SE | 31.0 | NNW | ... | 99.0 | 86.0 | 999.2 | 995.2 | -1.0 | -1.0 | 13.0 | 15.6 | Yes | Yes |
| 106640 | 2014/12/9 | GoldCoast | 19.3 | 31.7 | 36.0 | -1.0 | -1.0 | SE | 80.0 | NNW | ... | 75.0 | 76.0 | 1013.8 | 1010.0 | -1.0 | -1.0 | 26.0 | 25.8 | Yes | Yes |
| 106641 | 2014/10/7 | Wollongong | 17.5 | 22.2 | 1.2 | -1.0 | -1.0 | WNW | 65.0 | WNW | ... | 61.0 | 56.0 | 1008.2 | 1008.2 | -1.0 | -1.0 | 17.8 | 21.4 | Yes | No |
| 106642 | 2012/1/16 | Newcastle | 17.6 | 27.0 | 3.0 | -1.0 | -1.0 | -1 | -1.0 | NE | ... | 68.0 | 88.0 | -1.0 | -1.0 | 6.0 | 5.0 | 22.6 | 26.4 | Yes | No |
| 106643 | 2014/10/21 | AliceSprings | 16.3 | 37.9 | 0.0 | 14.2 | 12.2 | ESE | 41.0 | NNE | ... | 8.0 | 6.0 | 1017.9 | 1014.0 | 0.0 | 1.0 | 32.2 | 35.7 | No | No |
5 rows × 23 columns
## 利用value_counts函數檢視訓練集標籤的數量
pd.Series(data['RainTomorrow']).value_counts()
No     82786
Yes    23858
Name: RainTomorrow, dtype: int64
我們發現資料集中的負樣本數量遠大於正樣本數量,這種常見的問題叫做「資料不平衡」問題,在某些情況下需要進行一些特殊處理。
## 對於特徵進行一些統計描述
data.describe()
| MinTemp | MaxTemp | Rainfall | Evaporation | Sunshine | WindGustSpeed | WindSpeed9am | WindSpeed3pm | Humidity9am | Humidity3pm | Pressure9am | Pressure3pm | Cloud9am | Cloud3pm | Temp9am | Temp3pm | |
|---|---|---|---|---|---|---|---|---|---|---|---|---|---|---|---|---|
| count | 106644.000000 | 106644.000000 | 106644.000000 | 106644.000000 | 106644.000000 | 106644.000000 | 106644.000000 | 106644.000000 | 106644.000000 | 106644.000000 | 106644.000000 | 106644.000000 | 106644.000000 | 106644.000000 | 106644.000000 | 106644.000000 |
| mean | 12.129147 | 23.183398 | 2.313912 | 2.704798 | 3.509008 | 37.305137 | 13.852200 | 18.265378 | 67.940353 | 50.104657 | 917.003689 | 914.995385 | 2.381231 | 2.285670 | 16.877842 | 21.257600 |
| std | 6.444358 | 7.208596 | 8.379145 | 4.519172 | 5.105696 | 16.585310 | 8.949659 | 9.118835 | 20.481579 | 22.136917 | 304.042528 | 303.120731 | 3.483751 | 3.419658 | 6.629811 | 7.549532 |
| min | -8.500000 | -4.800000 | -1.000000 | -1.000000 | -1.000000 | -1.000000 | -1.000000 | -1.000000 | -1.000000 | -1.000000 | -1.000000 | -1.000000 | -1.000000 | -1.000000 | -7.200000 | -5.400000 |
| 25% | 7.500000 | 17.900000 | 0.000000 | -1.000000 | -1.000000 | 30.000000 | 7.000000 | 11.000000 | 56.000000 | 35.000000 | 1011.000000 | 1008.500000 | -1.000000 | -1.000000 | 12.200000 | 16.300000 |
| 50% | 12.000000 | 22.600000 | 0.000000 | 1.600000 | 0.200000 | 37.000000 | 13.000000 | 17.000000 | 70.000000 | 51.000000 | 1016.700000 | 1014.200000 | 1.000000 | 1.000000 | 16.700000 | 20.900000 |
| 75% | 16.800000 | 28.300000 | 0.600000 | 5.400000 | 8.700000 | 46.000000 | 19.000000 | 24.000000 | 83.000000 | 65.000000 | 1021.800000 | 1019.400000 | 6.000000 | 6.000000 | 21.500000 | 26.300000 |
| max | 31.900000 | 48.100000 | 268.600000 | 145.000000 | 14.500000 | 135.000000 | 130.000000 | 87.000000 | 100.000000 | 100.000000 | 1041.000000 | 1039.600000 | 9.000000 | 9.000000 | 39.400000 | 46.200000 |
Step4:視覺化描述
為了方便,我們先紀錄數位特徵與非數位特徵:
numerical_features = [x for x in data.columns if data[x].dtype == np.float]
category_features = [x for x in data.columns if data[x].dtype != np.float and x != 'RainTomorrow']
## 選取三個特徵與標籤組合的散點視覺化
sns.pairplot(data=data[['Rainfall',
'Evaporation',
'Sunshine'] + ['RainTomorrow']], diag_kind='hist', hue= 'RainTomorrow')
plt.show()
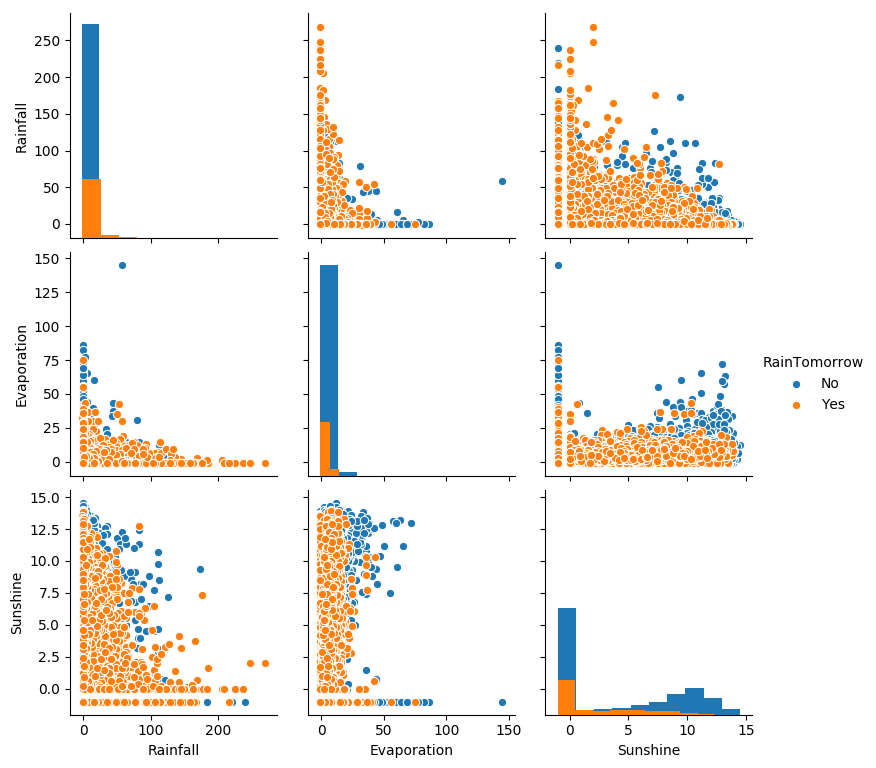
從上圖可以發現,在2D情況下不同的特徵組合對於第二天下雨與不下雨的散點分佈,以及大概的區分能力。相對的Sunshine與其他特徵的組合更具有區分能力
for col in data[numerical_features].columns:
    if col != 'RainTomorrow':
        sns.boxplot(x='RainTomorrow', y=col, saturation=0.5, palette='pastel', data=data)
        plt.title(col)
        plt.show()
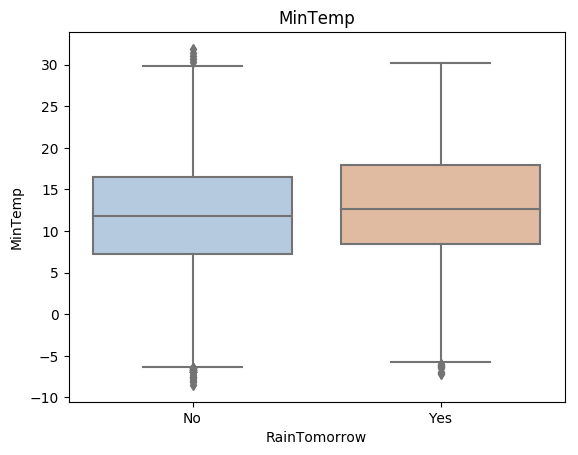

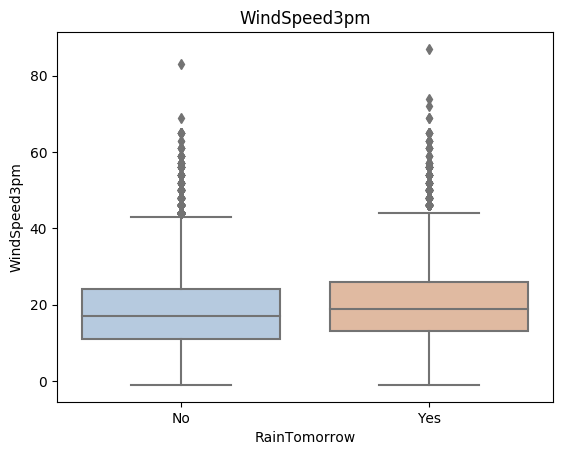
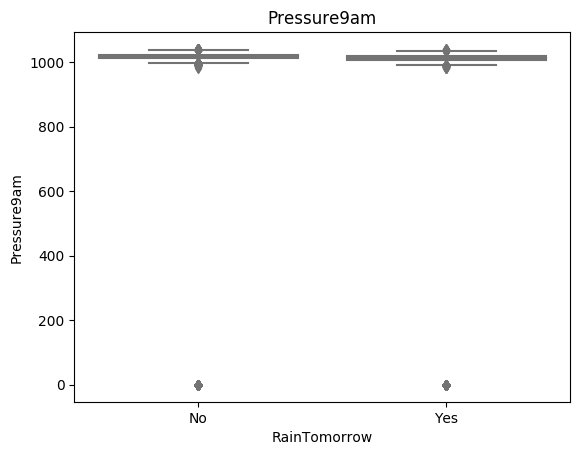
利用箱型圖我們也可以得到不同類別在不同特徵上的分佈差異情況。我們可以發現Sunshine,Humidity3pm,Cloud9am,Cloud3pm的區分能力較強
tlog = {}
for i in category_features:
    tlog[i] = data[data['RainTomorrow'] == 'Yes'][i].value_counts()
flog = {}
for i in category_features:
    flog[i] = data[data['RainTomorrow'] == 'No'][i].value_counts()
plt.figure(figsize=(10,10))
plt.subplot(1,2,1)
plt.title('RainTomorrow')
sns.barplot(x = pd.DataFrame(tlog['Location']).sort_index()['Location'], y = pd.DataFrame(tlog['Location']).sort_index().index, color = "red")
plt.subplot(1,2,2)
plt.title('Not RainTomorrow')
sns.barplot(x = pd.DataFrame(flog['Location']).sort_index()['Location'], y = pd.DataFrame(flog['Location']).sort_index().index, color = "blue")
plt.show()

從上圖可以發現不同地區降雨情況差別很大,有些地方明顯更容易降雨
plt.figure(figsize=(10,2))
plt.subplot(1,2,1)
plt.title('RainTomorrow')
sns.barplot(x = pd.DataFrame(tlog['RainToday'][:2]).sort_index()['RainToday'], y = pd.DataFrame(tlog['RainToday'][:2]).sort_index().index, color = "red")
plt.subplot(1,2,2)
plt.title('Not RainTomorrow')
sns.barplot(x = pd.DataFrame(flog['RainToday'][:2]).sort_index()['RainToday'], y = pd.DataFrame(flog['RainToday'][:2]).sort_index().index, color = "blue")
plt.show()

上圖我們可以發現,今天下雨明天不一定下雨,但今天不下雨,第二天大概率也不下雨。
3.2 特徵向量編碼
Step5:對離散變數進行編碼
由於XGBoost無法處理字串型別的資料,我們需要一些方法講字串資料轉化為資料。一種最簡單的方法是把所有的相同類別的特徵編碼成同一個值,例如女=0,男=1,狗狗=2,所以最後編碼的特徵值是在$[0, 特徵數量-1]$之間的整數。除此之外,還有獨熱編碼、求和編碼、留一法編碼等等方法可以獲得更好的效果。
## 把所有的相同類別的特徵編碼為同一個值
def get_mapfunction(x):
    mapp = dict(zip(x.unique().tolist(),
         range(len(x.unique().tolist()))))
    def mapfunction(y):
        if y in mapp:
            return mapp[y]
        else:
            return -1
    return mapfunction
for i in category_features:
    data[i] = data[i].apply(get_mapfunction(data[i]))
## 編碼後的字串特徵變成了數位

data['Location'].unique()
array([ 0,  1,  2,  3,  4,  5,  6,  7,  8,  9, 10, 11, 12, 13, 14, 15, 16,
       17, 18, 19, 20, 21, 22, 23, 24, 25, 26, 27, 28, 29, 30, 31, 32, 33,
       34, 35, 36, 37, 38, 39, 40, 41, 42, 43, 44, 45, 46, 47, 48])
3.3 模型訓練預測
Step6:利用 XGBoost 進行訓練與預測
## 為了正確評估模型效能,將資料劃分為訓練集和測試集,並在訓練集上訓練模型,在測試集上驗證模型效能。
from sklearn.model_selection import train_test_split

## 選擇其類別為0和1的樣本 (不包括類別為2的樣本)
data_target_part = data['RainTomorrow']
data_features_part = data[[x for x in data.columns if x != 'RainTomorrow']]

## 測試集大小為20%, 80%/20%分
x_train, x_test, y_train, y_test = train_test_split(data_features_part, data_target_part, test_size = 0.2, random_state = 2020)
#檢視標籤資料
print(y_train[0:2],y_test[0:2])

# 替換Yes為1,No為0
y_train = y_train.replace({'Yes': 1, 'No': 0})
y_test  = y_test.replace({'Yes': 1, 'No': 0})

# 列印修改後的結果
print(y_train[0:2],y_test[0:2])
98173    No
33154    No
Name: RainTomorrow, dtype: object 10273    Yes
90769     No
Name: RainTomorrow, dtype: object
98173    0
33154    0
Name: RainTomorrow, dtype: int64 10273    1
90769    0
Name: RainTomorrow, dtype: int64
The label for xgboost must consist of integer labels of the form 0, 1, 2, ..., [num_class - 1]. This means that the labels must be sequential integers starting from 0 up to the total number of classes minus 1. For example, if there are 3 classes, the labels should be 0, 1, and 2. If the labels are not in this format, xgboost may not be able to train the model properly.
## 匯入XGBoost模型
from xgboost.sklearn import XGBClassifier
## 定義 XGBoost模型
clf = XGBClassifier(use_label_encoder=False)
# 在訓練集上訓練XGBoost模型
clf.fit(x_train, y_train)

#https://cloud.tencent.com/developer/ask/sof/913362/answer/1303557
[17:34:10] WARNING: ../src/learner.cc:1061: Starting in XGBoost 1.3.0, the default evaluation metric used with the objective 'binary:logistic' was changed from 'error' to 'logloss'. Explicitly set eval_metric if you'd like to restore the old behavior.


XGBClassifier(base_score=0.5, booster='gbtree', colsample_bylevel=1,
              colsample_bynode=1, colsample_bytree=1, gamma=0, gpu_id=-1,
              importance_type='gain', interaction_constraints='',
              learning_rate=0.300000012, max_delta_step=0, max_depth=6,
              min_child_weight=1, missing=nan, monotone_constraints='()',
              n_estimators=100, n_jobs=24, num_parallel_tree=1, random_state=0,
              reg_alpha=0, reg_lambda=1, scale_pos_weight=1, subsample=1,
              tree_method='exact', use_label_encoder=False,
              validate_parameters=1, verbosity=None)
## 在訓練集和測試集上分佈利用訓練好的模型進行預測
train_predict = clf.predict(x_train)
test_predict = clf.predict(x_test)
from sklearn import metrics

## 利用accuracy(準確度)【預測正確的樣本數目佔總預測樣本數目的比例】評估模型效果
print('The accuracy of the Logistic Regression is:',metrics.accuracy_score(y_train,train_predict))
print('The accuracy of the Logistic Regression is:',metrics.accuracy_score(y_test,test_predict))

## 檢視混淆矩陣 (預測值和真實值的各類情況統計矩陣)
confusion_matrix_result = metrics.confusion_matrix(test_predict,y_test)
print('The confusion matrix result:\n',confusion_matrix_result)

# 利用熱力圖對於結果進行視覺化
plt.figure(figsize=(8, 6))
sns.heatmap(confusion_matrix_result, annot=True, cmap='Blues')
plt.xlabel('Predicted labels')
plt.ylabel('True labels')
plt.show()
The accuracy of the Logistic Regression is: 0.8982476703979371
The accuracy of the Logistic Regression is: 0.8575179333302076
The confusion matrix result:
 [[15656  2142]
 [  897  2634]]
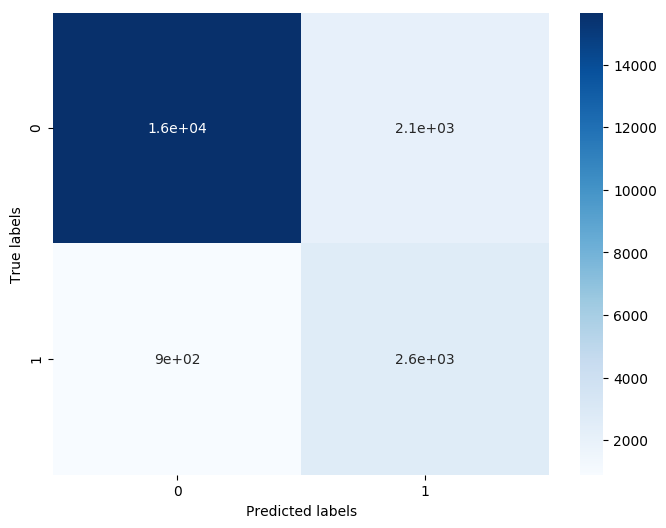
我們可以發現共有15759 + 2306個樣本預測正確,2470 + 794個樣本預測錯誤。
3.3.1 特徵選擇
Step7: 利用 XGBoost 進行特徵選擇
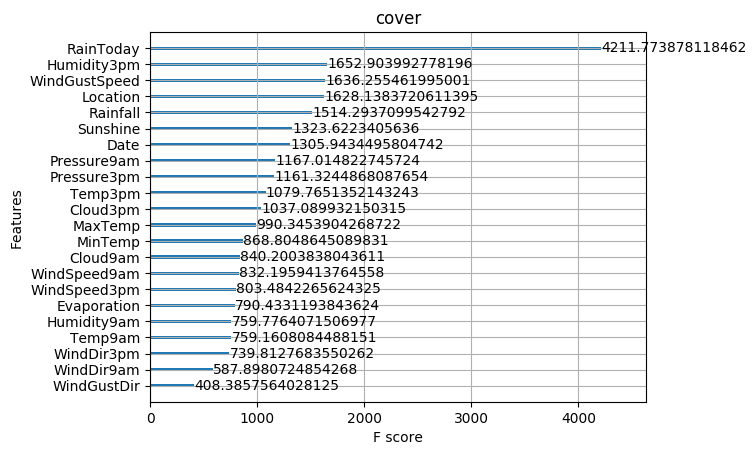
XGBoost的特徵選擇屬於特徵選擇中的嵌入式方法,在XGboost中可以用屬性feature_importances_去檢視特徵的重要度。
? sns.barplot
sns.barplot(y=data_features_part.columns, x=clf.feature_importances_)
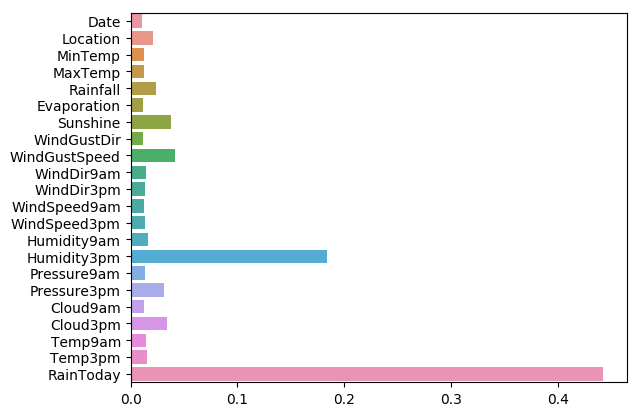
從圖中我們可以發現下午3點的溼度與今天是否下雨是決定第二天是否下雨最重要的因素
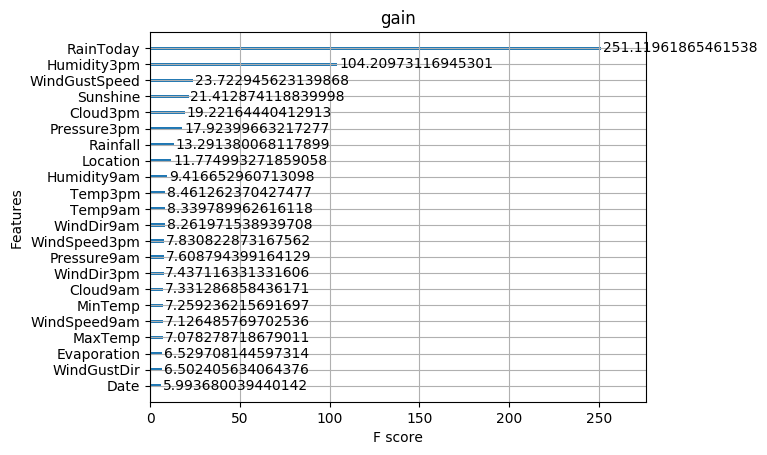
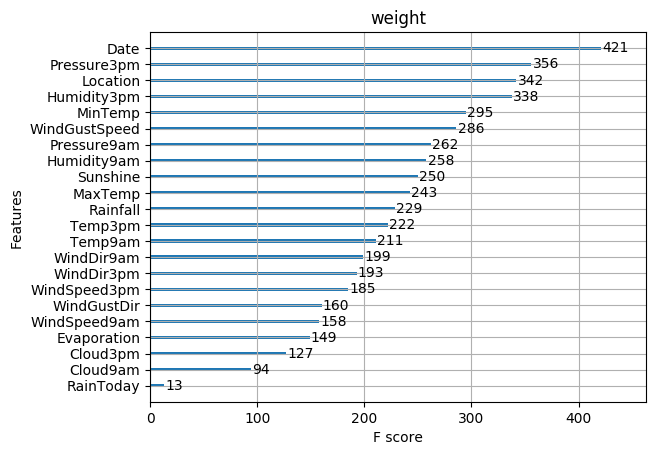
初次之外,我們還可以使用XGBoost中的下列重要屬性來評估特徵的重要性。
- weight:是以特徵用到的次數來評價
- gain:當利用特徵做劃分的時候的評價基尼指數
- cover:利用一個覆蓋樣本的指標二階導數(具體原理不清楚有待探究)平均值來劃分。
- total_gain:總基尼指數
- total_cover:總覆蓋
from sklearn.metrics import accuracy_score
from xgboost import plot_importance

def estimate(model,data):

    #sns.barplot(data.columns,model.feature_importances_)
    ax1=plot_importance(model,importance_type="gain")
    ax1.set_title('gain')
    ax2=plot_importance(model, importance_type="weight")
    ax2.set_title('weight')
    ax3 = plot_importance(model, importance_type="cover")
    ax3.set_title('cover')
    plt.show()
def classes(data,label,test):
    model=XGBClassifier()
    model.fit(data,label)
    ans=model.predict(test)
    estimate(model, data)
    return ans

ans=classes(x_train,y_train,x_test)
pre=accuracy_score(y_test, ans)
print('acc=',accuracy_score(y_test,ans))
/opt/conda/envs/python35-paddle120-env/lib/python3.7/site-packages/xgboost/sklearn.py:888: UserWarning: The use of label encoder in XGBClassifier is deprecated and will be removed in a future release. To remove this warning, do the following: 1) Pass option use_label_encoder=False when constructing XGBClassifier object; and 2) Encode your labels (y) as integers starting with 0, i.e. 0, 1, 2, ..., [num_class - 1].
  warnings.warn(label_encoder_deprecation_msg, UserWarning)


[17:34:28] WARNING: ../src/learner.cc:1061: Starting in XGBoost 1.3.0, the default evaluation metric used with the objective 'binary:logistic' was changed from 'error' to 'logloss'. Explicitly set eval_metric if you'd like to restore the old behavior.
acc= 0.8575179333302076
這些圖同樣可以幫助我們更好的瞭解其他重要特徵。
Step8: 通過調整引數獲得更好的效果
XGBoost中包括但不限於下列對模型影響較大的引數:
1. learning_rate: 有時也叫作eta,系統預設值為0.3。每一步迭代的步長,很重要。太大了執行準確率不高,太小了執行速度慢。
2. subsample:系統預設為1。這個引數控制對於每棵樹,隨機取樣的比例。減小這個引數的值,演演算法會更加保守,避免過擬合, 取值範圍零到一。
3. colsample_bytree:系統預設值為1。我們一般設定成0.8左右。用來控制每棵隨機取樣的列數的佔比(每一列是一個特徵)。
4. max_depth: 系統預設值為6,我們常用3-10之間的數位。這個值為樹的最大深度。這個值是用來控制過擬合的。max_depth越大,模型學習的更加具體。
3.3.2 核心引數調優
1.eta[預設0.3]
通過為每一顆樹增加權重,提高模型的魯棒性。
典型值為0.01-0.2。
2.min_child_weight[預設1]
決定最小葉子節點樣本權重和。
這個引數可以避免過擬合。當它的值較大時,可以避免模型學習到區域性的特殊樣本。
但是如果這個值過高,則會導致模型擬合不充分。
3.max_depth[預設6]
這個值也是用來避免過擬合的。max_depth越大,模型會學到更具體更區域性的樣本。
典型值:3-10
4.max_leaf_nodes
樹上最大的節點或葉子的數量。
可以替代max_depth的作用。
這個引數的定義會導致忽略max_depth引數。
5.gamma[預設0]
在節點分裂時,只有分裂後損失函數的值下降了,才會分裂這個節點。Gamma指定了節點分裂所需的最小損失函數下降值。
這個引數的值越大,演演算法越保守。這個引數的值和損失函數息息相關。
6.max_delta_step[預設0]
這引數限制每棵樹權重改變的最大步長。如果這個引數的值為0,那就意味著沒有約束。如果它被賦予了某個正值,那麼它會讓這個演演算法更加保守。
但是當各類別的樣本十分不平衡時,它對分類問題是很有幫助的。
7.subsample[預設1]
這個引數控制對於每棵樹,隨機取樣的比例。
減小這個引數的值,演演算法會更加保守,避免過擬合。但是,如果這個值設定得過小,它可能會導致欠擬合。
典型值:0.5-1
8.colsample_bytree[預設1]
用來控制每棵隨機取樣的列數的佔比(每一列是一個特徵)。
典型值:0.5-1
9.colsample_bylevel[預設1]
用來控制樹的每一級的每一次分裂,對列數的取樣的佔比。
subsample引數和colsample_bytree引數可以起到相同的作用,一般用不到。
10.lambda[預設1]
權重的L2正則化項。(和Ridge regression類似)。
這個引數是用來控制XGBoost的正則化部分的。雖然大部分資料科學家很少用到這個引數,但是這個引數在減少過擬合上還是可以挖掘出更多用處的。
11.alpha[預設1]
權重的L1正則化項。(和Lasso regression類似)。
可以應用在很高維度的情況下,使得演演算法的速度更快。
12.scale_pos_weight[預設1]
在各類別樣本十分不平衡時,把這個引數設定為一個正值,可以使演演算法更快收斂。
3.3.3 網格調參法
調節模型引數的方法有貪婪演演算法、網格調參、貝葉斯調參等。這裡我們採用網格調參,它的基本思想是窮舉搜尋:在所有候選的引數選擇中,通過迴圈遍歷,嘗試每一種可能性,表現最好的引數就是最終的結果
## 從sklearn庫中匯入網格調參函數
from sklearn.model_selection import GridSearchCV

## 定義引數取值範圍
learning_rate = [0.1, 0.3,]
subsample = [0.8]
colsample_bytree = [0.6, 0.8]
max_depth = [3,5]

parameters = { 'learning_rate': learning_rate,
              'subsample': subsample,
              'colsample_bytree':colsample_bytree,
              'max_depth': max_depth}
model = XGBClassifier(n_estimators = 20)

## 進行網格搜尋
clf = GridSearchCV(model, parameters, cv=3, scoring='accuracy',verbose=1,n_jobs=-1)

clf = clf.fit(x_train, y_train)
## 網格搜尋後的最好引數為

clf.best_params_
## 在訓練集和測試集上分佈利用最好的模型引數進行預測

## 定義帶引數的 XGBoost模型
clf = XGBClassifier(colsample_bytree = 0.6, learning_rate = 0.3, max_depth= 8, subsample = 0.9)
# 在訓練集上訓練XGBoost模型
clf.fit(x_train, y_train)

train_predict = clf.predict(x_train)
test_predict = clf.predict(x_test)

## 利用accuracy(準確度)【預測正確的樣本數目佔總預測樣本數目的比例】評估模型效果
print('The accuracy of the Logistic Regression is:',metrics.accuracy_score(y_train,train_predict))
print('The accuracy of the Logistic Regression is:',metrics.accuracy_score(y_test,test_predict))

## 檢視混淆矩陣 (預測值和真實值的各類情況統計矩陣)
confusion_matrix_result = metrics.confusion_matrix(test_predict,y_test)
print('The confusion matrix result:\n',confusion_matrix_result)

# 利用熱力圖對於結果進行視覺化
plt.figure(figsize=(8, 6))
sns.heatmap(confusion_matrix_result, annot=True, cmap='Blues')
plt.xlabel('Predicted labels')
plt.ylabel('True labels')
plt.show()
/opt/conda/envs/python35-paddle120-env/lib/python3.7/site-packages/xgboost/sklearn.py:888: UserWarning: The use of label encoder in XGBClassifier is deprecated and will be removed in a future release. To remove this warning, do the following: 1) Pass option use_label_encoder=False when constructing XGBClassifier object; and 2) Encode your labels (y) as integers starting with 0, i.e. 0, 1, 2, ..., [num_class - 1].
  warnings.warn(label_encoder_deprecation_msg, UserWarning)


[17:55:25] WARNING: ../src/learner.cc:1061: Starting in XGBoost 1.3.0, the default evaluation metric used with the objective 'binary:logistic' was changed from 'error' to 'logloss'. Explicitly set eval_metric if you'd like to restore the old behavior.
The accuracy of the Logistic Regression is: 0.9382992439781984
The accuracy of the Logistic Regression is: 0.856674011908669
The confusion matrix result:
 [[15611  2115]
 [  942  2661]]
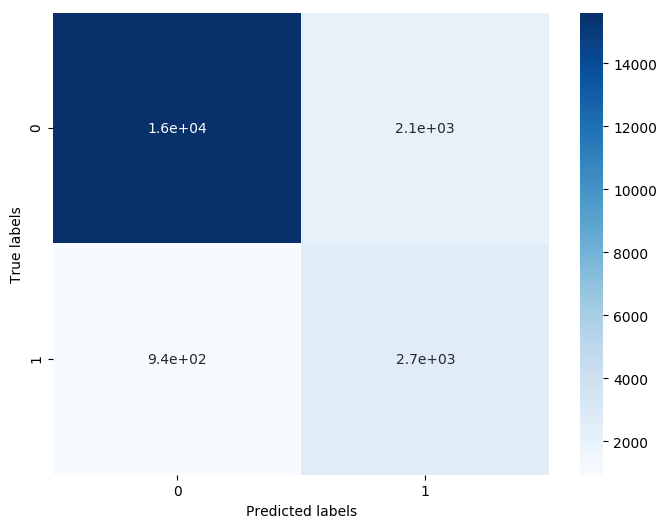
原本有2470 + 790個錯誤,現在有 2112 + 939個錯誤,帶來了明顯的正確率提升。
更多調參技巧請參考:https://blog.csdn.net/weixin_62684026/article/details/126859262
4. 總結
XGBoost的主要優點:
- 簡單易用。相對其他機器學習庫,使用者可以輕鬆使用XGBoost並獲得相當不錯的效果。
- 高效可延伸。在處理大規模資料集時速度快效果好,對記憶體等硬體資源要求不高。
- 魯棒性強。相對於深度學習模型不需要精細調參便能取得接近的效果。
- XGBoost內部實現提升樹模型,可以自動處理缺失值。
XGBoost的主要缺點:
- 相對於深度學習模型無法對時空位置建模,不能很好地捕獲影象、語音、文字等高維資料。
- 在擁有海量訓練資料,並能找到合適的深度學習模型時,深度學習的精度可以遙遙領先XGBoost。
本專案連結:https://www.heywhale.com/home/column/64141d6b1c8c8b518ba97dcc
參考連結:https://tianchi.aliyun.com/course/278/3423
本人最近打算整合ML、DRL、NLP等相關領域的體系化專案課程,方便入門同學快速掌握相關知識。宣告:部分專案為網路經典專案方便大家快速學習,後續會不斷增添實戰環節(比賽、論文、現實應用等)。
- 對於機器學習這塊規劃為:基礎入門機器學習演演算法--->簡單專案實戰--->資料建模比賽----->相關現實中應用場景問題解決。一條路線幫助大家學習,快速實戰。
- 對於深度強化學習這塊規劃為:基礎單智慧演演算法教學(gym環境為主)---->主流多智慧演演算法教學(gym環境為主)---->單智慧多智慧題實戰(論文復現偏業務如:無人機優化排程、電力資源排程等專案應用)
- 自然語言處理相關規劃:除了單點演演算法技術外,主要圍繞知識圖譜構建進行:資訊抽取相關技術(含智慧標註)--->知識融合---->知識推理---->圖譜應用
上述對於你掌握後的期許:
- 對於ML,希望你後續可以亂殺數學建模相關比賽(參加就獲獎保底,top還是難的需要鑽研)
- 可以實際解決現實中一些優化排程問題,而非停留在gym環境下的一些遊戲demo玩玩。(更深層次可能需要自己鑽研了,難度還是很大的)
- 掌握可知識圖譜全流程構建其中各個重要環節演演算法,包含圖資料庫相關知識。
這三塊領域耦合情況比較大,後續會通過比如:搜尋推薦系統整個專案進行耦合,各項演演算法都會耦合在其中。舉例:知識圖譜就會用到(圖演演算法、NLP、ML相關演演算法),搜尋推薦系統(除了該領域召回粗排精排重排混排等演演算法外,還有強化學習、知識圖譜等耦合在其中)。餅畫的有點大,後面慢慢實現。