C++溫故補缺(十九):atomic類
atomic
參考:c++11 多執行緒(3)atomic 總結 - 簡書.c++11 atomic Npgw的部落格.C++11 並行指南系列 - Haippy - 部落格園.
atomic_flag
atomic_flag看名字就能知道是一種flag型別,它是一種簡單的原子布林型別,只支援兩種操作:test-and-set和clear。
建立atomic_flag物件時,如果不初始化,那麼該物件的狀態就是unspecified,未指定的。(C++11的,C++20後未初始化時為clear)
atomic_flag flag;
可以使用ATOMIC_FLAG_INIT標誌初始化物件, 表示物件處於clear狀態。轉到定義,可以看到該tag的值為0

atomic_flag物件只有兩種操作,test_and_set就是把atomic_flag的_M_i域置為1,clear則是置零。
功能
test_and_set()的作用是先test測試返回atomic_flag物件的狀態,接著set,把物件設定為true。
clear()是直接設定為false,返回型別為void。
原子型別
原子型別需要參照標頭檔案<atomic>,一個原子型別就是原有型別加上atomic_表示。如int對應的原子型別atomic_int,也可以使用原始格式,是類別範本實現的:atomic<int> 。
其他原子型別還有:
| Typedefs | |
|---|---|
| std::atomic_bool | std::atomic |
| std::atomic_char | std::atomic |
| std::atomic_schar | std::atomic |
| std::atomic_uchar | std::atomic |
| std::atomic_short | std::atomic |
| std::atomic_ushort | std::atomic |
| std::atomic_int | std::atomic |
| std::atomic_uint | std::atomic |
| std::atomic_long | std::atomic |
| std::atomic_ulong | std::atomic |
| std::atomic_llong | std::atomic |
| std::atomic_ullong | std::atomic |
| std::atomic_char16_t | std::atomic<char16_t> |
| std::atomic_char32_t | std::atomic<char32_t> |
| std::atomic_wchar_t | std::atomic<wchar_t> |
| std::atomic_int_least8_t | std::atomic<int_least8_t> |
| std::atomic_uint_least8_t | std::atomic<uint_least8_t> |
| std::atomic_int_least16_t | std::atomic<int_least16_t> |
| std::atomic_uint_least16_t | std::atomic<uint_least16_t> |
| std::atomic_int_least32_t | std::atomic<int_least32_t> |
| std::atomic_uint_least32_t | std::atomic<uint_least32_t> |
| std::atomic_int_least64_t | std::atomic<int_least64_t> |
| std::atomic_int_fast8_t | std::atomic<int_fast8_t> |
| std::atomic_uint_fast8_t | std::atomic<uint_fast8_t> |
| std::atomic_int_fast16_t | std::atomic<int_fast16_t> |
| std::atomic_uint_fast16_t | std::atomic<uint_fast16_t> |
| std::atomic_int_fast32_t | std::atomic<int_fast32_t> |
| std::atomic_uint_fast32_t | std::atomic<uint_fast32_t> |
| std::atomic_int_fast64_t | std::atomic<int_fast64_t> |
| std::atomic_uint_fast64_t | std::atomic<uint_fast64_t> |
| std::atomic_intptr_t | std::atomic<intptr_t> |
| std::atomic_uintptr_t | std::atomic<uintptr_t> |
| std::atomic_size_t | std::atomic<size_t> |
| std::atomic_ptrdiff_t | std::atomic<ptrdiff_t> |
| std::atomic_intmax_t | std::atomic<intmax_t> |
| std::atomic_uintmax_t | std::atomic<uintmax_t> |
可以看到主要是一些關於int,short,long,char等在記憶體中以整數儲存的型別,沒有float,double等浮點型的。
- 原子型別實現同步的例子:
多執行緒做累加,如果沒有做同步,得到的結果可能是正確的,也可能小於預測值。
- 無同步,直接++計算
#include<iostream>
#include<thread>
#include<atomic>

using namespace std;

int count;
void counter(){
    for(int i=1;i<200000;i++)
        count++;

}

int main(){
    thread th1(counter);
    thread th2(counter);
    thread th3(counter);
    thread th4(counter);
    thread th5(counter);
    th1.join();
    th2.join();
    th3.join();
    th4.join();
    th5.join();
    cout<<count<<endl;
}
得到的結果:


每次結果都不同。
- 使用鎖進行同步:
#include<iostream>
#include<thread>
#include<atomic>
#include<mutex>
using namespace std;

int count;
mutex l;
void counter(){
    lock_guard<mutex> locker(l);
    for(int i=0;i<200000;i++)
        count++;
}

int main(){
    thread th1(counter);
    thread th2(counter);
    thread th3(counter);
    thread th4(counter);
    thread th5(counter);
    th1.join();
    th2.join();
    th3.join();
    th4.join();
    th5.join();
    cout<<count<<endl;
}

- 使用原子型別:
#include<iostream>
#include<thread>
#include<atomic>
#include<mutex>
using namespace std;

atomic_int count;

void counter(){
    for(int i=0;i<200000;i++)
        count++;
}

int main(){
    thread th1(counter);
    thread th2(counter);
    thread th3(counter);
    thread th4(counter);
    thread th5(counter);
    th1.join();
    th2.join();
    th3.join();
    th4.join();
    th5.join();
    cout<<count<<endl;
}

原子型別的實現原理
原子型別實現的原理是直接翻譯成CPU指令,而對原子型別的操作,像+,-,*,,++等直接過載了運運算元,編譯時也直接翻譯成CPU指令。每一個原子操作都是一條獨立的CPU指令來完成,在其指令週期內,其他CPU無法對原子型別操作。
舉例:
#include<iostream>
#include<thread>
#include<atomic>
#include<mutex>
using namespace std;

atomic_int count;

void counter(){
    for(int i=0;i<200000;i++)
        count++;
}

int main(){
    thread th1(counter);
    th1.join();
    cout<<count<<endl;
}
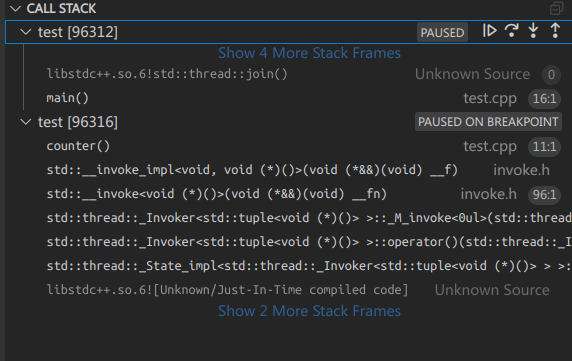
偵錯該程式,斷點打在count++,

首先可以看到呼叫棧有兩個test,也就是兩個執行緒,main和th1。

接著進入counter()的反組合檢視,open disassembly view:

call atomic_baseIiEppEi就是這條CPU指令用來給count++,它是原子性的,保證了不會被其他CPU操作。
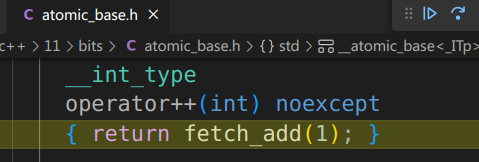
並且在step into中也能看到跳轉到了運運算元過載的標頭檔案:


這就是atomic的實現機制
第二條add [rbp-0x4],0x1就是i++對應的CPU指令,i就存在bp基址暫存器的前面四個位元組的位置。我們step over幾次讓i的值有變化,看暫存器相對定址的值:就是0x7


第三條指令是CPU優化了for迴圈,本來應該先把i mov到暫存器,現在優化後直接比較i和19999的值,0x30d3f就是十進位制的19999,也就是迴圈結束的條件。
如果給i加上volatile,就可以防止cpu優化
....
volatile int i;
for(i=0;i<200000;i++)
    count++;
....

原子型別的操作
上面的count++例子中,step into 跳轉到了atomic型別的運運算元過載定義中,實際上所有能夠對原子型別的操作,都是過載了普通的意思,或新增了新的函數。
所有的原子操作:atomic<> a;
-
縱列 triv :針對std::atomic以及「其他普通型別之atomic」提供的操作
-
縱列 int type :針對std::atomic<> 且使用整型型別而提供的操作;
-
縱列 ptr type :針對std::atomic<> 且使用pointer型別 而提供的操作
| 操作 | triv | int type | ptr type | 效果 |
|---|---|---|---|---|
| atomic a = val | yes | yes | yes | 以val為a的初值(這個不是atomic 的操作) |
| atomic a; atomic_init(&a,val) | yes | yes | yes | 同上 (若無後面的atomic_init(),則a的初始化不完整) |
| a.is_lock_free() | yes | yes | yes | 如果內部不使用lock則返回true 用來檢測atomic型別內部是否由於使用lock才成為atomic。如果不是,則硬體本身就擁有對atomic操作的固有支援 |
| a.store(val) | yes | yes | yes | 賦值 val (返回void) |
| a.load() | yes | yes | yes | 返回數值a的copy |
| a.exchange(val) | yes | yes | yes | 賦值val並返回舊值a的拷貝 |
| a.compare_exchange_strong(exp,des) | yes | yes | yes | cas操作 |
| a.compare_exchange_weak(exp,des) | yes | yes | yes | weak cas操作 |
| a = val | yes | yes | yes | 賦值並返回val的拷貝(copy) |
| a.operator atomic() | yes | yes | yes | 返回數值a的拷貝 |
| a.fetch_sub(val) | no | yes | yes | 不可切割值 a -= val 並返回新值得拷貝 |
| a += val | no | yes | yes | 等同於 t.fetch_add(val) |
| a -= val | no | yes | yes | 等同於 t.fetch_sub(val) |
| ++a a++ | no | yes | yes | 等同於 t.fetch_add(1) 並返回 a 或者a+1的拷貝 |
| –a a– | no | yes | yes | 等同於 t.fetch_sub(1) 並返回 a 或者a+1的拷貝 |
| a.fetch_and(val) | no | yes | no | 不可切割值 a &= val 並返回新值得拷貝 |
| a.fetch_or(val) | no | yes | no | 不可切割值 a |
| a.fetch_and(val) | no | yes | no | 不可切割值 a ^= val 並返回新值得拷貝 |
| a &= val | no | yes | no | 等同於 t.fetch_and(val) |
| a | = val | no | yes | no |
| a | = val | no | yes | no |
atomic<>中的模板除了整型,還可以是其他如浮點型,指標,但是他們可能沒有+,-,*,/等運運算元的過載或位運算過載。
CAS操作
a.compare_exchange_strong/weak是CAS操作(compare and swap),CPU提供這個操作用來比較「某記憶體的值」和「某給定的值」,當他們相同時,則把「該記憶體值」更新為」另一個給定的值「。如果不相同,則更新「某給定的值」為「某記憶體值」。
虛擬碼:
bool compare_exchange_strong(T & expected ,T desired)
{
 if(this->load() == expected )
 {
     this->strore(desired)
     return true;
 }
 else
 {
    expected = this->load();
    return false;
}
}
this就是記憶體值的指標,expected是第一個給定的值,desired是另一個給定的值。
memory_order和記憶體模型
參考:C++11 記憶體模型。知乎:C++ memory_order.詳解c++ atomic原子程式設計中的Memory Order.
C++11 中的原子型別的API大都需要提供一個std::memory_order(記憶體序,訪存順序)的列舉型別作為引數,如atomic_store, atomic_load, atomic_exchange, atomic_compare_exchange, atomic_flag, 以及還有test_and_set和clear等API都可以設定一個std::memory_order引數。在沒有指定時,預設的引數是std::memory_order_seq_cst(順序一致性)。
研究記憶體序,首先要研究C++的記憶體模型。
C++的記憶體模型一般可以分為靜態記憶體模型和動態記憶體模型。靜態記憶體模型主要涉及類的物件的在記憶體中是如何存放的,即從結構上來看一個物件在記憶體中的佈局。和之前研究的記憶體對齊和排序(C溫故補缺(九):位元組對齊與排序)類似。
而動態記憶體模型,可以理解為儲存一致性模型。主要是從行為上來看多個執行緒對同一個物件同時操作時所做的約束。和我們做執行緒同步的意義相似的:都是為了程式執行的正確性,避免未知結果。
std::memory_orderspecifies how memory accesses, including regular, non-atomic memory accesses, are to be ordered around an atomic operation. Absent any constraints on a multi-core system, when multiple threads simultaneously read and write to several variables, one thread can observe the values change in an order different from the order another thread wrote them. Indeed, the apparent order of changes can even differ among multiple reader threads. Some similar effects can occur even on uniprocessor systems due to compiler transformations allowed by the memory model.from cppreference
在cppreference.com中的簡單解釋中也說了:多核系統在沒有任何約束的條件下,在多個執行緒同時讀取和寫入多個變數時,因為執行順序的不同可能導致不同的值。在沒有規定時,多執行緒並行執行時,指令是可能被CPU重排的,所以就有可能出現不同的結果。比如:
a,b兩個共用變數,初始值都是0,通過兩個改變值
執行緒 1 執行緒 2 a = 1; b = 2; R1 = b; R2 = a;
雖然對於每個執行緒每一步都是原子的,但是兩個執行緒之前並沒有規定先後順序。就有可能出現6種情況。
| 情況 1 | 情況 2 | 情況 3 | 情況 4 | 情況 5 | 情況 6 |
|---|---|---|---|---|---|
| a = 1; | b = 2; | a = 1; | a = 1; | b = 2; | b = 2; |
| R1 = b; | R2 = a; | b = 2; | b = 2; | a = 1; | a = 1; |
| b = 2; | a = 1; | R1 = b; | R2 = a; | R1 = b; | R2 = b; |
| R2 = a; | R1 = b; | R2 = a; | R1 = b; | R2 = a; | R1 = b; |
| R1 == 0, R2 == 1 | R1 == 2, R2 == 0 | R1 == 2, R2 == 1 | R1 == 2, R2 == 1 | R1 == 2, R2 == 1 | R1 == 2, R2 == 1 |
常見的儲存一致性模型包括:順序一致性模型、處理器一致性模型、弱一致性模型、釋放一致性模型、急切更新一致性模型、懶惰更新釋放一致性模型、域一致性模型以及單項一致性模型。
因為C++中只有一下6種,所以只研究這幾種訪存次序。
| memory order | 作用 |
|---|---|
| memory_order_relaxed | 無fencing 作用,cpu和編譯器可以重排指令 |
| memory_order_consume | 後面依賴此原子變數的訪存指令勿重排至此條指令前 |
| memory_order_acquire | 後面的訪存指令勿重排至此指令前 |
| memory_order_release | 前面的訪存指令勿重排到此指令後 |
| memory_order_acq_rel | acquire+release |
| memory_order_seq_cst | acq_rel+所有使用seq_cst的指令有嚴格的全序關係 |
多執行緒程式設計時,通過這些標誌位,來讀寫原子變數,可以組合成4種同步模型:
Relaxed ordering
在這種模型下,std::atomic的load和store都要帶上memory_order_relaxed引數,Relaxed ordering僅僅保證load和store是原子的,除此之外無任何跨執行緒同步。
Release_Acquire ordering
這個模型下,store()使用memory_order_release,而load()使用memory_order_acquire。這個模型限制指令的重排:
-
在store()之前的讀寫操作,不允許重排到store()的後面。一般對應寫操作
-
在load()之後的讀寫操作,不允許重排到load()前面,一般對應讀操作
也就是store總是排在load前面,保證不會讀到修改前的資料。
如一個印表機有兩個模組,一個負責裝載列印資料,一個用來列印。如果未裝載新的資料,會直接列印上一次的資訊:
如果沒有規定執行緒之間的執行順序,則可能會讀到上一此的資訊:
#include<iostream>
#include<thread>
#include<atomic>
using namespace std;

string printstr="old data";//上一此的資訊
void load(string str){//裝載
    printstr=str;
}
void print(){//列印
    cout<<printstr<<endl;
}
int main(){
    thread th1(load,"Hello");
    thread th2(print);
    th1.join();
    th2.join();
}
因為程式會被cpu優化,所以手動編譯取消優化-O0
g++ test.cpp -O0 -o test;./test
每次的執行都是隨機排序的,所以可能會出現old data

使用Release_acquire模型來規定執行緒間的執行順序:
#include<iostream>
#include<thread>
#include<atomic>
using namespace std;

atomic<bool> ready{false};
string printstr="old data";//上一此的資訊
void load(string str){//裝載
    printstr=str;
    ready.store(true,memory_order_release);
}
void print(){//列印
    while(!ready.load(memory_order_acquire))
        ;//迴圈等待
    cout<<printstr<<endl;
}
int main(){
    thread th1(load,"Hello");
    thread th2(print);
    th1.join();
    th2.join();
}
 就得到了準確的結果
Release_Consume ordering
這個模型下 store()使用memory_order_release,而load()使用memory_order_consume。
-
在store前的所有讀寫,不允許被移動到store()後面
-
在load之後所有依賴此原子變數的讀寫,不允許被移動到load前面。
和上面Release-acquire模型的差別是load前可以出現不依賴該原子變數的讀寫
本文來自部落格園,作者:Tenerome,轉載請註明原文連結:https://www.cnblogs.com/Tenerome/p/cppreview19.html