萬字血書Vue—路由

多個路由通過路由器進行管理。
前端路由的概念和原理
(程式設計中的)路由(router)就是一組key-value對應關係,分為:後端路由和前端路由
後端路由指的是:請求方式、請求地址和function處理常式之間的對應關係
在SPA程式中,所有元件的展示和切換都在這唯一的一個頁面內完成,此時,不同元件之間的切換需要通過前端路由來實現
通俗易懂的來說,前端路由是:Hash地址(url中#的部分)與元件之間的對應關係
前端路由的工作方式
- 使用者點選了頁面上的路由連結
- 導致了URL位址列中的Hash值發生了變化
- 前端路由監聽到了Hash地址的變化
- 前端路由把當前Hash地址對應的元件渲染到瀏覽器中

實現簡易的前端路由(底層實現原理)
App.vue根元件
<template>
<div>
<h1>這是App根元件</h1>
<a href="#/Home">Home</a>
<a href="#/Movie">Movie</a>
<a href="#/About">About</a>
<hr>
<component :is="comName"></component>
</div>
</template>
<script>
import MyHome from './MyHome.vue'
import Mymovie from './MyMovie.vue'
import MyAbout from './MyAbout.vue'
import { walkFunctionParams } from '@vue/compiler-core'
export default {
name:'App',
components:{
MyHome,
MyAbout,
Mymovie,
},
data(){
return{
comName:'MyHome'
}
},
created(){
window.onhashchange=()=>{
switch(location.hash){
case '#/Home':
this.comName='MyHome'
break
case '#/Movie':
this.comName='MyMovie'
break
case '#/About':
this.comName='MyAbout'
break
}
}
}
}
</script>
<style lang="less" scoped>
</style>
vue-router的基本使用
vue-router是vue.js官方給出的路由解決方案,它只能結合vue專案進行使用,能夠輕鬆的管理SPA專案中的元件切換。
- vue-router 3.x 只能結合vue2進行使用,官方檔案:https://router.vuejs.org/zh/
- vue-router 4.x 只能結合vue3進行使用,官方檔案:https://next.router.vuejs.org/
二者差異主要是在宣告router組態檔上。
vue-router 3.x的基本使用步驟
- 在專案中安裝vue-router
npm install [email protected] -S
- 在
src原始碼目錄下,新建router/index.js路由模組
//匯入包
import Vue from 'vue'
import VueRouter from 'vue-router'
//外掛引入
Vue.use(VueRouter)
//建立路由的範例物件
const router = new VueRouter
//向外共用
export default router
- 在入口檔案
main.js中引入
import router from '@/router/index.js'
......
new Vue({
    ...
    router:router
    ...
}).$mount('#app')
vue-router 4.x的基本使用步驟
- 在專案中安裝vue-router
npm install vue-router@next -S
- 定義路由元件
MyHome.vue、MyMovie.vue、MyAbout.vue
- 宣告路由連結和預留位置
可以使用<router-link>標籤(會被渲染成a連結)來宣告路由連結,並使用<router-view>標籤來宣告路由預留位置
<template>
<div>
<h1>這是App根元件</h1>
<!-- <a href="#/Home">Home</a>
<a href="#/Movie">Movie</a>
<a href="#/About">About</a> -->
<!-- 宣告路由連結 -->
<router-link to="/home">首頁</router-link>
<router-link to="/movie">電影</router-link>
<router-link to="/about">我的</router-link>
<hr>
<!-- 路由預留位置 -->
<router-view></router-view>
<component :is="comName"></component>
</div>
</template>
- 建立路由模組
從專案中建立router.js路由模組,按照以下四步:
從vue-router中按需匯入兩個方法
import { createRouter, createWebHashHistory } from 'vue-router'
//createRouter方法用於建立路由的範例物件
//createWebHashHistory用於指定路由的工作方式(hash模式)
匯入需要使用路由控制的元件
import MyHome from './MyHome.vue'
import MyMovie from './MyMovie.vue'
import MyAbout from './MyAbout.vue'
建立路由範例物件
const router = createRouter({
history: createWebHashHistory(),
routes: [
  {
      path: '/home', component: MyHome
  },
  {
      path: '/movie', component: MyMovie
  },
  {
      path: '/about', component: MyAbout
  },

]
})
向外共用路由範例物件
export default router在main.js中匯入並掛載路由模組
import { createApp } from 'vue'
import App from './App.vue'
import './index.css'

import router from './components/router'

const app = createApp(App)
//掛載路由寫法
app.use(router)
app.mount('#app')
- 匯入並掛載路由模組
vue-router的高階用法
路由重定向
指的是:使用者在存取地址A的時候,強制使用者跳轉到地址C,從而展示特點的元件頁面
通過路由規則的redirect屬性,指定新的路由地址
const router = createRouter({
    history: createWebHashHistory(),
    routes: [
        {
            path: '/home', component: MyHome
        },
        {
            path: '/',redirect:'/home' //存取根路徑會重定向到home元件
        },
        {
            path: '/movie', component: MyMovie
        },
        {
            path: '/about', component: MyAbout
        },

    ]
})
路由傳參
query引數
<router-link :to="/about/home/message?id=123&title='abc'">我的</router-link>

<router-link :to="{
                 path:'/about/home/message',
                 query:{
                 	id:123,
                 	title:'abc'
                 }
               }">
    我的
</router-link>
params引數
宣告時:
path:'/about/home/message/:id/:title'
<router-link :to="/about/home/message/123/abc">我的</router-link>

<router-link :to="{
                 name:'my',
                 params:{
                 	id:123,
                 	title:'abc'
                 }
               }">
    我的
</router-link>
this.$route 是路由的"引數物件"
this.$router 是路由的"導航物件"
路由高亮
- 使用預設的高亮class類名
被啟用的路由連結,預設會使用router-link-active的類名,開發者可以使用此類名選擇器,為啟用的路由連結設定高亮樣式
- 自定義路由高亮的class類
在建立路由的範例物件時,開發者可以基於linkActiveClass屬性,自定義類名
const router = createRouter({
    history: createWebHashHistory(),
    linkActiveClass:'active-router',
    routes: [
        {
            path: '/home', component: MyHome
        },
        {
            path: '/',redirect:'/home' //存取根路徑會重定向到home元件
        },
        {
            path: '/movie', component: MyMovie
        },
        {
            path: '/about', component: MyAbout
        },

    ]
})
巢狀路由
通過路由來實現元件的巢狀展示
步驟:
- 宣告子路由連結和子路由預留位置
<template>
<div>MyAbout元件</div>
<hr>
<router-link to="/about/tab1">tab1</router-link>
<router-link to="/about/tab2">tab2</router-link>
<router-view></router-view>
</template>
- 在父路由規則中,通過children屬性巢狀宣告子路由規則
const router = createRouter({
    history: createWebHashHistory(),
    routes: [
        {
            path: '/home', component: MyHome
        },
        {
            path: '/movie', component: MyMovie
        },
        {
            path: '/about', component: MyAbout,children:[
                {
                path:'tab1',component:Tab1
            },
            {
                path:'tab2',component:Tab2
            },
        ]
        },

    ]
})
子路由規則的path不要以/開頭
在巢狀路由中實現路由的重定向
const router = createRouter({
    history: createWebHashHistory(),
    routes: [
        {
            path: '/home', component: MyHome
        },
        {
            path: '/movie', component: MyMovie
        },
        {
            path: '/about',
            component: MyAbout,
            redirect:'/about/tab1',
            children:[
                {
                path:'tab1',component:Tab1
            },
            {
                path:'tab2',component:Tab2
            },
        ]
        },

    ]
})
動態路由匹配
指的是:把Hash地址中可變的部分定義為引數項,從而提高路由規則的複用性,在vue-router中使用英文冒號:來定義路由的引數
  {
      path: '/movie/:id', component: MyMovie
   },
獲取動態路由引數值的方法:
- $route.params引數物件
<template>
  <div>Mymovie元件---{{$route.params.id}}</div>

</template>
- 使用props接受路由引數
{
     path: '/movie/:id', component: MyMovie,
     props: true,
},
為了簡化路由引數的獲取形式,vue-router允許在路由規則中開啟props傳參
程式設計式導航
通過呼叫API實現導航的方式,叫做程式設計式導航,與之對應的,通過點選連結實現導航的方式,叫做宣告式導航。
- 普通網頁中點選a連結,vue專案中點選
<router-link>都屬於宣告式導航 - 平臺網頁中呼叫
location.herf跳轉到新頁面的方式,屬於程式設計式導航
vue-router中程式設計式導航API
- this.$router.push('hash地址') 跳轉到指定Hash地址,並增加一條歷史記錄,從而展示對應的元件。
- this.$router.replace('hash地址') 跳轉到指定Hash地址,並替換當前的歷史記錄,從而展示對應的元件。
- this.$router.go('數值n') 實現導航歷史的前進、後退(-1),超過最大層數,則原地不動。
$router.back() 後退到上一層頁面
$router.forward() 前進到下一層頁面
命名路由
通過name屬性為路由規則定義名稱,叫做命名路由,name值不能重複,具有唯一性
Hash地址特別長時體現出命名路由的優勢
- 使用命名路由實現宣告式導航
<template>
	<h3>
        MyHome元件
    </h3>
    <router-link :to="{name:'mov',params:{id : 3}}">goToMovie</router-link>
</template>

<script>
	export default {
        name:'MyHome',
    }
</script>
- 使用命名路由實現程式設計式導航
<template>
	<h3>
        MyHome元件
    </h3>
	<button @click="goToMovie(3)">
        goToMovie
    </button>
</template>

<script>
	export default {
        method: {
            goToMovie(id) {
                this.$router.push({name:'mov',params:{id : 3}})
            }
        }
    }
</script>
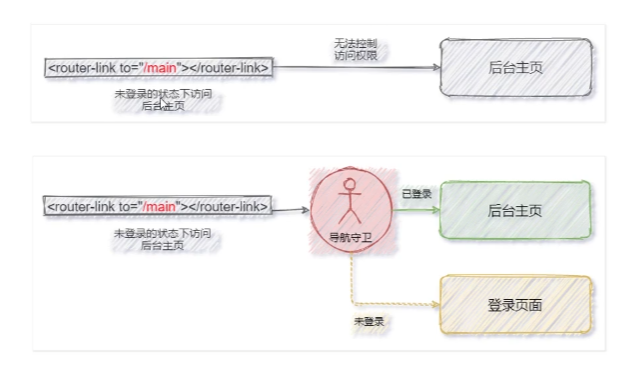
導航守衛
導航守衛可以控制路由的存取許可權

如何宣告全域性的導航守衛
全域性的導航守衛會攔截每個路由規則,從而對每個路由都進行存取許可權的控制
const router = createRouter({
   ...
})
//呼叫路由範例物件的beforeEach函數,fn必須是一個函數嗎,每次攔截後,都會呼叫fn進行處理
//宣告全域性的導航守衛,fn稱為守衛方法
router.beforeEach(fn)

router.beforeEach(()=>{
    console.log('Ok')
})
守衛方法的三個形參(可選)
router.beforeEach((to,from,mext)=>{
    console.log('Ok')
    //to 目標路由物件(資訊)
    //from當前導航正要離開的路由物件
    //next 是一個函數,表示放行
})
注:
在守衛方法中不宣告next形參,則預設允許使用者存取每一個路由
在守衛方法中宣告了next形參,則必須呼叫next()函數,否則不允許使用者存取如何一個路由!
next函數的3種呼叫方式
//宣告全域性的導航守衛
router.beforeEach((to, from, next) => {
    if (to.path === '/main') {
        //證明使用者要存取後臺主頁
        next(false)//強制使用者停留在之前所處的元件
        next('login')//強制使用者調轉到指定頁面
    } else {
        //證明使用者要存取的不是後臺主頁
        next()
    }
})
結合token控制後臺主頁的存取許可權
router.beforeEach((to, from, next) => {
    const tokenStr = localStorage.getItem('token') //讀取token


    if (to.path === '/main' && !tokenStr) { //token不存在,需要登入
        //證明使用者要存取後臺主頁
       // next(false)//強制使用者停留在之前所處的元件
        next('login')//強制使用者調轉到指定頁面
    } else {
        //證明使用者要存取的不是後臺主頁
        next()
    }
})
Hash&History
路由器的兩種工作模式:hash&history。
對於url來說:#及後面的內容就是hash值,hash值不會帶給伺服器。
hash模式:
- 地址中永遠帶著
#號,不美觀; - 若地址校驗嚴格,會被標記為不合法;
- 相容性較好;
history模式:
- 地址乾淨,美觀;
- 相容性比
hash模式較差; - 應用部署上線需要後端支援,解決重新整理頁面伺服器端404問題;(
node可以使用connect-history-api-fallback)