k8s HPA(HorizontalPodAutoscaler)--自動水平伸縮

寫在前面
我們平時部署web服務,當服務壓力大撐不住的時候,我們會加機器(加錢);一般沒有上容器編排是手動加的,臨時加的機器,臨時部署的服務還要改Nginx的設定,最後回收機器的時候,也是手動回收,手動修改Nginx的,挺麻煩的其實;
而K8s是支援這整個流程的自動化的,也就是HPA;
HPA介紹
HPA:全稱Horizontal Pod Autoscaler ,對應中文叫Pod的自動水平伸縮;
Pod的水平伸縮是水平方向增加/減少Pod的數量;
Pod的垂直伸縮則是垂直方向上控制Pod的硬體,比如增加/縮減CPU、記憶體等資源;
k8s的HPA一般會根據一個具體的指標來做,比如常見CPU、記憶體的負載;也可以根據web服務的吞吐量、單位時間內的傳輸位元組數等;另外還可以根據自定義的指標,比如RabbitMQ的佇列數量、Webhook等;
我這裡先講講怎麼根據CPU、記憶體的負載來做HPA;
HPA實操
環境
$ kubectl version

Client Version: version.Info{Major:"1", Minor:"22", GitVersion:"v1.22.5"

Server Version: version.Info{Major:"1", Minor:"22", GitVersion:"v1.22.5"
$ kubectl get node

NAME             STATUS   ROLES                  AGE    VERSION
docker-desktop   Ready    control-plane,master   177d   v1.22.5
檢查獲取指標是否正常
是否安裝了metrics-server
HPA是需要獲取具體的指標做伸縮的, metrics-server是提供指標的
$ kubectl  get pod -n kube-system|grep   metrics-server
metrics-server-5d78c4b4f5-x5c46          1/1     Running   2 (3d12h ago)       10d
是否正常獲取指標
$ kubectl  top node
docker-desktop   133m         0%     2671Mi          16%
如果沒有的,需先安裝metrics-server
安裝metrics-server
下載yaml
wget https://github.com/kubernetes-sigs/metrics-server/releases/latest/download/components.yaml
修改yaml
    spec:
      containers:
      - args:
        - --cert-dir=/tmp
        - --secure-port=4443
        - --kubelet-preferred-address-types=InternalIP,ExternalIP,Hostname
        - --kubelet-use-node-status-port
        - --metric-resolution=15s
        - --kubelet-insecure-tls #加上這個(不推薦生產這樣用)
        #image: k8s.gcr.io/metrics-server/metrics-server:v0.6.1 #這個映象需要梯子
        image: registry.cn-hangzhou.aliyuncs.com/chenby/metrics-server:v0.6.1 #換成網友阿里雲的映象
        imagePullPolicy: IfNotPresent
提交yaml
kubectl apply -f components.yaml -n kube-system
再驗證
kubectl  get pod -n kube-system|grep   metrics-server

kubectl  top node
部署一個測試的Pod(Webapi)
建立一個hpa-api.yaml的檔案內容如下:
apiVersion: apps/v1
kind: Deployment
metadata:
  name: hpa-api
spec:
  selector:
    matchLabels:
      app: hpa-api
  replicas: 1
  template:
    metadata:
      labels:
        app: hpa-api
    spec:
      containers:
      - name: hpa-api
        image: gebiwangshushu/hei-ocelot-api:1.0 #這是我寫其他文章上傳的映象,程式碼:https://github.com/gebiWangshushu/Hei.Ocelot.ApiGateway/blob/master/Hei.Api/Controllers/WeatherForecastController.cs
        ports:
        - containerPort: 80
        resources:
          requests:
            cpu: 1000m
            memory: 100Mi
          # limits:
          #   cpu: 100m
          #   memory: 100Mi
---
apiVersion: v1
kind: Service
metadata:
  name: hpa-api
  labels:
    app: hpa-api
spec:
  ports:
  - port: 80
    nodePort: 30999
  type: NodePort
  selector:
    app: hpa-api
kubectl apply -f hpa-api.yaml
這裡建立了一個測試的webapi,所用映象是gebiwangshushu/hei-ocelot-api:1.0,原始碼在這;這個Deployment的副本數是1,資源requests為cpu: 1000m memory: 100Mi;並且建立了一個nodePort:30999 型別的Service;
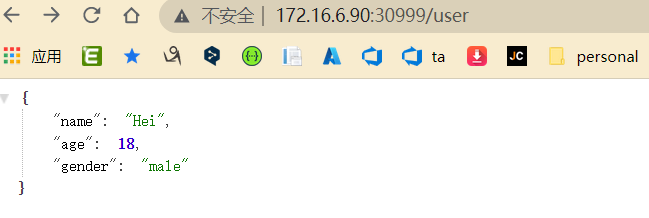
存取看看:

172.16.6.90 是我自己k8s叢集的地址;測試的webapi部署好了,我們來給他建立一個HPA(HorizontalPodAutoscaler);
建立HPA--HorizontalPodAutoscaler
檢視當前HPA支援版本:
$ kubectl api-versions|grep autoscaling
autoscaling/v1
autoscaling/v2beta1
autoscaling/v2beta2
autoscaling/v1: 只支援基於CPU的自動伸縮
autoscaling/v2beta1: 支援Resource Metrics(資源指標,如pod的CPU)和Custom Metrics(自定義指標)的縮放。
autoscaling/v2beta2:支援Resource Metrics(資源指標,如pod的CPU)和Custom Metrics(自定義指標)和ExternalMetrics(額外指標)的縮放。
建立一個HPA.yaml的檔案,內容如下:
apiVersion: autoscaling/v2beta2
kind: HorizontalPodAutoscaler
metadata:
  name: hpa-api
spec:
  scaleTargetRef:
    apiVersion: apps/v1
    kind: Deployment  #針對Deployment做伸縮
    name: hpa-api
  minReplicas: 1   #最小副本數
  maxReplicas: 10  #最大副本數
  metrics:
  - type: Resource
    resource:
      name: cpu
      target:
        type: Utilization  #Utilization 使用率做指標
        averageUtilization: 50 #CPU平均使用率超requests要求的cpu的50%時,開始做擴容
        #type: averageValue
        #averageValue: 30  #使用平均值averageValue(平均值) 做指標
-
type: Utilization #Utilization 表示用使用率作為指標,此外還有Value 或 AverageValue
-
averageUtilization: 50 表示CPU平均使用率超requests要求的cpu的50%時,開始做擴容
-
apiVersion: autoscaling/v2beta2 autoscaling的版本,不同版本的欄位和支援的指標不一樣;
當然,這裡的apiVersion: autoscaling/v2beta2 ,支援還支援很多引數,例如:
  metrics:
  - type: Resource
    resource:
      name: cpu
      target:
        type: Utilization
        averageUtilization: 60 #CPU平均負載超requests60%時,開始做擴容
  # - type: Resource
  #   resource:
  #     name: cpu
  #     target:
  #       type: AverageValue
  #       averageValue: 500m
  # - type: Pods #Pods型別的指標
  #   pods:
  #     metric:
  #       name: packets-per-second
  #     target:
  #       type: AverageValue
  #       averageValue: 1k
  # - type: Object
  #   object:
  #     metric:
  #       name: requests-per-second
  #     describedObject:
  #       apiVersion: networking.k8s.io/v1
  #       kind: Ingress
  #       name: main-route
  #     target:
  #       type: Value
  #       value: 10k

  # behavior: #控制伸縮行為速率的
  #   scaleDown:
  #     policies: #支援多個策略
  #     - type: Pods
  #       value: 4
  #       periodSeconds: 60  #60秒內#最多縮容4個pod
  #     - type: Percent
  #       value: 300
  #       periodSeconds: 60 #60秒內#最多縮容300%
  #     selectPolicy: Min
  #     stabilizationWindowSeconds: 300
  #   scaleUp:
  #     policies:
  #     - type: Pods
  #       value: 5
  #       periodSeconds: 60 #60秒內#最多縮容5個pod
  #     # - type: Percent
  #     #   value: 100  #最多擴容100%
  #     #   periodSeconds: 60 #60秒內
  #     selectPolicy: Max
  #     stabilizationWindowSeconds: 0
metrics中的type欄位有四種型別的值:Object、Pods、Resource、External。
- Resource:指的是當前伸縮物件下的pod的cpu和memory指標,只支援Utilization和AverageValue型別的目標值。
- Object:指的是指定k8s內部物件的指標,資料需要第三方adapter提供,只支援Value和AverageValue型別的目標值。
- Pods:指的是伸縮物件(statefulSet、replicaController、replicaSet)底下的Pods的指標,資料需要第三方的adapter提供,並且只允許AverageValue型別的目標值。
- External:指的是k8s外部的指標(比如prometheus),資料同樣需要第三方的adapter提供,只支援Value和AverageValue型別的目標值。
另外還有自定義指標等,需要1.23及以上版本才支援了;
建立HPA資源
kubectl apply -f HPA.yaml
檢視HPA
$ kubectl get hpa

NAMESPACE    NAME      REFERENCE            TARGETS   MINPODS   MAXPODS   REPLICAS   AGE
aspnetcore   hpa-api   Deployment/hpa-api   0%/50%    1         10        1          8d
驗證
hpa開啟watch監控模式
$ kubectl get hpa --watch
NAME      REFERENCE            TARGETS   MINPODS   MAXPODS   REPLICAS   AGE
hpa-api   Deployment/hpa-api   0%/50%    1         10        1          8d
...
#阻塞監聽狀態
用ab壓測工具壓一下
ab -n 200000 -c 10 http://172.16.6.90:30999/user
沒安裝的自己搜尋安裝下,這裡的 -n:請求個數,-c : 請求並行數
檢視資源使用情況
$ kubectl top po
NAME                      CPU(cores)   MEMORY(bytes)
hpa-api-88ddc5c49-2vgjd   1m           301Mi
hpa-api-88ddc5c49-4h5pz   1m           300Mi
hpa-api-88ddc5c49-8c8d2   1m           340Mi
hpa-api-88ddc5c49-8hmnm   1m           300Mi
hpa-api-88ddc5c49-cgxm9   1m           23Mi
hpa-api-88ddc5c49-tdrc6   1m           23Mi
擴容情況
kubectl get hpa --watch
NAME      REFERENCE            TARGETS   MINPODS   MAXPODS   REPLICAS   AGE
hpa-api   Deployment/hpa-api   0%/50%    1         10        1          8d
hpa-api   Deployment/hpa-api   262%/50%   1         10        1          8d
hpa-api   Deployment/hpa-api   33%/50%    1         10        4          8d
hpa-api   Deployment/hpa-api   0%/50%     1         10        6          8d  #這裡請求結束了
伸容過程
$ kubectl describe hpa hpa-api

Name:                                                  hpa-api
...
Reference:                                             Deployment/hpa-api
Metrics:                                               ( current / target )
  resource cpu on pods  (as a percentage of request):  262% (2628m) / 50%  #這裡資源直接遠超1000m的50%,達到了262% (2628m)
Deployment pods:                                       1 current / 4 desired
..
Deployment pods:                                       1 current / 4 desired
Conditions:
  Type            Status  Reason            Message
  ----            ------  ------            -------
  AbleToScale     True    SucceededRescale  the HPA controller was able to update the target scale to 4
  ScalingActive   True    ValidMetricFound  the HPA was able to successfully calculate a replica count from cpu resource utilization (percentage of request)
  ScalingLimited  True    ScaleUpLimit      the desired replica count is increasing faster than the maximum scale rateEvents:
  Type    Reason             Age   From                       Message
  ----    ------             ----  ----                       -------
  Normal  SuccessfulRescale  39s   horizontal-pod-autoscaler  New size: 4; reason: cpu resource utilization (percentage of request) above target #擴容到4個
   Normal  SuccessfulRescale  3m11s  horizontal-pod-autoscaler  New size: 6; reason: All metrics below target #擴容到6個
一旦 CPU 利用率降至 0,HPA 會自動將副本數縮減為 1;
擴容詳情
HPA 控制器基於 Master 的 kube-controller-manager 服務啟動引數 --horizontal-pod-autoscaler-sync-period 定義的探測週期(預設值為 15s) , 週期性地監測目標 Pod 的資源效能指標, 並與 HPA 資源物件中的擴縮容條件進行對比, 在滿足條件時對 Pod 副本數量進行調整。
在每個時間段內,控制器管理器都會根據每個 HorizontalPodAutoscaler 定義中指定的指標查詢資源利用率。 控制器管理器找到由 scaleTargetRef 定義的目標資源,然後根據目標資源的 .spec.selector 標籤選擇 Pod, 並從資源指標 API(針對每個 Pod 的資源指標)或自定義指標獲取指標 API(適用於所有其他指標)。
-
對於按 Pod 統計的資源指標(如 CPU),控制器從資源指標 API 中獲取每一個 HorizontalPodAutoscaler 指定的 Pod 的度量值,如果設定了目標使用率, 控制器獲取每個 Pod 中的容器資源使用 情況, 並計算資源使用率。如果設定了 target 值,將直接使用原始資料(不再計算百分比)。 接下來,控制器根據平均的資源使用率或原始值計算出擴縮的比例,進而計算出目標副本數。
需要注意的是,如果 Pod 某些容器不支援資源採集,那麼控制器將不會使用該 Pod 的 CPU 使用率。
-
如果 Pod 使用自定義指示,控制器機制與資源指標類似,區別在於自定義指標只使用 原始值,而不是使用率。
-
如果 Pod 使用物件指標和外部指標(每個指標描述一個物件資訊)。 這個指標將直接根據目標設定值相比較,並生成一個上面提到的擴縮比例。 在
autoscaling/v2beta2版本 API 中,這個指標也可以根據 Pod 數量平分後再計算。
HorizontalPodAutoscaler 的常見用途是將其設定為從(metrics.k8s.io、custom.metrics.k8s.io 或 external.metrics.k8s.io)獲取指標。 metrics.k8s.io API 就是我們前面安裝Metrics Server 的外掛;
擴容演演算法
期望副本數 = ceil[當前副本數 * (當前指標 / 期望指標)]
例如,如果當前指標值為
200m,而期望值為100m,則副本數將加倍, 因為200.0 / 100.0 == 2.0如果當前值為50m,則副本數將減半, 因為50.0 / 100.0 == 0.5。如果比率足夠接近 1.0(在全域性可設定的容差範圍內,預設為 0.1), 則控制平面會跳過擴縮操作。
套入上面的範例:
期望副本數 = ceil[ 1 * (262% / 50%)] == 6
類似本範例的示意圖:

可以看到這裡的指標,是針對所有pod的;
總結
k8s的東西太多,只學了點皮毛,有個基本的概念就趕緊記下來;k8s叢集版本、HPA的版本的不同又有很多限制與欄位的區別,需要後面更多的實踐與學習;
[參考]
https://kubernetes.io/zh-cn/docs/tasks/run-application/horizontal-pod-autoscale/
https://blog.51cto.com/smbands/4903843
https://www.cnblogs.com/fanggege/p/12299923.html