webgl 系列 —— 漸變三角形
其他章節請看:
漸變三角形
本文通過一個漸變三角形的範例逐步分析:varying變數、合併緩衝區、圖形裝配、光柵化、varying 內插

繪製三個點v1
需求:繪製三個相同顏色的點,效果如下:

通過三角形的學習,這個需求非常容易實現。程式碼如下:
const VSHADER_SOURCE = `
attribute vec4 a_Position;
void main() {
  gl_Position = a_Position;
  gl_PointSize = 10.0;
}
`

const FSHADER_SOURCE = `
void main() {
  gl_FragColor = vec4(1.0, 0.0, 0.0, 1.0);
}
`

function main() {
    const canvas = document.getElementById('webgl');
    const gl = canvas.getContext("webgl");
    if (!gl) {
        console.log('Failed to get the rendering context for WebGL');
        return;
    }

    if (!initShaders(gl, VSHADER_SOURCE, FSHADER_SOURCE)) {
        console.log('Failed to intialize shaders.');
        return;
    }

    gl.clearColor(0, 0, 0, 1);
    gl.clear(gl.COLOR_BUFFER_BIT);

    const vertices = {
        data: new Float32Array([
            0.0, 0.5,
            -0.5, -0.5,
            0.5, -0.5
        ]),
        vertexNumber: 3,
        count: 2,
    }

    initVertexBuffers(gl, vertices)

    gl.drawArrays(gl.POINTS, 0, vertices.vertexNumber);
}

function initVertexBuffers(gl, {data, count}) {
    const vertexBuffer = gl.createBuffer();
    if (!vertexBuffer) {
        console.log('建立緩衝區物件失敗');
        return -1;
    }

    gl.bindBuffer(gl.ARRAY_BUFFER, vertexBuffer);

    gl.bufferData(gl.ARRAY_BUFFER, data, gl.STATIC_DRAW);

    const a_Position = gl.getAttribLocation(gl.program, 'a_Position');
    if (a_Position < 0) {
        console.log('Failed to get the storage location of a_Position');
        return -1;
    }

    gl.vertexAttribPointer(a_Position, count, gl.FLOAT, false, 0, 0);

    gl.enableVertexAttribArray(a_Position);
}
繪製三個點v2
需求
需求:繪製三個不同顏色的點(基於版本1),效果如下:

Tip: 繪製三個點不同顏色的點其實也就完成了漸變三角形的繪製。這裡呼叫了兩次 drawArrays(),也就是繪製了兩個圖元,一系列點、三角形。
核心程式碼
相對版本1,變化的程式碼如下:
 const VSHADER_SOURCE = `
 attribute vec4 a_Position;
+attribute vec4 a_Color;
+varying vec4 v_Color;
 void main() {
   gl_Position = a_Position;
-  gl_PointSize = 10.0;
+  gl_PointSize = 10.0;
+  v_Color = a_Color;
 }
 `

 const FSHADER_SOURCE = `
+precision mediump float;
+varying vec4 v_Color;
 void main() {
-  gl_FragColor = vec4(1.0, 0.0, 0.0, 1.0);
+  gl_FragColor = v_Color;
 }
 `

function main() {
     const vertices = {
         data: new Float32Array([
-            0.0, 0.5,
-            -0.5, -0.5,
-            0.5, -0.5
+            0.0,   0.5, 1.0, 0.0, 0.0,
+            -0.5, -0.5, 0.0, 1.0, 0.0,
+            0.5,  -0.5, 0.0, 0.0, 1.0,
         ]),
         vertexNumber: 3,
         count: 2,
     initVertexBuffers(gl, vertices)

     gl.drawArrays(gl.POINTS, 0, vertices.vertexNumber);
+    gl.drawArrays(gl.TRIANGLE_FAN, 0, vertices.vertexNumber);
 }

function initVertexBuffers(gl, {data, count}) {
     const vertexBuffer = gl.createBuffer();

-    gl.vertexAttribPointer(a_Position, count, gl.FLOAT, false, 0, 0);

+    const FSIZE = data.BYTES_PER_ELEMENT;
+    gl.vertexAttribPointer(a_Position, count, gl.FLOAT, false, FSIZE * 5, 0);
     gl.enableVertexAttribArray(a_Position);
+    const a_Color = gl.getAttribLocation(gl.program, 'a_Color');
+    if (a_Color < 0) {
+        console.log('Failed to get the storage location of a_Color');
+        return -1;
+    }
+    gl.vertexAttribPointer(a_Color, 3, gl.FLOAT, false, FSIZE * 5, FSIZE * 2);
+    gl.enableVertexAttribArray(a_Color);
 }
完整程式碼
const VSHADER_SOURCE = `
attribute vec4 a_Position;
attribute vec4 a_Color;
varying vec4 v_Color;
void main() {
  gl_Position = a_Position;
  gl_PointSize = 10.0;
  v_Color = a_Color;
}
`

const FSHADER_SOURCE = `
precision mediump float;
varying vec4 v_Color;
void main() {
  gl_FragColor = v_Color;
}
`

function main() {
    const canvas = document.getElementById('webgl');
    const gl = canvas.getContext("webgl");
    if (!gl) {
        console.log('Failed to get the rendering context for WebGL');
        return;
    }

    if (!initShaders(gl, VSHADER_SOURCE, FSHADER_SOURCE)) {
        console.log('Failed to intialize shaders.');
        return;
    }

    gl.clearColor(0, 0, 0, 1);
    gl.clear(gl.COLOR_BUFFER_BIT);

    const vertices = {
        data: new Float32Array([
            0.0,   0.5, 1.0, 0.0, 0.0,
            -0.5, -0.5, 0.0, 1.0, 0.0,
            0.5,  -0.5, 0.0, 0.0, 1.0,
        ]),
        vertexNumber: 3,
        count: 2,
    }

    initVertexBuffers(gl, vertices)

    gl.drawArrays(gl.POINTS, 0, vertices.vertexNumber);
    gl.drawArrays(gl.TRIANGLE_FAN, 0, vertices.vertexNumber);
}

function initVertexBuffers(gl, { data, count }) {
    const vertexBuffer = gl.createBuffer();
    if (!vertexBuffer) {
        console.log('建立緩衝區物件失敗');
        return -1;
    }

    gl.bindBuffer(gl.ARRAY_BUFFER, vertexBuffer);

    gl.bufferData(gl.ARRAY_BUFFER, data, gl.STATIC_DRAW);

    const a_Position = gl.getAttribLocation(gl.program, 'a_Position');
    if (a_Position < 0) {
        console.log('Failed to get the storage location of a_Position');
        return -1;
    }

    const FSIZE = data.BYTES_PER_ELEMENT;
    gl.vertexAttribPointer(a_Position, count, gl.FLOAT, false, FSIZE * 5, 0);
    gl.enableVertexAttribArray(a_Position);
    const a_Color = gl.getAttribLocation(gl.program, 'a_Color');
    if (a_Color < 0) {
        console.log('Failed to get the storage location of a_Color');
        return -1;
    }
    gl.vertexAttribPointer(a_Color, 3, gl.FLOAT, false, FSIZE * 5, FSIZE * 2);
    gl.enableVertexAttribArray(a_Color);
}
改變顏色(varying)
前面我們說過著色器語言(GLSL ES)有三種型別的「變數」,我們已經使用了兩種:
attribute- 傳輸的是那些與頂點相關的資料。只有頂點著色器才能使用。例如頂點的位置、大小、顏色uniform- 傳輸的是那些對於所有頂點都相同的資料。例如變化矩陣
現在我們可以將顏色從 js 傳入 attribute。但真正影響顏色繪製的是片元著色器的 gl_FragColor,目前我們是靜態設定。就像這樣:
const FSHADER_SOURCE = `
  void main() {
    gl_FragColor = vec4(1.0, 0.0, 0.0, 1.0);
  }
`
如何將頂點著色器中的資料傳入片元著色器?

我們曾經通過 uniform 給片元著色器傳遞顏色。就像這樣:
const FSHADER_SOURCE = `
uniform vec4 u_FragColor;
void main() {
  gl_FragColor = u_FragColor;
}
`
但是 uniform 是相同的的變數,沒法為每個頂點準備一個值。為了讓每個點的顏色不同,需要使用varying(不同的)變數。
使用 varying 給片元著色器傳遞值(顏色)。就像這樣:
const VSHADER_SOURCE = `
// 定義一個 attribute 變數,用於接收 js 傳入的顏色
attribute vec4 a_Color;
// 定義 varying 變數。用於傳遞給片元著色器
varying vec4 v_Color;
void main() {
  gl_Position = a_Position;
  gl_PointSize = 10.0;
  // 給 varying 變數賦值
  v_Color = a_Color;
}
`

const FSHADER_SOURCE = `
precision mediump float;
// 宣告一個與頂點著色器中相同的 varying 變數名,用於接收顏色
varying vec4 v_Color;
void main() {
  gl_FragColor = v_Color;
}
`
程式碼解析:
- 通過在頂點著色器中宣告一個 attribute 變數用於接收 js 傳入的顏色
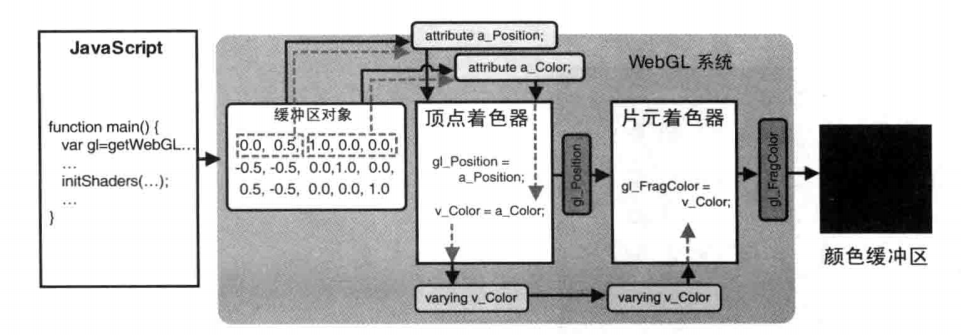
- 在頂點著色器中宣告一個 varying 變數,用於接收 attribute 中的顏色,並將顏色傳給片元著色器
- 片元著色器宣告一個與頂點著色器中相同的 varying 變數名,接收顏色

Tip:頂點著色器中的 varying 變數 v_Color 與 片元著色器中的 varying 變數 v_Color 不同。中間涉及 varying 內插,下文會介紹。
合併緩衝區
漸變三角形將頂點和每個頂點的顏色寫在一起,資料結構如下:
         data: new Float32Array([
-            0.0, 0.5,
-            -0.5, -0.5,
-            0.5, -0.5
+            0.0,   0.5, 1.0, 0.0, 0.0,
+            -0.5, -0.5, 0.0, 1.0, 0.0,
+            0.5,  -0.5, 0.0, 0.0, 1.0,
         ]),
在漸變三角形範例中我們只用了一個緩衝區物件(const vertexBuffer = gl.createBuffer();),當然也可以使用兩個緩衝區物件來實現相同的效果。核心程式碼如下:
// 宣告第二個緩衝區物件:顏色緩衝區
const vertexColorBuffer = gl.createBuffer();
if (!vertexColorBuffer) {
    console.log('建立緩衝區物件失敗');
    return -1;
}

gl.bindBuffer(gl.ARRAY_BUFFER, vertexColorBuffer);
// 顏色資料抽離出來
const colors = new Float32Array([
    1.0, 0.0, 0.0,
    0.0, 1.0, 0.0,
    0.0, 0.0, 1.0,
]);
gl.bufferData(gl.ARRAY_BUFFER, colors, gl.STATIC_DRAW);
const a_Color = gl.getAttribLocation(gl.program, 'a_Color');
if (a_Color < 0) {
    console.log('Failed to get the storage location of a_Color');
    return -1;
}
gl.vertexAttribPointer(a_Color, 3, gl.FLOAT, false, 0, 0);
gl.enableVertexAttribArray(a_Color);
將多個緩衝區合併,程式碼更簡潔。思路:
- 首先將頂點位置和顏色寫在一個陣列中
- 然後通過 vertexAttribPointer() 來讀取不同的資訊(頂點位置、顏色)。
請看程式碼:
const vertices = {
    // 頂點位置和顏色寫在一起
    data: new Float32Array([
        0.0,   0.5, 1.0, 0.0, 0.0,
        -0.5, -0.5, 0.0, 1.0, 0.0,
        0.5,  -0.5, 0.0, 0.0, 1.0,
    ]),
    vertexNumber: 3,
    count: 2,
}
// 每個元素所佔用的位元組數
const FSIZE = data.BYTES_PER_ELEMENT;
// FSIZE * 5 - 指定每個點的位元組數
// 0 - 偏移量
gl.vertexAttribPointer(a_Position, count, gl.FLOAT, false, FSIZE * 5, 0);
/*
提取顏色:
3 - 分量數
FSIZE * 2 - 偏移量,從第三個開始
*/
gl.vertexAttribPointer(a_Color, 3, gl.FLOAT, false, FSIZE * 5, FSIZE * 2);
例如提取顏色:每個點總共位元組數是 FSIZE * 5,顏色佔3個分量,從第三(FSIZE * 2)個數開始讀取 3 個分量。
為什麼是漸變
我們定義了三個不同顏色的點,繪製出來的三角形為什麼卻是漸變色彩?

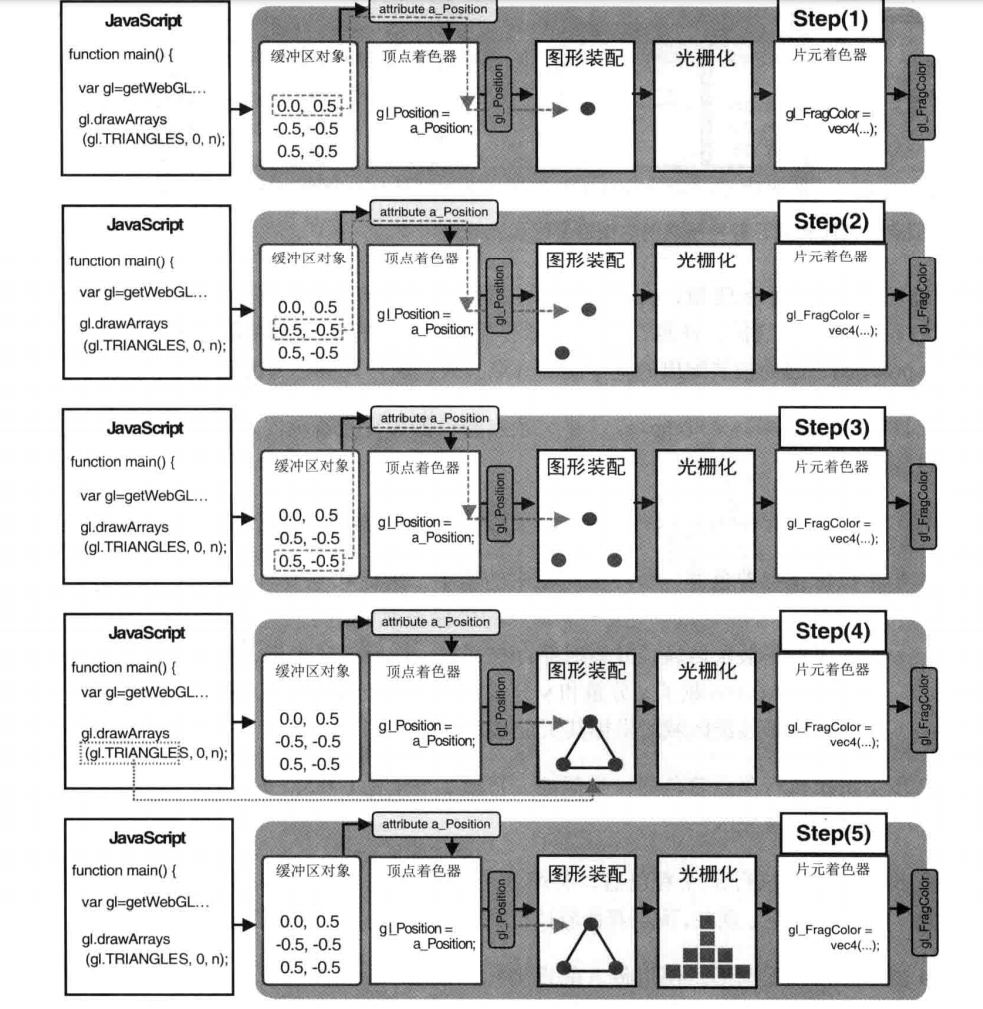
要回答這個問題,需要說一下整個繪製過程。
請看下圖:

- 首先確定頂點座標,我們傳了三個頂點
- 接著將孤立的頂點座標
裝配成幾何圖形。幾何圖形的類別由 drawArrays() 第一個引數決定 - 將裝配好的幾何圖形轉為
片元(簡單認為是畫素,這裡為了示意,只顯示了10個片元),這個過程稱為光柵化。
圖形裝配和光柵化過程如下圖所示:

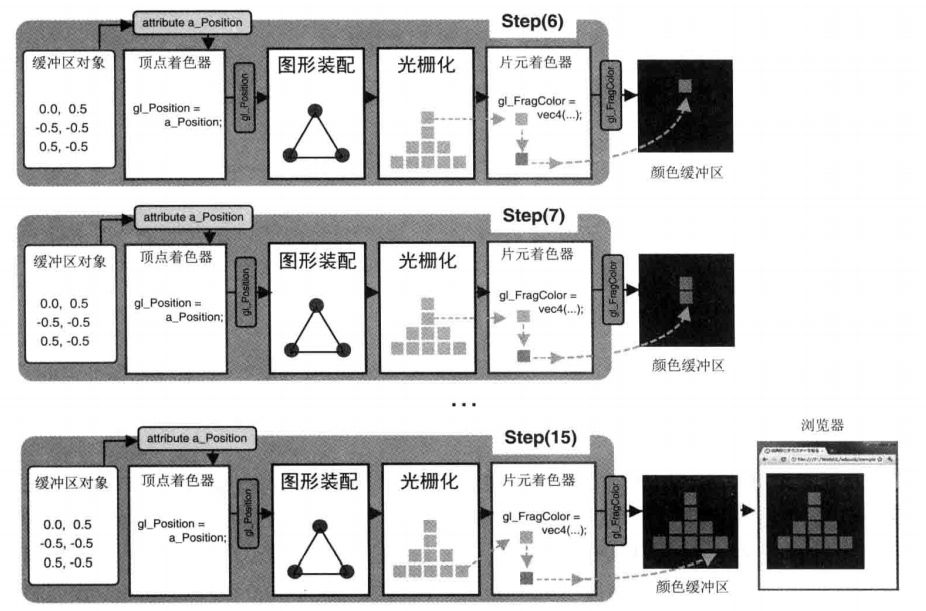
一旦光柵化結束,程式就開始逐片元呼叫片元著色器。這裡呼叫了10次,每呼叫一次就處理一個片元。對於每個片元,片元著色器計算出該片元的顏色,並寫入顏色緩衝區,當最後一個片元被處理完成,瀏覽器就會顯示最終結果。就像這樣:

漸變其實是由 varying 變數的內插導致的。比如繪製一條線,一端是紅色,一端是藍色,我們在頂點著色器向 varying 變數 v_Color 賦上兩個顏色,webgl 會計算出線段上所有點(片元)的顏色,並賦值給片元著色器中的 varying 變數 v_Color。就像這樣:

頂點著色器中的 v_Color 和片元著色器中的 v_Color 不是一回事。示意如下:

其他章節請看:
出處:https://www.cnblogs.com/pengjiali/p/17216109.html
本文版權歸作者和部落格園共有,歡迎轉載,但未經作者同意必須保留此段宣告,且在文章頁面明顯位置給出原文連線。