如何在 Net6.0 中對 WebAPI 進行 JWT 認證和授權
一、簡介
我們做微服務開發,或者說做分散式開發,有一項技術我們是避不開的,那就是WebAPI,在 Net6.0中,有兩類 WebAPI,一類是極簡 WebAPI,它砍掉了很多冗餘的東西,更純粹的是做 API的,也更適合做微服務的開發。另外一類就是我們通常使用的正常 API,這個沒得說,也是我們使用最多的。
我們開發的API必須做鑑權和授權操作,否則,就成了裸跑了,那對於系統來說是很危險的。總體來說,一般的WebAPI和MinimalAPI鑑權的過程都是差不多的,但是也有微小的差異。今天我們就來詳細說一下,內容很簡單,大家有了基礎可以隨意去擴充套件。
開發環境詳情:
作業系統:Windows 10 Professional
開發工具:Visual Studio 2022
開發語言:C#
開發平臺:Asp.Net Core 6.0 WebAPI
測試工具:PostMan
二、具體步驟
我們在做具體的開發前,也要做一些準備工作,我們要做鑑權和授權,尤其是要使用 JWT 做鑑權和授權,這裡麵包含兩個專案,一個是鑑權伺服器,用於提供 JWTToken,另外一個專案是需要做鑑權和授權的具體 WebAPI 專案。有了準備,我們就可以開始了。
1、第一個專案:PatrickLiu.Net6API.AuthenticationCenter,用於提供獲取 Token 介面。

(1)、Program.cs 原始碼如下,紅色是重要程式碼:
 1 using PatrickLiu.Net6API.Extensions;
 2
 3 var builder = WebApplication.CreateBuilder(args);
 4
 5 builder.Services.AddControllers();
 6 builder.Services.AddEndpointsApiExplorer();
 7 builder.Services.AddSwaggerGen();
 8
 9 builder.Services.Configure<JWTTokenOption>(builder.Configuration.GetSection("JWTTokenOption"));
10 builder.Services.AddTransient<IJWTService, JWTService>();
11
12 var app = builder.Build();
13
14 app.UseSwagger();
15 app.UseSwaggerUI();
16
17 app.MapControllers();
18
19 app.Run();
(2)、AuthenticationController 原始碼如下:
 1 using Microsoft.AspNetCore.Mvc;
 2 using Newtonsoft.Json;
 3 using PatrickLiu.Net6API.Extensions;
 4
 5 namespace PatrickLiu.Net6API.AuthenticationCenter.Controllers
 6 {
 7     [ApiController]
 8     [Route("api/[controller]/[action]")]
 9     public class AuthenticationController : ControllerBase
10     {
11         private readonly IJWTService _jWTService;
12
13         /// <summary>
14         /// 範例化。
15         /// </summary>
16         /// <param name="jWTService">注入服務。</param>
17         public AuthenticationController(IJWTService jWTService)
18         {
19             _jWTService = jWTService;
20         }
21
22         /// <summary>
23         /// 根據使用者名稱和密碼獲取 Token。
24         /// </summary>
25         /// <param name="userName">使用者名稱。</param>
26         /// <param name="password">密碼。</param>
27         /// <returns></returns>
28         [HttpPost]
29         public string Login(string userName, string password)
30         {
31             if (!string.IsNullOrEmpty(userName) && !string.IsNullOrEmpty(password))
32             {
33                 if (string.Compare(userName, "PatrickLiu", true) == 0 && string.Compare(password, "liulei123456", true) == 0)
34                 {
35                     string token = _jWTService.GetToken(userName, password);
36                     return JsonConvert.SerializeObject(new
37                     {
38                         Result = true,
39                         Token = token
40                     });
41                 }
42             }
43             return string.Empty;
44         }
45     }
46 }
(3)、appsettings.json 組態檔原始碼如下,紅色字型要注意:
 1 {
 2   "Logging": {
 3     "LogLevel": {
 4       "Default": "Information",
 5       "Microsoft.AspNetCore": "Warning"
 6     }
 7   },
 8   "AllowedHosts": "*",
 9   "JWTTokenOption": {
10     "Audience": "PatrickLiu.com",
11     "Issuer": "PatrickLiu.com",
12     "SecurityKey": "12333456677655ffrrffff"
13   }
14 }
2、還有一個公共專案,用於存放公共型別。專案型別:PatrickLiu.Net6API.Extensions,專案型別:Net 6.0類庫。

(1)、IJWTService 原始碼如下:
 1 namespace PatrickLiu.Net6API.Extensions
 2 {
 3     /// <summary>
 4     /// 提供 Token 的服務。
 5     /// </summary>
 6     public interface IJWTService
 7     {
 8         /// <summary>
 9         /// 獲取 Token。
10         /// </summary>
11         /// <param name="userName">使用者名稱</param>
12         /// <param name="password">密碼</param>
13         /// <returns></returns>
14         string GetToken(string userName,string password);
15     }
16 }
(2)、JWTService 原始碼如下:
 1 using Microsoft.Extensions.Options;
 2 using Microsoft.IdentityModel.Tokens;
 3 using System.IdentityModel.Tokens.Jwt;
 4 using System.Security.Claims;
 5 using System.Security.Cryptography;
 6 using System.Text;
 7
 8 namespace PatrickLiu.Net6API.Extensions
 9 {
10     /// <summary>
11     /// 提供 Token 服務的實現。
12     /// </summary>
13     public sealed class JWTService : IJWTService
14     {
15         private readonly IOptionsMonitor<JWTTokenOption> _option;
16
17         /// <summary>
18         /// 範例化。
19         /// </summary>
20         /// <param name="option">注入選項。</param>
21         public JWTService(IOptionsMonitor<JWTTokenOption> option)
22         {
23             _option = option;
24         }
25
26         /// <summary>
27         ///  獲取 Token。
28         /// </summary>
29         /// <param name="userName">使用者名稱。</param>
30         /// <param name="password">密碼</param>
31         /// <returns></returns>
32         public string GetToken(string userName, string password)
33         {
34             #region 有效載荷
35
36             var claims = new[] {
37             new Claim(ClaimTypes.Name, userName),
38             new Claim("NickName",userName),
39             new Claim(ClaimTypes.Role,"Administrator"),
40             new Claim("Password",password),
41             };
42
43             #endregion
44
45             SymmetricSecurityKey key = new SymmetricSecurityKey(Encoding.UTF8.GetBytes(_option.CurrentValue.SecurityKey!));
46
47             SigningCredentials signingCredentials = new SigningCredentials(key, SecurityAlgorithms.HmacSha256);
48
49             JwtSecurityToken token = new JwtSecurityToken(
50                 issuer: _option.CurrentValue.Issuer!,
51                 audience: _option.CurrentValue.Audience!,
52                 claims: claims,
53                 expires: DateTime.Now.AddMinutes(5),
54                 signingCredentials: signingCredentials
55                 );
56
57             string returnToken = new JwtSecurityTokenHandler().WriteToken(token);
58
59             return returnToken;
60         }
61     }
62 }
(3)、JWTTokenOption 原始碼如下:
 1 namespace PatrickLiu.Net6API.Extensions
 2 {
 3     /// <summary>
 4     /// 用於接受設定資料實體型別。
 5     /// </summary>
 6     public sealed class JWTTokenOption
 7     {
 8         /// <summary>
 9         /// 獲取或者設定接受者。
10         /// </summary>
11         public string? Audience { get; set; }
12
13         /// <summary>
14         /// 獲取或者設定加密 key。
15         /// </summary>
16         public string? SecurityKey { get; set; }
17
18         /// <summary>
19         /// 獲取或者設定釋出者
20         /// </summary>
21         public string? Issuer { get; set; }
22     }
23 }
(4)、授權伺服器執行起來如下:


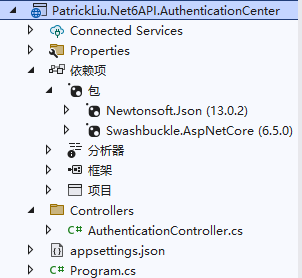
3、現在是普通WebAPI型別專案:
(1)、我們先看一下專案截圖,有一個直觀感受,截圖如下:

(2)、如果想做WebAPI的JWT的鑑權和授權,必須通過 Nuget 載入的程式包,名稱如下:
Microsoft.AspNetCore.Authentication.JwtBearer
Microsoft.IdentityModel.Tokens
(3)、Program.cs原始碼如下,紅色部分表示健全和授權的重要部分。
 1 using Microsoft.AspNetCore.Authentication.JwtBearer;
 2 using Microsoft.IdentityModel.Tokens;
 3 using PatrickLiu.Net6API.Extensions;
 4 using System.Text;
 5
 6 var builder = WebApplication.CreateBuilder(args);
 7
 8 builder.Services.AddControllers();
 9 builder.Services.AddEndpointsApiExplorer();
10 builder.Services.AddSwaggerGen();
11
12 #region 設定鑑權
13
14 //增加的鑑權邏輯,角色認證、策略認證都是支援的,和Net Core MVC 支援的一樣。
15 JWTTokenOption tokenOption = new JWTTokenOption();
16 builder.Configuration.Bind("JWTTokenOption", tokenOption);
17 //builder.Services.Configure<JWTTokenOption>(builder.Configuration.GetSection("JWTTokenOption"));
18 builder.Services.AddAuthentication(JwtBearerDefaults.AuthenticationScheme)
19     .AddJwtBearer(option =>
20 {
21     option.TokenValidationParameters = new TokenValidationParameters()
22     {
23         ValidateIssuer = true,//是否驗證 Issuer(發行商)
24         ValidateAudience = true,//是否驗證 Audience(受眾者)
25         ValidateLifetime = true,//是否驗證失效時間
26         ValidateIssuerSigningKey = true,//是否驗證 Issuer 的簽名鍵
27         ValidAudience=tokenOption.Audience,
28         ValidIssuer=tokenOption.Issuer,// ValidAudience,ValidIssuer這兩項的值要和驗證中心的只保持一致。
29         IssuerSigningKey=new SymmetricSecurityKey(Encoding.UTF8.GetBytes(tokenOption.SecurityKey!))
30     };
31 });
32
33 #endregion
34
35 var app = builder.Build();
36
37 app.UseSwagger();
38 app.UseSwaggerUI();
39
40 app.UseAuthentication();
41 app.UseAuthorization();42
43 app.MapControllers();
44
45 app.Run();
(4)、要實現授權的Controller增加【Authorize】特性,紅色部分要注意。
 1 using Microsoft.AspNetCore.Authentication.JwtBearer;
 2 using Microsoft.AspNetCore.Authorization;
 3 using Microsoft.AspNetCore.Mvc;
 4
 5 namespace PatrickLiu.Net6API.Resouces.Controllers
 6 {
 7     [Route("api/[controller]")]
 8     [ApiController]
 9     public class SecondController : ControllerBase
10     {
11         /// <summary>
12         /// 這裡使用 JWT 進行授權檢查。
13         /// </summary>
14         /// <returns></returns>
15         [HttpGet]
16         [Authorize(AuthenticationSchemes =JwtBearerDefaults.AuthenticationScheme)]
17         public object GetData()
18         {
19             return new
20             {
21                 Id = 1234,
22                 Name = "PatrickLiu"
23             };
24         }
25     }
26 }
(5)、appsettings.json 組態檔,這裡的設定要和【PatrickLiu.Net6API.AuthenticationCenter】專案設定一樣,紅色部分要注意。
 1 {
 2   "Logging": {
 3     "LogLevel": {
 4       "Default": "Information",
 5       "Microsoft.AspNetCore": "Warning"
 6     }
 7   },
 8   "AllowedHosts": "*",
 9   "JWTTokenOption": {
10     "Audience": "PatrickLiu.com",
11     "Issuer": "PatrickLiu.com",
12     "SecurityKey": "12333456677655ffrrffff"
13   }
14 }
4、現在是Minimal WebAPI型別專案:
其實,WebAPI和MinimalAPI鑑權和授權總體都是差不多,差別不大。
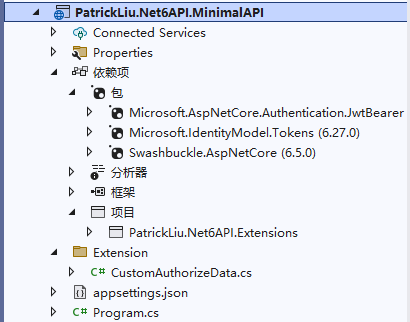
(1)、我們先看一下專案截圖,有一個直觀感受,截圖如下:

(2)、如果想做WebAPI的JWT的鑑權和授權,必須通過 Nuget 載入的程式包,名稱如下:
Microsoft.AspNetCore.Authentication.JwtBearer
Microsoft.IdentityModel.Tokens
(3)、Program.cs 原始碼如下,紅色標註要特別重要。
 1 using Microsoft.AspNetCore.Authentication.JwtBearer;
 2 using Microsoft.IdentityModel.Tokens;
 3 using PatrickLiu.Net6API.Extensions;
 4 using PatrickLiu.Net6API.MinimalAPI.Extension;
 5 using System.Text;
 6
 7 var builder = WebApplication.CreateBuilder(args);
 8
 9 builder.Services.AddEndpointsApiExplorer();
10 builder.Services.AddSwaggerGen();
11
12 #region 1、設定鑑權邏輯
13
14 //增加的鑑權邏輯,角色認證、策略認證都是支援的,和Net Core MVC 支援的一樣。
15 JWTTokenOption tokenOption = new JWTTokenOption();
16 builder.Configuration.Bind("JWTTokenOption", tokenOption);
17 builder.Services.AddAuthentication(JwtBearerDefaults.AuthenticationScheme)
18     .AddJwtBearer(option =>
19     {
20         option.TokenValidationParameters = new TokenValidationParameters()
21         {
22             ValidateIssuer = true,//是否驗證 Issuer(發行商)
23             ValidateAudience = true,//是否驗證 Audience(受眾者)
24             ValidateLifetime = true,//是否驗證失效時間
25             ValidateIssuerSigningKey = true,//是否驗證 Issuer 的簽名鍵
26             ValidAudience = tokenOption.Audience,
27             ValidIssuer = tokenOption.Issuer,// ValidAudience,ValidIssuer這兩項的值要和驗證中心的只保持一致。
28             IssuerSigningKey = new SymmetricSecurityKey(Encoding.UTF8.GetBytes(tokenOption.SecurityKey!))
29         };
30     });
31
32 #endregion
33
34 #region 2、設定授權邏輯
35
36 //在這裡不支援增加授權資訊,比如:builder.Services.AddAuthorization(JwtBearerDefaults.AuthenticationScheme);,這樣寫是不行的,
  我們可以擴充套件實現 IAuthorizeData 來達到同樣的目的。
37 builder.Services.AddAuthorization();
38
39 #endregion
40
41 var app = builder.Build();
42
43 app.UseSwagger();
44 app.UseSwaggerUI();
45
46 #region 3、使用鑑權授權中介軟體
47
48 app.UseAuthentication();
49 app.UseAuthorization();
50
51 #endregion
52
53 #region 4、實現授權要求
54
55 app.MapGet("/User", (int id, string name) =>
56 {
57     return "Hello World!";
58 }).RequireAuthorization(new CustomAuthorizeData()
59 {
60     AuthenticationSchemes = JwtBearerDefaults.AuthenticationScheme
61     //可以增加角色授權
62     //,Roles="",
63     //可以增加策略授權。
64     //Policy=""
65 });
66
67 app.MapGet("/Products", (HttpContext context) =>
68 {
69     return new
70     {
71         Id = 123456,
72         Name = "IPhone14 Pro Max",
73         Price = 4839.23,
74         DateOfProduction = "2023/2/12 23:22"
75     };
76 });
77
78 #endregion
79
80 app.Run();
(4)、擴充套件 IAuthorizeData 介面實現CustomAuthorizeData,可以實現對MinimalAPI授權。
 1 using Microsoft.AspNetCore.Authorization;
 2
 3 namespace PatrickLiu.Net6API.MinimalAPI.Extension
 4 {
 5     public sealed class CustomAuthorizeData : IAuthorizeData
 6     {
 7         public string? Policy { get; set; }
 8         public string? Roles { get; set; }
 9         public string? AuthenticationSchemes { get; set; }
10     }
11 }
(5)、appsettings.json 組態檔原始碼如下,紅色部分是重要程式碼。
 1 {
 2   "Logging": {
 3     "LogLevel": {
 4       "Default": "Information",
 5       "Microsoft.AspNetCore": "Warning"
 6     }
 7   },
 8   "AllowedHosts": "*",
 9   "JWTTokenOption": {
10     "Audience": "PatrickLiu.com",
11     "Issuer": "PatrickLiu.com",
12     "SecurityKey": "12333456677655ffrrffff"
13   }
14 }
三、結束語
好了,今天就寫到這裡了,現在總結一下,如果想要給WebAPI或者MinimalAPI實現授權和鑑權,總體步驟是差不多的,第一步,都要啟用連個中介軟體,就是授權和鑑權中介軟體(app.UseAuthorization()、app.UseAuthentication()),然後要設定鑑權的設定邏輯,差別就在授權方面,普通WebAPI直接通過 AuthorizeAttribute 特性標註在需要授權的方法或者 Controller 型別上就可以。普通WebAPI支援所有的角色授權、策略授權等方法,並且也支援所有的Filter。MinimalAPI要實現授權,要在GetXXX方法後面呼叫RequireAuthorization()來實現授權的內容。不忘初心,繼續努力,老天不會辜負努力的人。