webgl 系列 —— 變換矩陣和動畫
其他章節請看:
變換矩陣和動畫
動畫就是不停地將某個東西變換(transform)。例如將三角形不停地旋轉就是一個動畫
和 CSS transform 類似,變換有三種形式:平移、縮放和旋轉。
簡單的變換用普通表示式容易實現,如果事情複雜,比如旋轉後平移,這時就可以使用變換矩陣。
普通表示式
平移
比如要平移一個三角形,只需要將三個頂點移動相同的距離即可(這是一個逐頂點操作)
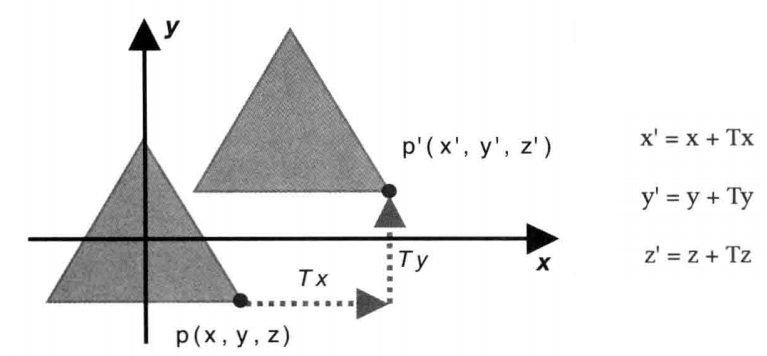
用二維向量表示,就像這樣:[x1, y1] + [tx1, ty2] = [x2, y2]
比如要實現如下效果:

前面我們已經講過三角形了,這裡不再冗餘,改動的核心程式碼如下:
 const VSHADER_SOURCE = `
 attribute vec4 a_Position;
+uniform vec4 u_Translation;
 void main() {
-  gl_Position = a_Position;
+  gl_Position = a_Position + u_Translation;
   gl_PointSize = 10.0;
 }
 `
function main() {
     gl.clearColor(0, 0, 0, 1);
     gl.clear(gl.COLOR_BUFFER_BIT);

+    const u_Translation = gl.getUniformLocation(gl.program, 'u_Translation');
+    if (!u_Translation) {
+        return;
+    }
+    gl.uniform4f(u_Translation, 0.5, 0.5, 0, 0.0);
+
a_Position 和 u_Translation 都是 vec4 型別,使用 + 號,兩個向量(也稱向量)對應的分量會被同時相加(向量相加是著色器語言的特性之一)。就像這樣:

縮放
以一個點為例,比如要將 A 點縮放到 B 點,乘以一個係數就好,係數小於1表示縮小,係數大於1表示放大:

用二維向量表示,就像這樣:k[x1, y1] = [x2, y2]
旋轉
比如要將 p 點旋轉 β,推匯出來的公式如下:

變換矩陣
概念
變換矩陣(非常適合操作計算機圖形)是數學線性代數中的一個概念。請看下圖:
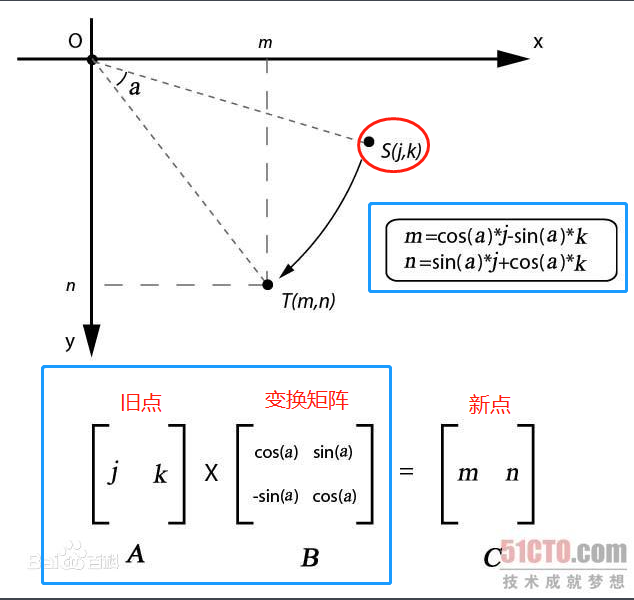
將點從 S 旋轉到 T,新座標(m, n)可以用普通表示式表示,同樣可以用變換矩陣來表示(舊點 * 變換矩陣 = 新點)
變換矩陣和向量相乘有一個規則,並會得到一個新的向量。
Tip:webgl 中的一個點,在座標系中就相當於一個向量
在 webgl 中變換矩陣和向量相乘的規則如下:

注:牢記公式:變換矩陣 * 向量 會生成一個新的向量;順序不同結果也不同,例如:向量 * 變換矩陣
旋轉
將旋轉的普通表示式轉為變換矩陣:

四維矩陣
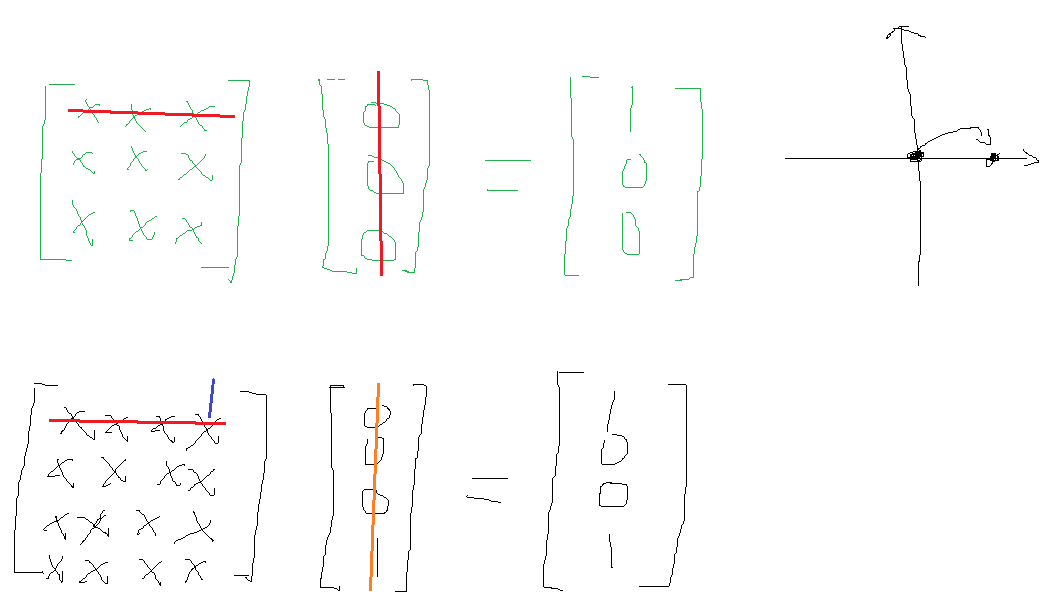
為什麼要用四維矩陣?
因為三維矩陣矩陣不夠用,比如將 (0,0,0) 移動到 (1, 0, 0),用三維矩陣是表示不出來的,而四維卻可以。請看下圖:
平移
將平移的普通表示式轉為變換矩陣:

縮放
將縮放的普通表示式轉為變換矩陣:

手動矩陣
為了更好的理解矩陣。我們先不使用矩陣庫,直接通過 js 來使用矩陣實現變換。
矩陣顛倒
js 中沒有矩陣資料型別,這裡用陣列表示。
比如要表示如下一個平移矩陣:
1, 0, 0, Tx
0, 1, 0, Ty
0, 0, 1, Tz
0, 0, 0, 1
陣列就是這樣:
const matrix = [
  1, 0, 0, Tx,
  0, 1, 0, Ty,
  0, 0, 1, Tz,
  0, 0, 0, 1,
]
而要表示如上這個變換矩陣,在 webgl 中就得將陣列顛倒:行變成列。
所以最後就得這麼寫:
const matrix = [
  1, 0, 0, 0,
  0, 1, 0, 0,
  0, 0, 1, 0,
  Tx, Ty, Tz, 1,
]
Tip: 對於縮放,顛倒後和顛倒前是相同的。
平移
需求:將三角形向右上角偏移。
效果:

前面我們已經學會畫三角形,筆者在此基礎上改動如下程式碼:
 const VSHADER_SOURCE = `
+// mat4 是一種4維矩陣
+uniform mat4 u_xformMatrix;
 void main() {
-  gl_Position = a_Position ;
+  // 注:必須是 "變換矩陣 * 向量",不可是 "向量 * 變換矩陣"
+  gl_Position = u_xformMatrix * a_Position ;
   gl_PointSize = 10.0;
 }
 `
function main() {
     initVertexBuffers(gl, vertices)

+    變換(gl)

    gl.drawArrays(gl.TRIANGLES, 0, vertices.vertexNumber);
}

+function 變換(gl){
+    const u_xformMatrix = gl.getUniformLocation(gl.program, 'u_xformMatrix');
+    if (!u_xformMatrix) {
+        console.log('Failed to get the storage location of u_xformMatrix');
+        return;
+    }
+    // 四維矩陣
+    const [Tx, Ty, Tz] = [0.5, 0.5, 0];
+    // webgl 中矩陣的行和列是要顛倒的,比如要傳一個 A 矩陣,給 webgl 的A矩陣就得顛倒,也就是將 A 的第一行變為第一列,第二行變成第二列
+    const matrix = new Float32Array([
+        1, 0, 0, 0,
+        0, 1, 0, 0,
+        0, 0, 1, 0,
+        Tx, Ty, Tz, 1,
+    ])
+    // 將矩陣分配給 u_xformMatrix
+    gl.uniformMatrix4fv(u_xformMatrix, false, matrix);
+}
程式碼解析:
- 前面已經說過,變換是一個
逐頂點的操作,每個頂點都相同,所以不用 attribute 而用 uniform mat4表示4*4的矩陣- 向量(新點) =
變換矩陣* 向量(舊點) - gl.uniformMatrix4fv(location, transpose, value) 為 uniform variables 指定矩陣值。webgl 中 transpose 必須為 false.
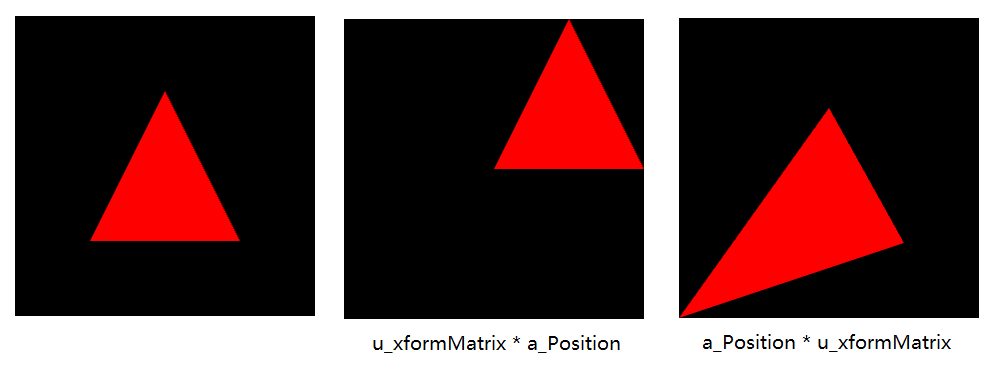
注:如果改變變換矩陣 * 向量的順序,平移效果就不對了:
矩陣庫
自己手寫矩陣陣列非常麻煩。
openGL 提供了一系列有用的函數幫助我們建立變換矩陣。例如通過 glTranslate 傳入在 x、y、z 上平移的距離,就可以建立一個平移矩陣。
既然 webgl 中未提供建立變換矩陣的函數,我們就使用庫來做這部分工作。
gl-matrix
筆者使用一個較流行的矩陣庫 gl-matrix —— 用於高效能WebGL應用程式的Javascript矩陣和向量(又稱為向量)庫。
下載後,在 dist 目錄下看到 esm 資料夾和兩個 js 檔案:
toji-gl-matrix-4480752/dist (master)
$ ll
drwxr-xr-x 1 Administrator 197121      0 Mar  6 15:26 esm/
-rw-r--r-- 1 Administrator 197121  52466 Jan 10 05:24 gl-matrix-min.js
-rw-r--r-- 1 Administrator 197121 206643 Jan 10 05:24 gl-matrix.js
其實也就是提供兩種使用的方法:
- esm 通過
<script type="module" src="main.mjs"></script>這種方式使用 - 最常見的
<script src="animation.js"></script>
筆者選用第二種:在 html 中引入:<script src="./animation.js"></script>
這時在控制檯就有一個 glMatrix 全域性變數:
glMatrix
{glMatrix: {…}, mat2: {…}, mat2d: {…}, mat3: {…}, mat4: {…}, …}
    glMatrix: {EPSILON: 0.000001, ANGLE_ORDER: "zyx", RANDOM: ƒ, setMatrixArrayType: ƒ, …}
    mat2: {create: ƒ, clone: ƒ, copy: ƒ, identity: ƒ, fromValues: ƒ, …}
    mat2d: {create: ƒ, clone: ƒ, copy: ƒ, identity: ƒ, fromValues: ƒ, …}
    mat3: {create: ƒ, fromMat4: ƒ, clone: ƒ, copy: ƒ, fromValues: ƒ, …}
    mat4: {create: ƒ, clone: ƒ, copy: ƒ, fromValues: ƒ, set: ƒ, …}
    quat: {create: ƒ, identity: ƒ, setAxisAngle: ƒ, getAxisAngle: ƒ, getAngle: ƒ, …}
    quat2: {create: ƒ, clone: ƒ, fromValues: ƒ, fromRotationTranslationValues: ƒ, fromRotationTranslation: ƒ, …}
    vec2: {create: ƒ, clone: ƒ, fromValues: ƒ, copy: ƒ, set: ƒ, …}
    vec3: {create: ƒ, clone: ƒ, length: ƒ, fromValues: ƒ, copy: ƒ, …}
    vec4: {create: ƒ, clone: ƒ, fromValues: ƒ, copy: ƒ, set: ƒ, …}
官方檔案也是從這幾個模組來介紹的:mat2, mat2d, mat3, mat4, quat, quat2, vec2, vec3, vec4。
mat[234]就是2維3維4維矩陣vec[234]就是2維3維4維向量
四維矩陣
首先取得 mat4 模組,然後呼叫 create() 就會建立一個四維矩陣:
// 四維矩陣模組
const { mat4 } = glMatrix
// 建立一個4維單位矩陣
const matrix = mat4.create()
/*
Float32Array(16) [
    1, 0, 0, 0,
    0, 1, 0, 0,
    0, 0, 1, 0,
    0, 0, 0, 1]
*/
console.log(matrix)
Tip: create() 建立的是一個單位矩陣,如同數的乘法中的1
平移矩陣
fromTranslation - 平移矩陣
語法如下:
(static) fromTranslation(out, v) → {mat4}

Creates a matrix from a vector translation This is equivalent to (but much faster than): mat4.identity(dest); mat4.translate(dest, dest, vec);

Parameters:
Name	Type	         Description
out	    mat4	         mat4 receiving operation result
v	    ReadonlyVec3	 Translation vector

Returns:
out
請看範例:
mat4.fromTranslation(matrix, [0.5, 0.5, 0])
/*
    Float32Array(16) [
        1,   0,   0,   0,
        0,   1,   0,   0,
        0,   0,   1,   0,
        0.5, 0.5, 0,   1
    ]
*/
console.log(matrix)
matrix 是一個單位矩陣,通過該方法,即可得到一個向 x 和 y 各平移 0.5 的變換矩陣。
與之對應不修改原矩陣的方法是:translate(out, a, v)。語法如下:
(static) translate(out, a, v) → {mat4}

Translate a mat4 by the given vector

Parameters:
Name	Type	        Description
out	  mat4	        the receiving matrix
a	    ReadonlyMat4	the matrix to translate
v	    ReadonlyVec3	vector to translate by

Returns:
out
請看範例:
const matrix2 = mat4.create()
mat4.translate(matrix2, matrix, [0.5, 0.5, 0])
// Float32Array(16) [1, 0, 0, 0, 0, 1, 0, 0, 0, 0, 1, 0, 0, 0, 0, 1]
/*
    Float32Array(16) [
        1, 0, 0, 0,
        0, 1, 0, 0,
        0, 0, 1, 0,
        0, 0, 0, 1
    ]
*/
console.log(matrix)
/*
    Float32Array(16) [
        1,   0,   0,   0,
        0,   1,   0,   0,
        0,   0,   1,   0,
        0.5, 0.5, 0,   1
    ]
*/
console.log(matrix2)
matrix 沒有改變,最終變換矩陣輸出到 matrix2。
旋轉矩陣
fromRotation - 旋轉矩陣
建立一個旋轉矩陣。請看範例:
// fromRotation(out, rad, axis) - out 是要修改的矩陣、rad 旋轉角度、axis 圍繞哪個軸旋轉 [x, y, z]
const angle = 90
// 角度轉弧度
const rad = angle * Math.PI / 180;
const axis = [0, 0, 1];
// 等於 fromXRotation、fromYRotation、fromZRotation
mat4.fromRotation(matrix, rad, axis)
/*
Float32Array(16) [
    6.123234262925839e-17, 1, 0, 0,
    -1, 6.123234262925839e-17, 0, 0,
    0, 0, 1, 0,
    0, 0, 0, 1
]
*/
console.log(matrix)
與之對應不修改原矩陣的方法是:rotate(out, a, rad, axis)。用法與平移中的類似。
toRadian
旋轉矩陣需要使用弧度,通過 toRadian() 可以將角度轉為弧度。用法如下:
glMatrix.glMatrix.toRadian(180) => 3.141592653589793
縮放矩陣
fromScaling - 縮放矩陣
建立一個縮放矩陣。請看範例:
mat4.fromScaling(matrix, [2, 2, 0])
/*
Float32Array(16) [
    2, 0, 0, 0,
    0, 2, 0, 0,
    0, 0, 0, 0,
    0, 0, 0, 1
]
*/
console.log(matrix)
與之對應不修改原矩陣的方法是:scale(out, a, v)。用法與平移中的類似。
平移
現在使用這個庫來實現平移,只需要將手動矩陣替換如下即可:
-    const matrix = new Float32Array([
-        1, 0, 0, 0,
-        0, 1, 0, 0,
-        0, 0, 1, 0,
-        Tx, Ty, Tz, 1,
-    ])
+
+    const { mat4 } = glMatrix
+    const matrix = mat4.create()
+    mat4.fromTranslation(matrix, [Tx, Ty, 0])
旋轉、縮放也類似,不再展開。
組合變換矩陣
變換矩陣可以組合,比如希望將三角形旋轉和平移,這裡需要注意:順序不同導致結果不同。請看下圖

核心程式碼:
const VSHADER_SOURCE = `
attribute vec4 a_Position;
// 移動矩陣
uniform mat4 u_tformMatrix;
// 旋轉矩陣
uniform mat4 u_rformMatrix;
void main() {
  // 先旋轉後移動
  // gl_Position = u_tformMatrix * u_rformMatrix * a_Position;

  // 先移動後旋轉
  gl_Position = u_rformMatrix * u_tformMatrix * a_Position;
  gl_PointSize = 10.0;
}
`

const u_rformMatrix = gl.getUniformLocation(gl.program, 'u_rformMatrix');
const u_tformMatrix = gl.getUniformLocation(gl.program, 'u_tformMatrix');

const { mat4 } = glMatrix
const tMatrix = mat4.create()
const rMatrix = mat4.create()

mat4.fromTranslation(tMatrix, [0.5, 0, 0])
// 設定移動矩陣
gl.uniformMatrix4fv(u_tformMatrix, false, tMatrix);

const rad = glMatrix.glMatrix.toRadian(90)
const axis = [0, 0, 1];
mat4.fromRotation(rMatrix, rad, axis)
// 設定旋轉矩陣
gl.uniformMatrix4fv(u_rformMatrix, false, rMatrix);
組合變換矩陣的順序和 css 類似,從右往左。比如:
u_rformMatrix * u_tformMatrix * a_Position先移動後旋轉u_tformMatrix * u_rformMatrix * a_Position先旋轉後移動
Tip: 這裡的組合變換矩陣其實就是計算機圖學中模型變換(M)。還有檢視變換(V)、投影變換(P),統稱為 MVP。
動畫
需求
需求:繪製一個旋轉動畫
效果如下:
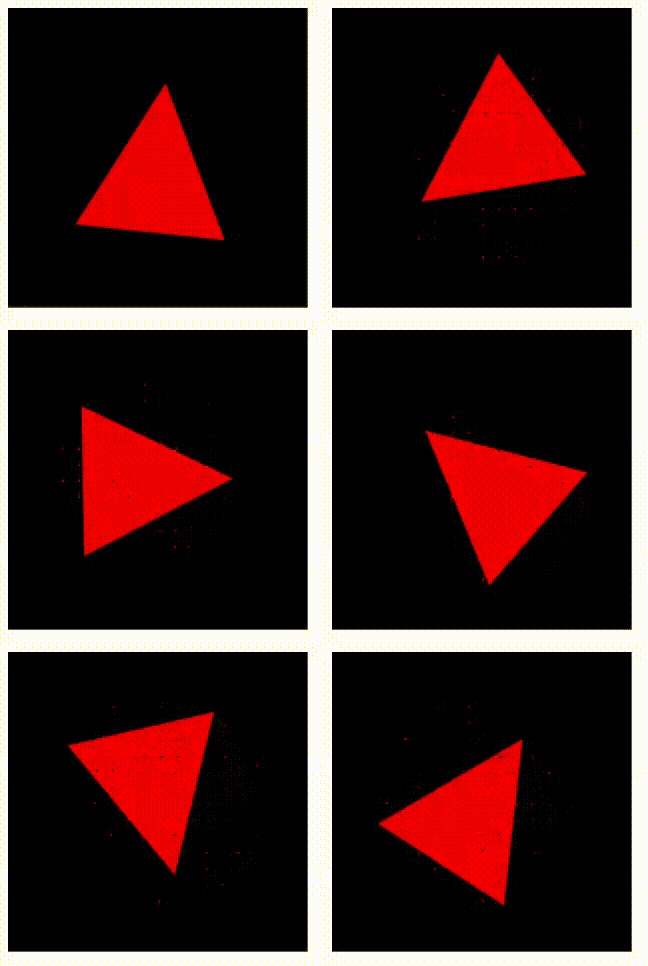
實現
思路:
- 首先繪製三角形
- 通過變換矩陣進行旋轉
- 不停的繪製(改變旋轉角度)。使用專門用於動畫的requestAnimationFrame(用法類似 setTimeout,但不需要指定回撥時間,瀏覽器會在最恰當的時候回撥)
完整程式碼如下:
const VSHADER_SOURCE = `
attribute vec4 a_Position;
// 所有頂點移動位置都相同,所以不用 Attribute 而用 uniform
// mat4 是一種4維矩陣
uniform mat4 u_xformMatrix;
void main() {
  // 注:必須是 "變換矩陣 * 向量",不可是 "向量 * 變換矩陣"
  gl_Position = u_xformMatrix * a_Position ;
  gl_PointSize = 10.0;
}
`
const FSHADER_SOURCE = `
void main() {
  gl_FragColor = vec4(1.0, 0.0, 0.0, 1.0);
}
`

function main() {
    const canvas = document.getElementById('webgl');
    const gl = canvas.getContext("webgl");
    if (!gl) {
        console.log('Failed to get the rendering context for WebGL');
        return;
    }
    if (!initShaders(gl, VSHADER_SOURCE, FSHADER_SOURCE)) {
        console.log('Failed to intialize shaders.');
        return;
    }
    const vertices = {
        data: new Float32Array([
            0.0, 0.5,
            -0.5, -0.5,
            0.5, -0.5
        ]),
        vertexNumber: 3,
        count: 2,
    }
    initVertexBuffers(gl, vertices)
    tick(gl, vertices)
}

function initVertexBuffers(gl, { data, count }) {
    // 1. 建立緩衝區物件
    const vertexBuffer = gl.createBuffer();
    if (!vertexBuffer) {
        console.log('建立緩衝區物件失敗');
        return -1;
    }

    gl.bindBuffer(gl.ARRAY_BUFFER, vertexBuffer);

    gl.bufferData(gl.ARRAY_BUFFER, data, gl.STATIC_DRAW);

    const a_Position = gl.getAttribLocation(gl.program, 'a_Position');
    if (a_Position < 0) {
        console.log('Failed to get the storage location of a_Position');
        return -1;
    }

    gl.vertexAttribPointer(a_Position, count, gl.FLOAT, false, 0, 0);

    gl.enableVertexAttribArray(a_Position);
}


function 變換(gl, vertices) {
    const u_xformMatrix = gl.getUniformLocation(gl.program, 'u_xformMatrix');
    if (!u_xformMatrix) {
        console.log('Failed to get the storage location of u_xformMatrix');
        return;
    }

    const { mat4 } = glMatrix
    const matrix = mat4.create()
    const rad = glMatrix.glMatrix.toRadian(angle)
    const axis = [0, 0, 1];
    mat4.fromRotation(matrix, rad, axis)
    gl.uniformMatrix4fv(u_xformMatrix, false, matrix);

    gl.clearColor(0, 0, 0, 1);
    gl.clear(gl.COLOR_BUFFER_BIT);

    gl.drawArrays(gl.TRIANGLES, 0, vertices.vertexNumber);
}

let angle = 0
// 每次改變的角度
const seed = 1

function tick(gl, vertices){
    變換(gl, vertices)
    // 改變角度
    angle += seed;
    // 動畫繪製
    requestAnimationFrame(() => tick(gl, vertices))
}
其他章節請看:
出處:https://www.cnblogs.com/pengjiali/p/17200893.html
本文版權歸作者和部落格園共有,歡迎轉載,但未經作者同意必須保留此段宣告,且在文章頁面明顯位置給出原文連線。