linux下字元裝置有哪些
linux字元裝置有:1、滑鼠,是計算機的一種外接輸入裝置,也是計算機顯示系統縱橫座標定位的指示器;2、鍵盤,是用於操作計算機裝置執行的一種指令和資料輸入裝置;3、串列埠終端,使用計算機串列埠連線的終端裝置;4、控制終端;5、控制檯等。

本教學操作環境:linux7.3系統、Dell G3電腦。
linux字元裝置
字元裝置是Linux三大裝置之一(另外兩種是塊裝置,網路裝置)。它們均以一個檔案節點形式顯示在檔案系統的/dev目錄下(crw--w---- 1 root tty 4, 0 7月 11 09:11 tty0 其中c代表字元裝置型別)。
字元裝置是指裝置無需緩衝即可直接進行讀寫的裝置, 如滑鼠,鍵盤,串列埠裝置、資料機等, 它與塊裝置的區別在於是字元操作的基本單位是位元組。
字元裝置的分類
字元裝置主要包括控制終端裝置和序列終端裝置, 例如控制檯和鍵盤。依據功能和硬體上的差別, 字元終端裝置有如下分類:
串列埠終端(/dev/ttSn):使用計算機串列埠連線的終端裝置, 序列裝置資料傳輸方式為同一字元8個bit單線傳輸, 在命令列輸入 echo 'hello world' > /dev/ttyS0可將輸入寫入到對應裝置。
偽終端(/dev/ttyp,/dev/ptyp): 對應底層不存在真實的硬體裝置, 用於為其他程式提供終端式樣的介面,如網路登陸主機時網路伺服器和shell程式之間的終端介面。
控制終端(/dev/tty):主裝置號為5, 程序控制終端,與程序相關聯,如登陸shell程序使用的就是終端/dev/tty。
控制檯(/dev/ttyn,/dev/consol): 計算機輸入輸出的顯示器,當控制檯登陸時, 使用的就是tty1, 而ubuntu 圖形介面使用的tty7。
其他型別:現行的linux針對許多不同的裝置建有許多其他種類的裝置特殊檔案,如ISIDIN裝置的/dev/ttyIn裝置。
字元裝置的性質及特點
字元裝置屬於裝置檔案系統的一種, 相當於底層硬體向上層提供的邏輯裝置檔案, 宛如將一個資料埠(資料暫存器)與一個檔案對接起來,裝置驅動程式直接對檔案操作, 於是便直接對埠進行了讀寫操作。 同樣作為檔案, 字元裝置驅動也必須實現檔案的基本的操作open(),close(),write(),read()等,當然終端重定向操作也是支援的。
字元裝置檔案檔案的讀寫是以單個位元組為單位的, 不需要設立硬體緩衝區。 裝置像存取位元組流一樣被作業系統存取。 位元組流就像在硬體埠和檔案系統搭建起了一個傳送管道, 位元組逐個通過管道傳輸並呈現給讀寫雙方。 這個流特性在驅動程式中是以緩衝佇列來實現的。例如: 控制檯的結構體中的讀寫緩衝佇列
struct tty_struct {
struct termios termios;
int pgrp;
int stopped;
void (*write)(struct tty_struct * tty);
struct tty_queue read_q;               //讀佇列
struct tty_queue write_q;              //寫佇列
struct tty_queue secondary;            //tty輔助佇列(存放規格化後的字元)
};登入後複製
字元裝置由字元裝置號標識。字元裝置號由主裝置號和次裝置號構成, 例如/dev/ttyS0的裝置號為(4,64); 主裝置號標識裝置對應驅動程式, 核心通過主裝置號將裝置和驅動程式一一對應起來, 次裝置號由驅動程式使用, 用於驅動程式內部區分裝置細節差別使用的程式碼,核心其他部分不使用它。
字元裝置在應用層如何體現
cat /proc/devices 命令可以檢視當前系統中所有的字元裝置和塊裝置。
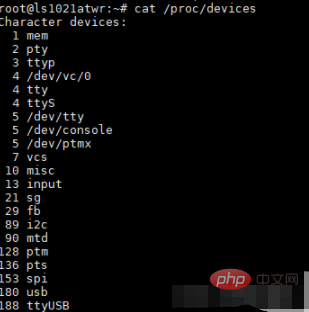
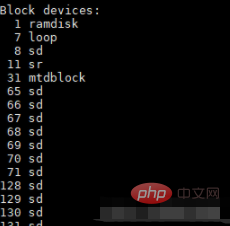
在Linux 中一切接檔案,裝置也被抽象成檔案,在/dev/ 目錄下可以檢視到字元裝置和塊裝置的對應的檔案。
例如這是兩個串列埠裝置檔案,使用ls -l 檢視它的詳細資訊。
與普通檔案不同的是裝置檔案沒有大小,而是被替換成了裝置號(主裝置號和次裝置號),裝置號可以與/proc/devices 中的資訊相對應。

如何存取一個裝置?
既然它被抽象成了一個檔案,那麼自然就用檔案IO (open、read、write 等等) 來存取。
裝置號
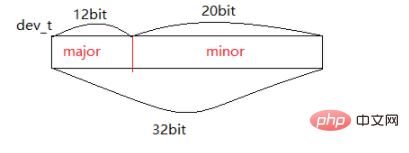
dev_t dev = MKDEV(major,minor)major = MAJOR(dev)minor = MINOR(dev)
裝置號由major和minor 組成,總共32位元,高12位元為major,低20位為minor。每一個裝置號都唯一對應著一個cdev結構體。
註冊字元裝置首先要申請裝置號,可以一次批次的申請多個裝置號(相同的major,依次遞增的minor)。
如果沒有指定主裝置號的話就使用如下函數來申請裝置號:int alloc_chrdev_region(dev_t *dev, unsigned baseminor, unsigned count, const char *name)
baseminor:起始的minor值。
count:一共申請幾個裝置號。申請到的裝置號在(MKDEV(major,baseminor) ~ MKDEV(major,baseminor+count)) 範圍內。
(自動申請裝置號的原理,其實是傳遞一個major = 0,然後由核心分配一個空閒的裝置號返回)
如果給定了裝置的主裝置號和次裝置號就使用如下所示函數來註冊裝置號即可:int register_chrdev_region(dev_t from, unsigned count, const char *name)
釋放裝置號:void unregister_chrdev_region(dev_t from, unsigned count)
字元裝置結構體 cdev
//include/linux/cdev.h
struct cdev {
        struct kobject kobj;
        struct module *owner;
        const struct file_operations *ops;
        struct list_head list;
        dev_t dev;
        unsigned int count;
};登入後複製
常用
申請一個cdev 記憶體:struct cdev *cdev_alloc(void);
初始化cdev->ops,即cdev->ops = &xxx_file_operation; :void cdev_init(struct cdev *, const struct file_operations *);
將填充好的cdev 範例,新增到cdev 連結串列。意味著向核心註冊一個字元裝置:int cdev_add(struct cdev *, dev_t, unsigned); //dev_t:新增cdev時必須要,傳遞一個dev_t,並且它與cdev是唯一對應的。
cdev_add 新增過程中會繫結cdev 與dev_t。
從核心刪除一個字元裝置:void cdev_del(struct cdev *);
不常用
增加cdev 呼叫計數:void cdev_put(struct cdev *p);
總結:註冊字元裝置的主要流程就是,申請裝置號dev_t,建立一個cdev、初始化cdev (cdev->ops)、向核心新增 cdev(同時會繫結cdev 與dev_t)。
如果你嫌這些步驟太麻煩的話,核心還提供了一個函數可以一步到位的註冊字元裝置——__register_chrdev
它會申請多個裝置號,建立cdev並初始化它,然後用這多個裝置號繫結同一個cdev 註冊。
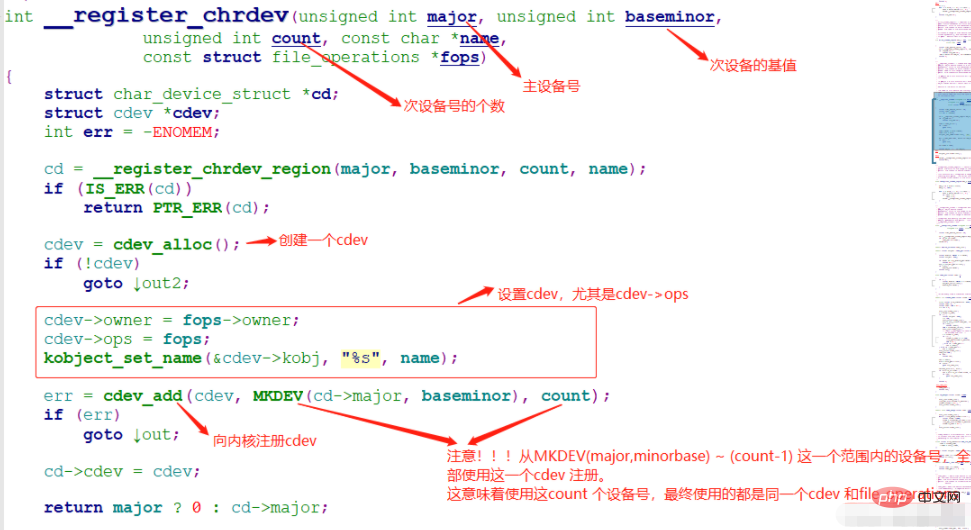
還有一個register_chrdev,它是對__register_chrdev 的封裝,次裝置號從基值0開始,直接申請了256 個次裝置號。static inline int register_chrdev(unsigned int major, const char *name, const struct file_operations *fops) { return __register_chrdev(major, 0, 256, name, fops); }
struct file_operations
字元裝置在/dev/ 目錄下建立裝置檔案,並通過struct file_operations 嚮應用層提供控制介面。應用層對應的open、read 等函數會呼叫到file_operations 對應的函數。
//include/linux/fs.h
struct file_operations {
        struct module *owner;
        loff_t (*llseek) (struct file *, loff_t, int);
        ssize_t (*read) (struct file *, char __user *, size_t, loff_t *);
        ssize_t (*write) (struct file *, const char __user *, size_t, loff_t *);
        ssize_t (*read_iter) (struct kiocb *, struct iov_iter *);
        ssize_t (*write_iter) (struct kiocb *, struct iov_iter *);
        int (*iterate) (struct file *, struct dir_context *);
        unsigned int (*poll) (struct file *, struct poll_table_struct *);
        long (*unlocked_ioctl) (struct file *, unsigned int, unsigned long);
        long (*compat_ioctl) (struct file *, unsigned int, unsigned long);
        int (*mmap) (struct file *, struct vm_area_struct *);
        int (*mremap)(struct file *, struct vm_area_struct *);
        int (*open) (struct inode *, struct file *);
        int (*flush) (struct file *, fl_owner_t id);
        int (*release) (struct inode *, struct file *);
        int (*fsync) (struct file *, loff_t, loff_t, int datasync);
        int (*aio_fsync) (struct kiocb *, int datasync);
        int (*fasync) (int, struct file *, int);
        int (*lock) (struct file *, int, struct file_lock *);
        ssize_t (*sendpage) (struct file *, struct page *, int, size_t, loff_t *, int);
        unsigned long (*get_unmapped_area)(struct file *, unsigned long, unsigned long, unsigned long, unsigned long);
        int (*check_flags)(int);
        int (*flock) (struct file *, int, struct file_lock *);
        ssize_t (*splice_write)(struct pipe_inode_info *, struct file *, loff_t *, size_t, unsigned int);
        ssize_t (*splice_read)(struct file *, loff_t *, struct pipe_inode_info *, size_t, unsigned int);
        int (*setlease)(struct file *, long, struct file_lock **, void **);
        long (*fallocate)(struct file *file, int mode, loff_t offset,
                          loff_t len);
        void (*show_fdinfo)(struct seq_file *m, struct file *f);
#ifndef CONFIG_MMU
        unsigned (*mmap_capabilities)(struct file *);
#endif
};登入後複製
copy_to_user() 與 copy_from_user()
為了安全考慮,應用程序不能直接存取核心資料,需要藉助這兩個函數拷貝:static inline int copy_to_user(void __user volatile *to, const void *from, unsigned long n)static inline int copy_from_user(void *to, const void __user volatile *from, unsigned long n)
返回非0 表示錯誤。
自動建立裝置檔案
自動建立裝置節點的工作是在驅動程式的入口函數中完成的,一般在 cdev_add 函數後面新增自動建立裝置節點相關程式碼。首先要建立一個 class 類, class 是個結構體,定義在檔案include/linux/device.h 裡面。
使用 class_create 建立一個類:
extern struct class * __must_check __class_create(struct module *owner,
                                                  const char *name,
                                                  struct lock_class_key *key);

#define class_create(owner, name)               \
({                                              \
        static struct lock_class_key __key;     \
        __class_create(owner, name, &__key);    \
})登入後複製
使用class_destroy 摧毀一個類:extern void class_destroy(struct class *cls);
struct class {
        const char              *name;
        struct module           *owner;

        struct class_attribute          *class_attrs;
        const struct attribute_group    **dev_groups;
        struct kobject                  *dev_kobj;

        int (*dev_uevent)(struct device *dev, struct kobj_uevent_env *env);
        char *(*devnode)(struct device *dev, umode_t *mode);

        void (*class_release)(struct class *class);
        void (*dev_release)(struct device *dev);

        int (*suspend)(struct device *dev, pm_message_t state);
        int (*resume)(struct device *dev);

        const struct kobj_ns_type_operations *ns_type;
        const void *(*namespace)(struct device *dev);

        const struct dev_pm_ops *pm;

        struct subsys_private *p;
};登入後複製
在建立完類後,要建立一個裝置,使用 device_create建立一個裝置:struct device *device_create(struct class *cls, struct device *parent, dev_t devt, void *drvdata, const char *fmt, ...);
摧毀一個裝置:extern void device_destroy(struct class *cls, dev_t devt);
建立類會在/sys/class/ 目錄下生成一個新的資料夾,其中包含屬於此類的裝置資料夾。

IS_ERR 和 PTR_ERR
IS_ERR 可以判斷一個指標是否為空,PTR_ERR 將指標轉化為數值返回。
static inline long __must_check PTR_ERR(const void *ptr)
{
	return (long) ptr;
}

static inline long __must_check IS_ERR(const void *ptr)
{
	return IS_ERR_VALUE((unsigned long)ptr);
}登入後複製#include <linux/fs.h> //file_operations宣告
#include <linux/module.h> //module_init module_exit宣告
#include <linux/init.h> //__init __exit 宏定義宣告
#include <linux/device.h> //class devise宣告
#include <linux/uaccess.h> //copy_from_user 的標頭檔案
#include <linux/types.h> //裝置號 dev_t 型別宣告
#include <asm/io.h> //ioremap iounmap的標頭檔案
#define DEVICE_CNT 0 //裝置號個數
struct led_device{
dev_t devid; //裝置號
int major; //主裝置號
int minor; //次裝置號
char* name = "led"; //驅動名
struct cdev led_dev; //cdev 結構體
struct class *class; /* 類 */
struct device* device; //裝置
};
struct led_device led;
static int led_open(struct inode *inode, struct file *filp)
{
return 0;
}
static ssize_t led_write(struct file *filp, const char __user *buf, size_t cnt, loff_t *offt)
{
return 0;
}
static ssize_t led_read(struct file *filp, char __user *buf, size_t cnt, loff_t *offt)
{
return 0;
}
/* 裝置操作函數 */
static struct file_operations led_fo = {
.owner = THIS_MODULE,
.open = led_open,
.read = led_read,
.write = led_write,
};
static int _init led_init()
{
/*註冊字元裝置驅動*/
/*1.註冊裝置號*/
led.major = 0; //由核心自動分配主裝置號
if(led.major) //如果分配了的話就註冊
{
led.devid = MKDEV(led.major,0);
register_chrdev_region(led.devid,DEVICE_CNT,led.name); //將驅動註冊到核心中
}
else{ //如果沒有分配的話
//從0號(次裝置號)開始申請
alloc_chrdev_region(&led.devid,0,DEVICE_CNT,led.name); //申請裝置號
led.major = MAJOR(led.devid); //獲取主裝置號
led.minor = MANOR(led.devid); //獲取次裝置號
}
printk("newcheled major=%d,minor=%d\r\n",newchrled.major, newchrled.minor);
/*2.初始化 cdev 結構體*/
led.led_dev.woner = THIS_MODULE;
cdev_init(&led.led_dev,&led_fo); //將操作函數初始化到cdev結構體
/*3.應該是向連結串列中添cdev*/
cdev_add(&led.led_dev,led.devid,DEVICE_CNT);
/*4.建立節點*/
led.class = class_create(THIS_MODULE,led.name); //先建立一個類
led.device = device_create(led.class,NULL,led.devid,NULL); //建立裝置
return 0;
}
static void _exit led_exit()
{
/* 登出字元裝置驅動 */
cdev_del(&newchrled.cdev);/* 刪除cdev */
unregister_chrdev_region(newchrled.devid, NEWCHRLED_CNT); /* 登出裝置號 */
device_destroy(newchrled.class, newchrled.devid);
class_destroy(newchrled.class);
}
/*註冊字元裝置入口與解除安裝入口*/
module_init(led_init);
module_exit(led_exit);
MODULE_LICENSE("GPL v2");
MODULE_AUTHOR("zhoujianghong");登入後複製應用open到file_operations->open 的呼叫原理
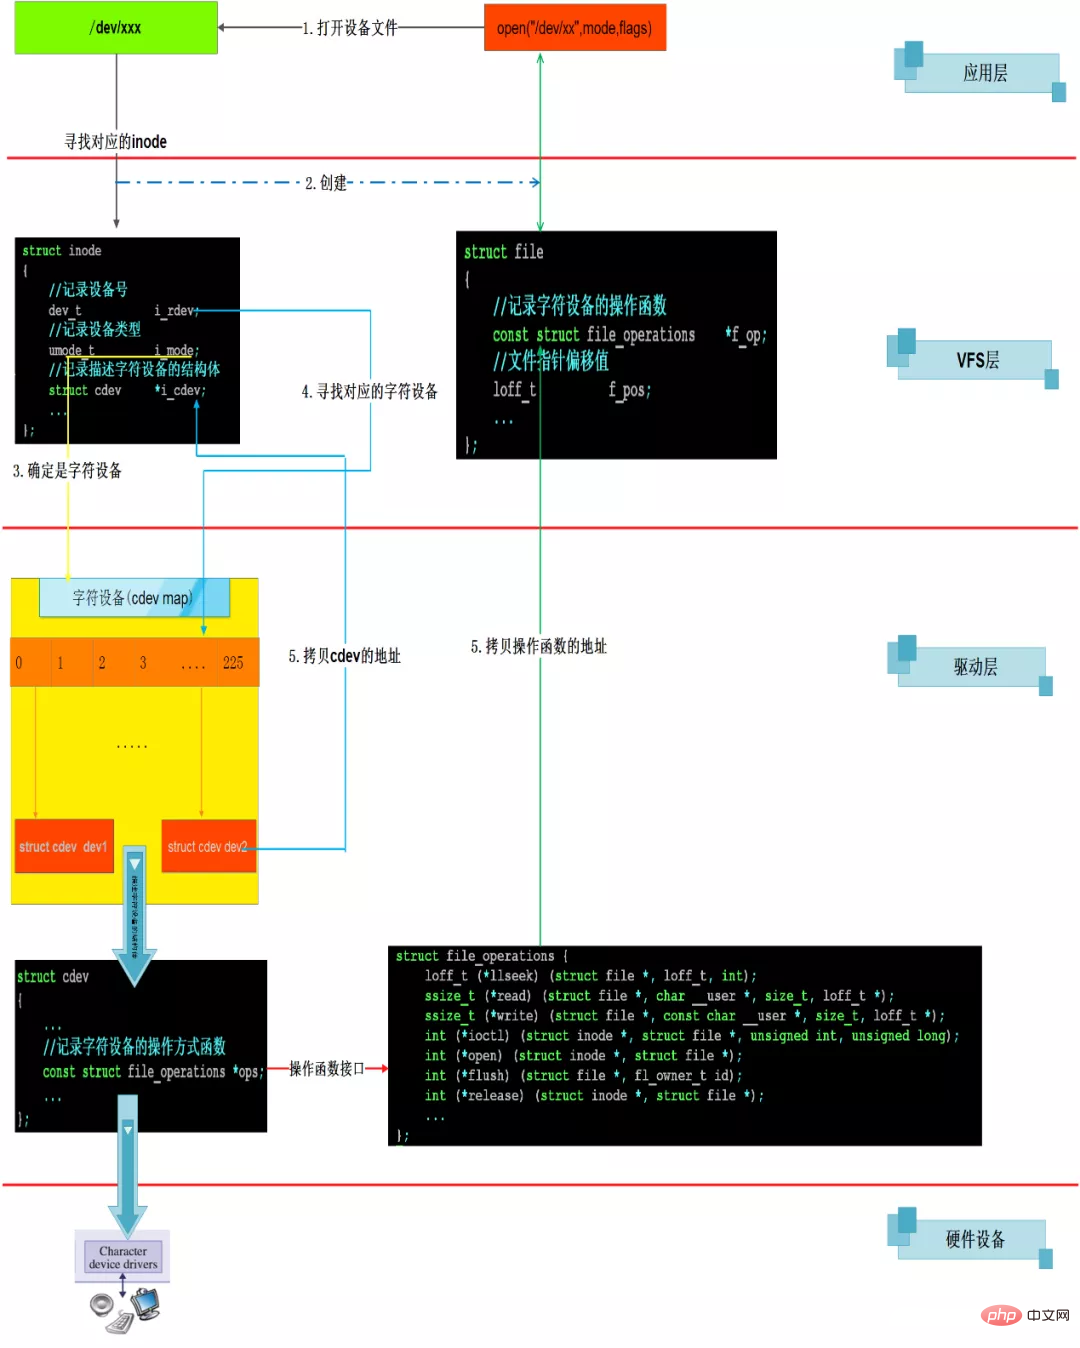
相關推薦:《Linux視訊教學》
以上就是linux下字元裝置有哪些的詳細內容,更多請關注TW511.COM其它相關文章!