Python實戰專案-7傳送驗證碼/簡訊登入/簡訊註冊介面
騰訊雲簡訊開發申請
API和SDK,有SDK優先用SDK
SDK:
3.0版本雲操作:雲操作的sdk,不僅僅有傳送簡訊,還有云功能的其他功能
2.0版本,簡單,只有傳送簡訊功能
# 安裝sdk
	-方式一:pip install tencentcloud-sdk-python
    -方式二原始碼安裝:
    	-下載原始碼
        -執行 python setup.py install

# 傳送簡訊測試
查詢手機號是否存在介面
class UserView(ViewSet):
	@action(methods=['get'], detail=False)
    def check_mobile(self, request):
        try:
            # 如果布報錯就說明手機號存在
            mobile = request.query_params.get('mobile')
            UserInfo.objects.get(mobile=mobile)
            return APIResponse('手機號存在')
        except Exception as e:
            raise APIException('手機號不存在!')
簡訊驗證碼功能
傳簡訊的功能是公共的,我們可以將這個功能封裝到公共的目錄下面
libs目錄下:
send_tx_sms(包)
init.py
settings.py
sms.py
sms.py
# 獲取n位亂數字驗證碼
import json

from utils.common_log import logger
import random
def get_code(num=4): # // 獲取隨機驗證碼
    code = ''
    for i in range(num):
        random_num = random.randint(0, 9)
        code += str(random_num)
    return code

from tencentcloud.common import credential
from tencentcloud.common.exception.tencent_cloud_sdk_exception import TencentCloudSDKException
import os
# 匯入對應產品模組的client models。
from tencentcloud.sms.v20210111 import sms_client, models

# 匯入可選設定類
from tencentcloud.common.profile.client_profile import ClientProfile
from tencentcloud.common.profile.http_profile import HttpProfile
# 傳送簡訊的函數
from . import settings
def send_phone_sms(mobile,code): # 將它封裝成函數,方便我們在呼叫的時候使用它
    try:
        # 必要步驟:
        # 範例化一個認證物件,入參需要傳入騰訊雲賬戶金鑰對secretId,secretKey。
        # 這裡採用的是從環境變數讀取的方式,需要在環境變數中先設定這兩個值。
        # 你也可以直接在程式碼中寫死金鑰對,但是小心不要將程式碼複製、上傳或者分享給他人,
        # 以免洩露金鑰對危及你的財產安全。
        # SecretId、SecretKey 查詢: https://console.cloud.tencent.com/cam/capi
        cred = credential.Credential(settings.SECRET_ID, settings.SECRET_KEY)
        # cred = credential.Credential(
        #     os.environ.get("secretId"),
        #     os.environ.get("secretKey")  #我們可以將 sercetId 和 sercetKey放在環境變數中
                                          # 這樣我們的安全性更高
        # )

        # 範例化一個http選項,可選的,沒有特殊需求可以跳過。
        httpProfile = HttpProfile()
        # 如果需要指定proxy存取介面,可以按照如下方式初始化hp(無需要直接忽略)
        # httpProfile = HttpProfile(proxy="http://使用者名稱:密碼@代理IP:代理埠")
        httpProfile.reqMethod = "POST"  # post請求(預設為post請求)
        httpProfile.reqTimeout = 30  # 請求超時時間,單位為秒(預設60秒)
        httpProfile.endpoint = "sms.tencentcloudapi.com"  # 指定接入地域域名(預設就近接入)

        # 非必要步驟:
        # 範例化一個使用者端設定物件,可以指定超時時間等設定
        clientProfile = ClientProfile()
        clientProfile.signMethod = "TC3-HMAC-SHA256"  # 指定簽名演演算法
        clientProfile.language = "en-US"
        clientProfile.httpProfile = httpProfile

        # 範例化要請求產品(以sms為例)的client物件
        # 第二個引數是地域資訊,可以直接填寫字串ap-guangzhou,支援的地域列表參考 https://cloud.tencent.com/document/api/382/52071#.E5.9C.B0.E5.9F.9F.E5.88.97.E8.A1.A8
        client = sms_client.SmsClient(cred, "ap-guangzhou", clientProfile)

        # 範例化一個請求物件,根據呼叫的介面和實際情況,可以進一步設定請求引數
        # 你可以直接查詢SDK原始碼確定SendSmsRequest有哪些屬性可以設定
        # 屬性可能是基本型別,也可能參照了另一個資料結構
        # 推薦使用IDE進行開發,可以方便的跳轉查閱各個介面和資料結構的檔案說明
        req = models.SendSmsRequest()

        # 基本型別的設定:
        # SDK採用的是指標風格指定引數,即使對於基本型別你也需要用指標來對引數賦值。
        # SDK提供對基本型別的指標參照封裝函數
        # 幫助連結:
        # 簡訊控制檯: https://console.cloud.tencent.com/smsv2
        # 騰訊雲簡訊小助手: https://cloud.tencent.com/document/product/382/3773#.E6.8A.80.E6.9C.AF.E4.BA.A4.E6.B5.81

        # 簡訊應用ID: 簡訊SdkAppId在 [簡訊控制檯] 新增應用後生成的實際SdkAppId,範例如1400006666
        # 應用 ID 可前往 [簡訊控制檯](https://console.cloud.tencent.com/smsv2/app-manage) 檢視
        req.SmsSdkAppId = settings.AppID
        # 簡訊簽名內容: 使用 UTF-8 編碼,必須填寫已稽核通過的簽名
        # 簽名資訊可前往 [國內簡訊](https://console.cloud.tencent.com/smsv2/csms-sign) 或 [國際/港澳臺簡訊](https://console.cloud.tencent.com/smsv2/isms-sign) 的簽名管理檢視
        req.SignName = settings.SignName
        # 模板 ID: 必須填寫已稽核通過的模板 ID
        # 模板 ID 可前往 [國內簡訊](https://console.cloud.tencent.com/smsv2/csms-template) 或 [國際/港澳臺簡訊](https://console.cloud.tencent.com/smsv2/isms-template) 的正文模板管理檢視
        req.TemplateId = settings.TEMPLATE_ID
        # 模板引數: 模板引數的個數需要與 TemplateId 對應模板的變數個數保持一致,,若無模板引數,則設定為空
        req.TemplateParamSet = [code, '30']
        # 下發手機號碼,採用 E.164 標準,+[國家或地區碼][手機號]
        # 範例如:+8613711112222, 其中前面有一個+號 ,86為國家碼,13711112222為手機號,最多不要超過200個手機號
        req.PhoneNumberSet = ["+86"+ mobile]
        # 使用者的 session 內容(無需要可忽略): 可以攜帶使用者側 ID 等上下文資訊,server 會原樣返回
        req.SessionContext = ""
        # 簡訊碼號擴充套件號(無需要可忽略): 預設未開通,如需開通請聯絡 [騰訊雲簡訊小助手]
        req.ExtendCode = ""
        # 國際/港澳臺簡訊 senderid(無需要可忽略): 國內簡訊填空,預設未開通,如需開通請聯絡 [騰訊雲簡訊小助手]
        req.SenderId = ""

        resp = client.SendSms(req)

        # 輸出json格式的字串回包
        # print(resp.to_json_string(indent=2))
        logger.warning(f'傳送簡訊{code},給手機號{mobile}成功!')
        res = json.loads(resp.to_json_string(indent=2))
        # 當出現以下錯誤碼時,快速解決方案參考
        # - [FailedOperation.SignatureIncorrectOrUnapproved](https://cloud.tencent.com/document/product/382/9558#.E7.9F.AD.E4.BF.A1.E5.8F.91.E9.80.81.E6.8F.90.E7.A4.BA.EF.BC.9Afailedoperation.signatureincorrectorunapproved-.E5.A6.82.E4.BD.95.E5.A4.84.E7.90.86.EF.BC.9F)
        # - [FailedOperation.TemplateIncorrectOrUnapproved](https://cloud.tencent.com/document/product/382/9558#.E7.9F.AD.E4.BF.A1.E5.8F.91.E9.80.81.E6.8F.90.E7.A4.BA.EF.BC.9Afailedoperation.templateincorrectorunapproved-.E5.A6.82.E4.BD.95.E5.A4.84.E7.90.86.EF.BC.9F)
        # - [UnauthorizedOperation.SmsSdkAppIdVerifyFail](https://cloud.tencent.com/document/product/382/9558#.E7.9F.AD.E4.BF.A1.E5.8F.91.E9.80.81.E6.8F.90.E7.A4.BA.EF.BC.9Aunauthorizedoperation.smssdkappidverifyfail-.E5.A6.82.E4.BD.95.E5.A4.84.E7.90.86.EF.BC.9F)
        # - [UnsupportedOperation.ContainDomesticAndInternationalPhoneNumber](https://cloud.tencent.com/document/product/382/9558#.E7.9F.AD.E4.BF.A1.E5.8F.91.E9.80.81.E6.8F.90.E7.A4.BA.EF.BC.9Aunsupportedoperation.containdomesticandinternationalphonenumber-.E5.A6.82.E4.BD.95.E5.A4.84.E7.90.86.EF.BC.9F)
        # - 更多錯誤,可諮詢[騰訊雲助手](https://tccc.qcloud.com/web/im/index.html#/chat?webAppId=8fa15978f85cb41f7e2ea36920cb3ae1&title=Sms)
        return res
    except TencentCloudSDKException as err:
        print(err)
        return False
settings.py
我們將sms.py中的設定項放在settings.py檔案中
SECRET_ID = ''  ## 當然可以採用環境變數放置給其賦值
SECRET_KEY = ''
APP_ID = ''
SIGN_NAME = ''
TEMPLATE_ID = ''
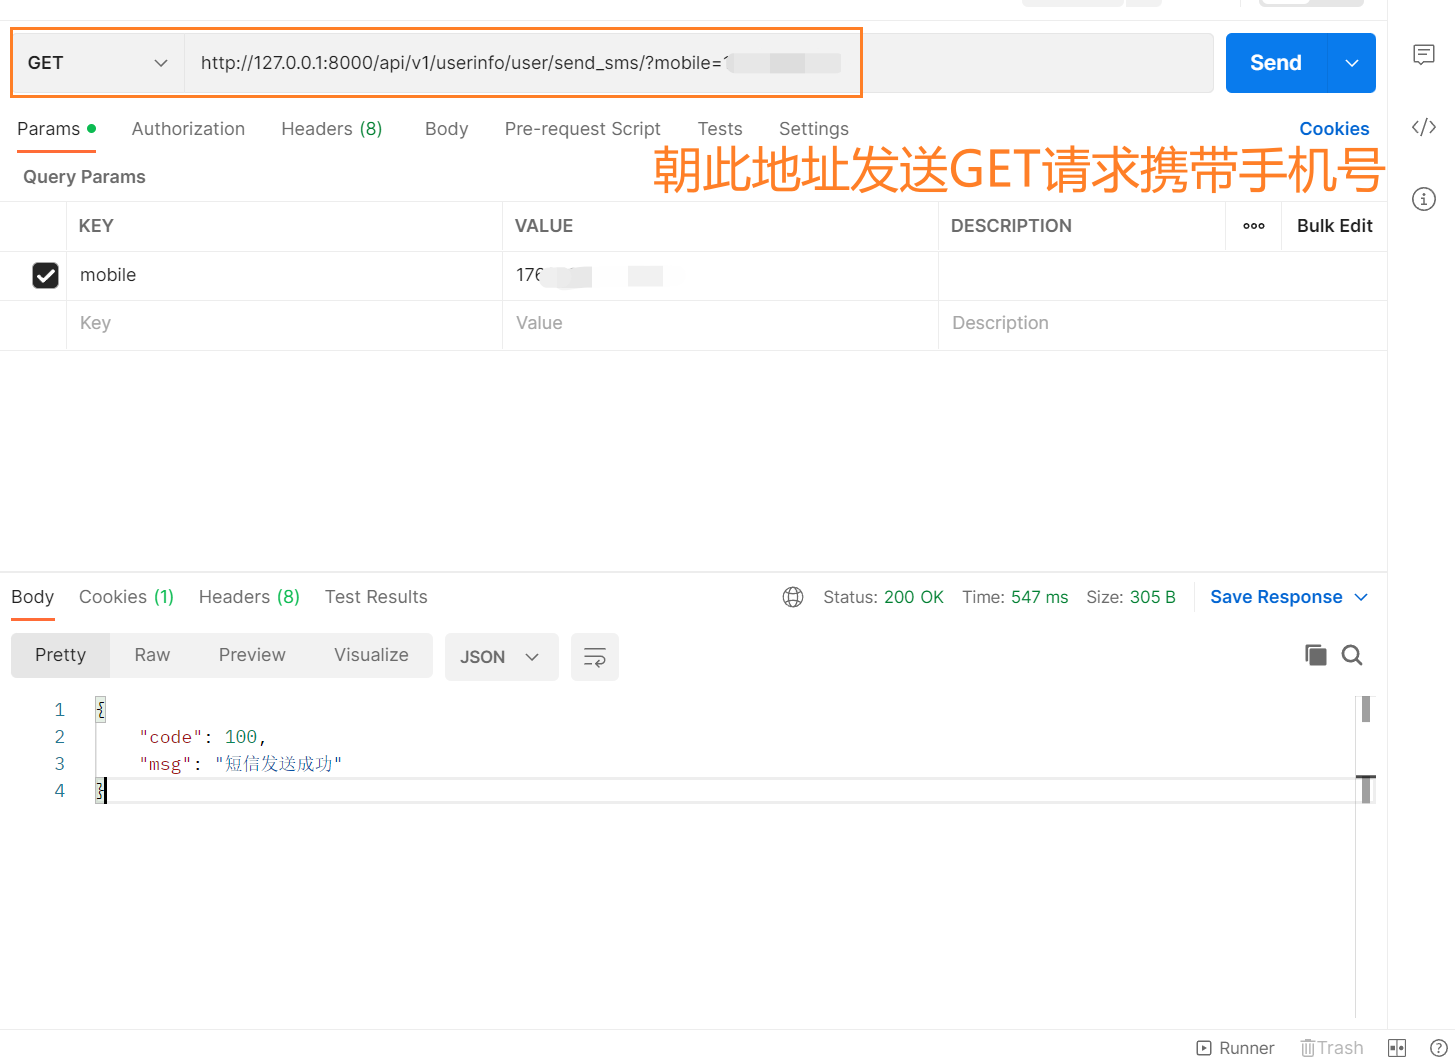
傳送驗證碼介面
view檢視層
from rest_framework.viewsets import ViewSet
from rest_framework.decorators import action
from libs.send_tx_sms import send_phone_sms, get_code
from utils.response import APIResponse
class UserView(ViewSet):
    @action(method=['get'],detail=False)  # 我們使用action裝飾器自動生成路由
    def send_sms(self,request) # 不一定是GET請求我們也可以更換action裝飾器變成post請求
    # 出了在手機號取值方面不一樣,其餘都是一樣的
    	mobile = request.query_params.get('mobile')
    	code = get_code() # 獲取驗證碼
    	'''
        我們雖然拿到了驗證碼,但是等一下我們需要對其進行登入校驗
        所以我們暫時先將驗證碼放在快取中(django專案重啟,快取中內容就會消失)
     	'''
    	cache.set('sms_code_%s' % mobile, code) # 記憶體中的Key需要唯一,如果不唯一,key會被覆蓋!

    	res = send_phone_sms(mobile,code)
    	print(res.get('SendStatusSet')[0]['Code']) #我們可以通過判斷 這個值
    	if res:  # 我在傳送簡訊函數中失敗處返回了False這樣我們可以對res進行判斷
            return APIresponse(msg='傳送成功')
        else:
            return APIresponse(msg='傳送驗證碼失敗',code=1002)
這樣我們就完成了簡訊傳送的介面,測試一下!


logger.warning(f'傳送簡訊{code},給手機號{mobile}成功!') 我在傳送簡訊函數中增加了紀錄檔資訊
簡訊登入介面
需求分析:
簡訊登入需要填寫 手機號 驗證碼
前端返回格式:{mobile:1213121,code:123}
思路:
先獲取使用者輸入手機號和驗證碼
對驗證碼進行校驗,是否與快取中驗證碼一致
在通過手機號查詢使用者資訊,判斷使用者是否存在,如果存在簽發token
簡訊登入介面其實與多方式登入介面思路是一致的,校驗邏輯我們可以放在序列化類中
而檢視層只需要幾行程式碼即可
view檢視層
class UserView(ViewSet):
    @action(methods=['post'], detail=False) # 我們可以通過Post請求攜帶資料
    def mobile_login(self,request):
        # 產生序列化物件,通過序列化類來進行判斷
        ser_obj = self._get_serializer(data=self.request.data)
        ser_obj.is_valid(raise_exception=True)
        token = ser_obj.context.get('token')
        icon = ser_obj.context.get('icon')
        username = ser_obj.context.get('username')
        return APIResponse(token=token, icon=icon, username=username)
至此我們可以發現,簡訊登入與多方式登入檢視層的程式碼都是一樣的,除了序列化類不一樣而已
所以我們就可以專門編寫替換序列化類的函數,判斷他們的區別,讓他們獲取不同的序列化類物件
獲取序列化類
class UserView(ViewSet):
    def _get_serializer(self,data):
        # 因為登入的請求的路徑是不同的,我們可以通過請求路徑進行判斷
        if res == '/api/v1/userinfo/user/mobile_login/':
            return MobileLoginSerializer(data=data)# 如果手機登入返回它
        return UserMulLoginSerializer(data=data)


class UserView(ViewSet):
    def _get_serializer(self,data):
    # 因為請求的action裝飾器不同,我們也可以通過action裝飾器的值進行判斷
    	if self.action == 'login'
        	return UserMulLoginSerializer(data=data)
		else:
        	return MobileLoginSerializer(data=data)
現在我們就可以將多方式登入和簡訊登入彙總到一起
def common_login(self):
    ser_obj = self._get_serializer(data=self.request.data) # 將我們所需要驗證的資料傳入獲取不同的序列化類即可
    ser_obj.is_valid(raise_exception=True)
    token = ser_obj.context.get('token')
    icon = ser_obj.context.get('icon')
    username = ser_obj.context.get('username')
    return APIResponse(token=token, icon=icon, username=username)
至此我們的檢視類就變成了
class UserView(ViewSet):
    @action(methods=['post'], detail=False, )
    def login(self, request):
        return self.common_login()

    @action(methods=['post'], detail=False)
    def mobile_login(self, request):
        return self.common_login()
讓我們在看一下序列化類中的變化
序列化類
我的思路是進行了三合一的封裝,封裝的有些多..
總體來說:
多方式登入序列化類/手機登入序列化類 簽發Token步驟/序列化全域性校驗步驟都是一樣的
所以我們可以將token部分/全域性勾點校驗 封裝起來
除了_get_user方法是登入部分上的不同,其餘基本一致,
import re
from django.contrib.auth import authenticate
from rest_framework.exceptions import ValidationError,APIException
from django.core.cache import cache
from rest_framework_jwt.serializers import jwt_payload_handler, jwt_encode_handler
from user.models import UserInfo


class Verification():
    def _get_token(self, user_obj):
        pay_load = jwt_payload_handler(user_obj)
        token = jwt_encode_handler(pay_load)
        return token
    def _validate(self,attrs):
        user_obj = self._get_user(attrs)
        token = self._get_token(user_obj)
        self.context['token'] = token  # self 是 序列化類物件 所以可以點context傳值進去
        self.context['username'] = user_obj.username
        self.context['icon'] = 'http://127.0.0.1:8000/media/' + str(user_obj.icon)
        return attrs
    def _get_user(self, attrs):
        username = attrs.get('username')
        password = attrs.get('password')
        mobile = attrs.get('mobile')
        if mobile:
            if not re.match(r'^1[3-9][0-9]{9}$', mobile):
                raise ValidationError('手機號格式輸入錯誤')
            code = attrs.get('code')
            old_code = cache.get('sms_code_%s' % mobile)
            if code == old_code:
                try:
                    user_obj = UserInfo.objects.get(mobile=mobile)
                    return user_obj
                except Exception as e:
                    raise APIException('手機號不存在')
            raise APIException('驗證碼錯誤')

        if re.match(r'^1[3-9][0-9]{9}$', username):
            user_obj = UserInfo.objects.filter(mobile=username).first()
            if user_obj and user_obj.check_password(password):
                return user_obj
            raise APIException('使用者名稱或密碼錯誤')
            # user_obj = authenticate(mobile=username, password=password)
        elif re.match(r'^.+@.+$', username):
            user_obj = authenticate(email=username, password=password)
        else:
            user_obj = authenticate(username=username, password=password)
        if not user_obj:
            raise APIException('使用者名稱或密碼錯誤')
        return user_obj
因為這個類也是單獨抽出來的重複程式碼,所以我將它封裝到了utils下的common_serializer.py中
這樣我們在序列化類中直接呼叫它(並繼承)即可
from rest_framework import serializers
from .models import UserInfo
from utils.common_serializer import Verification
from rest_framework.exceptions import APIException,ValidationError
from django.core.cache import cache


class UserMulLoginSerializer(serializers.ModelSerializer, Verification):
    username = serializers.CharField()

    class Meta:
        model = UserInfo
        fields = ['username', 'password']

    def validate(self, attrs):
        attrs = self._validate(attrs)
        return attrs


class MobileLoginSerializer(serializers.ModelSerializer, Verification):
    mobile = serializers.CharField()  # 需要重寫這兩個欄位,因為資料庫中mobile欄位攜帶unique 並且code在記憶體中
    code = serializers.CharField()

    class Meta:
        model = UserInfo
        fields = ['mobile', 'code']  # code儲存再記憶體中

    def validate(self, attrs):
        attrs = self._validate(attrs)
        return attrs
簡訊註冊介面
簡訊註冊介面分析:
前端返回格式:{mobile:123123123,code:1232,password:12312}
我們需要先獲取前端傳送的資料,
與登入同理,我們也在序列化類中進行校驗
先判斷手機號是否存在,並且判斷驗證碼是否與記憶體中驗證碼一致
如果一致,我們需要呼叫auth的create_user方法,因為我們的密碼沒有進行加密,所以通過此方法進行加密處理
序列化類:
from rest_framework import serializers
from .models import UserInfo
from utils.common_serializer import Verification
from rest_framework.exceptions import APIException,ValidationError
from django.core.cache import cache

class MobileRegisterSerializer(serializers.ModelSerializer):
    mobile = serializers.CharField()
    code = serializers.CharField(max_length=4,min_length=4)
    class Meta:
        model = UserInfo
        fields = ['mobile', 'code', 'password']

    def validate(self, attrs):
        mobile = attrs.get('mobile')
        code = attrs.get('code')
        password = attrs.get('password')
        user_obj = UserInfo.objects.filter(username=mobile)
        if user_obj:
            raise APIException('手機號已存在')
        old_code = cache.get('sms_code_%s' % mobile)
        if code != old_code:
            raise APIException('驗證碼錯誤')
        UserInfo.objects.create_user(username=mobile, password=password,mobile=mobile)
        self.context['username'] = mobile
        return attrs
** 檢視層**
class UserView(ViewSet):
	@action(methods=['post'], detail=False)
    def mobile_register(self, request):
        ser_obj = MobileRegisterSerializer(data=request.data)
        ser_obj.is_valid(raise_exception=True)
        return APIResponse(msg='註冊成功', code=108, username=ser_obj.context.get('username'))