登峰造極,師出造化,Pytorch人工智慧AI影象增強框架ControlNet繪畫實踐,基於Python3.10
人工智慧太瘋狂,傳統勞動力和內容創作平臺被AI槍斃,棄屍塵埃。並非空穴來風,也不是危言聳聽,人工智慧AI影象增強框架ControlNet正在瘋狂地改寫繪畫藝術的發展程序,你問我繪畫行業未來的樣子?我只好指著ControlNet的方向。本次我們在M1/M2晶片的Mac系統下,體驗人工智慧登峰造極的繪畫藝術。
本地安裝和設定ControlNet
ControlNet在HuggingFace訓練平臺上也有體驗版,請參見: https://huggingface.co/spaces/hysts/ControlNet
但由於公共平臺算力有限,同時輸入引數也受到平臺的限制,一次只能訓練一張圖片,不能讓人開懷暢飲。
為了能和史上最偉大的影象增強框架ControlNet一親芳澤,我們選擇本地搭建ControlNet環境,首先執行Git命令拉取官方的線上程式碼:
git clone https://github.com/lllyasviel/ControlNet.git
拉取成功後,進入專案目錄:
cd ControlNet
由於Github對檔案大小有限制,所以ControlNet的訓練模型只能單獨下載,模型都放在HuggingFace平臺上:https://huggingface.co/lllyasviel/ControlNet/tree/main/models,需要注意的是,每個模型的體積都非常巨大,達到了5.71G,令人乍舌。
下載好模型後,需要將其放到ControlNet的models目錄中:
├── models
│ ├── cldm_v15.yaml
│ ├── cldm_v21.yaml
│ └── control_sd15_canny.pth
這裡筆者下載了control_sd15_canny.pth模型,即放入models目錄中,其他模型也是一樣。
隨後安裝執行環境,官方推薦使用conda虛擬環境,安裝好conda後,執行命令啟用虛擬環境即可:
conda env create -f environment.yaml
conda activate control
但筆者檢視了官方的environment.yaml組態檔:
name: control
channels:
  - pytorch
  - defaults
dependencies:
  - python=3.8.5
  - pip=20.3
  - cudatoolkit=11.3
  - pytorch=1.12.1
  - torchvision=0.13.1
  - numpy=1.23.1
  - pip:
      - gradio==3.16.2
      - albumentations==1.3.0
      - opencv-contrib-python==4.3.0.36
      - imageio==2.9.0
      - imageio-ffmpeg==0.4.2
      - pytorch-lightning==1.5.0
      - omegaconf==2.1.1
      - test-tube>=0.7.5
      - streamlit==1.12.1
      - einops==0.3.0
      - transformers==4.19.2
      - webdataset==0.2.5
      - kornia==0.6
      - open_clip_torch==2.0.2
      - invisible-watermark>=0.1.5
      - streamlit-drawable-canvas==0.8.0
      - torchmetrics==0.6.0
      - timm==0.6.12
      - addict==2.4.0
      - yapf==0.32.0
      - prettytable==3.6.0
      - safetensors==0.2.7
      - basicsr==1.4.2
一望而知,Python版本是老舊的3.8,Torch版本1.12並不支援Mac獨有的Mps訓練模式。
同時,Conda環境也有一些缺點:
環境隔離可能會導致一些問題。雖然虛擬環境允許您管理軟體包的版本和依賴關係,但有時也可能導致環境衝突和奇怪的錯誤。
Conda環境可以佔用大量磁碟空間。每個環境都需要獨立的軟體包副本和依賴項。如果需要建立多個環境,這可能會導致磁碟空間不足的問題。
軟體包可用性和相容性也可能是一個問題。Conda環境可能不包含某些軟體包或庫,或者可能不支援特定作業系統或硬體架構。
在某些情況下,Conda環境的建立和管理可能會變得複雜和耗時。如果需要管理多個環境,並且需要在這些環境之間頻繁切換,這可能會變得困難。
所以我們也可以用最新版的Python3.10來構建ControlNet訓練環境,編寫requirements.txt檔案:
pytorch==1.13.0
gradio==3.16.2
albumentations==1.3.0
opencv-contrib-python==4.3.0.36
imageio==2.9.0
imageio-ffmpeg==0.4.2
pytorch-lightning==1.5.0
omegaconf==2.1.1
test-tube>=0.7.5
streamlit==1.12.1
einops==0.3.0
transformers==4.19.2
webdataset==0.2.5
kornia==0.6
open_clip_torch==2.0.2
invisible-watermark>=0.1.5
streamlit-drawable-canvas==0.8.0
torchmetrics==0.6.0
timm==0.6.12
addict==2.4.0
yapf==0.32.0
prettytable==3.6.0
safetensors==0.2.7
basicsr==1.4.2
隨後,執行命令:
pip3 install -r requirements.txt
至此,基於Python3.10來構建ControlNet訓練環境就完成了,關於Python3.10的安裝,請移玉步至:一網成擒全端涵蓋,在不同架構(Intel x86/Apple m1 silicon)不同開發平臺(Win10/Win11/Mac/Ubuntu)上安裝設定Python3.10開發環境,這裡不再贅述。
修改訓練模式(Cuda/Cpu/Mps)
ControlNet的程式碼中將訓練模式寫死為Cuda,CUDA是NVIDIA開發的一個平行計算平臺和程式設計模型,因此不支援NVIDIA GPU的系統將無法執行CUDA訓練模式。
除此之外,其他不支援CUDA訓練模式的系統可能包括:
沒有安裝NVIDIA GPU驅動程式的系統
沒有安裝CUDA工具包的系統
使用的NVIDIA GPU不支援CUDA(較舊的GPU型號可能不支援CUDA)
沒有足夠的GPU視訊記憶體來執行CUDA訓練模式(尤其是在訓練大型深度神經網路時需要大量視訊記憶體)
需要注意的是,即使系統支援CUDA,也需要確保所使用的機器學習框架支援CUDA,否則無法使用CUDA進行訓練。
我們可以修改程式碼將訓練模式改為Mac支援的Mps,請參見:聞其聲而知雅意,M1 Mac基於PyTorch(mps/cpu/cuda)的人工智慧AI本地語音識別庫Whisper(Python3.10),這裡不再贅述。
如果程式碼執行過程中,報下面的錯誤:
RuntimeError: Attempting to deserialize object on a CUDA device but torch.cuda.is_available() is False. If you are running on a CPU-only machine, please use torch.load with map_location=torch.device('cpu') to map your storages to the CPU.
說明當前系統不支援cuda模型,需要修改幾個地方,以專案中的gradio_canny2image.py為例子,需要將gradio_canny2image.py檔案中的cuda替換為cpu,同時修改/ControlNet/ldm/modules/encoders/modules.py檔案,將cuda替換為cpu,修改/ControlNet/cldm/ddim_hacked.py檔案,將cuda替換為cpu。至此,訓練模式就改成cpu了。
開始訓練
修改完程式碼後,直接在終端執行gradio_canny2image.py檔案:
python3 gradio_canny2image.py
程式返回:
➜  ControlNet git:(main) ✗ /opt/homebrew/bin/python3.10 "/Users/liuyue/wodfan/work/ControlNet/gradio_cann
y2image.py"
logging improved.
No module 'xformers'. Proceeding without it.
/opt/homebrew/lib/python3.10/site-packages/pytorch_lightning/utilities/distributed.py:258: LightningDeprecationWarning: `pytorch_lightning.utilities.distributed.rank_zero_only` has been deprecated in v1.8.1 and will be removed in v2.0.0. You can import it from `pytorch_lightning.utilities` instead.
  rank_zero_deprecation(
ControlLDM: Running in eps-prediction mode
DiffusionWrapper has 859.52 M params.
making attention of type 'vanilla' with 512 in_channels
Working with z of shape (1, 4, 32, 32) = 4096 dimensions.
making attention of type 'vanilla' with 512 in_channels
Loaded model config from [./models/cldm_v15.yaml]
Loaded state_dict from [./models/control_sd15_canny.pth]
Running on local URL:  http://0.0.0.0:7860

To create a public link, set `share=True` in `launch()`.
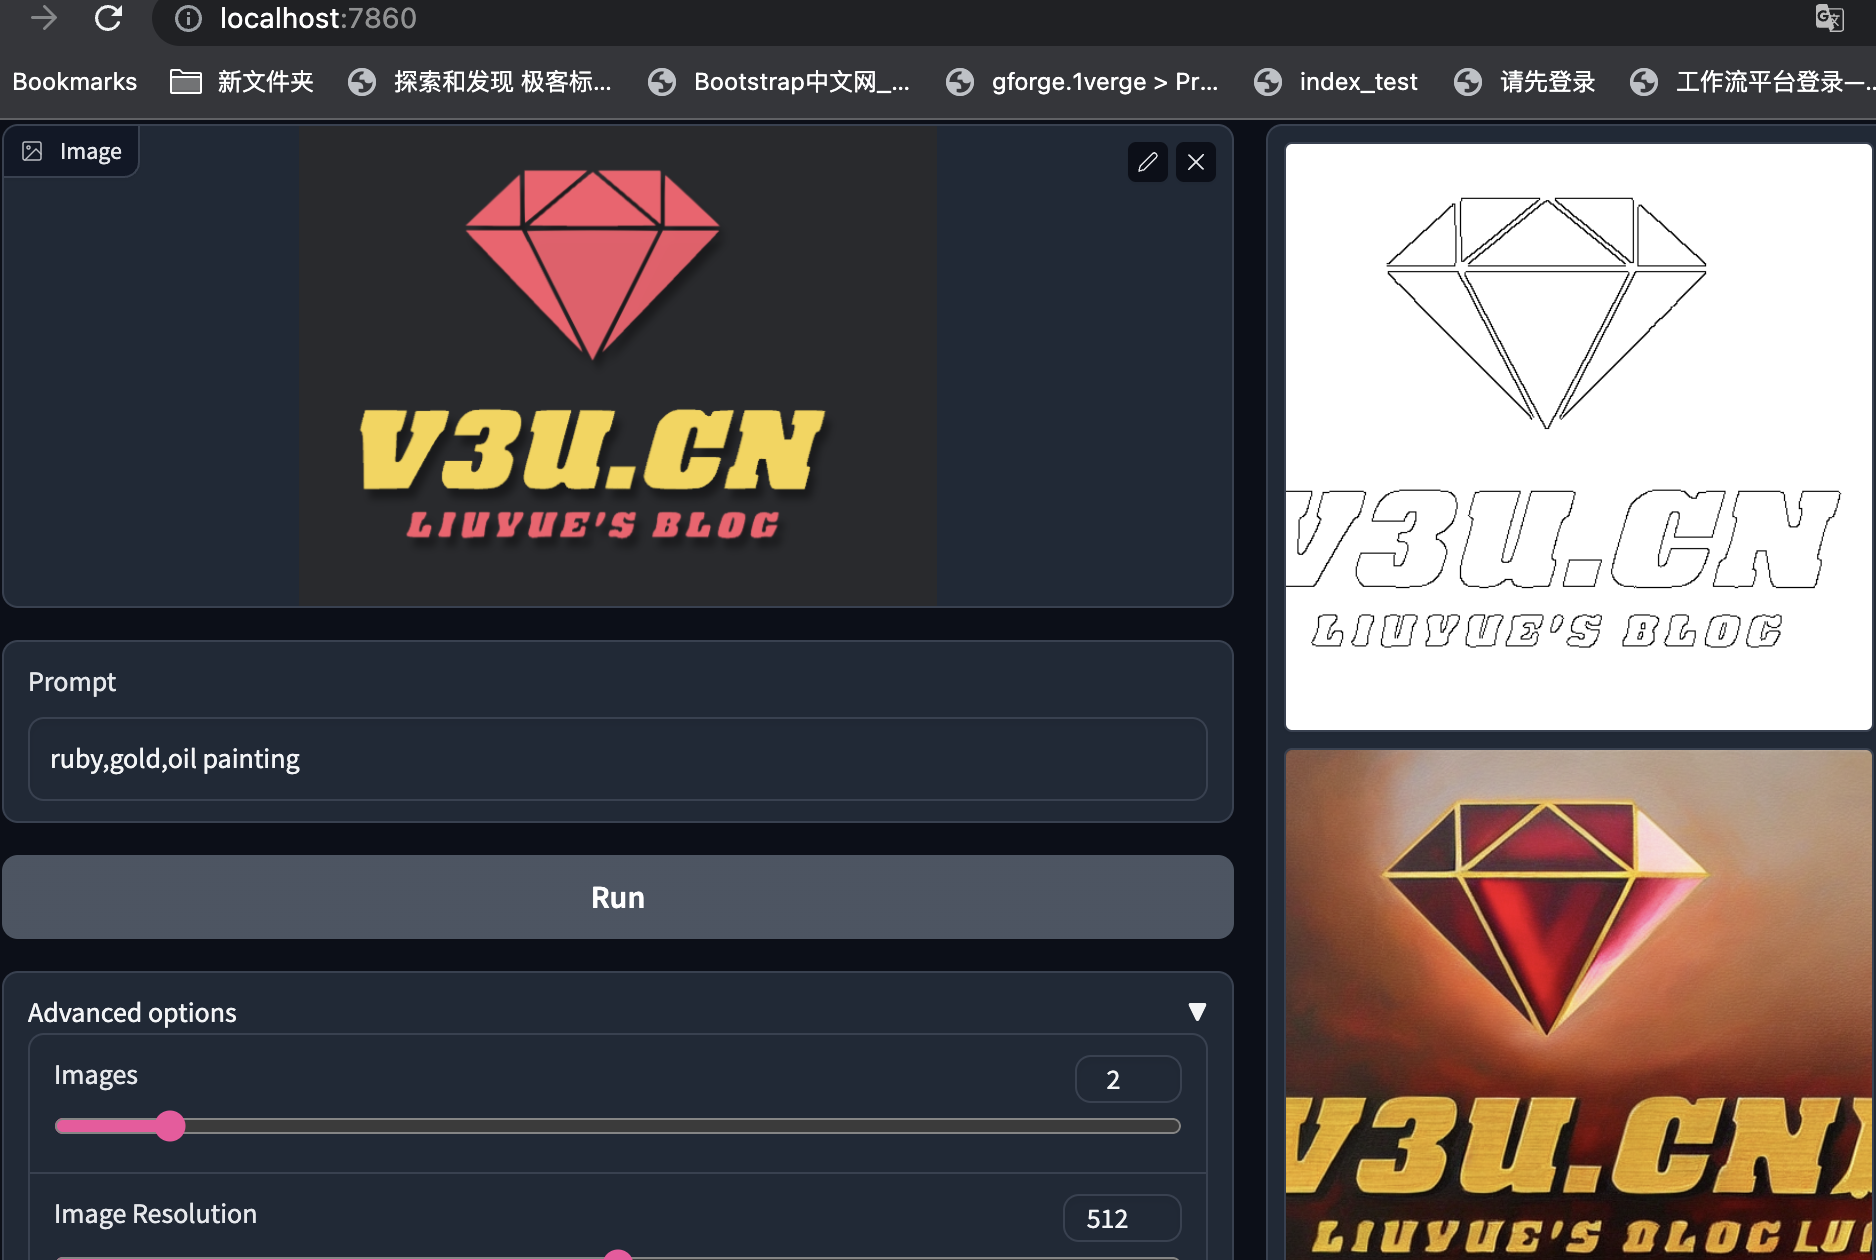
此時,在本地系統的7860埠上會執行ControlNet的Web使用者端服務。
存取 http://localhost:7860,就可以直接上傳圖片進行訓練了。
這裡以本站的Logo圖片為例子:

通過輸入引導詞和其他訓練引數,就可以對現有圖片進行擴散模型的增強處理,這裡的引導詞的意思是:紅寶石、黃金、油畫。訓練結果可謂是言有盡而意無窮了。
除了主引導詞,系統預設會新增一些輔助引導詞,比如要求影象品質的best quality, extremely detailed等等,完整程式碼:
from share import *
import config

import cv2
import einops
import gradio as gr
import numpy as np
import torch
import random

from pytorch_lightning import seed_everything
from annotator.util import resize_image, HWC3
from annotator.canny import CannyDetector
from cldm.model import create_model, load_state_dict
from cldm.ddim_hacked import DDIMSampler


apply_canny = CannyDetector()

model = create_model('./models/cldm_v15.yaml').cpu()
model.load_state_dict(load_state_dict('./models/control_sd15_canny.pth', location='cpu'))
model = model.cpu()
ddim_sampler = DDIMSampler(model)


def process(input_image, prompt, a_prompt, n_prompt, num_samples, image_resolution, ddim_steps, guess_mode, strength, scale, seed, eta, low_threshold, high_threshold):
    with torch.no_grad():
        img = resize_image(HWC3(input_image), image_resolution)
        H, W, C = img.shape

        detected_map = apply_canny(img, low_threshold, high_threshold)
        detected_map = HWC3(detected_map)

        control = torch.from_numpy(detected_map.copy()).float().cpu() / 255.0
        control = torch.stack([control for _ in range(num_samples)], dim=0)
        control = einops.rearrange(control, 'b h w c -> b c h w').clone()

        if seed == -1:
            seed = random.randint(0, 65535)
        seed_everything(seed)

        if config.save_memory:
            model.low_vram_shift(is_diffusing=False)

        cond = {"c_concat": [control], "c_crossattn": [model.get_learned_conditioning([prompt + ', ' + a_prompt] * num_samples)]}
        un_cond = {"c_concat": None if guess_mode else [control], "c_crossattn": [model.get_learned_conditioning([n_prompt] * num_samples)]}
        shape = (4, H // 8, W // 8)

        if config.save_memory:
            model.low_vram_shift(is_diffusing=True)

        model.control_scales = [strength * (0.825 ** float(12 - i)) for i in range(13)] if guess_mode else ([strength] * 13)  # Magic number. IDK why. Perhaps because 0.825**12<0.01 but 0.826**12>0.01
        samples, intermediates = ddim_sampler.sample(ddim_steps, num_samples,
                                                     shape, cond, verbose=False, eta=eta,
                                                     unconditional_guidance_scale=scale,
                                                     unconditional_conditioning=un_cond)

        if config.save_memory:
            model.low_vram_shift(is_diffusing=False)

        x_samples = model.decode_first_stage(samples)
        x_samples = (einops.rearrange(x_samples, 'b c h w -> b h w c') * 127.5 + 127.5).cpu().numpy().clip(0, 255).astype(np.uint8)

        results = [x_samples[i] for i in range(num_samples)]
    return [255 - detected_map] + results


block = gr.Blocks().queue()
with block:
    with gr.Row():
        gr.Markdown("## Control Stable Diffusion with Canny Edge Maps")
    with gr.Row():
        with gr.Column():
            input_image = gr.Image(source='upload', type="numpy")
            prompt = gr.Textbox(label="Prompt")
            run_button = gr.Button(label="Run")
            with gr.Accordion("Advanced options", open=False):
                num_samples = gr.Slider(label="Images", minimum=1, maximum=12, value=1, step=1)
                image_resolution = gr.Slider(label="Image Resolution", minimum=256, maximum=768, value=512, step=64)
                strength = gr.Slider(label="Control Strength", minimum=0.0, maximum=2.0, value=1.0, step=0.01)
                guess_mode = gr.Checkbox(label='Guess Mode', value=False)
                low_threshold = gr.Slider(label="Canny low threshold", minimum=1, maximum=255, value=100, step=1)
                high_threshold = gr.Slider(label="Canny high threshold", minimum=1, maximum=255, value=200, step=1)
                ddim_steps = gr.Slider(label="Steps", minimum=1, maximum=100, value=20, step=1)
                scale = gr.Slider(label="Guidance Scale", minimum=0.1, maximum=30.0, value=9.0, step=0.1)
                seed = gr.Slider(label="Seed", minimum=-1, maximum=2147483647, step=1, randomize=True)
                eta = gr.Number(label="eta (DDIM)", value=0.0)
                a_prompt = gr.Textbox(label="Added Prompt", value='best quality, extremely detailed')
                n_prompt = gr.Textbox(label="Negative Prompt",
                                      value='longbody, lowres, bad anatomy, bad hands, missing fingers, extra digit, fewer digits, cropped, worst quality, low quality')
        with gr.Column():
            result_gallery = gr.Gallery(label='Output', show_label=False, elem_id="gallery").style(grid=2, height='auto')
    ips = [input_image, prompt, a_prompt, n_prompt, num_samples, image_resolution, ddim_steps, guess_mode, strength, scale, seed, eta, low_threshold, high_threshold]
    run_button.click(fn=process, inputs=ips, outputs=[result_gallery])


block.launch(server_name='0.0.0.0')
其他的模型,比如gradio_hed2image.py,它可以保留輸入影象中的許多細節,適合影象的重新著色和樣式化的場景:

還記得AnimeGANv2模型嗎:神工鬼斧惟肖惟妙,M1 mac系統深度學習框架Pytorch的二次元動漫動畫風格遷移濾鏡AnimeGANv2+Ffmpeg(圖片+視訊)快速實踐,之前還只能通過統一模型濾鏡進行轉化,現在只要修改引導詞,我們就可以肆意地變化出不同的濾鏡,人工智慧技術的發展,就像發情的海,洶湧澎湃。
結語
「人類嘛時候會被人工智慧替代呀?」
「就是現在!就在今天!」

就算是達芬奇還魂,齊白石再生,他們也會被現今的人工智慧AI技術所震撼,縱橫恣肆的筆墨,抑揚變化的形態,左右跌宕的心氣,煥然飛動的神采!歷史長河中這一刻,大千世界裡這一處,讓我們變得瘋狂!
最後奉上修改後的基於Python3.10的Cpu訓練版本的ControlNet,與眾親同饗:https://github.com/zcxey2911/ControlNet_py3.10_cpu_NoConda