Ansible-playbook 快速入門到放棄
Ansible-playbook 快速入門到放棄
隔岸紅塵忙似火,當軒青嶂冷如冰。
1-簡介
playbook 相當於可以把模組命令都寫入到組態檔裡面,這樣就可以直接執行組態檔了,類似指令碼。
2-playbook 初體驗
編寫test.yml 檔案,在serviceA 主機機器上的/opt/tjt 路徑下建立test.txt 檔案。

1 ---
2 - hosts: serviceA
3   remote_user: root
4   tasks:
5     - name: "使用touch 命令建立test.txt檔案"
6       shell: touch /opt/tjt/test.txt

檔案格式說明
- 第一行需要有三個槓,hosts 引數指定了對哪些主機進行參作,如果是多臺機器可以用逗號作為分隔,也可以使用主機組,在/etc/ansible/hosts裡定義;
- user 引數指定了使用什麼使用者登入遠端主機操作;
- tasks 指定了一個任務,其下面的name 引數同樣是對任務的描述,在執行過程中會列印出來,shell 是ansible 模組名字。
編輯完成之後,使用ansible-playbook 命令執行test.yml 檔案。
[root@localhost tjt]# ansible-playbook /opt/tjt/ansible/test.yml

然後到使用者端上看看是否有建立test.txt 檔案。
[root@localhost ~]# ls -l /opt/tjt/test.txt

3-playbook 變數
通過建立使用者體驗playbook 的變數使用方式。
---
- name: "建立test使用者"
  hosts: 192.168.8.136
  user: root
  gather_facts: false
  vars:
     - user: "test"
  tasks:
    - name: "---playbook變數----建立test使用者---"
      user: name="{{ user }}"
說明:
- name:對該playbook 實現的功能做一個概述,後面執行過程中,會列印 name 變數的值 ,可以省略;
- gather_facts:指定了在以下任務部分執行前,是否先執行setup 模組獲取主機相關資訊,如果需要在後面的tasks裡獲取setup收集到的資訊,就需要把這個引數設定為True;
- vars:指定了變數,這裡宣告了一個user 變數,其值為test ,需要注意的是,變數值一定要用引號引住;
- user:提定了呼叫user 模組,name是user 模組裡的一個引數,而增加的使用者名稱字呼叫了上面user 變數的值。
執行該檔案:
[root@localhost tjt]# ansible-playbook /opt/tjt/ansible/create_user.yml

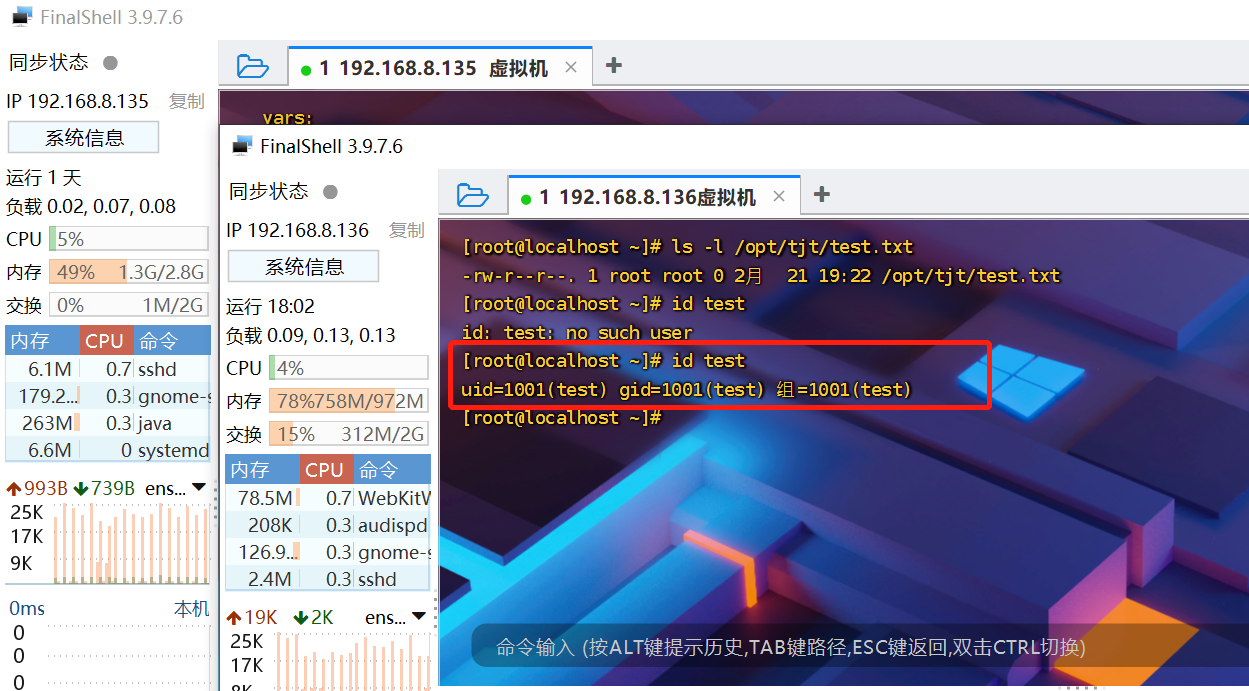
到使用者端上看看使用者是否已建立:
[root@localhost ~]# id test

4-playbook 迴圈
---
- hosts: 192.168.8.136
  user: root
  tasks:
    - name: "playbook---迴圈"
      file: path=/opt/tjt/{{ item }} state=touch mode=600
      with_items:
        - 1.txt
        - 2.txt
        - 3.txt
引數說明
- file 模組可以對檔案進行相關的操作,例如建立檔案或者更改檔案許可權等,具體可以檢視該模組的檔案。
- with_items 為迴圈的物件,相當於是一個陣列或集合,寫在下面的1.txt、2.txt 以及3.txt 是該集合的元素。而item 則表示的是遍歷出來的元素,也就是說item 指代的是1.txt、2.txt 以及3.txt。
- state 的值設定為touch 表示如果該檔案不存在就進行建立。
- path 表示檔案的路徑。
- mode 設定許可權。
執行該檔案:
[root@localhost tjt]# ansible-playbook /opt/tjt/ansible/while.yml

到使用者端上看看檔案是否已建立:
[root@localhost ~]# ll /opt/tjt/*.txt

5-playbook 條件判斷
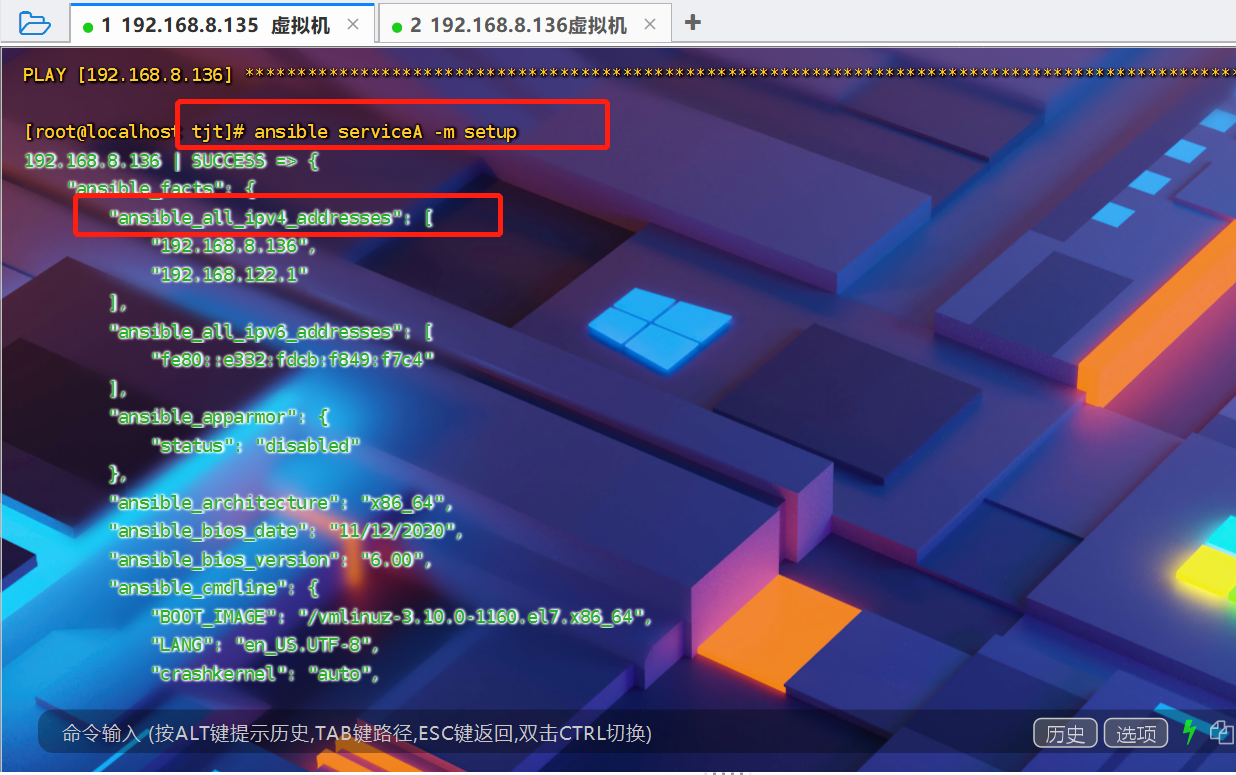
一般以setup 模組收集到的主機資訊,來作為判斷條件。所以在編寫程式碼之前,我們需要先獲取相應的資訊,例如我要以ip 地址來作為判斷條件,那麼我就得先從setup 裡獲取主機ip的相關資訊。執行以下命令可以檢視到setup 收集到的所有的facter 資訊,輸出的資訊是JSON格式的:
[root@localhost tjt]# ansible serviceA -m setup

通過一個簡單的建立檔案的例子體驗playbook 條件判斷語句的使用方式,編寫 when.yml 檔案內容如下:
---
- hosts: serviceA
  user: root
  gather_facts: True
  tasks:
    - name: "playbook---條件判斷"
      shell: touch /opt/tjt/when.txt
      when: ansible_virbr0.ipv4.address == "192.168.122.1"
引數說明
- ansible_virbr0 是一個陣列儲存著網路卡相關資訊,ipv4 屬於該陣列的子元素,但是ipv4也是一個陣列,而address 則是ipv4 陣列的子元素,我們需要使用address 來作為判斷條件,所以要存取address 就需要使用這樣的格式:ansible_virbr0.ipv4.address,address 表示的是鍵,而"192.168.122.1"則是值,when 為判斷語句相當於if,所以其判斷條件為:該鍵的值為"192.168.122.1"時就執行shell 模組裡定義的語句。
- gather_facts: True ,在遠端主機執行setup 模組,並將收集的資訊記錄起來(等於命令ansible all -m setup #檢視系統資訊),可以通過系統資訊來判斷是否執行。
- gather_facts: no ,在不需要獲取機器資訊時,根據資訊做判斷時,將其關閉,避免影響執行速度。
執行該檔案:
[root@localhost tjt]# ansible-playbook /opt/tjt/ansible/when.yml

到使用者端上看看檔案是否已建立:
[root@localhost ~]# ll /opt/tjt/when.txt
-rw-r--r--. 1 root root 0 2月  21 21:51 /opt/tjt/when.txt
[root@localhost ~]#
6-playbook 的handlers
- 有一種情況就是執行了tasks裡面的內容之後,伺服器發生了變化,這時我們可能需要執行一些相關的操作。
- 例如我們修改了某個服務的組態檔後,則需要重啟一下服務,而handlers 就是完成這樣的事情的,它相當於程式設計中的回撥函數,當tasks 裡的內容執行成功後,就會執行handlers 裡定義的內容。
- 類似於shell 指令碼中的 && 符號,例如 cat 1.txt && rm -f 1.txt ,當 cat 1.txt 命令執行成功之後就會執行 rm -f 1.txt 命令,否則不執行。
---
- name: "playbook中的handlers"
  hosts: serviceA
  user: root
  tasks:
    - name: copy file
      copy: src=/opt/tjt/handlers dest=/opt/tjt/handlers.txt
      notify: test handlers
  handlers:
    - name: test handlers
      shell: echo "This is a test string" >> /opt/tjt/ansible/handlers.txt
引數說明
- 只有copy 模組執行成功後,才會去呼叫下面的handlers 裡定義的內容,去執行handlers 裡面的shell 相關命令,這種比較適合組態檔發生更改後,重啟服務的操作。
- notify 用於指定handlers 的name 引數的值,因為handlers 可以定義多個,所以需要使用notify 來進行指定呼叫哪一個。
執行該檔案:
[root@localhost tjt]# ansible-playbook /opt/tjt/ansible/handlers.yml

到使用者端上檢視檔案末尾一行是否為ansible 執行的echo 寫進的那一行內容。
[root@localhost ~]# tail -n1 /opt/tjt/ansible/handlers.txt

7-Ansible 的roles
role是task檔案、變數檔案、handlers檔案的集合體,這個集合體的顯著特點是:可移植性和可重複執行性。
在實際專案中,通常我們以部署某個服務為單元作為一個role ,然後將這些服務單元(role)放在一個roles 目錄下,主playbook 檔案通過呼叫roles目錄下的role,來實現各種靈活多變的部署需求。
roles建立
建立一個role 的方法有兩種:
-
命令mkdir 和touch 行手動建立,即需要哪個目錄和檔案就用「mkdir」和「touch」命令建立出來。
-
使用ansible-galaxy 自動初始化一個role,建立完後再刪除不需要的目錄。
使用「ansible-galaxy init」命令建立一個名字為role_D 的role。
[root@localhost roles]#  ansible-galaxy init role_D
- Role role_D was created successfully

role 目錄結構
- tasks : 用於存放role_D 的主要任務,也可以新增其他task 檔案,供main.yml 呼叫,從而實現更加複雜的部署功能。
- handlers : 用於存放觸發執行( hanlders )的任務。
- defaults : 用於存放預設變數,優先順序最低。
- vars : 用於存放變數檔案,role_D 中任務和模版裡用到的變數可以在這裡定義。
- files :用於存放需要拷貝到目的主機的檔案,例如,作為「copy」模組src 引數的預設根目錄。
- template : 用於存放模版檔案,格式為.j2,檔案內容要符合Jinja2 語法規則,通常使用「template」模組部署服務的組態檔。
- meta : 用於存放role 依賴列表,這個知識點後面會詳細闡述。
- tests : 用於存放測試role 本身功能的playbook 和主機定義檔案,在開發測試階段比較常用。
role 中各個目錄下的main.yml 檔案很重要,這是ansible 預設載入的YAML 檔案。
roles 的參照&執行
可以使用「roles:」語句參照role ,根據需要在主playbook 中參照不同的role,ansible 會把role 所包含的任務、變數、handlers、依賴等載入到playbook中,按照順序執行。
編寫主playbook 檔案test_role.yml:
---
- name: "主playbook檔案通過呼叫roles目錄下的role"
  hosts: serviceA
  user: root
  gather_facts: false
  roles:
    - roleB
    - roleA
roleA 和roleB 目錄結構如下:

/opt/tjt/ansible/roles/roleA/tasks/main.yml
---
- name: "呼叫-roles目錄下的roleA"
  debug:
    msg: "msg: roleA被執行"
/opt/tjt/ansible/roles/roleB/tasks/main.yml
---
- name: "呼叫-roles目錄下的roleB"
  debug:
    msg: "age:: roleB被執行"
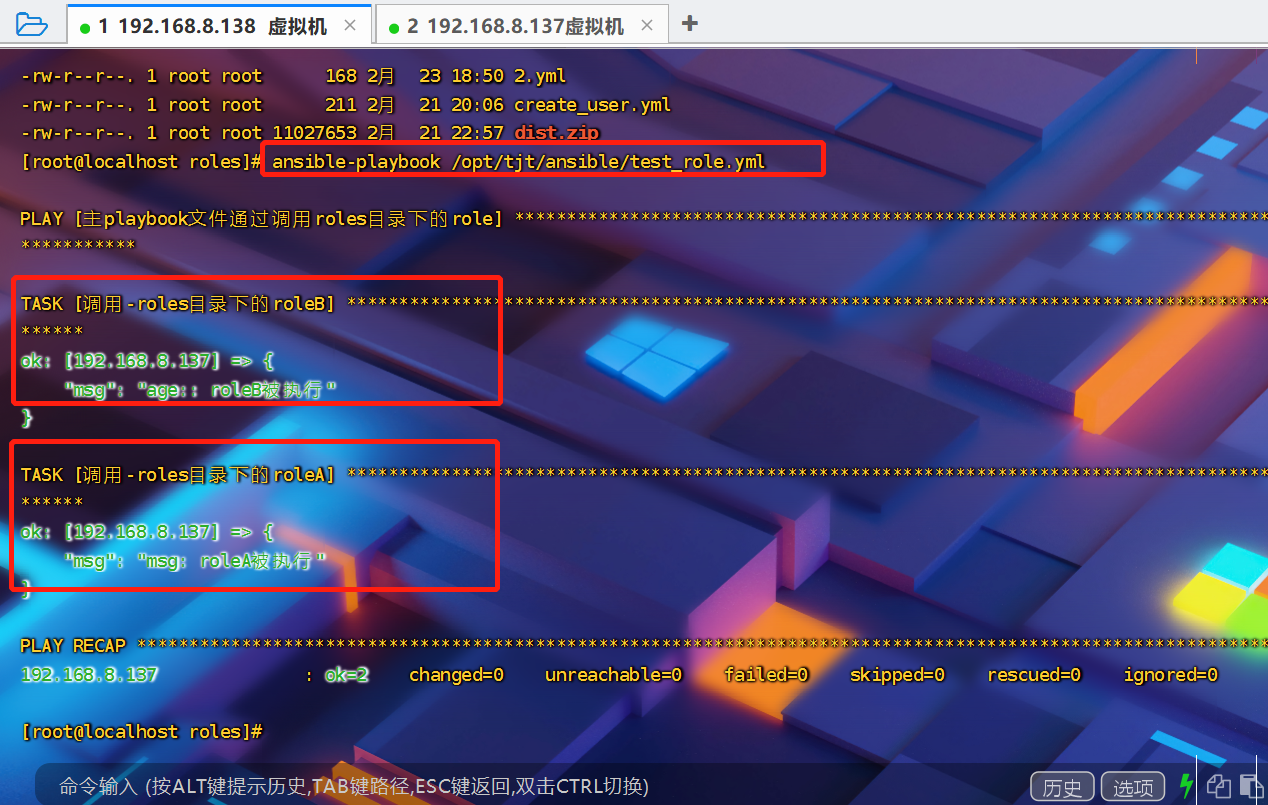
執行主playbook 檔案test_role.yml:
[root@localhost roles]# ansible-playbook /opt/tjt/ansible/test_role.ym

如上,可以看到roleB 和roleA 分別有序執行。
檢索路徑
ansible 如何查詢要執行的role,在不使用絕對路徑的情況下(可以這麼配role - role: /opt/tjt/ansible/roles/roleB),ansible 檢索role 的預設路徑有:
- 執行ansible-playbook 命令時所在的當前目錄
- playbook 檔案所在的目錄及playbook 檔案所在目錄的roles 目錄
- 當前系統使用者下的~/.ansible/roles 目錄
- /usr/share/ansible/roles 目錄
- ansible.cfg 中「roles_path」指定的目錄,預設值為/etc/ansible/roles 目錄
8-playbook 的chdir
chdir:進入指定目錄,如下chdir,執行ls 命令前,先進入指定目錄/opt/tjt。
[root@localhost roles]# ansible serviceA -m command -a 'chdir=/opt/tjt ls'

9-playbook 的with_items
ansible 中的迴圈模組有很多,with_items 最為簡單常用。
---
- name: "with_items迴圈遍歷"
  shell: "echo {{ item }}"
  register: "with_items_output"
  with_items: [a,b,c,d]

如上,with_items 可以用於迭代一個列表或字典,通過 {{ item }} 獲取每次迭代的值。
