部署Kubernetes v1.22.10高可用叢集
一、概述
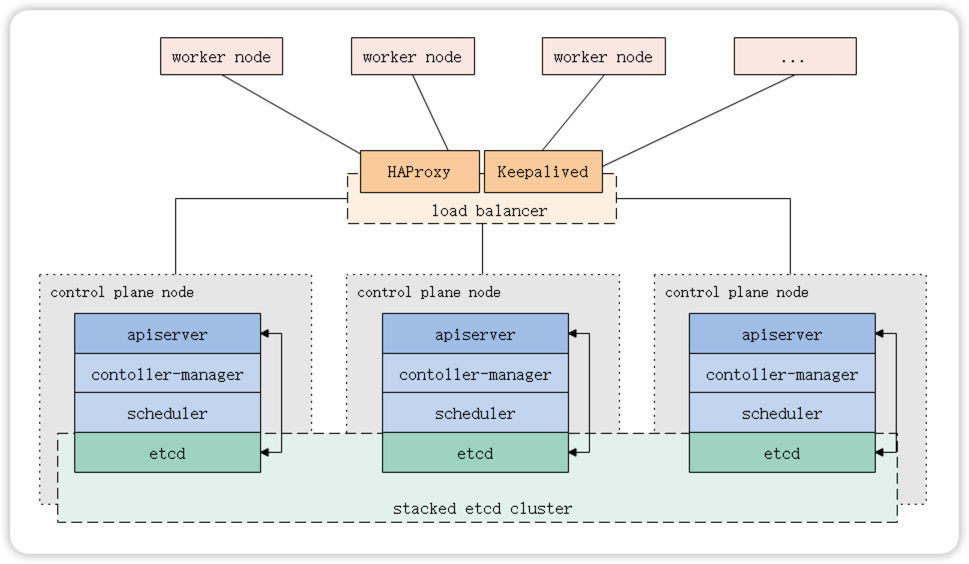
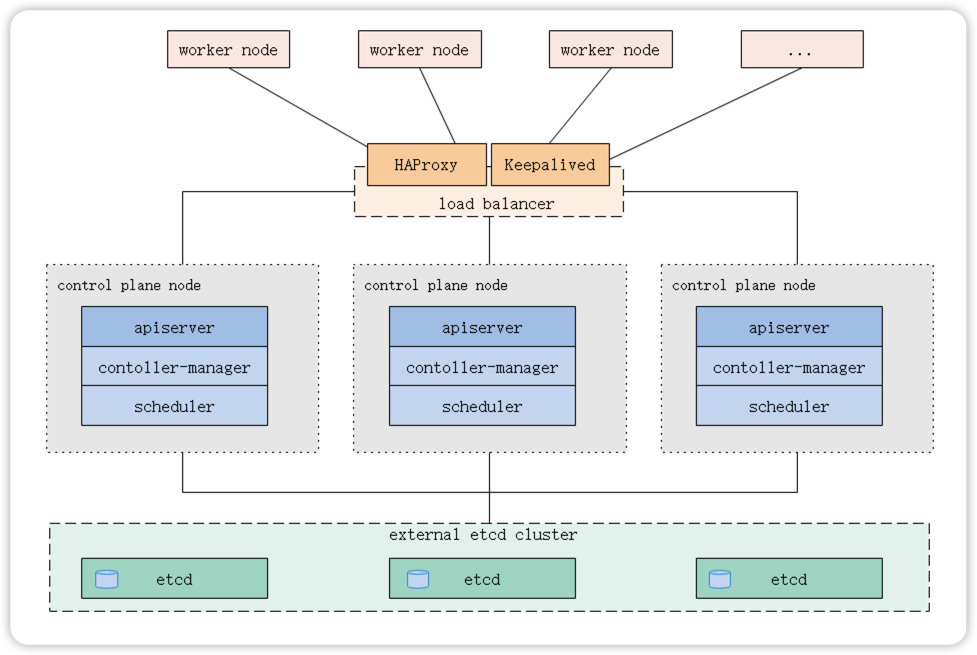
Kubernetes叢集控制平面(Master)節點右資料庫服務(Etcd)+其它服務元件(Apiserver、Controller-manager、Scheduler等)組成;整個叢集系統執行的互動資料都將儲存到資料庫服務(Etcd)中,所以Kubernetes叢集的高可用性取決於資料庫服務(Etcd)在多個控制平面(Master)節點構建的資料同步複製關係。由此搭建Kubernetes的高可用叢集可以選擇以下兩種部署方式:
- 使用堆疊的控制平面(Master)節點,其中etcd與組成控制平面的其他元件在同臺機器上;
- 使用外部Etcd節點,其中Etcd與控制平臺的其他元件在不同的機器上。
參考檔案:https://kubernetes.io/zh-cn/docs/setup/production-environment/tools/kubeadm/high-availability/
1.1 堆疊Etcd拓撲(推薦)
Etcd與其他元件共同執行在多臺控制平面(Master)機器上,構建Etcd叢集關係以形成高可用的Kubernetes叢集。
先決條件:
- 最少三個或更多奇數Master節點;
- 最少三個或更多Node節點;
- 叢集中所有機器之間的完整網路連線(公共或專用網路);
- 使用超級使用者許可權;
- 在叢集中的任何一個節點上都可以使用SSH遠端存取;
- Kubeadm和Kubelet已經安裝到機器上。
使用這種方案可以減少要使用機器的數量,降低成本,降低部署複雜度;多元件服務之間競爭主機資源,可能導致效能瓶頸,以及當Master主機發生故障時影響到所有元件正常工作。
在實際應用中,你可以選擇部署更多數量>3的Master主機,則該拓撲的劣勢將會減弱!
這是kubeadm中的預設拓撲,kubeadm會在Master節點上自動建立本地etcd成員。

1.2 外部Etcd拓撲
控制平面的Etcd元件執行在外部主機上,其他元件連線到外部的Etcd叢集以形成高可用的Kubernetes叢集。
先決條件:
- 最少三個或更多奇數Master主機;
- 最少三個或更多Node主機;
- 還需要三臺或更多奇數Etcd主機。
- 叢集中所有主機之間的完整網路連線(公共或專用網路);
- 使用超級使用者許可權;
- 在叢集中的任何一個節點主機上都可以使用SSH遠端存取;
- Kubeadm和Kubelet已經安裝到機器上。
使用外部主機搭建起來的Etcd叢集,擁有更多的主機資源和可延伸性,以及故障影響範圍縮小,但更多的機器將導致增加部署成本。

二、部署規劃
主機系統:CentOS Linux release 7.7.1908 (Core)
Kubernetes版本:1.22.10
Docker CE版本:20.10.17
管理節點執行服務:etcd、kube-apiserver、kube-scheduler、kube-controller-manager、docker、kubelet、keepalived、haproxy
管理節點設定:4vCPU / 8GB記憶體 / 200G儲存
|
主機名 |
主機地址 |
VIP地址 |
主機角色 |
|
k8s-master01 |
192.168.0.5 |
192.168.0.10 |
Master(Control Plane) |
|
k8s-master02 |
192.168.0.6 |
Master(Control Plane) |
|
|
k8s-master03 |
192.168.0.7 |
Master(Control Plane) |
注:確保伺服器為全新安裝的系統,未安裝其它軟體僅用於Kubernetes執行。
可使用如下命令檢查埠是否被佔用:
ss -alnupt |grep -E '6443|10250|10259|10257|2379|2380'
ss -alnupt |grep -E '10250|3[0-2][0-7][0-6][0-7]'
三、搭建Kubernetes叢集
3.1 核心升級(可選)
CentOS 7.x 版本的系統預設核心是3.10,該版本的核心在Kubernetes社群有很多已知的Bug(如:核心記憶體漏失錯誤),建議升級成4.17+版本以上。
官方映象倉庫下載地址:http://mirrors.coreix.net/elrepo-archive-archive/kernel/el7/x86_64/RPMS/
# 安裝4.19.9-1版本核心
$ rpm -ivh http://mirrors.coreix.net/elrepo-archive-archive/kernel/el7/x86_64/RPMS/kernel-ml-4.19.9-1.el7.elrepo.x86_64.rpm
$ rpm -ivh http://mirrors.coreix.net/elrepo-archive-archive/kernel/el7/x86_64/RPMS/kernel-ml-devel-4.19.9-1.el7.elrepo.x86_64.rpm

# 檢視核心啟動順序
$ awk -F \' '$1=="menuentry " {print i++ " : " $2}' /etc/grub2.cfg
0 : CentOS Linux (3.10.0-1062.12.1.el7.x86_64) 7 (Core)
1 : CentOS Linux (4.19.9-1.el7.elrepo.x86_64) 7 (Core)
2 : CentOS Linux (3.10.0-862.el7.x86_64) 7 (Core)
3 : CentOS Linux (0-rescue-ef219b153e8049718c374985be33c24e) 7 (Core)

# 設定系統啟動預設核心
$ grub2-set-default "CentOS Linux (4.19.9-1.el7.elrepo.x86_64) 7 (Core)"
$ grub2-mkconfig -o /boot/grub2/grub.cfg

# 檢視預設核心
$ grub2-editenv list
CentOS Linux (4.19.9-1.el7.elrepo.x86_64) 7 (Core)

# 重啟系統使其生效
$ reboot
3.2 系統初始化
3.2.1 設定主機名
### 在master01上執行
$ hostnamectl set-hostname k8s-master01
# 在master02上執行
$ hostnamectl set-hostname k8s-master02
# 在master03上執行
$ hostnamectl set-hostname k8s-master03
3.2.2 新增hosts名稱解析
### 在所有主機上執行
$ cat >> /etc/hosts << EOF
192.168.0.5 k8s-master01
192.168.0.6 k8s-master02
192.168.0.7 k8s-master03
EOF
3.2.3 安裝常用軟體
### 在所有主機上執行
$ yum -y install epel-release.noarch nfs-utils net-tools bridge-utils \
ntpdate vim chrony wget lrzsz
3.2.4 設定主機時間同步
在k8s-master01上設定從公共時間伺服器上同步時間
[root@k8s-master01 ~]# systemctl stop ntpd
[root@k8s-master01 ~]# timedatectl set-timezone Asia/Shanghai
[root@k8s-master01 ~]# ntpdate ntp.aliyun.com && /usr/sbin/hwclock
[root@k8s-master01 ~]# vim /etc/ntp.conf
# 當該節點丟失網路連線,採用本地時間作為時間伺服器為叢集中的其他節點提供時間同步
server 127.127.1.0
Fudge  127.127.1.0 stratum 10
# 註釋掉預設時間伺服器,改為如下地址
server cn.ntp.org.cn prefer iburst minpoll 4 maxpoll 10
server ntp.aliyun.com iburst minpoll 4 maxpoll 10
server time.ustc.edu.cn iburst minpoll 4 maxpoll 10
server ntp.tuna.tsinghua.edu.cn iburst minpoll 4 maxpoll 10

[root@k8s-master01 ~]# systemctl start ntpd
[root@k8s-master01 ~]# systemctl enable ntpd
[root@k8s-master01 ~]# ntpstat
synchronised to NTP server (203.107.6.88) at stratum 3
   time correct to within 202 ms
   polling server every 64 s
設定其它主機從k8s-master01同步時間
### 在除k8s-master01以外的所有主機上執行
$ systemctl stop ntpd
$ timedatectl set-timezone Asia/Shanghai
$ ntpdate k8s-master01 && /usr/sbin/hwclock
$ vim /etc/ntp.conf
# 註釋掉預設時間伺服器,改為如下地址
server k8s-master01 prefer iburst minpoll 4 maxpoll 10

$ systemctl start ntpd
$ systemctl enable ntpd
$ ntpstat
synchronised to NTP server (192.168.0.5) at stratum 4
   time correct to within 217 ms
   polling server every 16 s
3.2.5 關閉防火牆
### 在所有節點上執行
# 關閉SElinux
$ sed -i 's/^SELINUX=enforcing$/SELINUX=disabled/' /etc/selinux/config
$ setenforce 0
# 關閉Fileworld防火牆
$ systemctl stop firewalld.service
$ systemctl disable firewalld.service
3.2.6 系統優化
### 在所有節點上執行
# 關閉swap
$ swapoff -a
$ sed -i "s/^[^#].*swap/#&/g" /etc/fstab

# 啟用bridge-nf功能
$ cat > /etc/modules-load.d/k8s.conf << EOF
overlay
br_netfilter
EOF
$ modprobe overlay && modprobe br_netfilter

# 設定核心引數
$ cat > /etc/sysctl.d/k8s.conf << EOF
# 設定轉發 IPv4 並讓 iptables 看到橋接流量
net.ipv4.ip_forward                 = 1
net.bridge.bridge-nf-call-iptables  = 1
net.bridge.bridge-nf-call-ip6tables = 1

# 加強握手佇列能力
net.ipv4.tcp_max_syn_backlog        = 10240
net.core.somaxconn                  = 10240
net.ipv4.tcp_syncookies             = 1

# 調整系統級別的能夠開啟的檔案控制程式碼的數量
fs.file-max=1000000

# 設定arp cache 大小
net.ipv4.neigh.default.gc_thresh1   = 1024
net.ipv4.neigh.default.gc_thresh2   = 4096
net.ipv4.neigh.default.gc_thresh3   = 8192

# 令TCP視窗和狀態追蹤更加寬鬆
net.netfilter.nf_conntrack_tcp_be_liberal = 1
net.netfilter.nf_conntrack_tcp_loose = 1

# 允許的最大跟蹤連線條目,是在核心記憶體中netfilter可以同時處理的「任務」(連線跟蹤條目)
net.netfilter.nf_conntrack_max      = 10485760
net.netfilter.nf_conntrack_tcp_timeout_established = 300
net.netfilter.nf_conntrack_buckets  = 655360

# 每個網路介面接收封包的速率比核心處理這些包的速率快時,允許送到佇列的封包的最大數目。
net.core.netdev_max_backlog         = 10000

# 預設值: 128 指定了每一個real user ID可建立的inotify instatnces的數量上限
fs.inotify.max_user_instances       = 524288
# 預設值: 8192 指定了每個inotify instance相關聯的watches的上限
fs.inotify.max_user_watches         = 524288
EOF
$ sysctl --system

# 修改檔案開啟數
$ ulimit -n 65545
$ cat >> /etc/sysctl.d/limits.conf << EOF
*               soft    nproc           65535
*               hard    nproc           65535
*               soft    nofile          65535
*               hard    nofile          65535
EOF
$ sed -i '/nproc/ s/4096/65535/' /etc/security/limits.d/20-nproc.conf
3.3 安裝Docker
### 在所有節點上執行
# 安裝Docker
$ yum install -y yum-utils device-mapper-persistent-data lvm2
$ yum-config-manager --add-repo https://mirrors.aliyun.com/docker-ce/linux/centos/docker-ce.repo
$ sed -i 's+download.docker.com+mirrors.aliyun.com/docker-ce+' /etc/yum.repos.d/docker-ce.repo && yum makecache fast
$ yum -y install docker-ce-20.10.17

# 優化docker設定
$ mkdir -p /etc/docker && cat > /etc/docker/daemon.json <<EOF
{
  "registry-mirrors": [
      "https://hub-mirror.c.163.coma",
      "https://docker.mirrors.ustc.edu.cn",
      "https://p6902cz5.mirror.aliyuncs.com"
  ],
  "exec-opts": ["native.cgroupdriver=systemd"],
  "log-driver": "json-file",
  "log-opts": {
    "max-size": "100m"
  },
  "storage-driver": "overlay2",
  "storage-opts": [
    "overlay2.override_kernel_check=true"
  ],
  "bip": "172.38.16.1/24"
}
EOF

# 啟動並設定開機自啟
$ systemctl enable docker
$ systemctl restart docker
$ docker version
3.4 安裝Kubernetes
### 在所有Master節點執行
# 設定yum源
cat > /etc/yum.repos.d/kubernetes.repo <<EOF
[kubernetes]
name=Kubernetes
baseurl=https://mirrors.aliyun.com/kubernetes/yum/repos/kubernetes-el7-x86_64/
enabled=1
gpgcheck=1
repo_gpgcheck=1
gpgkey=https://mirrors.aliyun.com/kubernetes/yum/doc/yum-key.gpg https://mirrors.aliyun.com/kubernetes/yum/doc/rpm-package-key.gpg
EOF

# 安裝kubeadm、kubelet和kubectl
$ yum install -y kubelet-1.22.10 kubeadm-1.22.10 kubectl-1.22.10 --disableexcludes=kubernetes --nogpgcheck
$ systemctl enable --now kubelet

# 設定kubelet引數
$ cat > /etc/sysconfig/kubelet <<EOF
KUBELET_EXTRA_ARGS="--fail-swap-on=false"
EOF可以參考:https://www.yuque.com/wubolive/ops/ugomse 修改kubeadm原始碼更改證書籤發時長。
3.5 設定HA負載均衡
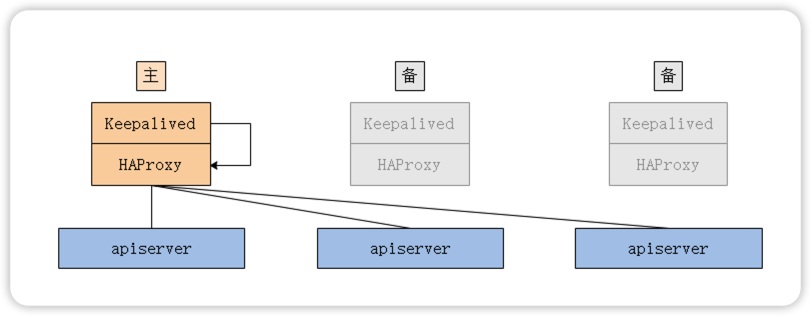
當存在多個控制平面時,kube-apiserver也存在多個,可以使用HAProxy+Keepalived這個組合,因為HAProxy可以提高更高效能的四層負載均衡功能。

官方檔案提供了兩種執行方式(此案例使用選項2):
- 選項1:在作業系統上執行服務
- 選項2:將服務作為靜態pod執行
參考檔案:https://github.com/kubernetes/kubeadm/blob/main/docs/ha-considerations.md
3.5.1 設定keepalived
將keepalived作為靜態pod執行,在引導過程中,kubelet將啟動這些程序,以便叢集可以在啟動時使用它們。這是一個優雅的解決方案,特別是在堆疊(Stacked)etcd 拓撲下描述的設定。
建立keepalived.conf組態檔
### 在k8s-master01上設定:
$ mkdir /etc/keepalived && cat > /etc/keepalived/keepalived.conf <<EOF
! /etc/keepalived/keepalived.conf
! Configuration File for keepalived
global_defs {
    router_id k8s-master01
}
vrrp_script check_apiserver {
  script "/etc/keepalived/check_apiserver.sh"
  interval 3
  weight -2
  fall 10
  rise 2
}

vrrp_instance VI_1 {
    state MASTER
    interface eth0
    virtual_router_id 51
    priority 100
    authentication {
        auth_type PASS
        auth_pass 123456
    }
    virtual_ipaddress {
        192.168.0.10
    }
    track_script {
        check_apiserver
    }
}
EOF

### 在k8s-master02上設定:
$ mkdir /etc/keepalived && cat > /etc/keepalived/keepalived.conf <<EOF
! /etc/keepalived/keepalived.conf
! Configuration File for keepalived
global_defs {
    router_id k8s-master02
}
vrrp_script check_apiserver {
  script "/etc/keepalived/check_apiserver.sh"
  interval 3
  weight -2
  fall 10
  rise 2
}

vrrp_instance VI_1 {
    state BACKUP
    interface eth0
    virtual_router_id 51
    priority 99
    authentication {
        auth_type PASS
        auth_pass 123456
    }
    virtual_ipaddress {
        192.168.0.10
    }
    track_script {
        check_apiserver
    }
}
EOF

### 在k8s-master03上設定:
$ mkdir /etc/keepalived && cat > /etc/keepalived/keepalived.conf <<EOF
! /etc/keepalived/keepalived.conf
! Configuration File for keepalived
global_defs {
    router_id k8s-master03
}
vrrp_script check_apiserver {
  script "/etc/keepalived/check_apiserver.sh"
  interval 3
  weight -2
  fall 10
  rise 2
}

vrrp_instance VI_1 {
    state BACKUP
    interface eth0
    virtual_router_id 51
    priority 98
    authentication {
        auth_type PASS
        auth_pass 123456
    }
    virtual_ipaddress {
        192.168.0.10
    }
    track_script {
        check_apiserver
    }
}
EOF
建立健康檢查指令碼
### 在所有Master控制節點上執行
$ cat > /etc/keepalived/check_apiserver.sh << 'EOF'
#!/bin/sh

errorExit() {
    echo "*** $*" 1>&2
    exit 1
}

curl --silent --max-time 2 --insecure https://localhost:9443/ -o /dev/null || errorExit "Error GET https://localhost:9443/"
if ip addr | grep -q 192.168.0.10; then
    curl --silent --max-time 2 --insecure https://192.168.0.10:9443/ -o /dev/null || errorExit "Error GET https://192.168.0.10:9443/"
fi
EOF
3.5.2 設定haproxy
### 在所有Master管理節點執行
$ mkdir /etc/haproxy && cat > /etc/haproxy/haproxy.cfg << 'EOF'
# /etc/haproxy/haproxy.cfg
#---------------------------------------------------------------------
# Global settings
#---------------------------------------------------------------------
global
    log /dev/log local0
    log /dev/log local1 notice
    daemon

#---------------------------------------------------------------------
# common defaults that all the 'listen' and 'backend' sections will
# use if not designated in their block
#---------------------------------------------------------------------
defaults
    mode                    http
    log                     global
    option                  httplog
    option                  dontlognull
    option http-server-close
    option forwardfor       except 127.0.0.0/8
    option                  redispatch
    retries                 1
    timeout http-request    10s
    timeout queue           20s
    timeout connect         5s
    timeout client          20s
    timeout server          20s
    timeout http-keep-alive 10s
    timeout check           10s

#---------------------------------------------------------------------
# Haproxy Monitoring panel
#---------------------------------------------------------------------
listen  admin_status
    bind 0.0.0.0:8888
    mode http
    log 127.0.0.1 local3 err
    stats refresh 5s
    stats uri /admin?stats
    stats realm itnihao\ welcome
    stats auth admin:admin
    stats hide-version
    stats admin if TRUE

#---------------------------------------------------------------------
# apiserver frontend which proxys to the control plane nodes
#---------------------------------------------------------------------
frontend apiserver
    bind *:9443
    mode tcp
    option tcplog
    default_backend apiserver

#---------------------------------------------------------------------
# round robin balancing for apiserver
#---------------------------------------------------------------------
backend apiserver
    option httpchk GET /healthz
    http-check expect status 200
    mode tcp
    option ssl-hello-chk
    balance     roundrobin
        server k8s-master01 192.168.0.5:6443 check
        server k8s-master02 192.168.0.6:6443 check
        server k8s-master03 192.168.0.7:6443 check
EOF
3.5.3 設定靜態Pod執行
對於此設定,需要在其中建立兩個清單檔案/etc/kubernetes/manifests(首先建立目錄)。
### 僅在k8s-master01上建立
$ mkdir -p /etc/kubernetes/manifests
# 設定keepalived清單
$ cat > /etc/kubernetes/manifests/keepalived.yaml << 'EOF'
apiVersion: v1
kind: Pod
metadata:
  creationTimestamp: null
  name: keepalived
  namespace: kube-system
spec:
  containers:
  - image: osixia/keepalived:2.0.17
    name: keepalived
    resources: {}
    securityContext:
      capabilities:
        add:
        - NET_ADMIN
        - NET_BROADCAST
        - NET_RAW
    volumeMounts:
    - mountPath: /usr/local/etc/keepalived/keepalived.conf
      name: config
    - mountPath: /etc/keepalived/check_apiserver.sh
      name: check
  hostNetwork: true
  volumes:
  - hostPath:
      path: /etc/keepalived/keepalived.conf
    name: config
  - hostPath:
      path: /etc/keepalived/check_apiserver.sh
    name: check
status: {}
EOF
# 設定haproxy清單
cat > /etc/kubernetes/manifests/haproxy.yaml << 'EOF'
apiVersion: v1
kind: Pod
metadata:
  name: haproxy
  namespace: kube-system
spec:
  containers:
  - image: haproxy:2.1.4
    name: haproxy
    livenessProbe:
      failureThreshold: 8
      httpGet:
        host: localhost
        path: /healthz
        port: 9443
        scheme: HTTPS
    volumeMounts:
    - mountPath: /usr/local/etc/haproxy/haproxy.cfg
      name: haproxyconf
      readOnly: true
  hostNetwork: true
  volumes:
  - hostPath:
      path: /etc/haproxy/haproxy.cfg
      type: FileOrCreate
    name: haproxyconf
status: {}
EOF
3.6 部署Kubernetes叢集
3.6.1 準備映象
由於國記憶體取k8s.gcr.io存在某些原因下載不了映象,所以我們可以在國內的映象倉庫中下載它們(比如使用阿里雲映象倉庫。阿里雲代理映象倉庫地址:registry.aliyuncs.com/google_containers
### 在所有Master控制節點執行
$ kubeadm config images pull --kubernetes-version=v1.22.10 --image-repository=registry.aliyuncs.com/google_containers
3.6.2 準備ini組態檔
### 在k8s-master01上執行
$ kubeadm config print init-defaults > kubeadm-init.yaml
$ vim kubeadm-init.yaml
apiVersion: kubeadm.k8s.io/v1beta3
bootstrapTokens:
- groups:
  - system:bootstrappers:kubeadm:default-node-token
  token: abcdef.0123456789abcdef
  ttl: 24h0m0s
  usages:
  - signing
  - authentication
kind: InitConfiguration
localAPIEndpoint:
  advertiseAddress: 192.168.0.5
  bindPort: 6443
nodeRegistration:
  criSocket: /var/run/dockershim.sock
  imagePullPolicy: IfNotPresent
  name: k8s-master01
  taints: null
---
controlPlaneEndpoint: "192.168.0.10:9443"
apiServer:
  timeoutForControlPlane: 4m0s
apiVersion: kubeadm.k8s.io/v1beta3
certificatesDir: /etc/kubernetes/pki
clusterName: kubernetes
controllerManager: {}
dns: {}
etcd:
  local:
    dataDir: /var/lib/etcd
imageRepository: registry.aliyuncs.com/google_containers
kind: ClusterConfiguration
kubernetesVersion: 1.22.10
networking:
  dnsDomain: cluster.local
  serviceSubnet: 10.96.0.0/12
scheduler: {}
設定說明:
localAPIEndpoint.advertiseAddress:本機apiserver監聽的IP地址。localAPIEndpoint.bindPort:本機apiserver監聽的埠。controlPlaneEndpoint:控制平面入口點地址(負載均衡器VIP地址+負載均衡器埠)。imageRepository:部署叢集時要使用的映象倉庫地址。kubernetesVersion:部署叢集的kubernetes版本。
3.6.3 初始化控制平面節點
kubeadm在初始化控制平面時會生成部署Kubernetes叢集中各個元件所需的相關組態檔在/etc/kubernetes目錄下,可以供我們參考。
### 在k8s-master01上執行
# 由於kubeadm命令為原始碼安裝,需要設定一下kubelet服務。
$ kubeadm init phase kubelet-start --config kubeadm-init.yaml
# 初始化kubernetes控制平面
$ kubeadm init --config kubeadm-init.yaml --upload-certs

Your Kubernetes control-plane has initialized successfully!

To start using your cluster, you need to run the following as a regular user:

  mkdir -p $HOME/.kube
  sudo cp -i /etc/kubernetes/admin.conf $HOME/.kube/config
  sudo chown $(id -u):$(id -g) $HOME/.kube/config

Alternatively, if you are the root user, you can run:

  export KUBECONFIG=/etc/kubernetes/admin.conf

You should now deploy a pod network to the cluster.
Run "kubectl apply -f [podnetwork].yaml" with one of the options listed at:
  https://kubernetes.io/docs/concepts/cluster-administration/addons/

You can now join any number of the control-plane node running the following command on each as root:

  kubeadm join 192.168.0.10:9443 --token abcdef.0123456789abcdef \
        --discovery-token-ca-cert-hash sha256:b30e986e80423da7b6b1cbf43ece58598074b2a8b86295517438942e9a47ab0d \
        --control-plane --certificate-key 57360054608fa9978864124f3195bc632454be4968b5ccb577f7bb9111d96597

Please note that the certificate-key gives access to cluster sensitive data, keep it secret!
As a safeguard, uploaded-certs will be deleted in two hours; If necessary, you can use
"kubeadm init phase upload-certs --upload-certs" to reload certs afterward.

Then you can join any number of worker nodes by running the following on each as root:

kubeadm join 192.168.0.10:9443 --token abcdef.0123456789abcdef \
        --discovery-token-ca-cert-hash sha256:b30e986e80423da7b6b1cbf43ece58598074b2a8b86295517438942e9a47ab0d
3.6.4 將其它節點加入叢集
將控制平面節點加入叢集
### 在另外兩臺Master控制節點執行:
$ kubeadm join 192.168.0.10:9443 --token abcdef.0123456789abcdef \
      --discovery-token-ca-cert-hash sha256:b30e986e80423da7b6b1cbf43ece58598074b2a8b86295517438942e9a47ab0d \
      --control-plane --certificate-key 57360054608fa9978864124f3195bc632454be4968b5ccb577f7bb9111d96597
將工作節點加入叢集(可選)
### 如有Node工作節點可使用如下命令
$ kubeadm join 192.168.0.10:9443 --token abcdef.0123456789abcdef \
        --discovery-token-ca-cert-hash sha256:b30e986e80423da7b6b1cbf43ece58598074b2a8b86295517438942e9a47ab0d
將keepalived和haproxy複製到其它Master控制節點
$ scp /etc/kubernetes/manifests/{haproxy.yaml,keepalived.yaml} root@k8s-master02:/etc/kubernetes/manifests/
$ scp /etc/kubernetes/manifests/{haproxy.yaml,keepalived.yaml} root@k8s-master03:/etc/kubernetes/manifests/
去掉master汙點(可選)
$ kubectl taint nodes --all node-role.kubernetes.io/master-3.6.5 驗證叢集狀態
### 可在任意Master控制節點執行
# 設定kubectl認證
$ mkdir -p $HOME/.kube
$ cp -i /etc/kubernetes/admin.conf $HOME/.kube/config

# 檢視節點狀態
$ kubectl get nodes
NAME           STATUS     ROLES                  AGE     VERSION
k8s-master01   NotReady   control-plane,master   13m     v1.22.10
k8s-master02   NotReady   control-plane,master   3m55s   v1.22.10
k8s-master03   NotReady   control-plane,master   113s    v1.22.10

# 檢視pod狀態
$ kubectl get pod -n kube-system
NAMESPACE     NAME                                   READY   STATUS    RESTARTS        AGE
kube-system   coredns-7f6cbbb7b8-96hp9               0/1     Pending   0               18m
kube-system   coredns-7f6cbbb7b8-kfmnn               0/1     Pending   0               18m
kube-system   etcd-k8s-master01                      1/1     Running   0               18m
kube-system   etcd-k8s-master02                      1/1     Running   0               9m21s
kube-system   etcd-k8s-master03                      1/1     Running   0               7m18s
kube-system   haproxy-k8s-master01                   1/1     Running   0               18m
kube-system   haproxy-k8s-master02                   1/1     Running   0               3m27s
kube-system   haproxy-k8s-master03                   1/1     Running   0               3m16s
kube-system   keepalived-k8s-master01                1/1     Running   0               18m
kube-system   keepalived-k8s-master02                1/1     Running   0               3m27s
kube-system   keepalived-k8s-master03                1/1     Running   0               3m16s
kube-system   kube-apiserver-k8s-master01            1/1     Running   0               18m
kube-system   kube-apiserver-k8s-master02            1/1     Running   0               9m24s
kube-system   kube-apiserver-k8s-master03            1/1     Running   0               7m23s
kube-system   kube-controller-manager-k8s-master01   1/1     Running   0               18m
kube-system   kube-controller-manager-k8s-master02   1/1     Running   0               9m24s
kube-system   kube-controller-manager-k8s-master03   1/1     Running   0               7m22s
kube-system   kube-proxy-cvdlr                       1/1     Running   0               7m23s
kube-system   kube-proxy-gnl7t                       1/1     Running   0               9m25s
kube-system   kube-proxy-xnrt7                       1/1     Running   0               18m
kube-system   kube-scheduler-k8s-master01            1/1     Running   0               18m
kube-system   kube-scheduler-k8s-master02            1/1     Running   0               9m24s
kube-system   kube-scheduler-k8s-master03            1/1     Running   0               7m22s

# 檢視kubernetes證書有效期
$ kubeadm certs check-expiration
CERTIFICATE                EXPIRES                  RESIDUAL TIME   CERTIFICATE AUTHORITY   EXTERNALLY MANAGED
admin.conf                 Oct 25, 2122 07:40 UTC   99y             ca                      no
apiserver                  Oct 25, 2122 07:40 UTC   99y             ca                      no
apiserver-etcd-client      Oct 25, 2122 07:40 UTC   99y             etcd-ca                 no
apiserver-kubelet-client   Oct 25, 2122 07:40 UTC   99y             ca                      no
controller-manager.conf    Oct 25, 2122 07:40 UTC   99y             ca                      no
etcd-healthcheck-client    Oct 25, 2122 07:40 UTC   99y             etcd-ca                 no
etcd-peer                  Oct 25, 2122 07:40 UTC   99y             etcd-ca                 no
etcd-server                Oct 25, 2122 07:40 UTC   99y             etcd-ca                 no
front-proxy-client         Oct 25, 2122 07:40 UTC   99y             front-proxy-ca          no
scheduler.conf             Oct 25, 2122 07:40 UTC   99y             ca                      no

CERTIFICATE AUTHORITY   EXPIRES                  RESIDUAL TIME   EXTERNALLY MANAGED
ca                      Oct 22, 2032 07:40 UTC   99y             no
etcd-ca                 Oct 22, 2032 07:40 UTC   99y             no
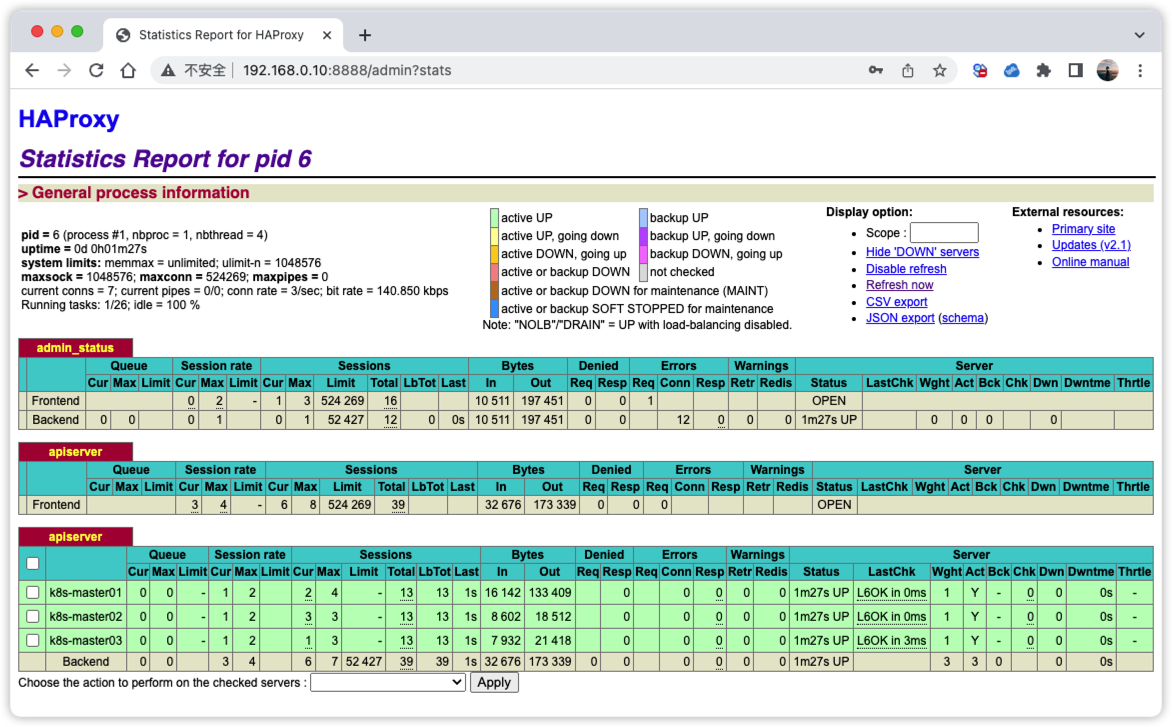
front-proxy-ca Oct 22, 2032 07:40 UTC 99y no 檢視HAProxy控制檯叢集狀態
存取:http://192.168.0.10:8888/admin?stats 賬號密碼都為admin

3.6.6 安裝CNA外掛(calico)
Calico是一個開源的虛擬化網路方案,支援基礎的Pod網路通訊和網路策略功能。
官方檔案:https://projectcalico.docs.tigera.io/getting-started/kubernetes/quickstart
### 在任意Master控制節點執行
# 下載最新版本編排檔案
$ kubectl apply -f https://docs.projectcalico.org/manifests/calico.yaml
# 下載指定版本編排檔案(可選)
$ curl https://raw.githubusercontent.com/projectcalico/calico/v3.24.0/manifests/calico.yaml -O
# 部署calico
$ kubectl apply -f calico.yaml

# 驗證安裝
$ kubectl get pod -n kube-system | grep calico
calico-kube-controllers-86c9c65c67-j7pv4   1/1     Running   0               17m
calico-node-8mzpk                          1/1     Running   0               17m
calico-node-tkzs2                          1/1     Running   0               17m
calico-node-xbwvp                          1/1     Running   0               17m
四、叢集優化及元件安裝
4.1 叢集優化
4.1.1 修改NodePort埠範圍(可選)
### 在所有Master管理節點執行
$ sed -i '/- --secure-port=6443/a\    - --service-node-port-range=1-32767' /etc/kubernetes/manifests/kube-apiserver.yaml
4.1.2 解決kubectl get cs顯示異常問題
### 在所有Master管理節點執行
$ sed -i 's/^[^#].*--port=0$/#&/g' /etc/kubernetes/manifests/{kube-scheduler.yaml,kube-controller-manager.yaml}
# 驗證
$ kubectl get cs
Warning: v1 ComponentStatus is deprecated in v1.19+
NAME                 STATUS    MESSAGE                         ERROR
scheduler            Healthy   ok
controller-manager   Healthy   ok
etcd-0               Healthy   {"health":"true","reason":""}
4.1.3 解決排程器監控不顯示問題
### 在所有Master管理節點執行
$ sed -i 's#bind-address=127.0.0.1#bind-address=0.0.0.0#g' /etc/kubernetes/manifests/kube-controller-manager.yaml
$ sed -i 's#bind-address=127.0.0.1#bind-address=0.0.0.0#g' /etc/kubernetes/manifests/kube-scheduler.yaml
4.2 安裝Metric-Server
指標服務Metrices-Server是Kubernetes中的一個常用外掛,它類似於Top命令,可以檢視Kubernetes中Node和Pod的CPU和記憶體資源使用情況。Metrices-Server每15秒收集一次指標,它在叢集中的每個節點中執行,可延伸支援多達5000個節點的叢集。
參考檔案:https://github.com/kubernetes-sigs/metrics-server
### 在任意Master管理節點執行
$ wget https://github.com/kubernetes-sigs/metrics-server/releases/latest/download/components.yaml -O metrics-server.yaml
# 修改設定
$ vim metrics-server.yaml
......
    spec:
      containers:
      - args:
        - --cert-dir=/tmp
        - --secure-port=4443
        - --kubelet-preferred-address-types=InternalIP,ExternalIP,Hostname
        - --kubelet-use-node-status-port
        - --metric-resolution=15s
        - --kubelet-insecure-tls  # 不要驗證由Kubelets提供的CA或服務證書。
        image: bitnami/metrics-server:0.6.1   # 修改成docker.io映象
        imagePullPolicy: IfNotPresent
......
# 部署metrics-server
$ kubectl apply -f metrics-server.yaml
# 檢視啟動狀態
$ kubectl get pod -n kube-system -l k8s-app=metrics-server -w
NAME                             READY   STATUS    RESTARTS   AGE
metrics-server-655d65c95-lvb7z   1/1     Running   0          103s
# 檢視叢集資源狀態
$ kubectl top nodes
NAME           CPU(cores)   CPU%   MEMORY(bytes)   MEMORY%
k8s-master01   193m         4%     2144Mi          27%
k8s-master02   189m         4%     1858Mi          23%
k8s-master03   268m         6%     1934Mi          24%
五、附錄
5.1 重置節點(危險操作)
當在使用kubeadm init或kubeadm join部署節點出現失敗狀況時,可以使用以下操作對節點進行重置!
注:重置會將節點恢復到未部署前狀態,若叢集已正常工作則無需重置,否則將引起不可恢復的叢集故障!
$ kubeadm reset -f
$ ipvsadm --clear
$ iptables -F && iptables -X && iptables -Z
5.2 常用查詢命令
# 檢視Token列表
$ kubeadm token list
TOKEN                     TTL         EXPIRES                USAGES                   DESCRIPTION                                                EXTRA GROUPS
abcdef.0123456789abcdef   22h         2022-10-26T07:43:01Z   authentication,signing   <none>                                                     system:bootstrappers:kubeadm:default-node-token
jgqg88.6mskuadei41o0s2d   40m         2022-10-25T09:43:01Z   <none>                   Proxy for managing TTL for the kubeadm-certs secret        <none>

# 查詢節點執行狀態
$ kubectl get nodes
NAME           STATUS   ROLES                  AGE   VERSION
k8s-master01   Ready    control-plane,master   81m   v1.22.10
k8s-master02   Ready    control-plane,master   71m   v1.22.10
k8s-master03   Ready    control-plane,master   69m   v1.22.10

# 檢視證書到期時間
$ kubeadm certs check-expiration
CERTIFICATE                EXPIRES                  RESIDUAL TIME   CERTIFICATE AUTHORITY   EXTERNALLY MANAGED
admin.conf                 Oct 25, 2122 07:40 UTC   99y             ca                      no
apiserver                  Oct 25, 2122 07:40 UTC   99y             ca                      no
apiserver-etcd-client      Oct 25, 2122 07:40 UTC   99y             etcd-ca                 no
apiserver-kubelet-client   Oct 25, 2122 07:40 UTC   99y             ca                      no
controller-manager.conf    Oct 25, 2122 07:40 UTC   99y             ca                      no
etcd-healthcheck-client    Oct 25, 2122 07:40 UTC   99y             etcd-ca                 no
etcd-peer                  Oct 25, 2122 07:40 UTC   99y             etcd-ca                 no
etcd-server                Oct 25, 2122 07:40 UTC   99y             etcd-ca                 no
front-proxy-client         Oct 25, 2122 07:40 UTC   99y             front-proxy-ca          no
scheduler.conf             Oct 25, 2122 07:40 UTC   99y             ca                      no

CERTIFICATE AUTHORITY   EXPIRES                  RESIDUAL TIME   EXTERNALLY MANAGED
ca                      Oct 22, 2032 07:40 UTC   99y             no
etcd-ca                 Oct 22, 2032 07:40 UTC   99y             no
front-proxy-ca          Oct 22, 2032 07:40 UTC   99y             no

# 檢視kubeadm初始化控制平面設定資訊
$ kubeadm config print init-defaults
apiVersion: kubeadm.k8s.io/v1beta3
bootstrapTokens:
- groups:
  - system:bootstrappers:kubeadm:default-node-token
  token: abcdef.0123456789abcdef
  ttl: 24h0m0s
  usages:
  - signing
  - authentication
kind: InitConfiguration
localAPIEndpoint:
  advertiseAddress: 1.2.3.4
  bindPort: 6443
nodeRegistration:
  criSocket: /var/run/dockershim.sock
  imagePullPolicy: IfNotPresent
  name: node
  taints: null
---
apiServer:
  timeoutForControlPlane: 4m0s
apiVersion: kubeadm.k8s.io/v1beta3
certificatesDir: /etc/kubernetes/pki
clusterName: kubernetes
controllerManager: {}
dns: {}
etcd:
  local:
    dataDir: /var/lib/etcd
imageRepository: k8s.gcr.io
kind: ClusterConfiguration
kubernetesVersion: 1.22.0
networking:
  dnsDomain: cluster.local
  serviceSubnet: 10.96.0.0/12
scheduler: {}

# 檢視kube-system空間Pod執行狀態
$ kubectl get pod --namespace=kube-system
NAME                                       READY   STATUS             RESTARTS      AGE
calico-kube-controllers-86c9c65c67-j7pv4   1/1     Running            0             47m
calico-node-8mzpk                          1/1     Running            0             47m
calico-node-tkzs2                          1/1     Running            0             47m
calico-node-xbwvp                          1/1     Running            0             47m
coredns-7f6cbbb7b8-96hp9                   1/1     Running            0             82m
coredns-7f6cbbb7b8-kfmnn                   1/1     Running            0             82m
etcd-k8s-master01                          1/1     Running            0             82m
etcd-k8s-master02                          1/1     Running            0             72m
etcd-k8s-master03                          1/1     Running            0             70m
haproxy-k8s-master01                       1/1     Running            0             36m
haproxy-k8s-master02                       1/1     Running            0             67m
haproxy-k8s-master03                       1/1     Running            0             66m
keepalived-k8s-master01                    1/1     Running            0             82m
keepalived-k8s-master02                    1/1     Running            0             67m
keepalived-k8s-master03                    1/1     Running            0             66m
kube-apiserver-k8s-master01                1/1     Running            0             82m
kube-apiserver-k8s-master02                1/1     Running            0             72m
kube-apiserver-k8s-master03                1/1     Running            0             70m
kube-controller-manager-k8s-master01       1/1     Running            0             23m
kube-controller-manager-k8s-master02       1/1     Running            0             23m
kube-controller-manager-k8s-master03       1/1     Running            0             23m
kube-proxy-cvdlr                           1/1     Running            0             70m
kube-proxy-gnl7t                           1/1     Running            0             72m
kube-proxy-xnrt7                           1/1     Running            0             82m
kube-scheduler-k8s-master01                1/1     Running            0             23m
kube-scheduler-k8s-master02                1/1     Running            0             23m
kube-scheduler-k8s-master03                1/1     Running            0             23m
metrics-server-5786d84b7c-5v4rv            1/1     Running            0             8m38s