交叉熵損失CrossEntropyLoss
在各種深度學習框架中,我們最常用的損失函數就是交叉熵,熵是用來描述一個系統的混亂程度,通過交叉熵我們就能夠確定預測資料與真實資料的相近程度。交叉熵越小,表示資料越接近真實樣本。
1 分類任務的損失計算
1.1 單標籤分類
二分類
單標籤任務,顧名思義,每個樣本只能有一個標籤,比如ImageNet影象分類任務,或者MNIST手寫數位識別資料集,每張圖片只能有一個固定的標籤。二分類是多分類任務中的一個特例,因為二分類只有正樣本和負樣本,並且兩者的概率之和為1,所以不需要預測一個向量,只需要輸出一個概率值就好了。損失函數一般是輸出經過sigmoid啟用函數之後,採用交叉熵損失函數計算loss。

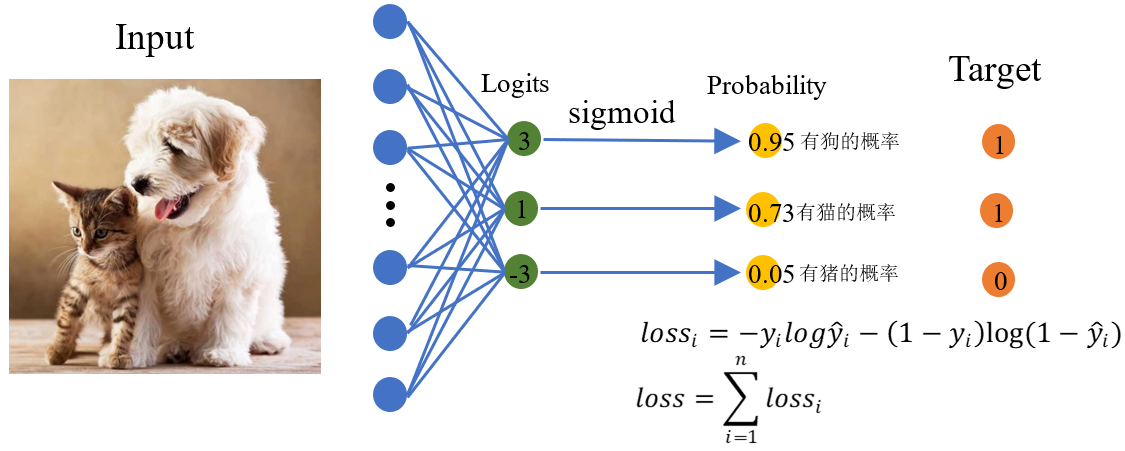
以上面貓狗二分類任務為例,網路最後一層的輸出應該理解為:網路認為圖片中含有這一類別物體的概率。而每一類的真實標籤都只有兩種可能值,即「不是這一類物體」和「是這一類物體」,這是一個二項分佈,可能的取值為0或者1,而網路預測的分佈可以理解為標籤是1的概率。當網路的輸出logits=2時,經過sigmoid得到為狗的概率是0.9,交叉熵損失loss=-1×log(0.9) - 0×log(0.1) ≈ 0.1。
多分類
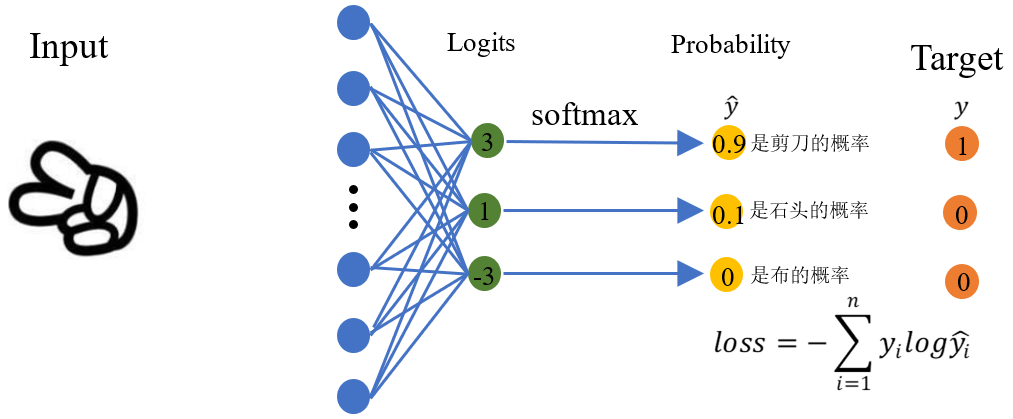
在多分類任務中,利用softmax函數將多個神經元(神經元數目為類別數)輸出的結果對映到對於總輸出的佔比(範圍0~1,佔比可以理解成概率值),我們通過選擇概率最大輸出類別作為預測類別。

上面為三分類任務,輸出的logits向量對應三個類別,經過softmax後得到三個和為1的概率[0.9,0.1,0]。樣本「剪刀」對應的真實分佈為[1,0,0],此時計算損失函數得loss = -1*log(0.9) - 0×log(0.1) - 0×log(0) ≈ 0.1。如果網路輸出的概率為[0.1,0.9,0],此時的交叉熵損失為loss= -1*log(0.1) - 0×log(0.9) - 0×log(0)= 1。上述兩種情況對比,第一個分佈的損失明顯低於第二個分佈的損失,說明第一個分佈更接近於真實分佈,事實也確實是這樣。
1.2 多標籤分類
多標籤分類任務,即一個樣本可以有多個標籤,比如一張圖片中同時含有「貓」和「狗」,這張圖片就同時擁有屬於「貓」和「狗」的兩種標籤。在這種情況下,我們將函數作為網路最後一層的輸出,把網路最後一層的每個神經元都看做任務中的一個類別,以影象識別任務為例,網路最後一層的輸出應該理解為:網路認為圖片中含有這一類別物體的概率。而每一類的真實標籤都只有兩種可能值,即「圖片中含有這一類物體」和「圖片中不含有這一類物體」,這是一個二項分佈。綜上所述,對多分類任務中的每一類單獨分析的話,真實分佈是一個二項分佈,可能的取值為0或者1,而網路預測的分佈可以理解為標籤是1的概率。此外,由於多標籤分類任務中,每一類是相互獨立的,所以網路最後一層神經元輸出的概率值之和並不等於1。

上面的多標籤分類任務有三個標籤:狗,貓,豬。輸入圖片中沒有豬,所以真實分佈應該為:[ 1, 1, 0 ] 。
假設經過右圖的網路輸出的概率分佈為:[ 0.95, 0.73, 0.05],則我們可以對狗,貓,豬這三類都計算交叉熵損失函數,然後將它們相加就得到這一張圖片樣本的交叉熵損失函數值。
loss狗=-1×log(0.95)-(1-1)×log(1-0.95)≈0.05
loss貓=-1×log(0.73)-(1-1)×log(1-0.73)≈0.31
loss豬=-0×log(0.05)-(1-0)×log(1-0.05)≈0.05
loss總=loss狗+loss貓+loss豬=0.05+0.31+0.05=0.41
假設經過右圖的網路輸出的概率分佈為:[ 0.3, 0.5, 0.7],交叉熵損失損失為
loss狗=-1×log(0.3)-(1-1)×log(1-0.3)≈1.2
loss貓=-1×log(0.5)-(1-1)×log(1-0.5)≈0.7
loss豬=-0×log(0.7)-(1-0)×log(1-0.7)≈1.2
loss總=loss狗+loss貓+loss豬=1.2+0.7+1.2=3.1
由上面兩種情況也可以看出,預測分佈越接近真實分佈,交叉熵損失越小,預測分佈越遠離真實分佈,交叉熵損失越大。
2 損失函數的pytorch實現
Pytorch關於損失函數的內容,可以在官方檔案torch.nn — PyTorch 1.10 documentation裡找到。
2.1 nn.BCEloss
BCEloss主要用於計算標籤只有1或者0時的二分類損失,標籤和預測值是一一對應的。需要注意的是,通過nn.BCEloss來計算損失前,需要對預測值進行一次sigmoid計算。sigmoid函數會將預測值對映到0-1之間。如果覺得手動加sigmoid函數麻煩,可以直接呼叫nn.BCEwithlogitsloss。
# class
torch.nn.BCELoss(weight=None, size_average=None, reduce=None, reduction='mean')

# function
torch.nn.functional.binary_cross_entropy(input, target, weight=None, size_average=None, reduce=None, reduction='mean')
-
input(Tensor) – 任意維度的張量
-
target(Tensor) – 和輸入一樣的shape,但值必須在0-1之間
-
weight(Tensor,optional) – 人為給定的權重
-
size_average(bool,optional) – 已棄用
-
reduce(bool,optional) – 已棄用
-
reduction(str,optional) – none:求 minibatch 中每個sample的loss值,不做歸併;mean:對 minibatch 中所有sample 的loss值求平均;sum:對 minibatch 中所有sample的loss值求和。
當 reduction = none時,

其中N表示batch_size,若reduction不為none時,
範例
import numpy as np
import torch
import torch.nn.functional as F

input = torch.Tensor([[0.6, 0.1], [0.3, 0.8]])
target = torch.Tensor([[0, 1], [1, 0]])

loss = F.binary_cross_entropy(input, target)
# loss : tensor(1.5081)

loss = torch.sum(-(target * torch.log(input) + (1 - target) * torch.log(1 - input))) / 4
# loss : tensor(1.5081)

loss = -(np.log(0.4) + np.log(0.1) + np.log(0.3) + np.log(0.2)) / 4
# 1.5080716354070594

loss = F.binary_cross_entropy(torch.sigmoid(input), target)
# loss : tensor(0.8518)

loss = F.binary_cross_entropy_with_logits(input, target)
# loss : tensor(0.8518)
2.2 nn.CrossEntropyLoss
使用神經網路模型時,調整輸出層的單元數,當進行n分類(n>2)時,設定輸出層的單元數為n,採用softmax損失函數(把輸出層整體轉換為0-1之間的概率分佈)+多分類交叉熵損失。把標籤轉換為one-hot向量,每個樣本的標籤是一個n維向量,其所屬類別位置為1,其餘位置為0。
#CLASS
torch.nn.CrossEntropyLoss(weight=None, size_average=None, ignore_index=- 100, reduce=None, reduction='mean', label_smoothing=0.0)

#FUNCTION
torch.nn.functional.cross_entropy(input, target, weight=None, size_average=None, ignore_index=- 100, reduce=None, reduction='mean', label_smoothing=0.0)
- input(Tensor)–在2D情況下輸入尺寸為(N, C, H, W),在K≥1時,輸入尺寸為 (N, C, d1, d2, ..., dK) 。
- target(Tensor)- 其中每個值是0≤target[i]≤C-1, 在K≥1時,target的尺寸為(N, d1, d2, ..., dK)。
- weight (Tensor,optional) – 對每個類別的手動重新縮放權重。如果給定,則必須是大小為C的張量
- size_average(bool,optional) – 不推薦使用。預設:True
- ignore_index ( int,optional) – 指定一個被忽略且對輸入梯度沒有貢獻的目標值。當size_average為 時 True,損失在未忽略的目標上取平均值。預設值:-100
- reduce ( bool,optional) – 不推薦使用。預設:True
- reduction(string,optional) – 指定應用於輸出的縮減: 'none'| 'mean'| 'sum'. 'none': 不會應用減少, 'mean': 輸出的總和將除以輸出中的元素數, 'sum': 輸出將被求和。注意:size_average 和reduce正在被棄用,同時,指定這兩個引數中的任何一個都將覆蓋reduction. 預設:'mean'
cross_entropy的pytorch實現
def cross_entropy(input, target, weight=None, size_average=None, ignore_index=-100, reduce=None, reduction='mean'):
    if size_average is not None or reduce is not None:
        reduction = _Reduction.legacy_get_string(size_average, reduce)
    return nll_loss(log_softmax(input, 1), target, weight, None, ignore_index, None, reduction)
可以看出softmax + log + NLLloss = crossEntropyLoss。
-
softmax
多分類問題(分類種類為c個)在經過輸出層的計算後,會產生c個輸出x,softmax的作用就是將輸出x轉化為和為1的概率問題。它是二分類函數sigmoid在多分類上的推廣,目的是將多分類的結果以概率的形式展現出來。其定義如下:

概率是非負且和為1的,因此softmax首先將模型的預測結果轉化到指數函數上,這樣保證了概率的非負性。再將轉換後的結果歸一化處理,使得各預測結果的概率之和等於1。比如三分類預測結果為[3,1,-3],求指數得[20.09,2.72,0.05],歸一化後得[0.88,0.12,0]。
當輸入x中存在特別大的xi時,exp(xi)會變得很大,導致出現上溢的情況。當輸入x中每個元素都為特別小的負數時,分母會變得很小,超出精度範圍時向下取0,導致下溢。
-
log_softmax
log_softmax是指在softmax函數的基礎上再進行一次log運算,當x再0-1之間時,log(x)值在負無窮到0之間。

其中zmax是輸入z中的最大值,對於任何一個zi,減去zmax後,exp(zi-zmax)的最大值為1,所以不會發生上溢。而∑exp(zi-zmax)中至少有一項值為1,避免了計算log(0),也解決了下溢的情況。
-
NLLloss
NLLloss輸入是一個對數概率向量和一個目標標籤,也就是將上面的輸出中與label對應的那個值拿出來,去掉負號再求均值。不用對label進行one_hot編碼,因為nll_loss函數已經實現了類似one-hot過程:直接在log(softmax(input))矩陣中,取出每個樣本的target值對應的下標位置(該位置在onehot中為1,其餘位置在onehot中為0)。

範例 NLLloss
import torch
import torch.nn.functional as F

# 1D
input = torch.Tensor([[2, 3, 1], [3, 7, 9]])
target = torch.tensor([1, 2])
loss = F.nll_loss(input, target)
#loss: tensor(-6.)

# 2D
input = torch.Tensor([[[2, 3],
                       [1, 5]],
                      [[3, 7],
                       [1, 9]]])
target = torch.tensor([[1, 1],
                       [0, 0]])
loss = F.nll_loss(input, target)
tensor(-4.)
在一維時,nllloss對兩個向量的操作為,將input中的向量,在target中對應的index取出,並取負號輸出。target中為1,則取2,3,1中的第1位3,target第二位為2,則取出3,7,9的第2位9,將兩數取平均(當reduction='mean'時)後加負號後輸出。在二維時(輸入是圖片),loss=[(-3)+(-7)+(-1)+(-5)]/4 = -4。
3 損失函數的weight引數
損失函數中的weight引數用於調節不同類別樣本佔比差異很大的現象,比如語意分割中,背景的畫素比缺陷的畫素多很多,在計算loss的時候兩類別loss直接相加會導致模型對背景的過擬合。在分類中,ok的樣本過多而ng樣本過少,當它們的比值大於10的時候要考慮樣本不平衡問題。假設有兩類,標籤類別為0, 1,所對應的樣本數量為1000,10。在網路學習的過程中,假設預測出來的標籤都是0(100000個樣本),它的準確率為1000/1010 ≈ 0.99,將近100%,所以模型就會朝著擬合標籤0的方向更新,導致對標籤0的樣本過擬合,對1類別的樣本欠擬合,泛化能力很差。
如何解決?
- 對於訓練影象數量較少的類,給它更多的權重,這樣如果網路在預測這些類的標籤時出錯,就會受到更多的懲罰。
- 對於具有大量影象的類,可以賦予它較小的權重。
3.1 cross_entropy函數中的weight引數
cross_entropy函數中的weight引數可以在分類問題中給不同的類別不同的權重。
範例 cross_entropy函數中的weight引數
import torch
import torch.nn.functional as F
input = torch.Tensor([[[1, 2], [3, 5]], [[4, 7], [4, 6]]])  # torch.Size([2, 2, 2])
target = torch.tensor([[0, 0], [1, 1]])  # torch.Size([2, 2])
weight = torch.tensor([1.0, 9.0])
loss = F.cross_entropy(input, target)  # tensor(1.7955)
loss = F.cross_entropy(input, target, weight) # tensor(1.1617)
3.2 binary_cross_entropy函數中的weight引數
pytorch官方對weight給出的解釋是「如果提供,則重複該操作以匹配輸入張量形狀」,也就是說給出weight引數後,會將其shape和input的shape相匹配。預設情況,也就是weight=None時,上述公式中的Wn=1;當weight!=None時,也就意味著我們需要為每一個樣本賦予權重Wi。
範例 binary_cross_entropy函數中的weight引數
import torch
import torch.nn.functional as F

input = torch.rand(3, 3)
target = torch.rand(3, 3).random_(2)
w = [0.1, 0.9] # 標籤0和標籤1的權重
weight = torch.zeros(target.shape)  # 權重矩陣
for i in range(target.shape[0]):
    for j in range(target.shape[1]):
        weight[i][j] = w[int(target[i][j])]
loss = F.binary_cross_entropy(input, target, weight=weight)

"""
# input
tensor([[0.1531, 0.3302, 0.7537],
        [0.2200, 0.6875, 0.2268],
        [0.5109, 0.5873, 0.9275]])
# target
tensor([[1., 0., 0.],
        [0., 0., 1.],
        [0., 1., 0.]])
# weight
tensor([[0.9000, 0.1000, 0.1000],
        [0.1000, 0.1000, 0.9000],
        [0.1000, 0.9000, 0.1000]])
# loss
tensor(0.4621)
"""
4 在二分類任務中輸出1通道後sigmoid還是輸出2通道softmax?
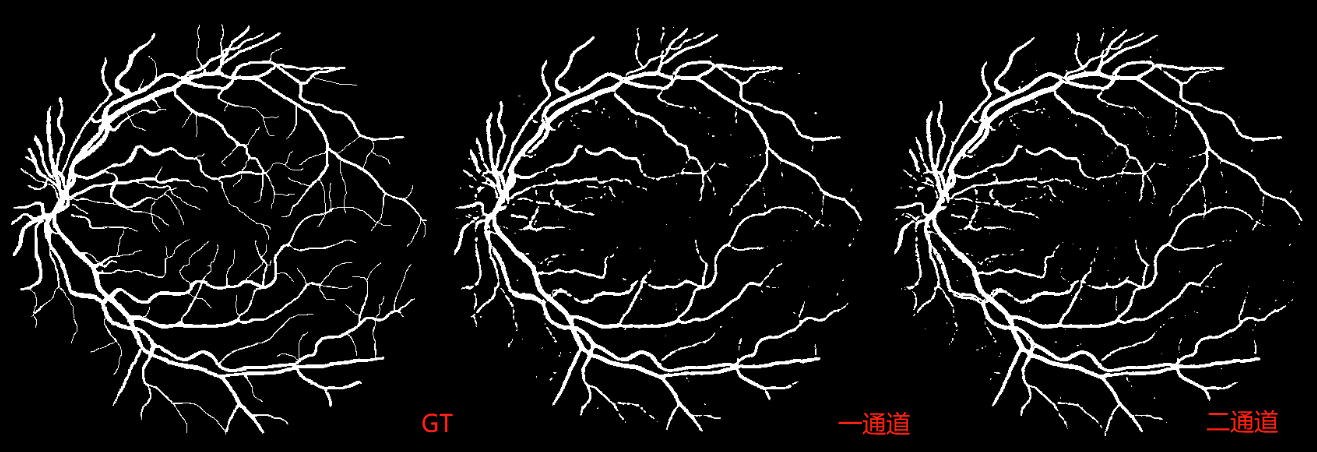
當語意分割任務是二分類時,有兩種情況(1)最後一個折積層直接輸出1通道的feature map,做sigmoid後用binary_cross_entropy函數計算損失(2)最後一個折積層輸出2channel的feature map,在通道維度做softmax,然後利用cross_entropy計算損失。這兩種方法哪一個更好?
4.1 理論
首先我們先理論上證明一下二者沒有本質上的區別,對於二分類而言(以輸入x1為例):
Sigmoid函數:

Softmax函數:

令(x1-x2)=z,和公式(1)完全相同,所以理論上來說兩者是沒有任何區別的。
4.2 實驗
視訊講解:https://www.bilibili.com/video/BV1Vq4y127fB
使用Up主霹靂吧啦Wz的UNet程式碼測試,原始碼輸出2通道後進行softmax。對網路進行以下改動,將其改為輸出1通道,並使用相同的評價指標。
損失部分
# 二通道損失計算
def criterion(inputs, target, loss_weight=None, num_classes: int = 2, dice: bool = False, ignore_index: int = -100):
    losses = {}
    for name, x in inputs.items():
        # 忽略target中值為255的畫素,255的畫素是目標邊緣或者padding填充
        loss = nn.functional.cross_entropy(x, target, ignore_index=ignore_index, weight=loss_weight)
        losses[name] = loss

    if len(losses) == 1:
        return losses['out']
    return losses['out'] + 0.5 * losses['aux']

# 一通道損失計算
def criterion(inputs, target, loss_weight=None, num_classes: int = 2, dice: bool = False, ignore_index: int = -100):
    losses = {}
    for name, x in inputs.items():
        # 將不關心區域(255)置為0
        roi_mask = torch.eq(target, ignore_index)
        target[roi_mask] = 0
     # reshape後target和x維度相同
        target = target.reshape(-1).float()
        x = x.reshape(-1).float()
        loss = nn.functional.binary_cross_entropy_with_logits(x, target)
        losses[name] = loss

    if len(losses) == 1:
        return losses['out']
    return losses['out'] + 0.5 * losses['aux']
評價指標
#二通道
def evaluate(model, data_loader, device, num_classes):
    model.eval()
    metric_logger = utils.MetricLogger(delimiter="  ")
    header = 'Test:'
    with torch.no_grad():
        for image, target in metric_logger.log_every(data_loader, 100, header):
            image, target = image.to(device), target.to(device)
            output0 = model(image)['out']
            output1 = torch.softmax(output0, dim=1)
            output2 = output1.argmax(dim=1).float() #只計算前景的dice_coeff
            target = target.float()
            dice = dice_coeff(output2, target, ignore_index=255)

    return dice.item()

#一通道
def evaluate(model, data_loader, device, num_classes):
    model.eval()
    dice = utils.DiceCoefficient(num_classes=num_classes, ignore_index=255)
    metric_logger = utils.MetricLogger(delimiter="  ")
    header = 'Test:'
    with torch.no_grad():
        for image, target in metric_logger.log_every(data_loader, 100, header):
            image, target = image.to(device), target.to(device)
            output = model(image)['out'] # 輸出的是0-1之間的概率
            output[output > 0.5] = 1
            output[output < 1] = 0
            target = target.float()
            dice = dice_coeff(output, target, ignore_index=255)
predict
# 二通道
...
output = model(img.to(device))
prediction = output['out'].argmax(1).squeeze(0)
prediction = prediction.to("cpu").numpy().astype(np.uint8)
# 將前景對應的畫素值改成255(白色)
prediction[prediction == 1] = 255
# 將不感興趣的區域畫素設定成0(黑色)
prediction[roi_img == 0] = 0
mask = Image.fromarray(prediction)

# 一通道
...
output = model(img.to(device))
prediction = torch.sigmoid(output['out']).squeeze(0).squeeze(0)
prediction = prediction.to("cpu").numpy()
# 將前景對應的畫素值改成255(白色)
prediction[prediction > 0.5] = 1
prediction[prediction < 1] = 0
# 將不感興趣的區域畫素設定成0(黑色)
prediction[roi_img == 0] = 0
mask = Image.fromarray((prediction*255).astype(np.uint8))
batch_size取16,不使用dice_loss,訓練150epoch後,效果差不多。


參考
1. PyTorch master documentation
2. torch的交叉熵損失函數(cross_entropy)計算
3. 帶權重的損失函數nn.crossEntropyLoss中的weight使用
4. 一文搞懂F.binary_cross_entropy以及weight引數
5. Cross-entropy 和 Binary cross-entropy
6. 交叉熵損失函數(Cross Entropy Loss)
7. 二分類問題,應該選擇sigmoid還是softmax?