《Terraform 101 從入門到實踐》 Terraform在公有云Azure上的應用
《Terraform 101 從入門到實踐》這本小冊在南瓜慢說官方網站和GitHub兩個地方同步更新,書中的範例程式碼也是放在GitHub上,方便大家參考檢視。
簡介
Azure是微軟的公有云,它提供了一些免費的資源,具體可以檢視: https://azure.microsoft.com/en-us/free/
本章將介紹如何通過Terraform來使用Azure的雲資源。
註冊Azure賬號
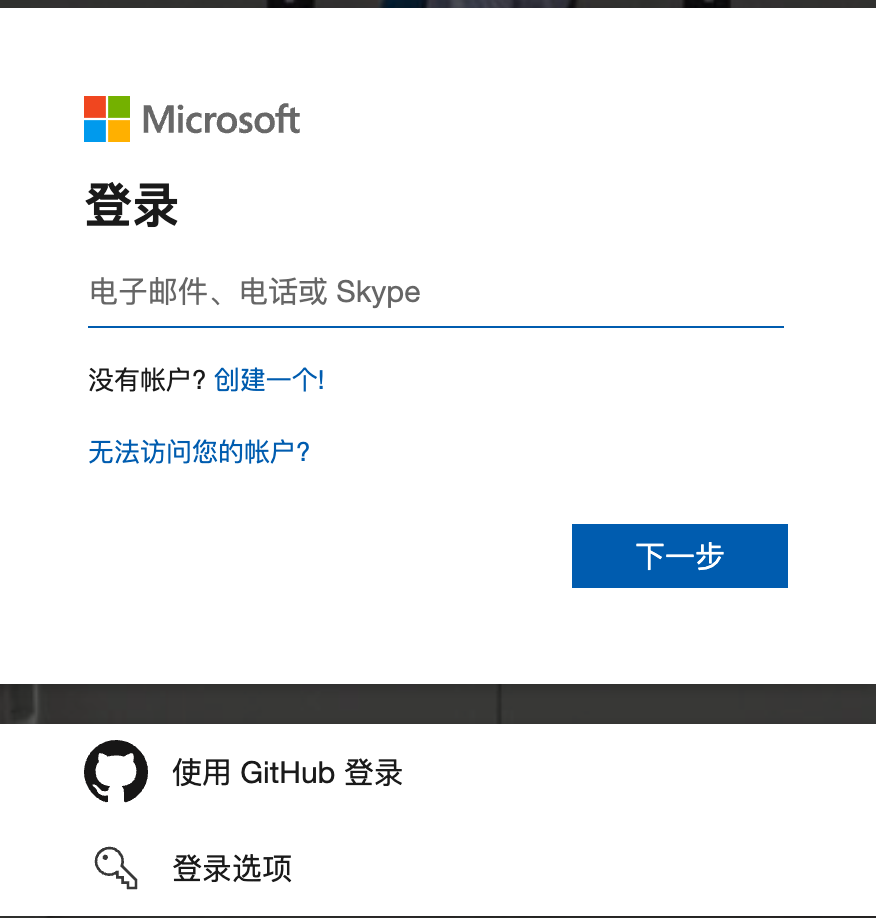
首先要註冊一個Azure賬號,我選擇用GitHub賬號登陸,免得又記多一個密碼。
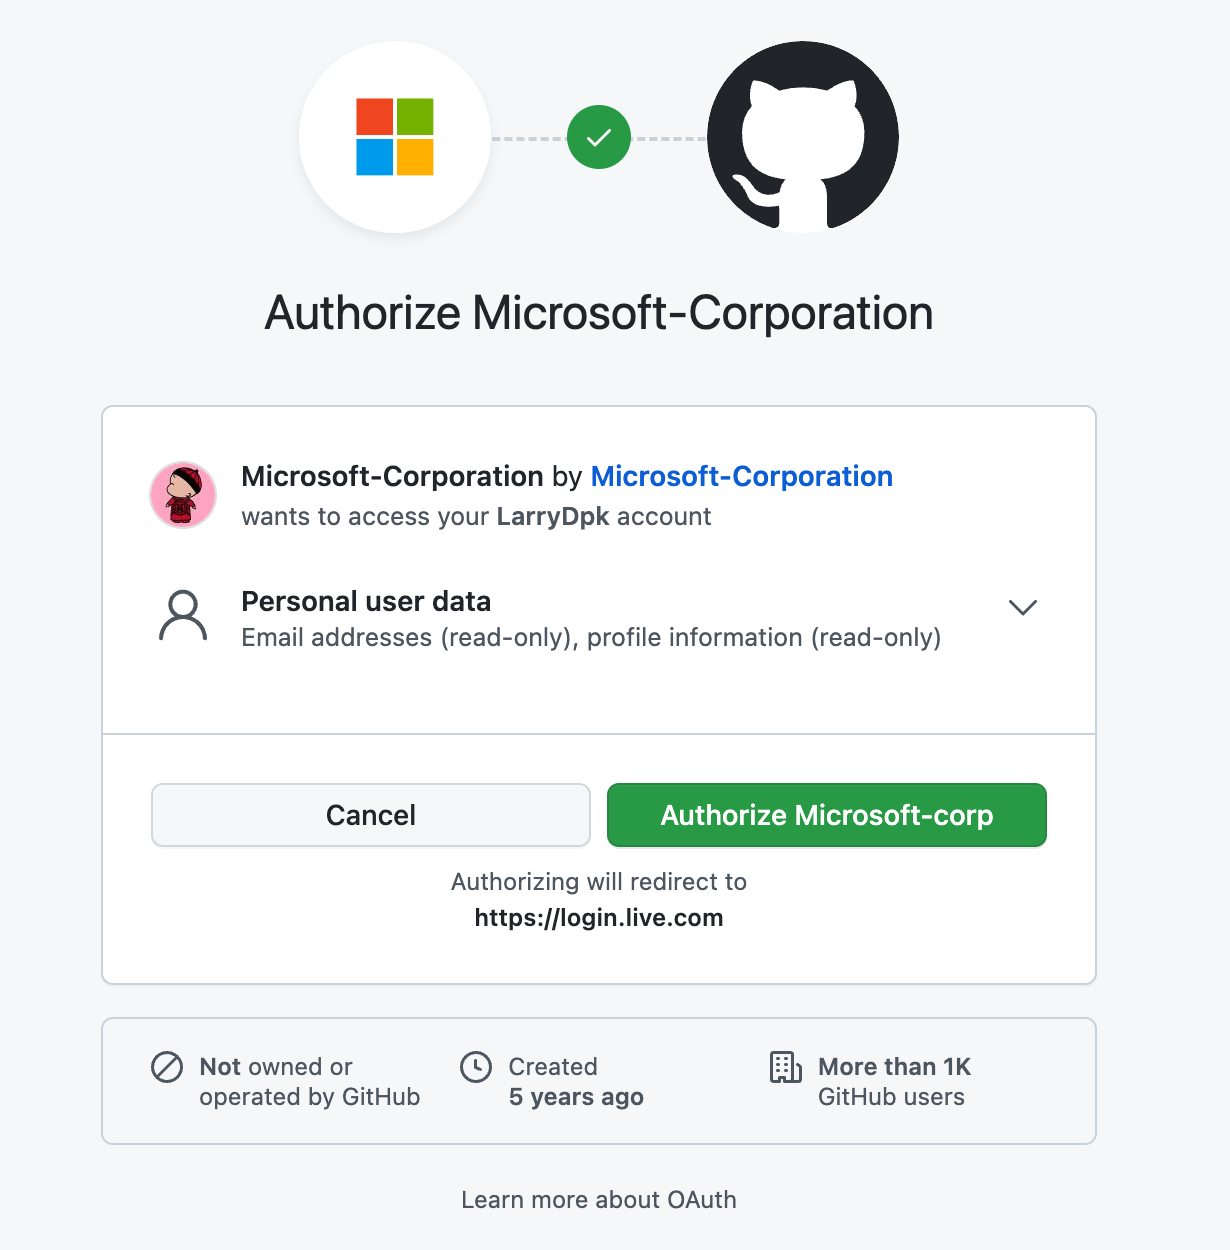
跳到GitHub,同意即可:
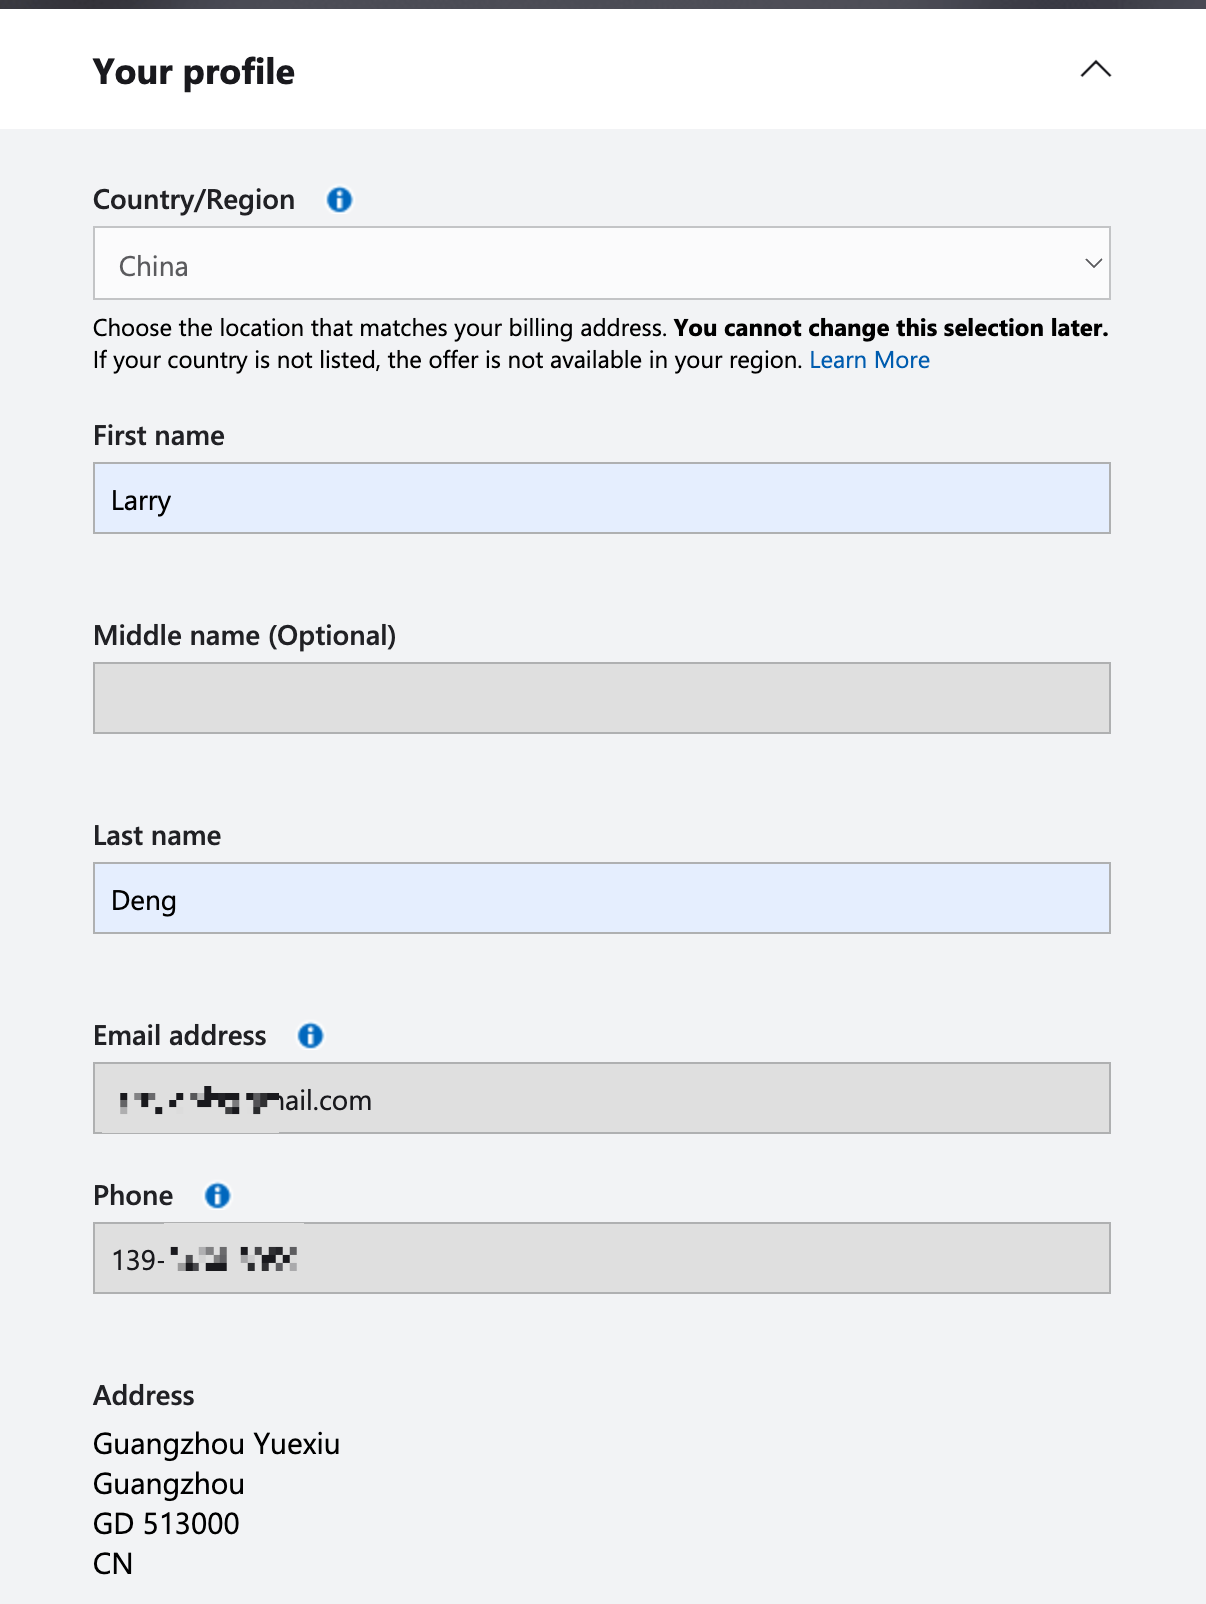
建立賬號時,有一些資訊要填,特別是郵箱和手機號比較關鍵:
同時還需要一張Visa或Master卡,我是有一張Visa的卡,填好後會有一個0元的扣費,不要擔心。下面Cardholder Name我填的中文名字,註冊成功了。

0元扣費成功後,表示卡是正常的,就可以成功註冊了,註冊後就可以到Portal檢視了。

手動部署虛擬機器器
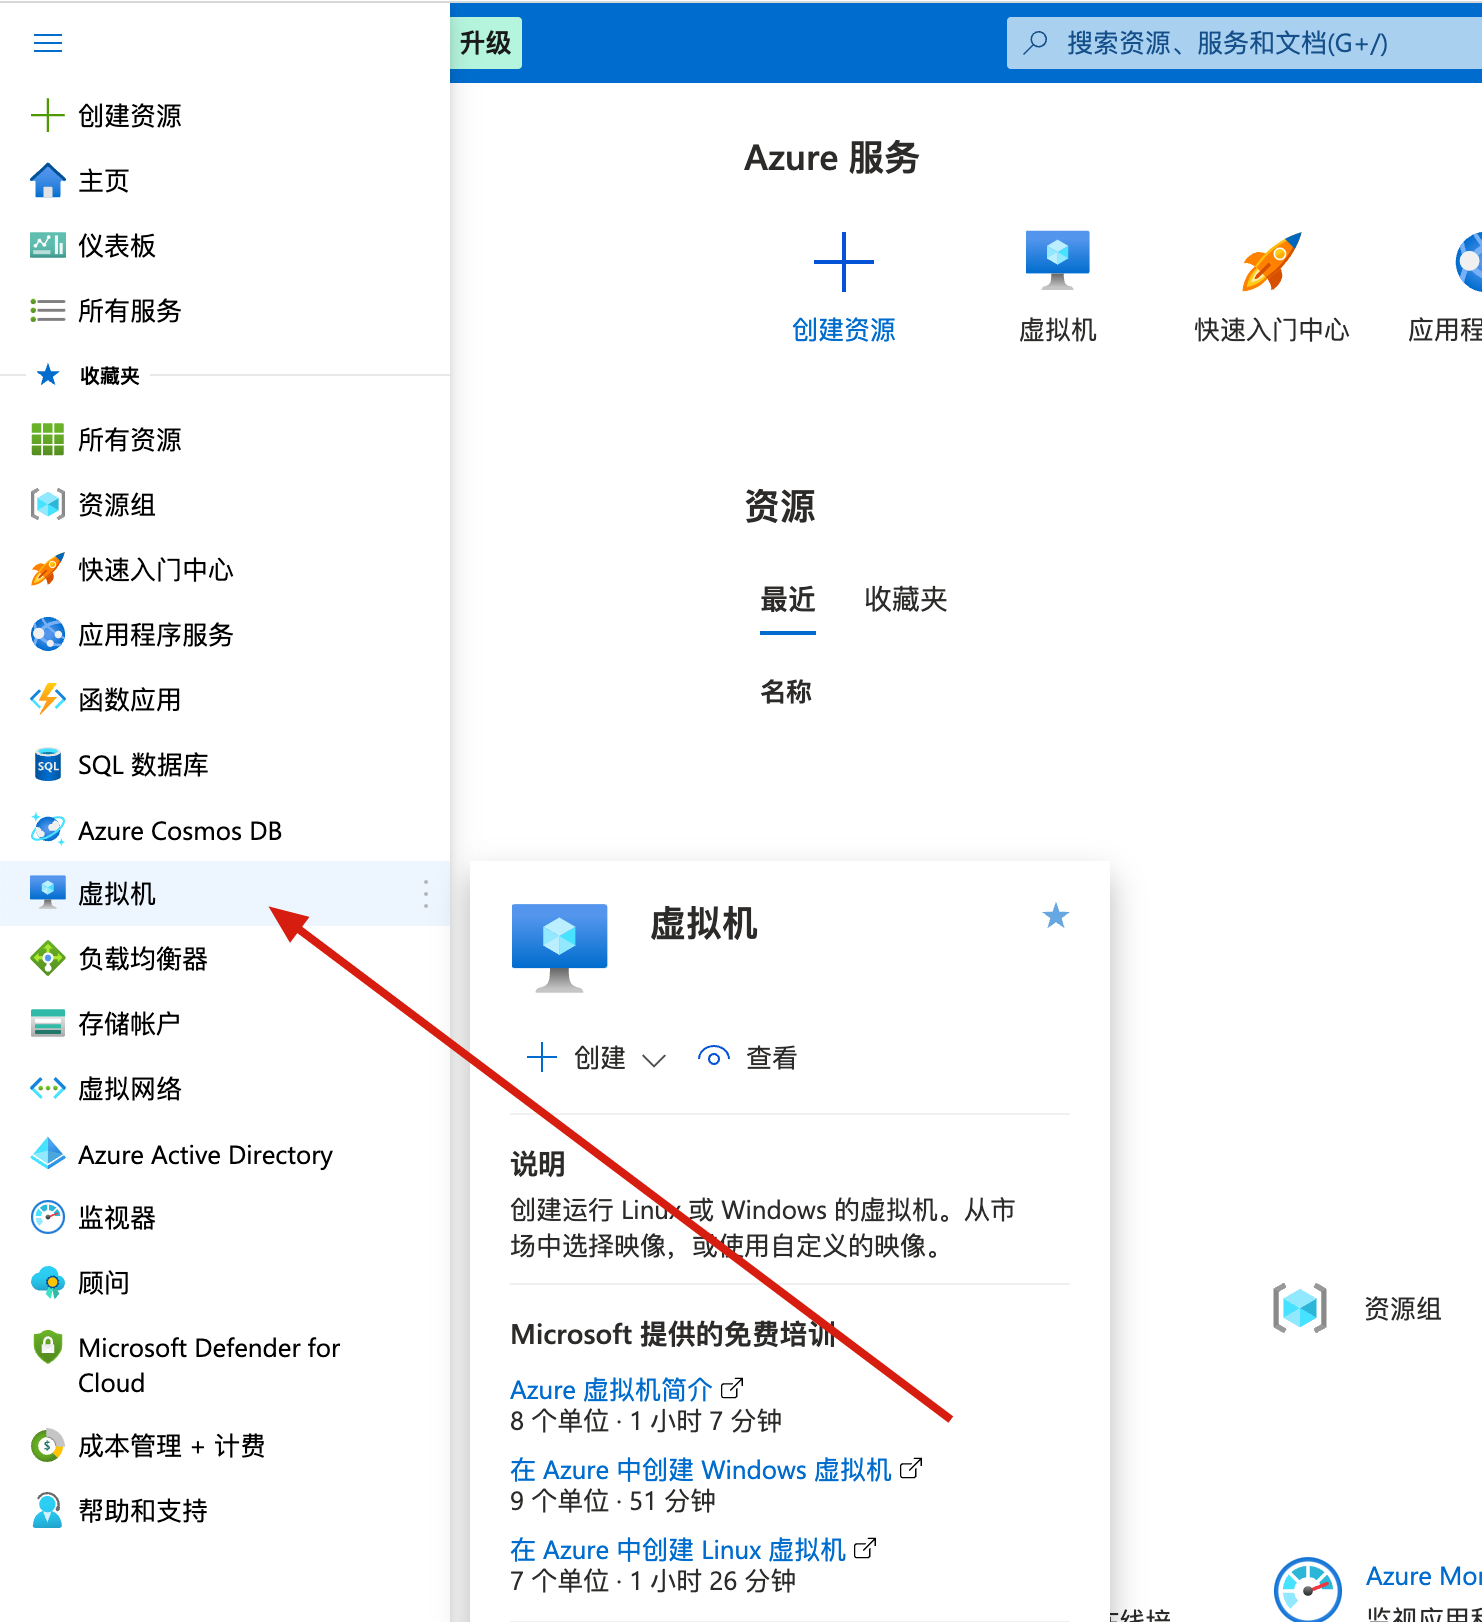
為了體驗一下Azure,我們先手動建立一個虛擬機器器,操作入口如下:
需要填寫一些設定資訊,如主機名、區域、映象、網路埠等,按需要我開啟了22/80/443埠。
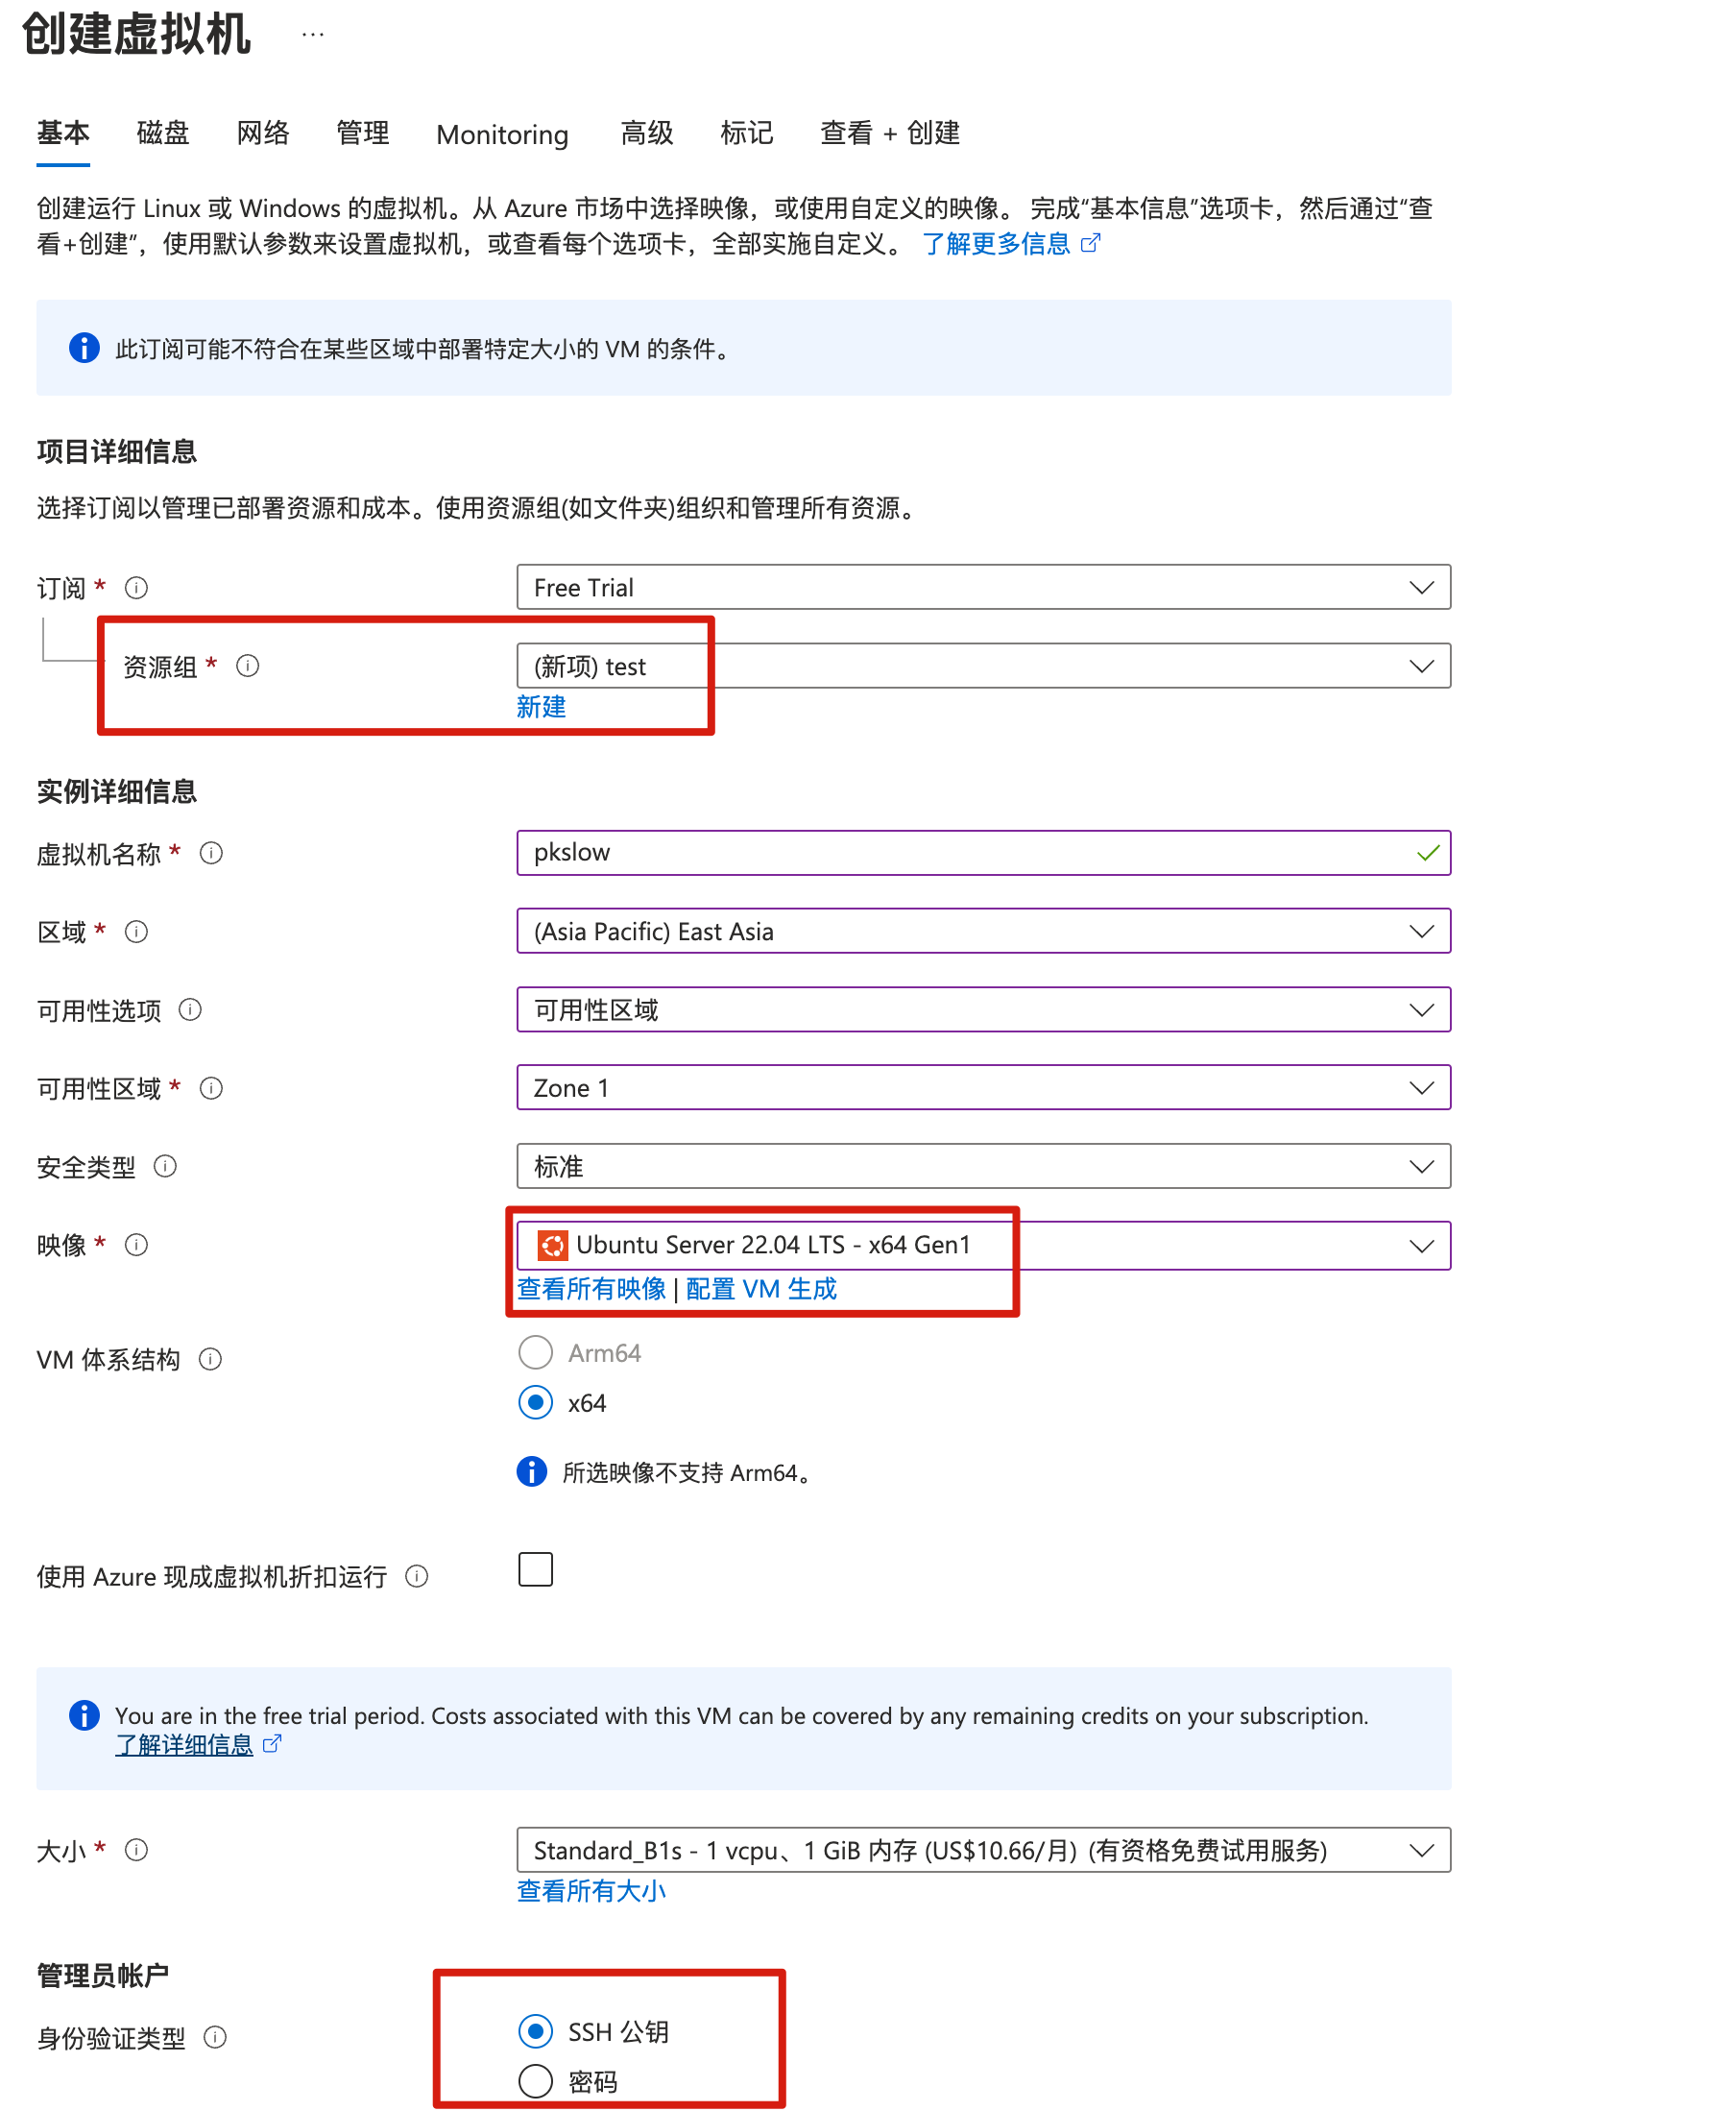
完成設定後,點選建立,提示要下載金鑰對,必須要在建立的時候下載:
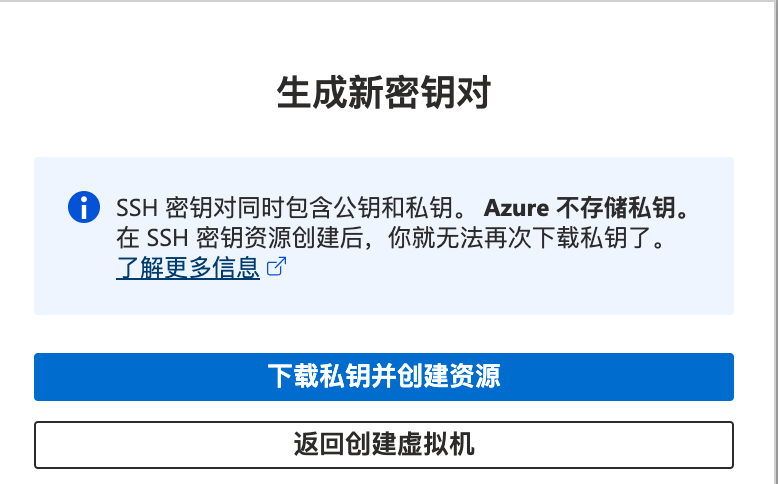
建立完資源後,可以在虛擬機器器列表檢視:

根據使用者名稱和公網IP,我們可以ssh連線到伺服器。需要給金鑰檔案修改許可權,太大是不行的,會報錯。
$ chmod 400 ~/Downloads/pksow-azure.pem
然後通過下面命令連線:
$ ssh [email protected] -i ~/Downloads/pksow-azure.pem
Welcome to Ubuntu 22.04.1 LTS (GNU/Linux 5.15.0-1030-azure x86_64)

 * Documentation:  https://help.ubuntu.com
 * Management:     https://landscape.canonical.com
 * Support:        https://ubuntu.com/advantage

  System load:  0.01513671875     Processes:             109
  Usage of /:   4.9% of 28.89GB   Users logged in:       0
  Memory usage: 31%               IPv4 address for eth0: 10.0.0.4
  Swap usage:   0%

0 updates can be applied immediately.


The programs included with the Ubuntu system are free software;
the exact distribution terms for each program are described in the
individual files in /usr/share/doc/*/copyright.

Ubuntu comes with ABSOLUTELY NO WARRANTY, to the extent permitted by
applicable law.

To run a command as administrator (user "root"), use "sudo <command>".
See "man sudo_root" for details.

azureuser@pkslow:~$ free
               total        used        free      shared  buff/cache   available
Mem:          928460      261816      288932        4140      377712      533872
Swap:              0           0           0
azureuser@pkslow:~$ df -h
Filesystem      Size  Used Avail Use% Mounted on
/dev/root        29G  1.5G   28G   5% /
tmpfs           454M     0  454M   0% /dev/shm
tmpfs           182M  1.1M  181M   1% /run
tmpfs           5.0M     0  5.0M   0% /run/lock
/dev/sda15      105M  5.3M  100M   5% /boot/efi
/dev/sdb1       3.9G   28K  3.7G   1% /mnt
tmpfs            91M  4.0K   91M   1% /run/user/1000
通過azure-cli建立虛擬機器器
安裝azure-cli
我的電腦是MacOS,安裝如下:
$ brew update-reset

$ brew install azure-cli

$ which az
/usr/local/bin/az

$ az version
{
  "azure-cli": "2.44.1",
  "azure-cli-core": "2.44.1",
  "azure-cli-telemetry": "1.0.8",
  "extensions": {}
}
其它系統請參考: https://learn.microsoft.com/en-us/cli/azure/install-azure-cli
許可權
通過命令列操作Azure的資源,必然是需要許可權的,我們可以通過密碼,還可以通過Service Principal等方式來登陸。我們主要使用Service Principal的方式來授權。因此我們先在Portal上建立。
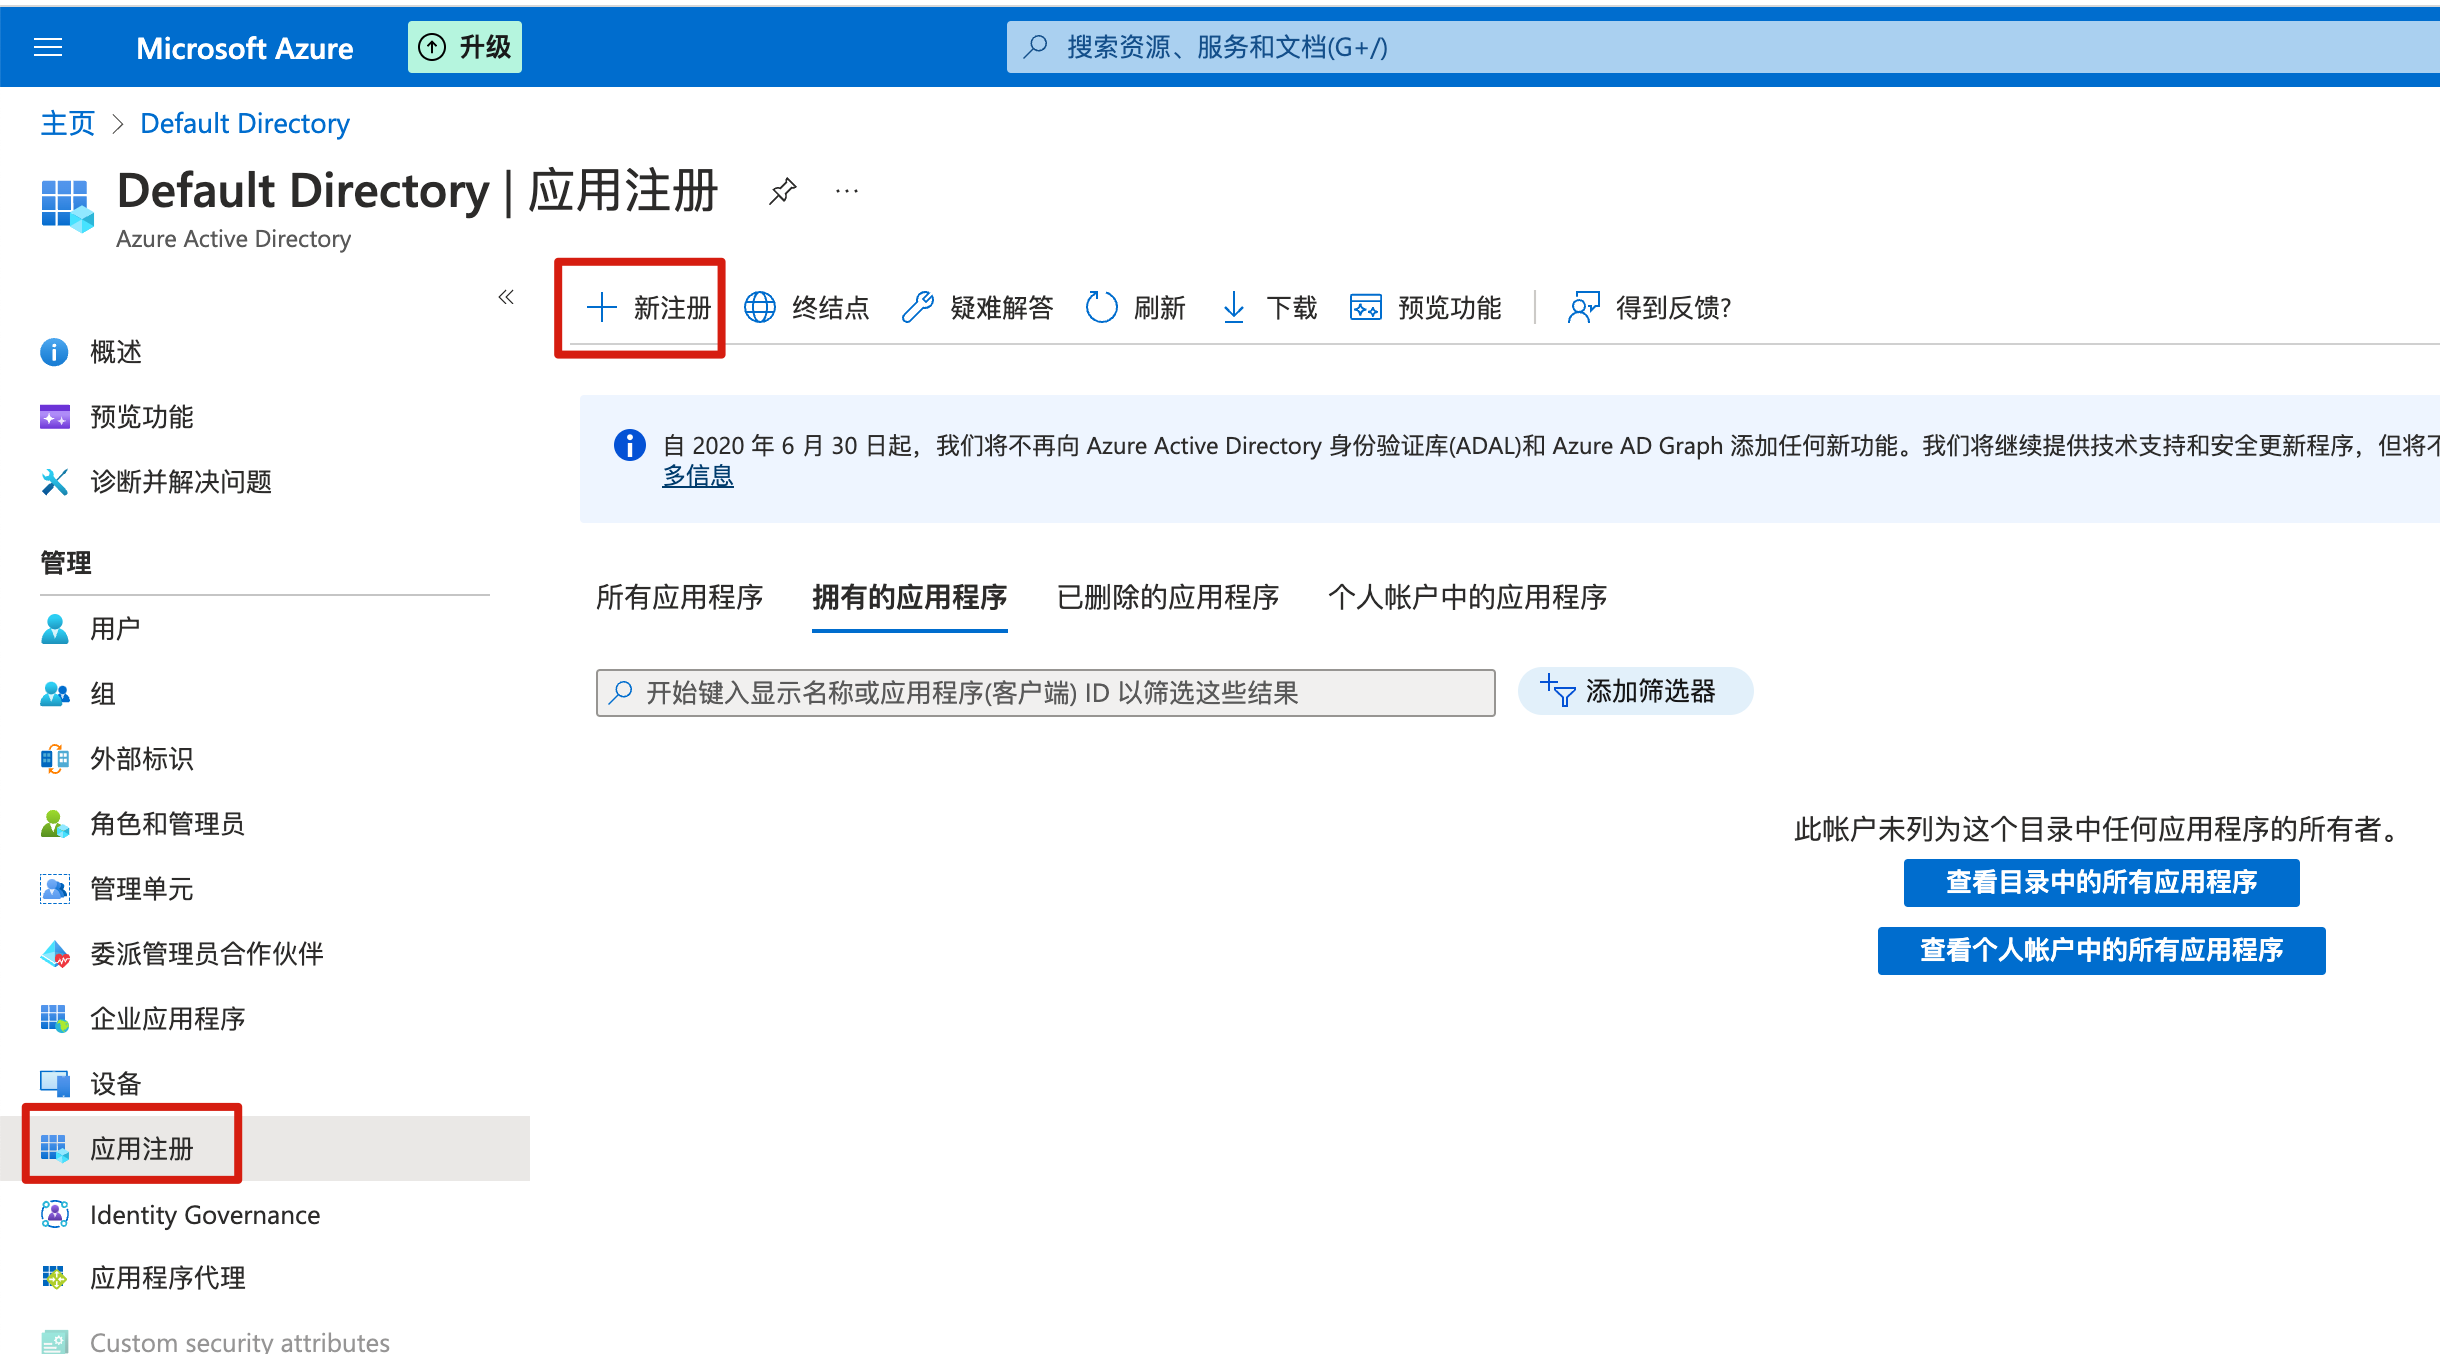
在左側選單選擇Azure Active Directory,選擇應用註冊,點選新註冊:
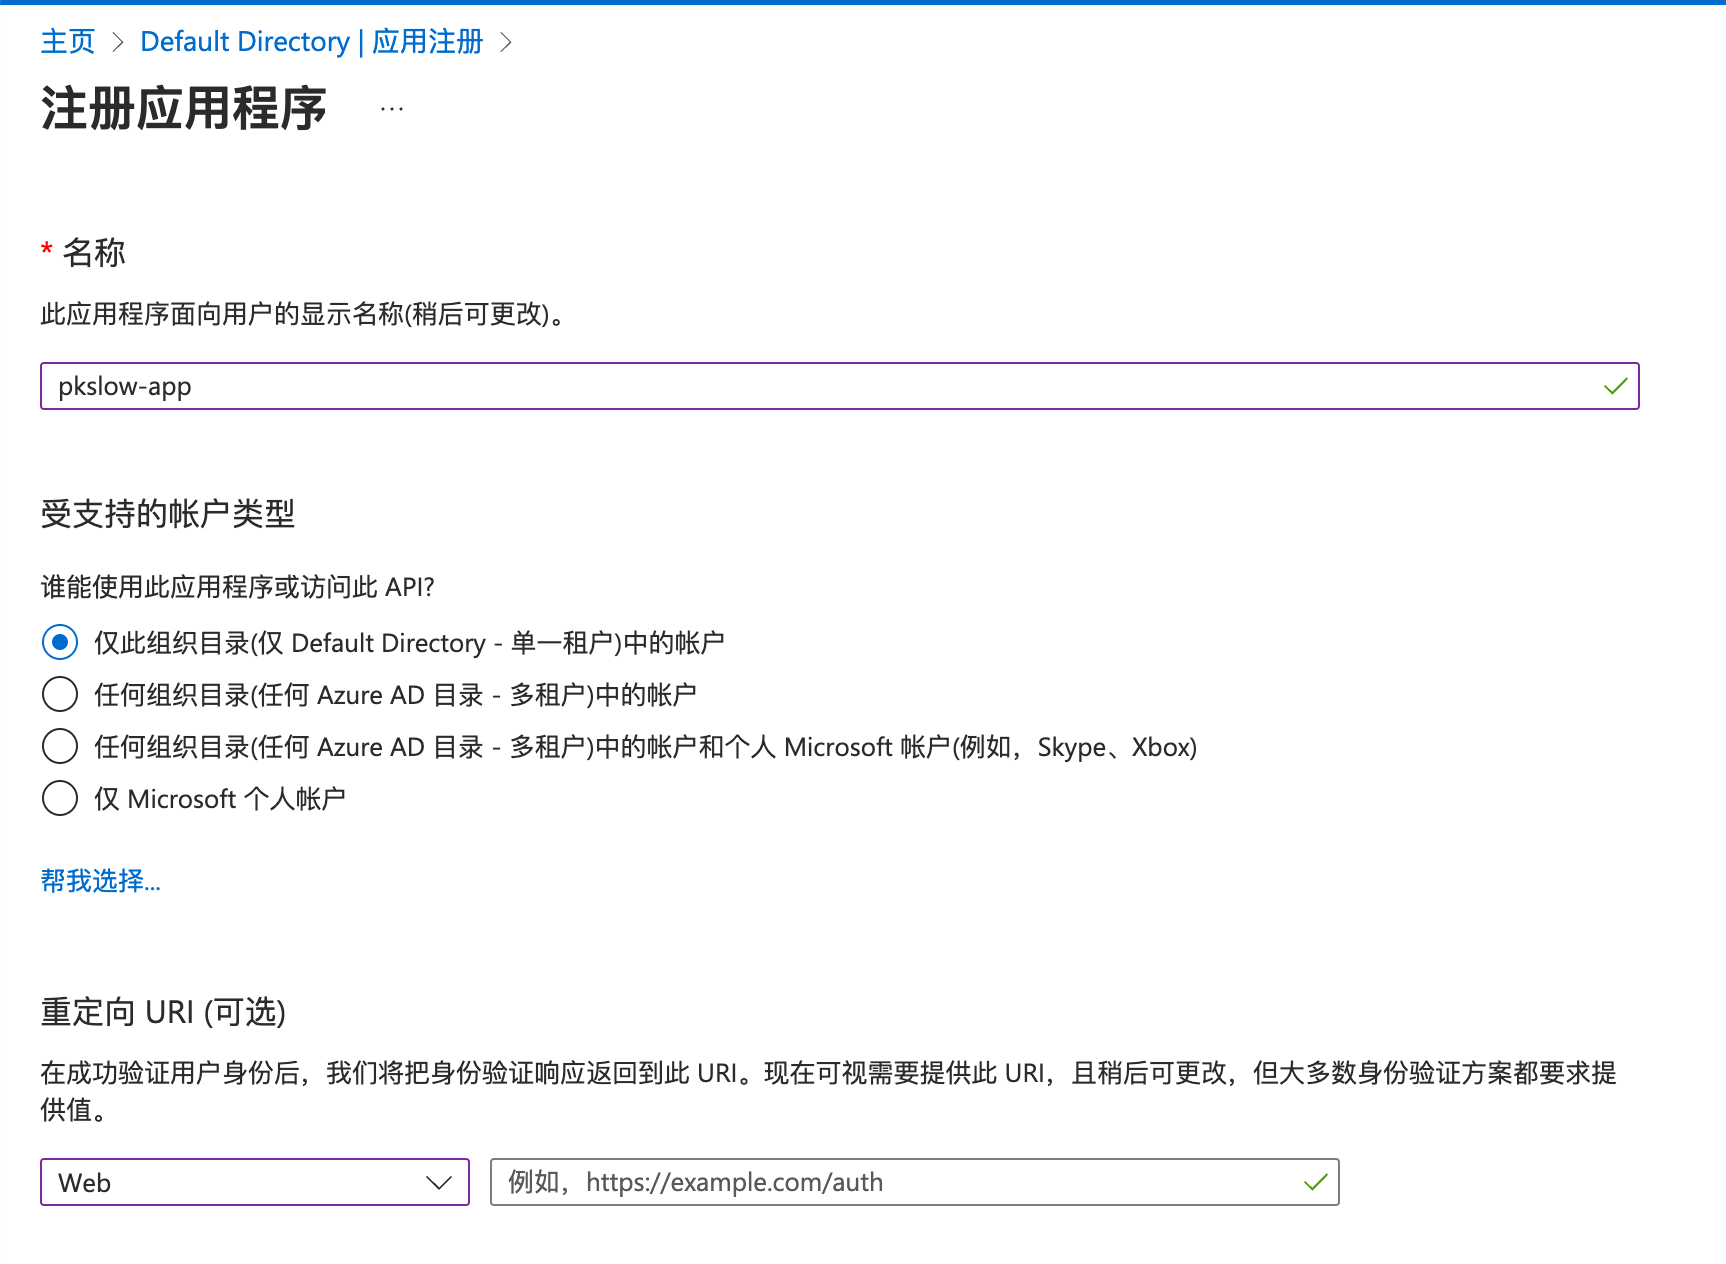
註冊應用程式:
新增密碼:
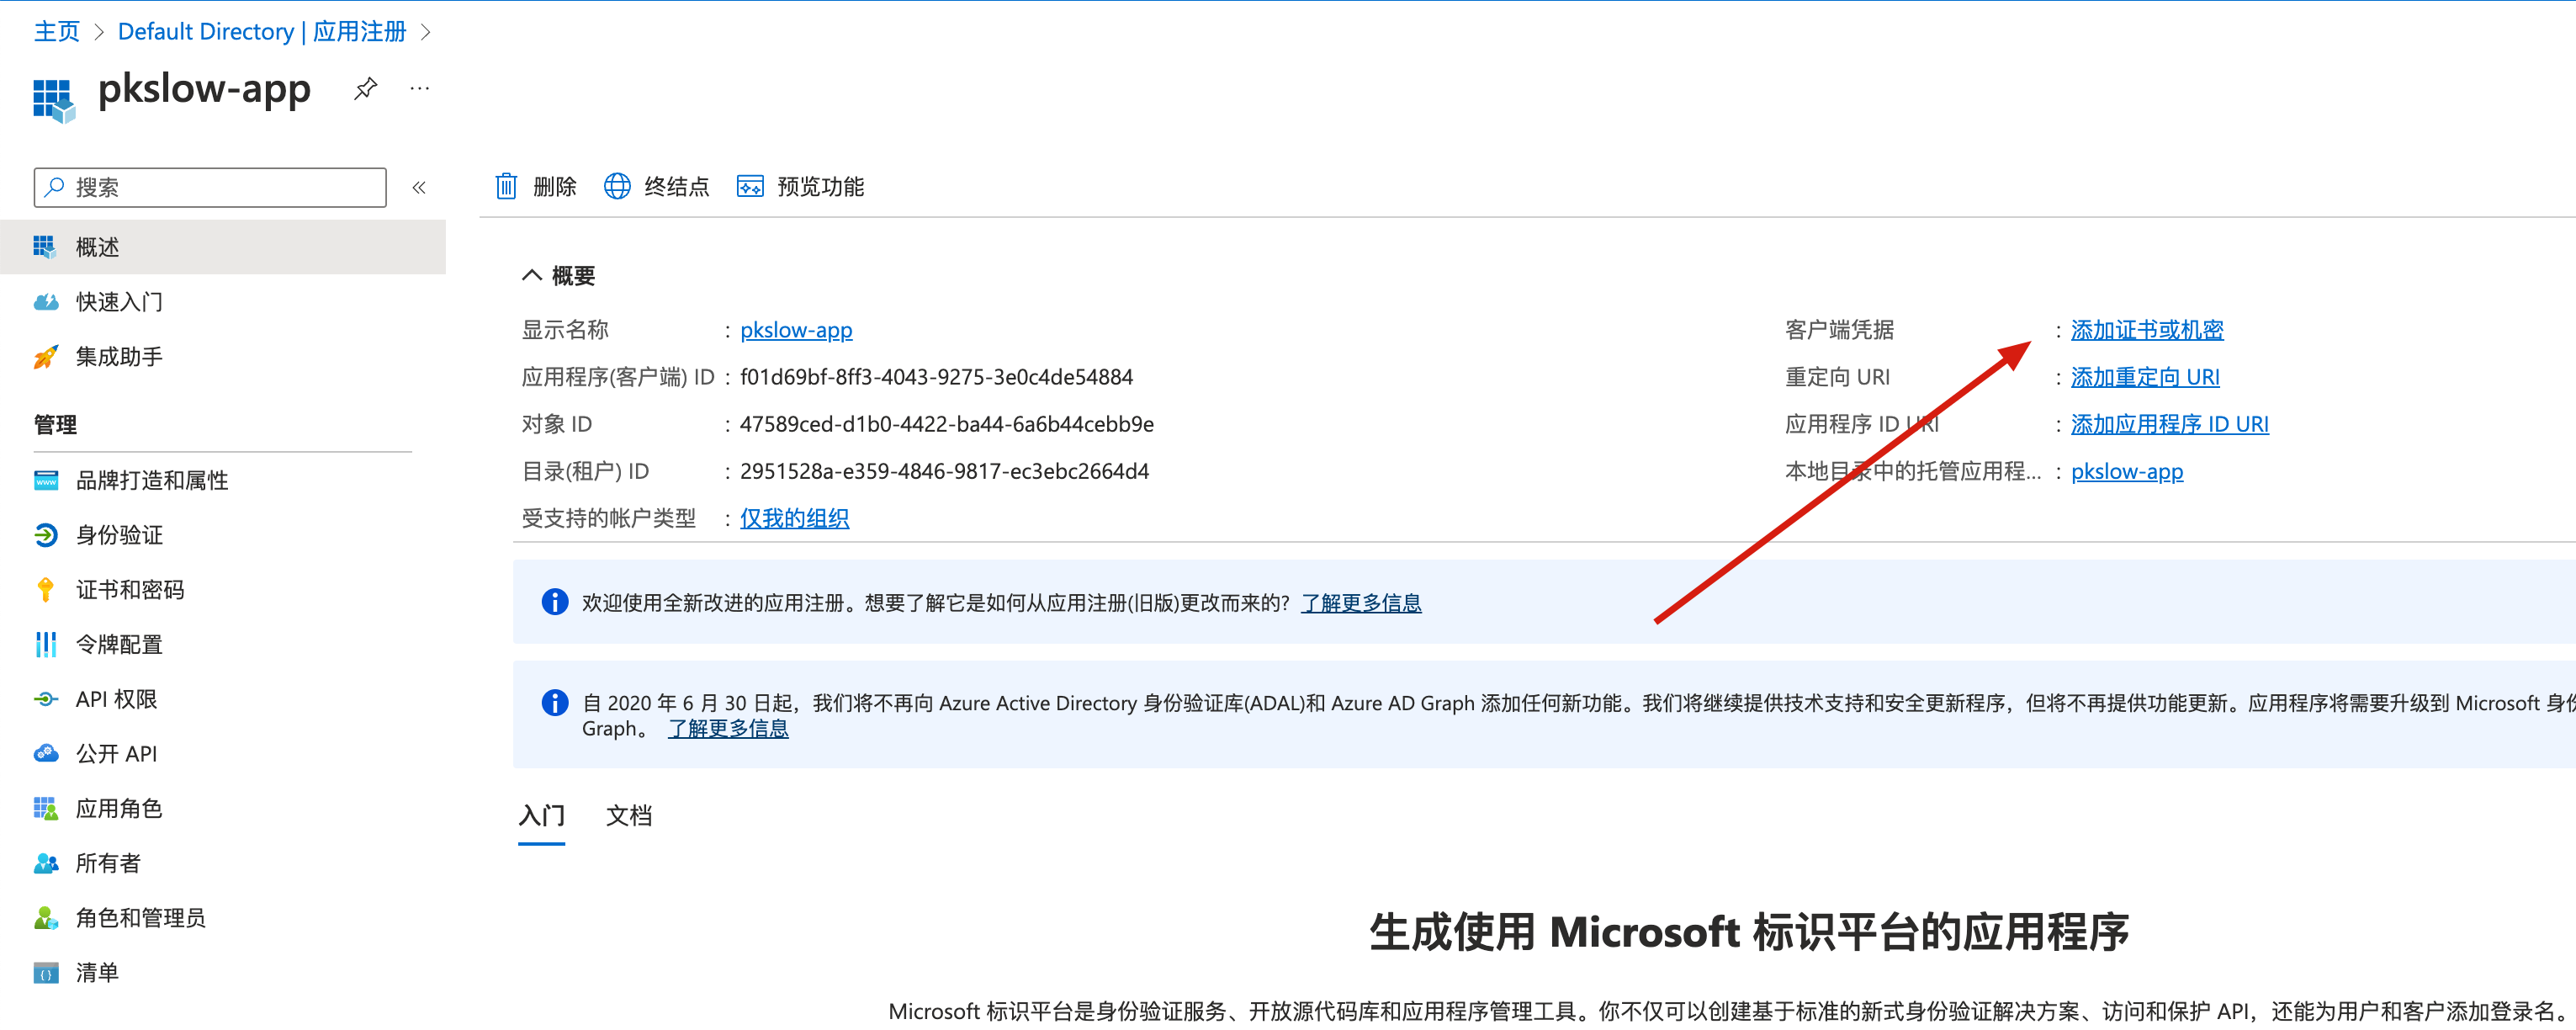
設定說明和時長:

建立完後要馬上記下密碼,後面無法再獲取密碼值:

檢視租戶
需要檢視租戶ID,或建立租戶:
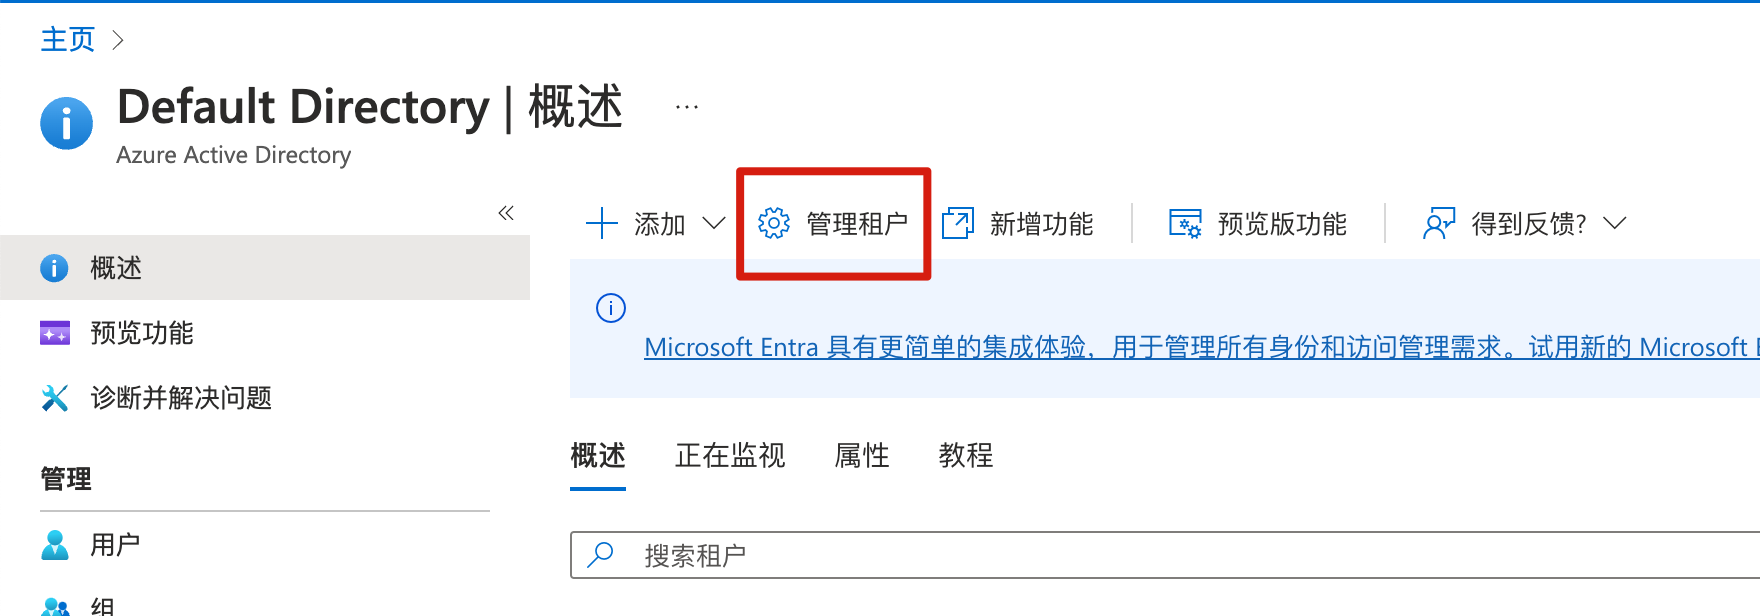
分配角色
到訂閱管理介面: Subscriptions page in Azure portal,檢視訂閱列表:
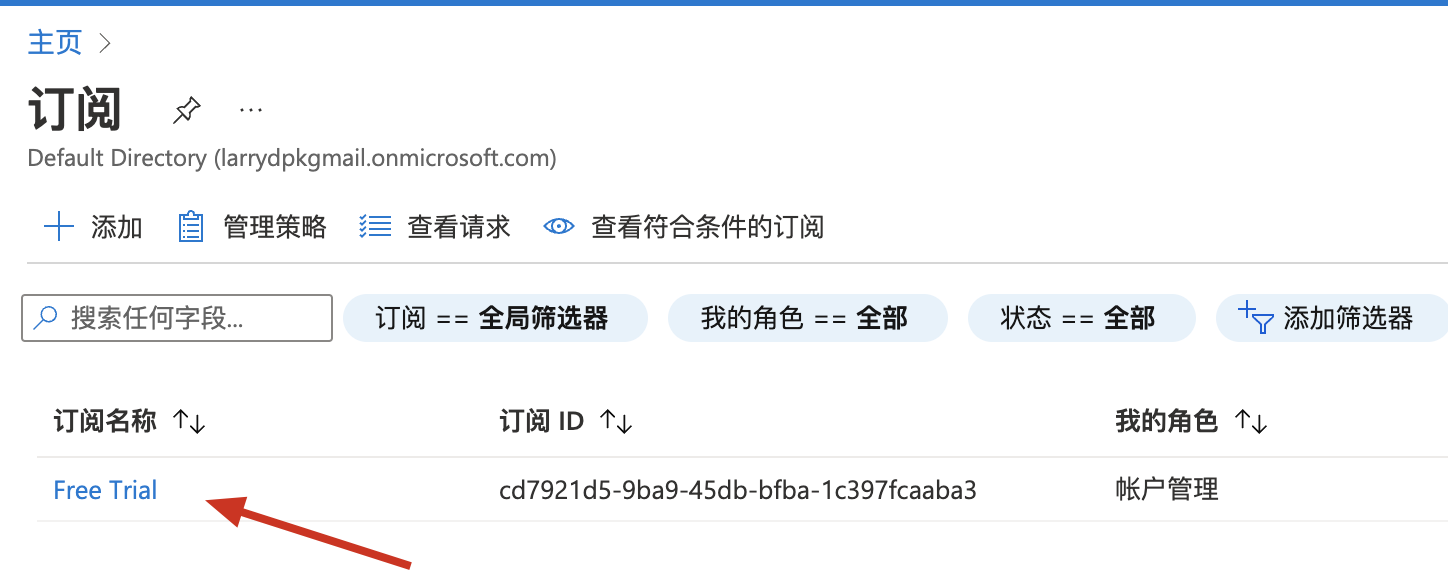
點進去後,可以管理存取控制:
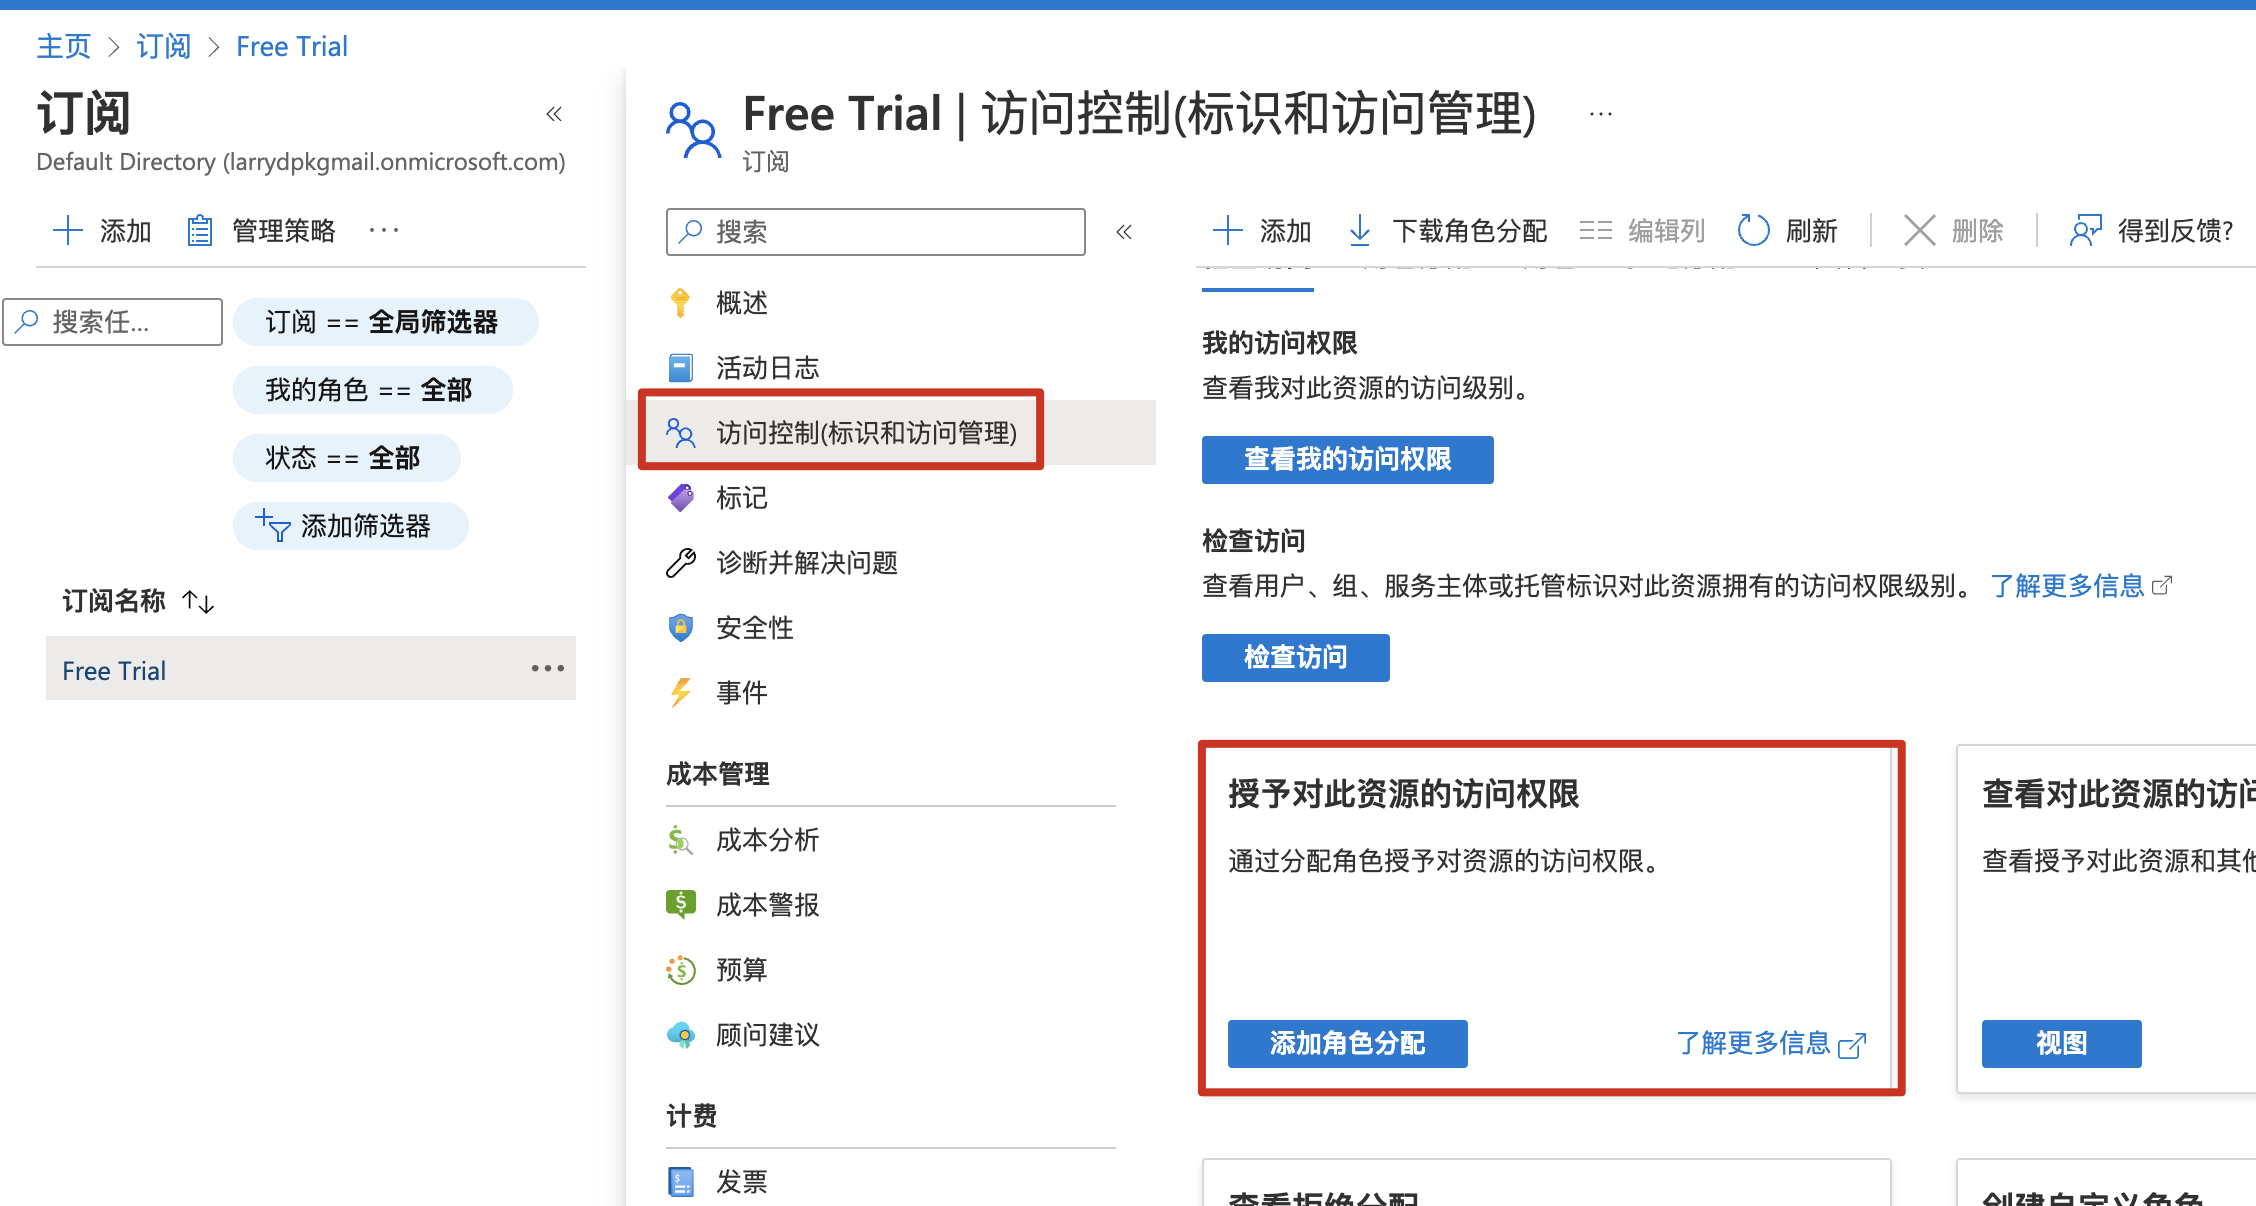
把之前建立的Service Principal加進來,分配特定角色:
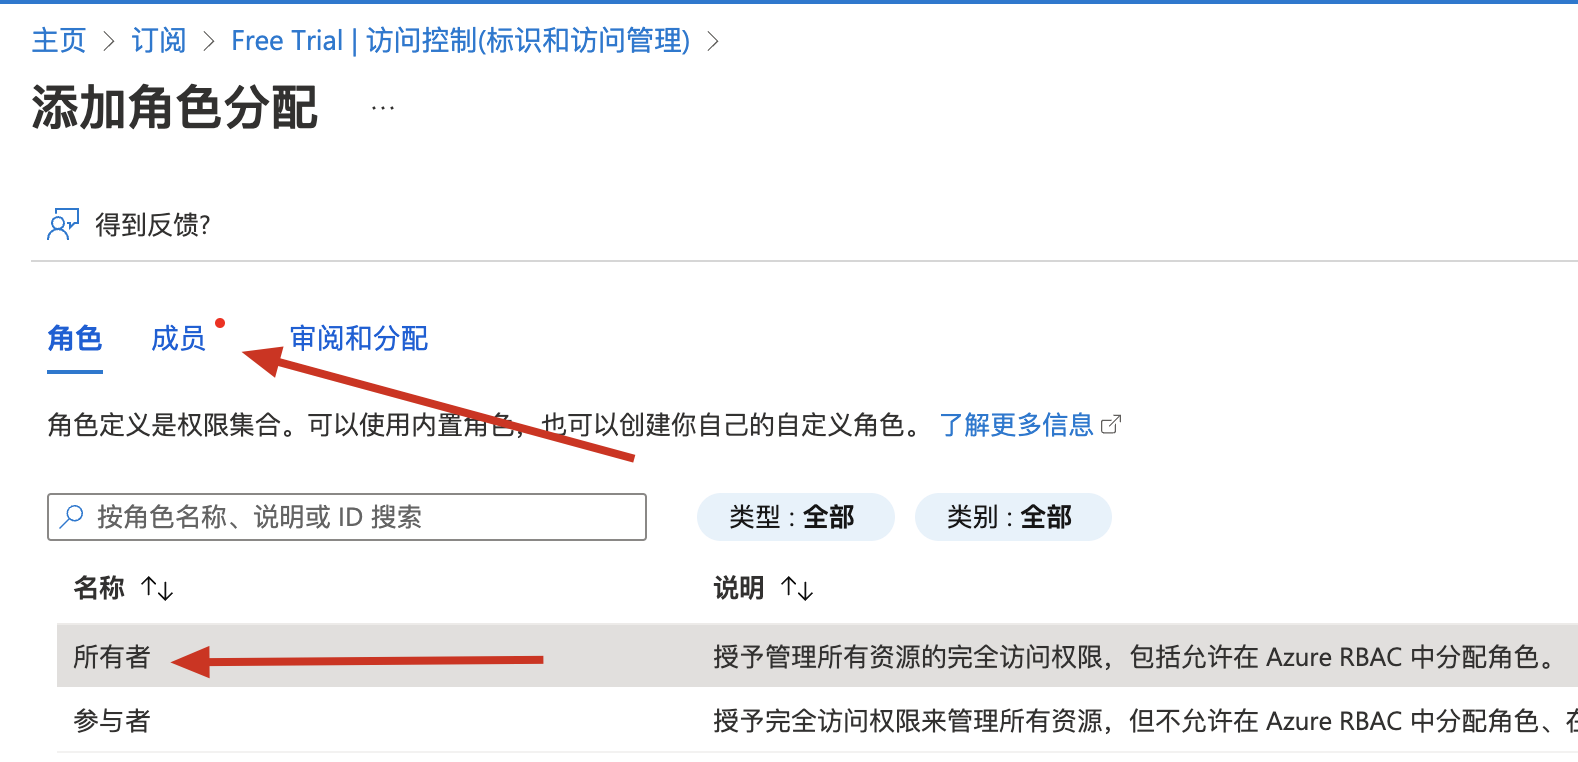
選擇對應的Service Principal:

命令列登陸
完成以上操作後,就可以通過命令列來登陸Azure了:
$ az login --service-principal -u f01d69bf-8ff3-4043-9275-3e0c4de54884 -p B0N8Q~PQu6hTJkBTS5xxxxxxxx******** --tenant 2951528a-e359-4846-9817-ec3ebc2664d4
[
  {
    "cloudName": "AzureCloud",
    "homeTenantId": "2951528a-e359-4846-9817-ec3ebc2664d4",
    "id": "cd7921d5-9ba9-45db-bfba-1c397fcaaba3",
    "isDefault": true,
    "managedByTenants": [],
    "name": "Free Trial",
    "state": "Enabled",
    "tenantId": "2951528a-e359-4846-9817-ec3ebc2664d4",
    "user": {
      "name": "f01d69bf-8ff3-4043-9275-3e0c4de54884",
      "type": "servicePrincipal"
    }
  }
]
-u是註冊應用的ID;
-p就是之前要記下的密碼;
--tenant就是租戶ID;
查詢之前建立的VM,成功:
$ az vm list -g test --output table
Name    ResourceGroup    Location    Zones
------  ---------------  ----------  -------
pkslow  test             eastasia    1
建立vm
通過命令列建立vm如下:
$ az vm create --resource-group 'test' --name 'pkslow2' --image 'canonical:0001-com-ubuntu-server-jammy:22_04-lts:22.04.202301100' --admin-username 'larry' --admin-password 'Pa!!!ss123' --location 'eastasia'

{
  "fqdns": "",
  "id": "/subscriptions/cd7921d5-9ba9-45db-bfba-1c397fcaaba3/resourceGroups/test/providers/Microsoft.Compute/virtualMachines/pkslow2",
  "location": "eastasia",
  "macAddress": "60-45-BD-57-30-C1",
  "powerState": "VM running",
  "privateIpAddress": "10.0.0.5",
  "publicIpAddress": "20.187.85.53",
  "resourceGroup": "test",
  "zones": ""
}
查詢後成功建立,已經有2臺虛擬機器器在執行:
$ az vm list -g test --output table
Name     ResourceGroup    Location    Zones
-------  ---------------  ----------  -------
pkslow   test             eastasia    1
pkslow2  test             eastasia
用Terraform建立vm
許可權環境變數設定
當我們使用Terraform來操作Azure時,同樣也是需要許可權的,設定以下環境變數即可。這些值在前面的內容已經講過了。
export ARM_SUBSCRIPTION_ID="<azure_subscription_id>"
export ARM_TENANT_ID="<azure_subscription_tenant_id>"
export ARM_CLIENT_ID="<service_principal_appid>"
export ARM_CLIENT_SECRET="<service_principal_password>"
外掛和版本
設定Terraform和外掛的版本:
terraform {
  required_version = ">= 1.1.3"
  required_providers {

    azurerm = {
      source = "hashicorp/azurerm"
      version = "3.38.0"
    }
  }
}
建立vm
通過azurerm_virtual_machine來建立VM資源:
provider "azurerm" {
  features {}
}

variable "prefix" {
  default = "pkslow-azure"
}

resource "azurerm_resource_group" "example" {
  name     = "${var.prefix}-resources"
  location = "West Europe"
}

resource "azurerm_virtual_network" "main" {
  name                = "${var.prefix}-network"
  address_space       = ["10.0.0.0/16"]
  location            = azurerm_resource_group.example.location
  resource_group_name = azurerm_resource_group.example.name
}

resource "azurerm_subnet" "internal" {
  name                 = "internal"
  resource_group_name  = azurerm_resource_group.example.name
  virtual_network_name = azurerm_virtual_network.main.name
  address_prefixes     = ["10.0.2.0/24"]
}

resource "azurerm_network_interface" "main" {
  name                = "${var.prefix}-nic"
  location            = azurerm_resource_group.example.location
  resource_group_name = azurerm_resource_group.example.name

  ip_configuration {
    name                          = "testconfiguration1"
    subnet_id                     = azurerm_subnet.internal.id
    private_ip_address_allocation = "Dynamic"
  }
}

resource "azurerm_virtual_machine" "main" {
  name                  = "${var.prefix}-vm"
  location              = azurerm_resource_group.example.location
  resource_group_name   = azurerm_resource_group.example.name
  network_interface_ids = [azurerm_network_interface.main.id]
  vm_size               = "Standard_DS1_v2"

  # Uncomment this line to delete the OS disk automatically when deleting the VM
  # delete_os_disk_on_termination = true

  # Uncomment this line to delete the data disks automatically when deleting the VM
  # delete_data_disks_on_termination = true

  storage_image_reference {
    publisher = "Canonical"
    offer     = "0001-com-ubuntu-server-jammy"
    sku       = "22_04-lts"
    version   = "22.04.202301100"
  }
  storage_os_disk {
    name              = "myosdisk1"
    caching           = "ReadWrite"
    create_option     = "FromImage"
    managed_disk_type = "Standard_LRS"
  }
  os_profile {
    computer_name  = "hostname"
    admin_username = "larry"
    admin_password = "Password1234!"
  }
  os_profile_linux_config {
    disable_password_authentication = false
  }
  tags = {
    environment = "staging"
  }
}
然後我們執行初始化,會下載Azure的Terraform外掛:
$ terraform init

Initializing the backend...

Initializing provider plugins...
- Finding hashicorp/azurerm versions matching "3.38.0"...
- Installing hashicorp/azurerm v3.38.0...
- Installed hashicorp/azurerm v3.38.0 (signed by HashiCorp)

Terraform has created a lock file .terraform.lock.hcl to record the provider
selections it made above. Include this file in your version control repository
so that Terraform can guarantee to make the same selections by default when
you run "terraform init" in the future.

Terraform has been successfully initialized!

You may now begin working with Terraform. Try running "terraform plan" to see
any changes that are required for your infrastructure. All Terraform commands
should now work.

If you ever set or change modules or backend configuration for Terraform,
rerun this command to reinitialize your working directory. If you forget, other
commands will detect it and remind you to do so if necessary.
檢視plan,看看會生成什麼資源:
$ terraform plan

Terraform used the selected providers to generate the following execution plan. Resource actions are indicated with the following symbols:
  + create

Terraform will perform the following actions:

  # azurerm_network_interface.main will be created
  + resource "azurerm_network_interface" "main" {
      + applied_dns_servers           = (known after apply)
      + dns_servers                   = (known after apply)
      + enable_accelerated_networking = false
      + enable_ip_forwarding          = false
      + id                            = (known after apply)
      + internal_dns_name_label       = (known after apply)
      + internal_domain_name_suffix   = (known after apply)
      + location                      = "westeurope"
      + mac_address                   = (known after apply)
      + name                          = "pkslow-azure-nic"
      + private_ip_address            = (known after apply)
      + private_ip_addresses          = (known after apply)
      + resource_group_name           = "pkslow-azure-resources"
      + virtual_machine_id            = (known after apply)

      + ip_configuration {
          + gateway_load_balancer_frontend_ip_configuration_id = (known after apply)
          + name                                               = "testconfiguration1"
          + primary                                            = (known after apply)
          + private_ip_address                                 = (known after apply)
          + private_ip_address_allocation                      = "Dynamic"
          + private_ip_address_version                         = "IPv4"
          + subnet_id                                          = (known after apply)
        }
    }

  # azurerm_resource_group.example will be created
  + resource "azurerm_resource_group" "example" {
      + id       = (known after apply)
      + location = "westeurope"
      + name     = "pkslow-azure-resources"
    }

  # azurerm_subnet.internal will be created
  + resource "azurerm_subnet" "internal" {
      + address_prefixes                               = [
          + "10.0.2.0/24",
        ]
      + enforce_private_link_endpoint_network_policies = (known after apply)
      + enforce_private_link_service_network_policies  = (known after apply)
      + id                                             = (known after apply)
      + name                                           = "internal"
      + private_endpoint_network_policies_enabled      = (known after apply)
      + private_link_service_network_policies_enabled  = (known after apply)
      + resource_group_name                            = "pkslow-azure-resources"
      + virtual_network_name                           = "pkslow-azure-network"
    }

  # azurerm_virtual_machine.main will be created
  + resource "azurerm_virtual_machine" "main" {
      + availability_set_id              = (known after apply)
      + delete_data_disks_on_termination = false
      + delete_os_disk_on_termination    = false
      + id                               = (known after apply)
      + license_type                     = (known after apply)
      + location                         = "westeurope"
      + name                             = "pkslow-azure-vm"
      + network_interface_ids            = (known after apply)
      + resource_group_name              = "pkslow-azure-resources"
      + tags                             = {
          + "environment" = "staging"
        }
      + vm_size                          = "Standard_DS1_v2"

      + identity {
          + identity_ids = (known after apply)
          + principal_id = (known after apply)
          + type         = (known after apply)
        }

      + os_profile {
          + admin_password = (sensitive value)
          + admin_username = "larry"
          + computer_name  = "hostname"
          + custom_data    = (known after apply)
        }

      + os_profile_linux_config {
          + disable_password_authentication = false
        }

      + storage_data_disk {
          + caching                   = (known after apply)
          + create_option             = (known after apply)
          + disk_size_gb              = (known after apply)
          + lun                       = (known after apply)
          + managed_disk_id           = (known after apply)
          + managed_disk_type         = (known after apply)
          + name                      = (known after apply)
          + vhd_uri                   = (known after apply)
          + write_accelerator_enabled = (known after apply)
        }

      + storage_image_reference {
          + offer     = "0001-com-ubuntu-server-jammy"
          + publisher = "Canonical"
          + sku       = "22_04-lts"
          + version   = "22.04.202301100"
        }

      + storage_os_disk {
          + caching                   = "ReadWrite"
          + create_option             = "FromImage"
          + disk_size_gb              = (known after apply)
          + managed_disk_id           = (known after apply)
          + managed_disk_type         = "Standard_LRS"
          + name                      = "myosdisk1"
          + os_type                   = (known after apply)
          + write_accelerator_enabled = false
        }
    }

  # azurerm_virtual_network.main will be created
  + resource "azurerm_virtual_network" "main" {
      + address_space       = [
          + "10.0.0.0/16",
        ]
      + dns_servers         = (known after apply)
      + guid                = (known after apply)
      + id                  = (known after apply)
      + location            = "westeurope"
      + name                = "pkslow-azure-network"
      + resource_group_name = "pkslow-azure-resources"
      + subnet              = (known after apply)
    }

Plan: 5 to add, 0 to change, 0 to destroy.

─────────────────────────────────────────────────────────────────────────────────────────────────────────────────────────────────────────────────────────────────────────────────

Note: You didn't use the -out option to save this plan, so Terraform can't guarantee to take exactly these actions if you run "terraform apply" now.
直接apply,建立對應的資源:
$ terraform apply

Terraform used the selected providers to generate the following execution plan. Resource actions are indicated with the following symbols:
  + create

Terraform will perform the following actions:

  # azurerm_network_interface.main will be created
  + resource "azurerm_network_interface" "main" {
      + applied_dns_servers           = (known after apply)
      + dns_servers                   = (known after apply)
      + enable_accelerated_networking = false
      + enable_ip_forwarding          = false
      + id                            = (known after apply)
      + internal_dns_name_label       = (known after apply)
      + internal_domain_name_suffix   = (known after apply)
      + location                      = "westeurope"
      + mac_address                   = (known after apply)
      + name                          = "pkslow-azure-nic"
      + private_ip_address            = (known after apply)
      + private_ip_addresses          = (known after apply)
      + resource_group_name           = "pkslow-azure-resources"
      + virtual_machine_id            = (known after apply)

      + ip_configuration {
          + gateway_load_balancer_frontend_ip_configuration_id = (known after apply)
          + name                                               = "testconfiguration1"
          + primary                                            = (known after apply)
          + private_ip_address                                 = (known after apply)
          + private_ip_address_allocation                      = "Dynamic"
          + private_ip_address_version                         = "IPv4"
          + subnet_id                                          = (known after apply)
        }
    }

  # azurerm_resource_group.example will be created
  + resource "azurerm_resource_group" "example" {
      + id       = (known after apply)
      + location = "westeurope"
      + name     = "pkslow-azure-resources"
    }

  # azurerm_subnet.internal will be created
  + resource "azurerm_subnet" "internal" {
      + address_prefixes                               = [
          + "10.0.2.0/24",
        ]
      + enforce_private_link_endpoint_network_policies = (known after apply)
      + enforce_private_link_service_network_policies  = (known after apply)
      + id                                             = (known after apply)
      + name                                           = "internal"
      + private_endpoint_network_policies_enabled      = (known after apply)
      + private_link_service_network_policies_enabled  = (known after apply)
      + resource_group_name                            = "pkslow-azure-resources"
      + virtual_network_name                           = "pkslow-azure-network"
    }

  # azurerm_virtual_machine.main will be created
  + resource "azurerm_virtual_machine" "main" {
      + availability_set_id              = (known after apply)
      + delete_data_disks_on_termination = false
      + delete_os_disk_on_termination    = false
      + id                               = (known after apply)
      + license_type                     = (known after apply)
      + location                         = "westeurope"
      + name                             = "pkslow-azure-vm"
      + network_interface_ids            = (known after apply)
      + resource_group_name              = "pkslow-azure-resources"
      + tags                             = {
          + "environment" = "staging"
        }
      + vm_size                          = "Standard_DS1_v2"

      + identity {
          + identity_ids = (known after apply)
          + principal_id = (known after apply)
          + type         = (known after apply)
        }

      + os_profile {
          + admin_password = (sensitive value)
          + admin_username = "larry"
          + computer_name  = "hostname"
          + custom_data    = (known after apply)
        }

      + os_profile_linux_config {
          + disable_password_authentication = false
        }

      + storage_data_disk {
          + caching                   = (known after apply)
          + create_option             = (known after apply)
          + disk_size_gb              = (known after apply)
          + lun                       = (known after apply)
          + managed_disk_id           = (known after apply)
          + managed_disk_type         = (known after apply)
          + name                      = (known after apply)
          + vhd_uri                   = (known after apply)
          + write_accelerator_enabled = (known after apply)
        }

      + storage_image_reference {
          + offer     = "0001-com-ubuntu-server-jammy"
          + publisher = "Canonical"
          + sku       = "22_04-lts"
          + version   = "22.04.202301100"
        }

      + storage_os_disk {
          + caching                   = "ReadWrite"
          + create_option             = "FromImage"
          + disk_size_gb              = (known after apply)
          + managed_disk_id           = (known after apply)
          + managed_disk_type         = "Standard_LRS"
          + name                      = "myosdisk1"
          + os_type                   = (known after apply)
          + write_accelerator_enabled = false
        }
    }

  # azurerm_virtual_network.main will be created
  + resource "azurerm_virtual_network" "main" {
      + address_space       = [
          + "10.0.0.0/16",
        ]
      + dns_servers         = (known after apply)
      + guid                = (known after apply)
      + id                  = (known after apply)
      + location            = "westeurope"
      + name                = "pkslow-azure-network"
      + resource_group_name = "pkslow-azure-resources"
      + subnet              = (known after apply)
    }

Plan: 5 to add, 0 to change, 0 to destroy.

Do you want to perform these actions?
  Terraform will perform the actions described above.
  Only 'yes' will be accepted to approve.

  Enter a value: yes

azurerm_resource_group.example: Creating...
azurerm_resource_group.example: Creation complete after 9s [id=/subscriptions/cd7921d5-9ba9-45db-bfba-1c397fcaaba3/resourceGroups/pkslow-azure-resources]
azurerm_virtual_network.main: Creating...
azurerm_virtual_network.main: Still creating... [10s elapsed]
azurerm_virtual_network.main: Creation complete after 17s [id=/subscriptions/cd7921d5-9ba9-45db-bfba-1c397fcaaba3/resourceGroups/pkslow-azure-resources/providers/Microsoft.Network/virtualNetworks/pkslow-azure-network]
azurerm_subnet.internal: Creating...
azurerm_subnet.internal: Still creating... [10s elapsed]
azurerm_subnet.internal: Creation complete after 11s [id=/subscriptions/cd7921d5-9ba9-45db-bfba-1c397fcaaba3/resourceGroups/pkslow-azure-resources/providers/Microsoft.Network/virtualNetworks/pkslow-azure-network/subnets/internal]
azurerm_network_interface.main: Creating...
azurerm_network_interface.main: Still creating... [10s elapsed]
azurerm_network_interface.main: Creation complete after 10s [id=/subscriptions/cd7921d5-9ba9-45db-bfba-1c397fcaaba3/resourceGroups/pkslow-azure-resources/providers/Microsoft.Network/networkInterfaces/pkslow-azure-nic]
azurerm_virtual_machine.main: Creating...
azurerm_virtual_machine.main: Still creating... [10s elapsed]
azurerm_virtual_machine.main: Still creating... [20s elapsed]
azurerm_virtual_machine.main: Still creating... [30s elapsed]
azurerm_virtual_machine.main: Still creating... [40s elapsed]
azurerm_virtual_machine.main: Still creating... [50s elapsed]
azurerm_virtual_machine.main: Still creating... [1m0s elapsed]
azurerm_virtual_machine.main: Creation complete after 1m0s [id=/subscriptions/cd7921d5-9ba9-45db-bfba-1c397fcaaba3/resourceGroups/pkslow-azure-resources/providers/Microsoft.Compute/virtualMachines/pkslow-azure-vm]

Apply complete! Resources: 5 added, 0 changed, 0 destroyed.
檢視所有資源,選擇資源組pkslow-azure-resources下面的,已經成功建立:

使用完成後,通過下面命令刪除:
terraform destroy
部署Azure Kubernetes叢集
通過Auzre CLI部署
建立資源組
Azure資源組是用於部署和管理Azure資源的邏輯組。建立資源時,系統會提示你指定一個位置。該位置主要用於:
(1)資源組後設資料的儲存位置;
(2)在建立資源期間未指定另一個區域時,資源在Azure中的執行位置。
我們通過以下命令來建立資源組:
$ az group create --name pkslow-aks --location eastasia
{
  "id": "/subscriptions/cd7921d5-9ba9-45db-bfba-1c397fcaaba3/resourceGroups/pkslow-aks",
  "location": "eastasia",
  "managedBy": null,
  "name": "pkslow-aks",
  "properties": {
    "provisioningState": "Succeeded"
  },
  "tags": null,
  "type": "Microsoft.Resources/resourceGroups"
}
建立AKS
通過下面的命令建立AKS:
az aks create -g pkslow-aks -n pkslow --enable-managed-identity --node-count 1 --enable-addons monitoring --enable-msi-auth-for-monitoring --generate-ssh-keys
建立完成後會輸出很大的Json紀錄檔,我們直接來檢視一下是否正確生成:
$ az aks list --output table
Name    Location    ResourceGroup    KubernetesVersion    CurrentKubernetesVersion    ProvisioningState    Fqdn
------  ----------  ---------------  -------------------  --------------------------  -------------------  --------------------------------------------------------
pkslow  eastasia    pkslow-aks       1.24.6               1.24.6                      Succeeded            pkslow-pkslow-aks-cd7921-725c7247.hcp.eastasia.azmk8s.io
連線到AKS
需要有kubectl命令,沒有的就安裝一下:
az aks install-cli
連線叢集需要認證,要獲取一下驗證設定:
$ az aks get-credentials --resource-group pkslow-aks --name pkslow
Merged "pkslow" as current context in /Users/larry/.kube/config
成功後就可以連線並操作了:
$ kubectl get node
NAME                                STATUS   ROLES   AGE     VERSION
aks-nodepool1-29201873-vmss000000   Ready    agent   8m45s   v1.24.6


$ kubectl get ns
NAME              STATUS   AGE
default           Active   9m33s
kube-node-lease   Active   9m35s
kube-public       Active   9m35s
kube-system       Active   9m35s


$ kubectl get pod -n kube-system
NAME                                  READY   STATUS    RESTARTS   AGE
ama-logs-lhlkb                        3/3     Running   0          9m8s
ama-logs-rs-6cf9546595-rdmh9          2/2     Running   0          9m26s
azure-ip-masq-agent-nppvd             1/1     Running   0          9m8s
cloud-node-manager-bd4c2              1/1     Running   0          9m8s
coredns-59b6bf8b4f-lrzpp              1/1     Running   0          9m26s
coredns-59b6bf8b4f-zbbkm              1/1     Running   0          7m56s
coredns-autoscaler-5655d66f64-5946c   1/1     Running   0          9m26s
csi-azuredisk-node-9rpvd              3/3     Running   0          9m8s
csi-azurefile-node-hvxhc              3/3     Running   0          9m8s
konnectivity-agent-95ff8bbd-fwkds     1/1     Running   0          9m26s
konnectivity-agent-95ff8bbd-qg9vx     1/1     Running   0          9m26s
kube-proxy-c5crz                      1/1     Running   0          9m8s
metrics-server-7dd74d8758-ms8h9       2/2     Running   0          7m50s
metrics-server-7dd74d8758-nxq9t       2/2     Running   0          7m50s
部署測試應用
為了方便,我們直接使用官網的範例來測試一下。建立檔案azure-vote.yaml,內容如下:
apiVersion: apps/v1
kind: Deployment
metadata:
  name: azure-vote-back
spec:
  replicas: 1
  selector:
    matchLabels:
      app: azure-vote-back
  template:
    metadata:
      labels:
        app: azure-vote-back
    spec:
      nodeSelector:
        "kubernetes.io/os": linux
      containers:
        - name: azure-vote-back
          image: mcr.microsoft.com/oss/bitnami/redis:6.0.8
          env:
            - name: ALLOW_EMPTY_PASSWORD
              value: "yes"
          resources:
            requests:
              cpu: 100m
              memory: 128Mi
            limits:
              cpu: 250m
              memory: 256Mi
          ports:
            - containerPort: 6379
              name: redis
---
apiVersion: v1
kind: Service
metadata:
  name: azure-vote-back
spec:
  ports:
    - port: 6379
  selector:
    app: azure-vote-back
---
apiVersion: apps/v1
kind: Deployment
metadata:
  name: azure-vote-front
spec:
  replicas: 1
  selector:
    matchLabels:
      app: azure-vote-front
  template:
    metadata:
      labels:
        app: azure-vote-front
    spec:
      nodeSelector:
        "kubernetes.io/os": linux
      containers:
        - name: azure-vote-front
          image: mcr.microsoft.com/azuredocs/azure-vote-front:v1
          resources:
            requests:
              cpu: 100m
              memory: 128Mi
            limits:
              cpu: 250m
              memory: 256Mi
          ports:
            - containerPort: 80
          env:
            - name: REDIS
              value: "azure-vote-back"
---
apiVersion: v1
kind: Service
metadata:
  name: azure-vote-front
spec:
  type: LoadBalancer
  ports:
    - port: 80
  selector:
    app: azure-vote-front
然後執行以下命令:
$ kubectl apply -f azure-vote.yaml
deployment.apps/azure-vote-back created
service/azure-vote-back created
deployment.apps/azure-vote-front created
service/azure-vote-front created
成功後檢視對應資源:
$ kubectl get svc
NAME               TYPE           CLUSTER-IP     EXTERNAL-IP    PORT(S)        AGE
azure-vote-back    ClusterIP      10.0.156.161   <none>         6379/TCP       112s
azure-vote-front   LoadBalancer   10.0.29.217    20.239.124.1   80:30289/TCP   112s
kubernetes         ClusterIP      10.0.0.1       <none>         443/TCP        21m

$ kubectl get deployment
NAME               READY   UP-TO-DATE   AVAILABLE   AGE
azure-vote-back    1/1     1            1           2m1s
azure-vote-front   1/1     1            1           2m1s

$ kubectl get pod
NAME                                READY   STATUS    RESTARTS   AGE
azure-vote-back-7cd69cc96f-gqm7r    1/1     Running   0          2m7s
azure-vote-front-7c95676c68-jtkqz   1/1     Running   0          2m7s
已經成功建立。
看front那有external IP,通過它直接在瀏覽器存取如下:
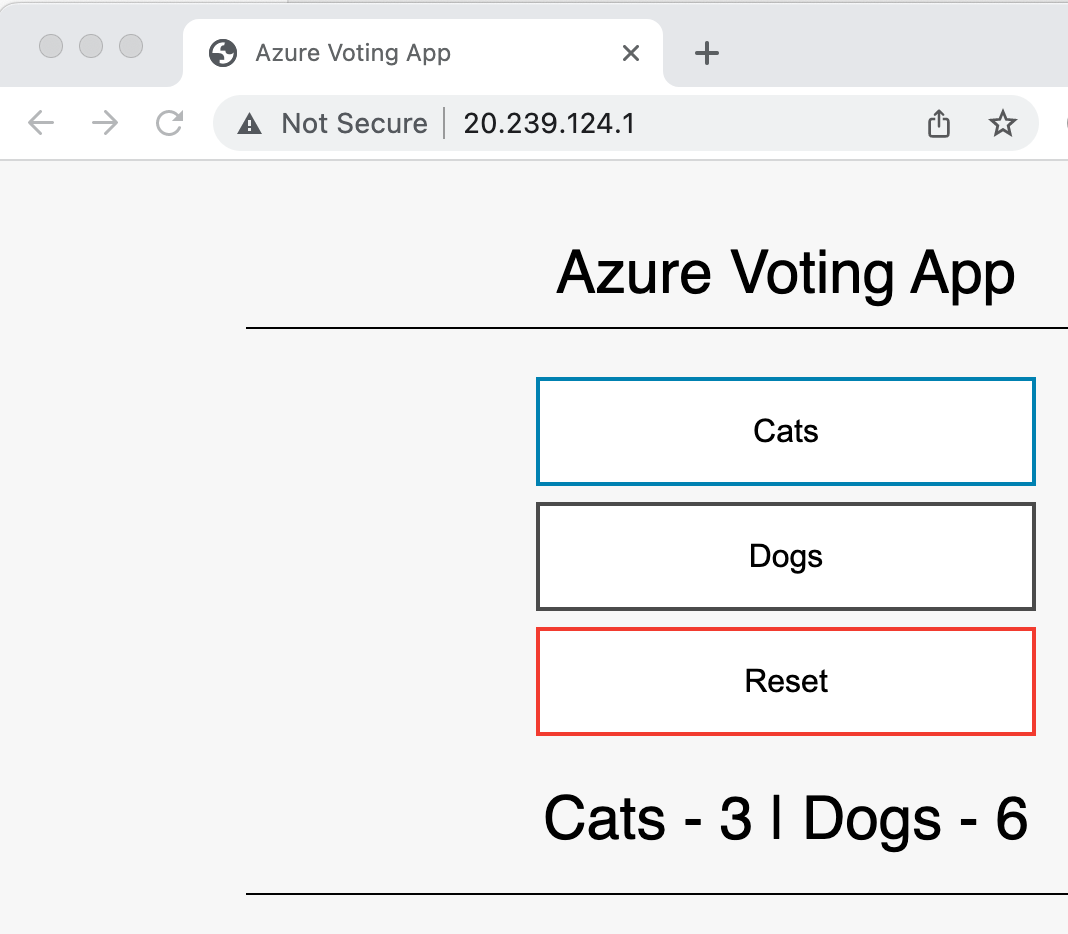
應用已經成功部署並存取了。
刪除資源組
如果完成測試,不再使用,可以整個資源組一起刪除:
az group delete --name pkslow-aks --yes --no-wait
通過Terraform部署
設定外掛和版本
terraform {
  required_version = ">= 1.1.3"
  required_providers {

    azurerm = {
      source = "hashicorp/azurerm"
      version = "3.38.0"
    }

    random = {
      source  = "hashicorp/random"
      version = "= 3.1.0"
    }
  }
}
變數設定
給Terraform設定一些要用到的變數:
variable "agent_count" {
  default = 1
}

# The following two variable declarations are placeholder references.
# Set the values for these variable in terraform.tfvars
variable "aks_service_principal_app_id" {
  default = ""
}

variable "aks_service_principal_client_secret" {
  default = ""
}

variable "cluster_name" {
  default = "pkslow-k8s"
}

variable "dns_prefix" {
  default = "pkslow"
}

# Refer to https://azure.microsoft.com/global-infrastructure/services/?products=monitor for available Log Analytics regions.
variable "log_analytics_workspace_location" {
  default = "eastus"
}

variable "log_analytics_workspace_name" {
  default = "testLogAnalyticsWorkspaceName"
}

# Refer to https://azure.microsoft.com/pricing/details/monitor/ for Log Analytics pricing
variable "log_analytics_workspace_sku" {
  default = "PerGB2018"
}

variable "resource_group_location" {
  default     = "eastus"
  description = "Location of the resource group."
}

variable "resource_group_name_prefix" {
  default     = "rg"
  description = "Prefix of the resource group name that's combined with a random ID so name is unique in your Azure subscription."
}

variable "ssh_public_key" {
  default = "~/.ssh/id_rsa.pub"
}
agent_count應該設定合理,這裡設成1是因為我的賬號是免費的,有限制。
輸出結果
當Terraform執行完,會有一些結果,我們可以把一些值輸出以便使用:
output "client_certificate" {
  value     = azurerm_kubernetes_cluster.k8s.kube_config[0].client_certificate
  sensitive = true
}

output "client_key" {
  value     = azurerm_kubernetes_cluster.k8s.kube_config[0].client_key
  sensitive = true
}

output "cluster_ca_certificate" {
  value     = azurerm_kubernetes_cluster.k8s.kube_config[0].cluster_ca_certificate
  sensitive = true
}

output "cluster_password" {
  value     = azurerm_kubernetes_cluster.k8s.kube_config[0].password
  sensitive = true
}

output "cluster_username" {
  value     = azurerm_kubernetes_cluster.k8s.kube_config[0].username
  sensitive = true
}

output "host" {
  value     = azurerm_kubernetes_cluster.k8s.kube_config[0].host
  sensitive = true
}

output "kube_config" {
  value     = azurerm_kubernetes_cluster.k8s.kube_config_raw
  sensitive = true
}

output "resource_group_name" {
  value = azurerm_resource_group.rg.name
}
main.tf建立AKS
通過azurerm_kubernetes_cluster建立AKS:
provider "azurerm" {
  features {}
}

# Generate random resource group name
resource "random_pet" "rg_name" {
  prefix = var.resource_group_name_prefix
}

resource "azurerm_resource_group" "rg" {
  location = var.resource_group_location
  name     = random_pet.rg_name.id
}

resource "random_id" "log_analytics_workspace_name_suffix" {
  byte_length = 8
}

resource "azurerm_log_analytics_workspace" "test" {
  location            = var.log_analytics_workspace_location
  # The WorkSpace name has to be unique across the whole of azure;
  # not just the current subscription/tenant.
  name                = "${var.log_analytics_workspace_name}-${random_id.log_analytics_workspace_name_suffix.dec}"
  resource_group_name = azurerm_resource_group.rg.name
  sku                 = var.log_analytics_workspace_sku
}

resource "azurerm_log_analytics_solution" "test" {
  location              = azurerm_log_analytics_workspace.test.location
  resource_group_name   = azurerm_resource_group.rg.name
  solution_name         = "ContainerInsights"
  workspace_name        = azurerm_log_analytics_workspace.test.name
  workspace_resource_id = azurerm_log_analytics_workspace.test.id

  plan {
    product   = "OMSGallery/ContainerInsights"
    publisher = "Microsoft"
  }
}

resource "azurerm_kubernetes_cluster" "k8s" {
  location            = azurerm_resource_group.rg.location
  name                = var.cluster_name
  resource_group_name = azurerm_resource_group.rg.name
  dns_prefix          = var.dns_prefix
  tags                = {
    Environment = "Development"
  }

  default_node_pool {
    name       = "agentpool"
    vm_size    = "Standard_D2_v2"
    node_count = var.agent_count
  }
  linux_profile {
    admin_username = "ubuntu"

    ssh_key {
      key_data = file(var.ssh_public_key)
    }
  }
  network_profile {
    network_plugin    = "kubenet"
    load_balancer_sku = "standard"
  }
  service_principal {
    client_id     = var.aks_service_principal_app_id
    client_secret = var.aks_service_principal_client_secret
  }
}
執行
準備好檔案後,先初始化,下載外掛:
$ terraform init

Initializing the backend...

Initializing provider plugins...
- Finding hashicorp/random versions matching "3.1.0"...
- Finding hashicorp/azurerm versions matching "3.38.0"...
- Installing hashicorp/random v3.1.0...
- Installed hashicorp/random v3.1.0 (unauthenticated)
- Installing hashicorp/azurerm v3.38.0...
- Installed hashicorp/azurerm v3.38.0 (signed by HashiCorp)

Terraform has created a lock file .terraform.lock.hcl to record the provider
selections it made above. Include this file in your version control repository
so that Terraform can guarantee to make the same selections by default when
you run "terraform init" in the future.

Terraform has been successfully initialized!

You may now begin working with Terraform. Try running "terraform plan" to see
any changes that are required for your infrastructure. All Terraform commands
should now work.

If you ever set or change modules or backend configuration for Terraform,
rerun this command to reinitialize your working directory. If you forget, other
commands will detect it and remind you to do so if necessary.
檢視Terraform計劃,知道將要生成多少資源:
$ terraform plan -out main.tfplan -var="aks_service_principal_app_id=$ARM_CLIENT_ID" -var="aks_service_principal_client_secret=$ARM_CLIENT_SECRET"
沒有問題則執行變更:
$ terraform apply main.tfplan
Outputs:

client_certificate = <sensitive>
client_key = <sensitive>
cluster_ca_certificate = <sensitive>
cluster_password = <sensitive>
cluster_username = <sensitive>
host = <sensitive>
kube_config = <sensitive>
resource_group_name = "rg-harmless-tomcat"
連線AKS
把kube_config輸出,然後設定環境變數就可以通過kubectl連線了:
$ echo "$(terraform output kube_config)" > ./azurek8s

$ export KUBECONFIG=./azurek8s

$ kubectl get nodes
NAME                                STATUS   ROLES   AGE     VERSION
aks-agentpool-45159290-vmss000000   Ready    agent   9m20s   v1.24.6
如果有問題,可以檢視azurek8s檔案是否正常。
建立PostgreSQL
通過Azure CLI建立Single Server
建立資源組和資料庫
先建立資源組:
az group create --name pkslow-sql --location eastasia --tag create-postgresql-server-and-firewall-rule
然後建立資料庫:
$ az postgres server create \
> --name pkslow-pg \
> --resource-group pkslow-sql \
> --location eastasia \
> --admin-user pguser \
> --admin-password 'Pa$$word' \
> --sku-name GP_Gen5_2


Checking the existence of the resource group 'pkslow-sql'...
Resource group 'pkslow-sql' exists ? : True
Creating postgres Server 'pkslow-pg' in group 'pkslow-sql'...
Your server 'pkslow-pg' is using sku 'GP_Gen5_2' (Paid Tier). Please refer to https://aka.ms/postgres-pricing  for pricing details
Make a note of your password. If you forget, you would have to reset your password with 'az postgres server update -n pkslow-pg -g pkslow-sql -p <new-password>'.
{
  "additionalProperties": {},
  "administratorLogin": "pguser",
  "byokEnforcement": "Disabled",
  "connectionString": "postgres://pguser%40pkslow-pg:[email protected]/postgres?sslmode=require",
  "earliestRestoreDate": "2023-01-15T03:24:18.440000+00:00",
  "fullyQualifiedDomainName": "pkslow-pg.postgres.database.azure.com",
  "id": "/subscriptions/cd7921d5-9ba9-45db-bfba-1c397fcaaba3/resourceGroups/pkslow-sql/providers/Microsoft.DBforPostgreSQL/servers/pkslow-pg",
  "identity": null,
  "infrastructureEncryption": "Disabled",
  "location": "eastasia",
  "masterServerId": "",
  "minimalTlsVersion": "TLSEnforcementDisabled",
  "name": "pkslow-pg",
  "password": "Pa$$word",
  "privateEndpointConnections": [],
  "publicNetworkAccess": "Enabled",
  "replicaCapacity": 5,
  "replicationRole": "None",
  "resourceGroup": "pkslow-sql",
  "sku": {
    "additionalProperties": {},
    "capacity": 2,
    "family": "Gen5",
    "name": "GP_Gen5_2",
    "size": null,
    "tier": "GeneralPurpose"
  },
  "sslEnforcement": "Enabled",
  "storageProfile": {
    "additionalProperties": {},
    "backupRetentionDays": 7,
    "geoRedundantBackup": "Disabled",
    "storageAutogrow": "Enabled",
    "storageMb": 5120
  },
  "tags": null,
  "type": "Microsoft.DBforPostgreSQL/servers",
  "userVisibleState": "Ready",
  "version": "11"
}
建立成功後,會列印很多有用的資訊,如連線資訊。
也可以在以後檢視:
az postgres server show --resource-group pkslow-sql --name pkslow-pg
禁用SSL
建立完成後還可以更新一些設定,如我們禁用SSL:
az postgres server update --resource-group pkslow-sql --name pkslow-pg --ssl-enforcement Disabled
生產環境不要禁用SSL。
新增防火牆
需要把使用者端IP新增到Firewall,不然會連線失敗。
az postgres server firewall-rule create \
--resource-group pkslow-sql \
--server pkslow-pg \
--name AllowIps \
--start-ip-address '0.0.0.0' \
--end-ip-address '255.255.255.255'
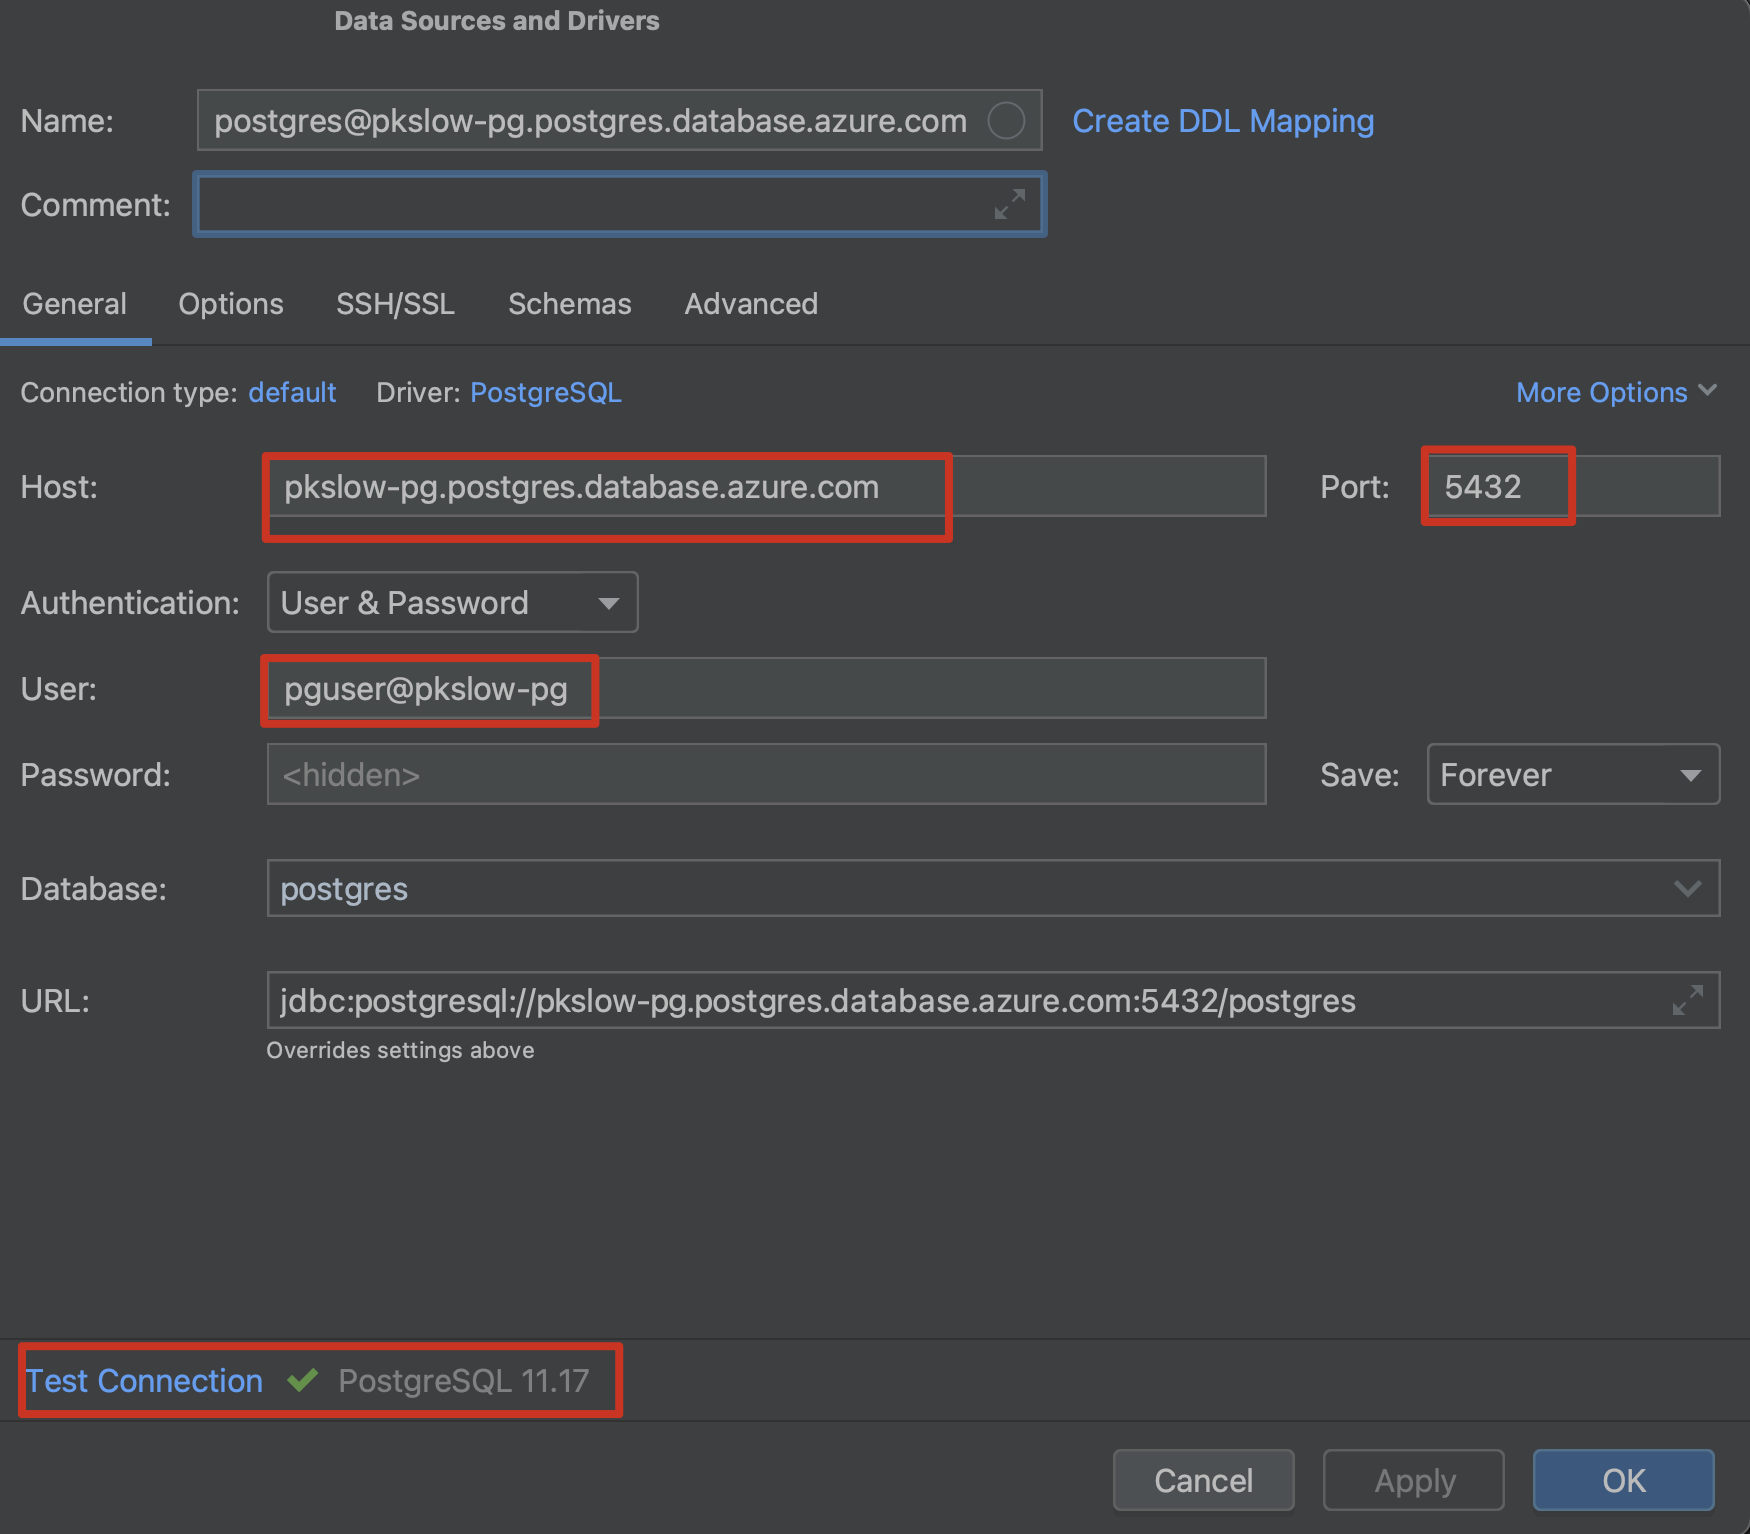
測試連線
設定連線如下,注意使用者名稱不只是pguser:
刪除資源
如果不需要再使用,就刪除資源:
az group delete --name pkslow-sql
通過Terraform建立Flexible Server
外掛與版本
terraform {
  required_version = ">= 1.1.3"
  required_providers {

    azurerm = {
      source = "hashicorp/azurerm"
      version = "3.38.0"
    }
  }
}

provider "azurerm" {
  features {}
}
變數設定
variable "name_prefix" {
  default     = "pkslow-pg-fs"
  description = "Prefix of the resource name."
}

variable "location" {
  default     = "eastus"
  description = "Location of the resource."
}
main.tf建立
resource "random_pet" "rg-name" {
  prefix = var.name_prefix
}

resource "azurerm_resource_group" "default" {
  name     = random_pet.rg-name.id
  location = var.location
}

resource "azurerm_virtual_network" "default" {
  name                = "${var.name_prefix}-vnet"
  location            = azurerm_resource_group.default.location
  resource_group_name = azurerm_resource_group.default.name
  address_space       = ["10.0.0.0/16"]
}

resource "azurerm_network_security_group" "default" {
  name                = "${var.name_prefix}-nsg"
  location            = azurerm_resource_group.default.location
  resource_group_name = azurerm_resource_group.default.name

  security_rule {
    name                       = "test123"
    priority                   = 100
    direction                  = "Inbound"
    access                     = "Allow"
    protocol                   = "Tcp"
    source_port_range          = "*"
    destination_port_range     = "*"
    source_address_prefix      = "*"
    destination_address_prefix = "*"
  }
}

resource "azurerm_subnet" "default" {
  name                 = "${var.name_prefix}-subnet"
  virtual_network_name = azurerm_virtual_network.default.name
  resource_group_name  = azurerm_resource_group.default.name
  address_prefixes     = ["10.0.2.0/24"]
  service_endpoints    = ["Microsoft.Storage"]

  delegation {
    name = "fs"

    service_delegation {
      name = "Microsoft.DBforPostgreSQL/flexibleServers"

      actions = [
        "Microsoft.Network/virtualNetworks/subnets/join/action",
      ]
    }
  }
}

resource "azurerm_subnet_network_security_group_association" "default" {
  subnet_id                 = azurerm_subnet.default.id
  network_security_group_id = azurerm_network_security_group.default.id
}

resource "azurerm_private_dns_zone" "default" {
  name                = "${var.name_prefix}-pdz.postgres.database.azure.com"
  resource_group_name = azurerm_resource_group.default.name

  depends_on = [azurerm_subnet_network_security_group_association.default]
}

resource "azurerm_private_dns_zone_virtual_network_link" "default" {
  name                  = "${var.name_prefix}-pdzvnetlink.com"
  private_dns_zone_name = azurerm_private_dns_zone.default.name
  virtual_network_id    = azurerm_virtual_network.default.id
  resource_group_name   = azurerm_resource_group.default.name
}

resource "azurerm_postgresql_flexible_server" "default" {
  name                   = "${var.name_prefix}-server"
  resource_group_name    = azurerm_resource_group.default.name
  location               = azurerm_resource_group.default.location
  version                = "13"
  delegated_subnet_id    = azurerm_subnet.default.id
  private_dns_zone_id    = azurerm_private_dns_zone.default.id
  administrator_login    = "pguser"
  administrator_password = "QAZwsx123"
  zone                   = "1"
  storage_mb             = 32768
  sku_name               = "GP_Standard_D2s_v3"
  backup_retention_days  = 7

  depends_on = [azurerm_private_dns_zone_virtual_network_link.default]
}
準備檔案:pg-fs-db.tf
resource "azurerm_postgresql_flexible_server_database" "default" {
  name      = "${var.name_prefix}-db"
  server_id = azurerm_postgresql_flexible_server.default.id
  collation = "en_US.UTF8"
  charset   = "UTF8"
}
輸出結果
output "resource_group_name" {
  value = azurerm_resource_group.default.name
}

output "azurerm_postgresql_flexible_server" {
  value = azurerm_postgresql_flexible_server.default.name
}

output "postgresql_flexible_server_database_name" {
  value = azurerm_postgresql_flexible_server_database.default.name
}
執行
準備好hcl檔案後,執行如下:
$ terraform init

$ terraform plan -out main.tfplan

$ terraform apply main.tfplan
Apply complete! Resources: 10 added, 0 changed, 0 destroyed.

Outputs:
azurerm_postgresql_flexible_server = "pkslow-pg-fs-server"
postgresql_flexible_server_database_name = "pkslow-pg-fs-db"
resource_group_name = "pkslow-pg-fs-delicate-honeybee"
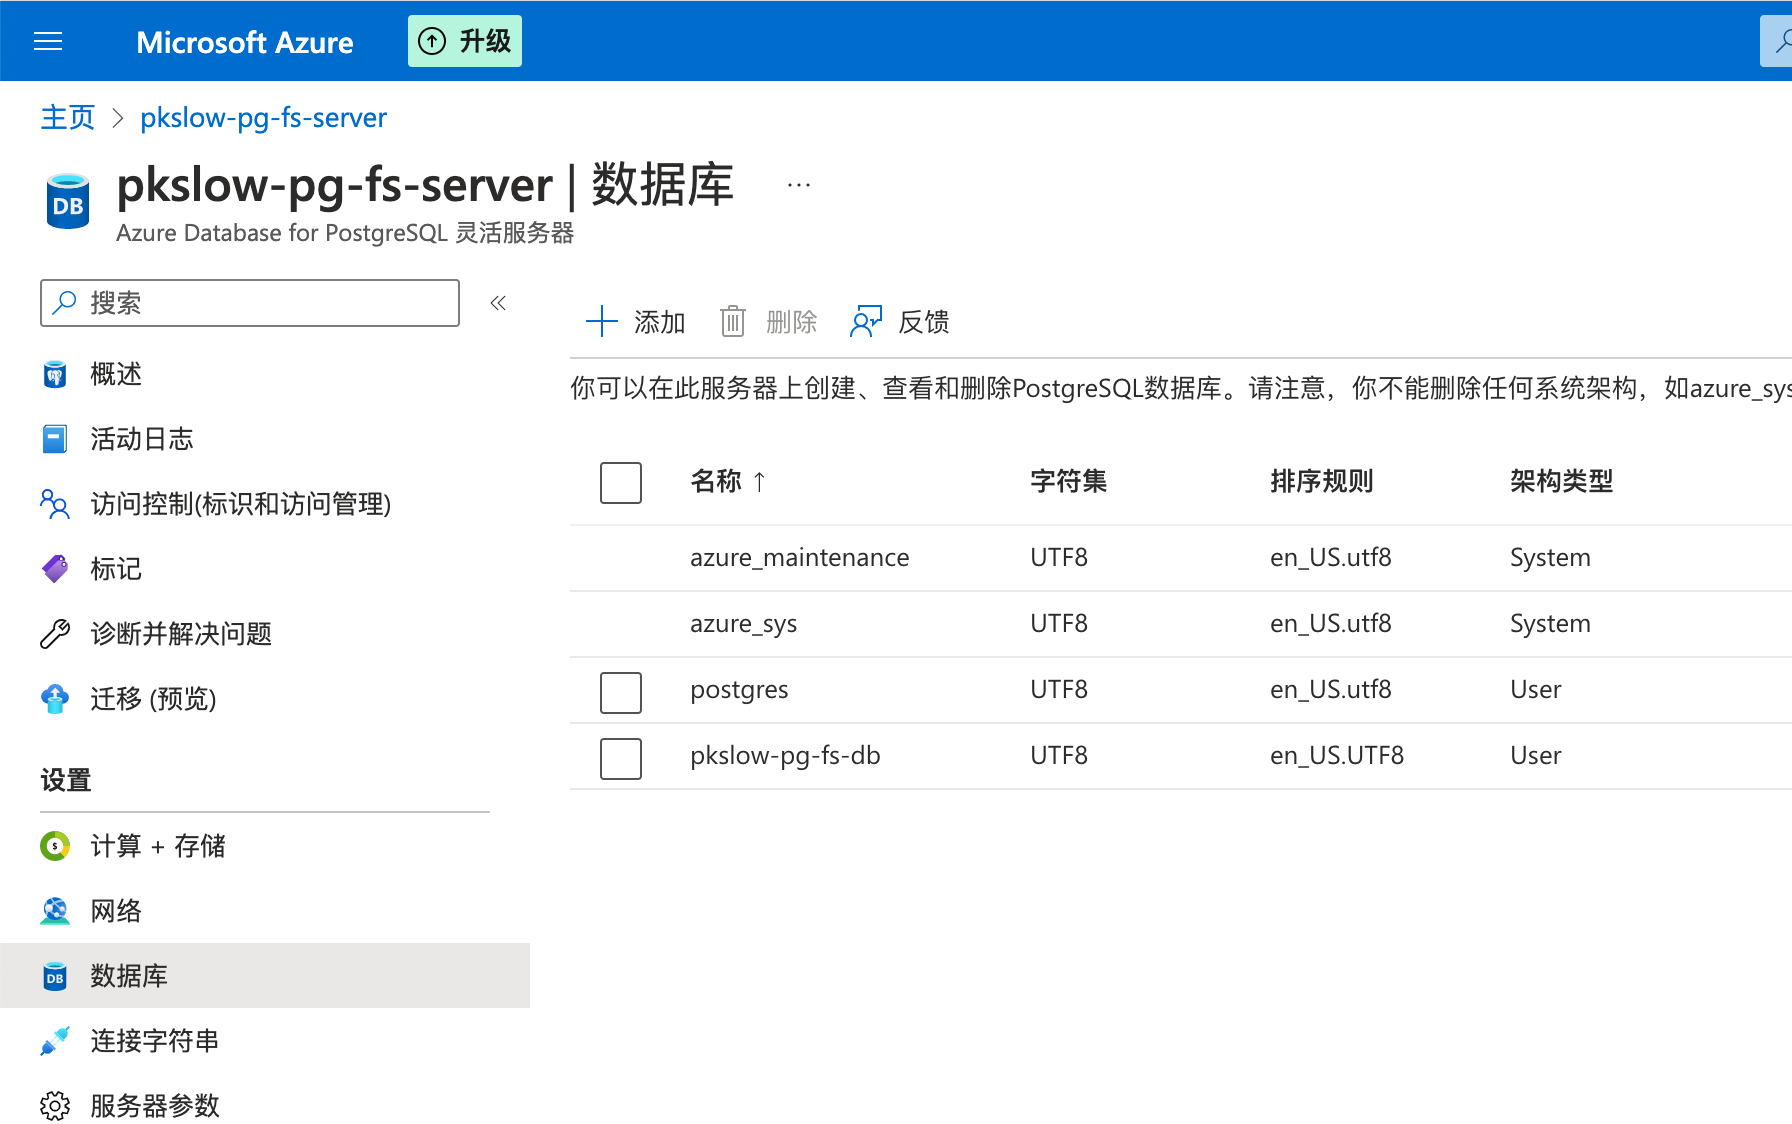
建立成功後,可以檢視:
$ az postgres flexible-server list --output table
Name                 Resource Group                  Location    Version    Storage Size(GiB)    Tier            SKU              State    HA State    Availability zone
-------------------  ------------------------------  ----------  ---------  -------------------  --------------  ---------------  -------  ----------  -------------------
pkslow-pg-fs-server  pkslow-pg-fs-delicate-honeybee  East US     13         32                   GeneralPurpose  Standard_D2s_v3  Ready    NotEnabled  1
當然,在Portal上看也是可以的:
刪除
不需要了可以執行刪除:
terraform destroy
在Azure雲端儲存上管理Terraform狀態
預設Terraform的狀態是儲存在原生的,為了安全和共同作業,在生產環境中一般要儲存在雲上。
建立Azure Storage
我們建立Storage來儲存Terraform狀態。按下面一步步執行即可:
RESOURCE_GROUP_NAME=pkslow-tstate-rg
STORAGE_ACCOUNT_NAME=pkslowtfstate
CONTAINER_NAME=tfstate

# Create resource group
az group create --name $RESOURCE_GROUP_NAME --location "West Europe"

# Create storage account
az storage account create --resource-group $RESOURCE_GROUP_NAME --name $STORAGE_ACCOUNT_NAME --sku Standard_LRS --encryption-services blob

# Get storage account key
ACCOUNT_KEY=$(az storage account keys list --resource-group $RESOURCE_GROUP_NAME --account-name $STORAGE_ACCOUNT_NAME --query [0].value -o tsv)

# Create blob container
az storage container create --name $CONTAINER_NAME --account-name $STORAGE_ACCOUNT_NAME --account-key $ACCOUNT_KEY

echo "storage_account_name: $STORAGE_ACCOUNT_NAME"
echo "container_name: $CONTAINER_NAME"
echo "access_key: $ACCOUNT_KEY"
Terraform backend
建立完Storage後,我們需要在Terraform中設定使用:
terraform {
  required_version = ">= 1.1.3"
  required_providers {

    azurerm = {
      source  = "hashicorp/azurerm"
      version = "3.38.0"
    }
    local = {
      source  = "hashicorp/local"
      version = "= 2.1.0"
    }
  }

  backend "azurerm" {
    resource_group_name  = "pkslow-tstate-rg"
    storage_account_name = "pkslowtfstate"
    container_name       = "tfstate"
    key                  = "pkslow.tfstate"
  }
}

provider "azurerm" {
  features {}
}

resource "local_file" "test-file" {
  content  = "https://www.pkslow.com"
  filename = "${path.root}/terraform-guides-by-pkslow.txt"
}
主要程式碼是這塊:
backend "azurerm" {
resource_group_name  = "pkslow-tstate-rg"
storage_account_name = "pkslowtfstate"
container_name       = "tfstate"
key                  = "pkslow.tfstate"
}
這裡前三個變數的值都是前面建立Storage的時候指定的。
執行Terraform
初始化:
$ terraform init

Initializing the backend...

Initializing provider plugins...
- Finding hashicorp/local versions matching "2.1.0"...
- Finding hashicorp/azurerm versions matching "3.38.0"...
- Installing hashicorp/local v2.1.0...
- Installed hashicorp/local v2.1.0 (unauthenticated)
- Installing hashicorp/azurerm v3.38.0...
- Installed hashicorp/azurerm v3.38.0 (signed by HashiCorp)

Terraform has created a lock file .terraform.lock.hcl to record the provider
selections it made above. Include this file in your version control repository
so that Terraform can guarantee to make the same selections by default when
you run "terraform init" in the future.

Terraform has been successfully initialized!

You may now begin working with Terraform. Try running "terraform plan" to see
any changes that are required for your infrastructure. All Terraform commands
should now work.

If you ever set or change modules or backend configuration for Terraform,
rerun this command to reinitialize your working directory. If you forget, other
commands will detect it and remind you to do so if necessary.
看紀錄檔就會初始化backend。
執行apply:
$ terraform apply -auto-approve
Acquiring state lock. This may take a few moments...

Terraform used the selected providers to generate the following execution plan. Resource actions are indicated with the following symbols:
  + create

Terraform will perform the following actions:

  # local_file.test-file will be created
  + resource "local_file" "test-file" {
      + content              = "https://www.pkslow.com"
      + directory_permission = "0777"
      + file_permission      = "0777"
      + filename             = "./terraform-guides-by-pkslow.txt"
      + id                   = (known after apply)
    }

Plan: 1 to add, 0 to change, 0 to destroy.
local_file.test-file: Creating...
local_file.test-file: Creation complete after 0s [id=6db7ad1bbf57df0c859cd5fc62ff5408515b5fc1]
Releasing state lock. This may take a few moments...

Apply complete! Resources: 1 added, 0 changed, 0 destroyed.
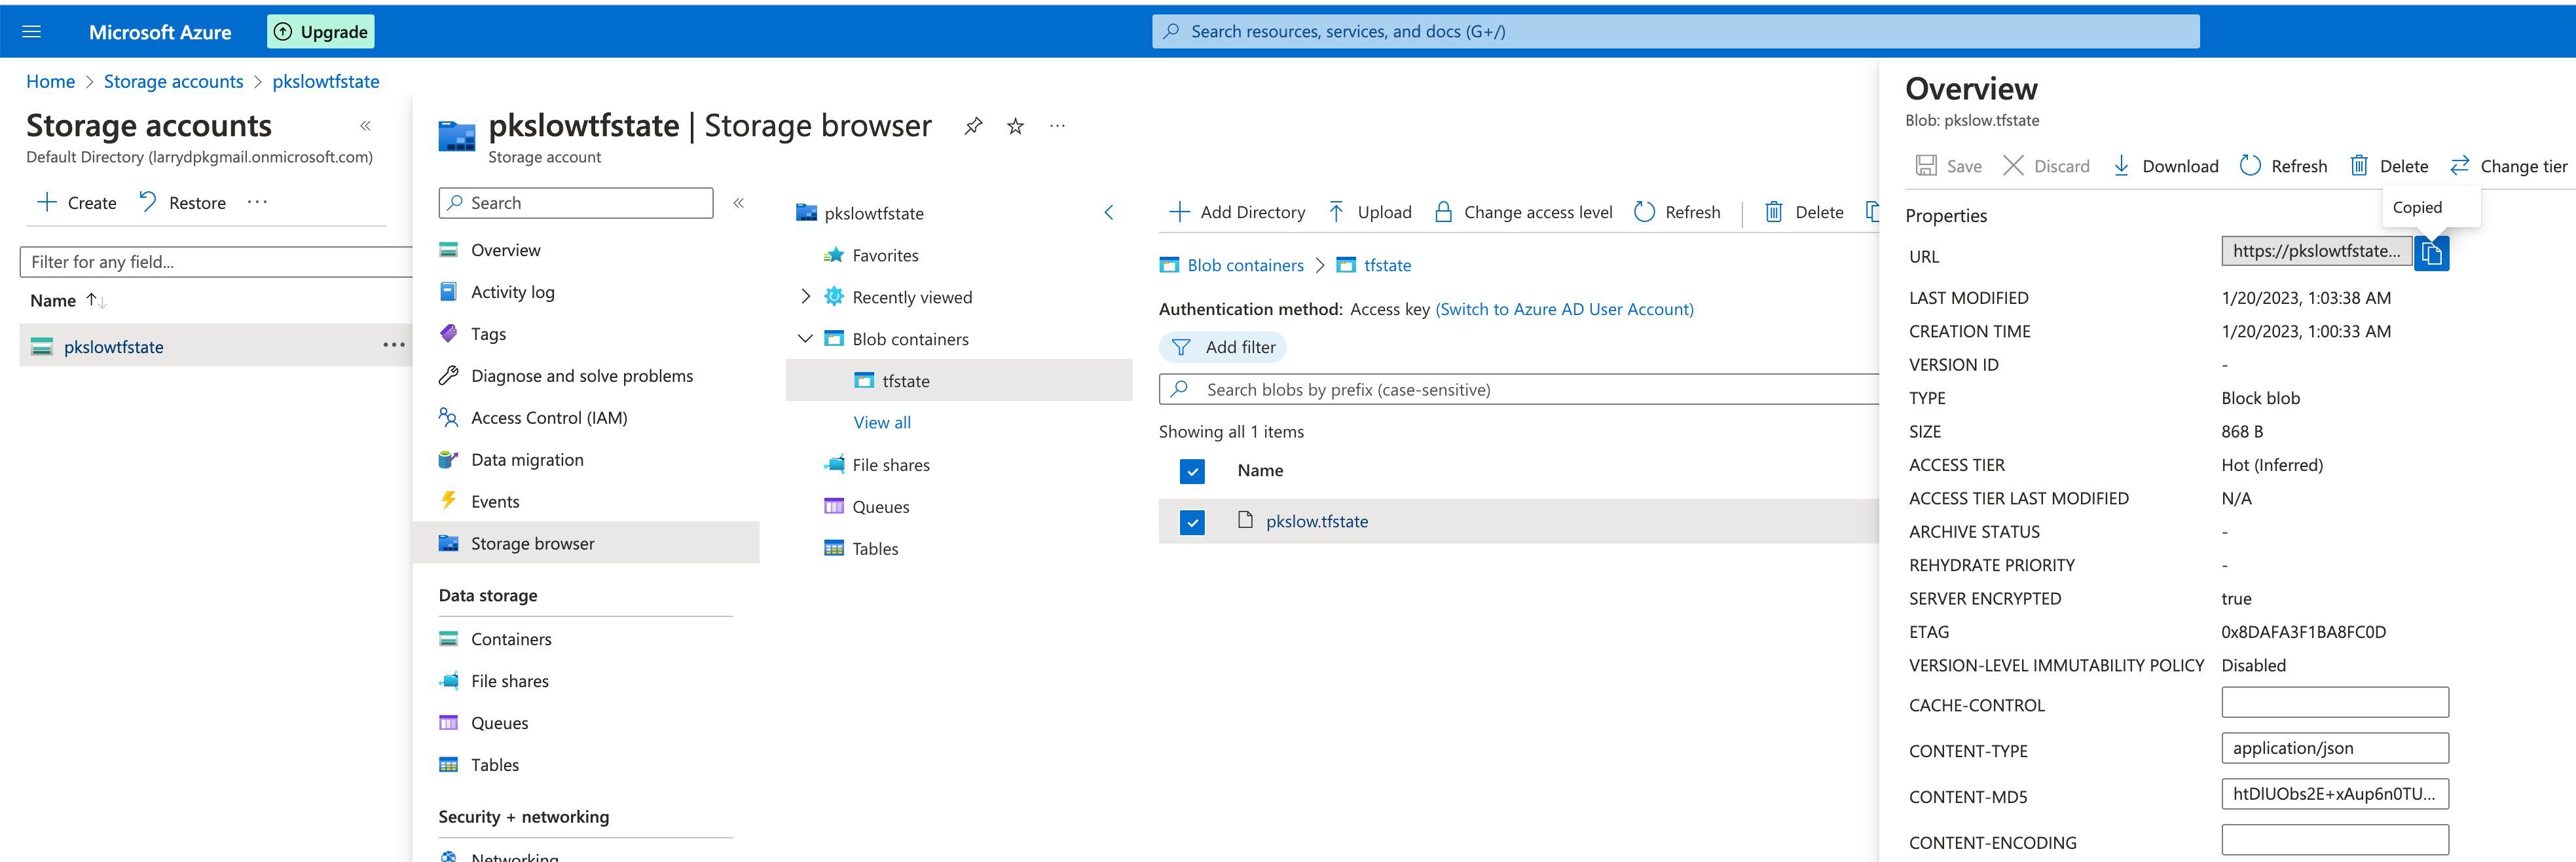
然後我們去檢視Azure Storage,就可以發現已經生成一個Terraform狀態檔案:
如果不再使用,記得刪除資源。