構建api gateway之 負載均衡
什麼是負載均衡
負載均衡,英文名稱為Load Balance,其含義就是指將負載(工作任務)進行平衡、分攤到多個操作單元上進行執行
以下為幾種負載均衡策略介紹
1.隨機(Random)
大家很多時候說到隨機的負載均衡都會想到 Round Robin, 其實 Round Robin並非隨機,
Random 這種是真正意義上隨機,根據隨機演演算法隨意分配請求到伺服器。
-
優點:
- 有了負載能力
-
缺點:
- 受隨機演演算法影響,並不能均衡各個伺服器的負載,
- 也不能根據伺服器的負載情況進行自我調節 所以基本很少有如此單純的真隨機策略了
2.輪循(Round Robin)
如上述,其實輪詢是平均策略,並非隨機策略,
它的具體策略內容如下:
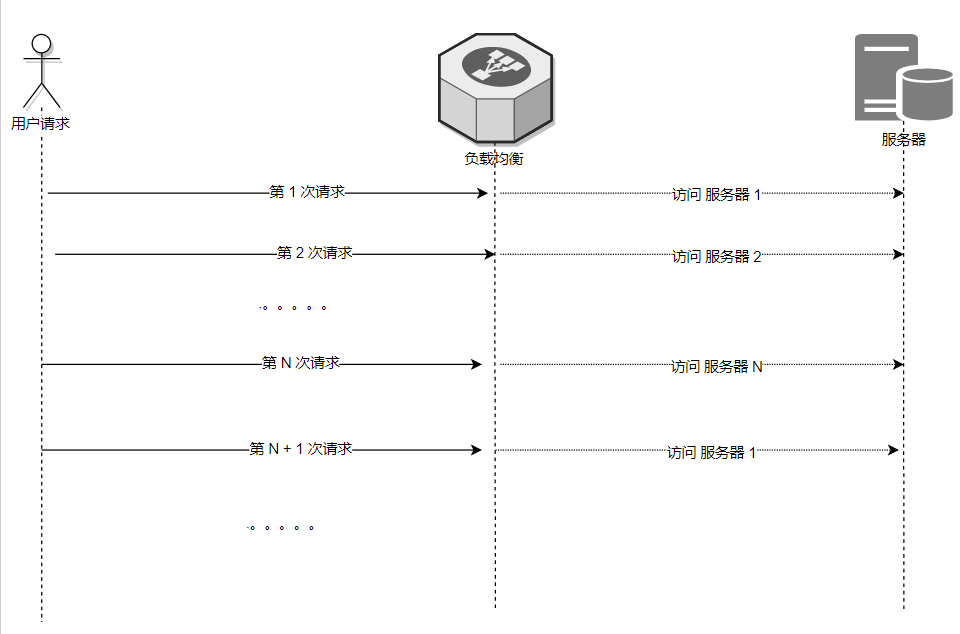
負載均衡負責者有一份 伺服器列表,
它會將其做排序,形成固定的 1 到 N 的順序列表排隊,
每次請求都會佇列依次選擇一位沒有輪到的伺服器同志接受 請求任務,
當整個佇列都接受過任務後,就會從頭開始新一輪的任務排隊。

而大家為什麼很多時候又說它是隨機策略呢?
主要是對請求的client 來說, 這一次和下一次請求的伺服器並不一定是同一個伺服器,所以像是隨機。
-
優點:
- 負載非常平均
-
缺點:
- 不能根據伺服器差異(比如效能)調配負載情況
- 由於是順序 1 開始, 如果一開始就是瞬間大並行流量大的情況,第一臺存在被擊垮的風險
3.最少連線 (Least Connection)
從名字我們就能很輕鬆明白了,
它的策略非常簡單: 就是每次取連線計數最小的那個伺服器使用
-
優點:
- 能根據連線數變化動態平衡資源情況
- 長連線多的場景(比如 ftp),資源調配很合理
-
缺點:
- 但在伺服器資源差異情況下,連線數並不能平衡這種差異
- 動態增刪伺服器列表的場景,請求都會命中新加入的伺服器,大流量易擊垮這臺伺服器 (一般會通過 緩啟動策略減低對應負載,降低風險)
4.Hash
其他的負載均衡策略都適合於無狀態服務,
只有 Hash 是專門解決有狀態服務的負載均衡問題的。
它的具體策略就以其中簡單的做法作為說明:
比如 ip 或者 url hash, 會用 ip 或者 url 的string 根據 hash 演演算法 算出固定的整型數值,
然後用該整型數值 根據 伺服器數量 取模運算 得出對應哪一臺機器,
從而形成 粘機 的效果
-
優點:
- 解決了有狀態服務無法負載均衡的問題
-
缺點:
- 伺服器下線,可能導致 部分粘機的存取仍然存取失效的機器 (一般會通過health check 識別下線,然後重新hash 粘機)
- 如採用有重新 hash 粘機的演演算法策略,需要業務方處理上規避其帶來的影響,比如不能將資料只放在粘機的伺服器上
5. EWMA
印象中好像該方式最早見於 Finagle(Twitter的使用者端RPC庫) 中。
理論上來說伺服器 在cpu 算力不足,網路卡負荷過大,埠不足等等各種情況下,響應的時間都會存在明顯變長的情況
那麼響應的延遲變化就可以一定程度上用來評價伺服器的負載以及伺服器自身情況,
EWMA 的思想就是衡量請求延遲變化來動態優化負載均衡效果。
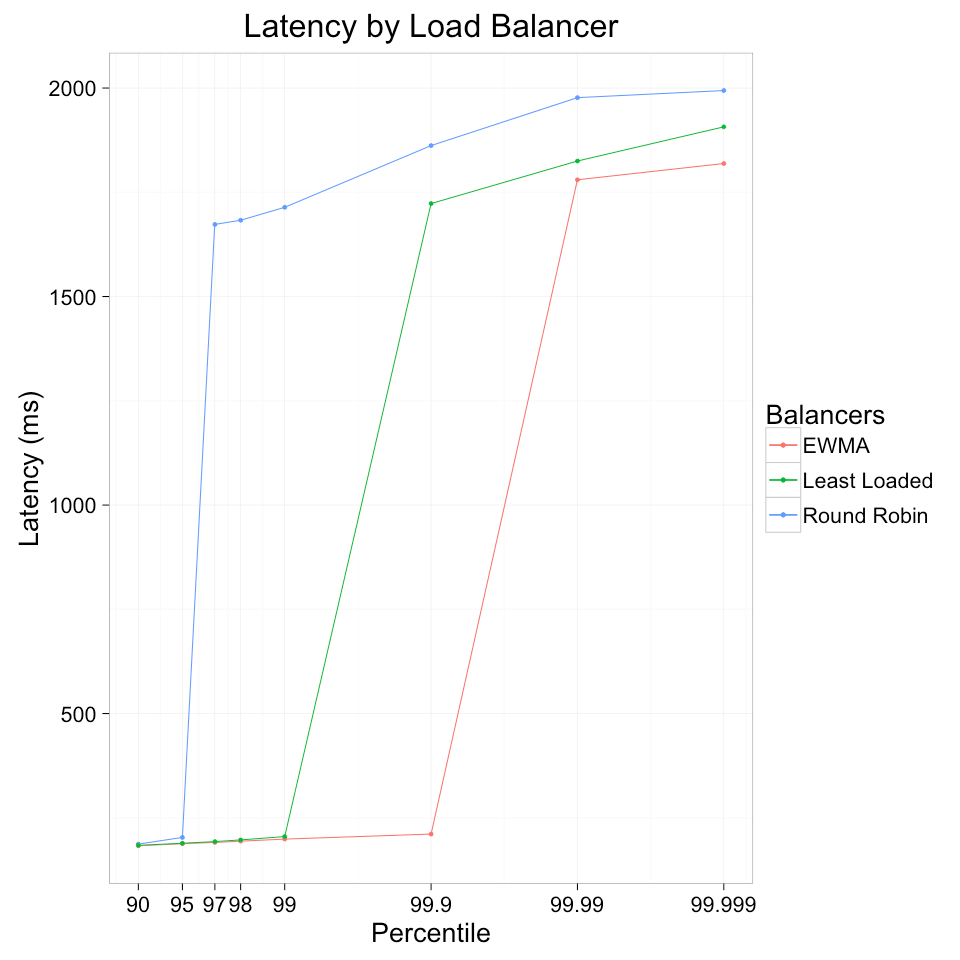
簡單來說,EWMA就是 保持每個伺服器請求的往返時間的移動平均值,以未完成請求的數量加權,並將流量分配給成本函數最小的伺服器。
一般來說,還會使用P2C策略結合 EWMA使用,以避免同一時間集中命中同一臺伺服器。 (P2C 就是隨機選取兩臺伺服器,比較他們倆的EWMA值,取最小的那一個)
linkerd 做過一個負載均衡的測驗,其結果 (當然並不一定代表實際效果)

-
優點:
- 演演算法能更好根據變化情況動態調整負載情況
-
缺點:
- 業務場景本身就是高延遲的情況,比如長輪詢,該演演算法就不能衡量出伺服器的負載情況
權重的特殊說明
嚴格來說,權重很少作為單獨的負載均衡策略,
一般都是與上述各種負載均衡策略進行組合。
權重的目的主要是解決 我們在已知或者能預估出伺服器的負載能力的情況下, 我們如何更好的預設資源的分配。
所以現在一般這些負載均衡演演算法都會提供 權重引數以便大家預設負載比例,
甚至一些還嘗試用機器學習等手段動態調整權重引數等,以便更快調整資源負載情況
輪循(Round Robin) 簡單實現
篇幅關係,這裡不解釋每一個怎麼實現了,只介紹 輪循(Round Robin)
以下內容更新到 openresty-dev-1.rockspec
-- 依賴包
dependencies = {
    "lua-resty-balancer >= 0.04",
}
然後執行
luarocks install openresty-dev-1.rockspec --tree=deps --only-deps --local具體demo 程式碼如下:
worker_processes  1;        #nginx worker 數量
error_log logs/error.log;   #指定錯誤紀錄檔檔案路徑
events {
    worker_connections 1024;
}

http {
    log_format main '$remote_addr [$time_local] $status $request_time $upstream_status $upstream_addr $upstream_response_time';
    access_log logs/access.log main buffer=16384 flush=3;            #access_log 檔案設定

    lua_package_path  "$prefix/deps/share/lua/5.1/?.lua;$prefix/deps/share/lua/5.1/?/init.lua;$prefix/?.lua;$prefix/?/init.lua;;./?.lua;/usr/local/openresty/luajit/share/luajit-2.1.0-beta3/?.lua;/usr/local/share/lua/5.1/?.lua;/usr/local/share/lua/5.1/?/init.lua;/usr/local/openresty/luajit/share/lua/5.1/?.lua;/usr/local/openresty/luajit/share/lua/5.1/?/init.lua;";
    lua_package_cpath "$prefix/deps/lib64/lua/5.1/?.so;$prefix/deps/lib/lua/5.1/?.so;;./?.so;/usr/local/lib/lua/5.1/?.so;/usr/local/openresty/luajit/lib/lua/5.1/?.so;/usr/local/lib/lua/5.1/loadall.so;";
    # 開啟 lua code 快取
    lua_code_cache on;

    upstream nature_upstream {
        server 127.0.0.1:6699; #upstream 設定為 hello world 服務

        # 一樣的balancer
        balancer_by_lua_block {
            local balancer = require "ngx.balancer"
            local upstream = ngx.ctx.api_ctx.upstream
            local ok, err = balancer.set_current_peer(upstream.host, upstream.port)
            if not ok then
                ngx.log(ngx.ERR, "failed to set the current peer: ", err)
                return ngx.exit(ngx.ERROR)
            end
        }
    }

    init_by_lua_block {

        -- 初始化 lb
        local roundrobin = require("resty.roundrobin")
        local nodes = {k1 = {host = '127.0.0.1', port = 6698}, k2 = {host = '127.0.0.1', port = 6699}}
        local ns = {}
        for k, v in pairs(nodes) do
            -- 初始化 weight
            ns[k] = 1
        end
        local picker = roundrobin:new(ns)

        -- 初始化路由
        local radix = require("resty.radixtree")
        local r = radix.new({
            {paths = {'/aa/d'}, metadata = picker},
        })

        -- 匹配路由
        router_match = function()
            local p, err = r:match(ngx.var.uri, {})
            if err then
                log.error(err)
            end

            -- 執行 roundrobin lb 選擇
            local k, err = p:find()
            if not k then
                return nil, err
            end
            return nodes[k]
        end
    }

    server {
		#監聽埠,若你的8699埠已經被佔用,則需要修改
        listen 8699 reuseport;

        location / {

            # 在access階段匹配路由
            access_by_lua_block {
                local upstream = router_match()
                if upstream then
                    ngx.ctx.api_ctx = { upstream = upstream }
                else
                    ngx.exit(404)
                end
            }

            proxy_http_version                  1.1;
            proxy_pass http://nature_upstream; #轉發到 upstream
        }
    }


    #為了大家方便理解和測試,我們引入一個hello world 服務
    server {
		#監聽埠,若你的6699埠已經被佔用,則需要修改
        listen 6699;
        location / {
            default_type text/html;

            content_by_lua_block {
                ngx.say("HelloWorld")
            }
        }
    }
}
啟動服務並測試
$ openresty -p ~/openresty-test -c openresty.conf #啟動
$ curl --request GET 'http://127.0.0.1:8699/aa/d'  #第一次
<html>
<head><title>502 Bad Gateway</title></head>
<body>
<center><h1>502 Bad Gateway</h1></center>
</body>
</html>
$ curl --request GET 'http://127.0.0.1:8699/aa/d'  #第二次
HelloWorld
$ curl --request GET 'http://127.0.0.1:8699/aa/d'  #第三次
<html>
<head><title>502 Bad Gateway</title></head>
<body>
<center><h1>502 Bad Gateway</h1></center>
</body>
</html>
$ curl --request GET 'http://127.0.0.1:8699/aa/d'  #第四次
HelloWorld
可以看到 一次失敗一次成功輪著來,證明 lb 起效
所有這裡介紹的lb實現都可以參考 nature 中的例子