分散式檔案系統之FastDFS
目錄結構:
分散式檔案系統 (Distributed File System) 是一個軟體/軟體伺服器,這個軟體可以用來管理檔案。但這個軟體所管理的檔案通常不是在一個伺服器節點上,而是在多個伺服器節點上,這些伺服器節點通過網路相連構成一個龐大的檔案儲存伺服器叢集,這些伺服器都用於儲存檔案資源,通過分散式檔案系統來管理這些伺服器上的檔案。
常見的分散式檔案系統有:FastDFS、GFS、HDFS、Lustre 、Ceph 、GridFS 、mogileFS、TFS等。
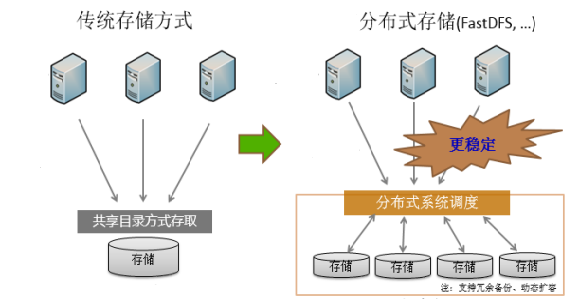
分散式檔案系統與傳統檔案系統對比
1.3 安裝 libfastcommon 庫
libfastcommon 庫是FastDFS檔案系統執行需要的公共 C 語言函數庫
下載地址:https://github.com/happyfish100
(1)上傳檔案:將下載的壓縮檔案 libfastcommon-1.0.59.tar.gz 上傳到/opt目錄下
(2)解壓檔案:
[root@localhost opt]# tar -zxvf libfastcommon-1.0.59.tar.gz
(3)編譯檔案
[root@localhost libfastcommon-1.0.59]# ./make.sh
注意: make編譯的時候如果報錯,需解決錯誤後再次進行make,通常發生錯誤是由於Linux缺少某些依賴庫導致,根據錯誤提示解決錯誤
(4)安裝軟體
[root@localhost libfastcommon-1.0.59]# ./make.sh install
1.4 安裝FastDFS
FastDFS沒有Windows版本,不能在Windows下使用。
下載地址:https://github.com/happyfish100
(1)上傳檔案:將下載的壓縮檔案 fastdfs-6.08.tar.gz 上傳到/opt目錄下
(2)解壓檔案
[root@localhost opt]# tar -zxvf fastdfs-6.08.tar.gz
(3)編譯檔案
[root@localhost fastdfs-6.08]# ./make.sh
(4)安裝軟體
[root@localhost fastdfs-6.08]# ./make.sh install
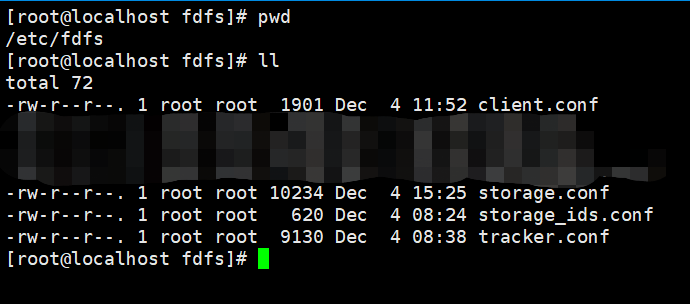
(5)檢視組態檔目錄
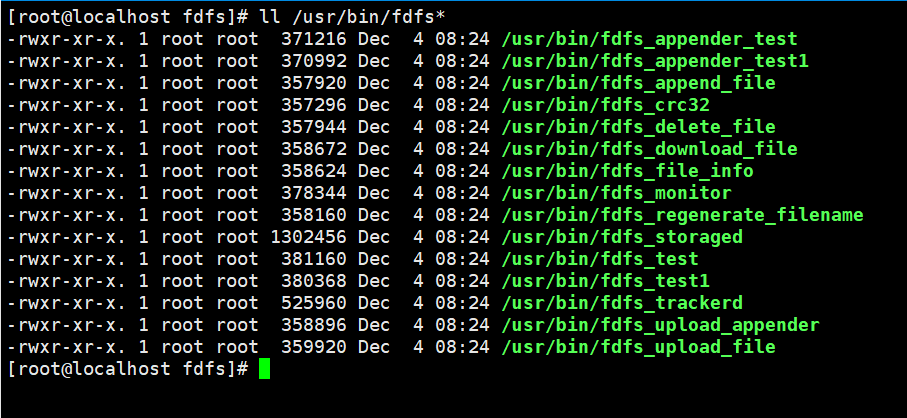
(6)檢視安裝的可執行檔案
1.5 設定FastDFS
(1)修改組態檔tracker.conf
# the base path to store data and log files
base_path = /dfs/tracker
(2)修改組態檔storage.conf
# the base path to store data and log files
base_path = /dfs/tracker

store_path0 = /dfs/storage/files

tracker_server = IP地址:22122
1.6 啟動tracker和storage服務
[root@localhost fdfs]# fdfs_trackerd /etc/fdfs/tracker.conf
[root@localhost fdfs]# fdfs_storaged /etc/fdfs/storage.conf
注意:首次啟動storage後,會在設定的路徑下建立儲存檔案的目錄

在data目錄下,建立了256個子目錄,每個子目錄下又有256個子目錄,總共有256的平方個目錄儲存檔案
1.7 檢視storage是否已經註冊到了tracker下
fdfs_monitor /etc/fdfs/storage.conf
1.8 重啟tracker和storage服務
[root@localhost fdfs]# fdfs_trackerd /etc/fdfs/tracker.conf restart
[root@localhost fdfs]# fdfs_storaged /etc/fdfs/storage.conf restart
1.9 關閉tracker和storage服務
[root@localhost fdfs]# fdfs_trackerd /etc/fdfs/tracker.conf stop
[root@localhost fdfs]# fdfs_storaged /etc/fdfs/storage.conf stop
注意:可以使用kill關閉fastdfs,但不建議線上上使用 kill -9 強制關閉,因為可能會導致檔案資訊不同步問題
2 測試FastDFS
2.1 修改組態檔 client.conf
# the base path to store log files
base_path = /dfs/client

tracker_server = IP地址:22122
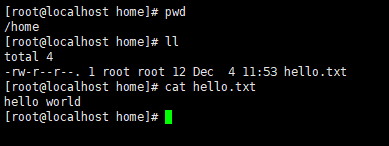
2.2 建立待上傳的檔案
/home路徑下新建檔案hello.txt
2.3 上傳檔案
[root@localhost home]# fdfs_test /etc/fdfs/client.conf upload /home/hello.txt
2.4 檢視檔案

其中:
*_big.txt 代表從檔案
*_big.txt-m 代表從屬性資訊
*.txt 代表主檔案
*.txt-m 代表主屬性資訊meta-info
2.5 測試刪除檔案
fdfs_delete_file /etc/fdfs/client.conf group1/M00/00/00/wKgAgmO2yJ6AAdUoAAAADK8IOy0938.txt
其中:group1代表組名(這個在storage.cof檔案中有設定),M00代表磁碟,/00/00是/dfs/storage/files/data/下的子目錄

3 http存取檔案
在檔案上傳的時候,上傳成功的資訊中有提示我們可以通過某個路徑去存取上傳的檔案,但是我們直接存取這個路徑,卻不可以,那麼已經上傳到FastDFS檔案系統中的檔案,我們如何在瀏覽器中存取呢?
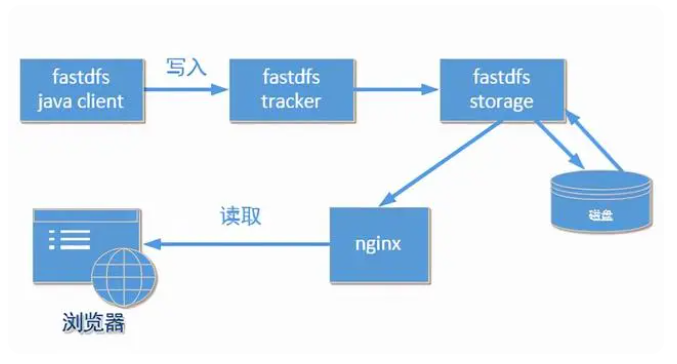
FastDFS提供了一個Nginx擴充套件模組,利用該模組,我們可以通過Nginx存取已經上傳到FastDFS上的檔案
Nginx存取示意圖:
1.2 採用maven命令編譯成jar包安裝到本地maven庫
mvn clean install

打包完成後,jar包在本地Maven倉庫的儲存路徑

1.3 在Java程式中使用它提供的API來存取FastDFS檔案系統
<!--參照打包好的fastdfs-client-java的依賴-->
<dependency>
    <groupId>org.csource</groupId>
    <artifactId>fastdfs-client-java</artifactId>
    <version>1.28-SNAPSHOT</version>
</dependency>
2 檔案上傳功能的實現
使用Java使用者端,程式碼操作fastDFS分散式檔案系統,上傳本地檔案到FastDFS伺服器上
2.1 建立springboot專案,新增 fastdfs-client-java的依賴
2.2 組態檔拷貝
將儲存fastdfs-client-java-1.28路徑下的組態檔fdfs_client.conf 拷貝到專案中的resources目錄下
2.3 新增本地待上傳檔案

2.4 編寫測試程式碼,上傳檔案
 1 @Test
 2 void testUpload(){
 3     StorageClient storageClient = null;
 4     try {
 5         // 1.全域性初始化
 6         ClientGlobal.init("fdfs_client.conf");
 7         // 2.建立TrackerServer、StorageServer
 8         TrackerServer trackerServer = null;
 9         StorageServer storageServer = null;
10         // 3.建立TrackerClient,用來建立TrackerServer、StorageServer物件
11         TrackerClient trackerClient = new TrackerClient();
12         // 4.賦值
13         trackerServer = trackerClient.getTrackerServer();
14         storageServer = trackerClient.getStoreStorage(trackerServer);
15         // 5.建立StorageClient,檔案的上傳和下載
16         storageClient = new StorageClient(trackerServer, storageServer);
17         // 6.上傳檔案
18         // 1.本地檔案路徑 2.副檔名 3.檔案的後設資料(檔案大小,圖片的寬高等)
19         String[] uploadFile = storageClient.upload_file("D:\\檔案路徑\\hello.txt", "txt", null);
20         System.out.println(Arrays.toString(uploadFile));
21     } catch (Exception e) {
22         e.printStackTrace();
23     } finally {
24         if (storageClient != null){
25             try {
26                 storageClient.close();
27             } catch (IOException e) {
28                 e.printStackTrace();
29             }
30         }
31     }
32
33 }
執行結果:
返回值是組名,以及磁碟、路徑和檔名等

2.5 檢視上傳檔案
Linux中儲存的檔案

瀏覽器存取檔案

3 檔案下載
3.1 編寫測試程式碼
和檔案上傳程式碼大致相同,只是storageClient物件呼叫的方法不一樣
1 // 下載檔案
2 // 1.組名稱 2.檔案路徑 3.本地儲存路徑
3 // 返回值result:0代表成功
4 int result = storageClient.download_file("group1", "M00/00/00/wKgAgmO27MeAL-2PAAAADZ1CZDI733.txt",
5         "本地路徑/down_hello.txt");
執行測試用例後,可到指定的本地路徑下檢視已下載的檔案
4 檔案刪除
4.1 編寫測試程式碼
和檔案上傳、下載程式碼大致相同,只是storageClient物件呼叫的方法不一樣
1 // 刪除檔案
2 // 1.組名稱 2.檔案路徑
3 // 返回值result:0代表成功
4 int result = storageClient.delete_file("group1", "M00/00/00/wKgAgmO27MeAL-2PAAAADZ1CZDI733.txt");
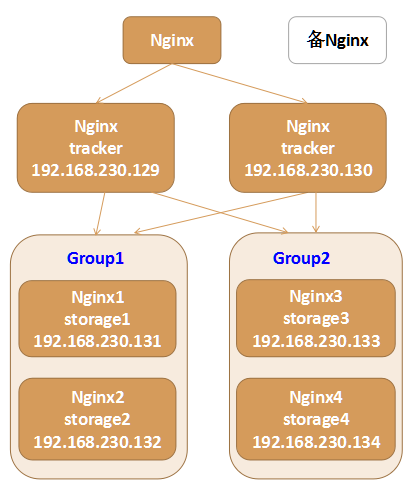
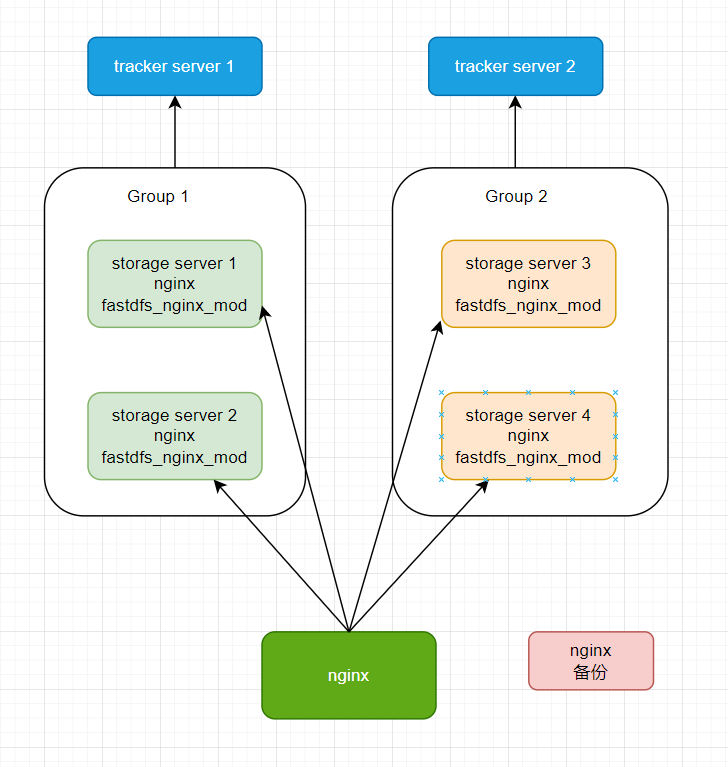
1 架構圖
架構1:
架構2:
2 叢集環境搭建步驟
限於篇幅與裝置,下次再更吧。。。