實現簡單的csv檔案上傳和bootstrap表格的下載
一、寫一個簡單的頁面並行送檔案
引入bootstrap.js,jQuery.js等,具體的網頁就不細寫了,很簡單。
加入input框,button控制元件,進度條。如下:
 <li class="list-group-item" id="input-file-group">
    <div class="input-group mb-3">
    <!-- 上傳.csv檔案 -->
        <input type="file" class="form-control" id="inputGroupFile" aria-describedby="inputGroupFileAddon" aria-label="Upload" accept=".csv">
        <button class="btn btn-default btn-outline-secondary" type="button" id="inputGroupFileAddon" onclick="submitUpload()">確認提交</button>
        <br>
        <!-- 進度條 -->
        <div class="progress" style="width: 500px; margin: 15px 10px">
            <div class="progress-bar progress-bar-striped active" id="progress-bar"></div>
        </div>
    </div>
</li>
編寫點選事件
獲取檔案
var orderFile =document.querySelector('#inputGroupFile').files;
建立formdata物件並新增檔案
var fd=new FormData();
fd.append('avatar',orderFile[0]);
使用Ajax傳送檔案並實現進度條
$.ajax({
            type: "POST",
            url: "",
            data: fd,
            processData: false,
            contentType: false,
            error: function (data) {
                setTimeout(function(){
                    alert("檔案上傳失敗");
                },50);
            },
            success: function (data) {
                setTimeout(function(){
                    alert("檔案上傳成功");
                    },1000);
            },
            xhr: function () {
                myXhr = $.ajaxSettings.xhr();
                if (myXhr.upload) {
                    myXhr.upload.addEventListener('progress', progressHandlingFunction, false);
                }
                return myXhr;
            }
});
實現的效果如下所示:


二、Multer中介軟體解析上傳檔案
先引入multer
const multer = require('multer');
router.post('', multer().single('avatar'), (req, res) => {

    let { buffer, mimetype } = req.file;
    var tempString = buffer.toString('utf8');
});
這裡,buffer的內容就是十六進位制的檔案資訊,mimetype是檔案格式text/csv

轉換成utf-8編碼後就可以使用了。

三、bootstrap表格的下載
提一下bootstrap表格的實現:
引入bootstrap-table外掛
<link href="https://unpkg.com/[email protected]/dist/bootstrap-table.min.css" rel="stylesheet">
<script src="https://unpkg.com/[email protected]/dist/bootstrap-table.min.js"></script>
<script src="https://unpkg.com/[email protected]/dist/locale/bootstrap-table-zh-CN.min.js"></script>
版本要對應上
使用的程式碼:
$('#searchResultTable').bootstrapTable({
    method:'get',
    url:'',
    pageNumber : 1,
    pagination : true,
    sidePagination : 'client',
    pageSize : 4,
    pageList : [ 5, 10, 20, 30 ],
    queryParams : function(params) {
    var a=111;
    };
});
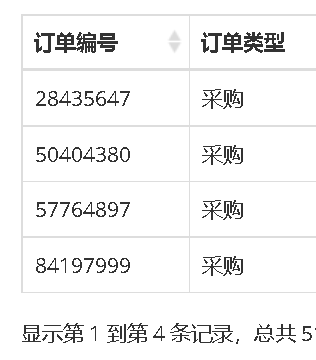
這裡 router要傳送一個符合上述行的json資料
建議用如下方式
res.json(aaa);
如下所示:
[
  {
    orderID: '28435647',
    orderType: '0'
  },
  {
    orderID: '50404380',
    orderType: '0'
  }
]
效果如下:

現在,使用bootstrap-table-export外掛實現bootstrap的匯出
加入依賴(按順序),和上面有些重複的
<link href="https://unpkg.com/[email protected]/dist/bootstrap-table.min.css" rel="stylesheet">
<script src="https://unpkg.com/tableexport.jquery.plugin/tableExport.min.js"></script>
<script src="https://unpkg.com/[email protected]/dist/bootstrap-table.min.js"></script>
<script src="https://unpkg.com/[email protected]/dist/locale/bootstrap-table-zh-CN.min.js"></script>
<script src="https://unpkg.com/[email protected]/dist/extensions/export/bootstrap-table-export.min.js"></script>
在之前的bootstrap表格的js程式碼中加入如下一行:
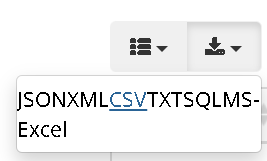
showExport:true,
會出現如下按鈕:

點選對應的格式就可以匯出相應檔案。
如果出現問題,一般就是bootstrap、jQuery、bootstrap-table、bootstrap-table-export、tableExport的版本對應不上,選擇合適的版本就行。
參考文章:
https://blog.csdn.net/m0_53620413/article/details/121126046
https://blog.csdn.net/qq_45859670/article/details/123306590
https://www.jianshu.com/p/9cc6c903c4b6