JAVA中使用最廣泛的本地快取?Ehcache的自信從何而來2 —— Ehcache的各種專案整合與使用初體驗

大家好,又見面了。
本文是筆者作為掘金技術社群簽約作者的身份輸出的快取專欄系列內容,將會通過系列專題,講清楚快取的方方面面。如果感興趣,歡迎關注以獲取後續更新。
在上一篇文章《JAVA中使用最廣泛的本地快取?Ehcache的自信從何而來 —— 感受來自Ehcache的強大實力》中,介紹了Ehcache所具有的核心優秀特性,如資料持久化、多級快取、叢集能力等等。所謂紙上得來終覺淺、絕知此事要躬行,接下來我們就一起動手實踐下,在專案中整合Ehcache並體驗Ehcache的各種常見用法。

Ehcache的依賴整合與設定
依賴引入
整合使用Ehcache的第一步,就是要引入對應的依賴包。對於Maven專案而言,可以在pom.xml中新增對應依賴:
<dependency>
  <groupId>org.ehcache</groupId>
  <artifactId>ehcache</artifactId>
  <version>3.10.0</version>
</dependency>
依賴新增完成後,還需要對快取進行設定後方可使用。

快取的設定與建立
使用程式碼設定與建立Ehcache
Ehcache支援在程式碼中手動建立快取物件,並指定對應快取引數資訊。在使用之前,需要先了解幾個關鍵程式碼類:
| 類名 | 具體說明 |
|---|---|
| CacheManagerBuilder | CacheManager物件的構造器物件,可以方便的指定相關引數然後建立出符合條件的CacheManager物件。 |
| ResourcePoolsBuilder | 用於指定快取的儲存形式(ResourcePools)的設定構造器物件,可以指定快取是堆內快取、堆外快取、磁碟快取或者多者的組合,以及各個型別快取的容量資訊、是否持久化等資訊。 |
| CacheConfiguration | 用於承載所有指定的關於快取的設定屬性值。 |
| CacheConfigurationBuilder | 用於生成最終快取總體設定資訊的構造器,可以指定快取儲存形式(ResourcePools)、過期策略(ExpiryPolicy)、鍵值型別等等各種屬性值。 |
通過組合使用上述Builder構造器,我們便可以在程式碼中完成對快取Cache屬性的設定。比如下面這樣:
public static void main(String[] args) {
    CacheManager cacheManager = CacheManagerBuilder.newCacheManagerBuilder()
            .with(CacheManagerBuilder.persistence("d:\\myCache\\"))
            .build(true);
    // 指定快取的儲存形式,採用多級快取,並開啟快取持久化操作
    ResourcePools resourcePools = ResourcePoolsBuilder.newResourcePoolsBuilder()
            .heap(1, MemoryUnit.MB)
            .disk(10, MemoryUnit.GB, true)
            .build();
    // 封裝快取設定物件,指定了鍵值型別、指定了使用TTL與TTI聯合的過期淘汰策略
    CacheConfiguration<Integer, String> cacheConfiguration =
            CacheConfigurationBuilder.newCacheConfigurationBuilder(Integer.class, String.class, resourcePools)
                    .withExpiry(ExpiryPolicyBuilder.timeToIdleExpiration(Duration.ofSeconds(10)))
                    .withExpiry(ExpiryPolicyBuilder.timeToLiveExpiration(Duration.ofSeconds(5)))
                    .build();
    // 使用給定的設定引數,建立指定名稱的快取物件
    Cache<Integer, String> myCache = cacheManager.createCache("myCache", cacheConfiguration);
}
上面的範例中,我們建立了一個基於heap + disk的二級快取物件,並開啟了快取的持久化,以及指定了持久化結果檔案的儲存路徑。

基於XML設定Ehcache
因為Ehcache在建立快取的時候可以指定的引數較多,如果通過上面的程式碼方式指定設定,略顯繁瑣且不夠清晰直觀,並且當需要建立多個不同的快取物件的時候比較麻煩。好在Ehcache還提供了一種通過XML來進行引數設定的途徑,並且支援在一個xml中設定多個不同的快取物件資訊。
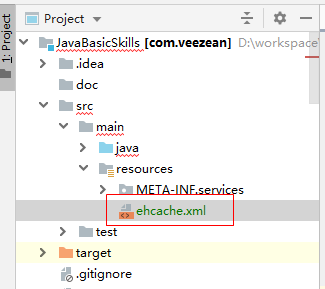
在專案的resource目錄下新增個Ehcache的組態檔,比如取名ehcache.xml,專案層級結構示意如下:

然後我們在ehcache.xml中新增設定內容。內容範例如下:
<?xml version="1.0" encoding="UTF-8"?>
<config xmlns:xsi='http://www.w3.org/2001/XMLSchema-instance' xmlns:jsr107='http://www.ehcache.org/v3/jsr107'
        xmlns='http://www.ehcache.org/v3'
        xsi:schemaLocation="http://www.ehcache.org/v3 http://www.ehcache.org/schema/ehcache-core-3.1.xsd
        http://www.ehcache.org/v3/jsr107 http://www.ehcache.org/schema/ehcache-107-ext-3.1.xsd">

    <persistence directory="D:\myCache"/>

    <cache alias="myCache">
        <key-type>java.lang.Integer</key-type>
        <value-type>java.lang.String</value-type>
        <expiry>
            <tti unit="minutes">5</tti>
        </expiry>
        <resources>
            <heap unit="MB">10</heap>
            <offheap unit="MB">50</offheap>
            <disk persistent="true" unit="MB">500</disk>
        </resources>
    </cache>
</config>
上面演示的Ehcache3.x版本中的設定實現方式(組態檔與Ehcache2.x存在較大差異,不要混用,執行會報錯),在xml中指定了myCache的key與value對應的型別,指定了基於TTI的5分鐘過期淘汰策略,並規定了採用heap + offheap + disk的三級快取機制,此外還開啟了快取持久化能力,並指定了持久化檔案的儲存路徑。
通過xml設定的方式,可以很直觀的看出這個快取物件的所有關鍵屬性約束,也是相比於程式碼中直接設定的方式更有優勢的一個地方。在xml組態檔中,也可以同時設定多個快取物件資訊。此外,為了簡化設定,Ehcache還支援通過<cache-template>來將一些公用的設定資訊抽取出來成為模板,然後各個Cache獨立設定的時候只需要增量設定各自差異化的部分即可,當然也可以基於給定的模板進行個性化的修改覆寫設定。
比如下面這個組態檔,設定了兩個Cache物件資訊,複用了同一個設定模板,然後各自針對模板中不符合自己的設定進行了重新改寫。
<?xml version="1.0" encoding="UTF-8"?>
<config xmlns:xsi='http://www.w3.org/2001/XMLSchema-instance' xmlns:jsr107='http://www.ehcache.org/v3/jsr107'
        xmlns='http://www.ehcache.org/v3'
        xsi:schemaLocation="
        http://www.ehcache.org/v3 http://www.ehcache.org/schema/ehcache-core-3.1.xsd
        http://www.ehcache.org/v3/jsr107 http://www.ehcache.org/schema/ehcache-107-ext-3.1.xsd">

    <persistence directory="D:\myCache"/>

    <cache-template name="myTemplate">
        <key-type>java.lang.String</key-type>
        <value-type>java.lang.String</value-type>
        <expiry>
            <ttl unit="minutes">30</ttl>
        </expiry>
        <resources>
            <heap unit="MB">10</heap>
            <disk unit="GB" persistent="true">2</disk>
        </resources>
    </cache-template>

    <cache alias="myCache" uses-template="myTemplate">
        <key-type>java.lang.Integer</key-type>
    </cache>
    <cache alias="myCache2" uses-template="myTemplate">
        <expiry>
            <ttl unit="minutes">60</ttl>
        </expiry>
    </cache>
</config>
設定完成之後,我們還需要在程式碼中指定使用此組態檔進行CacheManager建立與設定,並且完成CacheManager的init初始化操作。
public Cache<Integer, String> createCacheWithXml() {
    // 獲取組態檔
    URL xmlConfigUrl = this.getClass().getClassLoader().getResource("./ehcache.xml");
    // 解析對應的組態檔並建立CacheManager物件
    XmlConfiguration xmlConfiguration = new XmlConfiguration(xmlConfigUrl);
    CacheManager cacheManager = CacheManagerBuilder.newCacheManager(xmlConfiguration);
    // 執行初始化操作
    cacheManager.init();
    // 直接從CacheManager中根據名稱獲取對應的快取物件
    return cacheManager.getCache("myCache", Integer.class, String.class);
}
這樣,Ehcache的整合與設定就算完成了,接下來直接獲取Cache物件並對其進行操作即可。
public static void main(String[] args) {
    EhcacheService ehcacheService = new EhcacheService();
    Cache<Integer, String> cache = ehcacheService.createCacheWithXml();
    cache.put(1, "value1");
    System.out.println(cache.get(1));
}
當然,Ehcache3.x版本中使用xml方式設定的時候,有幾個坑需要提防,避免踩坑。
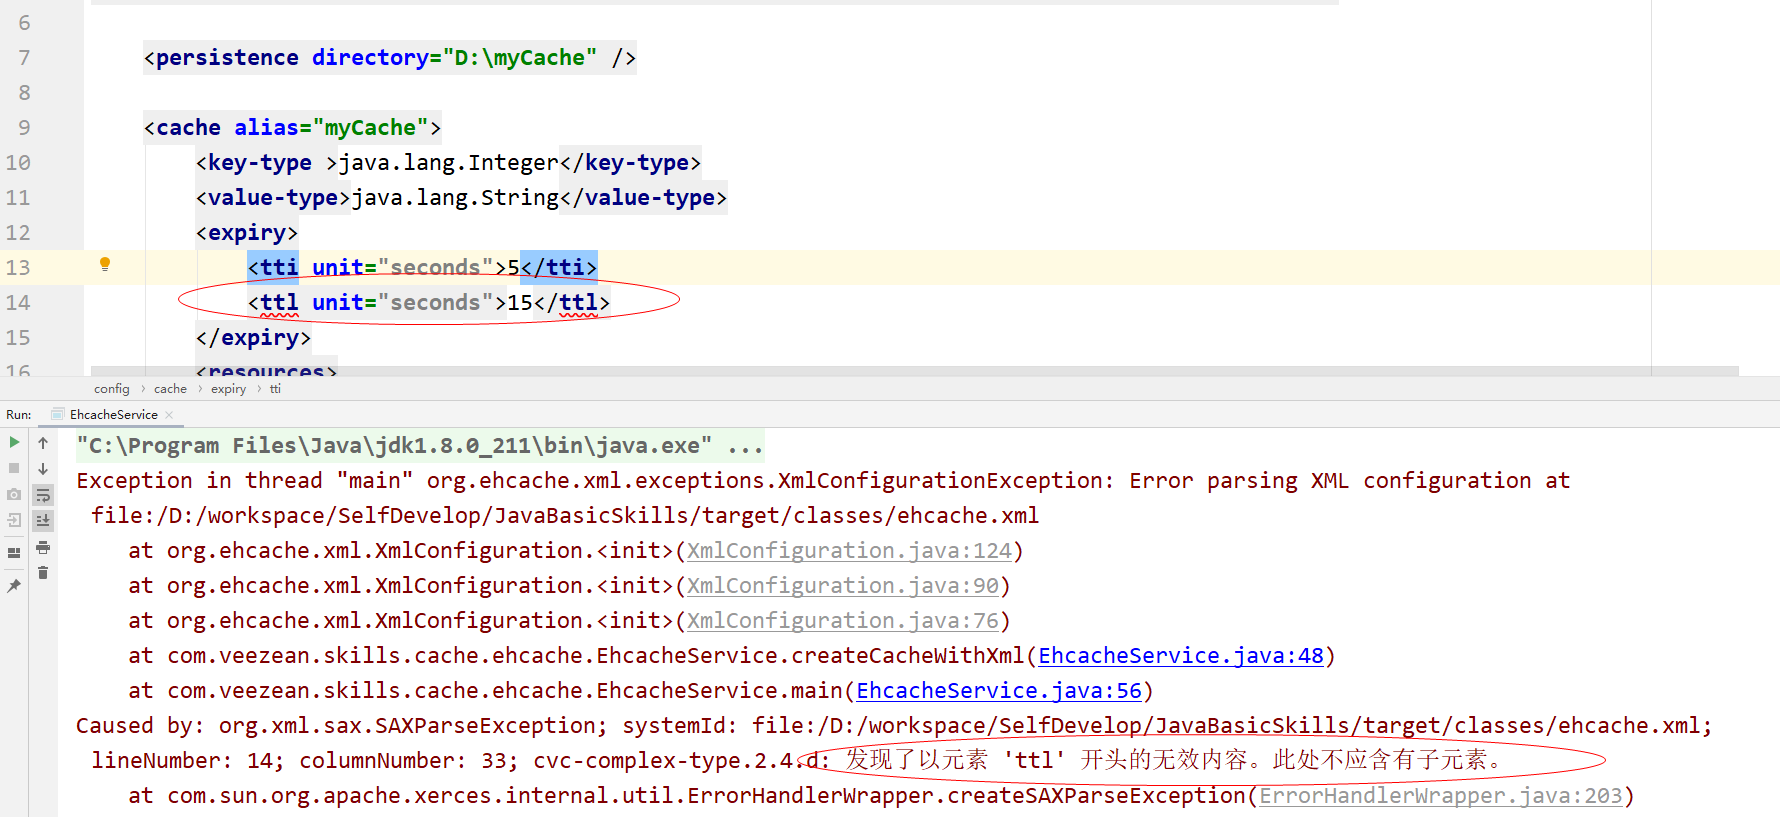
- 對於過期時間的設定只允許選擇ttl或者tti中的一者,不允許兩者同時存在——而通過程式碼設定的時候則沒有這個問題。如果在xml中同時指定ttl與tti則執行的時候會拋異常。

<cache>節點下面設定的時候,<expire>節點需要放在<configuration>節點的前面,否則會報錯Schema校驗失敗。


業務中使用
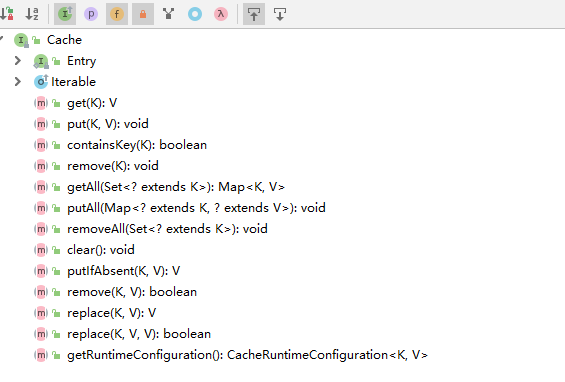
快取設定並建立完成後,業務程式碼中便可以通過Ehcache提供的介面,進行快取資料的相關操作。業務使用是通過對Cache物件的操作來進行的,Cache提供的API介面與JDK中的Map介面極其相似,所以在使用上毫無門檻,可以直接上手。

實際編碼中,根據業務的實際訴求,通過Cache提供的API介面來完成快取資料的增刪改查操作。
public static void main(String[] args) {
    EhcacheService ehcacheService = new EhcacheService();
    Cache<Integer, String> cache = ehcacheService.getCache();
    // 存入單條記錄到快取中
    cache.put(1, "value1");
    Map<Integer, String> values = new HashMap<>();
    values.put(2, "value2");
    values.put(3, "value3");
    // 批次向快取中寫入資料
    cache.putAll(values);
    // 當快取不存在的時候才寫入快取
    cache.putIfAbsent(2, "value2");
    // 查詢單條記錄
    System.out.println(cache.get(2));
    // 批次查詢操作
    System.out.println(cache.getAll(Stream.of(1,2,3).collect(Collectors.toSet())));
    // 移除單條記錄
    cache.remove(1);
    System.out.println(cache.get(1));
    // 清空快取記錄
    cache.clear();
    System.out.println(cache.get(1));
}
從上述程式碼可以看出,EhCache具體使用起來與普通Map操作無異。雖然使用簡單,但是這樣也存在個問題就是業務程式碼所有使用快取的地方,都需要強依賴Ehcache的具體介面,導致業務程式碼與Ehcache的依賴耦合度太高,後續如果想要更換快取元件時,難度會非常大。
在前面的文章《聊一聊JAVA中的快取規範 —— 雖遲但到的JCache API與天生不俗的Spring Cache》中有介紹過JAVA業界的快取標準規範,主要有JSR107標準與Spring Cache標準,如果可以通過標準的介面方式進行存取,這樣就可以解決與EhCache深度耦合的問題了。令人欣慰的是,Ehcache同時提供了對JSR107與Spring Cache規範的支援!
下面一起看下如何通過JSR107規範介面以及Spring Cache的標準來使用Ehcache。

通過JCache API來使用Ehcache
依賴整合與設定
如果要使用JCache標準方式來使用,需要額外引入JCache對應依賴包:
<dependency>
    <groupId>javax.cache</groupId>
    <artifactId>cache-api</artifactId>
    <version>1.1.1</version>
</dependency>
按照JCache的規範,必須通過CacheManager才能獲取到Cache物件(這一點與Ehcache相同),而CacheManager則又需要通過CacheProvider來獲取。

遵循這一原則,我們可以按照JCache的方式來得到Cache物件:
import javax.cache.Cache;
import javax.cache.CacheManager;
import javax.cache.Caching;
import javax.cache.configuration.MutableConfiguration;
import javax.cache.expiry.CreatedExpiryPolicy;
import javax.cache.expiry.Duration;
import javax.cache.spi.CachingProvider;

public class JsrCacheService {
    public Cache<Integer, String> getCache() {
        CachingProvider cachingProvider = Caching.getCachingProvide();
        CacheManager cacheManager = cachingProvider.getCacheManager();
        MutableConfiguration<Integer, String> configuration =
                new MutableConfiguration<Integer, String>()
                        .setTypes(Integer.class, String.class)
                        .setStoreByValue(false)
                        .setExpiryPolicyFactory(CreatedExpiryPolicy.factoryOf(Duration.ONE_MINUTE));
        Cache<Integer, String> myCache = cacheManager.createCach    ("myCache", configuration);
        System.out.println(myCache.getClass().getCanonicalName());
        return myCache;
    }
}
從import的內容可以看出上述程式碼沒有呼叫到任何Ehcache的類,呼叫上述程式碼執行並列印出構建出來的Cache物件具體型別如下,可以看出的的確確建立出來的是Ehcache提供的Eh107Cache類:
org.ehcache.jsr107.Eh107Cache
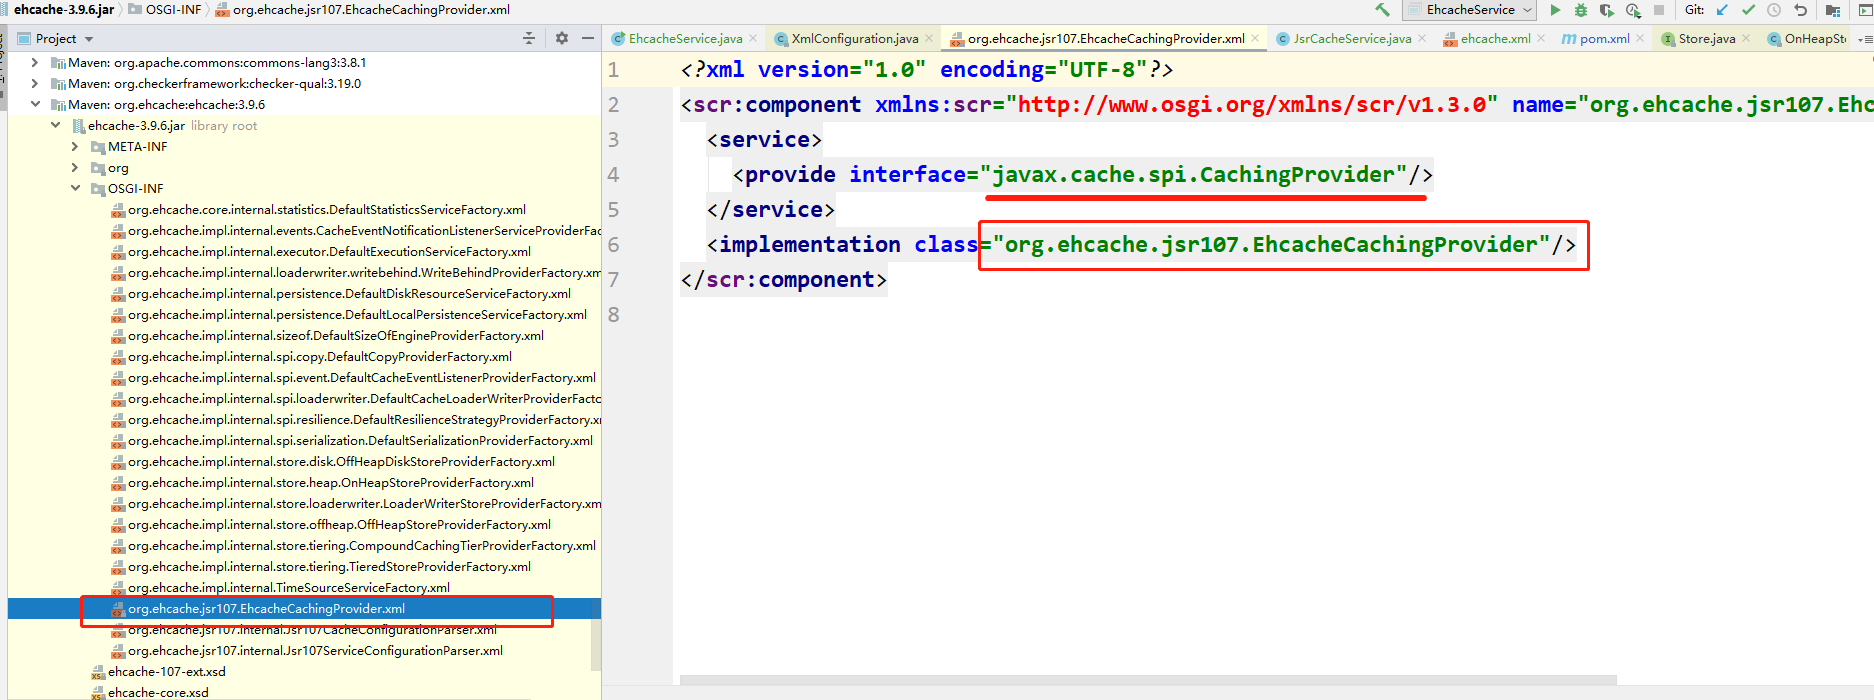
這是為什麼呢?其實原理很簡單,之前介紹JCache API的文章中也有解釋過。JCache中的CacheProvider其實是一個SPI介面,Ehcache實現並向JVM中註冊了這一介面,所以JVM可以直接載入使用了Ehcache提供的實際能力。翻看下Ehcache的原始碼,我們也可以找到其SPI註冊對應的設定資訊:

這裡還有一個需要注意的點,因為SPI介面有可能被多個元件實現,而且可能會有多個元件同時往JVM中註冊了javax.cache.spi.CachingProvider這一SPI介面的實現類,這種情況下,上述程式碼執行的時候會報錯,因為沒有指定具體使用哪一個SPI,所以JVM出現了選擇困難症,只能拋異常了:

所以為了避免這種情況的發生,我們可以在獲取CacheProvider的時候,指定載入使用Ehcache提供的具體實現類org.ehcache.jsr107.EhcacheCachingProvider即可。
CachingProvider cachingProvider = Caching.getCachingProvider("org.ehcache.jsr107.EhcacheCachingProvider");
上面程式碼中,使用了JCache的MutableConfiguration類來實現快取設定的設定。作為通用規範,JCache僅定義了所有快取實現者需要實現的功能的最小集,而Ehcache除了JCache提供的最低限度快取功能外,還有很多其餘快取不具備的增強特性。如果需要使用這些特性,則需要使用Ehcache自己的快取設定類來實現。
舉個例子,MutableConfiguration只能設定基於記憶體快取的一些行為引數,而如果需要設定Ehcache提供的heap+offheap+disk三級快取能力,或者是要開啟Ehcache的持久化能力,則MutableConfiguration就有點愛莫能助,只能Ehcache親自出馬了。
比如下面這樣:
public Cache<Integer, String> getCache() {
    CacheConfiguration<Integer, String> cacheConfiguration =
            CacheConfigurationBuilder.newCacheConfigurationBuilder(Integer.class, String.class,
                    ResourcePoolsBuilder.heap(10).offheap(20, MemoryUnit.MB)).build();
    EhcacheCachingProvider cachingProvider = (EhcacheCachingProvider) Caching.getCachingProvider();
    CacheManager cacheManager = cachingProvider.getCacheManager();
    return cacheManager.createCache("myCache",
            Eh107Configuration.fromEhcacheCacheConfiguration(cacheConfiguration));
}
當然,也可以在JCache中繼續使用Ehcache的xml設定方式。如下示意:
public Cache<Integer, String> getCache3() throwsURISyntaxException {
    CachingProvider cachingProvider = Caching.getCachingProvider();
    CacheManager manager = cachingProvider.getCacheManager(
            getClass().getClassLoader().getResource("./ehcache.xml").toURI(),
            getClass().getClassLoader());
    return manager.getCache("myCache", Integer.class, String.class);
}
相比於使用純粹的JCache API方式,上述兩種使用Ehcache自己設定的方式可以享受到Ehcache提供的一些高階特性。但代價就是業務程式碼與Ehcache的解耦不是那麼徹底,好在這些依賴僅在建立快取的地方,對整體程式碼的耦合度影響不是很高,屬於可接受的範圍。

業務中使用
完成了通過JCache API獲取Cache物件,然後業務層程式碼中,便可以基於Cache物件提供的一系列方法,對快取的具體內容進行操作了。
public static void main(String[] args) throws Exception {
    JsrCacheService service = new JsrCacheService();
    Cache<Integer, String> cache = service.getCache();
    cache.put(1,"value1");
    cache.put(2,"value2");
    System.out.println(cache.get(1));
    cache.remove(1);
    System.out.println(cache.containsKey(1));
}

在Spring中整合Ehcache
作為JAVA領域霸主級別的存在,Spring憑藉其優良的設計與出色的表現俘獲了大批開發人員青睞,大部分專案都使用Spring作為基礎框架來簡化編碼邏輯。Ehcache可以整合到Spring中,並搭配Spring Cache的標準化註解,讓程式碼可以以一種更加優雅的方式來實現快取的操作。
依賴整合與設定
以SpringBoot專案為例進行說明,首先需要引入對應的依賴包。對於maven專案,在pom.xml中新增如下設定:
<dependency>
    <groupId>org.springframework.boot</groupId>
    <artifactId>spring-boot-starter-cache</artifactId>
</dependency>
<dependency>
    <groupId>org.ehcache</groupId>
    <artifactId>ehcache</artifactId>
</dependency>
依賴引入之後,我們需要在組態檔中指定使用Ehcache作為整合的快取能力提供者,並且可以指定ehcache.xml獨立的組態檔(ehcache.xml組態檔需要放置在resource目錄下):
spring.cache.type=ehcache
spring.cache.ehcache.config=./ehcache.xml
然後我們需要在專案啟動類上新增上@EnableCaching來宣告開啟快取能力:
@SpringBootApplication
@EnableCaching
public class CrawlerApplication {
    // ...
}
到這裡,對於Ehcache2.x版本而言,就已經完成整合預設定操作,可以直接在程式碼中進行操作與使用了。但是對於Ehcache3.x版本而言,由於Spring並未提供對應的CacheManager對其進行支援,如果這個時候我們直接啟動程式,會在啟動的時候就被無情的潑上一盆冷水:

為了實現Ehcache3.x與Spring的整合,解決上述的問題,需要做一些額外的適配邏輯。根據報錯資訊,首先可以想到的就是手動實現cacheManager的建立與初始化。而由於Spring Cache提供了對JSR107規範的支援,且Ehcache3.x也全面符合JSR107規範,所以我們可以將三者結合起來,以JSR107規範作為橋樑,實現SpringBoot與Ehcache3.x的整合。
這個方案也即目前比較常用的"SpringBoot + JCache + Ehcache"組合模式。首先需要在前面已有實現的基礎上,額外增加對JCache的依賴:
<dependency>
    <groupId>javax.cache</groupId>
    <artifactId>cache-api</artifactId>
    <version>1.1.1</version>
</dependency>
其次,需要修改下application.properties組態檔,將Spring Cache宣告使用的快取型別改為JCache。
spring.cache.type=jcache
spring.cache.jcache.config=./ehcache.xml
上面的設定看著略顯魔幻,也是很多不清楚原有的小夥伴們會比較疑惑的地方(我曾經剛在專案中看到這種寫法的時候,就一度懷疑是別人程式碼設定寫錯了)。但是經過上述的原因闡述,應該就明白其中的寓意了。
接下來,需要在專案中手動指定使用ehcache.xml組態檔來構建cacheManager物件。
@Configuration
public class EhcacheConfig {
    @Bean
    public JCacheManagerFactoryBean cacheManagerFactoryBean() throws Exception {
        JCacheManagerFactoryBean factoryBean = new JCacheManagerFactoryBean();
        factoryBean.setCacheManagerUri(getClass().getClassLoader().getResource("ehcache.xml").toURI());
        return factoryBean;
    }
    @Bean
    public CacheManager cacheManager(javax.cache.CacheManager cacheManager) {
        JCacheCacheManager cacheCacheManager = new JCacheCacheManager();
        cacheCacheManager.setCacheManager(cacheManager);
        return cacheCacheManager;
    }
}
這樣,就完成了通過JCache橋接來實現Spring中使用Ehcache3.x版本的目的了。

支援Spring Cache註解操作
完成了Spring與Ehcache的整合之後,便可以使用Spring Cache提供的標準註解來實現對Ehcache快取的操作。
首先需瞭解Spring Cache幾個常用的註解及其含義:
| 註解 | 含義說明 |
|---|---|
| @EnableCaching | 開啟使用快取能力 |
| @Cacheable | 新增相關內容到快取中 |
| @CachePut | 更新相關快取記錄 |
| @CacheEvict | 刪除指定的快取記錄,如果需要清空指定容器的全部快取記錄,可以指定allEntities=true來實現 |
通過註解的方式,可以輕鬆的實現將某個方法呼叫的入參與響應對映自動快取起來,基於AOP機制,實現了對業務邏輯無侵入式的靜默快取處理。
@Service
@Slf4j
public class TestService {
    @Cacheable(cacheNames = "myCache", key = "#id")
    public String queryById(int id) {
        log.info("queryById方法被執行");
        return "value" + id;
    }
    @CachePut(cacheNames = "myCache", key = "#id")
    public String updateIdValue(int id, String newValue) {
        log.info("updateIdValue方法被執行");
        return newValue;
    }
    @CacheEvict(cacheNames = "myCache", key = "#id")
    public void deleteById(int id) {
        log.info("deleteById方法被執行");
    }
}
通過註解的方式指定了各個方法需要配套執行的快取操作,具體業務程式碼裡面則聚焦於自身邏輯,無需操心快取的具體實現。可以通過下面的程式碼測試下整合後的效果:
@GetMapping("/test")
public String test() {
    String value = testService.queryById(123);
    System.out.println("第一次查詢,結果:" + value);
    value = testService.queryById(123);
    System.out.println("第二次查詢,結果:" +value);
    testService.updateIdValue(123, "newValue123");
    value = testService.queryById(123);
    System.out.println("更新後重新查詢,結果:" + value);
    testService.deleteById(123);
    value = testService.queryById(123);
    System.out.println("刪除後重新查詢,結果:" + value);
    return "OK";
}
執行結果如下:
queryById方法被執行
第一次查詢,結果:value123
第二次查詢,結果:value123
updateIdValue方法被執行
更新後重新查詢,結果:newValue123
deleteById方法被執行
queryById方法被執行
刪除後重新查詢,結果:newValue123
從測試結果可以看出,查詢之後方法的入參與返回值被做了快取,再次去查詢的時候並沒有真正的執行具體的查詢操作方法,而呼叫刪除方法之後再次查詢,又會觸發了真正的查詢方法的執行。

小結回顧
好啦,關於Ehcache的各種設定、以及通過JSR107或者Spring Cache規範整合到專案中使用的相關內容,就介紹到這裡了。不知道小夥伴們是否對Ehcache的使用有了進一步的瞭解呢?而關於Ehcache,你是否有自己的一些想法與見解呢?歡迎評論區一起交流下,期待和各位小夥伴們一起切磋、共同成長。